

Sites & Locations
Sites & Locations
The Sites & Locations section allows users to create and manage sites, locations, and sub-locations. Users can associate a site with a customer, specify its geographical position, link published checklists, and organize locations into a structured hierarchy. Users can also view location details, manage sub-locations, upload documents, and use locations when creating tasks or work orders.
1. Create a New Site
A Site represents the top-level location, such as a building, campus, or facility. Locations, assets, and work orders can be organized under the created site.
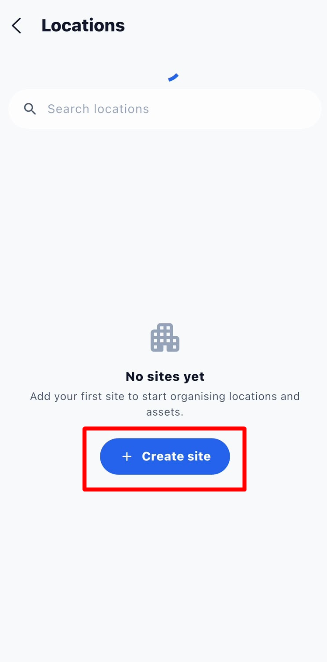
Steps to Create a Site
- Open Settings.
- Select Sites & locations.
- The Locations page is displayed.
- Click + Create site.
- The New site form is displayed.
- Enter the required site details.
- Select the customer to which the site belongs.
- Specify the geographical location using the search field or map.
- Enter any additional information, if required.
- Review the entered information.
- Click Create site.
- The site is created and becomes available in the Locations section.
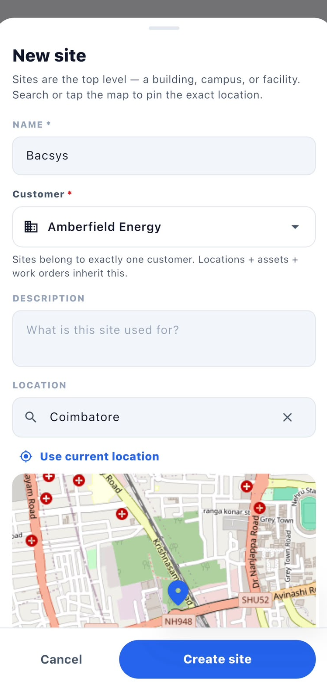
2. New Site Form
The New site form contains the fields required to create a site. Users can enter basic site information, specify the geographical location, and provide additional details.
2.1 Basic Site Details
| Field / Option | Description |
|---|---|
| Name* | Enter the site name. This field is required. |
| Customer* | Select the customer to whom the site belongs. Each site belongs to one customer, and its locations, assets, and work orders inherit that customer association. |
| Description | Enter an optional description explaining the purpose or use of the site. |
2.2 Specify the Site Location
The Location field allows users to search for the site's geographical location and identify its position using the map.
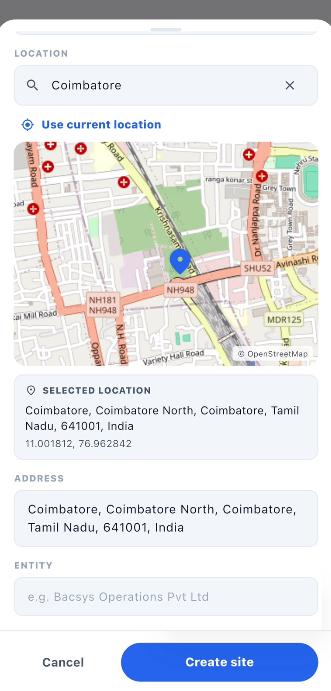
| Field / Option | Description |
|---|---|
| Location | Search for the site's geographical location by entering a place or location name. |
| Clear (X) | Clears the currently entered location. |
| Use current location | Uses the device's current location to identify the site position. |
| Map | Displays the geographical area and allows users to identify the site's position. |
| Selected location | Displays the selected location's address and geographical coordinates. |
| Address | Displays the site's address, which users can review or update as required. |
Steps to Set the Site Location
- Enter the required place or location in the Location field.
- Select the appropriate search result, if displayed.
- Alternatively, click Use current location to use the device's location.
- Review the map and select the appropriate site position.
- Check the Selected location details.
- Review the Address field.
- Continue entering the remaining site information.
2.3 Additional Site Information
After specifying the geographical location, scroll down in the New site form to enter additional information about the site.
| Field | Description |
|---|---|
| Entity | Enter the entity or organization associated with the site, if applicable. |
| State | Enter the state in which the site is located. |
| Branch Area (Sq Ft) | Enter the branch or site area in square feet. |
| Category | Enter the site category, such as Branch, Warehouse, or Datacentre. |
| Custom Field 1 | Enter additional site-specific information, if required. |
| Custom Field 2 | Enter additional site-specific information, if required. |
| Custom Field 3 | Enter additional site-specific information, if required. |
| Custom Field 4 | Enter additional site-specific information, if required. |
| Custom Field 5 | Enter additional site-specific information, if required. |
2.4 Create the Site
- Enter the Name.
- Select the Customer.
- Enter the Description, if required.
- Specify the Location using the search field or map.
- Review the selected location and Address.
- Enter the Entity, State, Branch Area (Sq Ft), and Category, if applicable.
- Complete any required custom fields.
- Click Create site.
- The site is created and becomes available in the Locations section.
| Button | Description |
|---|---|
| Cancel | Closes the form without creating the site. |
| Create site | Creates the site using the entered information. |
3. Create a New Location
A Location represents a specific area or part of a site. Users can create a location by providing its name, selecting its type, entering an optional description, and linking published checklists for inspections.
Steps to Create a New Location
- Open Settings.
- Select Sites & locations.
- Select the required site.
- The Locations page for the selected site is displayed.
- Click + New location.
- The New location pop-up is displayed.
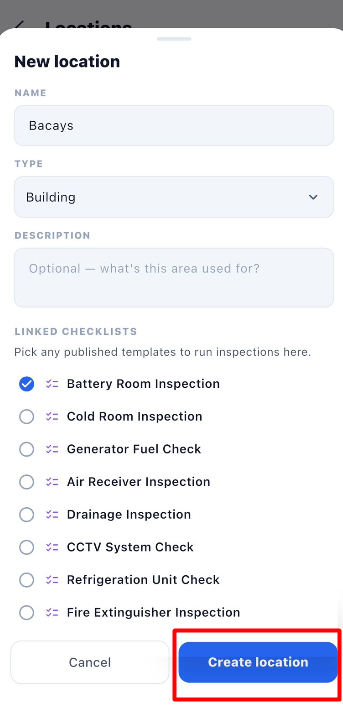
- Enter the location Name.
- Select the required Type.
- Enter a Description, if required.
- Select the required options under Linked checklists.
- Review the entered information.
- Click Create location.
- The location is created and added under the selected site.
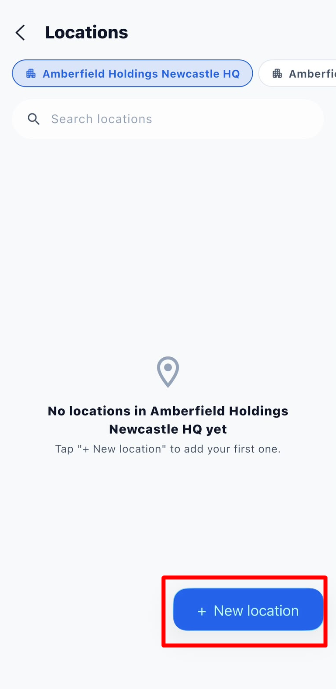
3.1 New Location Fields
| Field / Option | Description |
|---|---|
| Name | Enter the name of the location. For example, Bacsys. |
| Type | Select the appropriate location type from the available options. |
| Description | Enter an optional description explaining the purpose of the location. |
| Linked checklists | Select the published checklist templates that should be available for inspections at this location. |
| Cancel | Closes the pop-up without creating the location. |
| Create location | Creates the location using the entered information. |
3.2 Select Location Type
The Type field allows users to specify the category of the location being created.
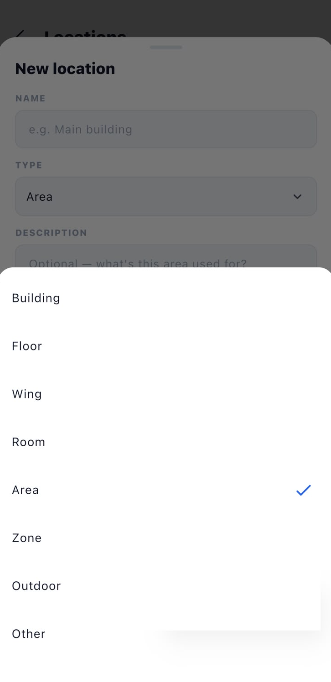
| Location Type | Description |
|---|---|
| Building | Represents a building within the site. |
| Floor | Represents a specific floor within a building. |
| Wing | Represents a wing or section of a building. |
| Room | Represents an individual room. |
| Area | Represents a general area within the site. |
| Zone | Represents a designated zone within the site. |
| Outdoor | Represents an outdoor location. |
| Other | Represents a location that does not fit the available categories. |
Steps to Select a Location Type
- Click the Type field.
- The available location types are displayed.
- Select the required type, such as Building, Floor, Room, or Area.
- The selected type appears in the Type field.
3.3 Link Checklists to a Location
The Linked checklists section allows users to select published checklist templates that can be used to perform inspections at the selected location.
| Action | Description |
|---|---|
| Select a checklist | Select the checkbox next to the required published checklist. |
| Multiple checklists | Select multiple checklists if more than one inspection is required. |
| Create location | Saves the location with the selected checklist associations. |
Steps to Link Checklists
- Go to the Linked checklists section.
- Review the available published checklists.
- Select the checkbox next to each required checklist.
- Select one or more checklists as needed.
- Review the selected checklists.
- Click Create location to save the location.
3.4 Save the Location
- Enter the location Name.
- Select the Type.
- Enter the Description, if required.
- Select the required Linked checklists.
- Review all the entered details.
- Click Create location.
- The location is created successfully under the selected site.
- The newly created location becomes available in the Locations list.
4. View Location Details
After creating a location, users can open it to view its details, manage sub-locations, link checklists, upload files, and use the location when creating tasks or work orders.
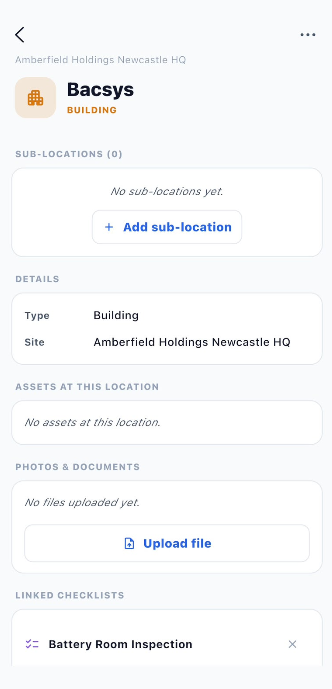
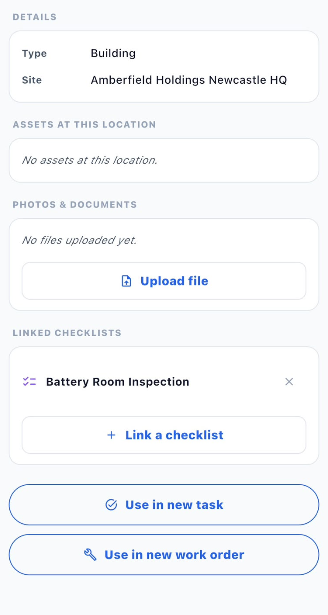
4.1 Location Details Overview
| Section / Option | Description |
|---|---|
| Location Name | Displays the name of the selected location, such as Bacsys. |
| Location Type | Displays the type of location, such as Building, Floor, or Room. |
| Site Name | Displays the site under which the location was created. |
| Sub-locations | Displays the sub-locations created under the current location. If none exist, a message indicates that no sub-locations are available. |
| + Add sub-location | Opens the form to create a sub-location under the current location. |
| Details | Displays the location's type and associated site. |
| Assets at this location | Displays the assets associated with the selected location. |
| Photos & Documents | Displays uploaded files and documents associated with the location. |
| Upload file | Allows users to upload a file or document to the location. |
| Linked Checklists | Displays the checklists linked to the location. |
| Link a checklist | Allows users to link an additional published checklist to the location. |
| Use in new task | Opens the task creation process using the selected location. |
| Use in new work order | Opens the work order creation process using the selected location. |
4.2 Location Actions
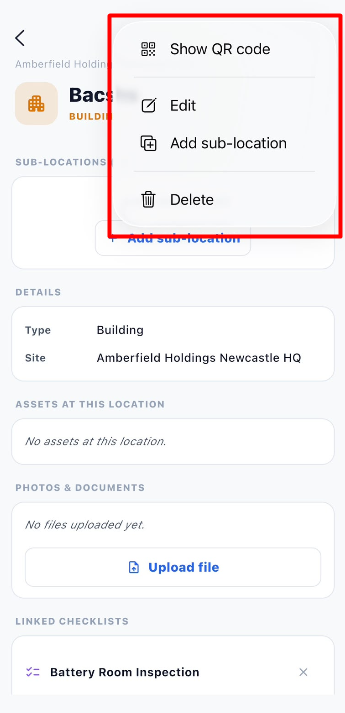
Click the three-dot menu (...) on the location details page to view the available actions.
| Action | Description |
|---|---|
| Show QR code | Displays the QR code associated with the selected location. |
| Edit | Allows users to modify the existing location details. |
| Add sub-location | Opens the form to create a new sub-location under the selected location. |
| Delete | Deletes the selected location. Use this option carefully, as deletion may affect the location's availability. |
5. Create a Sub-location
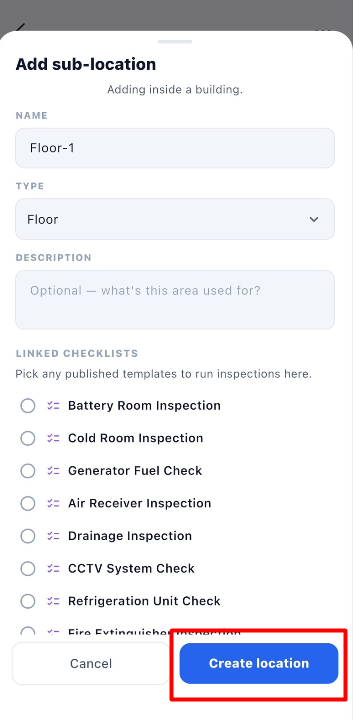
The + Add sub-location option allows users to create multiple sub-locations under an existing location. For example, users can create a building and then add floors, wings, rooms, areas, or other supported location types under it.
5.1 Steps to Create a Sub-location
- Open Settings.
- Select Sites & locations.
- Select the required site.
- Open the location under which the sub-location needs to be created.
- Under Sub-locations, click + Add sub-location.
- The Add sub-location pop-up is displayed.
- Enter the sub-location Name.
- Select the required Type.
- Enter a Description, if required.
- Under Linked checklists, select the published checklists required for the sub-location.
- Review the entered information.
- Click Create location.
- The sub-location is created under the selected parent location.
- Repeat these steps to create additional sub-locations as required.
5.2 Add Sub-location Fields
| Field / Option | Description |
|---|---|
| Name | Enter the name of the sub-location. For example, Floor-1. |
| Type | Select the appropriate type for the sub-location. |
| Description | Enter an optional description explaining the purpose of the sub-location. |
| Linked checklists | Select the published checklist templates that should be available for inspections at the sub-location. |
| Cancel | Closes the pop-up without creating the sub-location. |
| Create location | Creates the sub-location under the currently selected parent location. |
5.3 Available Sub-location Types
| Type | Description |
|---|---|
| Building | Creates a building-level location. |
| Floor | Creates a floor under the selected parent location. |
| Wing | Creates a wing or section. |
| Room | Creates an individual room. |
| Area | Creates a general area. |
| Zone | Creates a designated zone. |
| Outdoor | Creates an outdoor location. |
| Other | Creates a location that does not match the other available types. |
5.4 Link Checklists to a Sub-location
| Action | Description |
|---|---|
| Select a checklist | Select the checkbox next to a published checklist required for the sub-location. |
| Multiple checklists | Select multiple checklists when more than one inspection is required. |
| Create location | Saves the sub-location with the selected checklist associations. |
Steps
- Open the Add sub-location pop-up.
- Enter the sub-location name.
- Select its type.
- Enter a description, if required.
- Review the available published checklists.
- Select the required checklists.
- Click Create location.
- Verify that the new sub-location appears under Sub-locations on the parent location's details page.
6. View Created Locations
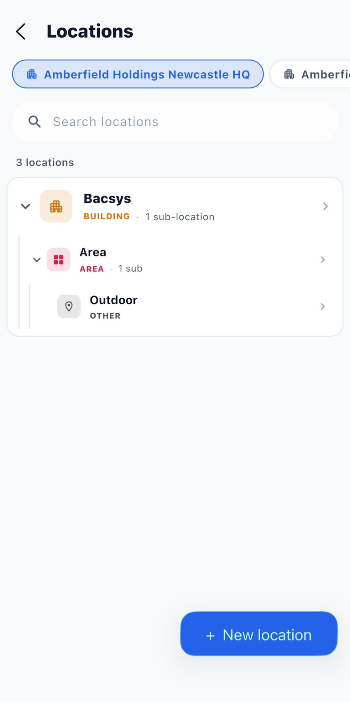
After creating a location and its sub-locations, users can view the complete location hierarchy on the Locations page. The hierarchy displays parent locations and their associated sub-locations in an expandable list.
Steps to View Created Locations
- Open Settings.
- Select Sites & locations.
- Select the required site.
- The Locations page displays the locations created under the selected site.
- Review the list of locations and their sub-locations.
- Click the Expand arrow next to a location to view its sub-locations.
- Click the Collapse arrow to hide the sub-locations.
- Select a location to open its details page.
6.1 Location List Options
| Section / Option | Description |
|---|---|
| Site selector | Allows users to select the site whose locations they want to view. |
| Search locations | Allows users to search for a specific location by name. |
| Location count | Displays the total number of locations shown for the selected site, including locations represented in the hierarchy. |
| Location name | Displays the name of the created location. |
| Location type | Displays the type assigned to the location, such as Building, Area, or Outdoor. |
| Sub-location count | Displays the number of sub-locations associated with a location. |
| Expand / Collapse | Expands or collapses the location hierarchy to show or hide sub-locations. |
| Location arrow (>) | Opens the selected location's details page. |
| + New location | Opens the form to create another location under the selected site. |
7. Overall Sites & Locations Workflow
Open Settings
      ↓
Select Sites & Locations
      ↓
View Locations Page
      ↓
Create Site (If Required)
      ↓
Enter Site Details
      ↓
Select Customer
      ↓
Specify Geographical Location
      ↓
Enter Additional Site Information
      ↓
Click Create Site
      ↓
Site Created
      ↓
Select the Required Site
      ↓
Click + New Location
      ↓
Enter Location Name
      ↓
Select Location Type
      ↓
Enter Description (Optional)
      ↓
Link Published Checklists (Optional)
      ↓
Click Create Location
      ↓
Location Created
      ↓
Open Location Details
      ↓
Add Sub-location (If Required)
      ↓
Enter Sub-location Details
      ↓
Select Sub-location Type
      ↓
Link Checklists (Optional)
      ↓
Click Create Location
      ↓
Sub-location Created
      ↓
Repeat to Create More Sub-locations
      ↓
View Location Hierarchy
      ↓
Expand / Collapse Locations
      ↓
Manage Location Details
      ↓
Use Location in New Task or Work Order