

Categories
Configure maintenance categories and subcategories for organizing tasks and requests.
Categories
The Categories module allows users to create and manage categories to organize items in the application. Users can create new categories, add descriptions, choose colours, edit existing categories, and delete categories when required. The category list also displays how many assets are associated with each category.
1. View Categories
The Categories page displays the available categories and the number of assets associated with each one.
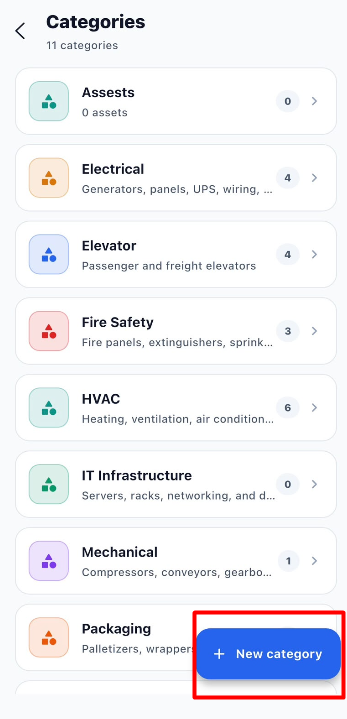
Each category card displays the following information:
| Field | Description |
|---|---|
| Category name | Displays the name of the category, such as Assets, Electrical, Elevator, Fire Safety, or HVAC. |
| Description | Provides a short explanation of the items included in the category, when available. |
| Asset count | Displays the number of assets associated with that category. |
| Arrow icon (>) | Opens the selected category for viewing or editing. |
| + New category | Opens the form to create a new category. |
2. Create a New Category
Click + New category to open the New category form. Enter the category name, add a description if required, select a colour, and click Create category.
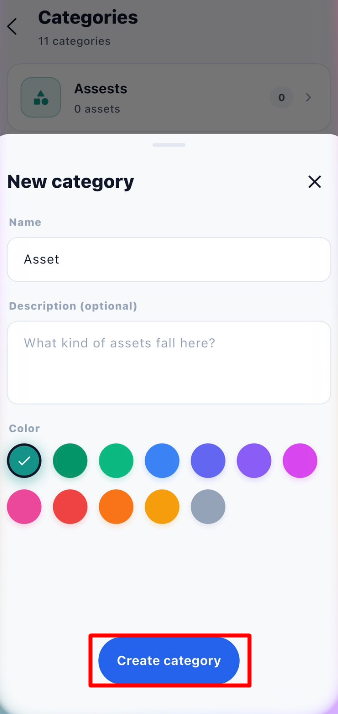
Fields in the New Category Form
| Field | Description | Required |
|---|---|---|
| Name | Enter a name that clearly identifies the category. | Yes |
| Description (optional) | Explain what types of items belong to this category. | No |
| Color | Select a colour to visually identify the category. | Yes, select an available colour |
Steps to Create a Category
- Open the Categories module.
- Click + New category.
- Enter the category name in the Name field.
- Add a description, if required.
- Select a colour from the available colour options.
- Review the entered information.
- Click Create category.
- Verify that the new category appears in the Categories list.
Example: Create a category named Fire Safety and add a description such as Fire panels, extinguishers, sprinklers, and alarms.
3. Edit an Existing Category
You can update an existing category when its name, description, or colour needs to change.
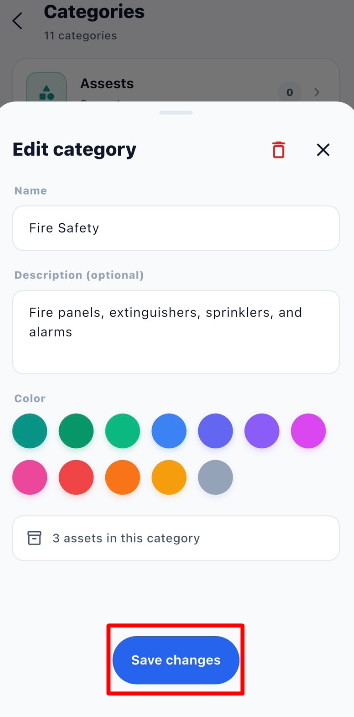
The Edit category form displays the current category information. It also shows the number of assets associated with the category.
Available Options
| Field or Option | Description |
|---|---|
| Name | Update the category name. |
| Description (optional) | Edit the description of the category. |
| Color | Select a different colour for the category. |
| Assets in this category | Displays the number of assets associated with the category. |
| Save changes | Saves the changes made to the category. |
| Delete icon (trash) | Allows you to delete the category. |
| Close (X) | Closes the editing form. |
Steps to Edit a Category
- Open the Categories module.
- Find the category you want to update.
- Select the category to open the Edit category form.
- Update the name, description, or colour as required.
- Review the changes.
- Click Save changes.
- Verify that the updated information appears in the Categories list.
4. View Associated Assets
When you open a category for editing, the form displays the number of assets associated with that category.
For example, the Fire Safety category may show 3 assets in this category.
This information helps you understand whether assets are already linked to the category before making changes or deleting it.
Steps to Check Associated Assets
- Open the Categories module.
- Select the category you want to review.
- Check the asset count displayed in the Edit category form.
- Review the category information before making changes.
Note: The screenshot displays the number of associated assets. It does not show a separate list of those assets in the editing form.
5. Delete a Category
The Delete option is available through the trash icon in the Edit category form. Use this option when a category is no longer required.
Steps to Delete a Category
- Open the Categories module.
- Select the category you want to delete.
- Review the category name and associated asset count.
- Click the trash icon in the top-right corner of the editing form.
- Review any confirmation message displayed by the application.
- Confirm the deletion if you want to proceed.
- Verify the result in the Categories list.
Important: Before deleting a category, check the number of assets associated with it. If assets are linked to the category, verify how the application handles those associations before proceeding. The screenshots do not specify what happens to associated assets after deletion.
6. End-to-End Categories Workflow
Open the Categories Module
        ↓
View the Existing Categories
        ↓
Choose an Action
        ↓
 ┌─────────────┐
 │ Create a Category   │
 └─────────────┘
        ↓
Click + New category
        ↓
Enter Category Name
        ↓
Add Description if Required
        ↓
Select a Colour
        ↓
Click Create category
        ↓
Verify the New Category
        ↓
Category Available in the List


For an Existing Category
        ↓
Select the Required Category
        ↓
Open Edit category
        ↓
Review Name and Description
        ↓
Check the Associated Asset Count
        ↓
Choose an Action
        ↓
 ┌─────────────────────────┐
 │ Edit Category       │ Delete Category  │
 └─────────────────────────┘
        ↓                       ↓
Update Required Fields     Click Trash Icon
        ↓                       ↓
Click Save changes        Confirm if Prompted
        ↓                       ↓
Verify Updated Details   Verify Deletion Result