

Inventory
View and manage inventory and parts.
Inventory
The Inventory module allows users to create, view, search, and manage inventory parts. Users can maintain part details, track available stock, identify low-stock items, and filter inventory based on categories, stock status, and sorting preferences.
1. Create a New Inventory Part
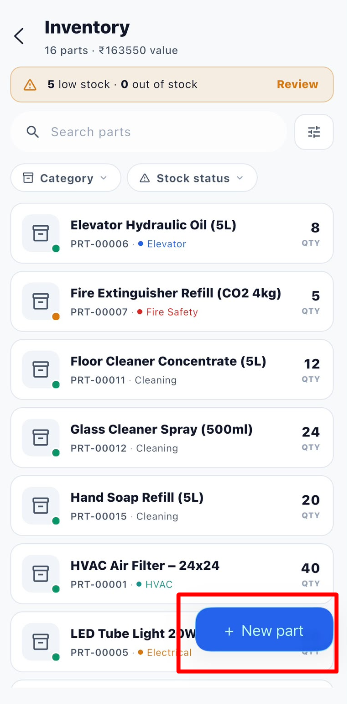
To add a new part to the inventory, open the Inventory module and click + New part. The New part form opens, allowing you to enter the part details, stock quantity, price, supplier, and site information.
1.1 Fields in the New Part Form
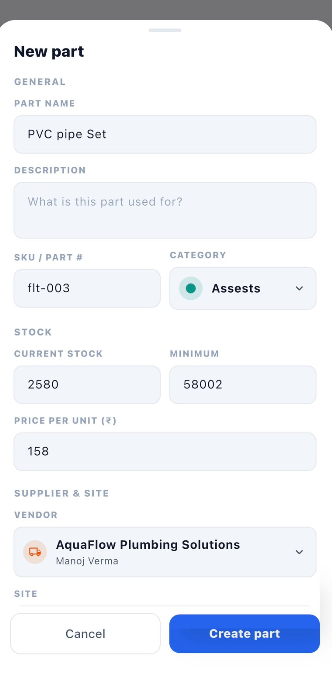
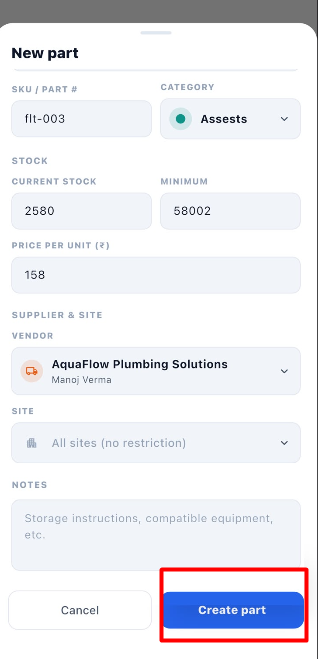
The form contains several sections to help you enter the required information.
| Section | Field | Description |
|---|---|---|
| General | Part name | Enter the name of the inventory part. |
| General | Description | Describe what the part is used for. |
| General | SKU / Part # | Enter the stock-keeping unit (SKU) or part number used to identify the item. |
| General | Category | Select the category to which the part belongs. |
| Stock | Current stock | Enter the quantity currently available in inventory. |
| Stock | Minimum | Enter the minimum stock quantity that should be maintained. |
| Stock | Price per unit (₹) | Enter the price of one unit of the part. |
| Supplier & Site | Vendor | Select the supplier or vendor associated with the part. |
| Supplier & Site | Site | Select the site where the part is available, or choose All sites (no restriction). |
| Notes | Notes | Add additional information, such as storage instructions, compatible equipment, or other relevant details. |
1.2 Steps to Create a New Part
- Open the Inventory module.
- Click + New part.
- Enter the part name in the Part name field.
- Add a description explaining the purpose of the part, if required.
- Enter the SKU / Part #.
- Select the appropriate Category.
- Enter the available quantity in Current stock.
- Set the Minimum stock quantity.
- Enter the Price per unit (₹).
- Select the appropriate Vendor.
- Select the required Site, or choose All sites (no restriction).
- Enter any additional information in Notes, if needed.
- Review all the entered information.
- Click Create part to save the inventory part.
Note: Complete the required fields before creating the part. Check the stock quantity, minimum quantity, and price carefully to help maintain accurate inventory records.
2. View Inventory Parts
After creating a part, it appears in the Inventory list.
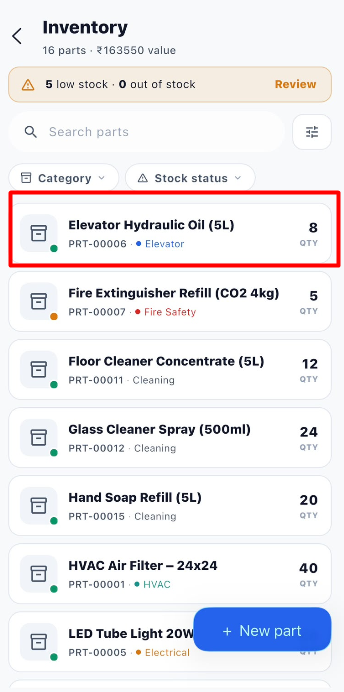
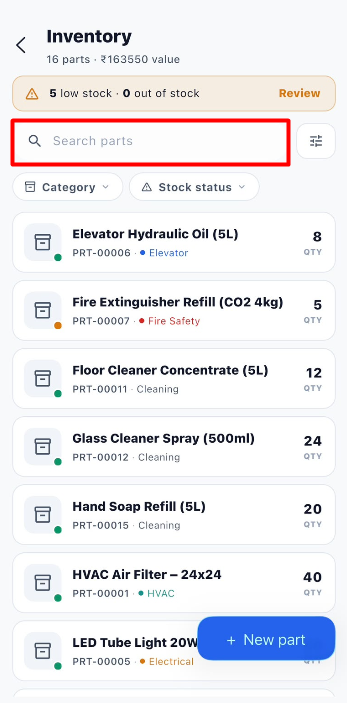
The Inventory page provides an overview of the available parts and their stock information.
The page displays:
- Total parts: The number of inventory parts available in the list.
- Total value: The displayed value of the inventory.
- Low stock: The number of parts that have reached a low stock level.
- Out of stock: The number of parts that have no stock available.
Each inventory card displays information such as the part name, part number, category, and available quantity. A coloured indicator also helps users identify the stock status shown for a part.
Use the search field, category selector, stock status selector, and advanced filters to find the required inventory parts.
3. Filter Parts by Category
The Category selector allows users to display inventory parts belonging to a particular category.
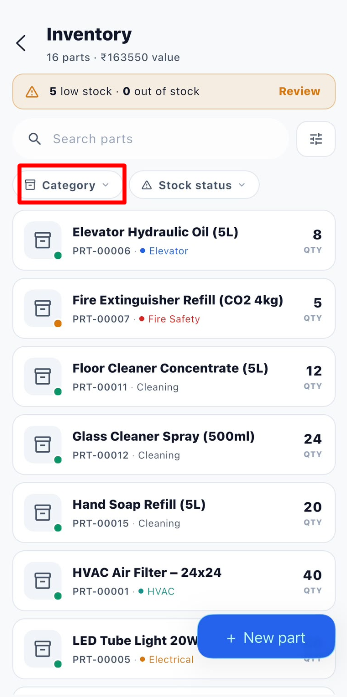
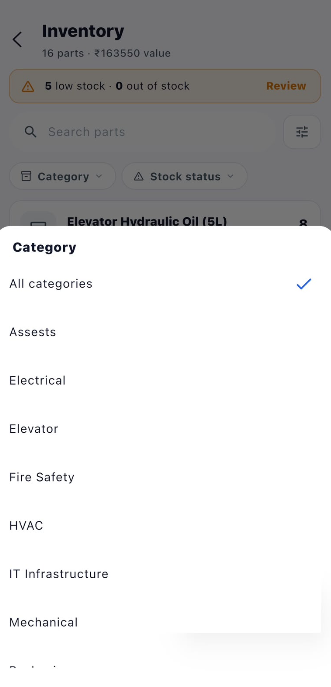
Click Category on the Inventory page to open the category list. Select a category to display the parts associated with it.
3.1 Available Categories
| Category | Description |
|---|---|
| All categories | Displays parts from all available categories. |
| Assets | Displays parts categorized under Assets. |
| Electrical | Displays parts categorized under Electrical. |
| Elevator | Displays parts categorized under Elevator. |
| Fire Safety | Displays parts categorized under Fire Safety. |
| HVAC | Displays parts categorized under HVAC. |
| IT Infrastructure | Displays parts categorized under IT Infrastructure. |
| Mechanical | Displays parts categorized under Mechanical. |
3.2 Steps to Filter by Category
- Open the Inventory module.
- Click Category.
- Review the available categories.
- Select the category you want to view.
- Review the inventory list to see the matching parts.
Example: Select HVAC to display parts categorized under HVAC.
Note: The category list may contain additional options that are not visible in the screenshots.
4. Filter Parts by Stock Status
The Stock status selector allows users to view inventory parts according to their current stock condition.
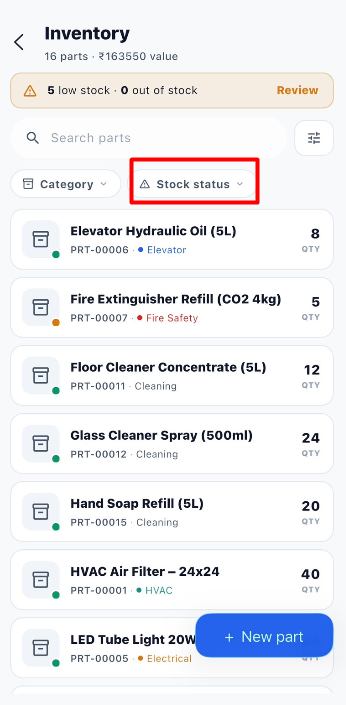
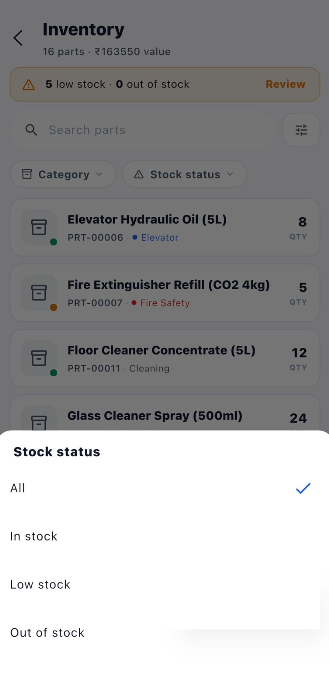
Click Stock status to open the available stock status options. Select the required option to narrow down the inventory list.
4.1 Available Stock Status Options
| Option | Description |
|---|---|
| All | Displays parts regardless of their stock status. |
| In stock | Displays parts that currently have stock available. |
| Low stock | Displays parts with a low stock level. |
| Out of stock | Displays parts that have no stock available. |
4.2 Steps to Filter by Stock Status
- Open the Inventory module.
- Click Stock status.
- Select All, In stock, Low stock, or Out of stock.
- Review the inventory list.
- Select another stock status whenever you need to view a different group of parts.
Example: Select Low stock to identify parts that may need replenishment.
5. Search Inventory Parts
The Search parts field allows users to find a specific inventory part without manually reviewing the entire list.
Steps to Search for a Part
- Open the Inventory module.
- Click the Search parts field.
- Enter the part name or other relevant search text.
- Review the matching results displayed in the inventory list.
- If needed, change the search text to find a different part.
Note: Enter a relevant part name or identifying information to make it easier to locate the required item.
6. Apply Advanced Filters
The advanced Filter option provides additional ways to organize inventory parts. It allows users to identify parts that need reordering and sort the list based on part name, quantity, or total value.
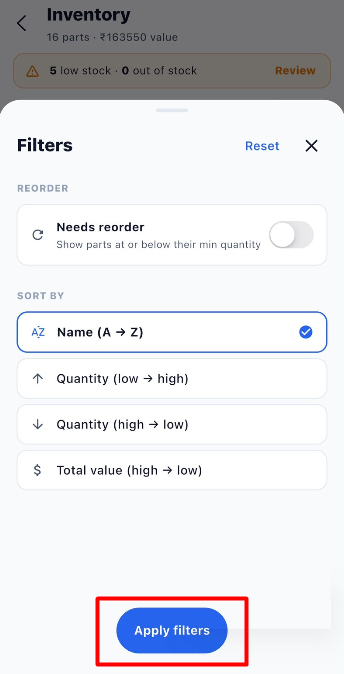
Click the Filter icon beside the search field to open the Filters panel.
6.1 Available Filter Options
| Option | Description |
|---|---|
| Needs reorder | When enabled, displays parts whose quantities are at or below their minimum stock quantity. |
| Name (A → Z) | Sorts parts alphabetically by name, from A to Z. |
| Quantity (low → high) | Displays parts starting with the lowest quantity and ending with the highest. |
| Quantity (high → low) | Displays parts starting with the highest quantity and ending with the lowest. |
| Total value (high → low) | Displays parts from the highest total value to the lowest. |
6.2 Steps to Apply Advanced Filters
- Open the Inventory module.
- Click the Filter icon beside the search field.
- Enable Needs reorder if you want to find parts that have reached or fallen below their minimum stock quantity.
- Under Sort By, select the required sorting option.
- Review the selected settings.
- Click Apply filters.
- Review the updated inventory list.
6.3 Additional Filter Options
| Option | Description |
|---|---|
| Reset | Clears the selected filter settings. |
| Close (X) | Closes the Filters panel. |
| Apply filters | Applies the selected filter and sorting options to the inventory list. |
Example: Enable Needs reorder and select Quantity (low → high) to display parts that need replenishment, starting with the lowest quantities.
Important: The Category and Stock status selectors are separate from the advanced Filters panel. Use them to narrow down parts by category or stock condition.
7. End-to-End Inventory Workflow
The following workflow summarizes the process of creating an inventory part and then viewing, searching, and filtering it.
Open the Inventory Module
        ↓
Click + New part
        ↓
Enter Part Name and Description
        ↓
Enter SKU / Part Number
        ↓
Select Category
        ↓
Enter Current Stock and Minimum Quantity
        ↓
Enter Price per Unit
        ↓
Select Vendor and Site
        ↓
Add Notes if Required
        ↓
Review the Entered Information
        ↓
Click Create part
        ↓
Part Saved to Inventory
        ↓
View the Part in the Inventory List
        ↓
Search for a Part if Required
        ↓
Select Category if Required
        ↓
Select Stock Status if Required
        ↓
Open Advanced Filters if Required
        ↓
Select Reorder and Sorting Options
        ↓
Click Apply filters
        ↓
Review the Matching Inventory Parts