

Locations
View and manage sites, locations, and sub-locations.
Locations
The Locations module allows users to organize sites and their locations in a structured hierarchy. You can create sites, add locations such as buildings and floors, create multiple sub-locations, link published checklists, upload documents, and use locations when creating tasks or work orders.
This guide explains how to create and manage sites and locations, search for existing locations, and use the available location options.
1. View the Locations Page
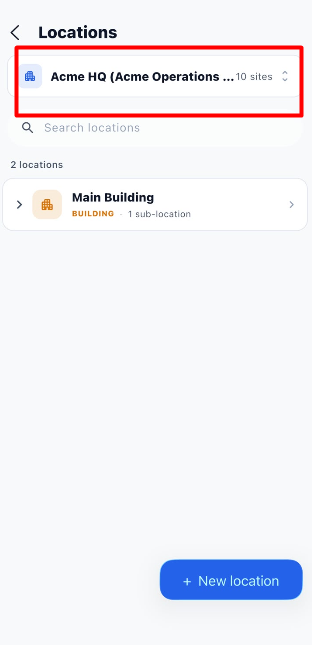
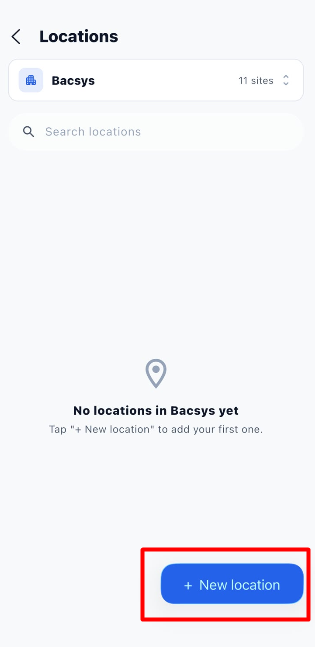
The Locations page displays the locations associated with the currently selected site.
| Option | Description |
|---|---|
| Site selector | Displays the currently selected site. Click it to switch to another site or create a new site. |
| Search locations | Allows you to find a location by entering its name or relevant search text. |
| Location list | Displays the locations available under the selected site. |
| Location count | Shows the number of locations displayed. |
| Expand arrow | Allows you to expand a parent location and view its sub-locations. |
| + New location | Opens the form to create a location under the selected site. |
Steps to Open the Locations Page
- Open the application.
- Navigate to the Locations module.
- Check the currently selected site.
- Review the locations displayed under that site.
- Use Search locations to find a specific location, if required.
Note: The locations displayed depend on the selected site.
2. Select or Switch a Site
Before creating or viewing locations, make sure the correct site is selected.
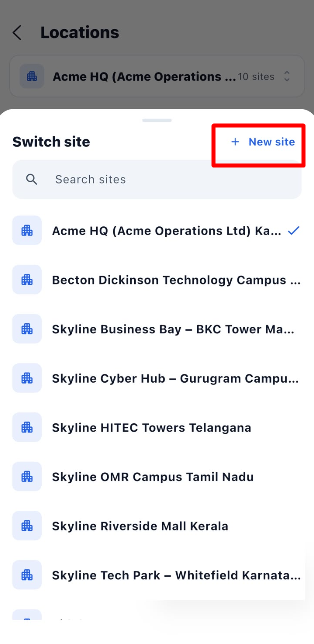
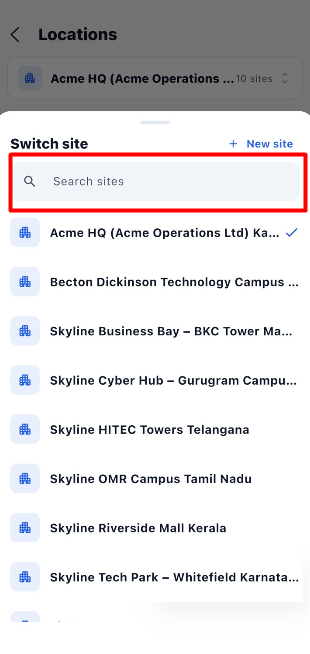
Click the site selector at the top of the Locations page to open the Switch site panel.
Available Options
| Option | Description |
|---|---|
| Switch site | Displays the available sites that you can select. |
| Search sites | Helps you find a specific site by name. |
| Site list | Displays the available sites. |
| + New site | Opens the form to create a new site. |
| Checkmark | Identifies the currently selected site. |
Steps to Switch a Site
- Open the Locations module.
- Click the site selector at the top of the page.
- Review the available sites.
- Use Search sites to find a particular site, if required.
- Select the site you want to work with.
- Verify that the selected site is displayed at the top of the Locations page.
3. Create a New Site
A site represents the top-level location, such as a building, campus, branch, or facility. You must select the appropriate site before creating locations under it.
To create a site, open the Switch site panel and click + New site.
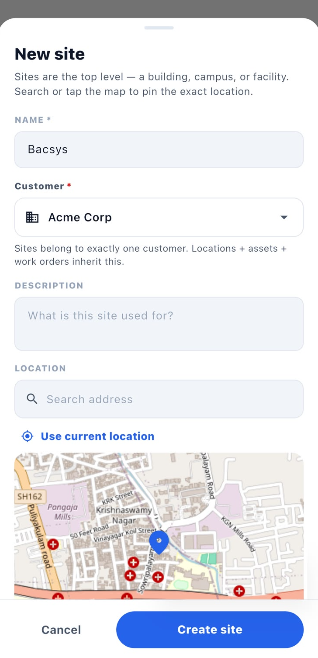
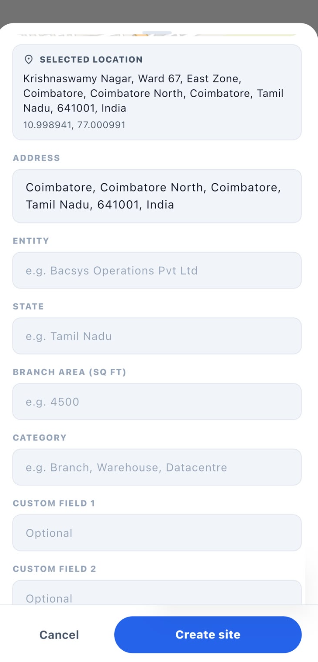
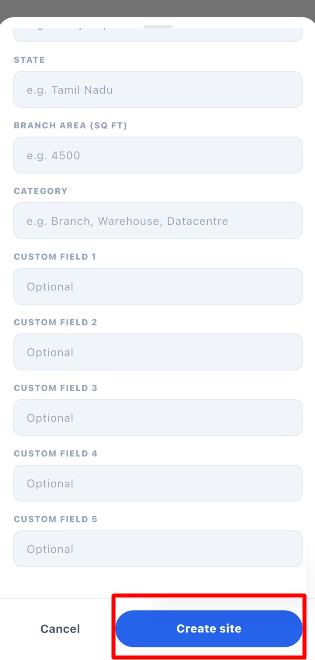
The New site form contains basic information, geographical location, address, and additional site details.
4. Enter the Site Details
4.1 Basic Information
The New site form begins with the site's name, customer, and description.
| Field | Description | Required |
|---|---|---|
| Name | Enter the name of the site. | Yes |
| Customer | Select the customer to whom the site belongs. | Yes |
| Description | Describe the purpose of the site. | Optional |
Important: A site belongs to exactly one customer. Locations, assets, and work orders inherit that customer association.
Steps to Enter Basic Information
- Enter the site name in Name.
- Open the Customer dropdown.
- Select the appropriate customer.
- Enter a description, if required.
4.2 Select the Site's Geographical Location
The Location section allows you to specify the geographical position of the site using an address or the map.
| Option | Description |
|---|---|
| Search address | Search for the site's address. |
| Use current location | Uses the current device location, where available. |
| Map | Displays the geographical area and allows you to select the site's position. |
| Selected location | Displays the selected address and geographical coordinates. |
Steps to Set the Location
- Navigate to the Location section.
- Enter an address in Search address, or select Use current location if appropriate.
- Select the correct position on the map.
- Review the Selected location information.
- Verify that the geographical position is correct.
Note: The form displays the selected address and coordinates after a location has been selected.
4.3 Enter the Address and Additional Site Information
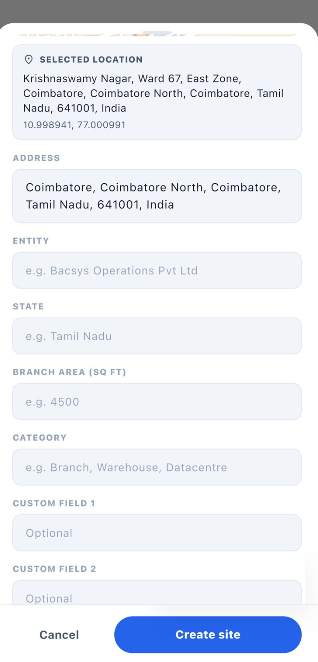
After selecting the geographical location, complete the remaining fields where applicable.
| Field | Description |
|---|---|
| Address | Enter the site's postal address. |
| Entity | Enter the associated organization or entity name, if applicable. |
| State | Enter the state where the site is located. |
| Branch Area (sq ft) | Enter the branch or site area in square feet. |
| Category | Enter the site category, such as Branch, Warehouse, or Datacentre. |
| Custom Field 1 | Enter additional site information, if needed. |
| Custom Field 2 | Enter additional site information, if needed. |
| Custom Field 3 | Enter additional site information, if needed. |
| Custom Field 4 | Enter additional site information, if needed. |
| Custom Field 5 | Enter additional site information, if needed. |
Steps to Complete Additional Details
- Review the Address field and update it if necessary.
- Enter the Entity name, if applicable.
- Enter the State.
- Enter the Branch Area (sq ft), if applicable.
- Enter the Category.
- Complete any relevant custom fields.
- Review the information before creating the site.
Note: The custom fields are provided for additional site information.
4.4 Create the Site
After completing the site information, save the site.
Steps to Create a Site
- Open the Locations module.
- Click the site selector.
- Click + New site.
- Enter the Name.
- Select the Customer.
- Enter the Description, if required.
- Search for an address or select a location on the map.
- Review the selected location and coordinates.
- Enter the address and additional site details, if applicable.
- Review all the information.
- Click Create site.
- Verify that the site is available in the site selector.
Important: The Name and Customer fields are marked as required. Complete these fields before creating the site.
5. Search and View Locations
The Search locations field helps you find a specific location under the selected site.
Steps to Search for a Location
- Open the Locations module.
- Verify that the correct site is selected.
- Click the Search locations field.
- Enter the location name or relevant search text.
- Review the matching locations.
- Select the required location to view its details or sub-locations.
Note: If you cannot find the expected location, verify that you have selected the correct site.
6. Create a New Location
After creating or selecting a site, you can add locations within it. Examples include buildings, floors, wings, rooms, zones, and outdoor areas.
You can also associate published checklists with locations for inspection activities.
6.1 Open the New Location Form
- Open the Locations module.
- Select the site where you want to create the location.
- Click + New location.
- The New location form opens.
- Enter the location details and select any applicable checklists.
6.2 Enter the Location Details
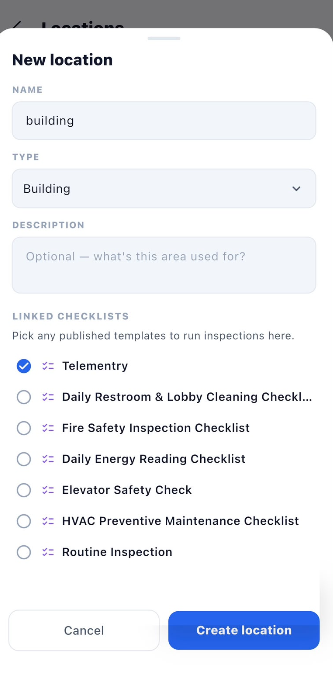
| Field | Description | Required |
|---|---|---|
| Name | Enter a descriptive name, such as Main Building or Floor 1. | Yes |
| Type | Select the type that best describes the location. | Select an appropriate type |
| Description | Enter additional information about the location or explain its purpose. | Optional |
| Linked checklists | Select published checklist templates to associate with the location. | Optional |
6.3 Available Location Types
Click the Type dropdown to view the available location types.
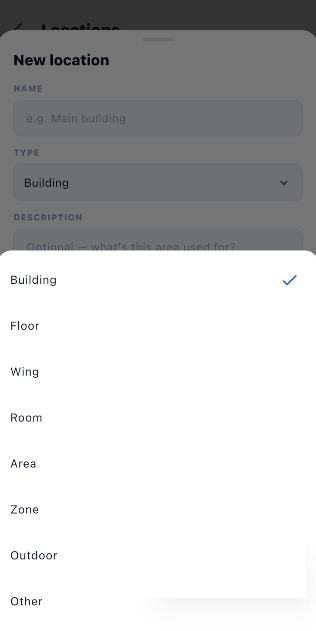
| Type | Description |
|---|---|
| Building | Represents a building within a site. |
| Floor | Represents a floor within a building. |
| Wing | Represents a wing or section of a building. |
| Room | Represents an individual room. |
| Area | Represents a specific area within a site or building. |
| Zone | Represents a designated zone within a site. |
| Outdoor | Represents an outdoor location. |
| Other | Represents a location that does not fit the listed types. |
Steps to Select a Location Type
- Open the Type dropdown.
- Review the available location types.
- Select the appropriate type.
- Enter a name that clearly identifies the location.
- Add a description, if required.
6.4 Link Checklists to a Location
The Linked checklists section allows you to associate published checklist templates with a location.
These checklists can be used for inspections at that location.
Examples of checklists shown in the form include:
- Telemetry
- Daily Restroom & Lobby Cleaning Checklist
- Fire Safety Inspection Checklist
- Daily Energy Reading Checklist
- Elevator Safety Check
- HVAC Preventive Maintenance Checklist
- Routine Inspection
Steps to Link a Checklist
- Navigate to the Linked checklists section.
- Review the available published checklist templates.
- Select the checklist you want to associate with the location.
- Verify that the checklist is selected.
- Continue reviewing the location details.
Note: The form indicates that published templates are available for selection.
6.5 Create the Location
After entering the required information, save the new location.
Steps to Create a Location
- Open the Locations module.
- Select the correct site.
- Click + New location.
- Enter the location Name.
- Select the appropriate Type.
- Enter a description, if required.
- Select any applicable linked checklists.
- Review the information.
- Click Create location.
- Verify that the new location appears under the selected site.
Note: If the selected site has no locations, the page displays a message indicating that no locations are available and prompts you to add the first one.
7. View the Site and Its Locations
After creating a site and adding locations, the Locations page displays the site and its associated locations in a structured list.
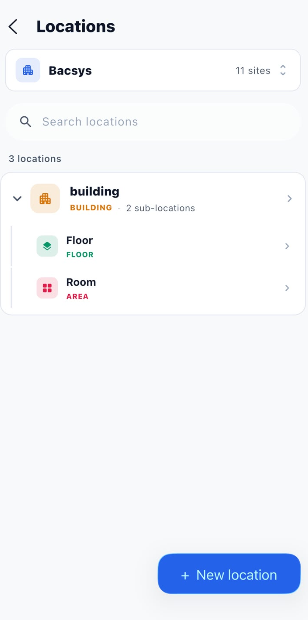
The page provides the following information:
| Element | Description |
|---|---|
| Site selector | Displays the selected site and the number of sites available. |
| Search locations | Allows you to search for a specific location. |
| Location count | Displays the number of locations available under the selected site. |
| Parent location | Displays the main location, such as a building. |
| Sub-locations | Displays locations created under the parent location, such as a floor or room. |
| Expand/Collapse icon | Allows you to show or hide a parent location's sub-locations. |
| New location | Opens the form to create another location. |
Steps to View Locations
- Open the Locations module.
- Select the required site from the site selector.
- Review the number of locations displayed.
- Find the required parent location, such as a building.
- Expand the parent location to view its sub-locations.
- Select a location to open its details.
Example Location Structure
- Bacsys — Site
- building — Parent location
- Floor — Sub-location
- Room — Sub-location
- building — Parent location
The hierarchy helps users identify the correct place when managing assets, checklists, tasks, and work orders.
8. View Location Details
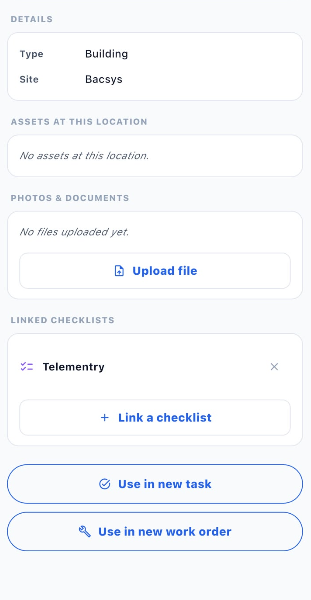
After creating a location, select it from the list to open its details page. This page provides information about the location and allows you to manage its sub-locations, documents, and linked checklists.
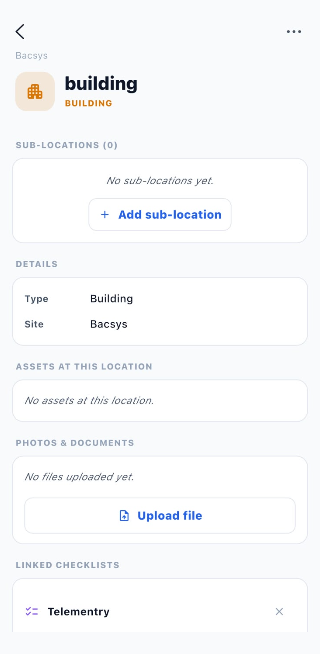
8.1 Location Details Overview
| Section | Description |
|---|---|
| Location name | Displays the name of the selected location. |
| Location type | Displays the selected type, such as Building or Floor. |
| Site | Shows the site to which the location belongs. |
| Parent | Displays the parent location for a sub-location, where applicable. |
| Sub-locations | Displays the locations associated with the current location. |
| Assets at this location | Displays assets associated with the location, if any. |
| Photos & Documents | Allows you to upload files related to the location. |
| Linked Checklists | Displays checklists associated with the location. |
8.2 View Assets at This Location
The Assets at this location section displays assets associated with the selected location.
- If assets are associated with the location, review the displayed asset information.
- If no assets are associated with the location, the page displays No assets at this location.
8.3 Upload Photos and Documents
The Photos & Documents section allows you to attach files related to the location.
Steps to Upload a File
- Open the location details page.
- Navigate to Photos & Documents.
- Click Upload file.
- Select the file you want to attach.
- Follow any additional prompts displayed by the application.
8.4 Manage Linked Checklists
The Linked Checklists section displays the checklists associated with the location.
| Option | Description |
|---|---|
| Linked checklist | Displays the name of an associated checklist. |
| X icon | Provides an option to remove the checklist association. |
| + Link a checklist | Allows you to associate another checklist with the location. |
Steps to Link Another Checklist
- Open the location details page.
- Navigate to Linked Checklists.
- Click + Link a checklist.
- Select the checklist you want to associate.
- Verify that the checklist appears in the list.
Important: Removing a checklist from this section removes its association with the location. Review the action before proceeding.
9. Manage Multiple Sub-locations
You can create multiple sub-locations under a parent location to organize a site into smaller, clearly defined areas.
For example, a building can contain a floor and a room. Each sub-location can have its own name, type, description, and linked checklists.
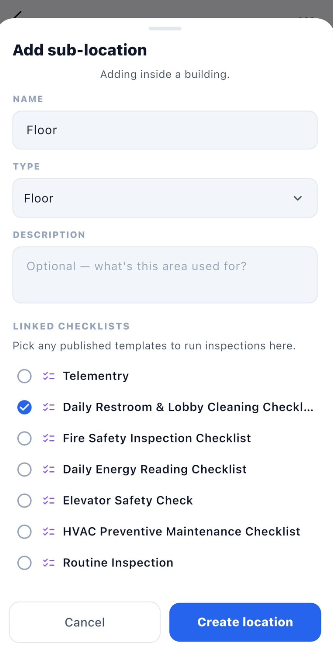
9.1 Add a Sub-location
- Open the Locations module.
- Select the required site.
- Open the parent location, such as a building.
- Click + Add sub-location.
- Enter the sub-location name in the Name field.
- Select the appropriate Type, such as Floor, Room, or Area.
- Enter a description, if required.
- Select any relevant published checklists under Linked Checklists.
- Review the information.
- Click Create location.
- Verify that the new sub-location appears under the parent location.
9.2 Add More Sub-locations
Repeat the same process to add additional sub-locations under the parent location.
For example:
- Building
- Floor
- Room
- Additional floors or rooms, as required
The Locations page displays the parent location with its sub-locations arranged underneath it. The parent location also displays the number of associated sub-locations.
Note: You can open a sub-location to view its details and manage its own sub-locations, where applicable.
10. Location Options Menu
Click the three-dot menu (⋯) on the location details page to access additional actions.
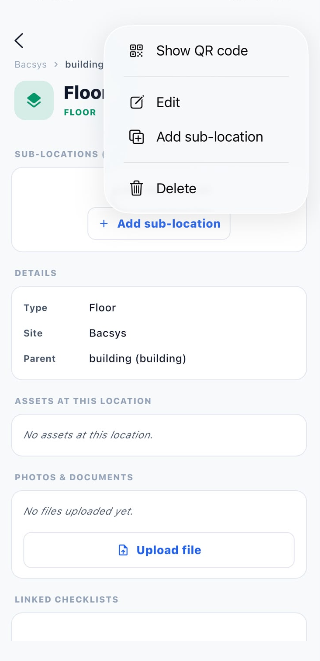
| Option | Description |
|---|---|
| Show QR code | Displays the QR code associated with the location. |
| Edit | Allows you to update the location details. |
| Add sub-location | Allows you to create a sub-location under the current location. |
| Delete | Allows you to delete the current location. |
Steps to Use the Location Options
- Open the Locations module.
- Select the required site and open the location.
- Click the three-dot menu (⋯) in the top-right corner.
- Select the required action:
- Show QR code: View the location's QR code.
- Edit: Update the location information.
- Add sub-location: Create a location under the current one.
- Delete: Delete the location, if permitted.
- Follow any additional instructions or confirmation prompts displayed by the application.
Important: Before deleting a location, verify that you have selected the correct one and review any confirmation prompt.
11. Use a Location in a New Task or Work Order
The location details page provides options for using the selected location in operational activities.
| Option | Purpose |
|---|---|
| Use in new task | Starts the process of creating a new task using the selected location. |
| Use in new work order | Starts the process of creating a new work order using the selected location. |
Steps
- Open the required location.
- Review the location details and linked checklists.
- Click Use in new task to begin creating a task, or click Use in new work order to begin creating a work order.
- Complete the remaining fields in the form that opens.
12. Important Notes
- Select the correct site before creating or searching for locations.
- Complete the required fields when creating a site or location.
- Use clear, descriptive names so users can easily identify locations.
- Choose the appropriate location type, such as Building, Floor, Room, or Area.
- Select published checklists when you need to associate inspection templates with a location.
- Use sub-locations to represent the structure of a site.
- Review location details before editing or deleting a location.
- Use the search field to find locations without manually checking the entire list.
- Use Use in new task or Use in new work order to start an activity associated with the selected location.
13. End-to-End Location Workflow
Open the Locations Module
        ↓
View the Current Site
        ↓
Select or Switch to the Required Site
        ↓
Is a New Site Required?
        ↓
      Yes ──→ Click + New site
        │              ↓
        │       Enter Site Name
        │              ↓
        │       Select Customer
        │              ↓
        │       Set Geographical Location
        │              ↓
        │       Enter Address and Additional Details
        │              ↓
        │       Click Create site
        │              ↓
        └────── Verify the Site
                       ↓
             Select the Required Site
                       ↓
              Click + New location
                       ↓
              Enter Location Name
                       ↓
              Select Location Type
                       ↓
              Add Description if Required
                       ↓
              Link Published Checklists if Required
                       ↓
              Click Create location
                       ↓
              Open the Location Details
                       ↓
              Review Site, Type, and Parent
                       ↓
              Add Sub-locations if Required
                       ↓
              Repeat to Create More Sub-locations
                       ↓
              Upload Photos or Documents if Required
                       ↓
              Link Additional Checklists if Required
                       ↓
              Review Assets at This Location
                       ↓
              Open the Three-dot Menu if Required
                       ↓
              Show QR Code / Edit / Add Sub-location / Delete
                       ↓
              Choose an Operational Action
                       ↓
              Use in new task
                       OR
              Use in new work order
                       ↓
              Complete the Task or Work Order Form