

Vendors
Create, view, search, and manage vendors, including their contact details, categories, site access, payment terms, and contract information.
Vendors
The Vendors module allows users to maintain vendor information in one place. You can create vendor records, view the vendor list, check vendor status, search for a specific vendor, and apply filters to find vendors based on their category, rating, or sorting preferences.
1. Create a New Vendor
To add a vendor, open the Vendors module and click + New vendor. The New vendor form opens, allowing you to enter the vendor's general information, contact details, site access, financial information, and contract details.
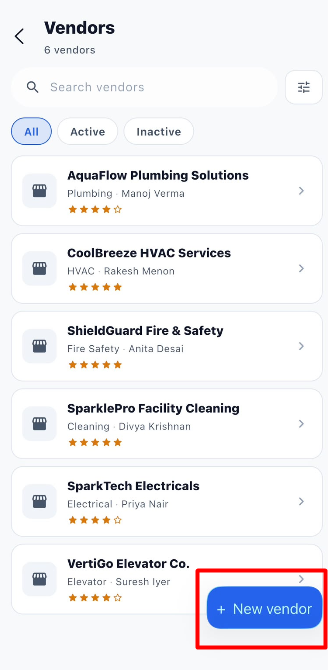
The form contains multiple sections. Complete the relevant fields and review the information before clicking Create vendor.
2. General Information
The General section contains the vendor's name, category, and rating.
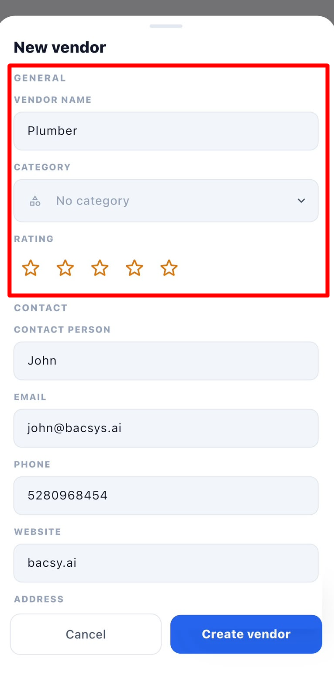
Fields
| Field | Description |
|---|---|
| Vendor name | Enter the name of the vendor or service provider. |
| Category | Select the category associated with the vendor, if applicable. |
| Rating | Select a rating using the available star icons, if required. |
Steps to Enter General Information
- Enter the vendor's name in the Vendor name field.
- Open the Category dropdown.
- Select the appropriate category, if applicable.
- Choose a rating using the star icons, if required.
3. Contact Information
The Contact section stores the vendor's contact person's details and communication information.
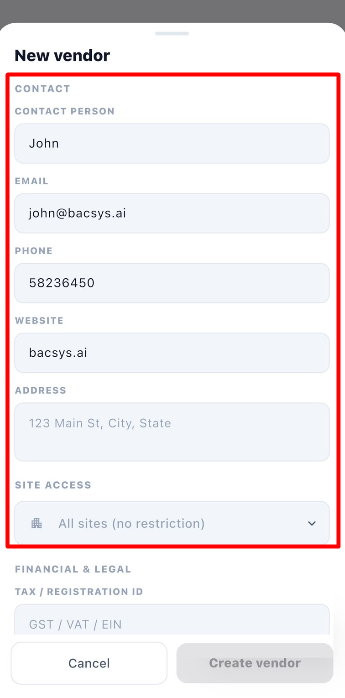
Available Fields
| Field | Description |
|---|---|
| Contact person | Enter the name of the person to contact at the vendor's organization. |
| Enter the vendor's email address. | |
| Phone | Enter the vendor's contact number. |
| Website | Enter the vendor's website address. |
| Address | Enter the vendor's business address. |
Steps to Enter Contact Information
- Enter the contact person's name.
- Provide the vendor's email address.
- Enter the phone number.
- Add the website address, if available.
- Enter the vendor's business address.
Note: Check the contact details carefully before saving so users can identify and contact the correct vendor.
4. Site Access
The Site access field allows you to specify which sites the vendor can be associated with.
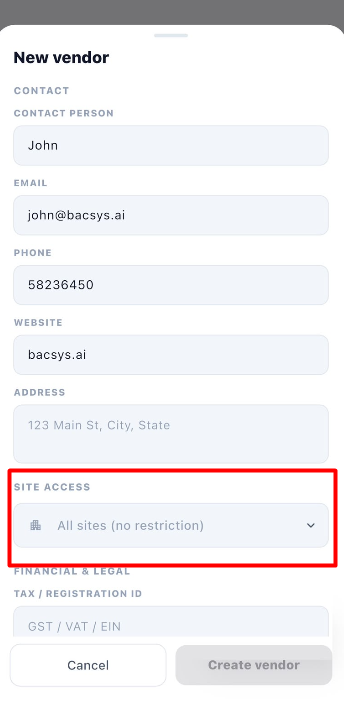
Available Field
| Field | Description |
|---|---|
| Site access | Select the applicable site or choose All sites (no restriction). |
Steps to Configure Site Access
- Open the Site access dropdown.
- Select the appropriate site, if required.
- Choose All sites (no restriction) if the vendor should not be restricted to a particular site.
- Verify the selected option before proceeding.
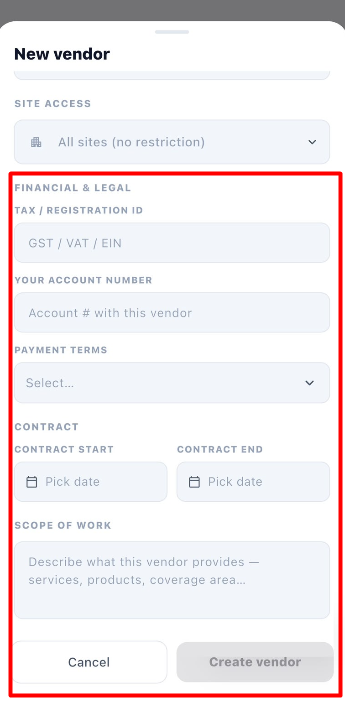
5. Financial and Legal Information
The Financial & Legal section stores the vendor's registration details, account number, and payment terms.
Available Fields
| Field | Description |
|---|---|
| Tax / Registration ID | Enter the vendor's tax or registration identifier. |
| Your account number | Enter the account number associated with the vendor record. |
| Payment terms | Select the applicable payment terms from the dropdown. |
Steps to Enter Financial and Legal Information
- Enter the Tax / Registration ID, if applicable.
- Enter Your account number, if applicable.
- Open the Payment terms dropdown.
- Select the appropriate payment terms.
- Review the entered information.
Example: The form displays Due on receipt as a payment term. Select this option if it matches the agreement with the vendor.
6. Contract Information
The Contract section allows users to record the vendor's contract period and scope of work.
Available Fields
| Field | Description |
|---|---|
| Contract start | Select the date on which the contract begins. |
| Contract end | Select the date on which the contract ends. |
| Scope of work | Describe the services, products, or coverage provided by the vendor. |
Steps to Enter Contract Information
- Select the Contract start date.
- Select the Contract end date, if applicable.
- Enter the vendor's services or responsibilities in Scope of work.
- Review the dates and description to ensure they are correct.
Example: The scope of work can describe the services, products, or coverage area provided by the vendor.
7. Create the Vendor
After completing the relevant sections, review the information and save the vendor record.
Steps to Create a Vendor
- Open the Vendors module.
- Click + New vendor.
- Enter the Vendor name.
- Select the category and rating, if required.
- Enter the contact person's details, email, phone, website, and address.
- Configure Site access.
- Enter the financial and legal information, if applicable.
- Select the contract start and end dates, if applicable.
- Add the Scope of work, if required.
- Review the entered information.
- Click Create vendor.
- Verify that the vendor appears in the Vendors list.
Important: Review the information before creating the vendor to help maintain accurate vendor records.
8. View Vendors and Check Their Status
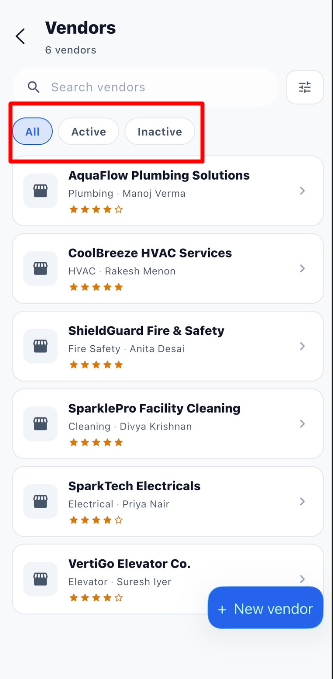
The Vendors page displays the total number of vendors and provides status tabs to help users view vendors according to their current status.
Vendor Status Filters
| Option | Description |
|---|---|
| All | Displays all vendors available in the list. |
| Active | Displays vendors whose status is Active. |
| Inactive | Displays vendors whose status is Inactive. |
The total vendor count appears below the Vendors heading. In the provided screenshot, the page shows 6 vendors.
Each vendor card can display the vendor's name, category, contact person's name, star rating, and a navigation arrow to open the vendor record.
Steps to View Vendors by Status
- Open the Vendors module.
- Check the total number of vendors displayed below the heading.
- Select All to view every vendor.
- Select Active to view active vendors.
- Select Inactive to view inactive vendors.
- Review the list displayed for the selected status.
Note: The number of vendors in each status category depends on the records available in the application.
9. Search Vendors
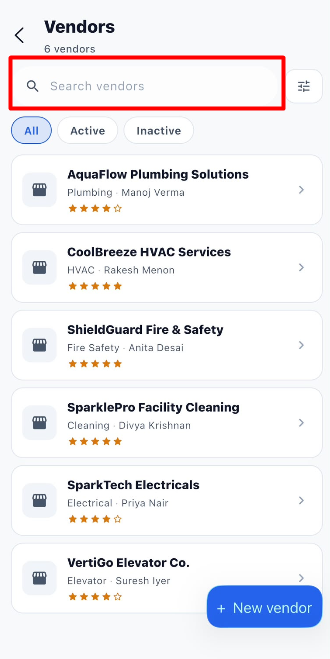
The Search vendors field allows users to find a specific vendor without manually reviewing the entire list.
Steps to Search for a Vendor
- Open the Vendors module.
- Click the Search vendors field at the top of the page.
- Enter the vendor's name or relevant search text.
- Review the matching vendors displayed in the list.
- Select the required vendor to view its details.
Note: Use relevant search text to locate the required vendor more quickly.
10. Filter Vendors
The Filter option allows users to narrow down the vendor list by category, minimum rating, and sorting preference.
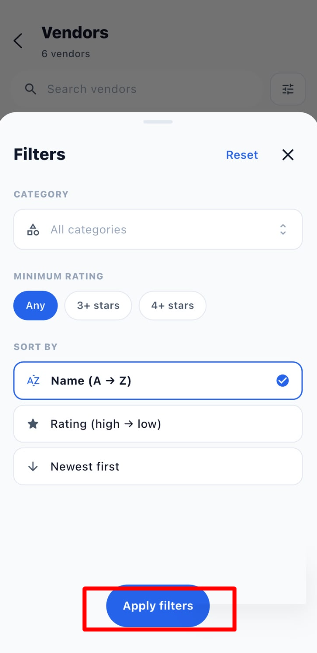
Click the Filter icon beside the search field to open the Filters panel.
10.1 Available Filter Options
| Option | Description |
|---|---|
| Category | Select a category to display vendors associated with that category. |
| Any | Displays vendors regardless of their rating. |
| 3+ stars | Displays vendors with a rating of three stars or higher. |
| 4+ stars | Displays vendors with a rating of four stars or higher. |
| Name (A → Z) | Sorts vendors alphabetically by name. |
| Rating (high → low) | Displays higher-rated vendors before lower-rated vendors. |
| Newest first | Displays the newest vendors first. |
10.2 Steps to Apply Filters
- Open the Vendors module.
- Click the Filter icon beside the search field.
- Select a category from the Category dropdown, if required.
- Choose a minimum rating: Any, 3+ stars, or 4+ stars.
- Select a sorting option under Sort By.
- Review your selected criteria.
- Click Apply filters.
- Review the updated vendor list.
10.3 Additional Filter Options
| Option | Description |
|---|---|
| Reset | Clears the selected filter settings. |
| Close (X) | Closes the Filters panel. |
| Apply filters | Applies the selected criteria to the vendor list. |
Note: You can use the search field, status tabs, and advanced filters to find vendors more easily. Each option helps you narrow down the list in a different way.
11. End-to-End Vendor Workflow
The following workflow summarizes the process of creating a vendor and then viewing, searching, and filtering vendor records.
Open the Vendors Module
        ↓
View the Existing Vendors
        ↓
Click + New vendor
        ↓
Enter Vendor Name
        ↓
Select Category and Rating
        ↓
Enter Contact Person Details
        ↓
Add Email, Phone, Website, and Address
        ↓
Configure Site Access
        ↓
Enter Financial and Legal Information
        ↓
Select Payment Terms
        ↓
Enter Contract Start and End Dates
        ↓
Describe the Scope of Work
        ↓
Review All Vendor Details
        ↓
Click Create vendor
        ↓
Vendor Created
        ↓
Verify the Vendor in the Vendors List
        ↓
View Vendors by Status if Required
        ↓
Search for a Vendor if Required
        ↓
Open Filters if Required
        ↓
Select Category and Minimum Rating
        ↓
Choose a Sorting Option
        ↓
Click Apply filters
        ↓
Review the Matching Vendors