

Assets
Manage and track facility assets, equipment, and lifecycle details.
Assets
The Assets module allows users to register and manage equipment across different sites and locations. Users can enter asset information, assign a status and criticality, record purchase and warranty details, configure maintenance schedules, link checklists, and monitor telemetry information.
This guide explains how to create an asset, search and filter assets, view asset details, create work orders, configure telemetry points, view trends, and review asset history.
1. Open the Assets Module
The Assets page displays registered assets and provides options to create, search, filter, and view assets.
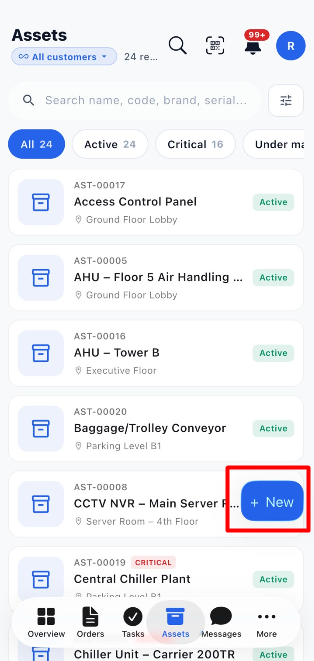
Steps to Create an Asset
- Open the Assets module from the bottom navigation menu.
- Click + New.
- The New asset form opens.
- Complete the asset information in the available sections.
- Review the entered details.
- Click Create asset to register the asset.
Note: The application automatically generates an asset code when the asset is created.
2. Create a New Asset
The New asset form contains several sections. Complete the mandatory fields and enter additional information wherever applicable.
2.1 General
The General section contains the basic information used to identify and classify the asset.
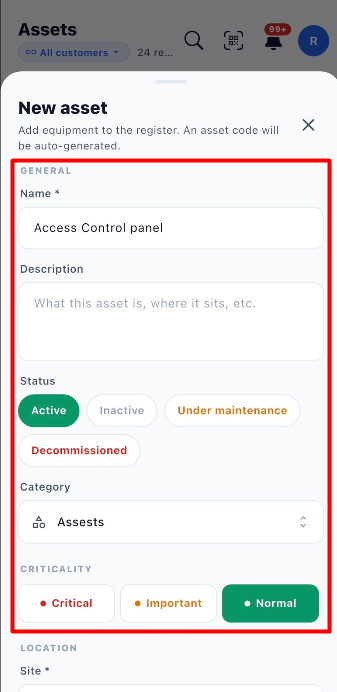
| Field | Description | Required |
|---|---|---|
| Name * | Enter a clear name for the asset, such as Access Control Panel. | Yes |
| Description | Enter additional information about the asset, such as what it is or where it is used. | No |
| Status | Select the current status of the asset. | Select as applicable |
| Category | Select the category that describes the asset. | Select as applicable |
| Criticality | Select the asset's importance level: Critical, Important, or Normal. | Select as applicable |
Asset Status Options
| Status | Description |
|---|---|
| Active | The asset is active. |
| Inactive | The asset is inactive. |
| Under maintenance | The asset is undergoing maintenance. |
| Decommissioned | The asset has been taken out of service. |
Criticality Options
| Criticality | Description |
|---|---|
| Critical | Identifies an asset with critical importance. |
| Important | Identifies an asset with significant operational importance. |
| Normal | Identifies an asset with normal importance. |
Steps:
- Enter the asset name.
- Add a description if required.
- Select the appropriate status.
- Choose the asset category.
- Select the appropriate criticality.
2.2 Location
The Location section associates the asset with a site and, optionally, a specific location within that site.
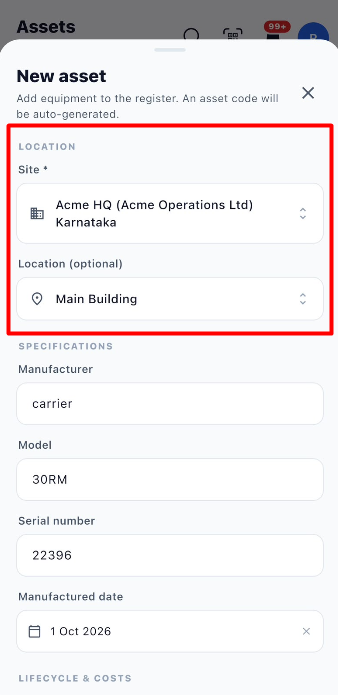
| Field | Description | Required |
|---|---|---|
| Site * | Select the site where the asset is installed or maintained. | Yes |
| Location (optional) | Select the specific location associated with the selected site. | No |
Steps:
- Open the Site dropdown.
- Select the required site.
- Open the Location (optional) dropdown.
- Select the appropriate location, if applicable.
- Verify the selected site and location.
Important: The site is mandatory. Select the site before choosing a location.
2.3 Specifications
The Specifications section records the manufacturer's details and identification information for the asset.
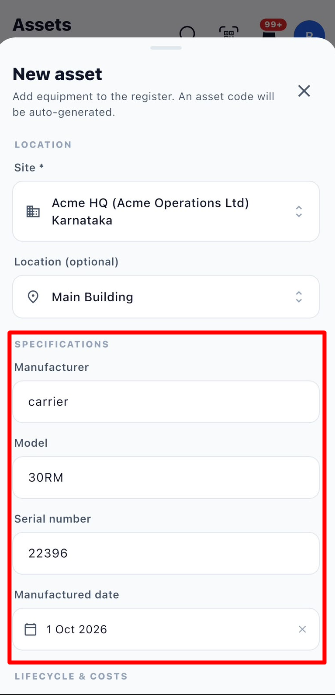
| Field | Description |
|---|---|
| Manufacturer | Enter the name of the asset manufacturer. |
| Model | Enter the asset model number or name. |
| Serial number | Enter the serial number provided by the manufacturer. |
| Manufactured date | Select the date the asset was manufactured. |
Steps:
- Enter the manufacturer name.
- Enter the model.
- Enter the serial number.
- Select the manufactured date, if available.
- Review the information.
Tip: Accurate manufacturer, model, and serial number details help users identify the asset during maintenance and servicing.
2.4 Lifecycle & Costs
The Lifecycle & Costs section records purchase information and warranty details.
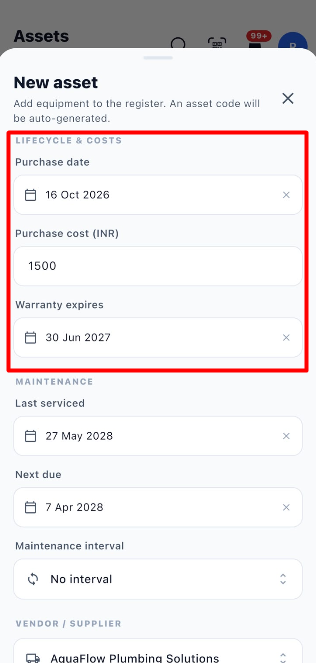
| Field | Description |
|---|---|
| Purchase date | Select the date the asset was purchased. |
| Purchase cost (INR) | Enter the asset's purchase cost in Indian rupees. |
| Warranty expires | Select the date on which the asset's warranty expires. |
Steps:
- Select the purchase date.
- Enter the purchase cost in INR, if available.
- Select the warranty expiry date, if applicable.
- Review the entered information.
2.5 Maintenance
The Maintenance section records the asset's service history and maintenance schedule.
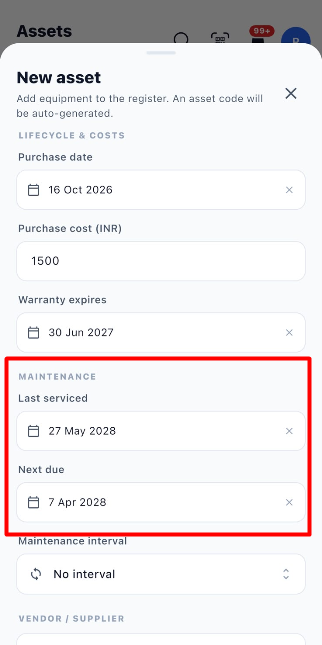
| Field | Description |
|---|---|
| Last serviced | Select the date the asset was last serviced. |
| Next due | Select the next maintenance due date. |
| Maintenance interval | Select the maintenance interval, if applicable. |
Steps:
- Select the Last serviced date, if available.
- Set the Next due date, if applicable.
- Choose the appropriate Maintenance interval.
- Review the maintenance details.
Note: The displayed default for Maintenance interval is No interval.
2.6 Vendor / Supplier
The Vendor / Supplier section associates the asset with its vendor or supplier.
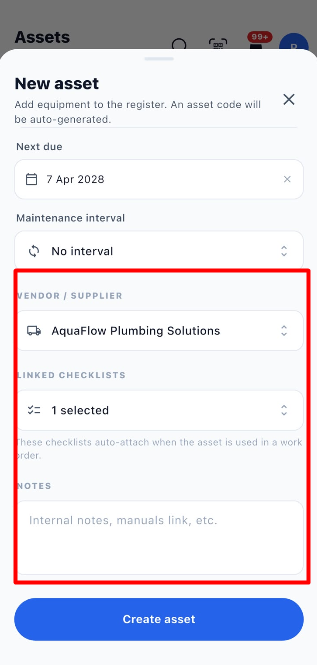
Steps:
- Open the Vendor / Supplier dropdown.
- Select the appropriate vendor or supplier.
- Verify the selected value.
2.7 Linked Checklists
The Linked Checklists section allows users to associate checklists with an asset.
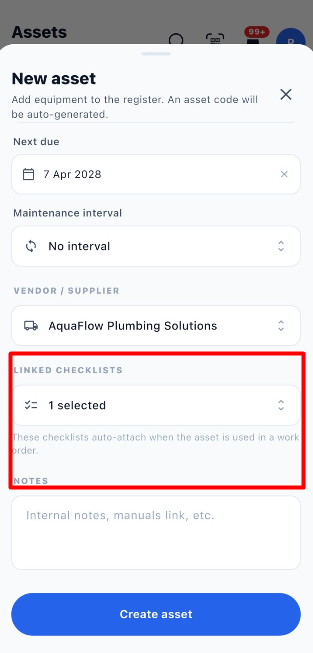
The selected checklists are configured to attach automatically when the asset is used in a work order.
Steps:
- Open the Linked Checklists field.
- Select the required checklist or checklists.
- Verify the selected items.
Note: Linking a checklist helps make the relevant checklist available when the asset is used in a work order.
2.8 Notes
The Notes field allows users to record additional internal information about the asset.
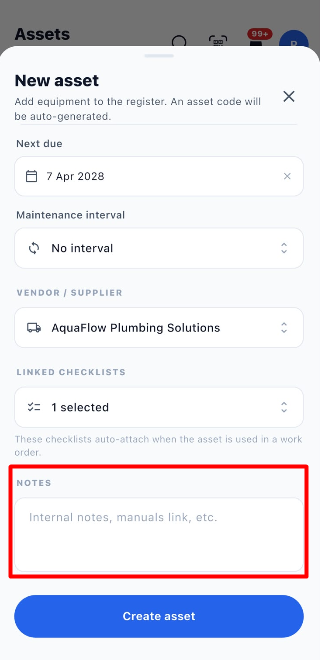
Steps:
- Navigate to the Notes field.
- Enter relevant information, such as maintenance notes or a manual link.
- Review the entered notes.
Use this field for additional information that does not fit into the other asset fields.
3. Create the Asset
Before creating the asset, review the information entered in the form.
Pre-Creation Checklist
- Confirm that the asset name has been entered.
- Select the appropriate status, category, and criticality.
- Confirm that the required site has been selected.
- Review the location, if applicable.
- Check the manufacturer, model, serial number, and manufactured date, if available.
- Review the purchase date, purchase cost, and warranty expiry, if applicable.
- Verify the maintenance details.
- Confirm the vendor or supplier, if applicable.
- Review the linked checklists and notes.
Steps to Create the Asset
- Scroll to the bottom of the New asset form.
- Review the entered information.
- Click Create asset.
- Return to the Assets page.
- Locate the newly created asset in the list.
Important: The asset name and site are mandatory in the displayed form. Complete these fields before creating the asset.
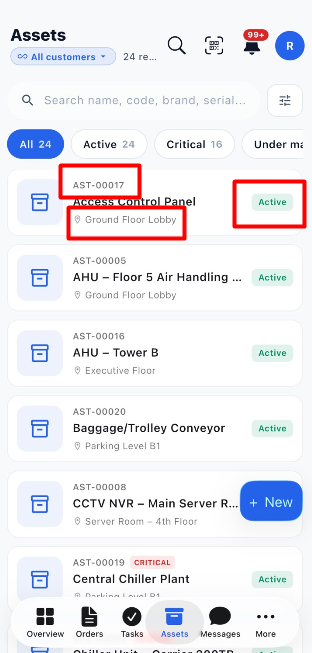
4. View Assets
After creation, the asset appears in the Assets list. Users can open an asset to review its basic information and current status.
The asset cards can display the following information:
| Information | Description |
|---|---|
| Asset code | The unique code generated for the asset. |
| Asset name | The name of the registered asset. |
| Location | The location associated with the asset. |
| Status | The current status, such as Active. |
| Criticality | The asset's criticality level, where displayed. |
Steps to View an Asset
- Open the Assets module.
- Review the available asset cards.
- Find the required asset.
- Select the asset to open its details page.
5. Search Assets
The Search field allows users to find a specific asset by entering its name, asset code, brand, or serial number.
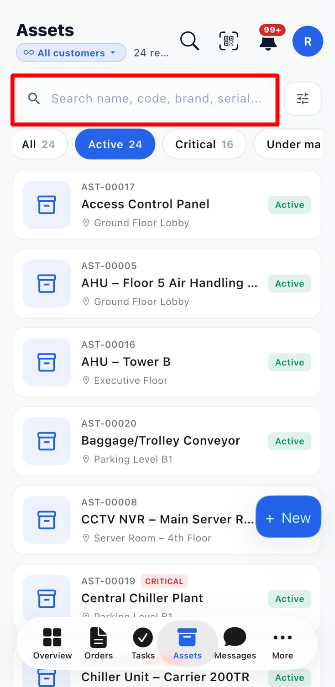
Steps to Search for an Asset
- Open the Assets module.
- Click the Search field at the top of the page.
- Enter the asset name, code, brand, or serial number.
- Review the matching assets displayed in the list.
- Select the required asset to view its details.
Note: Enter relevant search information to find the required asset easily.
6. Apply Filters to Assets
Click the Filter icon on the Assets page to open the Filters panel. This panel allows users to narrow down the asset list by criticality, category, and site, and choose how the assets should be sorted.
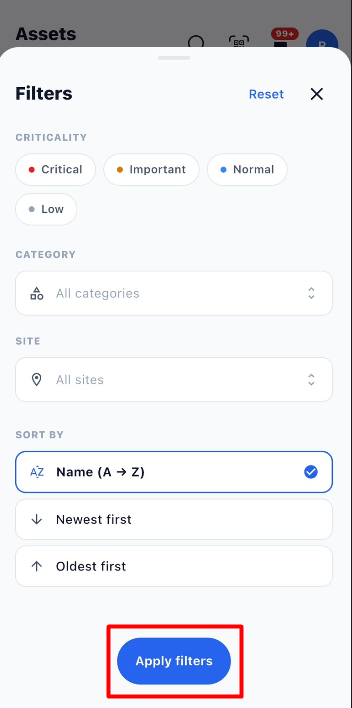
6.1 Available Filter Options
| Option | Description |
|---|---|
| Criticality | Filter assets by Critical, Important, Normal, or Low. |
| Category | Select a specific asset category or choose All categories. |
| Site | Select a specific site or choose All sites. |
6.2 Sort By Options
| Option | Description |
|---|---|
| Name (A → Z) | Sort assets alphabetically by name, from A to Z. |
| Newest first | Display the newest assets first. |
| Oldest first | Display the oldest assets first. |
6.3 Steps to Apply Filters
- Open the Assets module.
- Click the Filter icon beside the search field.
- Select the required Criticality option.
- Choose a Category, if needed.
- Select a Site, if needed.
- Choose the preferred sorting option under Sort By.
- Click Apply filters to update the asset list.
Additional Options
- Reset: Clear the selected filter options and return to the default selections.
- Close (X): Close the Filters panel.
7. View Asset Details and Available Actions
After creating an asset, select it from the Assets list to view its information, review maintenance details, create a work order, or access additional actions.
7.1 Asset Overview
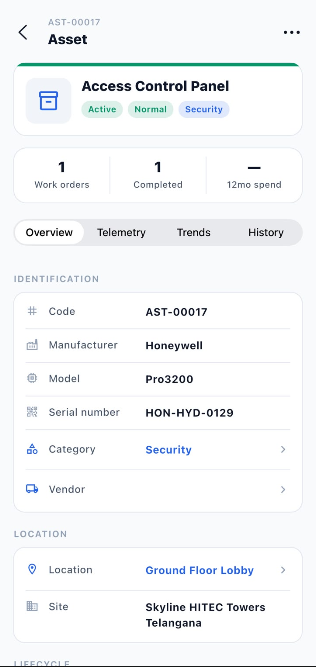
The asset details page displays a summary of the selected asset and provides access to its information.
| Section | Description |
|---|---|
| Asset Summary | Displays the asset name, asset code, status, criticality, and category. |
| Summary Cards | Shows the number of associated work orders, completed work orders, and 12-month spend. |
| Overview | Displays the asset's identification, location, and other registered details. |
| Telemetry | Provides access to the asset's telemetry points. |
| Trends | Displays available telemetry trends. |
| History | Displays work order history associated with the asset. |
7.2 Identification
The Identification section displays the information used to identify the asset.
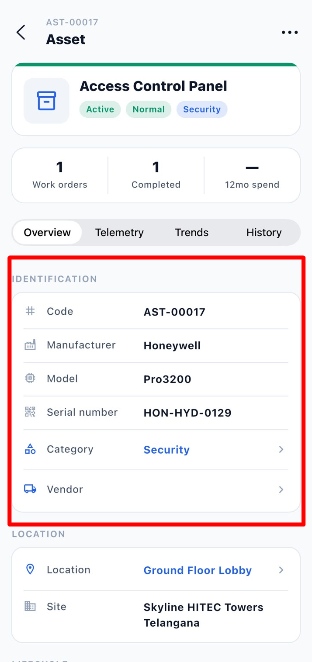
| Field | Description |
|---|---|
| Code | Displays the unique asset code generated by the application. |
| Manufacturer | Displays the asset manufacturer. |
| Model | Displays the asset model. |
| Serial number | Displays the manufacturer's serial number. |
| Category | Displays the category assigned to the asset. |
| Vendor | Displays the associated vendor or supplier. |
Select Category or Vendor to view the associated information, where supported by the application.
7.3 Location
The Location section shows where the asset is installed or maintained.
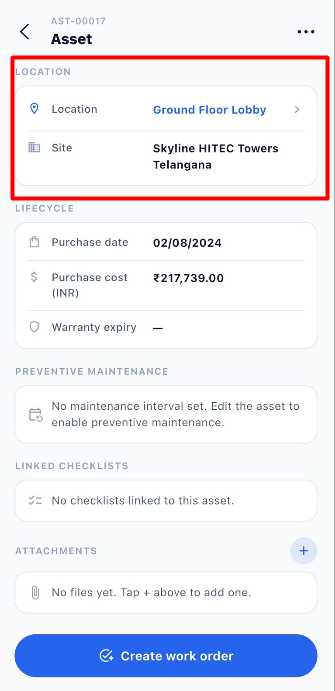
| Field | Description |
|---|---|
| Location | Displays the specific location associated with the asset. |
| Site | Displays the site to which the asset belongs. |
Use this information to confirm that you have opened the correct asset and to identify its physical location.
7.4 Lifecycle
The Lifecycle section displays the asset's purchase and warranty information.
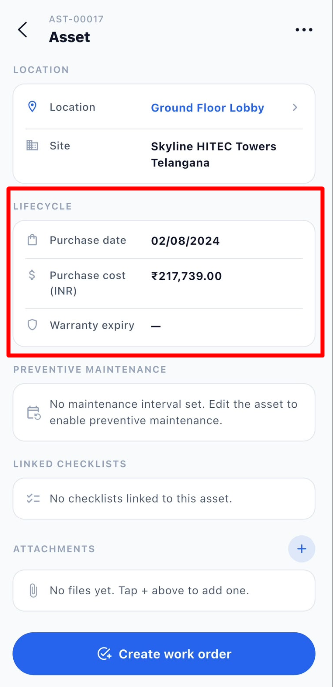
| Field | Description |
|---|---|
| Purchase date | Displays when the asset was purchased. |
| Purchase cost (INR) | Displays the recorded purchase cost in Indian rupees. |
| Warranty expiry | Displays the warranty expiry date, if available. |
These details help users review the asset's purchase history and warranty information.
7.5 Preventive Maintenance
The Preventive Maintenance section displays the maintenance interval configured for the asset.
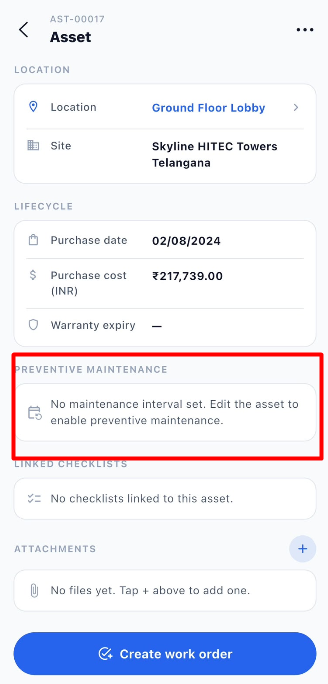
If no maintenance interval has been configured, the application displays a message indicating that no maintenance interval is set.
7.6 Linked Checklists
The Linked Checklists section displays the checklists associated with the asset.
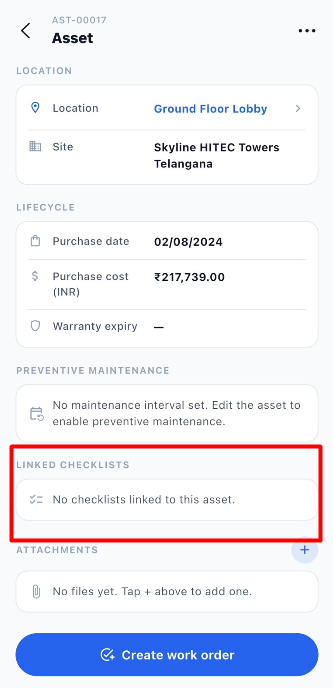
If no checklists have been linked, the application displays No checklists linked to this asset.
Linked checklists can be configured to attach automatically when the asset is used in a work order.
7.7 Attachments
The Attachments section displays files associated with the asset.
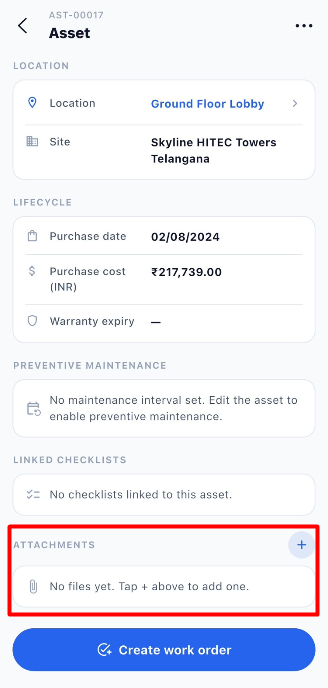
- Click the + icon to add an attachment.
- Review the files displayed in this section.
- If no files have been added, the application displays No files yet. Tap + above to add one.
7.8 Create a Work Order from an Asset
The Create work order button allows users to start creating a work order directly from the asset details page.
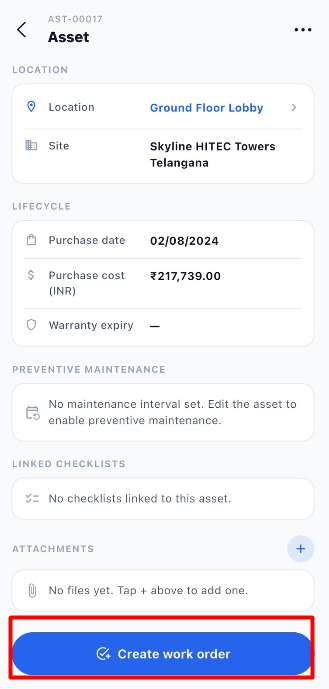
Steps:
- Open the Assets module.
- Select the asset for which work needs to be performed.
- Review the asset details.
- Click Create work order at the bottom of the page.
- The application redirects you to the work order creation page.
- Enter the required work order information.
- Associate the required asset and checklist, where applicable.
- Complete the work order creation process.
This option provides a direct way to initiate maintenance or other work associated with the selected asset.
7.9 Asset Options Menu
Click the three-dot menu (⋯) in the top-right corner of the asset details page to access additional actions.
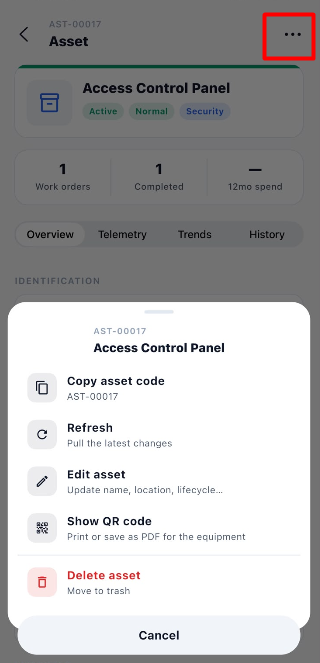
| Option | Description |
|---|---|
| Copy asset code | Copies the asset's unique code so it can be reused where needed. |
| Refresh | Retrieves the latest asset information. |
| Edit asset | Opens the asset editing form to update information such as its name, location, or lifecycle details. |
| Show QR code | Displays the asset's QR code, which can be printed or saved as a PDF. |
| Delete asset | Moves the asset to the trash. |
| Cancel | Closes the options menu without selecting an action. |
Steps to Use the Options Menu
- Open the required asset.
- Click the three-dot menu (⋯).
- Select the required option.
- Follow any instructions displayed by the application to complete the action.
Important: Verify that you have selected the correct asset before editing or deleting it.
8. Telemetry
The Telemetry section allows users to create telemetry points for an asset. After creating the required point, users can add it to a checklist, publish the checklist, and verify the resulting telemetry information and trends through the asset.
8.1 Create a Telemetry Point
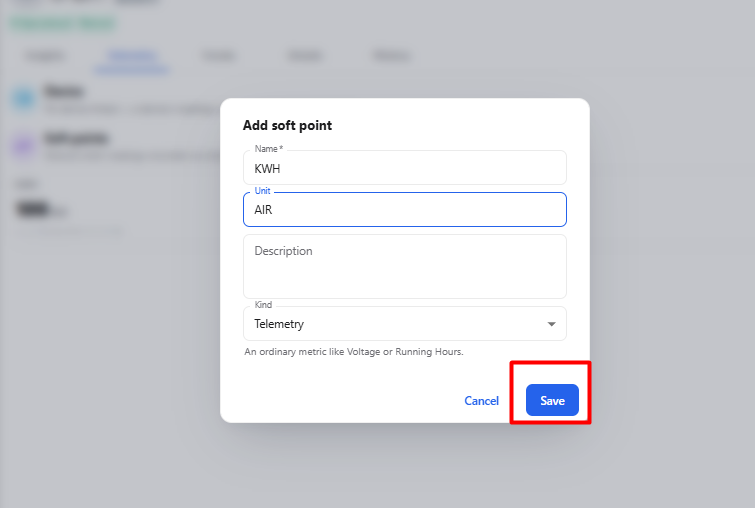
Steps:
- Open the Assets module.
- Select the required asset.
- Navigate to the Telemetry tab.
- Click the + icon to add a telemetry point.
- Complete the fields in the Add soft point form.
| Field | Description |
|---|---|
| Name * | Enter the name of the telemetry point, such as Kwh, Voltage, or Current. This field is mandatory. |
| Unit | Enter the measurement unit, if applicable. |
| Description | Enter a description of the telemetry point. |
| Kind | Select the type of point. The displayed option is Telemetry. |
- Click Save to save the telemetry point.
- Verify that the point has been created.
8.2 Create a Checklist
Create a checklist that will contain the telemetry point.
Steps to Create the Checklist:
- Navigate to the Checklists module.
- Select the option to create a new checklist.
- Enter a clear, descriptive name in the Name field.
- Add a description if required.
- Select the Customer Scope:
- Keep All customers (shared) to make the checklist available to all customers.
- Select a specific customer if the checklist should be limited to that customer.
- Add tags if required using Create new tag.
- Under Site Availability, keep Available at all sites selected if the checklist should be available at every site.
- Click Create checklist.
8.3 Add the Telemetry Point and Publish the Checklist
After creating the checklist, add the telemetry point and publish the checklist.
Steps:
- Open the newly created checklist.
- Use the available option to add a telemetry point.
- Enter the telemetry point details, including the mandatory name and other applicable fields.
- Save the telemetry point.
- Verify that the telemetry point has been added to the checklist.
- Use the available Publish option to publish the checklist.
- Confirm that the checklist is published before proceeding.
Note: Save the telemetry point within the checklist before publishing the checklist.
8.4 Create a Work Order for the Asset
After publishing the checklist, create a work order associated with the asset and the checklist.
Steps:
- Open the Assets module.
- Select the asset associated with the telemetry point.
- Click Create work order.
- Complete the required work order details.
- Associate the required asset and checklist, where applicable.
- Create the work order.
8.5 Verify the Telemetry Point
After creating the work order, return to the asset details page to verify the telemetry information.
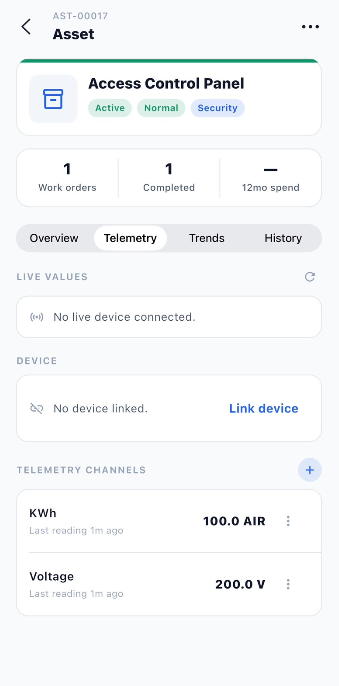
Steps:
- Open the asset associated with the work order.
- Navigate to the Telemetry tab.
- Verify that the created telemetry point is displayed.
- Navigate to the Trends tab to review the available trend information.
9. View Telemetry Trends
The Trends tab displays available telemetry readings in a graphical format. Users can select a telemetry point, choose a time period, and review the recorded values.
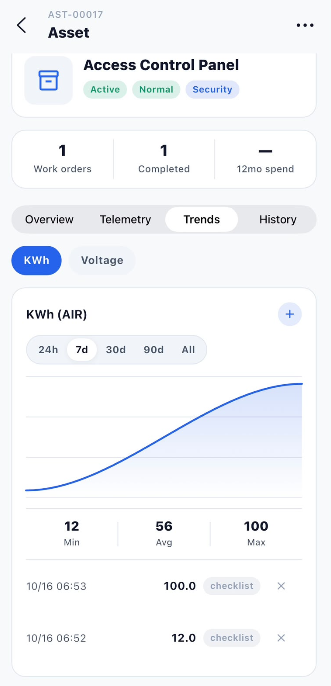
Available Options
| Option | Description |
|---|---|
| Telemetry Point | Select a measurement, such as KWh or Voltage, to view its trend data. |
| + | Access the available option to add a trend item. |
| 24h | View trend data for the last 24 hours. |
| 7d | View trend data for the last 7 days. |
| 30d | View trend data for the last 30 days. |
| 90d | View trend data for the last 90 days. |
| All | View all available trend data. |
| Trend Graph | Displays telemetry values over the selected time period. |
| Min | Displays the minimum recorded value for the selected period. |
| Avg | Displays the average recorded value. |
| Max | Displays the maximum recorded value. |
| Recorded Values | Displays individual readings with their date, time, value, and source label, such as checklist. |
| X | Removes an individual reading from the displayed list, where available. |
Steps to View Telemetry Trends
- Open the Assets module.
- Select the asset associated with the telemetry point.
- Navigate to the Trends tab.
- Select the telemetry point you want to review, such as KWh or Voltage.
- Choose a time period: 24h, 7d, 30d, 90d, or All.
- Review the graph to understand how the telemetry values change over time.
- Check the Min, Avg, and Max values for the selected period.
- Review the recorded readings below the graph, including their timestamps and source labels.
Note: The available trend information depends on the telemetry points and readings associated with the asset.
10. View Asset History
The History tab displays work order history associated with the selected asset. Users can review previous work, check work order status, and view the assigned person and closure date.
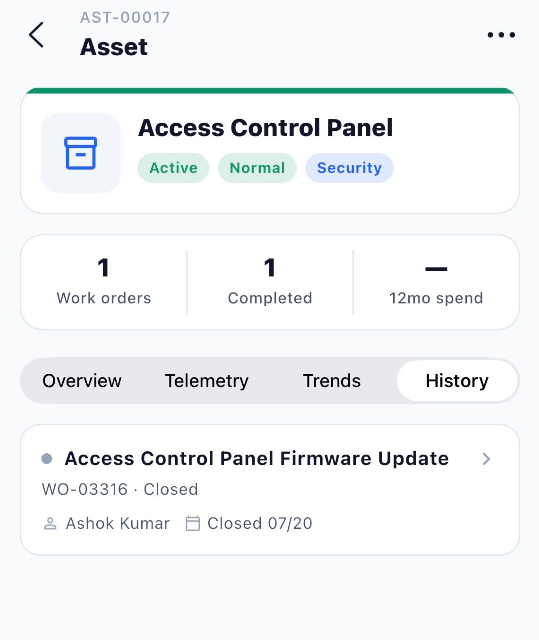
Each history card displays the following information:
| Field | Description |
|---|---|
| Work Order Title | Displays the title of the work order associated with the asset. |
| Work Order Code | Displays the unique work order reference, such as WO-03316. |
| Status | Displays the work order status, such as Closed. |
| Assigned Person | Displays the person associated with the work order. |
| Closed Date | Displays the date the work order was closed. |
| Arrow (>) | Allows users to open the work order details. |
Steps to View Asset History
- Open the Assets module.
- Select the required asset.
- Navigate to the History tab.
- Review the listed work orders associated with the asset.
- Check each work order's title, code, status, assigned person, and closure date.
- Select a work order to view its details.
Note: The History tab helps users review previously recorded work orders associated with the selected asset.
11. Important Notes
- The asset name and site are mandatory in the displayed form.
- An asset code is generated automatically when the asset is created.
- Location is optional and is associated with the selected site.
- Select the appropriate status, category, and criticality for the asset.
- Enter accurate manufacturer, model, and serial number information when available.
- Record purchase and warranty information where applicable.
- Configure maintenance dates and intervals according to the asset's maintenance requirements.
- Link the required checklists so they can attach automatically when the asset is used in a work order.
- Save telemetry points and publish the checklist before verifying the associated telemetry information.
- Use the Search field to find assets by name, code, brand, or serial number.
- Use the Filter panel to narrow down assets by criticality, category, or site.
- Review the asset details before editing or deleting an asset.
12. End-to-End Asset Workflow
The following workflow summarizes the process of creating an asset, configuring its telemetry, and reviewing its associated work information.
Open the Assets module
        ↓
Click + New
        ↓
Enter the asset name and description
        ↓
Select the status, category, and criticality
        ↓
Select the required site and optional location
        ↓
Enter manufacturer, model, serial number, and manufactured date
        ↓
Enter purchase and warranty details, if available
        ↓
Configure maintenance dates and interval, if applicable
        ↓
Select the vendor or supplier
        ↓
Link checklists and add notes, if required
        ↓
Review the asset information
        ↓
Click Create asset
        ↓
Open the newly created asset
        ↓
Create and save a telemetry point
        ↓
Create a checklist and add the telemetry point
        ↓
Publish the checklist
        ↓
Create a work order associated with the asset and checklist
        ↓
Verify the telemetry point and view available trends
        ↓
Review the asset's work order history when needed