

Orders
Manage work orders, dispatches, parts requisitions, and service requests.
Work Orders
The Work Orders module helps users create, schedule, assign, track, and complete maintenance activities. A work order can include a site, location, asset, priority, work type, checklist, assigned person or team, approval requirements, and supporting attachments.
The module also allows users to search for work orders, apply filters, change the display layout, and review work order details, comments, and activity.
1. Work Orders Page
The Work Orders page displays existing work orders and provides tools to find records, filter the list, change the display layout, and create new work orders.
Available Options
- All customers: Choose a customer to view the associated work orders.
- Search: Find work orders using the search field.
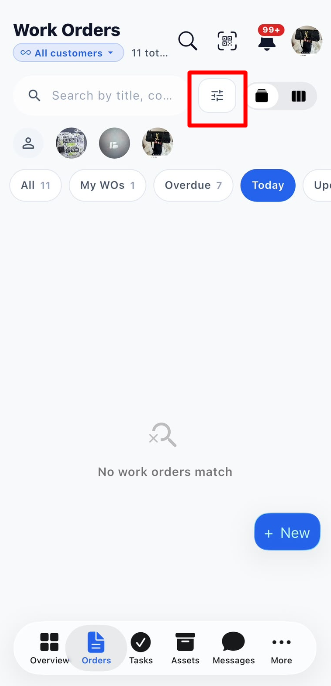
- Filter: Narrow the work order list by priority, work type, site, location, assignee, team, and sorting options.
- Work order filters: Use All, My WOs, Overdue, Today, Upcoming, Open, In Progress, Closed, Resolved, and Active Only.
- View options: Switch between Card View and List View.
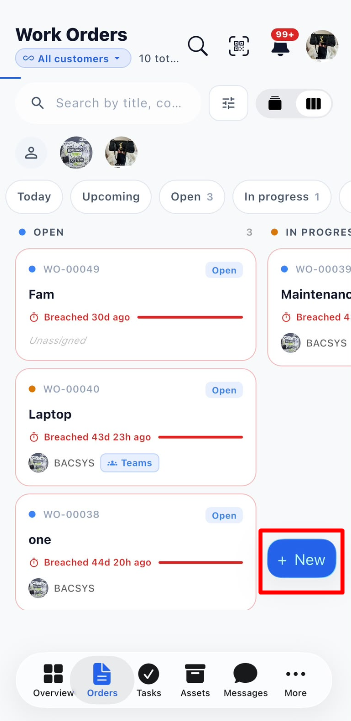
- + New: Open the creation menu to create a task or work order.
2. Create a New Work Order
Step 1: Open the Create Menu
- Navigate to the Work Orders module.
- Click + New.
-
The Create menu appears with two options:
- Task: For soft-services activities where no asset, vendor, or parts are required.
- Work Order: For maintenance activities where assets, vendors, and parts are available.
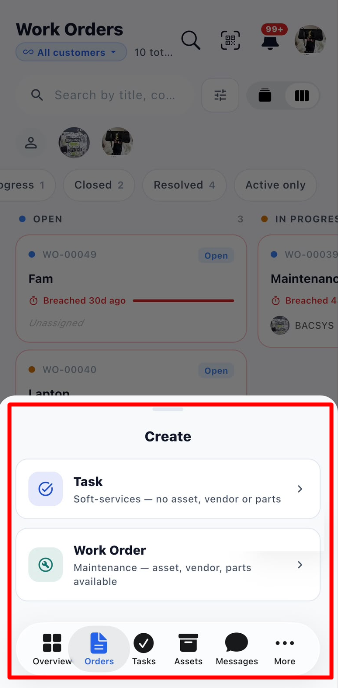
- Select Work Order to open the New work order form.
3. New Work Order Form
The New work order form contains several sections. Enter the required details and configure the optional fields according to the maintenance requirements.
3.1 General
Enter the basic information about the work order.
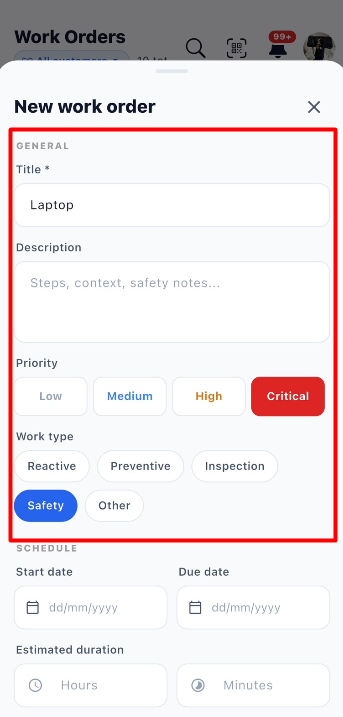
| Field | Description |
|---|---|
| Title * | Enter a title describing the work to be performed. |
| Description | Enter the work details, steps, context, or safety notes. |
| Priority | Select Low, Medium, High, or Critical. |
| Work type | Select Reactive, Preventive, Inspection, Safety, or Other. |
Steps:
- Enter the work order title.
- Add a description if required.
- Select the appropriate priority.
- Choose the work type based on the maintenance activity.
3.2 Schedule
Configure the work order's schedule, activation method, and estimated duration.
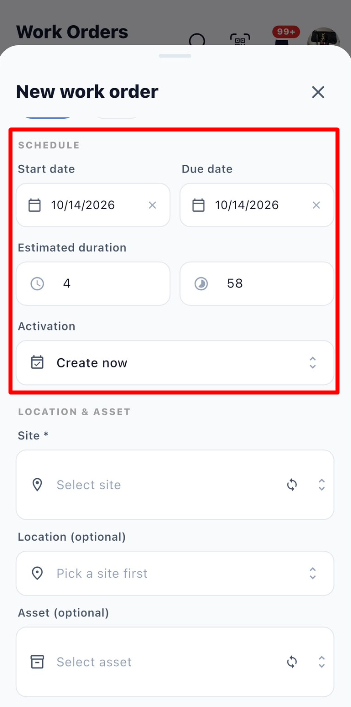
| Field | Description |
|---|---|
| Start date | Select the planned start date. |
| Due date | Select the date by which the work order should be completed. |
| Estimated duration – Hours | Enter the estimated number of hours required. |
| Estimated duration – Minutes | Enter the estimated number of minutes required. |
| Activation | Select when or how the work order should be activated. The available options are Create now, Schedule for date/time, and Recurring. |
Activation Options
1. Create now
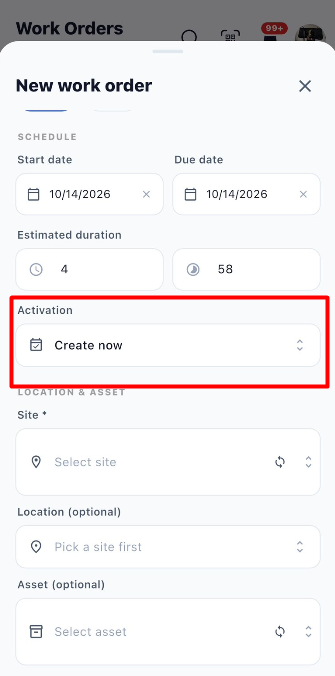
The Create now option creates the work order immediately after the required details are entered and the user clicks Create work order.
Steps:
- Open the Activation dropdown.
- Select Create now.
- Complete the required work order details.
- Click Create work order to create the work order immediately.
2. Schedule for date/time
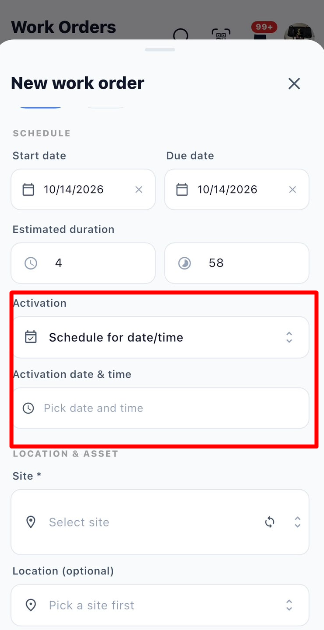
The Schedule for date/time option allows users to schedule a work order for a specific date and time.
Steps:
- Open the Activation dropdown.
- Select Schedule for date/time.
- The Activation date & time field appears.
- Click Pick date and time.
- Select the required date and time.
- Complete the remaining work order details.
- Click Create work order to submit the scheduled work order.
3. Recurring
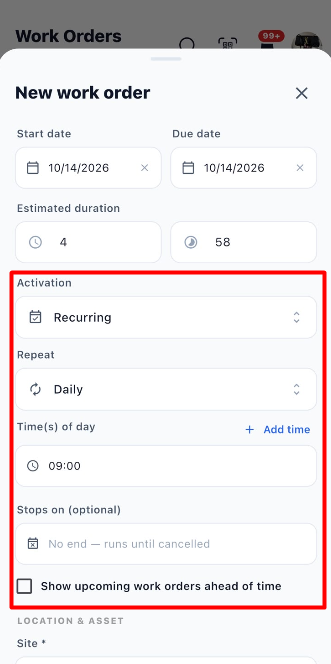
The Recurring option allows users to configure a work order to repeat according to a selected schedule.
| Field / Option | Description |
|---|---|
| Repeat | Select the recurrence frequency. The displayed example is Daily. |
| Time(s) of day | Set the time at which the recurring work order should run. The displayed example is 09:00. |
| Add time | Add another time for the recurring schedule. |
| Stops on (optional) | Specify an end date for the recurring schedule. The displayed default is No end — runs until cancelled. |
| Show upcoming work orders ahead of time | Enable this checkbox to configure the display of upcoming recurring work orders ahead of time. |
Steps:
- Open the Activation dropdown and select Recurring.
- Choose the required frequency under Repeat.
- Set the required time under Time(s) of day.
- Click Add time if additional times are required.
- Set Stops on (optional) if the recurring schedule should end on a specific date.
- Keep No end — runs until cancelled if no end date is required.
- Enable Show upcoming work orders ahead of time if needed.
- Complete the remaining work order details and click Create work order.
3.3 Location & Asset
Use this section to associate the work order with the appropriate site, location, and asset.
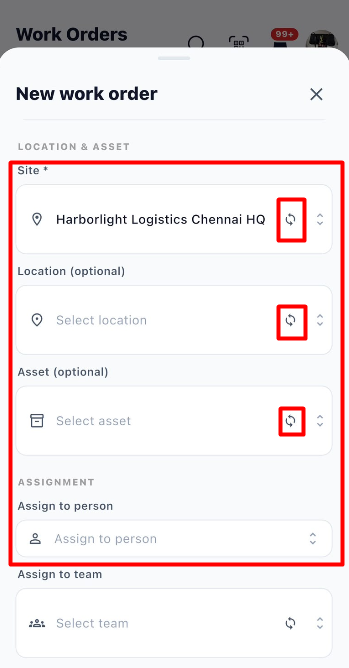
| Field | Description |
|---|---|
| Site * | Select the site where the work will take place. |
| Location (optional) | Select a location associated with the selected site. |
| Asset (optional) | Select the asset associated with the work order. |
Steps:
1. Select a Site
- Click the Site field.
- A pop-up appears displaying the available sites.
- Select the required site.
- If the expected site is not displayed, click the Refresh icon to reload the site list.
2. Select a Location
- After selecting a site, click the Location field.
- The available locations associated with the selected site will be displayed.
- Select the required location.
- If the expected location is not displayed, click the Refresh icon to reload the location list.
- If no location is required, leave this optional field unselected.
3. Select an Asset
- Click the Asset field.
- Select the relevant asset if the work order is associated with specific equipment.
- If the expected asset is not displayed, click the Refresh icon to reload the asset list.
Note: Select the site before selecting a location, as the available locations depend on the selected site.
3.4 Assignment
Assign responsibility for completing the work order.
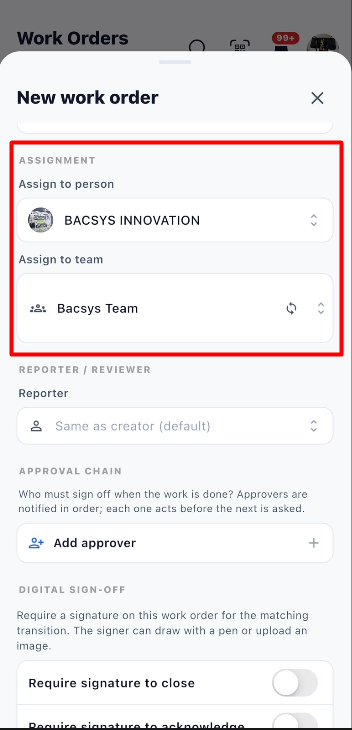
| Field | Description |
|---|---|
| Assign to person | Select the person responsible for the work order. |
| Assign to team | Select the team responsible for the work order. |
Steps:
- Select a person in Assign to person, if required.
- Select a team in Assign to team, if required.
- Verify the assignment details before creating the work order.
3.5 Reporter / Reviewer
Configure the reporter associated with the work order.
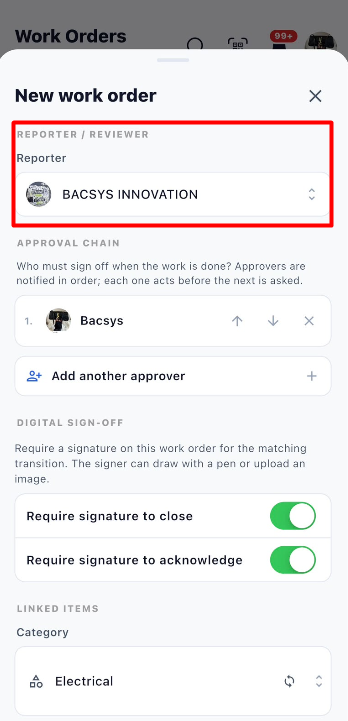
| Field | Description |
|---|---|
| Reporter | Select the reporter. The displayed default is Same as creator (default). |
Steps:
- Open the Reporter dropdown.
- Keep the default option or select another available reporter.
- Verify the selected reporter.
3.6 Approval Chain
Use the Approval Chain section to add approvers who must sign off when the work is completed.
Approvers are notified in order, and each approver must act before the next approver is asked.
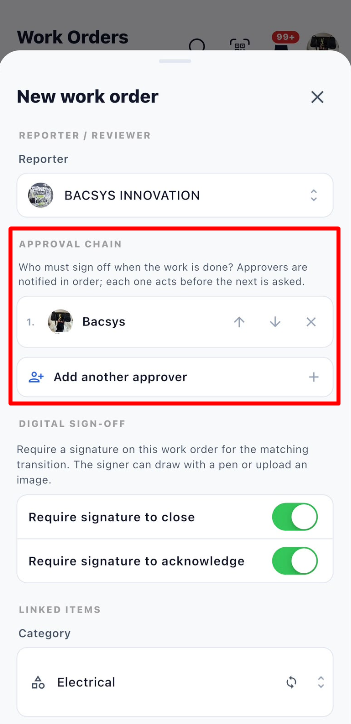
Steps:
- Navigate to Approval Chain.
- Click Add approver.
- Select or configure the available approver details.
- Add further approvers if required.
- Verify the approval sequence.
3.7 Digital Sign-off
Configure whether a signature is required for specific work order transitions.
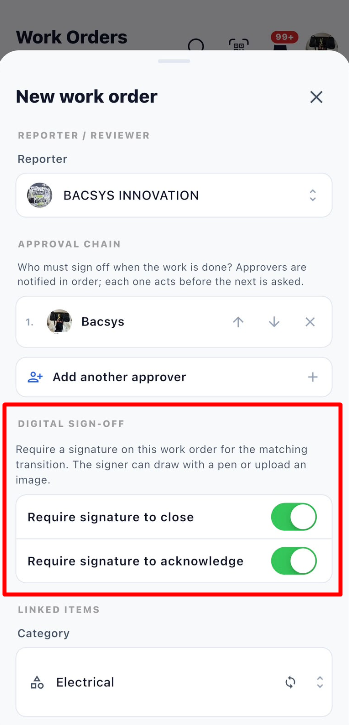
| Option | Description |
|---|---|
| Require signature to close | Enable this option if a signature is required to close the work order. |
| Require signature to acknowledge | Enable this option if a signature is required to acknowledge the work order. |
The signer can draw a signature or upload a signature image.
Steps:
- Navigate to Digital Sign-off.
- Enable Require signature to close if needed.
- Enable Require signature to acknowledge if needed.
- Verify the selected options.
3.8 Linked Items
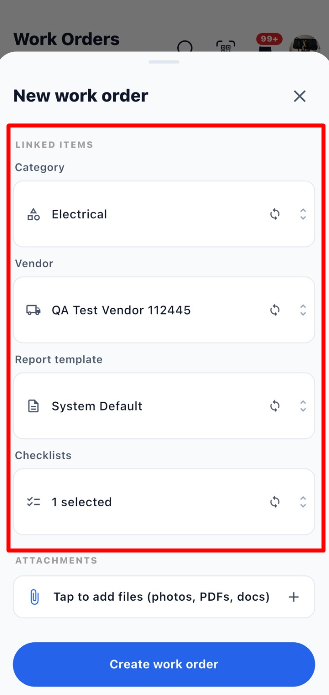
The Linked Items section allows users to associate additional information and resources with the work order.
| Field | Description |
|---|---|
| Category | Select the applicable category. |
| Vendor | Select the vendor associated with the work order. |
| Report template | Select a report template. The displayed default is Use org default. |
| Checklists | Select the checklist or checklists to be associated with the work order. |
Steps:
- Select a Category, if applicable.
- Select a Vendor, if required.
- Choose a Report template or keep Use org default.
- Select the required Checklists.
- Verify the linked items.
3.9 Attachments
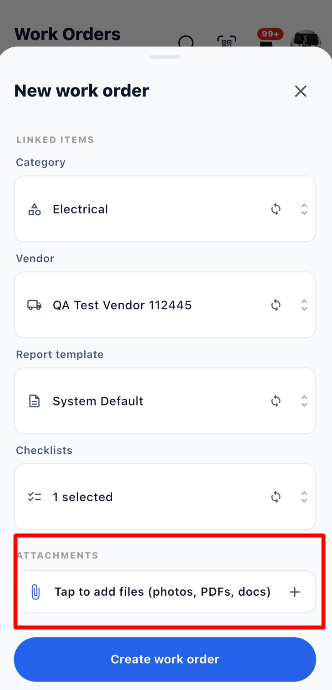
Attach supporting documents or files related to the work order.
Steps:
- Navigate to Attachments.
- Click Tap to add files (photos, PDFs, docs).
- Select the required files from the available file picker.
- Verify that the intended attachments have been added.
4. Create the Work Order
After completing the required fields and reviewing the optional settings:
- Verify the title and other required details.
- Confirm the selected site.
- Review the priority, work type, schedule, and assignment.
- Check any configured approvals, digital sign-off settings, linked items, and attachments.
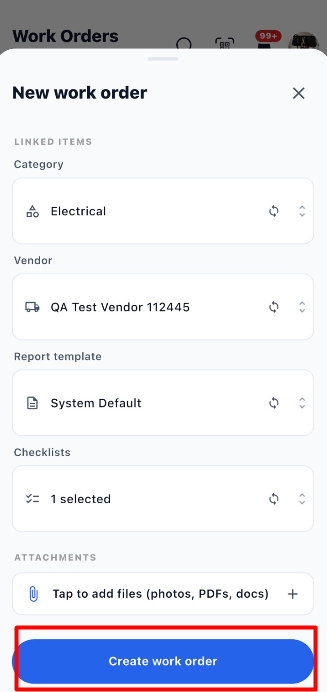
- Click Create work order at the bottom of the form.
- The work order is submitted for creation.
- Return to the Work Orders list and locate the new record under the appropriate filter.
5. View and Start a Work Order
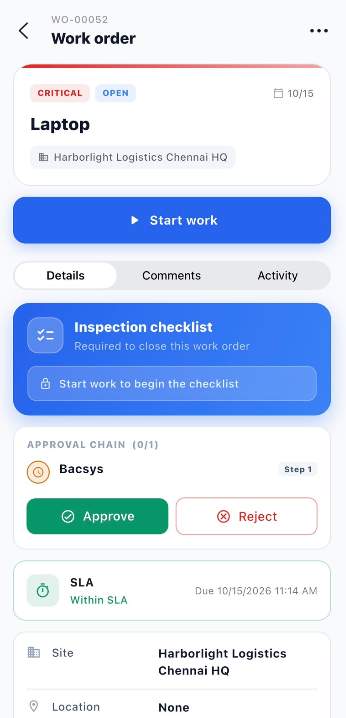
After creation, the work order appears in the Work Orders list. Select All to find the new record, then open it to review the information and begin the work when ready.
| Step | Action | Description |
|---|---|---|
| 1 | Open Work Orders | Navigate to the Work Orders module. |
| 2 | Select All | View the available work orders, including the newly created work order. |
| 3 | Open a work order | Click the required work order to view its details. |
| 4 | Review details | View the priority, status, site, location, asset, due date, work type, and assignment. |
| 5 | Click Start work | Start working on the selected work order. |
| 6 | Check the status | The work order moves to the In Progress section. |
6. Work Order Details and Options
Click the three-dot menu (⋯) at the top-right corner of the work order details page to access the available actions.
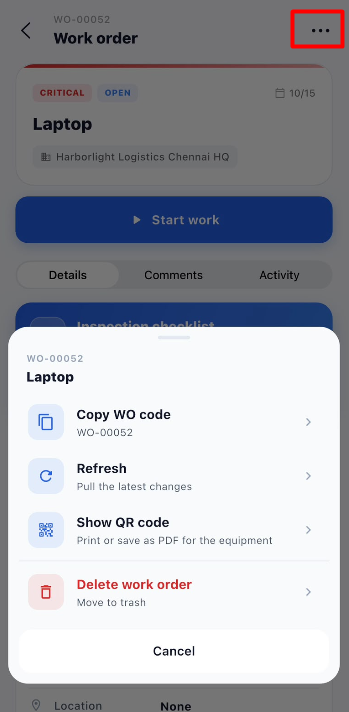
| Option | Description |
|---|---|
| Copy WO code | Copy the work order's unique code. |
| Refresh | Pull the latest changes for the work order. |
| Show QR code | Display the work order's QR code, which can be printed or saved as a PDF. |
| Delete work order | Move the work order to the trash. |
| Cancel | Close the menu without selecting an action. |
7. Start Work and Complete the Checklist
Open the required work order and click Start work to begin the maintenance activity. The status changes from Open to In Progress. The technician can then open the associated checklist, answer the required questions, add supporting information, and submit the completed checklist.
7.1 Start Work
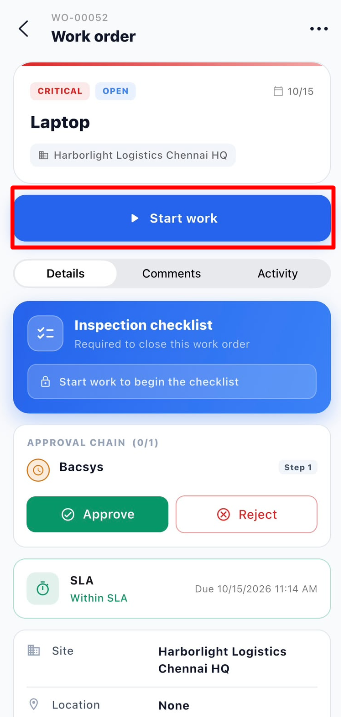
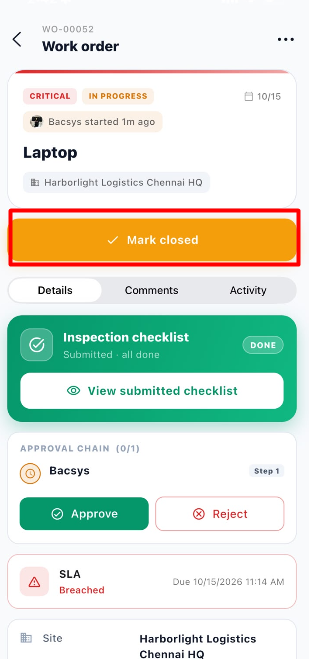
| Step | Action | Description |
|---|---|---|
| 1 | Open the work order | Select the required work order from the Work Orders list. |
| 2 | Review the details | Check the priority, site, due date, assignment, and other work order information. |
| 3 | Click Start work | Start the work order. |
| 4 | Check the status | The work order status changes to In Progress. |
| 5 | Open the inspection checklist | Review the checklist associated with the work order. |
7.2 Complete the Inspection Checklist
The Inspection checklist section displays the checklist required to close the work order. After starting the work, open the checklist and answer the required questions.
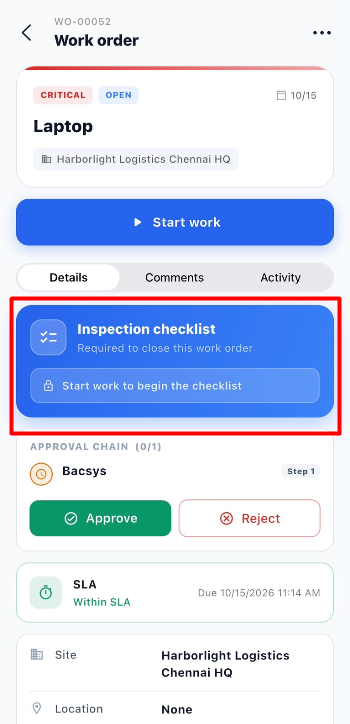
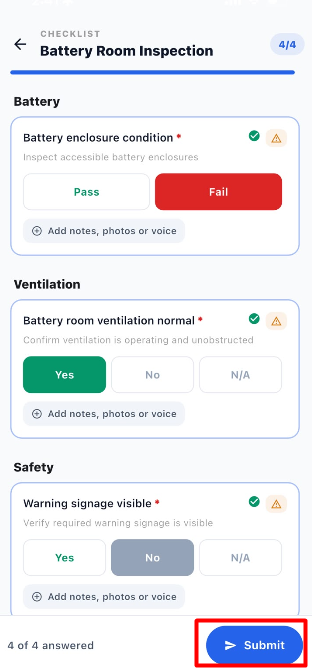
| Option | Description |
|---|---|
| Checklist questions | Answer the questions displayed under each section, such as Battery, Ventilation, and Safety. |
| Pass / Fail | Select the appropriate result for inspection questions that provide these options. |
| Yes / No / N/A | Select the applicable response for questions that provide these options. |
| Add notes, photos or voice | Add supporting notes, photographs, or voice information when required. |
| Progress indicator | Displays the number of questions answered, such as 4/4. |
| Submit | Submit the completed checklist. |
Steps:
- Open the inspection checklist.
- Review each checklist section.
- Answer all required questions.
- Select the appropriate response for each question.
- Add notes, photos, or voice information if needed.
- Verify that all required questions have been answered.
- Click Submit to submit the checklist.
- After submission, the checklist displays its completion status, such as Submitted · all done.
7.3 Approval Signature
When an approval requires a signature, the Sign to approve page appears.
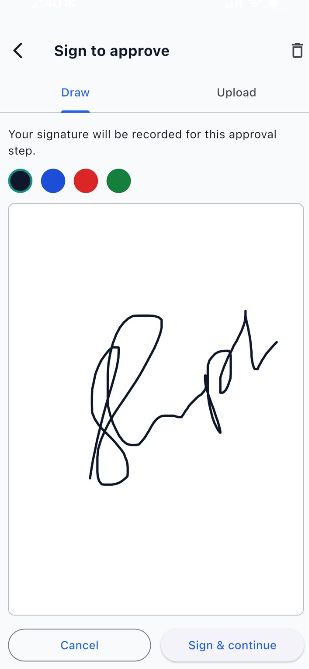
| Option | Description |
|---|---|
| Draw | Draw the signature directly on the signature area. |
| Upload | Upload a signature image. |
| Signature colour | Select an available colour for the signature. |
| Clear signature | Use the delete icon to clear the current signature, if needed. |
| Cancel | Cancel the signature action. |
| Sign & continue | Submit the signature and continue with the approval process. |
Steps:
- Open the approval signature page.
- Select Draw to sign on the screen or Upload to provide a signature image.
- If drawing, select a signature colour and draw in the signature area.
- Review the signature.
- Click Sign & continue to proceed with the approval.
7.4 Approve or Reject the Work Order
The work order details page displays the Approval Chain when approval is configured.
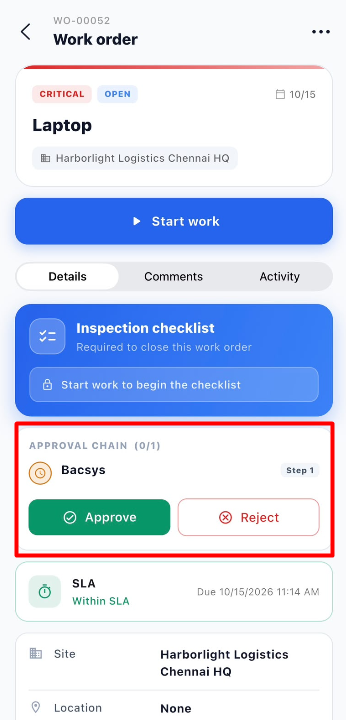
| Option | Description |
|---|---|
| Approve | Approve the work order at the current approval step. |
| Reject | Reject the work order at the current approval step. |
| Approval Chain | Displays the approver and approval step information. |
Steps:
- Open the work order details.
- Navigate to the Approval Chain section.
- Review the approver and current approval step.
- Click Approve or Reject, as appropriate.
- If a signature is required, complete the signature process to continue.
7.5 Mark the Work Order Closed
After the work and required checklist are complete, use Mark closed when the work order is ready to be closed. Any configured approval or signature requirements may also need to be completed.
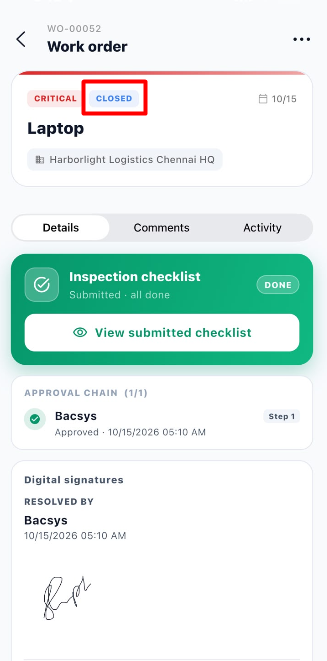
| Step | Action | Description |
|---|---|---|
| 1 | Complete the work | Finish the maintenance activity and required checklist. |
| 2 | Submit the checklist | Ensure the checklist is submitted. |
| 3 | Complete approval | Follow the configured approval process, if applicable. |
| 4 | Click Mark closed | Close the work order when the required conditions are met. |
| 5 | Verify the status | Check the work order's updated status. |
8. Work Order Details, Comments, and Activity
After opening a work order, users can access three tabs: Details, Comments, and Activity. Each tab provides different information about the work order.
8.1 Details
The Details tab displays the work order information, checklist status, approval details, and digital signatures.
| Section | Description |
|---|---|
| Work Order Information | Displays the work order code, priority, status, title, site, and due date. |
| Inspection checklist | Displays the checklist submission status. When completed, it shows Submitted · all done and a View submitted checklist button. |
| Approval Chain | Displays the approver, approval step, approval status, and approval date and time. |
| Digital signatures | Displays the signature associated with the work order, including the person who resolved it and the date and time. |
| Site | Displays the site associated with the work order. |
| Location | Displays the selected location, or None if no location is assigned. |
| Asset | Displays the associated asset, or None if no asset is assigned. |
| Due | Displays the work order's due date. |
| Type | Displays the work order type, such as Reactive. |
| Assigned to | Displays the person assigned to the work order. |
| Team | Displays the assigned team. |
| Reporter | Displays the work order reporter. |
| Parts & materials | Allows users to add parts and materials used during the work order. |
Steps to view work order details:
- Open the required work order.
- Select the Details tab.
- Review the work order information and current status.
- Check the inspection checklist submission status.
- Review the Approval Chain and digital signatures.
- Scroll down to view the site, location, asset, assignment, reporter, and parts and materials information.
- Click View submitted checklist to review the submitted checklist.
8.2 Comments
The Comments tab allows users to view and add comments related to the work order.
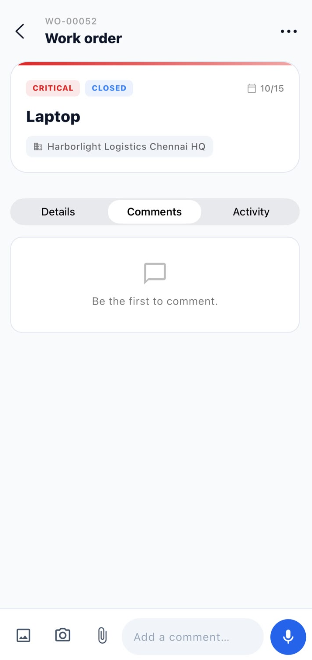
When no comments have been added, the page displays Be the first to comment.
| Option | Description |
|---|---|
| Image | Attach an image to the comment. |
| Camera | Capture a photo using the camera. |
| Attachment | Attach a file. |
| Add a comment | Enter the comment text in the comment field. |
| Microphone | Record or provide voice input for a comment. |
Steps to add a comment:
- Open the required work order.
- Select the Comments tab.
- Enter the comment in the Add a comment... field.
- Attach an image, capture a photo, or add a file if needed.
- Use the microphone option if voice input is required.
- Use the available send or submit control to post the comment.
8.3 Activity
The Activity tab displays the work order's recorded activities and updates.
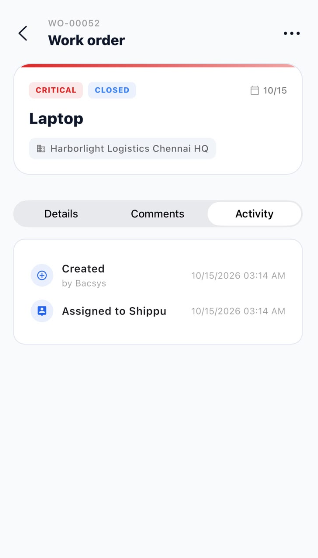
For example, the screenshot shows the following entries:
| Activity | Description |
|---|---|
| Created | Indicates that the work order was created. |
| Assigned to Shippu | Indicates that the work order was assigned to Shippu. |
Each activity entry displays the activity description, the associated user where available, and the date and time.
Steps to view activity:
- Open the required work order.
- Select the Activity tab.
- Review the listed activities.
- Check the user and timestamp associated with each activity, where displayed.
8.4 Difference Between Details, Comments, and Activity
| Tab | Purpose |
|---|---|
| Details | View work order information, checklist status, approvals, signatures, assignment, and related resources. |
| Comments | View and add comments, images, and attachments related to the work order. |
| Activity | Review recorded work order events, such as creation and assignment. |
9. Work Order Filters and Status Categories
The Work Orders page includes quick filters that help users display work orders by assignment, due date, schedule, or status. Select a filter to update the list to the matching work orders.
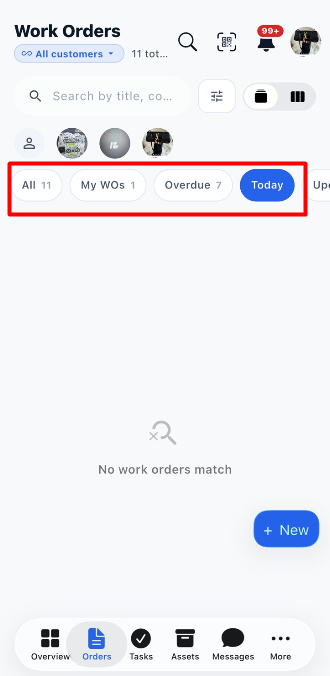
| Filter | Description |
|---|---|
| All | Displays all work orders available to the user. |
| My WOs | Displays work orders assigned to the current user. |
| Overdue | Displays work orders that have passed their due date and are overdue. |
| Today | Displays work orders scheduled for today. |
| Upcoming | Displays work orders scheduled for a future date. |
| Open | Displays work orders that are open and have not yet been started. |
| In Progress | Displays work orders that are currently being worked on. |
| Closed | Displays work orders that have been closed. |
| Resolved | Displays work orders marked as resolved. |
| Active Only | Filters the list to show active work orders only. |
Steps to filter work orders:
- Open the Work Orders module.
- Select the required filter, such as All, My WOs, Overdue, or Today.
- Review the work orders displayed for the selected filter.
- Select a work order to open its details.
- Use another filter whenever you need to view a different group of work orders.
10. Search Work Orders
Use Search when you know the work order title or have relevant text to look for. The search field is displayed near the top of the Work Orders page.
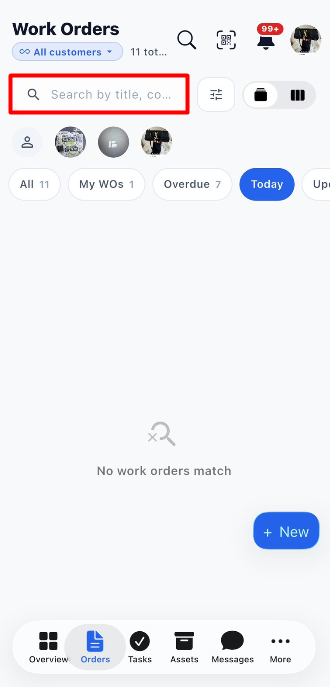
Steps to Search Work Orders:
- Navigate to the Work Orders module.
- Click the Search field at the top of the page.
- Enter the work order title or relevant search text.
- Review the matching work orders displayed in the list.
- Select the required work order to view its details.
Note: The search field displays the placeholder text Search by title, co... in the provided screenshot.
11. Apply Filters to Work Orders
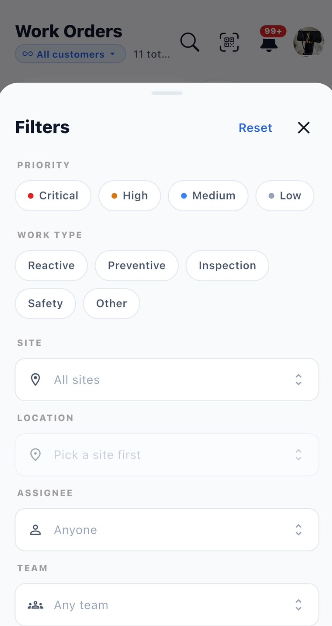
Use the Filter icon to open the Filters panel. Choose one or more criteria to narrow the work order list, then select a sort order to arrange the matching results.
Available Filter Options
| Filter | Description |
|---|---|
| Priority | Filter work orders by Critical, High, Medium, or Low priority. |
| Work Type | Filter by Reactive, Preventive, Inspection, Safety, or Other. |
| Site | Select a specific site or choose All sites. |
| Location | Select a location associated with the selected site. |
| Assignee | Select a specific person or choose Anyone. |
| Team | Select a specific team or choose Any team. |
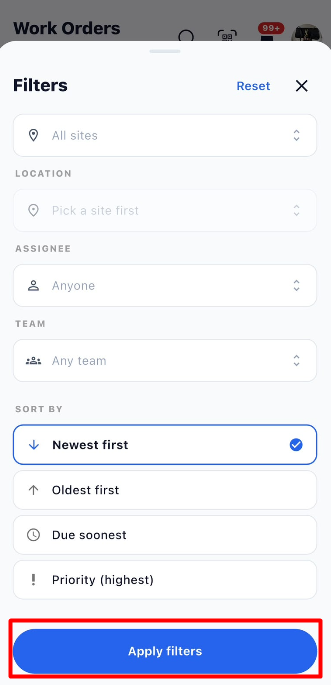
Sort By Options
| Option | Description |
|---|---|
| Newest first | Displays the newest work orders first. |
| Oldest first | Displays the oldest work orders first. |
| Due soonest | Sorts work orders by the nearest due date. |
| Priority (highest) | Displays higher-priority work orders first. |
Steps to Apply Filters
- Navigate to the Work Orders module.
- Click the Filter icon near the search field.
- Select the required priority and work type.
- Choose a site and, if required, a location.
- Select an assignee and team, if applicable.
- Choose the required sorting option under Sort By.
- Click Apply filters to apply the selected filters and update the work order list.
- Click Reset to clear the filter selections and start again, if needed.
- Click the X icon to close the Filters panel.
Note: The Location field displays Pick a site first until a site is selected.
12. Work Order View Options
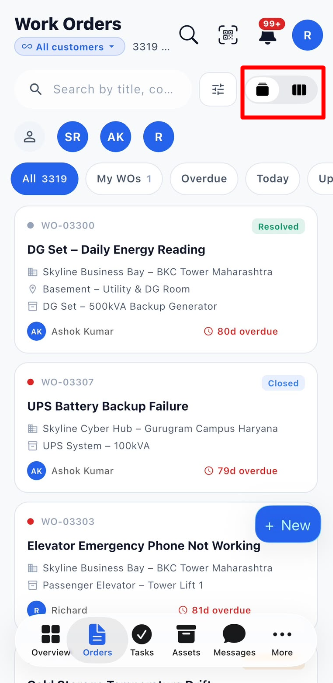
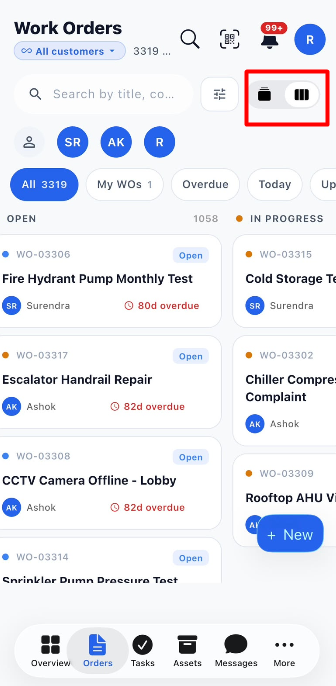
The two icons highlighted in the screenshot are the Work Order View options. They change the layout used to display the work order list; they do not change the work order data.
| Option | Description |
|---|---|
| Card View (left icon) | Displays work orders as individual cards with details such as work order code, title, status, site, location, assignee, and overdue information. |
| List View (right icon) | Displays work orders in a compact list layout, making it easier to view multiple work orders in a structured format. |
Steps to change the view:
- Navigate to the Work Orders module.
- Locate the two view icons beside the Filter icon.
- Click the left icon to display work orders in Card View.
- Click the right icon to switch to List View.
Note: These icons change the display layout of the work orders; they do not create, delete, or modify work orders.
13. End-to-End Work Order Workflow
Open the Work Orders module
             ↓
Click + New
             ↓
Select Work Order
             ↓
Enter general details and choose priority and work type
             ↓
Choose activation: Create now, Schedule for date/time, or Recurring
             ↓
Select the required site, location, and asset
             ↓
Assign a person or team and configure reporter and approvals if needed
             ↓
Configure digital sign-off, linked items, and attachments if needed
             ↓
Click Create work order
             ↓
Find and open the work order from the list
             ↓
Click Start work
             ↓
Complete and submit the inspection checklist
             ↓
Complete required approvals and signatures
             ↓
Click Mark closed when the work is complete
Important Notes
- Fields marked with an asterisk (*) are required.
- Site is required; Location and Asset are optional in the displayed form.
- Use Refresh beside Site, Location, or Asset if the expected options do not appear.
- Review the work order details before selecting Create work order.
- Follow any configured checklist, approval, or digital-signature requirements before closing a work order.