

Workflows
The Workflow Module is primarily used to automate business processes within an organization or building. It simplifies operations by eliminating manual tasks through configurable action blocks. These action blocks can be used to generate alarms, perform data backups etc.
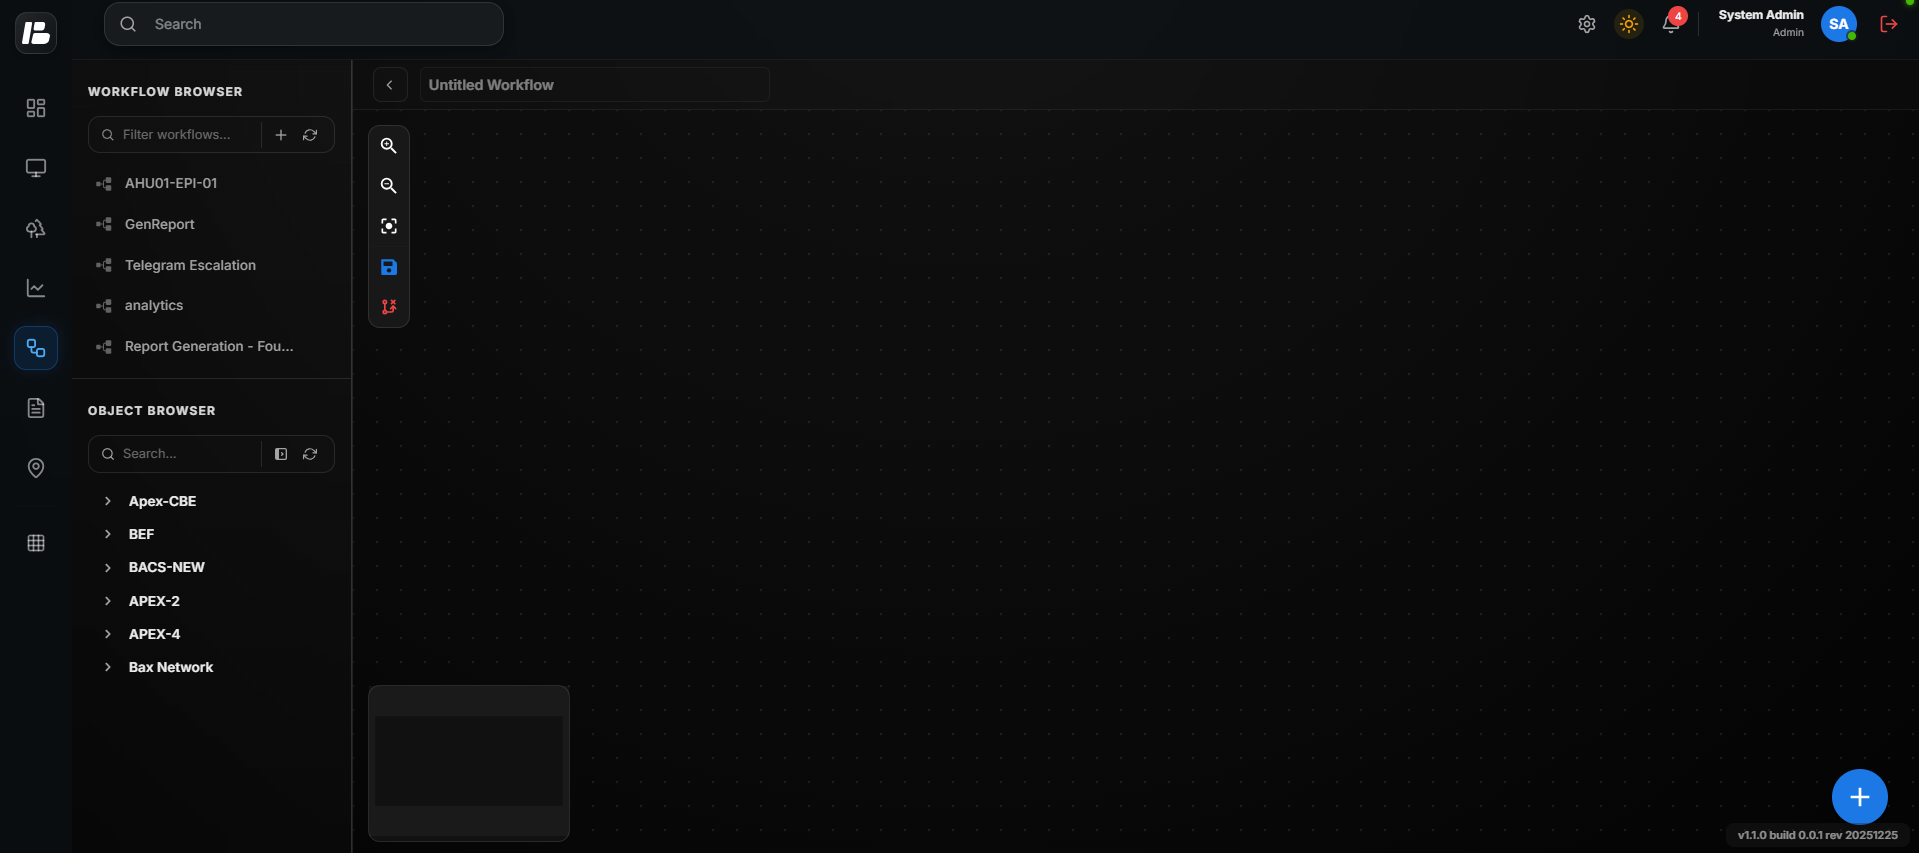 WorkFlow
Accessing the Workflows Module
- Click on the Workflows icon on the main menu.
- Click on (>) button to Expand or (<) button to collapse the browser menu.
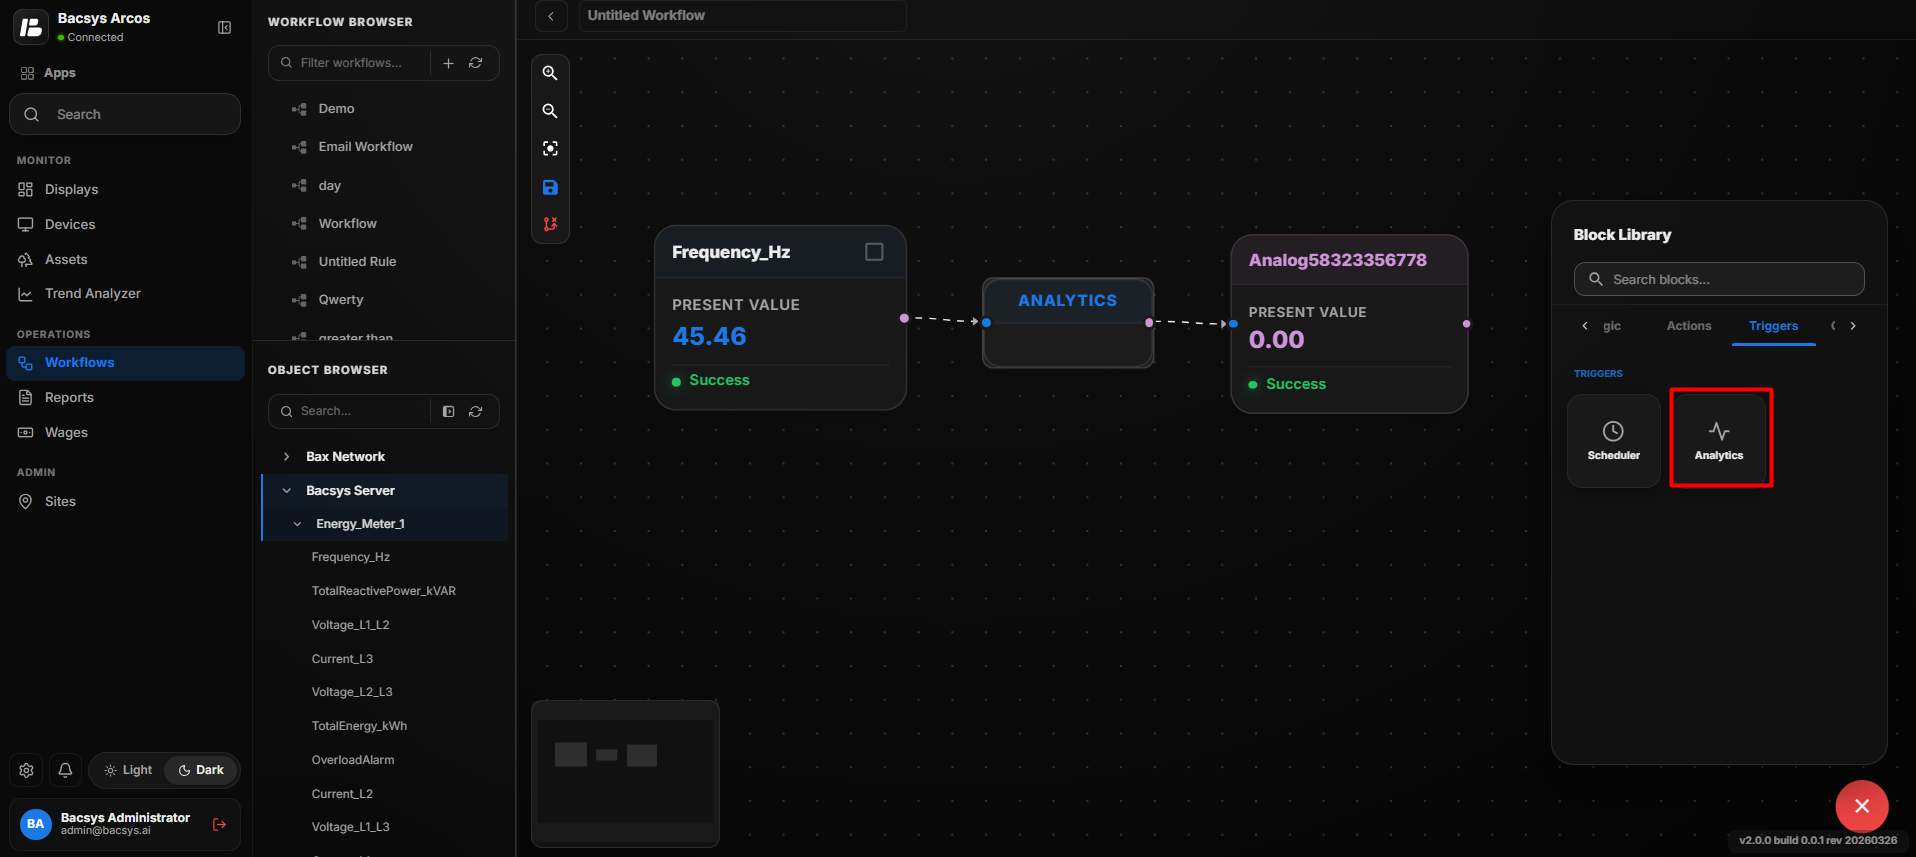
- The browser menu lists all the configured Workflows.
Creating a Workflow
1. Start a New Workflow
Click the Create New Rule button located in the Workflow browser pane.
2. Name the Workflow
Enter a name for the workflow in the Name field at the top-left corner of the canvas.
3. Add Device Points
From the Device browser pane:
- Drag and drop the desired device points onto the canvas.
- Use the Search Points bar to quickly find specific points.
- Click Expand All or Collapse to manage device/network visibility.
- Click the Refresh button to reload the list of available data points.
4. Add Action Blocks
From the Blocks pane on the right side, drag and drop the required action blocks onto the canvas.
5. Connect Blocks
Create logical connections between the device points and blocks to define the workflow behavior.
6. Save the Workflow
Click the Save icon to save your configured workflow.
Math Block
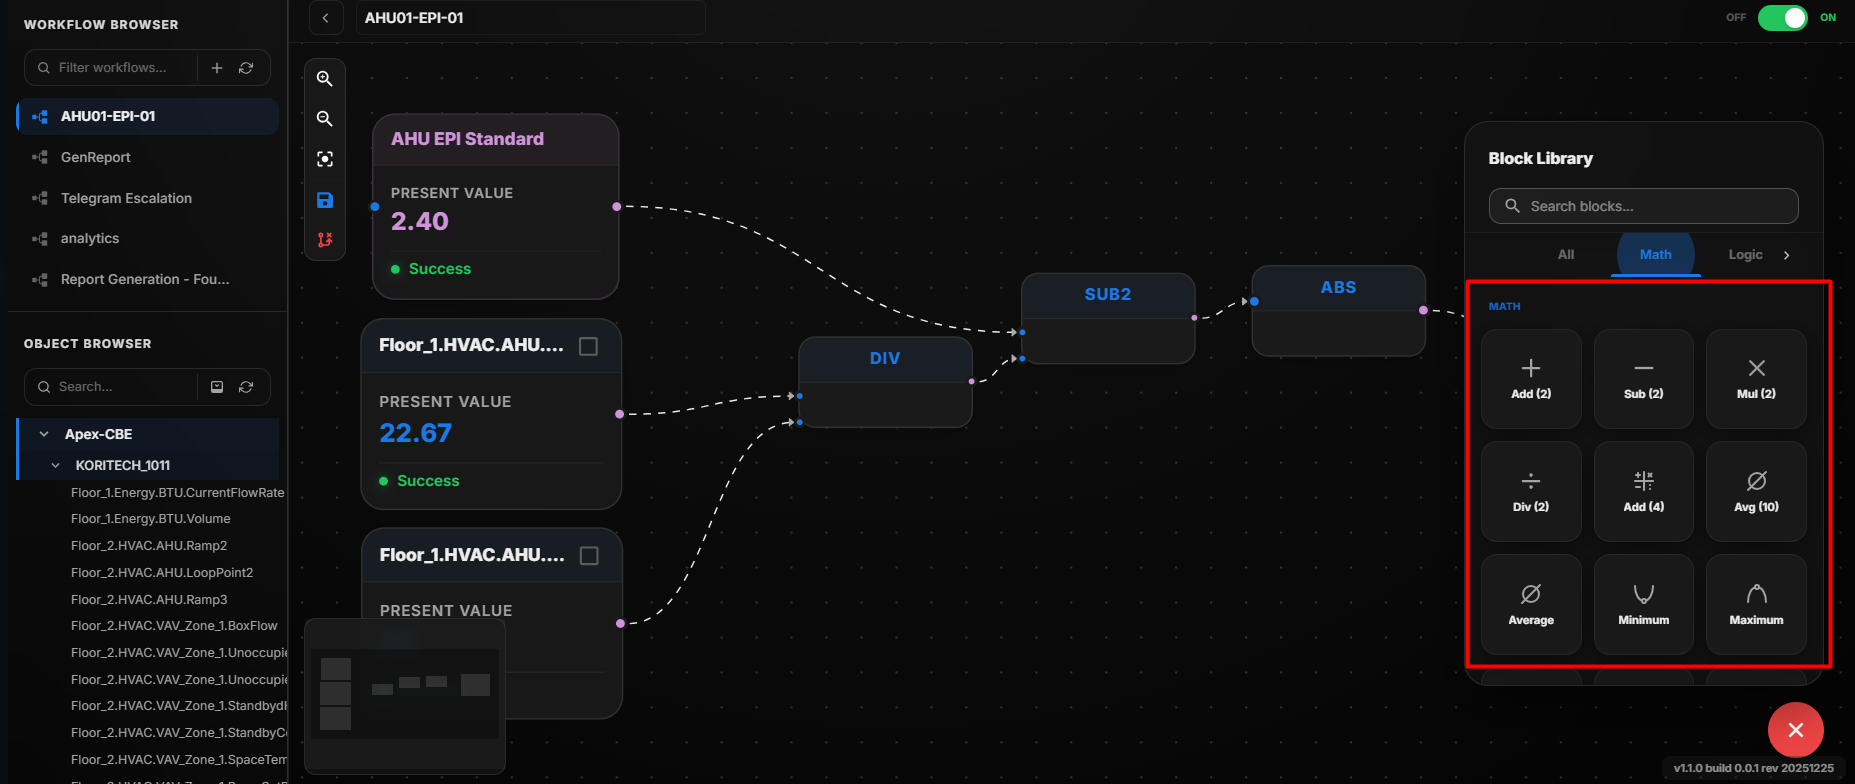 Math Block
| Function | Description |
|---|---|
| Add(2) | Adds two input values and returns the sum. |
| Sub(2) | Subtracts the second input value from the first input value. |
| Mul(2) | Multiplies two input values and returns the result. |
| Div(2) | Divides the first input value by the second input value. |
| Add(4) | Adds four input values and returns the total sum. |
| Avg(10) | Calculates the average of up to ten input values. |
| Average | Calculates the average value of all selected inputs. |
| Minimum | Returns the lowest value among the selected inputs. |
| Maximum | Returns the highest value among the selected inputs. |
| Mul(4) | Multiplies four input values and returns the result. |
| Sub(4) | Sequentially subtracts the remaining three input values from the first input value. |
| Absolute | Returns the absolute (positive) value of the input, regardless of its sign. |
| Percent | Calculates the percentage value based on the configured input values. |
Logic Block
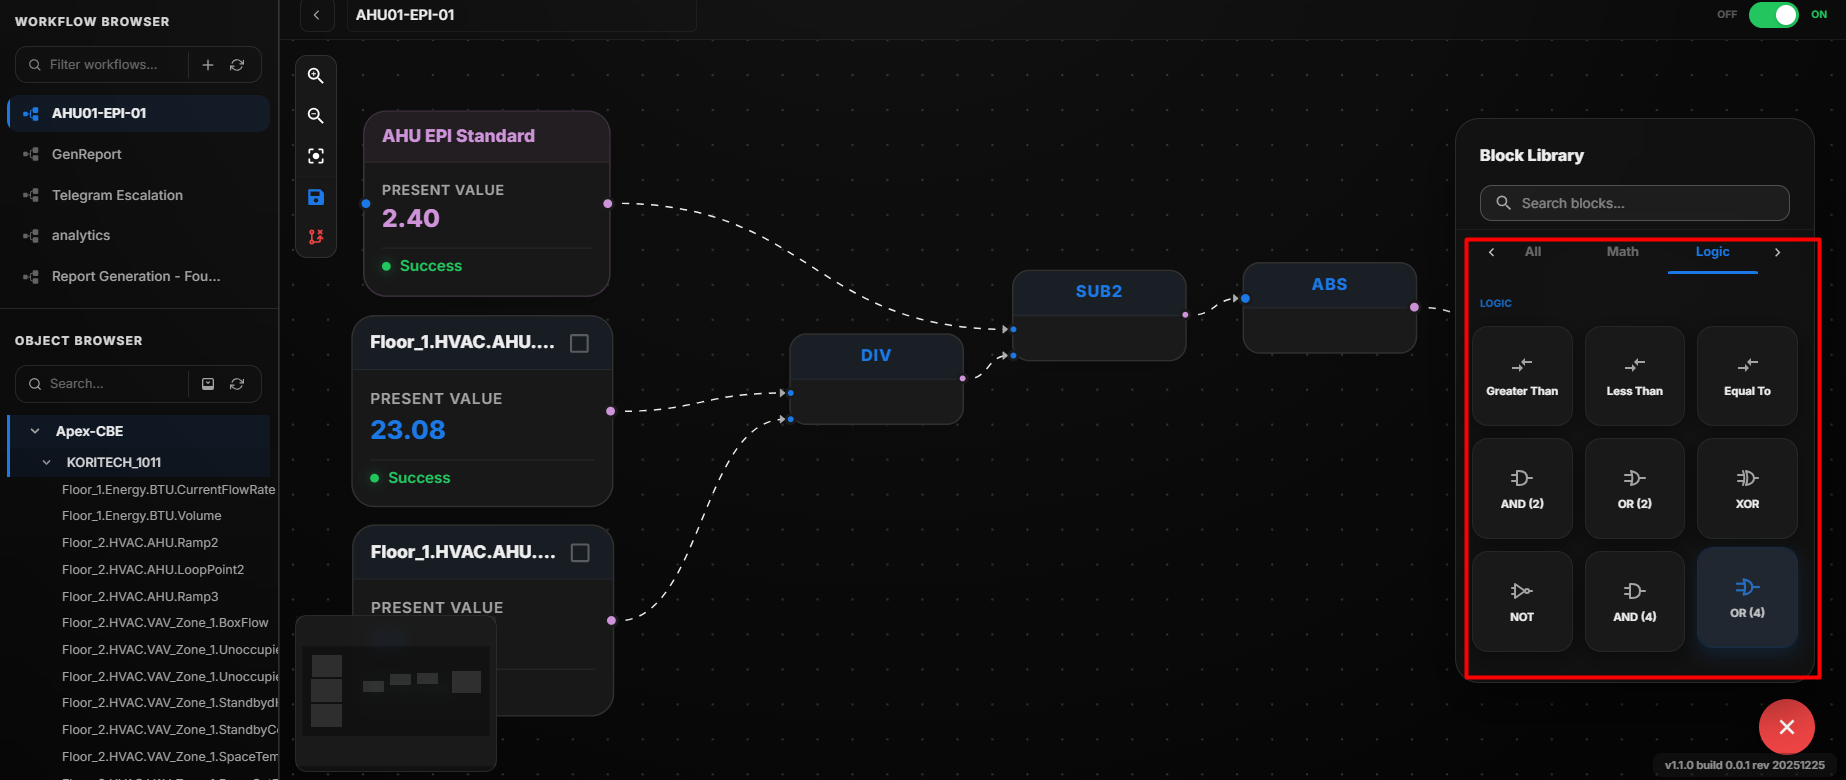 Logic Block
| Function | Description |
|---|---|
| GreaterThan | Returns true when the first input value is greater than the second input value. |
| LessThan | Returns true when the first input value is less than the second input value. |
| EqualTo | Returns true when both input values are equal. |
| And(2) | Returns true only when both input conditions are true. |
| Or(2) | Returns true when at least one of the two input conditions is true. |
| Xor | Returns true when only one of the input conditions is true. |
| Not | Reverses the input condition. A true condition becomes false, and a false condition becomes true. |
| And(4) | Returns true only when all four input conditions are true. |
| Or(4) | Returns true when at least one of the four input conditions is true. |
Action Block
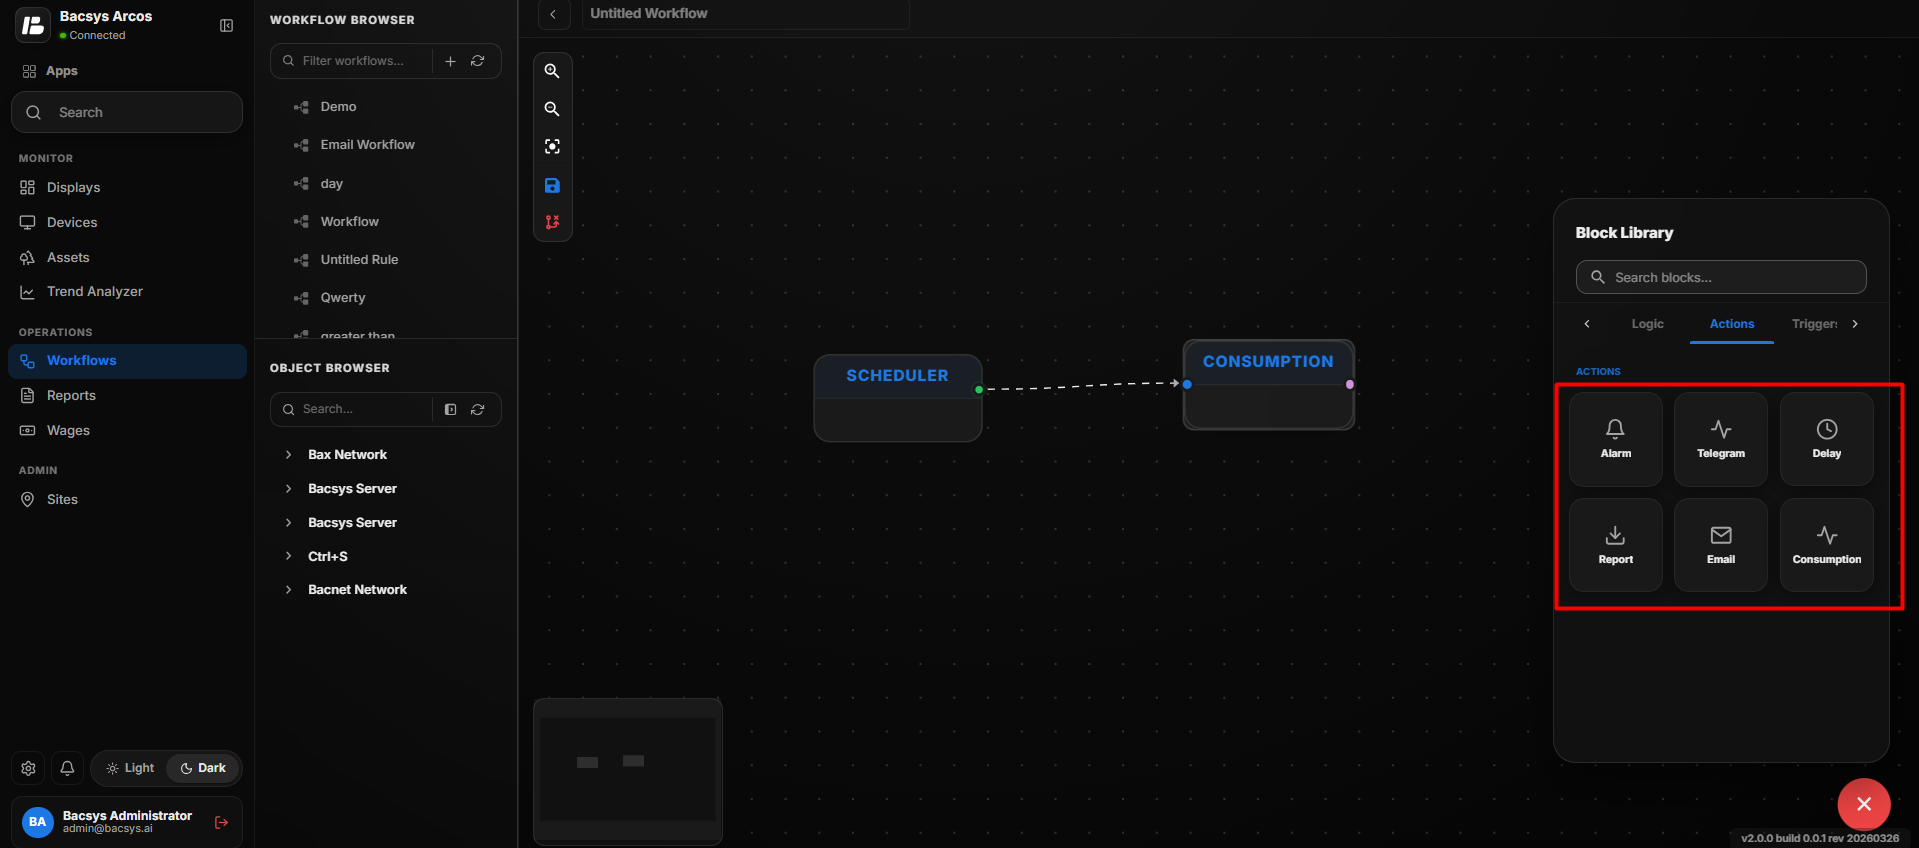 Action Block
| Function | Description |
|---|---|
| Alarm | Triggers an alarm notification based on the configured workflow conditions. |
| Telegram | Sends a message or alert through Telegram to the configured recipients. |
| Delay | Introduces a specified time delay before the next workflow block is executed. |
| Report | Generates a report using the configured data points and parameters. |
| Sends an email with the specified file(s) or report(s) attached. | |
| Consumption | Calculates and processes consumption-based data for reporting or analysis. |
Configure the Alarm Workflow
The Alarm workflow node is used to generate an alarm notification based on the configured workflow conditions.
Add and Configure the Alarm Node
- Open the required Workflow.
- Drag and drop the Generate Alarm node onto the workflow canvas.
- Connect the Generate Alarm node to the required workflow blocks.
- Double-click the Generate Alarm node to open the Alarm Configuration panel.
- Under Alarm Description, enter the required description for the alarm.
- Under Priority, select the required alarm priority:
- Critical
- Medium
- Low
- Review the configured alarm settings.
- Click Apply Changes to save the configuration.
- The configured settings are applied to the Generate Alarm node.
- Continue configuring the remaining workflow nodes as required.
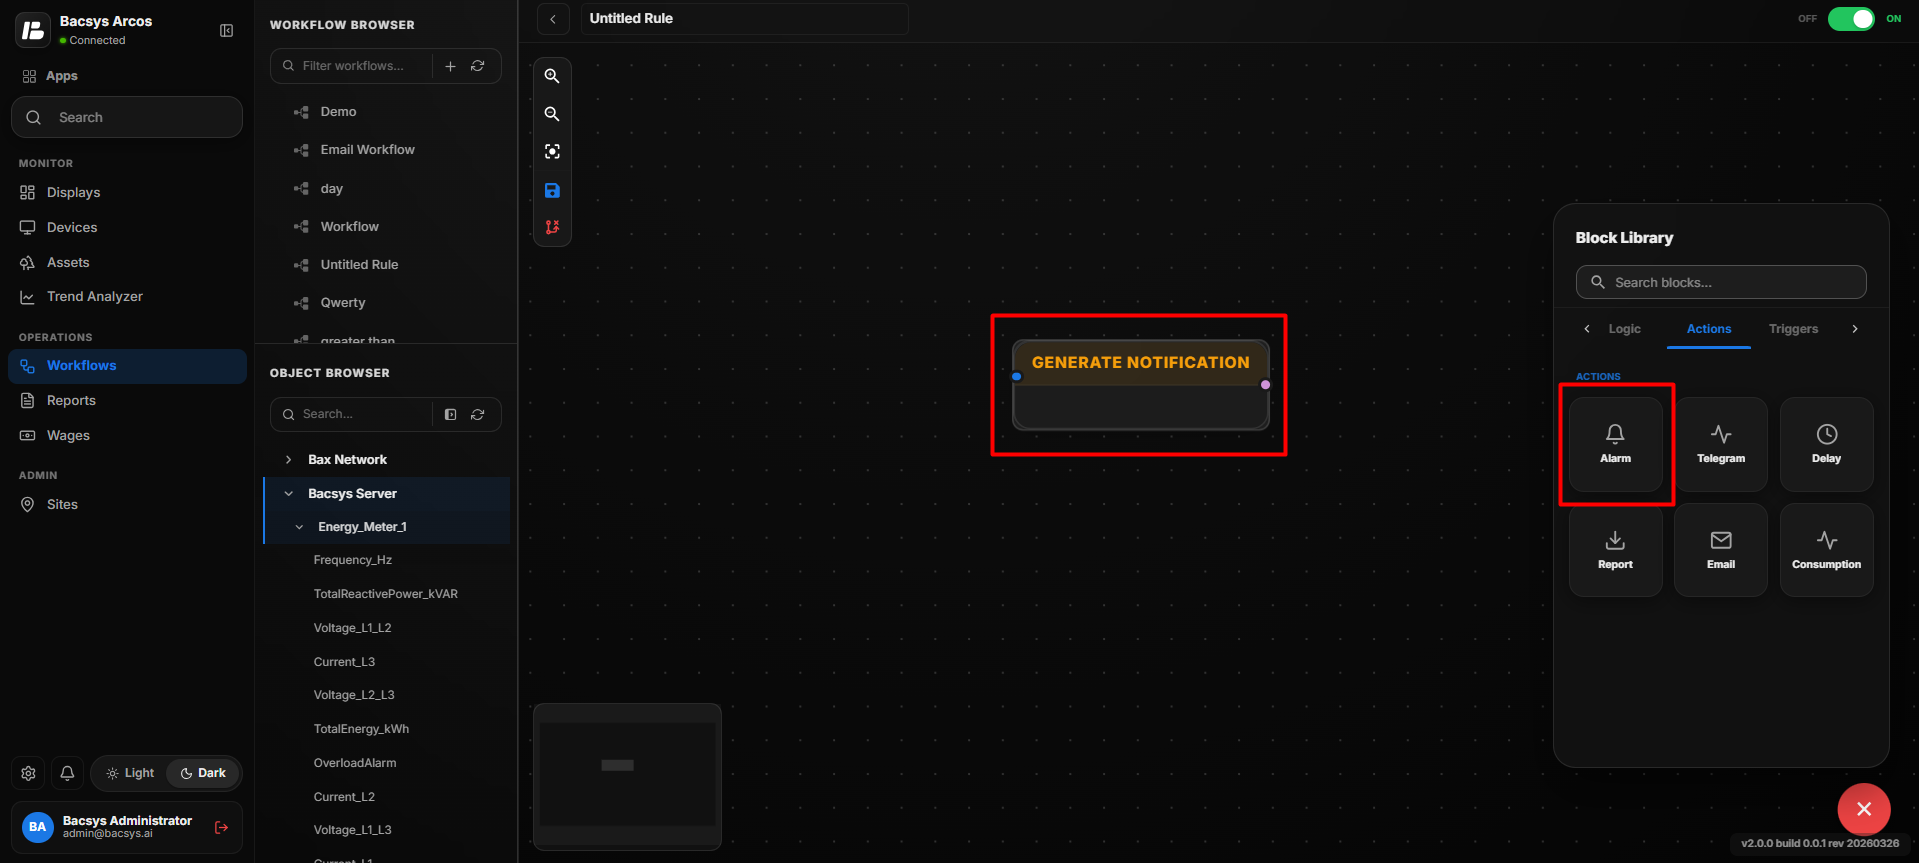 Alarm Configuration
- The Workflow canvas is displayed.
- Drag and drop the Generate Alarm node onto the canvas.
- Connect the Generate Alarm node to the required workflow blocks.
- Double-click the Generate Alarm node to open the Alarm Configuration panel.
Alarm Configuration Settings
| Option | Description |
|---|---|
| Alarm Description | Enter the description or message that identifies the alarm. |
| Priority | Select the priority level for the generated alarm. Available options are Critical, Medium, and Low. |
| Apply Changes | Saves and applies the configured alarm settings to the workflow node. |
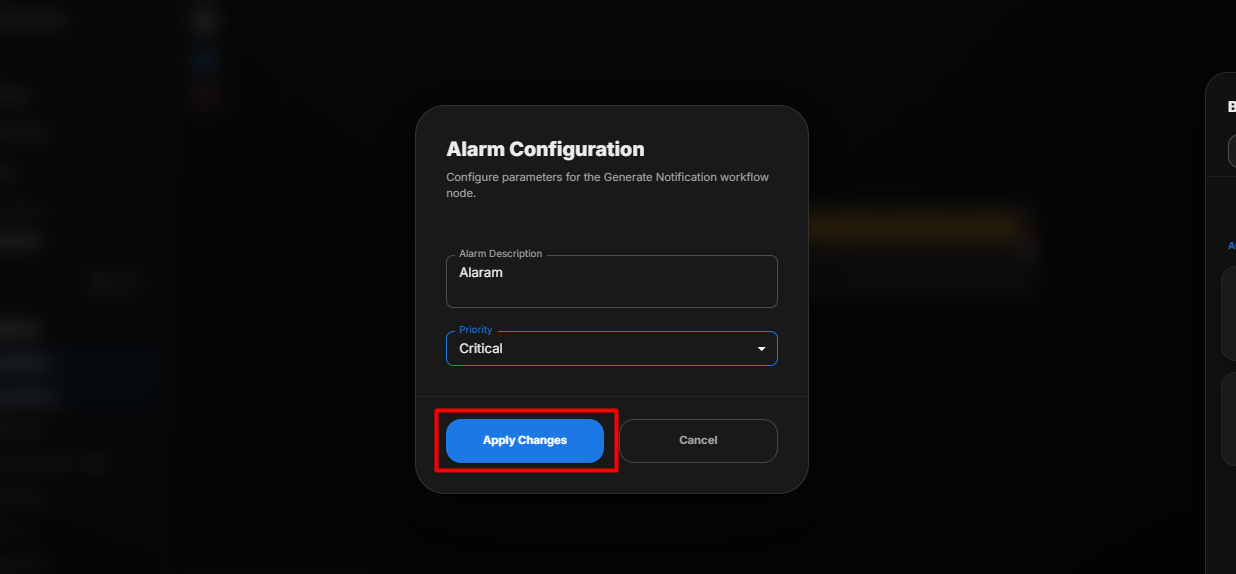 Alarm Configuration
Alarm Priority
| Priority | Description |
|---|---|
| Critical | Indicates a high-priority alarm that requires immediate attention. |
| Medium | Indicates an alarm with medium priority. |
| Low | Indicates an alarm with low priority. |
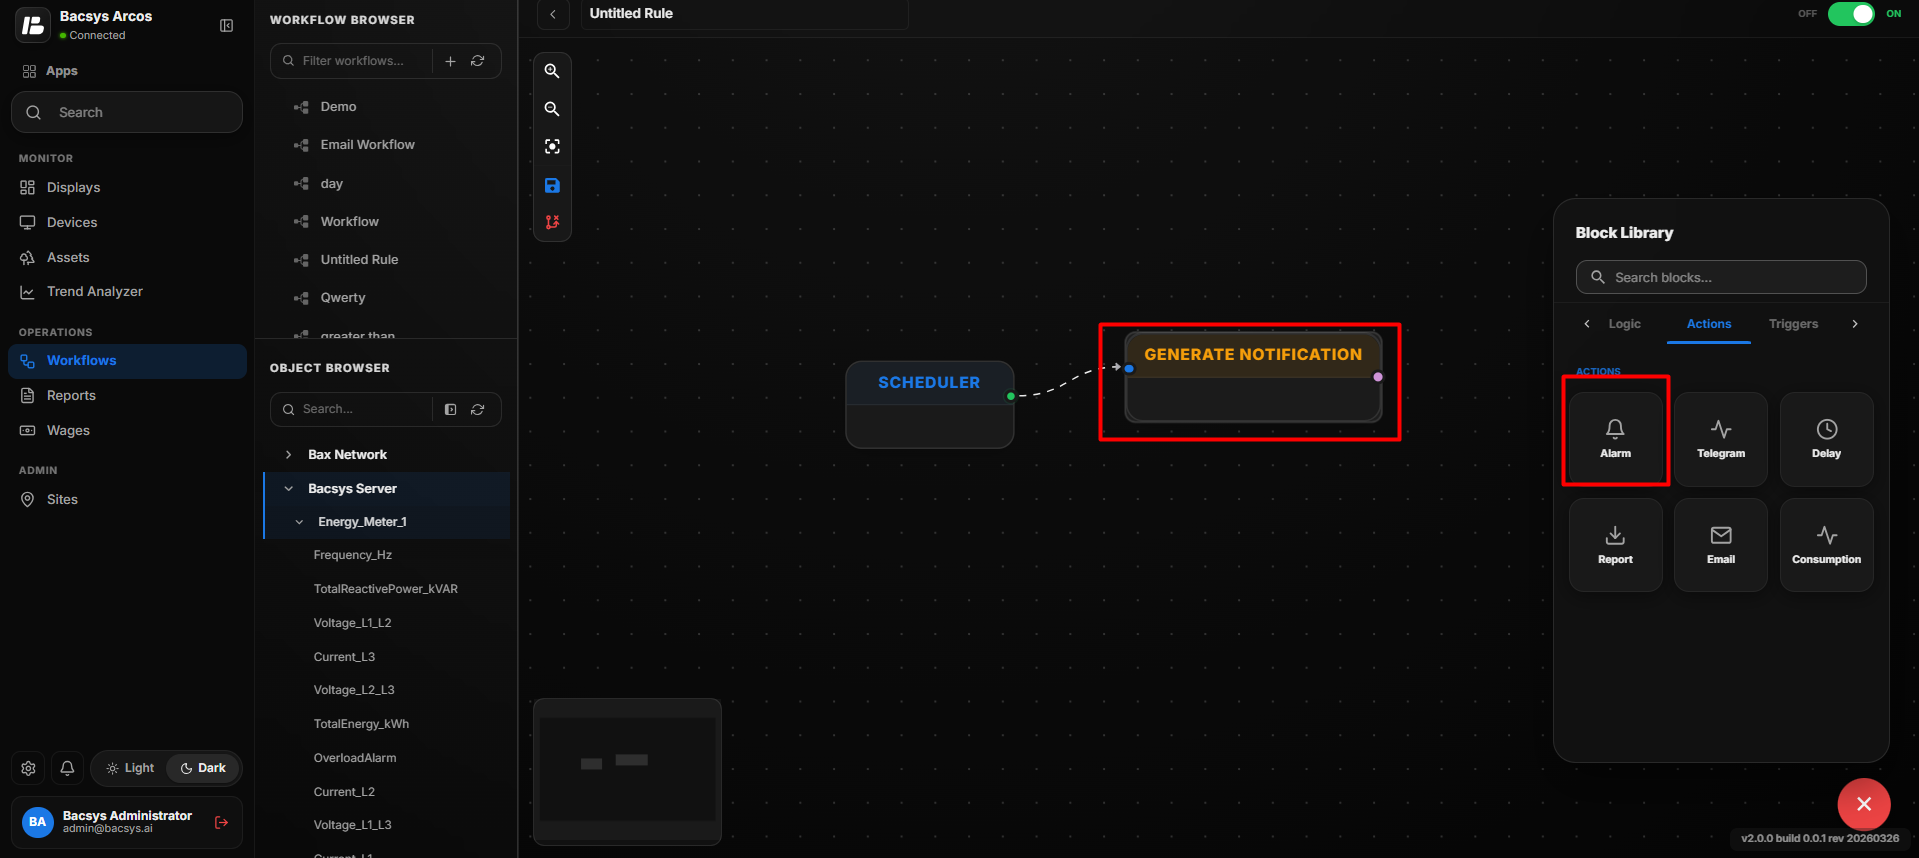 Alarm Priority
Apply the Alarm Configuration
After clicking Apply Changes, the configured Alarm Description and Priority are applied to the Generate Alarm node. The node can then be used as part of the workflow to generate the configured alarm when the workflow conditions are met.
Configure the Telegram Alerts Workflow
The Telegram Alerts workflow node is used to send notifications through Telegram when the configured workflow conditions are met.
Add and Configure the Telegram Alerts Node
- Open the required Workflow.
- Drag and drop the Telegram Alerts node onto the workflow canvas.
- Connect the Telegram Alerts node to the required workflow blocks.
- Double-click the Telegram Alerts node to open the Telegram Alerts configuration panel.
- Under Chat ID, enter the Telegram chat ID of the recipient or configured Telegram chat.
- Review the entered Chat ID.
- Click Apply Changes to save the configuration.
- Click Cancel if you want to discard the changes.
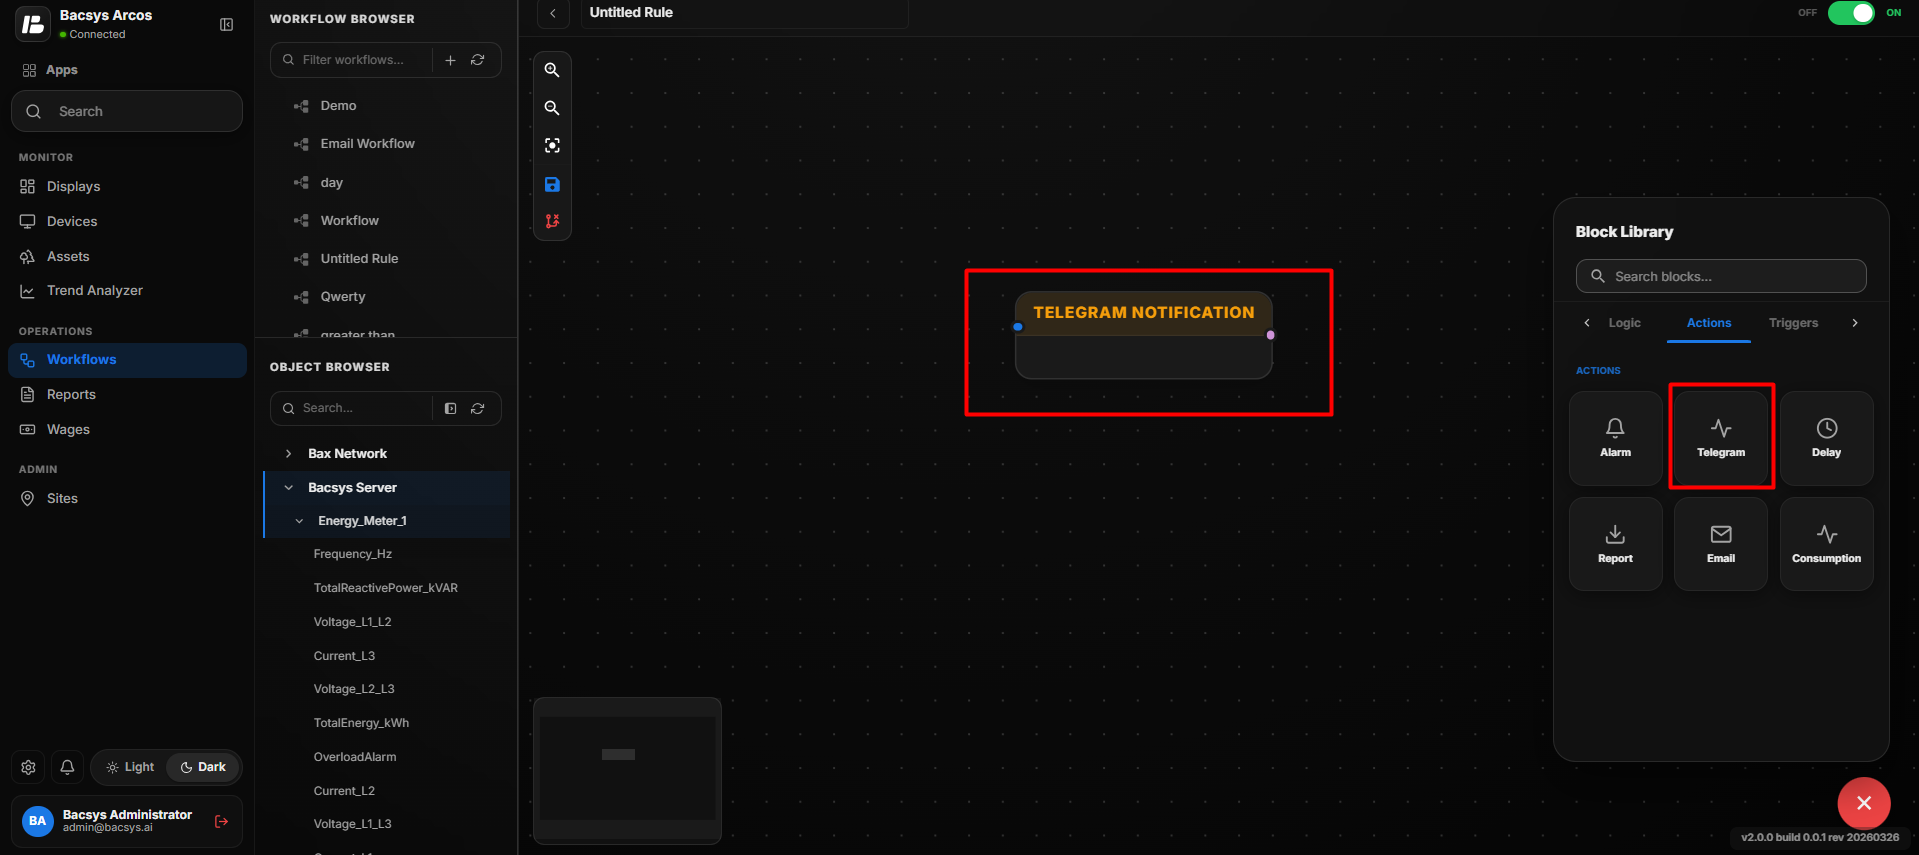 Telegram Alerts Configuration
Telegram Alerts Settings
| Option | Description |
|---|---|
| Chat ID | Enter the Telegram chat ID where the workflow notification should be sent. |
| Apply Changes | Saves and applies the configured Telegram Chat ID to the workflow node. |
| Cancel | Closes the configuration panel without applying the changes. |
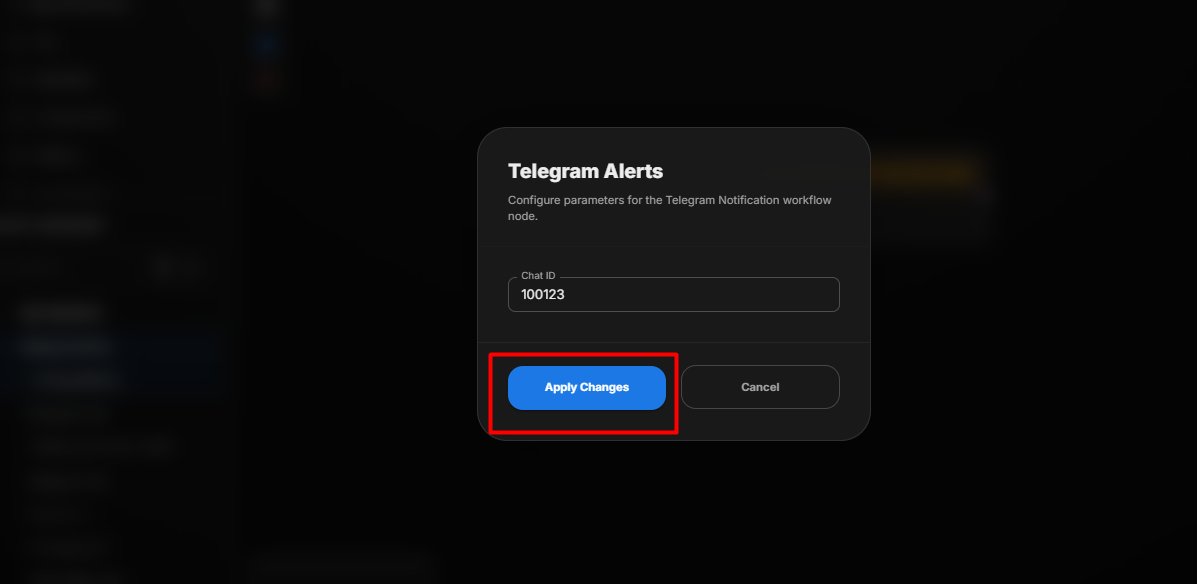 Telegram Alerts Configuration
Apply the Telegram Configuration
After clicking Apply Changes, the configured Chat ID is applied to the Telegram Alerts node. When the workflow reaches this node, the configured Telegram notification is sent to the specified chat.
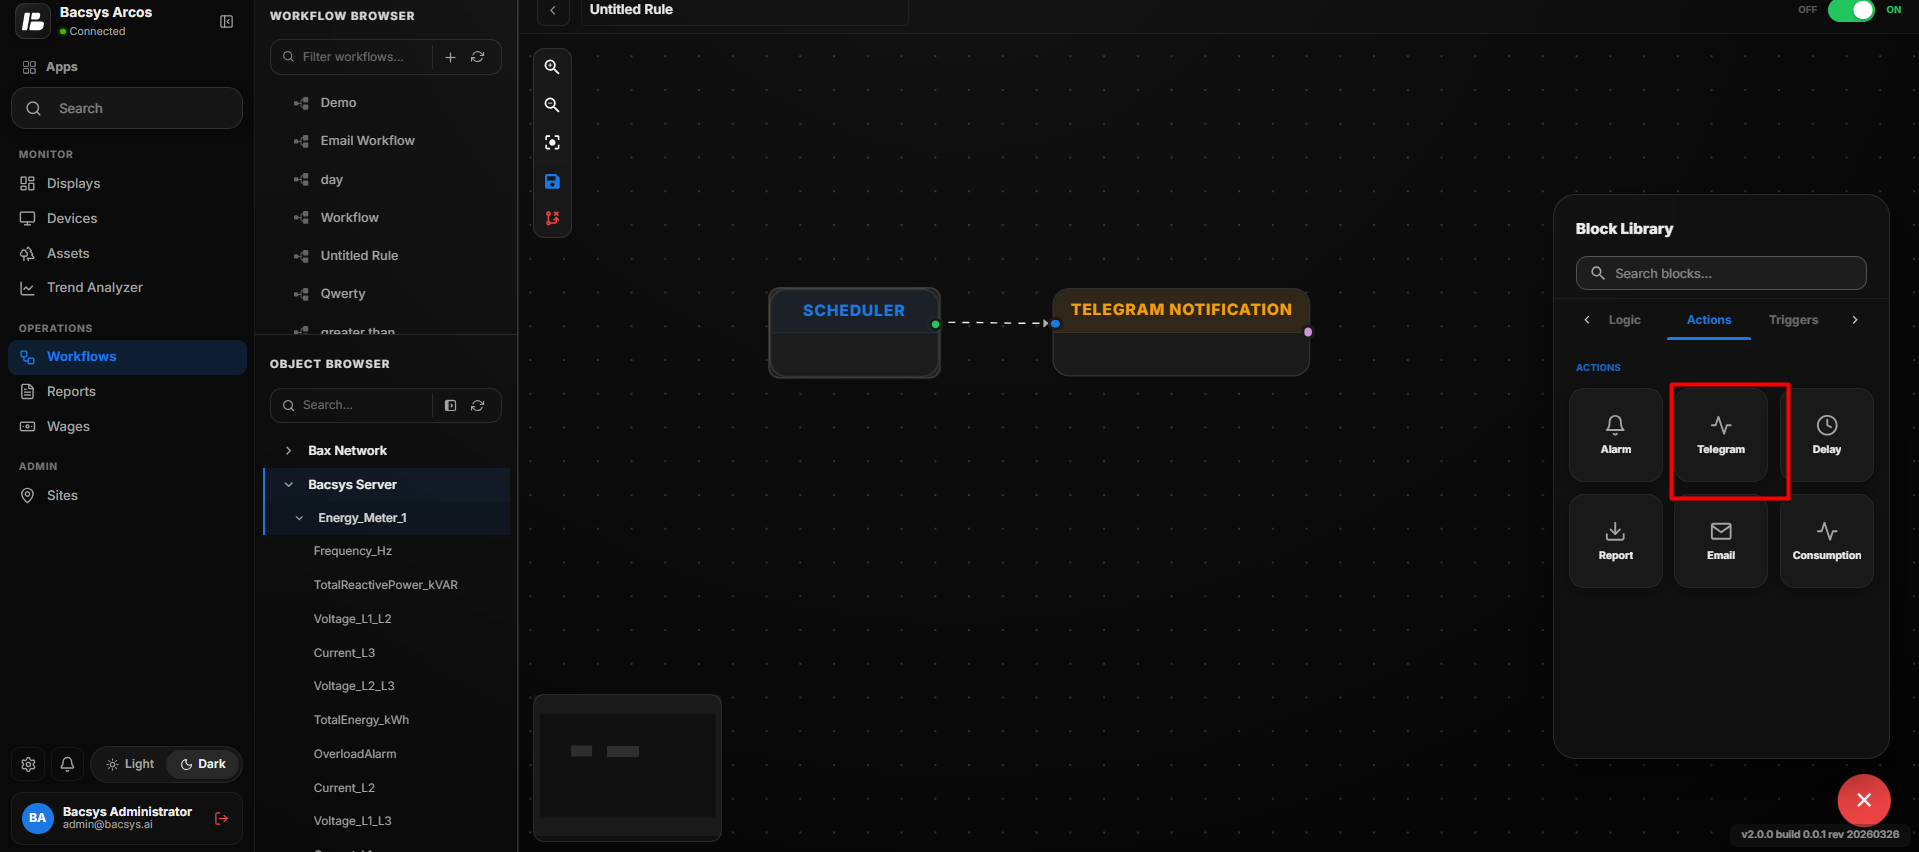 Telegram Alerts Configuration
Configure the Delay Workflow
The Delay workflow node is used to introduce a specific time delay before the workflow continues to the next connected node. The delay can be configured using hours, minutes, and seconds.
Add and Configure the Delay Node
- Open the required Workflow.
- Drag and drop the Delay node onto the workflow canvas.
- Connect the Delay node to the required workflow blocks.
- Double-click the Delay node to open the Timing Configuration panel.
- Under Time Delay, enter the required delay duration:
- Hours – Enter the number of hours to delay the workflow.
- Minutes – Enter the number of minutes to delay the workflow.
- Seconds – Enter the number of seconds to delay the workflow.
- Review the configured delay duration.
- Click Apply Changes to save the configuration.
- Click Cancel if you want to discard the changes.
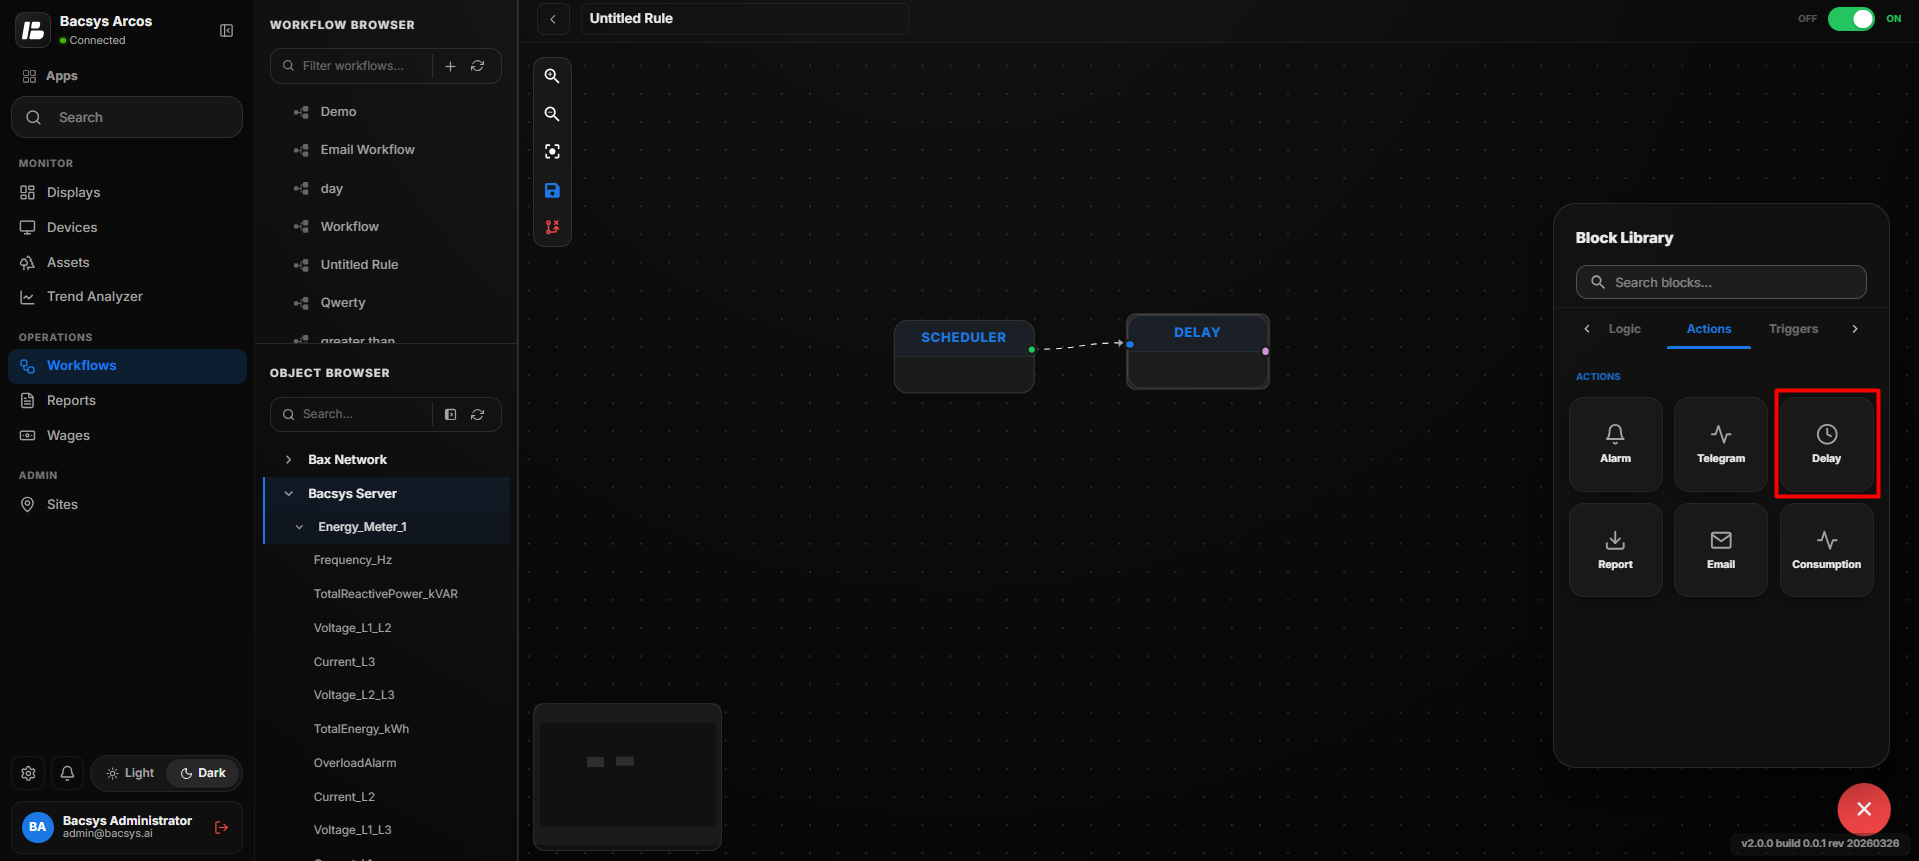 Delay Configuration
Delay Settings
| Option | Description |
|---|---|
| Hours (H) | Specifies the number of hours for which the workflow should be delayed. |
| Minutes (M) | Specifies the number of minutes for which the workflow should be delayed. |
| Seconds (S) | Specifies the number of seconds for which the workflow should be delayed. |
| Apply Changes | Saves and applies the configured delay duration to the workflow node. |
| Cancel | Closes the configuration panel without applying the changes. |
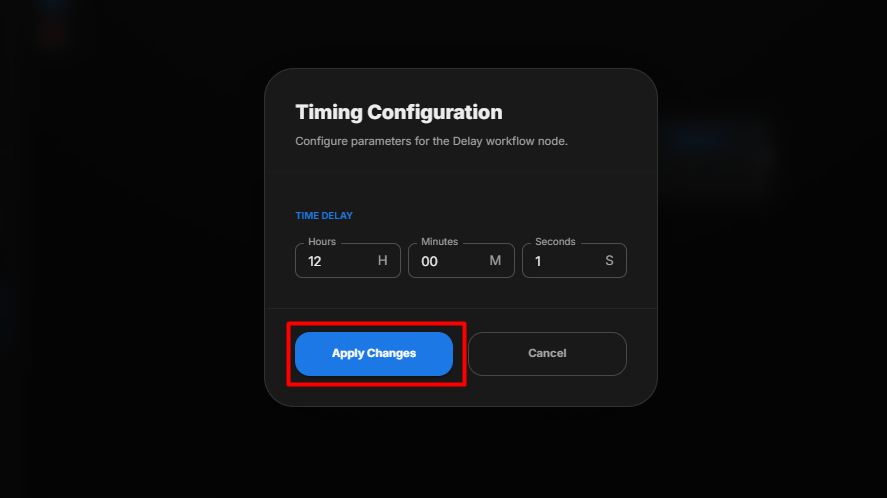 Delay Configuration
Apply the Delay Configuration
After clicking Apply Changes, the configured time delay is applied to the Delay node. When the workflow reaches this node, execution pauses for the configured duration and then continues to the next connected workflow node.
Configure the Report Automation Workflow
The Report Automation workflow node is used to generate reports automatically based on a selected Report Blueprint and export the generated report in the required format. It allows users to select an existing report configuration and choose whether the report should be generated as a CSV or Excel file.
Add and Configure the Report Automation Node
- Open the required Workflow.
- Drag and drop the Generate Report node onto the workflow canvas.
- Connect the Generate Report node to the required workflow blocks.
- Double-click the Generate Report node to open the Report Automation configuration panel.
- Under Select Report Blueprint, select the required report blueprint.
- Available report blueprints can include:
- EM
- Metrix
- Consumption
- Test
- test1
- Untitled Report
- Shift A
- Shift wise
- shift B
- temp
- temp - Copy
- Under Format, select the required export format:
- Export CSV
- Export Excel
- Review the configured report settings.
- Click Apply Changes to save the configuration.
- Click Cancel if you want to discard the changes.
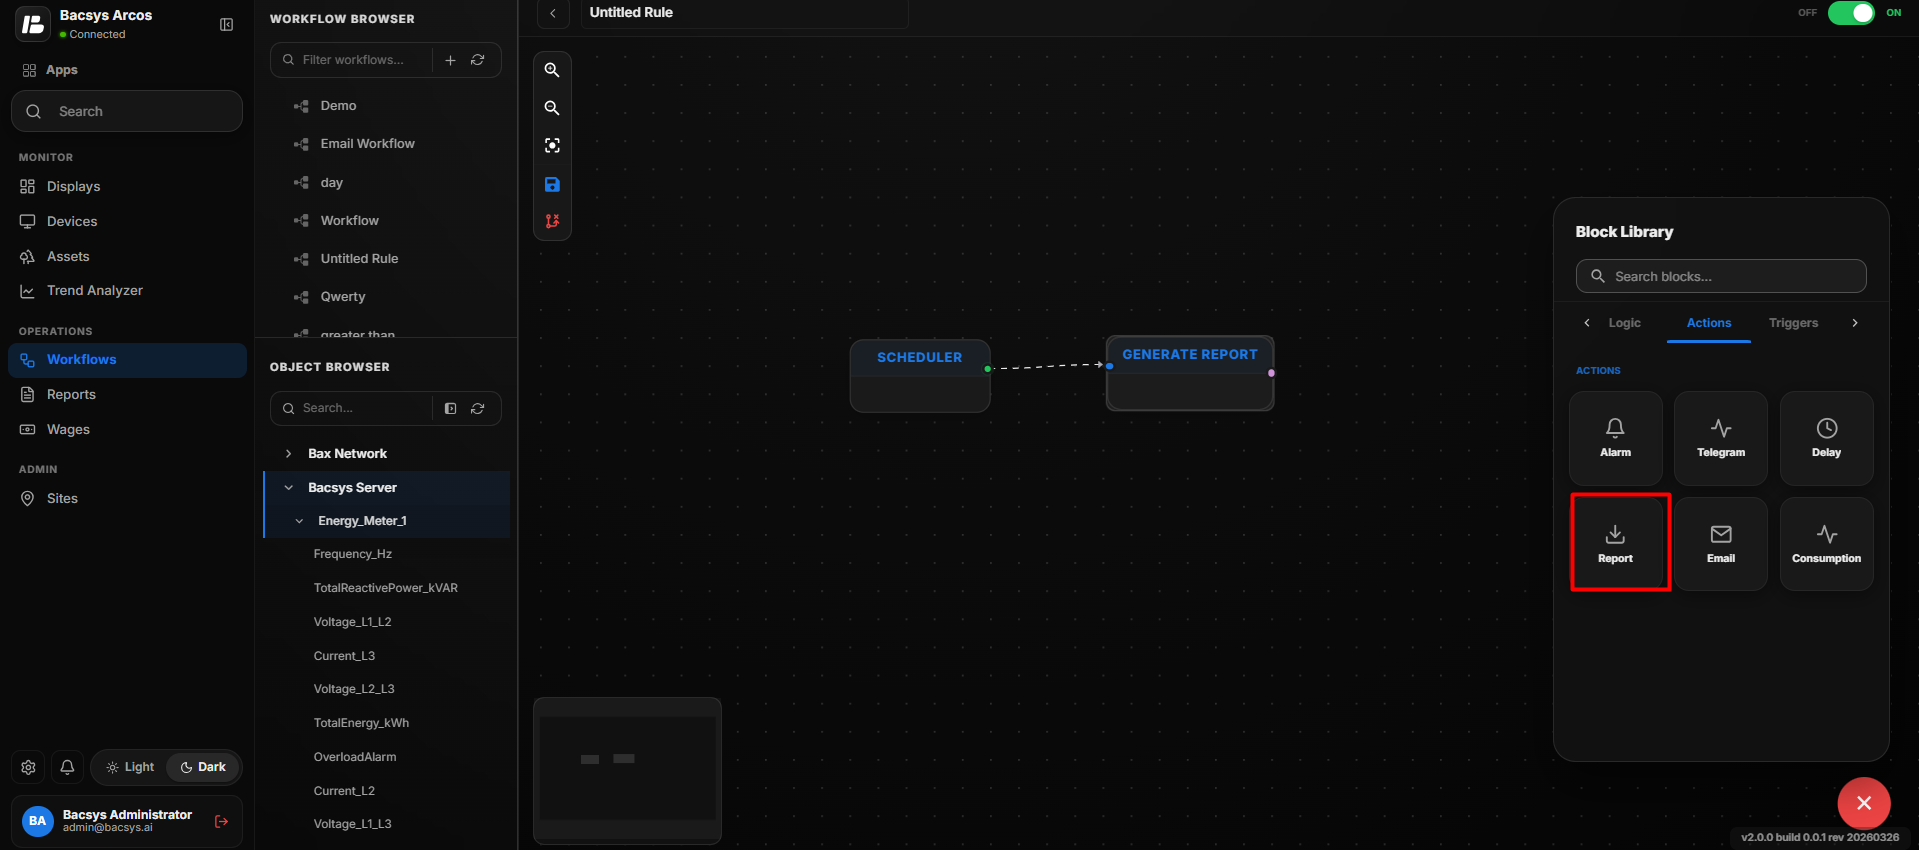 Report Automation Configuration
Report Automation Settings
| Option | Description |
|---|---|
| Select Report Blueprint | Selects the report blueprint that should be used to generate the report. |
| Format | Specifies the export format for the generated report. Available options are Export CSV and Export Excel. |
| Apply Changes | Saves and applies the selected report blueprint and export format to the workflow node. |
| Cancel | Closes the configuration panel without applying the changes. |
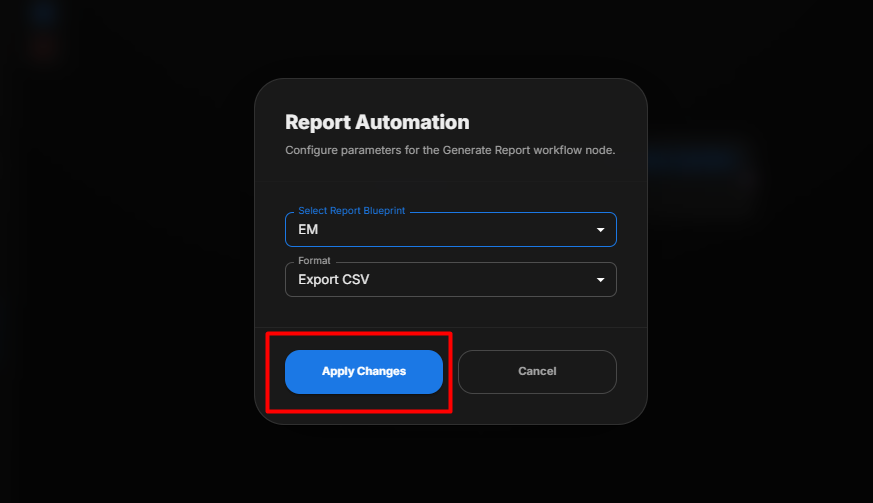 Report Automation Configuration
Apply the Report Configuration
After clicking Apply Changes, the selected Report Blueprint and Format are applied to the Generate Report node. When the workflow reaches this node, the configured report is generated using the selected blueprint and exported in the selected format.
Configure the Email Dispatcher Workflow
The Email Dispatcher workflow node is used to send email notifications with the configured workflow output or attachments. It allows users to specify one or more recipients who should receive the email.
Add and Configure the Email Dispatcher Node
- Open the required Workflow.
- Drag and drop the Email Dispatcher node onto the workflow canvas.
- Connect the Email Dispatcher node to the required workflow blocks.
- Double-click the Email Dispatcher node to open the Email Dispatcher configuration panel.
- Under Recipients (Comma Separated), enter the email addresses of the required recipients.
- Separate multiple email addresses using a comma.
- Review the entered recipient addresses.
- Click Apply Changes to save the configuration.
- Click Cancel if you want to discard the changes.
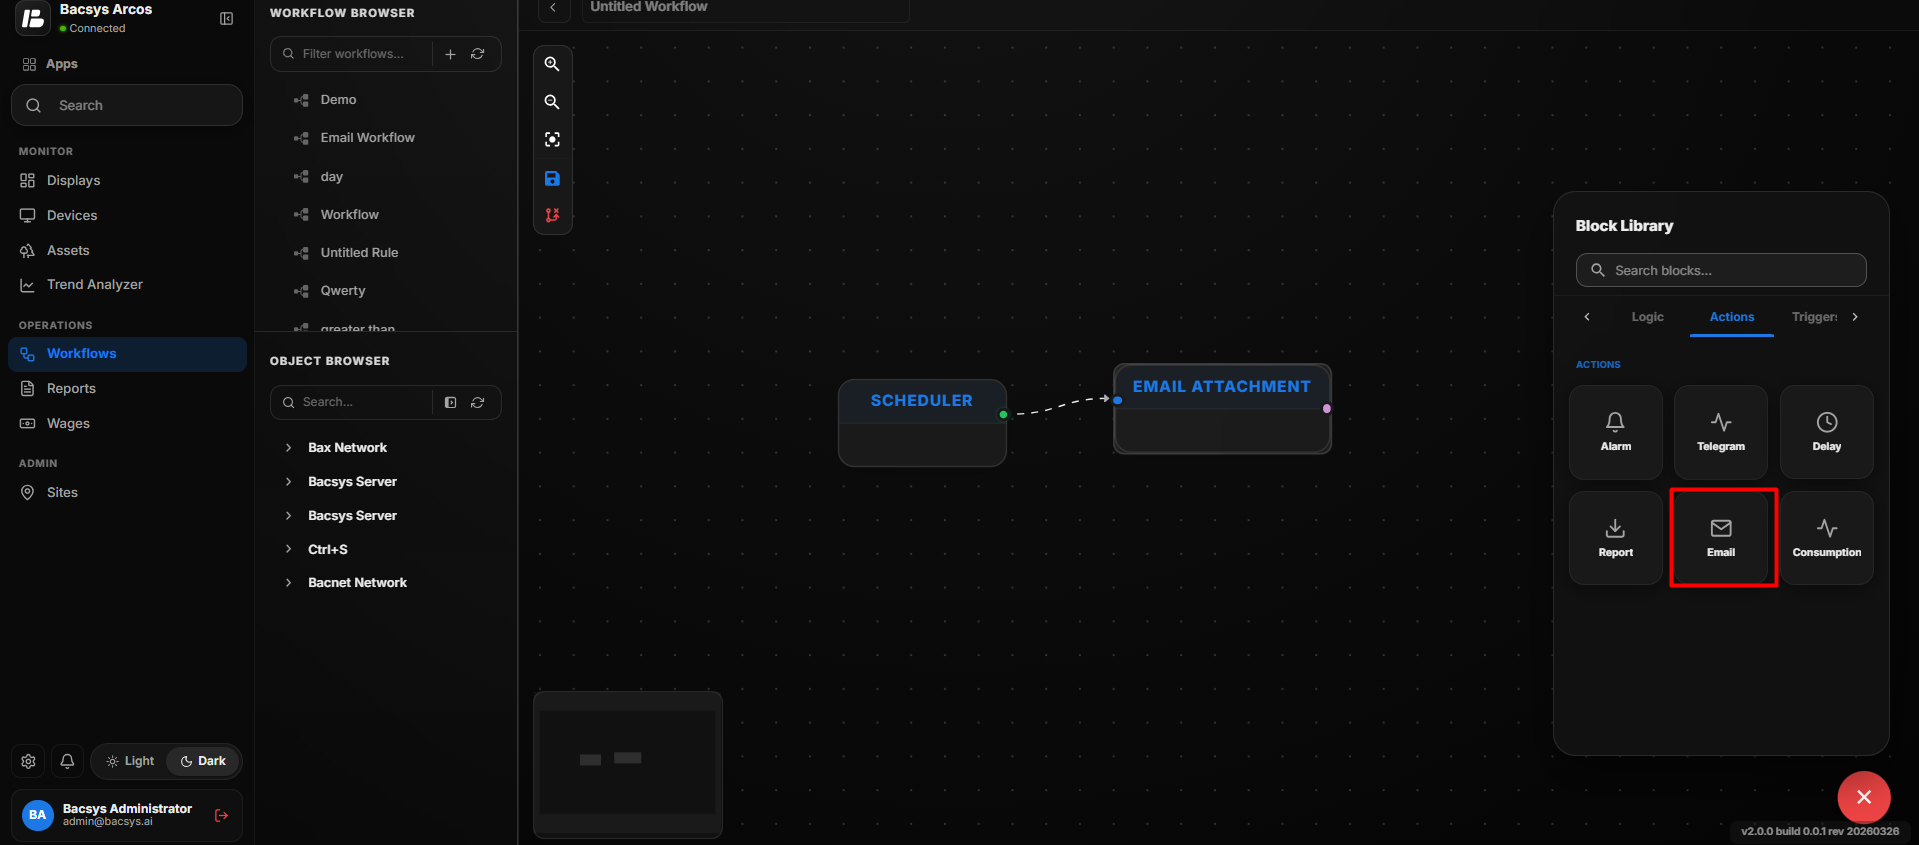 Email Dispatcher Configuration
Email Dispatcher Settings
| Option | Description |
|---|---|
| Recipients (Comma Separated) | Enter one or more email addresses that should receive the email. Multiple recipients must be separated by commas. |
| Apply Changes | Saves and applies the configured recipient email addresses to the workflow node. |
| Cancel | Closes the configuration panel without applying the changes. |
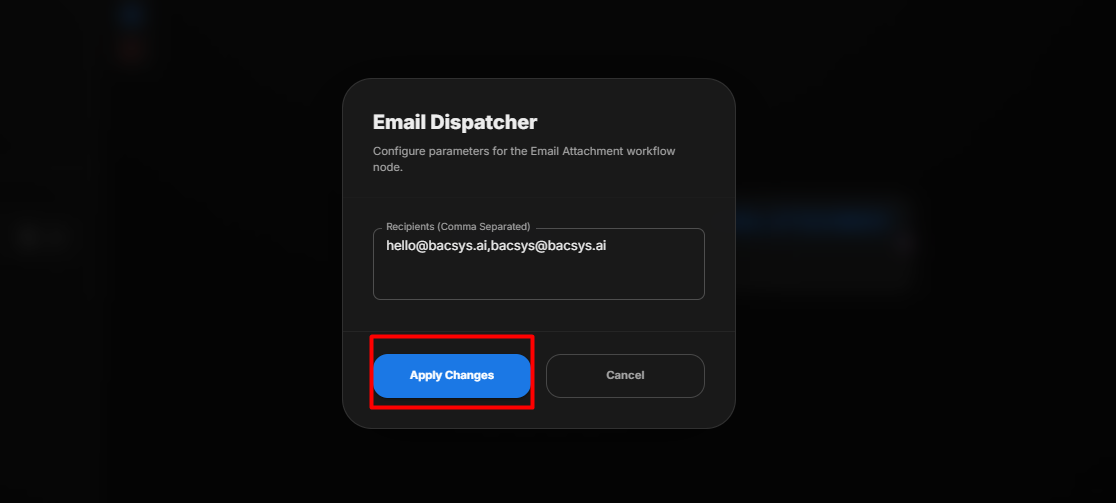 Email Dispatcher Configuration
Apply the Email Configuration
After clicking Apply Changes, the configured recipient addresses are applied to the Email Dispatcher node. When the workflow reaches this node, the configured email is dispatched to the specified recipients.
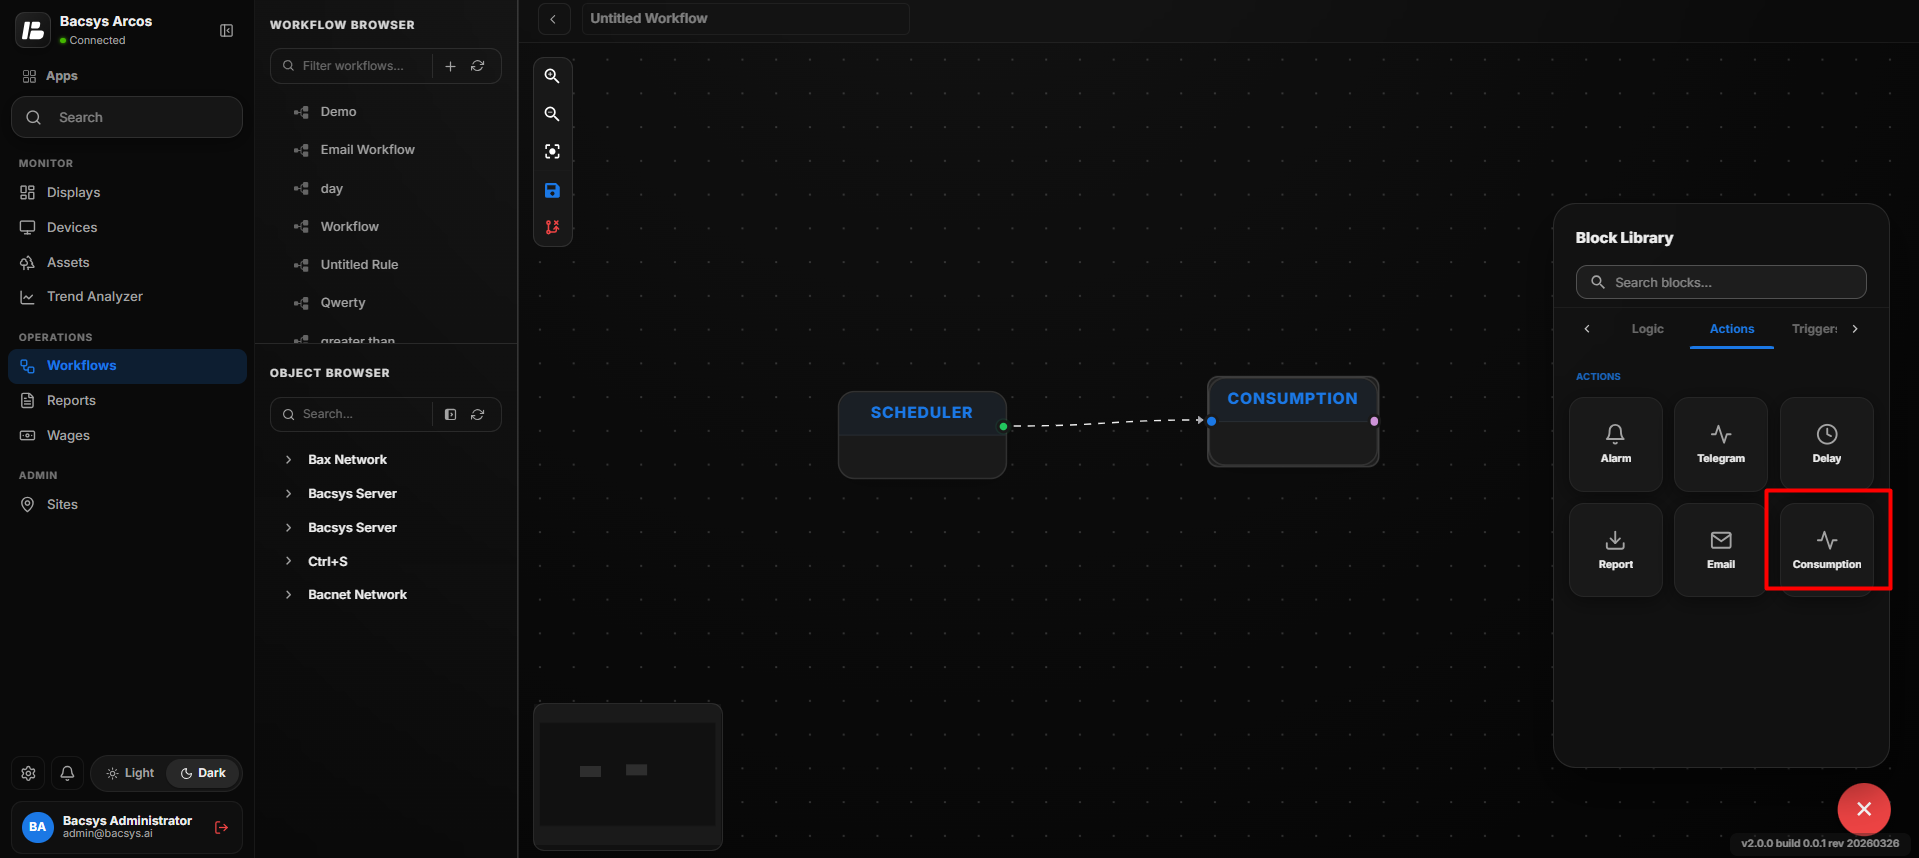
Configure the Consumption Workflow
The Consumption workflow node is used to analyze and process consumption data based on a selected Aggregation Period. It allows the workflow to calculate consumption over different time periods.
Add and Configure the Consumption Node
- Open the required Workflow.
- Drag and drop the Consumption node onto the workflow canvas.
- Connect the Consumption node to the required workflow blocks.
- Double-click the Consumption node to open the Utilities Analysis configuration panel.
- Under Aggregation Period, select the required period:
- Hourly
- Daily
- Weekly
- Monthly
- Yearly
- Review the selected aggregation period.
- Click Apply Changes to save the configuration.
- Click Cancel if you want to discard the changes.
 Consumption Configuration
Consumption Settings
| Option | Description |
|---|---|
| Aggregation Period | Defines the time period used to aggregate and analyze consumption data. |
| Hourly | Aggregates consumption data on an hourly basis. |
| Daily | Aggregates consumption data on a daily basis. |
| Weekly | Aggregates consumption data on a weekly basis. |
| Monthly | Aggregates consumption data on a monthly basis. |
| Yearly | Aggregates consumption data on a yearly basis. |
| Apply Changes | Saves and applies the selected aggregation period to the Consumption node. |
| Cancel | Closes the configuration panel without applying the changes. |
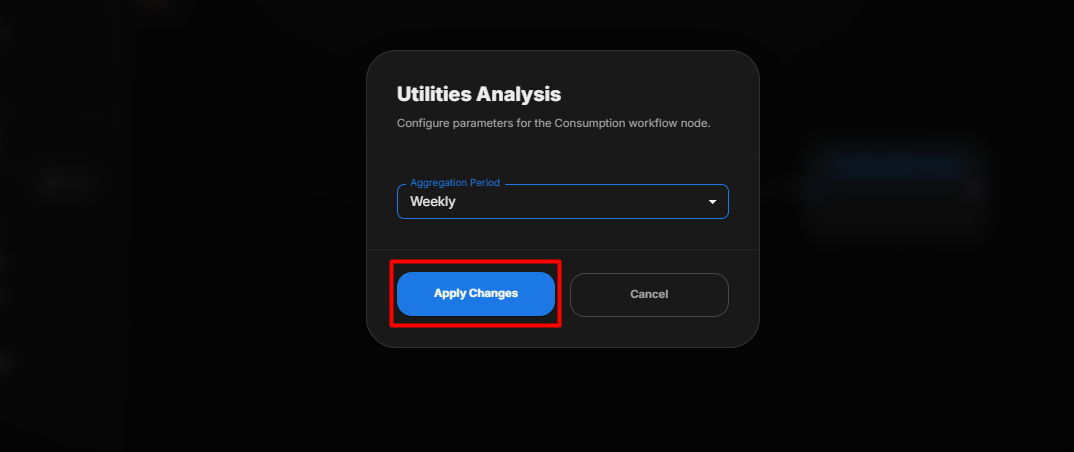 Consumption Configuration
Apply the Consumption Configuration
After clicking Apply Changes, the selected Aggregation Period is applied to the Consumption node. When the workflow reaches this node, the consumption data is processed according to the selected aggregation period.
Trigger Block
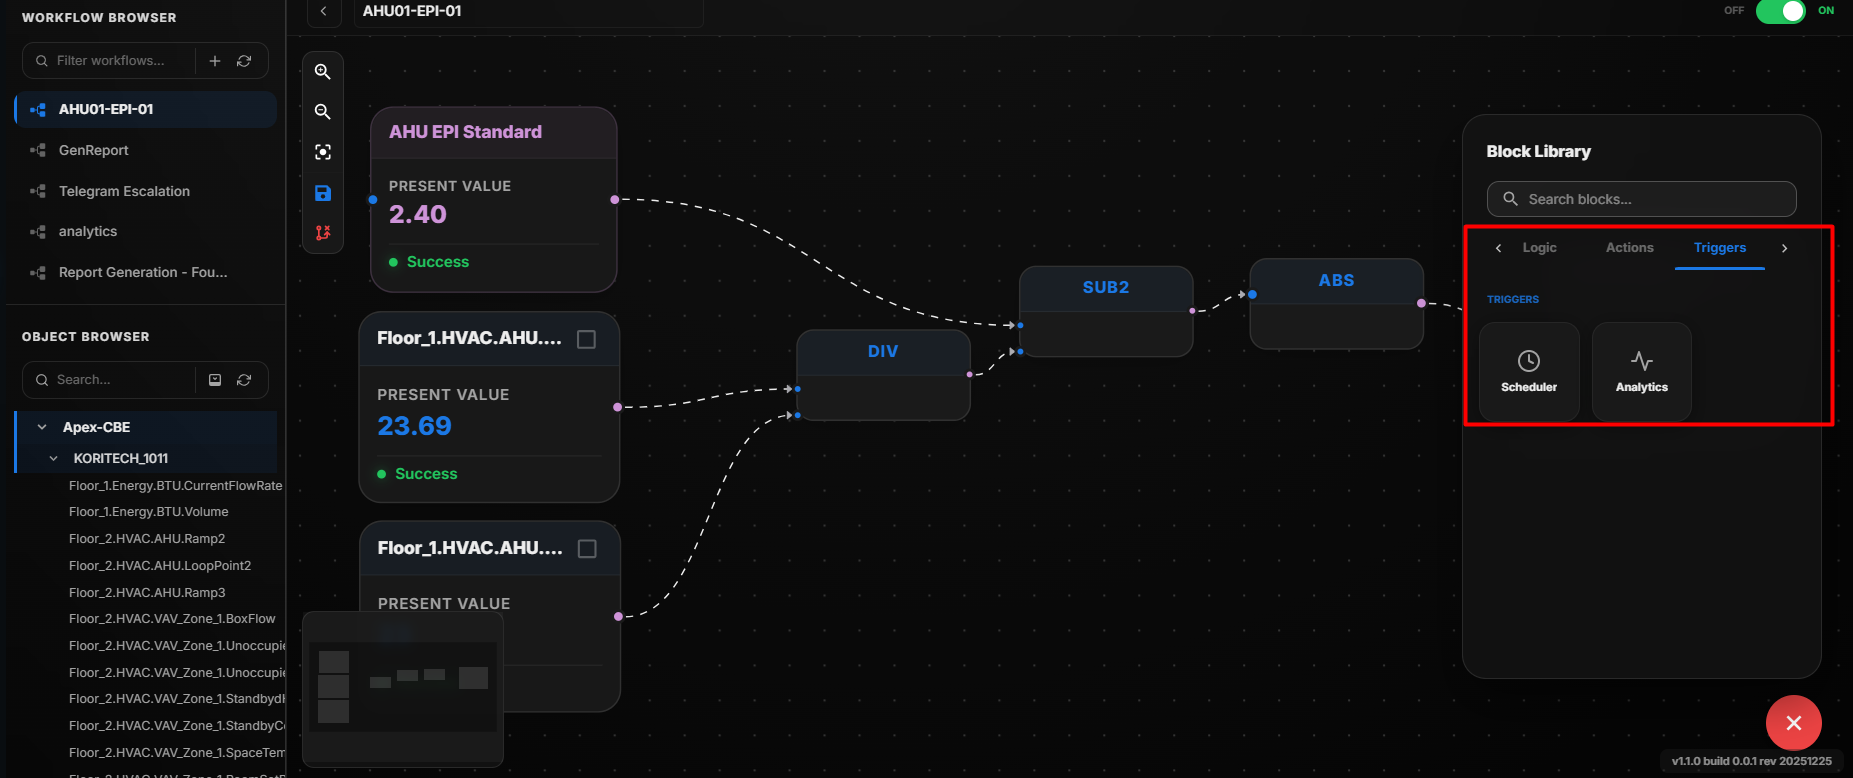
Trigger Block
The Trigger Block starts the workflow based on a configured event or condition. It defines when the workflow should begin execution.
| Function | Description |
|---|---|
| Schedule | Triggers the workflow based on a defined time schedule, such as daily, weekly, or custom intervals. |
| Analytics | Triggers or supports workflow execution based on analyzed data trends, patterns, and performance metrics. |
Configure the Schedule Trigger
The Schedule trigger is used to start a workflow automatically based on selected days and a defined time period. It allows users to specify the days on which the workflow should run and configure the start and end times.
Add and Configure the Schedule Trigger
- Open the required Workflow.
- Add the Schedule trigger block to the workflow.
- Double-click the Schedule block to open the Scheduler Settings panel.
- Under Active Days, select the days on which the workflow should run:
- Sun
- Mon
- Tue
- Wed
- Thu
- Fri
- Sat
- Under Start Time, select the time at which the workflow should start.
- Under End Time, select the time at which the workflow should stop or complete its scheduled execution period.
- Review the selected days and configured time range.
- Click Apply Changes to save the schedule configuration.
- Click Cancel if you want to discard the changes.
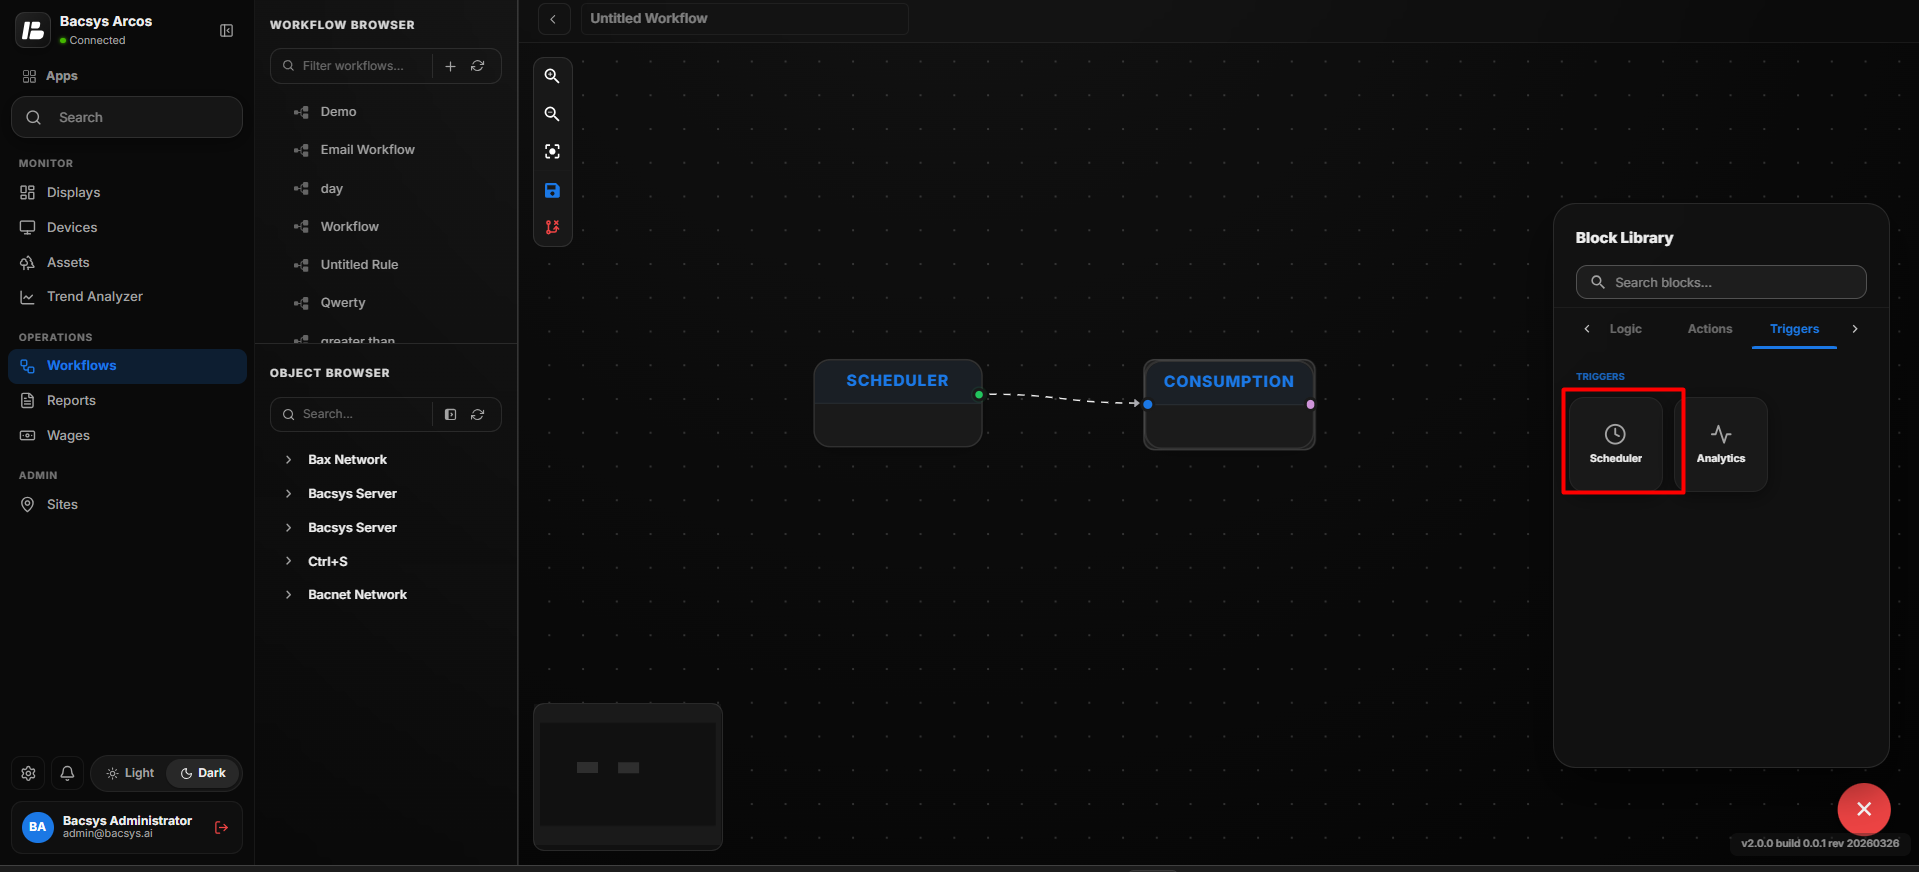 Schedule Configuration
Schedule Settings
| Option | Description |
|---|---|
| Active Days | Selects the days on which the scheduled workflow should be active. |
| Sun | Enables the workflow schedule for Sunday. |
| Mon | Enables the workflow schedule for Monday. |
| Tue | Enables the workflow schedule for Tuesday. |
| Wed | Enables the workflow schedule for Wednesday. |
| Thu | Enables the workflow schedule for Thursday. |
| Fri | Enables the workflow schedule for Friday. |
| Sat | Enables the workflow schedule for Saturday. |
| Start Time | Defines the time at which the scheduled workflow becomes active. |
| End Time | Defines the time at which the scheduled workflow's active period ends. |
| Apply Changes | Saves and applies the configured schedule settings to the Schedule trigger. |
| Cancel | Closes the configuration panel without applying the changes. |
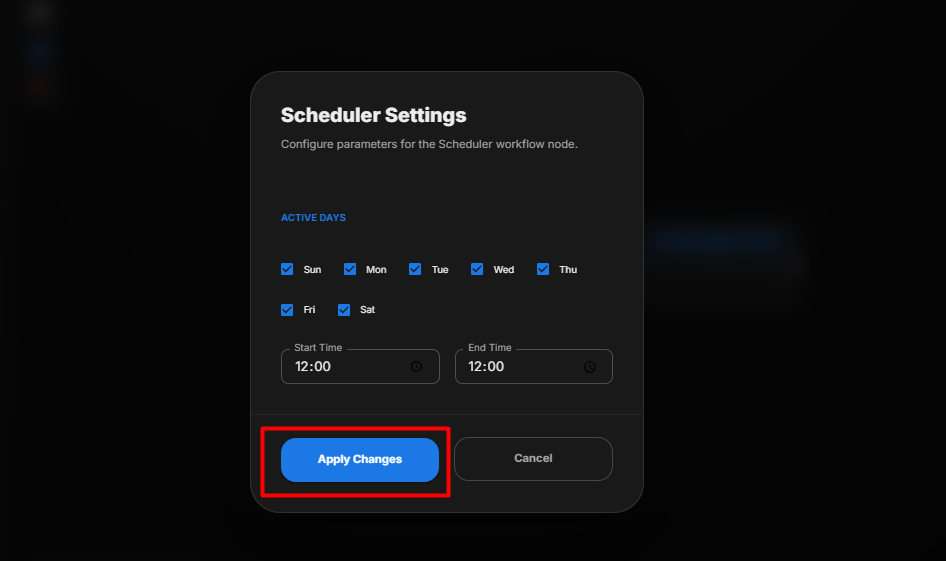 Schedule Configuration
Apply the Schedule Configuration
After clicking Apply Changes, the selected Active Days, Start Time, and End Time are applied to the Schedule trigger. The workflow will execute according to the configured schedule.
Configure the Analytics Workflow
The Analytics workflow node is used to analyze data over a selected time period. It allows users to define an Analysis Window, specify the Baseline Start and Comparison Start dates, and choose how the analytics result should be represented.
Add and Configure the Analytics Node
- Open the required Workflow.
- Drag and drop the Analytics node onto the workflow canvas.
- Connect the Analytics node to the required workflow blocks.
- Double-click the Analytics node to open the Analytics Engine configuration panel.
- Under Analysis Window, select the required analysis period:
- Daily
- Week
- Month
- Quarter
- Year
- Under Baseline Start, select the starting date for the baseline analysis period.
- Under Comparison Start, select the starting date for the comparison period.
- Under Output Format, select the required result format:
- Count
- Percentage
- Review the configured analytics settings.
- Click Apply Changes to save the configuration.
- Click Cancel if you want to discard the changes.
 Analytics Configuration
Analytics Settings
| Option | Description |
|---|---|
| Analysis Window | Defines the time period over which the analytics data is analyzed. |
| Daily | Analyzes the data on a daily basis. |
| Week | Analyzes the data over a weekly period. |
| Month | Analyzes the data over a monthly period. |
| Quarter | Analyzes the data over a quarterly period. |
| Year | Analyzes the data over a yearly period. |
| Baseline Start | Specifies the starting date for the baseline period used in the analysis. |
| Comparison Start | Specifies the starting date for the comparison period. |
| Output Format | Defines how the analytics result is represented. |
| Count | Returns the analytics result as a count. |
| Percentage | Returns the analytics result as a percentage. |
| Apply Changes | Saves and applies the configured analytics settings to the workflow node. |
| Cancel | Closes the configuration panel without applying the changes. |
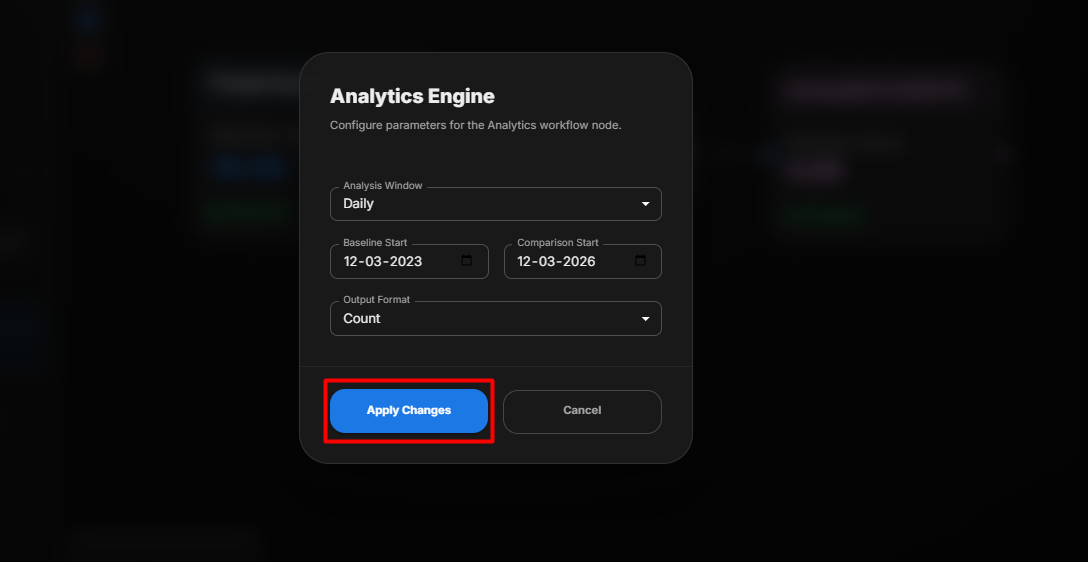 Analytics Configuration
Apply the Analytics Configuration
After clicking Apply Changes, the selected Analysis Window, Baseline Start, Comparison Start, and Output Format are applied to the Analytics node. When the workflow reaches this node, the analytics data is processed according to the configured settings.
Constant
The Constant block is used to provide fixed input values within a workflow. It supports different types of constant values depending on the requirement.
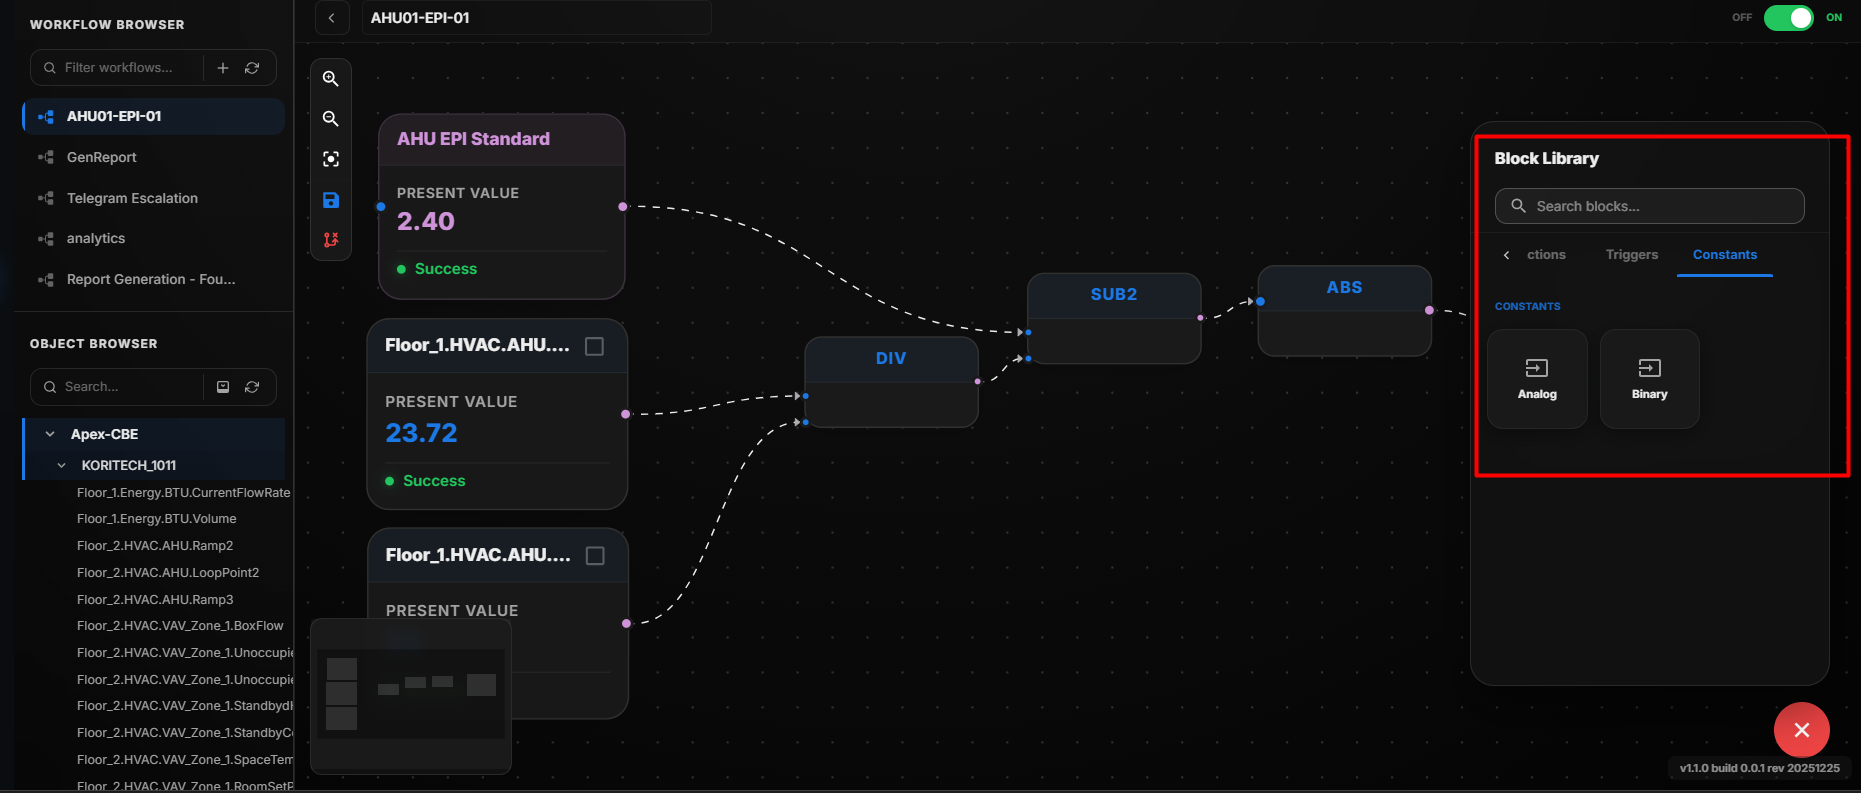
Constant Types
| Function | Description |
|---|---|
| Analog | Represents continuous signals or values, typically used to monitor or control physical parameters such as temperature, pressure, or voltage. |
| Binary | Represents digital signals with two possible states, such as ON/OFF or 1/0, commonly used for simple control or status monitoring. |
Analog Configuration
The Analog constant is used to provide a fixed numerical value within a workflow. It can be configured with a point name and a constant point value, which can then be used as an input for other workflow nodes.
Configure the Analog Constant
- Open the required Workflow.
- Add the Analog constant node to the workflow canvas.
- Double-click the Analog node to open the Analog Configuration panel.
- Under Point Name, enter the name for the analog point.
- Under Point Value, enter the required constant numerical value.
- Review the configured point name and value.
- Click Apply Changes to save the configuration.
- Click Cancel if you want to discard the changes.
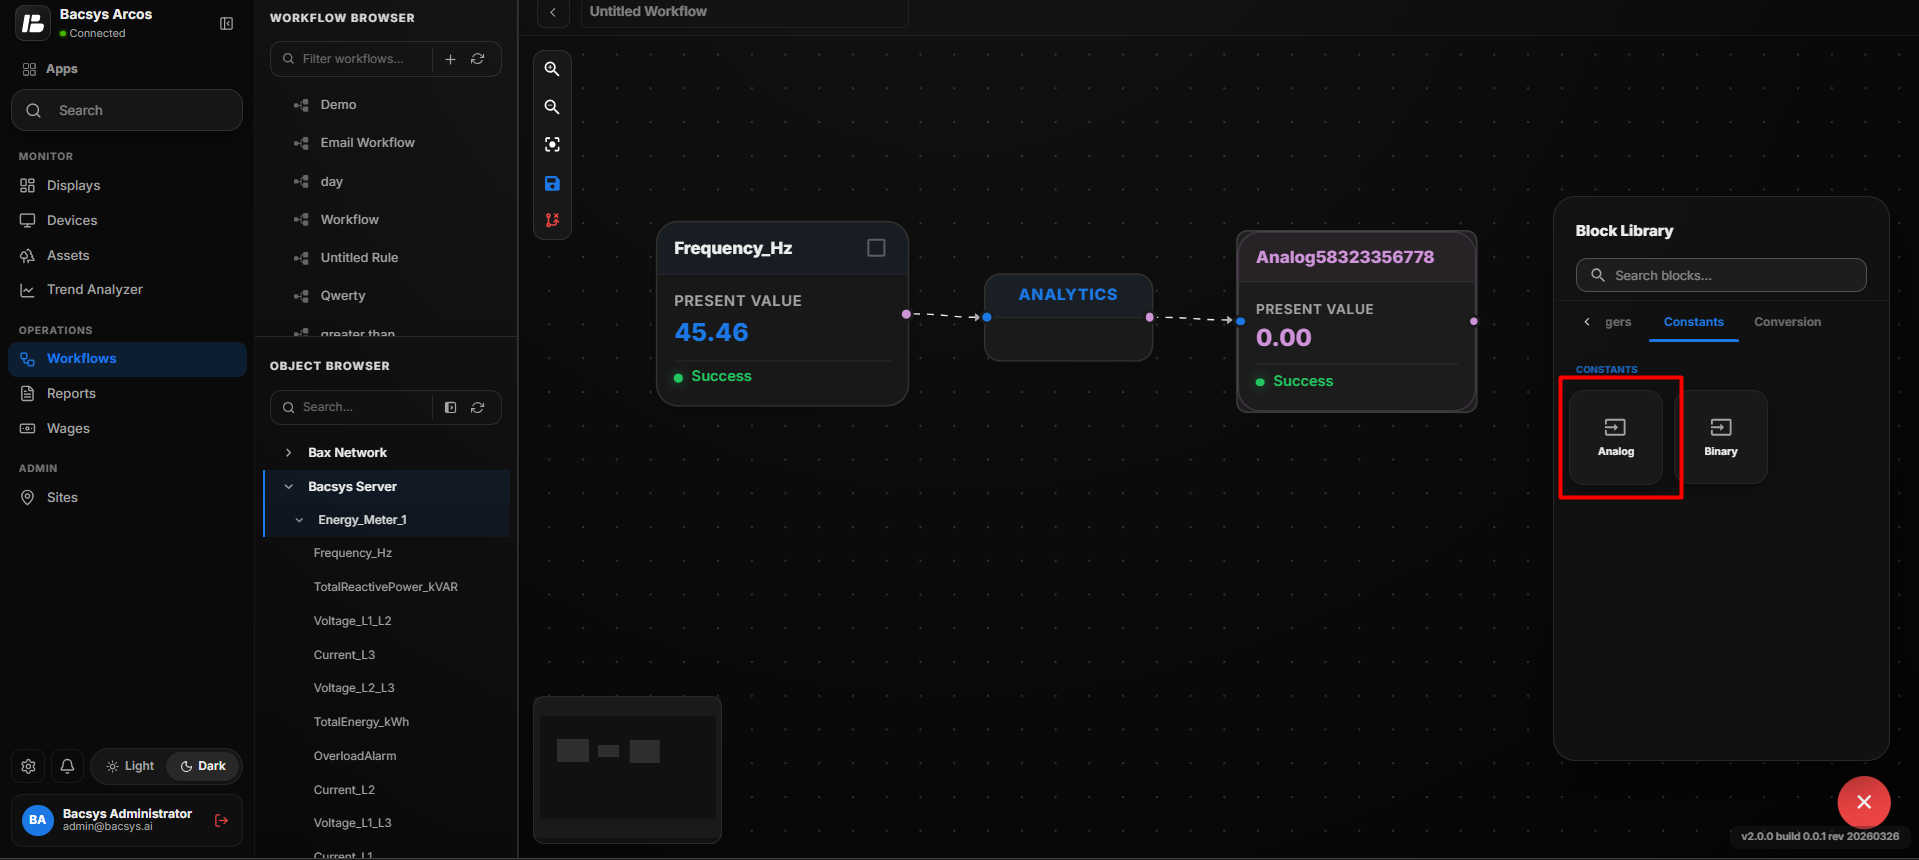 Analog Configuration
Analog Settings
| Option | Description |
|---|---|
| Point Name | Defines the name of the analog constant point. |
| Point Value | Specifies the fixed numerical value provided by the Analog node. |
| Apply Changes | Saves and applies the configured point name and value. |
| Cancel | Closes the configuration panel without applying the changes. |
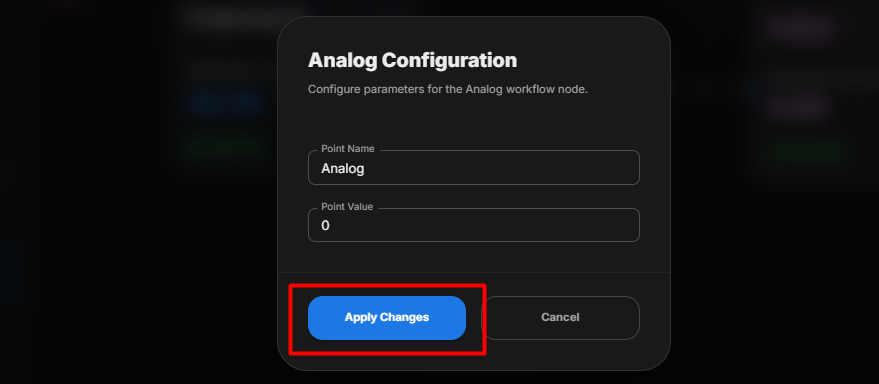 Analog Configuration
Apply the Analog Configuration
After clicking Apply Changes, the configured Point Name and Point Value are applied to the Analog node. The configured constant value can then be used as an input within the workflow.
Conversion
The Conversion node is used to convert values from one format to another. It supports different types of conversion depending on the requirement.
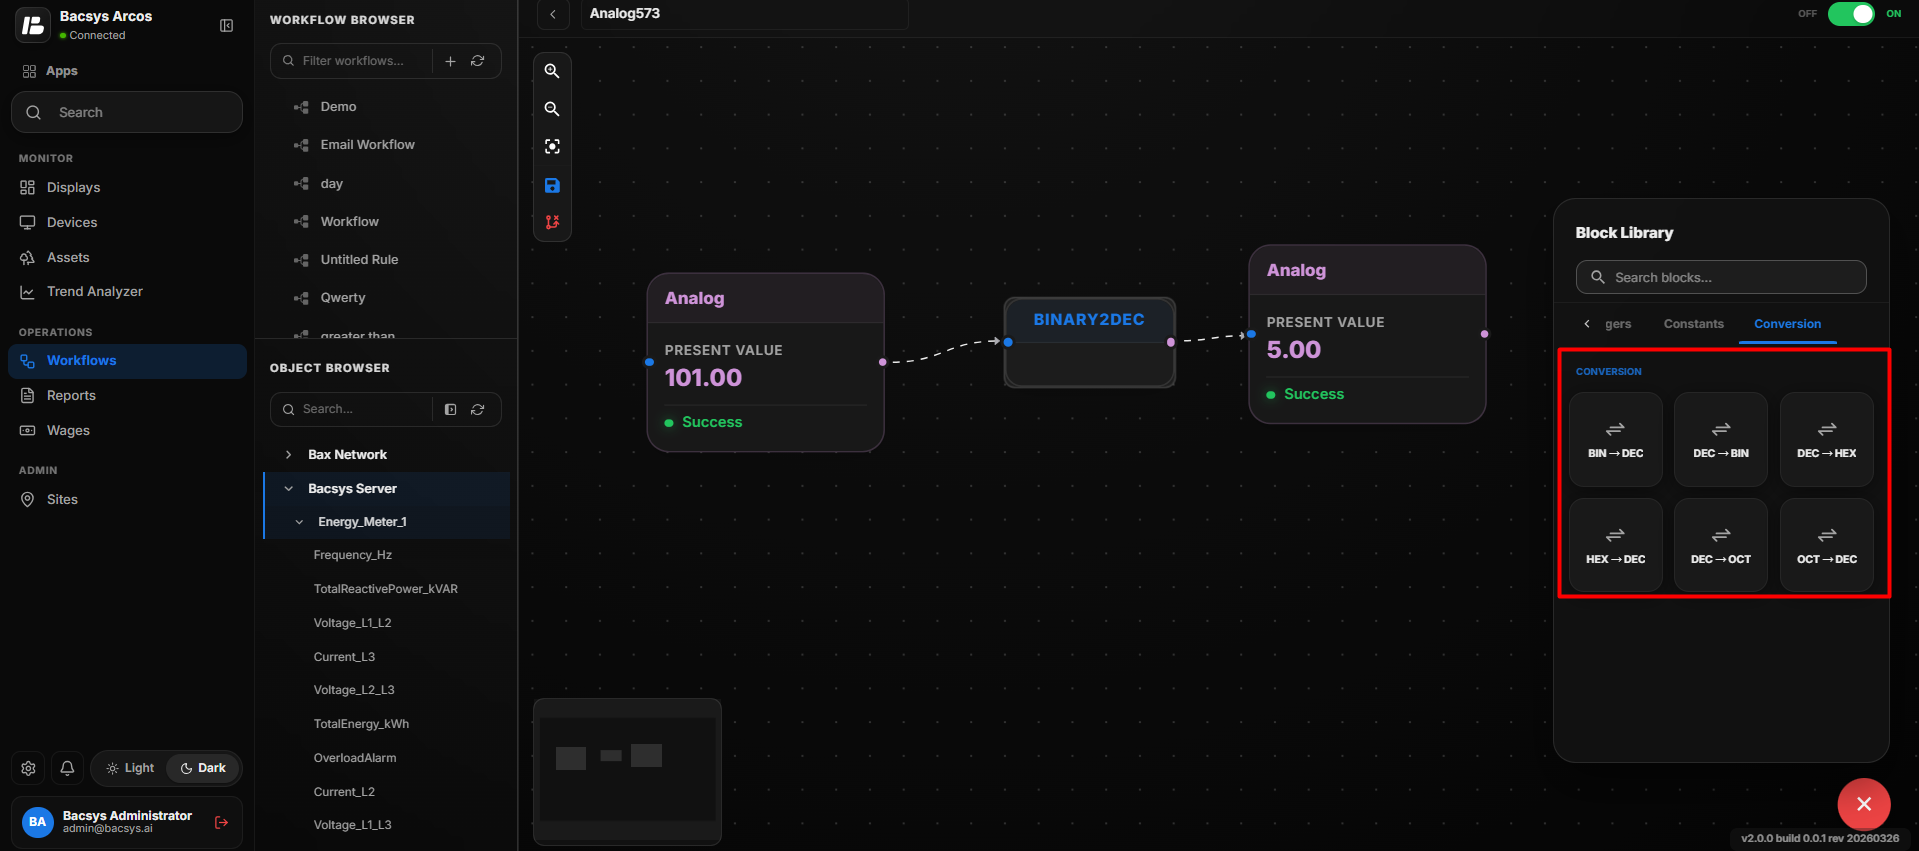 Conversion Configuration
| Function | Description |
|---|---|
| BIN → DEC | Converts a binary (BIN) value to a decimal (DEC) value. |
| DEC → BIN | Converts a decimal (DEC) value to a binary (BIN) value. |
| DEC → HEX | Converts a decimal (DEC) value to a hexadecimal (HEX) value. |
| HEX → DEC | Converts a hexadecimal (HEX) value to a decimal (DEC) value. |
| DEC → OCT | Converts a decimal (DEC) value to an octal (OCT) value. |
| OCT → DEC | Converts an octal (OCT) value to a decimal (DEC) value. |
Managing a Workflow
You can make a workflow active or inactive by,
- To activate a workflow, click on the toggle button towards ON.
- To deactivate a workflow, click on the toggle button towards OFF.
Note: When you make any changes between the blocks in a workflow, kindly save the workflow to reflect the changes.
To delete a workflow,
- Click on the Delete button located to the right of the workflow name in the Workflow browser pane.
- Click on the Confirm button to permanently delete the rule.
Canvas Options
| Option | Description |
|---|---|
| Zoom In | Zooms in on the canvas. |
| Zoom Out | Zooms out from the canvas. |
| Fit View | Fits all nodes within the canvas to the screen. |
| Toggle Interactivity | Locks/Unlocks the position of the nodes. |
| Save Rules | Saves the current rule. |
| Clear All Nodes | Deletes all nodes from the canvas. |
| Mini Map | Displays a high-level view of all nodes present in the canvas. |
| `` |
Workflow Browser
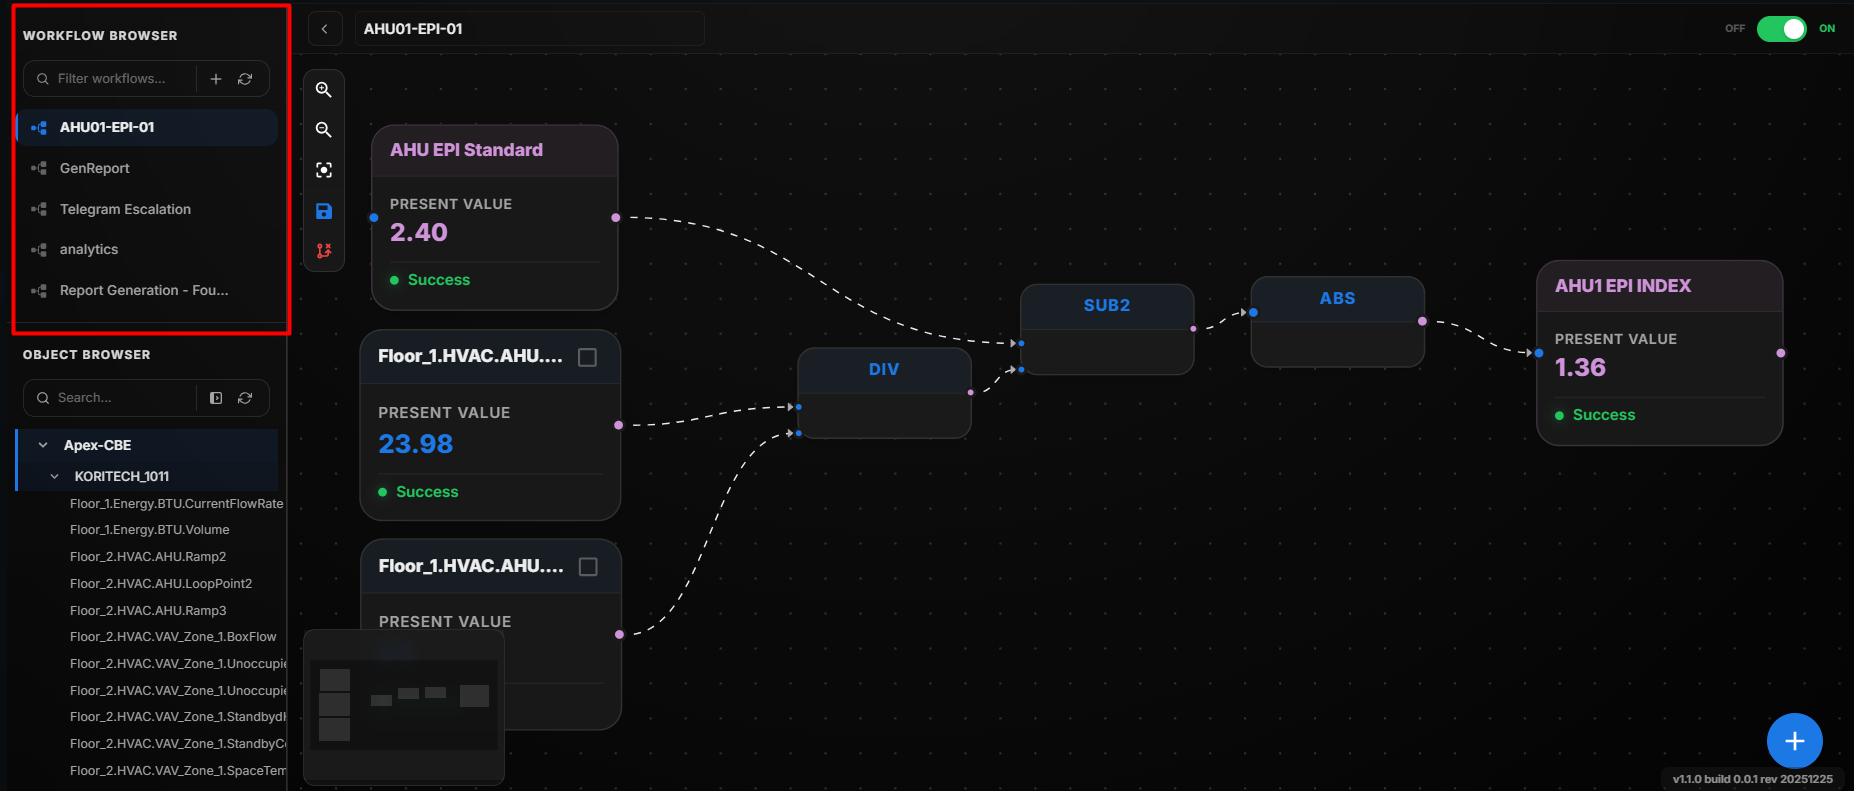 WorkFlow Browser
The Workflow Browser displays all the workflows that have been created and saved in the system.
- Any workflow that is configured and saved will appear in the Workflow Browser.
- Users can view, edit, or manage previously created workflows.
- It serves as a centralized location to access all saved workflow configurations.
+ New WorkFlow
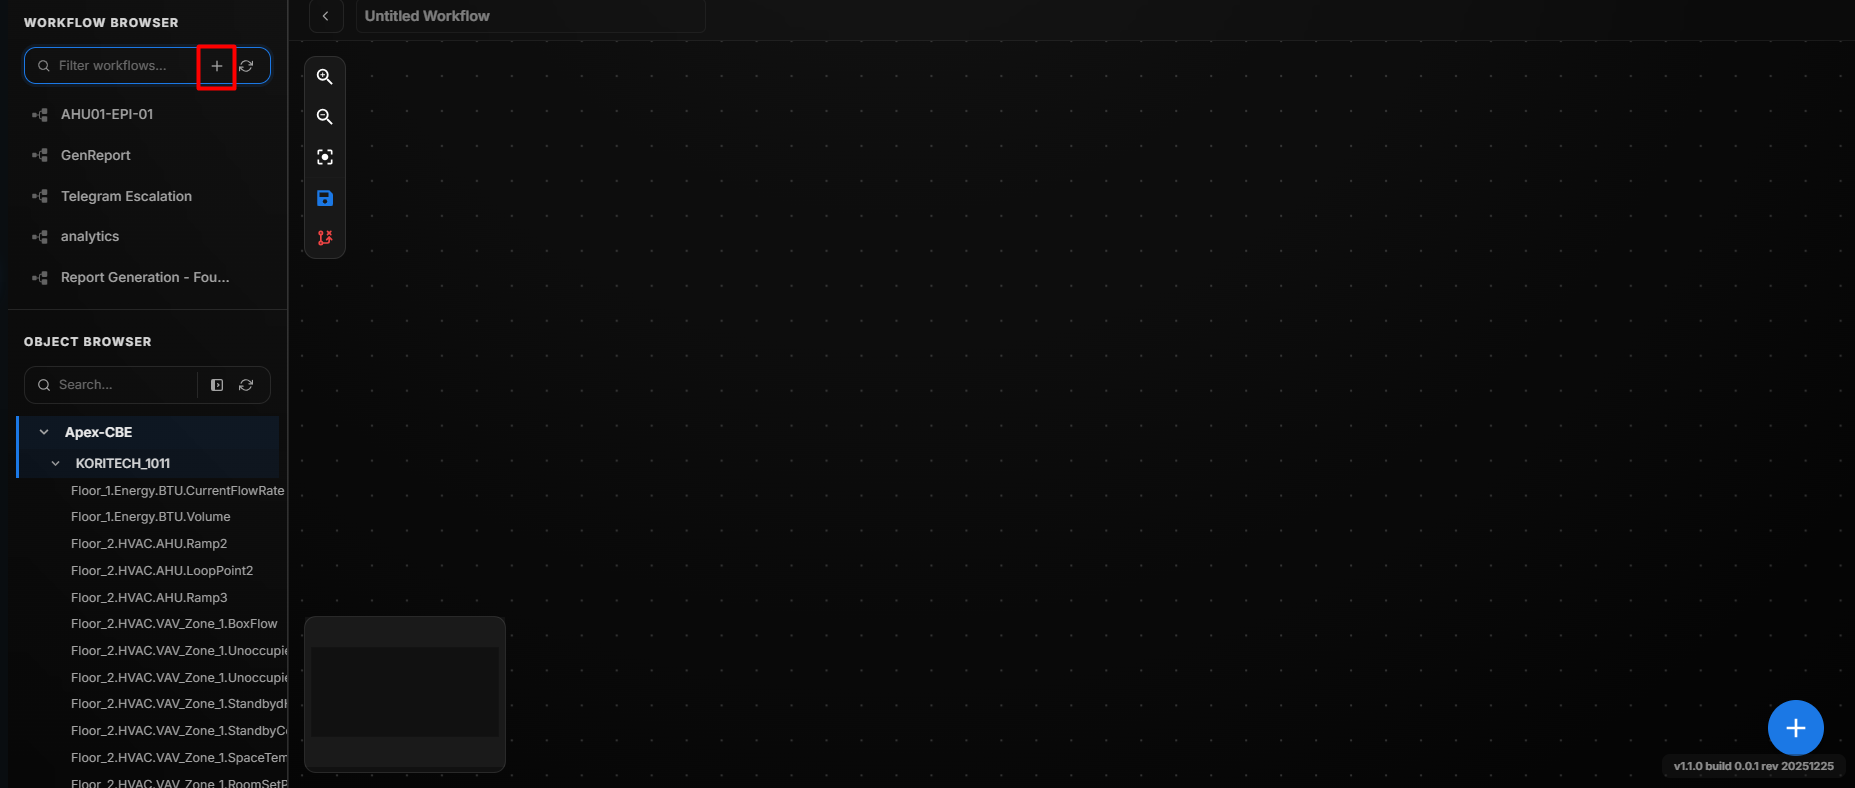 WorkFlow New
The + New option allows users to add a new workflow.
When the + New button is clicked:
- A new workflow is created.
- Users can configure the required logic, conditions, and actions.
- After saving, the workflow will be added to the Workflow Browser.
Refresh
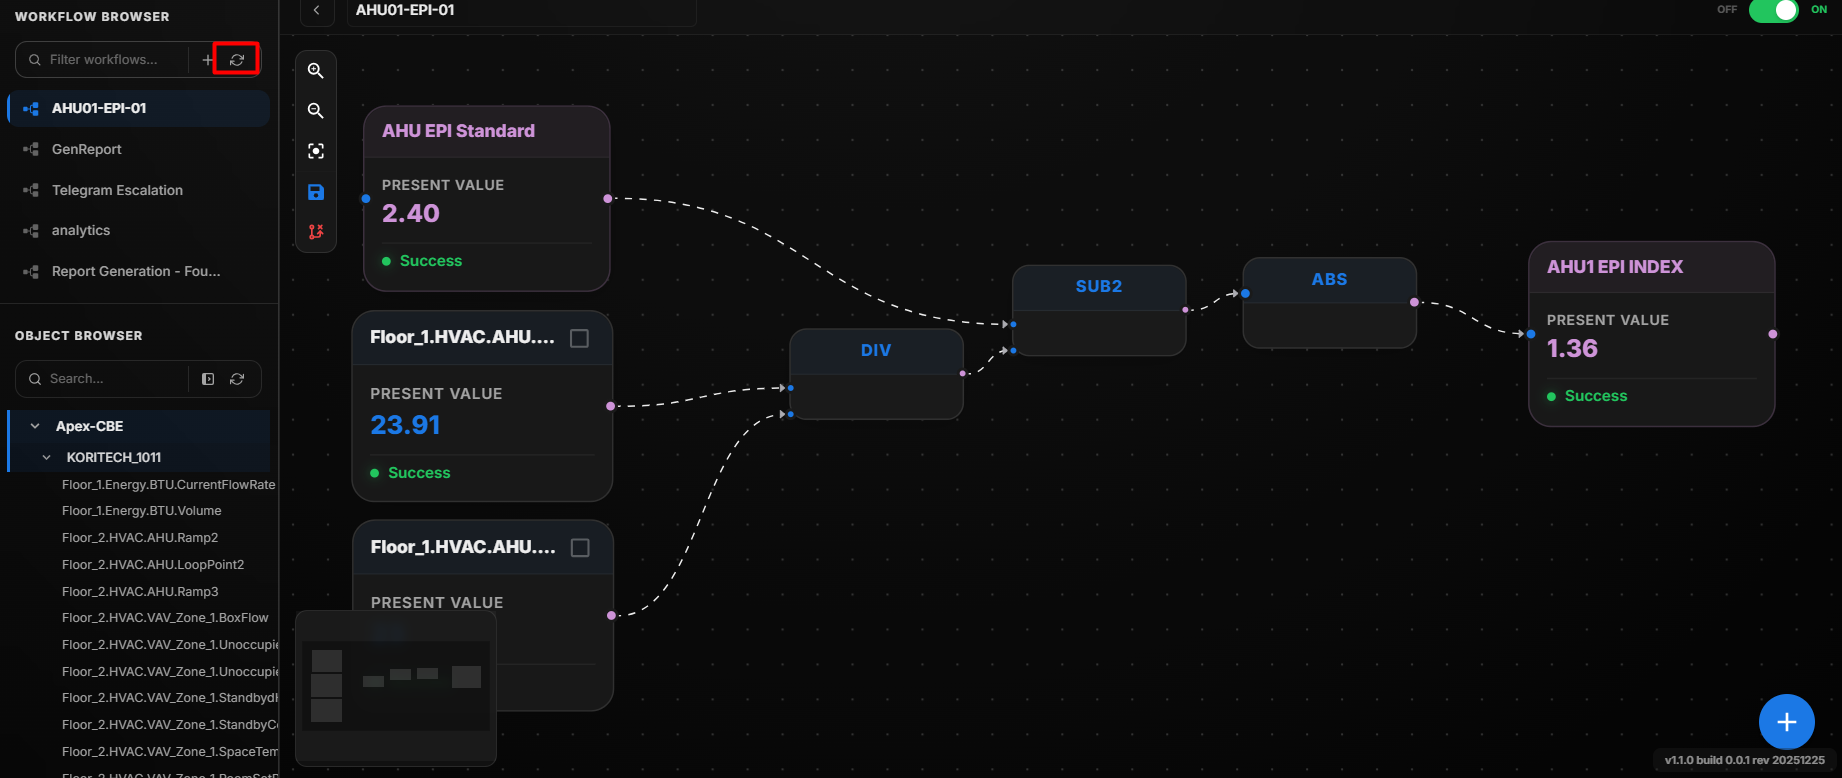 WorkFlow Refresh
The Refresh option updates the Workflow Browser with the latest saved workflows.
When the Refresh button is clicked:
- The system reloads the workflow list.
- Newly created or recently updated workflows are displayed.
- Any changes made are reflected immediately in the browser.
Object Browser
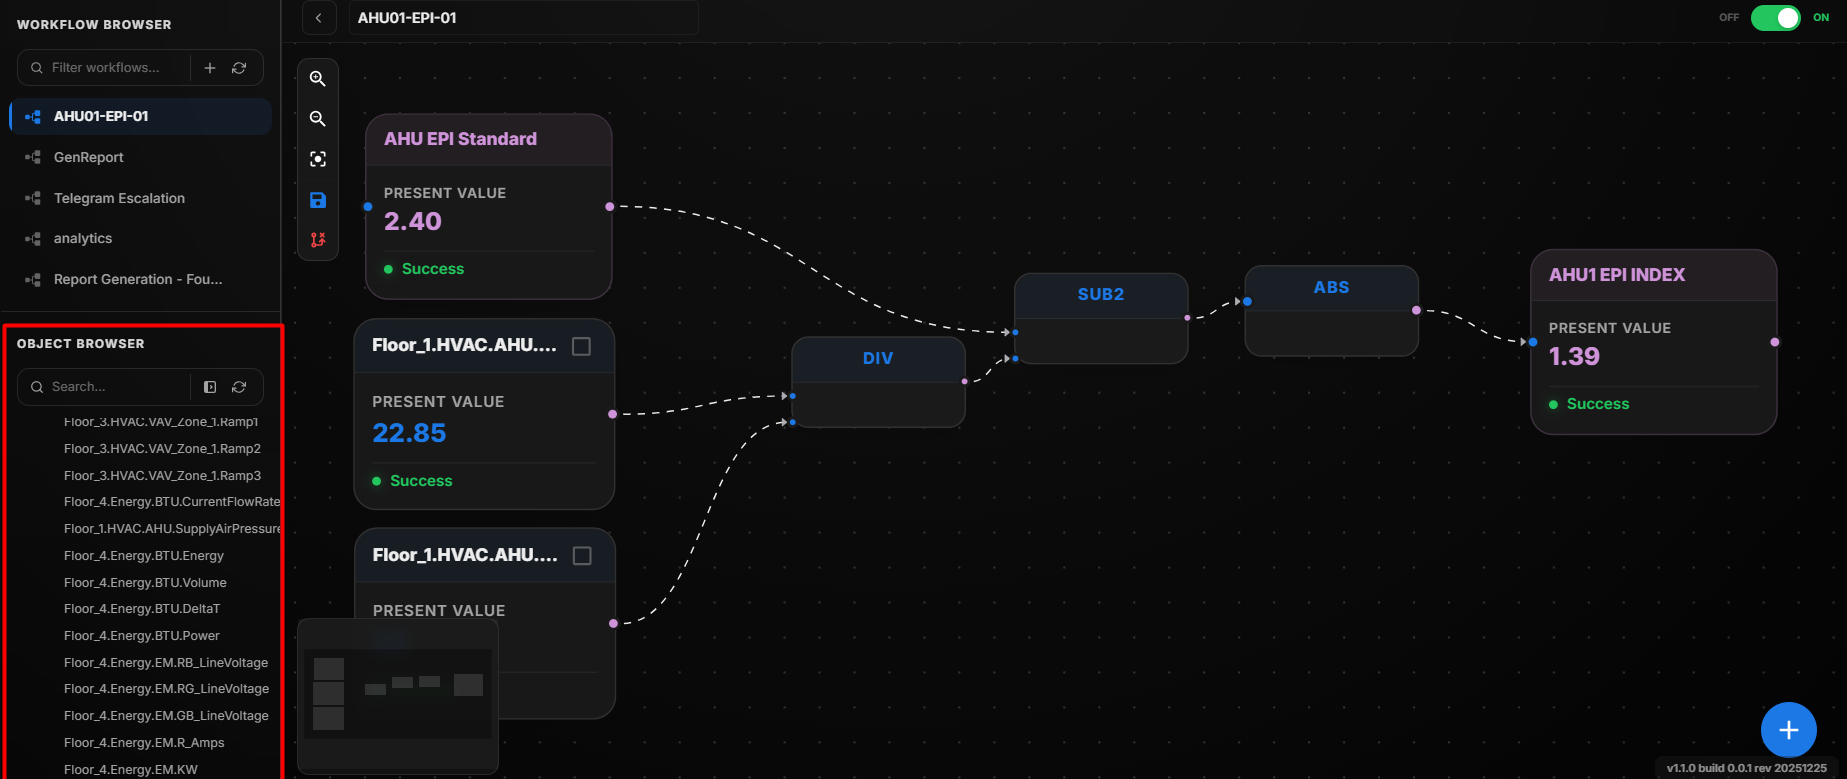 WorkFlow object Browser
In the Object Browser, users can view the hierarchy of Networks, Devices, and Points.
- All configured networks are displayed.
- Devices under each network are listed.
- Points under each device are shown.
- Users can drag and drop points from the Object Browser into the workspace for configuration or analysis.
Expand All
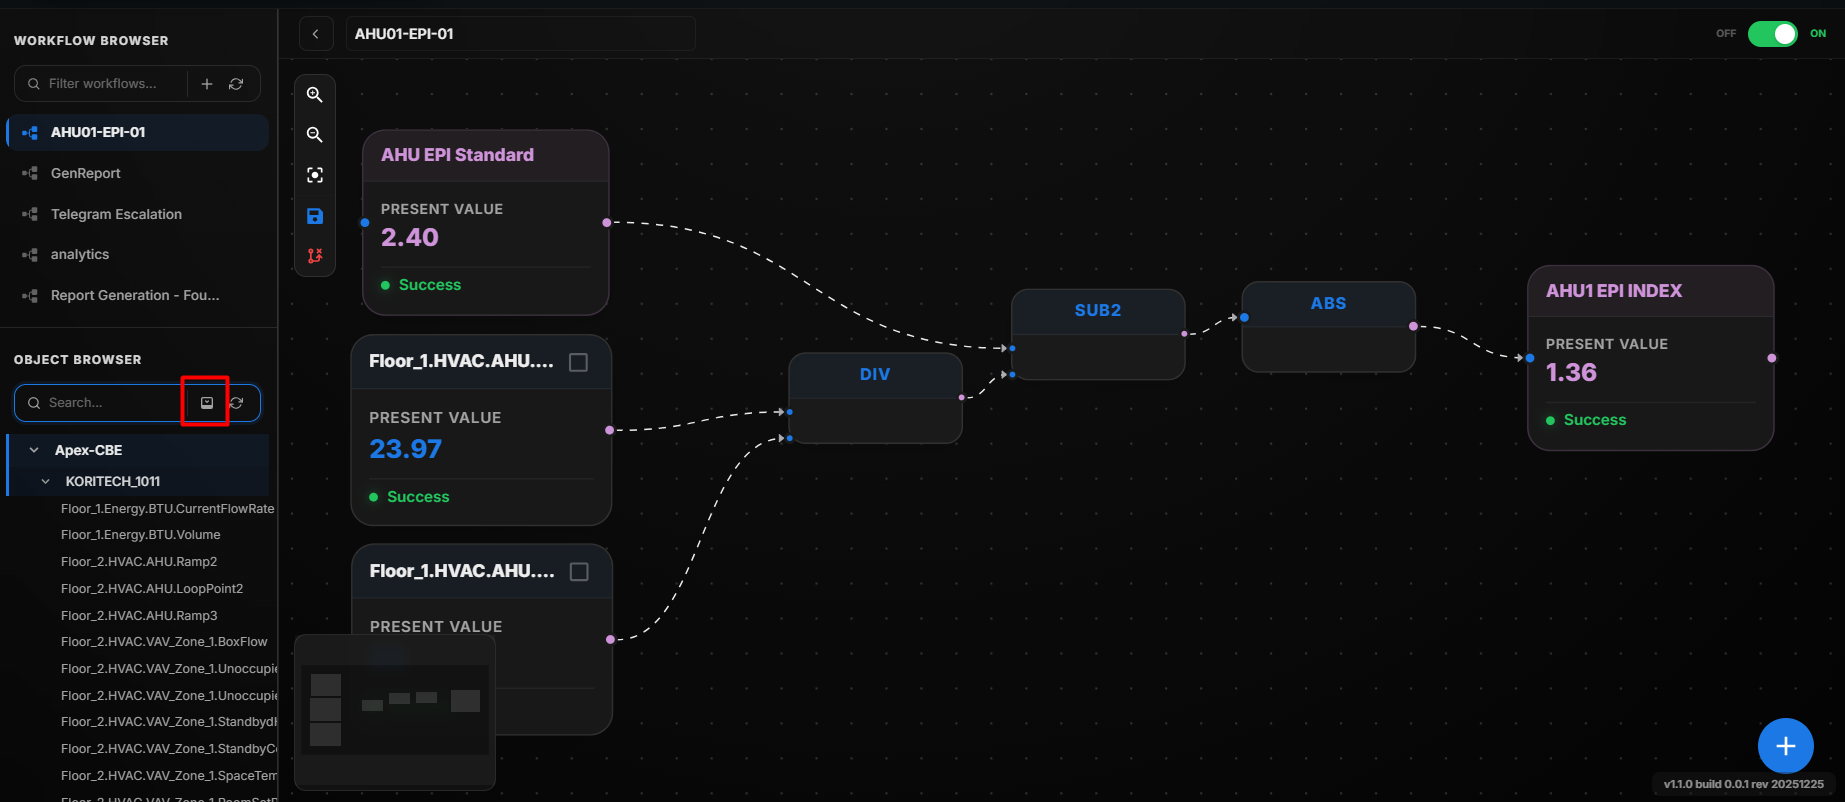 Workflow Expand
The Expand All option expands the complete hierarchy in the Object Browser.
When the Expand All button is clicked:
- All networks are expanded.
- All devices under each network are displayed.
- All points under each device become visible.
This allows users to view the entire structure without manually expanding each level.
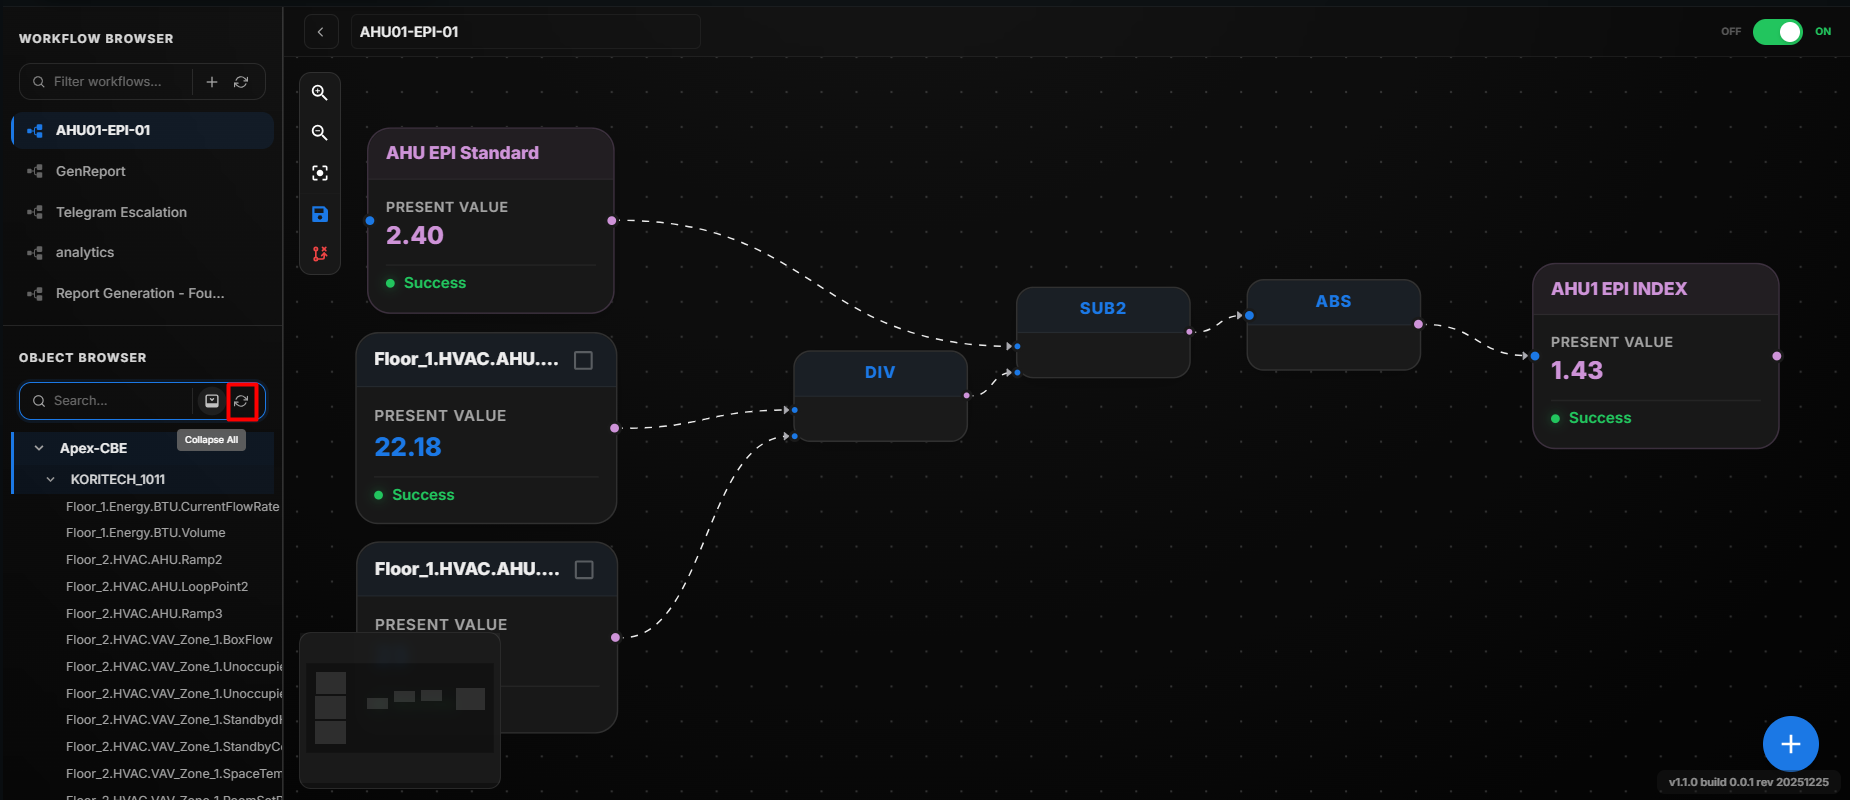
Refresh
 Workflow Expand
The Refresh option updates the Object Browser with the latest network, device, and point information.
When the Refresh button is clicked:
- The system reloads the hierarchy.
- Newly added networks, devices, or points are displayed.
- Recent changes are reflected immediately.