

Checklists
Configure and manage inspection checklists in Optimo Mobile.
Checklists
The Checklists module allows users to create, organize, publish, and manage checklist templates for inspections, maintenance activities, and other operational tasks.
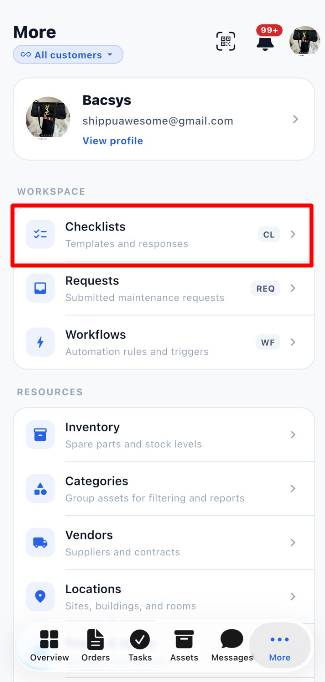
Users can create a checklist, add sections and items, assign tags, publish the checklist, and search for existing templates. This guide explains each step in a simple way.
1. Create a New Checklist
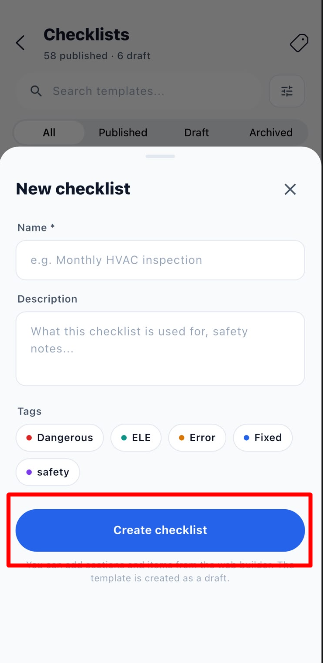
The New checklist form allows users to enter a checklist name, add a description, and assign tags to organize the checklist.
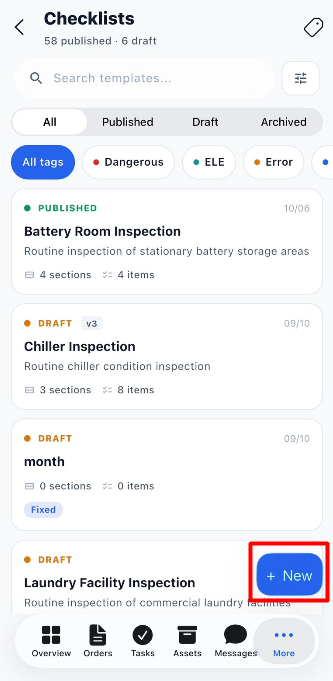
Steps to Create a Checklist
- Open the Checklists module.
- Click + New to open the New checklist form.
- Enter a descriptive name in the Name * field. This field is mandatory.
- Enter a description explaining the purpose of the checklist, if required.
- Select the relevant tags to categorize the checklist.
- To create a new tag, use the available tag creation option.
- Review the entered information.
- Click Create checklist.
Note: The checklist template is created as a draft. You can add sections and items from the web builder after creating it.
2. View the Created Checklist
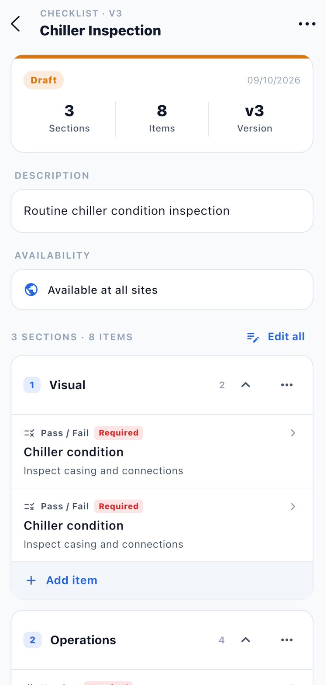
After clicking Create checklist, the checklist is saved as a Draft. Open the checklist to review its details, sections, and items before publishing it.
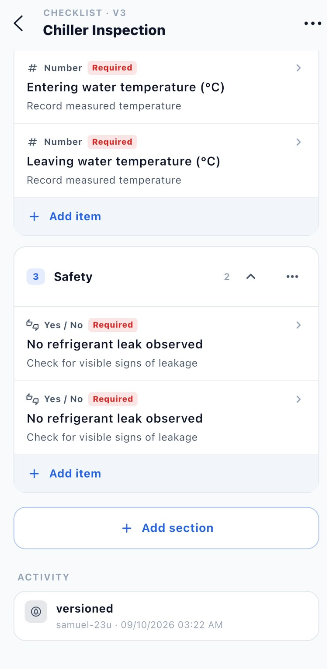
2.1 Checklist Details
| Section | Description |
|---|---|
| Status | Displays the current checklist status, such as Draft. |
| Sections | Displays the number of sections in the checklist. |
| Items | Displays the total number of checklist items. |
| Version | Displays the checklist version. |
| Description | Shows the description entered when creating the checklist. |
| Availability | Displays where the checklist is available, such as all sites. |
| Activity | Shows recorded activity related to the checklist. |
2.2 Manage Checklist Sections and Items
The checklist details page provides options to organize and update the checklist.
| Option | Description |
|---|---|
| Edit all | Opens the available editing options for checklist sections and items. |
| Section options (⋯) | Provides additional actions for a section. |
| Add item | Adds a new item to a section. |
| Add section | Adds another section to the checklist. |
2.3 Steps to Review the Draft
- Open the Checklists module.
- Select the Draft tab.
- Open the checklist you created.
- Review the checklist description and availability.
- Check the existing sections and items.
- Use Edit all, Add item, or Add section to make the required changes.
- Review the checklist before publishing it.
Note: Complete the required sections and items before publishing the checklist.
3. Publish a Checklist
After reviewing the checklist draft and completing the required sections and items, publish it to make that version available for use.
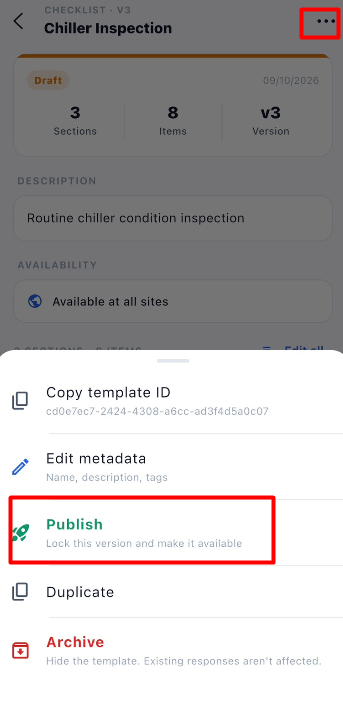
3.1 Steps to Publish a Checklist
- Open the Checklists module.
- Select the Draft tab.
- Open the checklist you want to publish.
- Click the three-dot menu (⋯) in the top-right corner.
- Select Publish from the available options.
- Confirm the action if the application asks for confirmation.
- Verify that the checklist status changes from Draft to Published.
3.2 Other Options in the Three-Dot Menu
| Option | Description |
|---|---|
| Copy template ID | Copies the unique ID of the checklist template. |
| Edit metadata | Allows you to update the checklist name, description, and tags. |
| Publish | Publishes the current checklist version and makes it available for use. |
| Duplicate | Creates a copy of the checklist. |
| Archive | Hides the checklist template. Existing responses are not affected. |
Important: Review the checklist before publishing. The Publish option locks the current version and makes it available for use.
4. Verify the Published Checklist
After clicking Publish, the checklist appears under the Published tab on the Checklists page. Its status changes from Draft to Published.
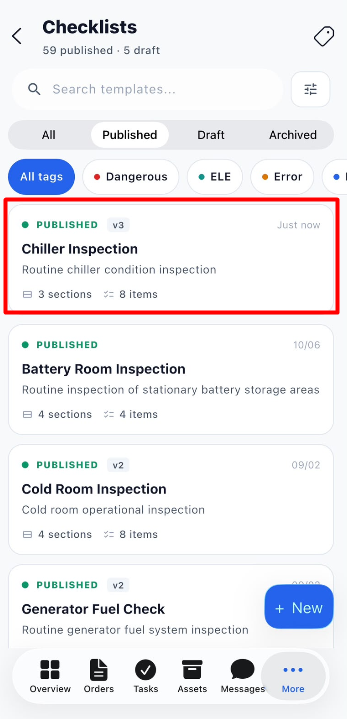
Steps to Verify Publication
- Open the Checklists module.
- Select the Published tab.
- Locate the checklist you just published.
- Verify that its status displays PUBLISHED.
- Check the checklist name, description, number of sections, and number of items.
Note: The published checklist is available for use according to its configured availability settings.
5. Manage Checklist Tags
The Manage tags option allows users to organize checklists by category. Users can create new tags, edit existing tags, and delete tags when they are no longer needed.
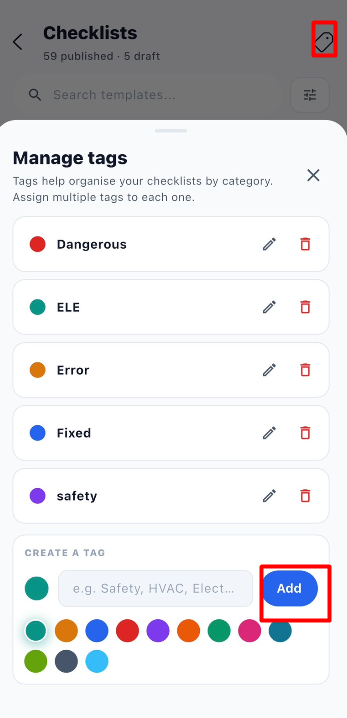
5.1 Available Options
| Option | Description |
|---|---|
| Edit (pencil icon) | Allows you to edit an existing tag. |
| Delete (trash icon) | Allows you to delete an existing tag. |
| Create a tag | Allows you to enter a name for a new tag. |
| Color selection | Allows you to choose a color to identify the tag visually. |
| Add | Creates a tag using the entered name and selected color. |
| Close (X) | Closes the Manage tags panel. |
5.2 Edit an Existing Tag
- Open the Checklists module.
- Click the Manage tags icon at the top of the page.
- Find the tag you want to update.
- Click the pencil icon beside the tag.
- Update the tag information using the available editing options.
- Save the changes, if prompted.
5.3 Delete an Existing Tag
- Open Manage tags.
- Find the tag you want to delete.
- Click the trash icon beside the tag.
- Confirm the deletion if the application asks for confirmation.
Important: Check whether the tag is used by existing checklists before deleting it.
5.4 Create a New Tag
- Open Manage tags.
- Navigate to the Create a tag section.
- Enter a name in the text field, such as Safety, HVAC, or Electrical.
- Select a color from the available color options.
- Click Add.
- Verify that the new tag appears in the list.
Note: Tags help users categorize and identify checklists more easily.
6. Search Checklists
The Search templates... field allows users to find a specific checklist template by entering its name or relevant search text.
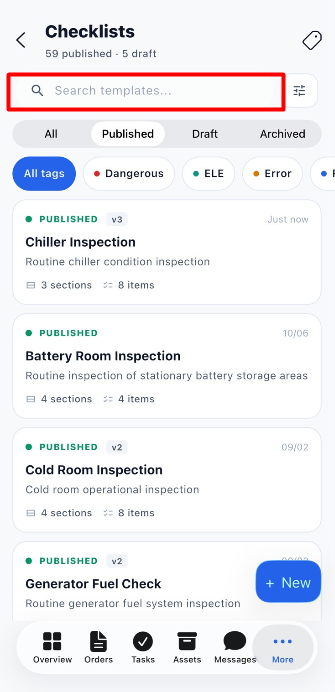
Steps to Search for a Checklist
- Open the Checklists module.
- Click the Search templates... field.
- Enter the checklist name or relevant search text.
- Review the matching checklist templates displayed on the page.
- Open the required checklist to view its details.
Tip: Enter a clear checklist name or a relevant part of the name to find the required template more easily.
7. Apply Filters to Checklists
The Filter icon beside the search field opens the Filters panel. Users can filter checklist templates by tags and choose how the results are sorted.
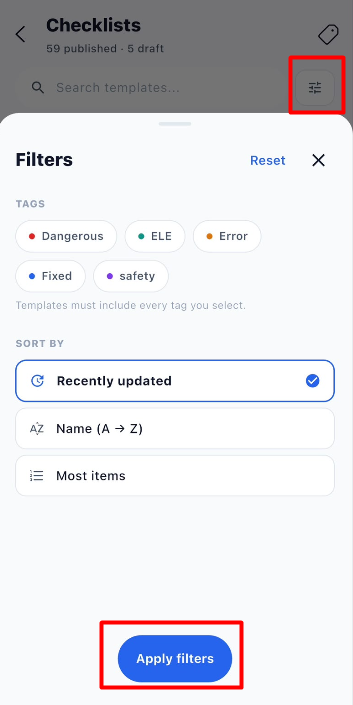
7.1 Available Tag Filters
Select one or more tags to display checklist templates that include every tag selected.
| Tag | Description |
|---|---|
| Dangerous | Filters templates associated with the Dangerous tag. |
| ELE | Filters templates associated with the ELE tag. |
| Error | Filters templates associated with the Error tag. |
| Fixed | Filters templates associated with the Fixed tag. |
| safety | Filters templates associated with the safety tag. |
7.2 Sort By Options
| Option | Description |
|---|---|
| Recently updated | Sorts templates by their most recent updates. |
| Name (A → Z) | Sorts templates alphabetically by name. |
| Most items | Sorts templates based on the number of items they contain. |
7.3 Steps to Apply Filters
- Open the Checklists module.
- Click the Filter icon beside the search field.
- Select the required tag or tags.
- Choose a sorting option under Sort By.
- Click Apply filters.
- Review the checklist templates displayed.
7.4 Additional Filter Options
- Reset: Clears the selected filter settings.
- Close (X): Closes the Filters panel.
Important: The filter panel states that templates must include every selected tag. For example, selecting both ELE and safety displays templates that include both tags.
8. Important Notes
- The checklist name is mandatory when creating a checklist.
- A newly created checklist is saved as a Draft.
- Review the checklist description, availability, sections, and items before publishing.
- Use Add section and Add item to organize the checklist.
- Use the three-dot menu to publish, duplicate, archive, or manage checklist metadata.
- Verify that the checklist displays PUBLISHED after publication.
- Use Manage tags to create, edit, and delete tags.
- Use Search templates... to find a checklist by name.
- Use the Filters panel to filter templates by tags and sort the results.
9. End-to-End Checklist Workflow
The following workflow summarizes the process of creating, reviewing, publishing, and finding a checklist.
Open Checklists Module
        ↓
Click + New
        ↓
Enter Checklist Name and Description
        ↓
Select or Create Tags
        ↓
Click Create Checklist
        ↓
Checklist Saved as Draft
        ↓
Open the Draft Checklist
        ↓
Review Description and Availability
        ↓
Add or Edit Sections and Items
        ↓
Open Three-Dot Menu (⋯)
        ↓
Click Publish
        ↓
Verify Checklist Status as Published
        ↓
Open the Published Tab
        ↓
Search for the Checklist or Apply Filters
        ↓
Open and Review the Checklist