

Workflows
Create, configure, and automate maintenance workflows in Optimo Mobile.
Workflows
The Workflows module allows users to automate routine maintenance activities. A workflow starts when a selected event occurs and then performs the actions configured by the user.
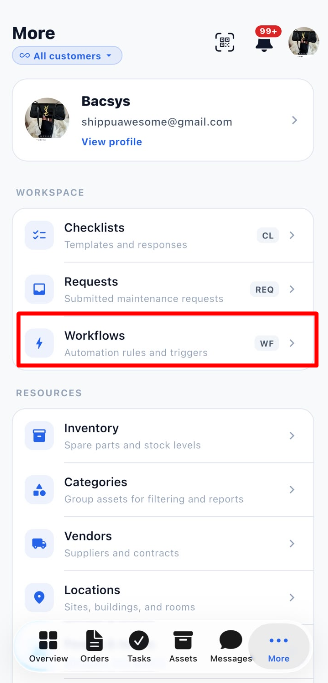
For example, a workflow can automatically assign a work order, send a notification, request approval, attach a checklist, or create another work order.
A workflow consists of three main parts:
| Component | Purpose |
|---|---|
| Trigger | Defines the event that starts the workflow. |
| Conditions | Defines when the workflow should run, based on the configured criteria. |
| Steps | Defines the actions that the workflow performs after it starts. |
1. View the Workflows Module
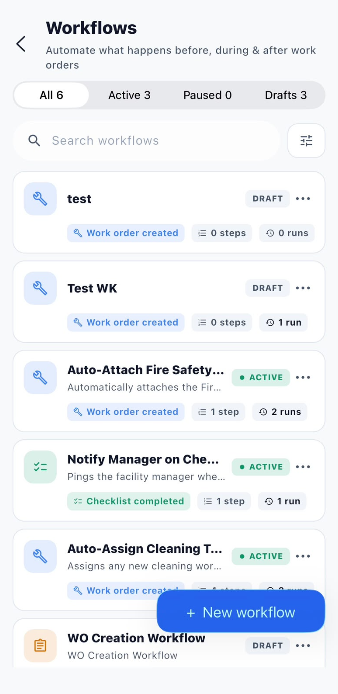
The Workflows page displays the workflows available in the application. Each workflow card provides information such as its name, trigger, status, number of configured steps, and number of recorded runs.
From this page, users can create workflows, search for existing workflows, filter workflows, and manage their status.
1.1 Workflow Status Tabs
| Tab | Description |
|---|---|
| All | Displays all available workflows, regardless of status. |
| Active | Displays workflows that are currently active. |
| Paused | Displays workflows that have been paused. |
| Drafts | Displays workflows that are still in draft status. |
The number displayed beside each tab indicates how many workflows belong to that category.
1.2 Information Displayed on Workflow Cards
| Field | Description |
|---|---|
| Workflow Name | Identifies the workflow. |
| Status | Shows whether the workflow is Active or Draft, where displayed. |
| Trigger | Shows the event that starts the workflow, such as Work order created. |
| Steps | Displays the number of configured workflow steps. |
| Runs | Displays the number of workflow executions recorded by the application. |
| Three-dot menu (⋯) | Provides the available workflow management options. |
1.3 Search Workflows
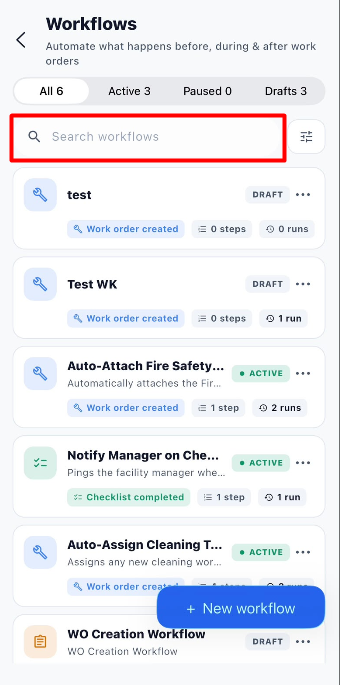
The Search workflows field helps users find a particular workflow without manually reviewing the entire list.
Steps to Search for a Workflow
- Open the Workflows module.
- Click the Search workflows field.
- Enter the workflow name or relevant search text.
- Review the matching workflows.
- Open the required workflow to view its configuration.
2. Create a New Workflow
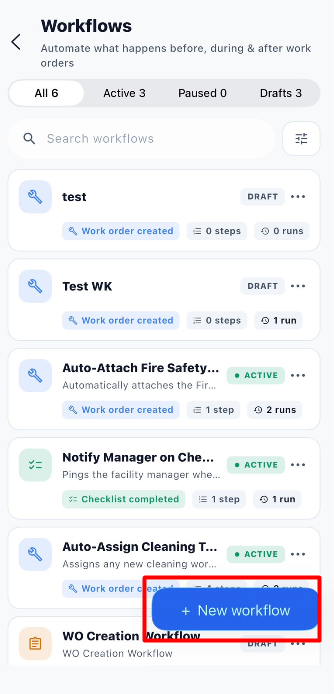
Click + New workflow to open the workflow creation form. You must provide a workflow name and select a trigger before continuing with the configuration.
2.1 Workflow Details
| Field | Description | Required |
|---|---|---|
| Workflow name | Enter a meaningful name that identifies the purpose of the workflow. | Yes |
| Description (optional) | Explain what the workflow is intended to automate. | No |
Steps to Create a Workflow
- Open the Workflows module.
- Click + New workflow.
- Enter a name in the Workflow name field.
- Add a description in Description (optional), if required.
- Select the event that should start the workflow.
- Continue by configuring the trigger and any available conditions.
Example: A workflow named Auto-Attach Fire Safety Checklist could be configured to attach a Fire Safety Inspection Checklist when a work order is created with the relevant category.
3. Select a Workflow Trigger
A trigger is the event that starts a workflow. Choose the trigger based on the activity you want the application to respond to.
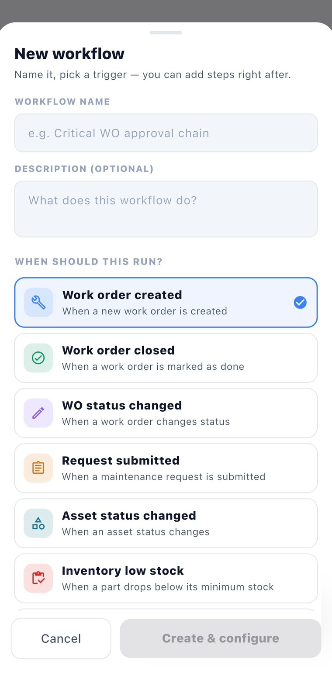
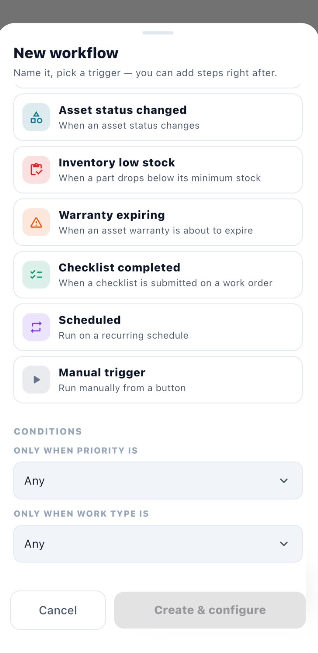
3.1 Available Triggers
| Trigger | Description |
|---|---|
| Work order created | Starts the workflow when a new work order is created. |
| Work order closed | Starts the workflow when a work order is marked as done. |
| WO status changed | Starts the workflow when a work order's status changes. |
| Request submitted | Starts the workflow when a maintenance request is submitted. |
| Asset status changed | Starts the workflow when an asset's status changes. |
| Inventory low stock | Starts the workflow when a part drops below its minimum stock level. |
| Warranty expiring | Starts the workflow when an asset warranty is about to expire. |
| Checklist completed | Starts the workflow when a checklist is submitted on a work order. |
| Scheduled | Starts the workflow according to a configured schedule. |
| Manual trigger | Allows the workflow to be started manually from a button. |
3.2 Steps to Select a Trigger
- Open the New workflow form.
- Review the available trigger options.
- Select the event that should start the workflow.
- Confirm that the selected trigger matches the intended automation.
- Continue to the conditions section, if applicable.
Example: Select Work order created when the workflow should run after a new work order is created.
Important: The trigger determines when the workflow starts. The steps determine what happens after the trigger occurs.
4. Configure Workflow Conditions
Conditions allow you to restrict when a workflow should run. The workflow creation form provides conditions for priority and work type.
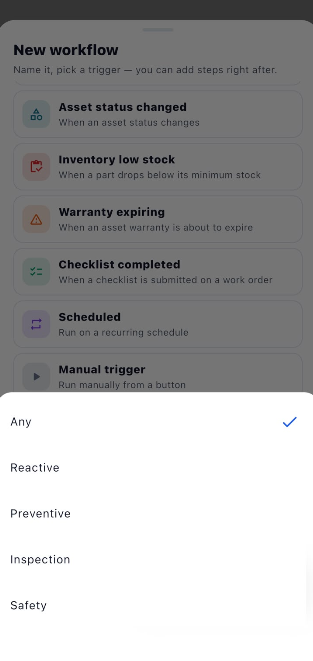
4.1 Available Conditions
| Condition | Description |
|---|---|
| Only when priority is | Restricts the workflow to work matching the selected priority. |
| Only when work type is | Restricts the workflow to work matching the selected work type. |
4.2 Priority Options
| Option | Description |
|---|---|
| Any | Does not restrict the workflow to one particular priority. |
| Low | Applies the condition to Low-priority work. |
| Medium | Applies the condition to Medium-priority work. |
| High | Applies the condition to High-priority work. |
| Critical | Applies the condition to Critical-priority work. |
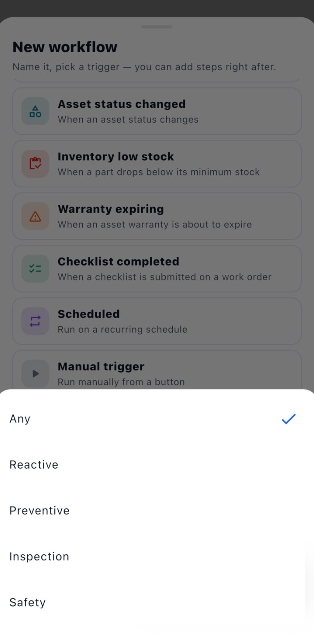
4.3 Work Type Options
| Option | Description |
|---|---|
| Any | Does not restrict the workflow to one particular work type. |
| Reactive | Applies the condition to Reactive work. |
| Preventive | Applies the condition to Preventive work. |
| Inspection | Applies the condition to Inspection work. |
| Safety | Applies the condition to Safety work. |
4.4 Steps to Configure Conditions
- Locate the Conditions section.
- Open Only when priority is.
- Select the required priority or keep Any if no priority restriction is needed.
- Open Only when work type is.
- Select the required work type or keep Any.
- Review the selected conditions.
- Continue with the workflow configuration.
Example: Select Critical if the workflow should be restricted to Critical-priority work, where supported by the selected trigger.
5. Create and Configure the Workflow
After entering the workflow details and selecting a trigger, click Create & configure to proceed to the workflow configuration page.
Steps
- Enter the workflow name.
- Add a description, if required.
- Select the trigger.
- Configure the available priority and work type conditions.
- Review the information.
- Click Create & configure.
- Open the created workflow to configure its steps.
Note: The screenshots show that Create & configure remains disabled until the required information has been provided.
6. Add Steps to a Workflow
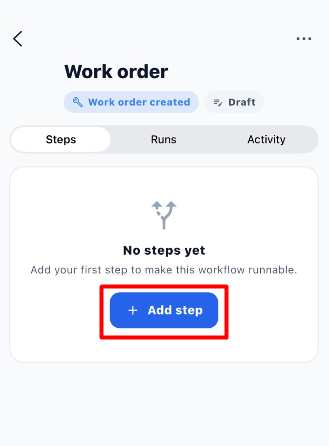
After creating and opening a workflow, use the Steps tab to define the actions that should happen when the workflow runs.
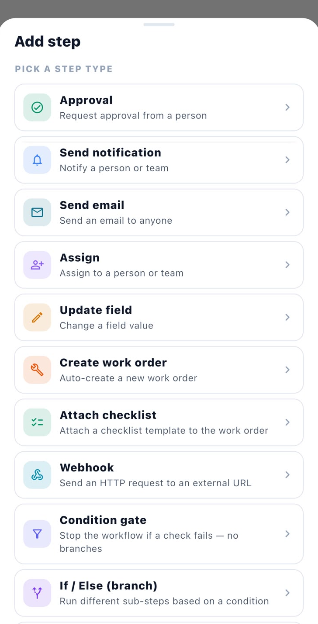
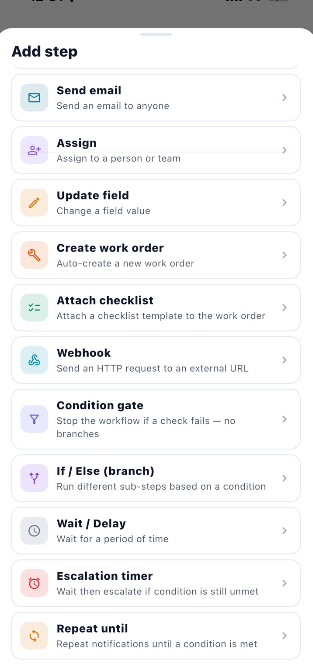
Click + Add step to open the Add step panel. Select a step type to display its configuration form. Complete the required fields and click Add step to add the action to the workflow.
6.1 Available Step Types
| Step Type | Purpose |
|---|---|
| Approval | Requests approval from a person. |
| Send notification | Sends a notification to a person or team. |
| Send email | Sends an email to a specified recipient. |
| Assign | Assigns a work order to a person or team. |
| Update field | Changes the value of a selected field. |
| Create work order | Automatically creates a new work order. |
| Attach checklist | Attaches a checklist template to a work order. |
| Webhook | Sends an HTTP request to an external URL. |
| Condition gate | Checks a condition and stops the workflow if the check fails. It does not provide separate branches. |
| If / Else (branch) | Runs different sub-steps depending on whether a condition is true or false. |
| Wait / Delay | Pauses the workflow for a specified period. |
| Escalation timer | Waits and triggers configured escalation actions if a condition remains unmet. |
| Repeat until | Repeats configured actions at an interval until a condition is met, subject to the iteration limit. |
General Steps to Add a Workflow Action
- Open the required workflow.
- Select the Steps tab.
- Click + Add step.
- Select the required step type.
- Complete the fields displayed for that step.
- Review the configuration.
- Click Add step.
- Confirm that the step appears in the workflow.
- Repeat these steps to add more actions.
The following sections explain how to configure each step type.
7. Configure Individual Workflow Steps
7.1 Add an Approval Step
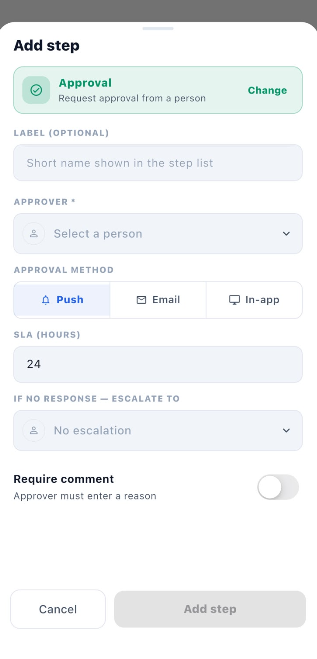
The Approval step requests approval from a selected person. You can configure how the request is delivered, how long the approver has to respond, and what happens if there is no response.
Available Fields
| Field | Description | Required |
|---|---|---|
| Label (optional) | Enter a short name to identify the step in the workflow. | No |
| Approver | Select the person who must approve the request. | Yes |
| Approval method | Select Push, Email, or In-app. | Yes |
| SLA (hours) | Specify the expected response time in hours. The screenshot shows 24 hours by default. | Yes |
| If no response — escalate to | Select an escalation option if the approver does not respond. The screenshot shows No escalation by default. | No |
| Require comment | Enable this option if the approver must provide a reason or comment. | No |
Steps to Configure Approval
- Click + Add step.
- Select Approval.
- Enter a label, if required.
- Open Approver and select the required person.
- Select the Approval method.
- Set the SLA (hours).
- Configure If no response — escalate to, if required.
- Enable Require comment if an explanation must be provided.
- Review the settings.
- Click Add step.
Note: Complete the required fields before adding the approval step.
7.2 Add a Send Notification Step
The Send notification step sends a notification to a selected recipient through the chosen delivery channel.
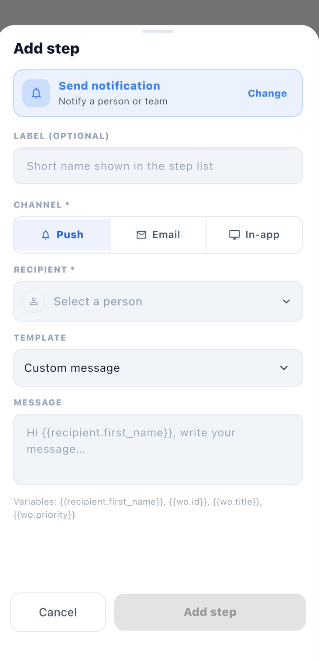
Available Fields
| Field | Description | Required |
|---|---|---|
| Label (optional) | Enter a short name for the notification step. | No |
| Channel | Select Push, Email, or In-app. | Yes |
| Recipient | Select the person who should receive the notification. | Yes |
| Template | Select the notification template. The screenshot shows Custom message. | No |
| Message | Enter the notification content. Supported variables can be included. | Depends on configuration |
The screenshot shows these example message variables:
{{recipient.first_name}}{{wo.id}}{{wo.title}}{{wo.priority}}
Steps to Configure a Notification
- Click + Add step.
- Select Send notification.
- Enter a label, if required.
- Select the Channel.
- Choose the Recipient.
- Select a Template.
- Enter the notification content in Message.
- Include supported variables when you want to insert recipient or work order information.
- Review the notification settings.
- Click Add step.
Note: Check the recipient and delivery channel before adding the step.
7.3 Add a Send Email Step
The Send email step sends an email to the address specified in the configuration form.
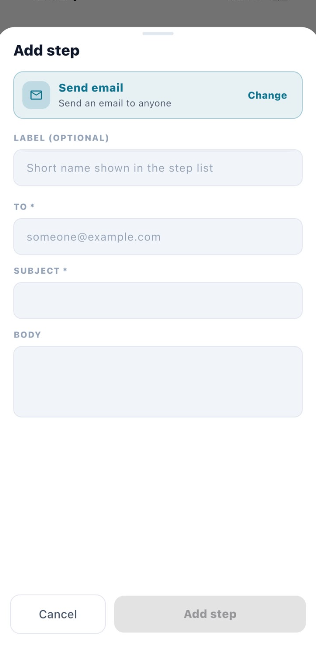
Available Fields
| Field | Description | Required |
|---|---|---|
| Label (optional) | Enter a short name for the email step. | No |
| To | Enter the recipient's email address. | Yes |
| Subject | Enter the email subject. | Yes |
| Body | Enter the email message. | Not marked as required in the screenshot |
Steps to Configure an Email
- Click + Add step.
- Select Send email.
- Enter a label, if required.
- Enter the recipient's email address in To.
- Enter the email subject in Subject.
- Write the message in Body.
- Review the recipient, subject, and message.
- Click Add step.
Tip: Use a clear subject and message so the recipient understands why the email was sent.
7.4 Add an Assign Step
The Assign step assigns a work order to a person, a team, or both.
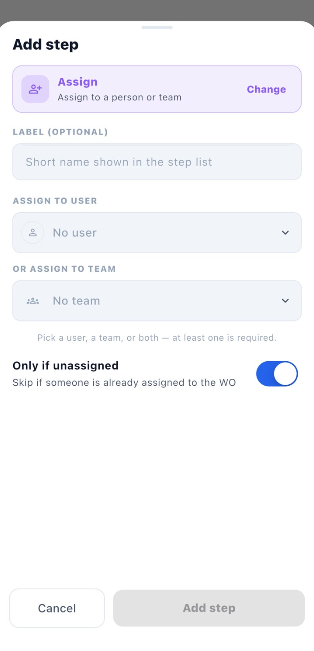
Available Fields
| Field | Description | Required |
|---|---|---|
| Label (optional) | Enter a short name for the step. | No |
| Assign to user | Select the person who should receive the work order. | At least one assignment is required |
| Or assign to team | Select the team responsible for the work order. | At least one assignment is required |
| Only if unassigned | When enabled, skips the assignment if someone is already assigned to the work order. The screenshot shows this option enabled by default. | No |
Steps to Configure Assignment
- Click + Add step.
- Select Assign.
- Enter a label, if required.
- Open Assign to user and select a person, if needed.
- Open Or assign to team and select a team, if needed.
- Configure Only if unassigned according to your requirement.
- Review the assignment settings.
- Click Add step.
Important: Select at least a user or a team before adding the step.
7.5 Add an Update Field Step
The Update field step changes the value of a field selected in the configuration form.
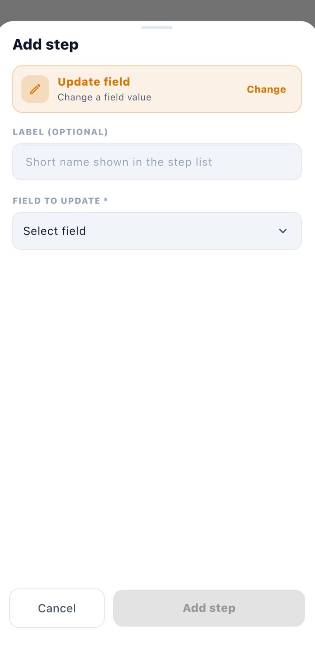
Available Fields
| Field | Description | Required |
|---|---|---|
| Label (optional) | Enter a short name for the step. | No |
| Field to update | Select the field whose value should be changed. | Yes |
Steps to Configure Update Field
- Click + Add step.
- Select Update field.
- Enter a label, if required.
- Open Field to update.
- Select the field you want to change.
- Complete any additional fields displayed for that selection.
- Review the configuration.
- Click Add step.
Note: The available additional fields depend on the field selected.
7.6 Add a Create Work Order Step
The Create work order step automatically creates a new work order when the workflow reaches this action.
The configuration form contains sections for general details, assignment, location and asset, schedule, recurrence, linked items, reporter, and attachments.
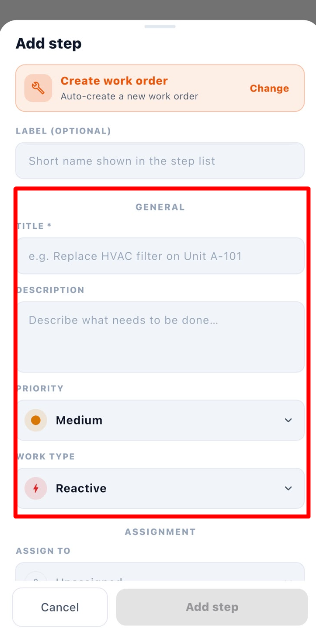
7.6.1 General Details
| Field | Description | Required |
|---|---|---|
| Label (optional) | Enter a short name to identify the step. | No |
| Title | Enter the title of the work order to be created. | Yes |
| Description | Describe the work that needs to be completed. | No |
| Priority | Select the priority of the new work order. The screenshot shows Medium. | Available field |
| Work type | Select the type of work. The screenshot shows Reactive. | Available field |
7.6.2 Assignment
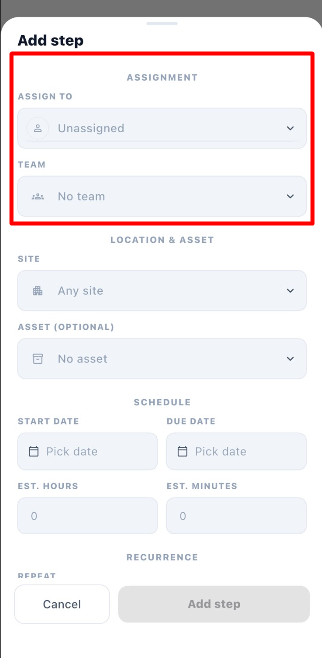
| Field | Description |
|---|---|
| Assign to | Select the person responsible for the work order. The screenshot shows Unassigned. |
| Team | Select the team responsible for the work order. The screenshot shows No team. |
Choose the appropriate person, team, or assignment options for the new work order.
7.6.3 Location and Asset
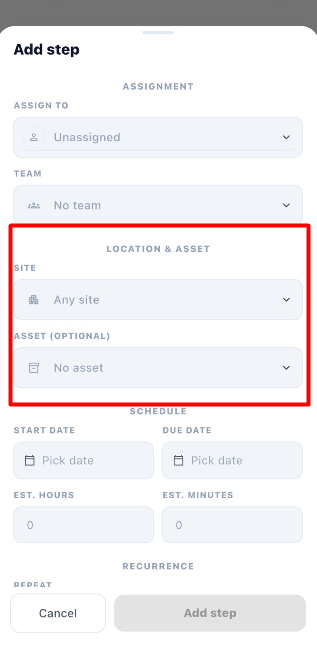
| Field | Description |
|---|---|
| Site | Select the site associated with the work order. The screenshot shows Any site. |
| Asset (optional) | Select the asset associated with the work order, if applicable. The screenshot shows No asset. |
7.6.4 Schedule
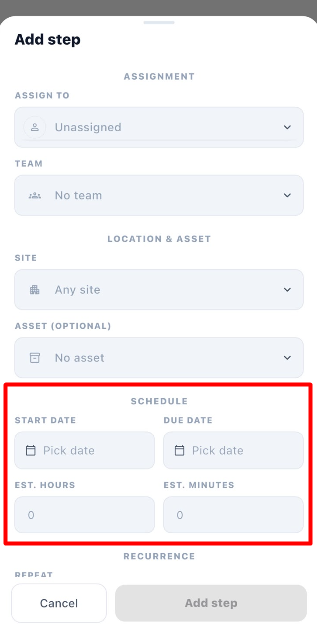
| Field | Description |
|---|---|
| Start date | Select the planned start date. |
| Due date | Select the work order's due date. |
| Est. hours | Enter the estimated duration in hours. |
| Est. minutes | Enter the estimated duration in minutes. |
7.6.5 Recurrence
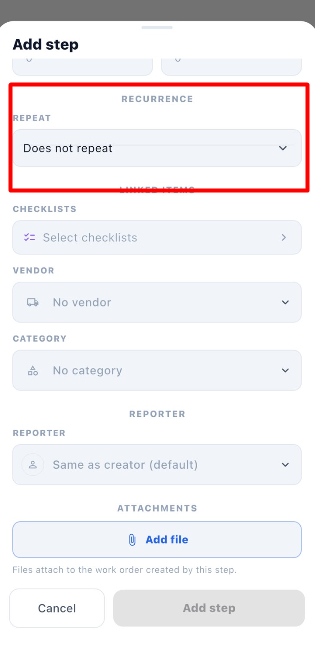
| Field | Description |
|---|---|
| Repeat | Select whether the work order should repeat. The screenshot shows Does not repeat. |
If a recurring work order is required, select the appropriate option and complete any additional fields displayed.
7.6.6 Linked Items
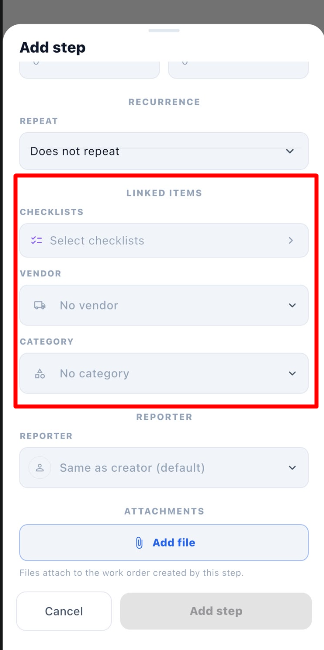
| Field | Description |
|---|---|
| Checklists | Select checklist templates to attach to the work order. |
| Vendor | Select the associated vendor, if applicable. The screenshot shows No vendor. |
| Category | Select a category for the work order. The screenshot shows No category. |
7.6.7 Reporter
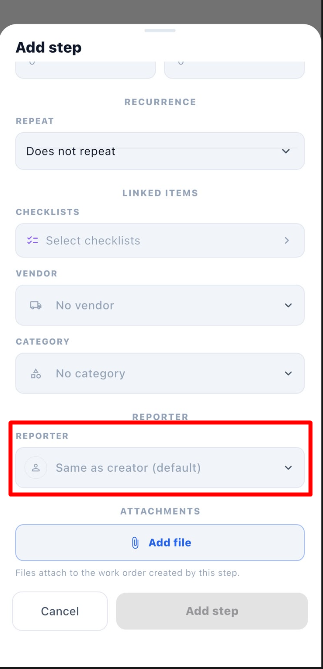
| Field | Description |
|---|---|
| Reporter | Select the person recorded as the work order's reporter. The screenshot shows Same as creator (default). |
7.6.8 Attachments
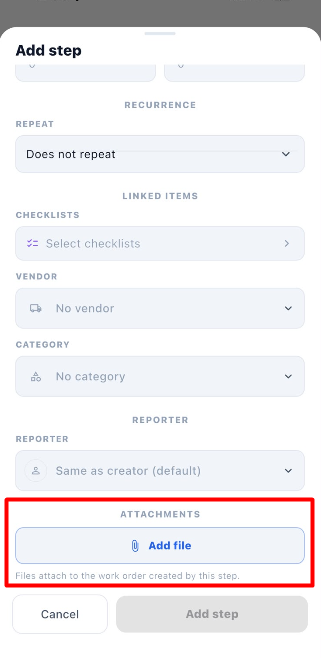
| Option | Description |
|---|---|
| Add file | Attach files to the work order created by this workflow step. |
Steps to Configure Create Work Order
- Click + Add step.
- Select Create work order.
- Enter a label, if required.
- Enter the work order Title.
- Add a Description, if needed.
- Select the Priority and Work type.
- Configure Assign to and Team.
- Select the Site and an Asset, if applicable.
- Set the Start date, Due date, and estimated duration.
- Configure Repeat if a recurring schedule is required.
- Select the required Checklists.
- Select a Vendor and Category, if applicable.
- Review the Reporter setting.
- Click Add file to attach supporting files, if required.
- Review all the entered information.
- Click Add step to save the configured action to the workflow.
Important: Complete the mandatory fields and verify the work order details before adding the step.
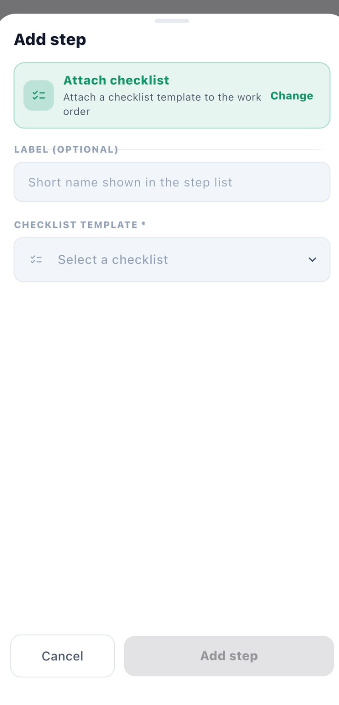
7.7 Add an Attach Checklist Step
The Attach checklist step attaches a checklist template to a work order when the workflow runs.
Available Fields
| Field | Description | Required |
|---|---|---|
| Label (optional) | Enter a short name for the step. | No |
| Checklist template | Select the checklist that should be attached to the work order. | Yes |
Steps to Configure Attach Checklist
- Open the required workflow.
- Select the Steps tab.
- Click + Add step.
- Select Attach checklist.
- Enter a label, if required.
- Open Checklist template.
- Select the required checklist.
- Review the selected checklist.
- Click Add step.
Note: Choose the checklist template that should be attached when the workflow action runs.
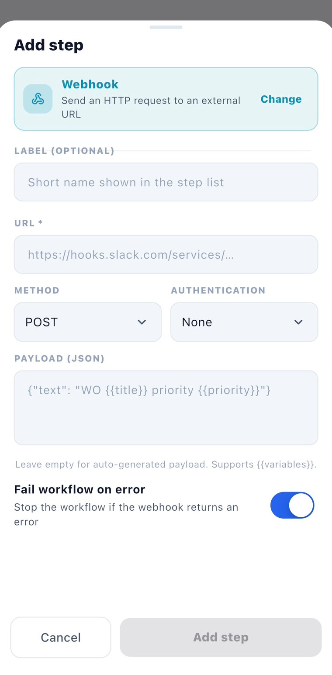
7.8 Add a Webhook Step
The Webhook step sends an HTTP request to an external URL. It can be configured to send workflow information to another system or service.
Available Fields
| Field | Description | Required |
|---|---|---|
| Label (optional) | Enter a short name for the step. | No |
| URL | Enter the external URL that will receive the request. | Yes |
| Method | Select the HTTP request method. The screenshot shows POST. | Available field |
| Authentication | Select the authentication method. The screenshot shows None. | Available field |
| Payload (JSON) | Enter the data to send in JSON format. | Optional in the screenshot |
| Fail workflow on error | When enabled, stops the workflow if the webhook returns an error. | Optional |
The screenshot shows these example variables in the payload:
{{wo.title}}{{priority}}
Steps to Configure a Webhook
- Click + Add step.
- Select Webhook.
- Enter a label, if required.
- Enter the destination address in URL.
- Select the required Method.
- Select the appropriate Authentication option.
- Enter the JSON payload, if required.
- Enable or disable Fail workflow on error, as needed.
- Review the configuration.
- Click Add step.
Important: Verify the destination URL, authentication settings, and payload before adding the webhook.
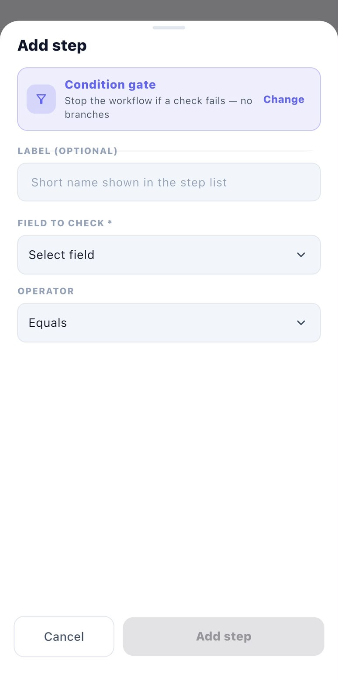
7.9 Add a Condition Gate Step
The Condition gate step checks a selected field against a condition. If the check fails, the workflow stops at this step. It does not provide separate true and false branches.
Available Fields
| Field | Description | Required |
|---|---|---|
| Label (optional) | Enter a short name for the step. | No |
| Field to check | Select the field whose value should be checked. | Yes |
| Operator | Select the comparison operator. The screenshot shows Equals. | Available field |
Steps to Configure a Condition Gate
- Click + Add step.
- Select Condition gate.
- Enter a label, if required.
- Open Field to check.
- Select the field to evaluate.
- Choose the required Operator.
- Complete any additional fields displayed.
- Review the condition.
- Click Add step.
Note: The available comparison options and additional fields depend on the selected field and operator.
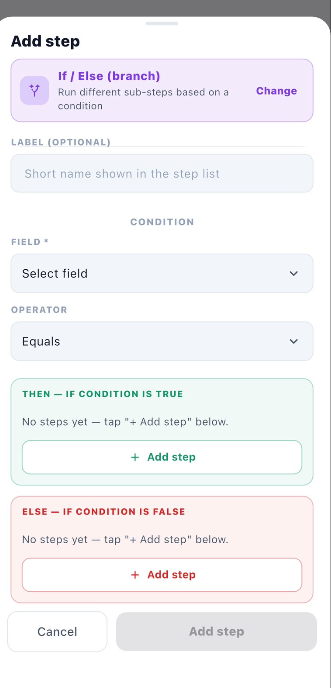
7.10 Add an If / Else (Branch) Step
The If / Else (branch) step allows the workflow to follow different paths depending on whether a condition is true or false.
Available Fields and Options
| Field or Option | Description |
|---|---|
| Label (optional) | Enter a short name for the branch step. |
| Field | Select the field to evaluate. |
| Operator | Choose how the field value should be checked. The screenshot shows Equals. |
| Then — If condition is true | Add sub-steps to run when the condition is true. |
| Else — If condition is false | Add sub-steps to run when the condition is false. |
Steps to Configure If / Else
- Click + Add step.
- Select If / Else (branch).
- Enter a label, if required.
- Under Condition, select the required Field.
- Choose the appropriate Operator.
- Under Then — If condition is true, click + Add step.
- Add the actions that should run when the condition is true.
- Under Else — If condition is false, click + Add step.
- Add the actions that should run when the condition is false.
- Review both branches.
- Click Add step to add the branch to the workflow.
Note: Both branches initially have no steps. Add the required actions to define what happens in each case.
7.11 Add a Wait / Delay Step
The Wait / Delay step pauses the workflow for a specified period before it continues.
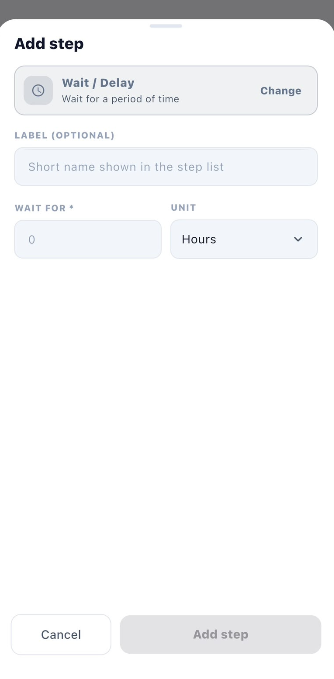
Available Fields
| Field | Description | Required |
|---|---|---|
| Label (optional) | Enter a short name for the step. | No |
| Wait for | Enter how long the workflow should wait. | Yes |
| Unit | Select the time unit. The screenshot shows Hours. | Yes |
Steps to Configure Wait / Delay
- Click + Add step.
- Select Wait / Delay.
- Enter a label, if required.
- Enter the waiting duration in Wait for.
- Select the appropriate Unit.
- Review the waiting period.
- Click Add step.
Example: Enter 2 in Wait for and select Hours to configure a two-hour delay.
7.12 Add an Escalation Timer Step
The Escalation timer step waits for a specified period and checks whether a condition remains unmet. If the condition still holds after the waiting period, the configured escalation actions can run.
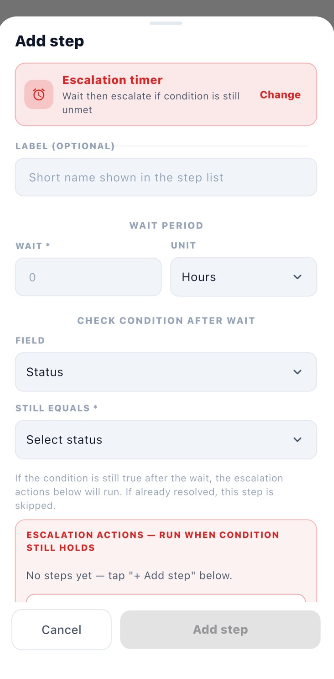
Available Fields
| Field | Description | Required |
|---|---|---|
| Label (optional) | Enter a short name for the step. | No |
| Wait | Enter the waiting period before checking the condition. | Yes |
| Unit | Select the time unit. The screenshot shows Hours. | Yes |
| Field | Select the field to check after the waiting period. The screenshot shows Status. | Available field |
| Still equals | Select the value that must still be present for escalation actions to run. | Yes |
| Escalation actions | Configure the actions to run if the condition remains true after the waiting period. | Configure as required |
If the condition is no longer true after the waiting period, the escalation step is skipped.
Steps to Configure an Escalation Timer
- Click + Add step.
- Select Escalation timer.
- Enter a label, if required.
- Enter the waiting duration in Wait.
- Select the Unit.
- Under Check condition after wait, select the required Field.
- Choose the expected value under Still equals.
- Configure the escalation actions.
- Review the waiting period and condition.
- Click Add step.
Note: Configure the escalation actions according to what should happen if the condition remains unmet.
7.13 Add a Repeat Until Step
The Repeat until step repeats configured actions at a specified interval until a selected condition is met. A maximum iteration limit helps prevent an indefinite loop.
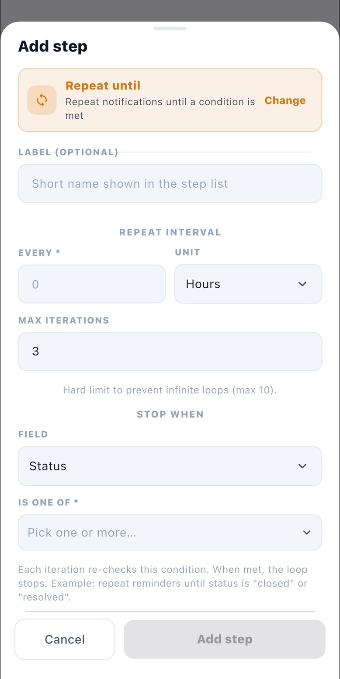
Available Fields
| Field | Description | Required |
|---|---|---|
| Label (optional) | Enter a short name for the step. | No |
| Every | Enter the interval between repetitions. | Yes |
| Unit | Select the time unit. The screenshot shows Hours. | Yes |
| Max iterations | Set the maximum number of repetitions. The screenshot shows 3. | Available field |
| Field | Select the field used to determine when repetition should stop. The screenshot shows Status. | Available field |
| Is one of | Select one or more values that should stop the repetition when the condition is met. | Yes |
The screenshot indicates a hard limit of 10 iterations to prevent infinite loops. The selected condition is checked again during each iteration.
Steps to Configure Repeat Until
- Click + Add step.
- Select Repeat until.
- Enter a label, if required.
- Enter the repetition interval in Every.
- Select the appropriate Unit.
- Set Max iterations.
- Under Stop when, select the required Field.
- Under Is one of, select one or more values that should stop the repetition.
- Review the interval, iteration limit, and stopping condition.
- Click Add step.
Example: If the selected field is Status, choose the appropriate status values that should stop the repetition.
8. Review Workflow Steps, Runs, and Activity
After configuring a workflow, use the Steps, Runs, and Activity tabs to review its configuration and recorded execution information.
8.1 Steps Tab
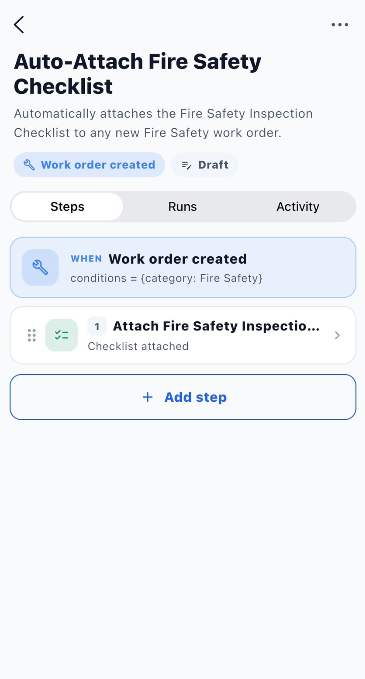
The Steps tab displays the trigger and the actions configured for the workflow.
In the example shown, the workflow starts when a Work order created event occurs and attaches a Fire Safety Inspection Checklist to the new work order.
Information displayed
- Trigger: Shows the event that starts the workflow.
- Conditions: Shows configured conditions, such as the category being Fire Safety.
- Configured steps: Shows the actions added to the workflow.
- + Add step: Allows you to add more actions.
Steps to Add Multiple Actions
- Open the required workflow.
- Select the Steps tab.
- Click + Add step.
- Select the required step type.
- Complete the configuration fields.
- Click Add step.
- Review the newly added action.
- Repeat these steps to add more actions.
Note: You can add multiple steps to automate several actions in sequence.
8.2 Runs Tab
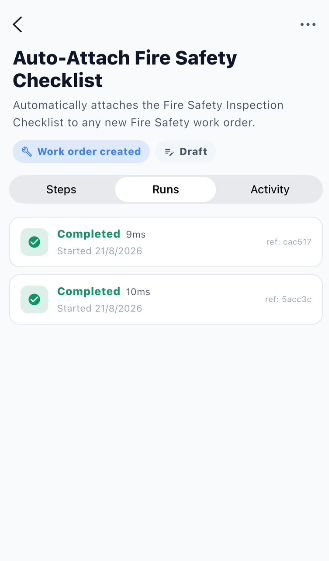
The Runs tab displays recorded workflow executions. It helps users check whether a workflow has run and review the time taken for each recorded execution.
Information Displayed
| Field | Description |
|---|---|
| Status | Indicates the outcome of a workflow run. The screenshot shows Completed. |
| Duration | Shows how long the execution took, such as 9 ms or 10 ms. |
| Started | Displays when the workflow run started. |
| Reference | Displays the reference identifier associated with the run. |
Steps to View Workflow Runs
- Open the required workflow.
- Select the Runs tab.
- Review the recorded executions.
- Check the status of each run.
- Review the duration, start information, and reference identifier displayed.
Note: The Runs tab shows recorded executions. The number of runs and the displayed details depend on the information available in the application.
8.3 Activity Tab
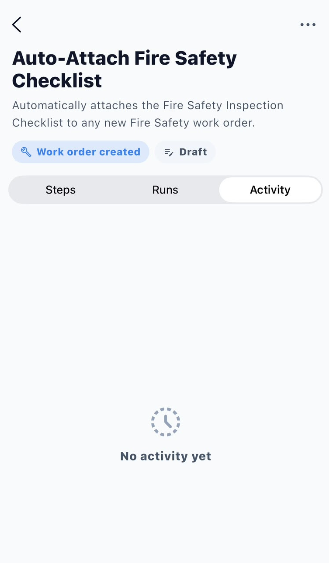
The Activity tab displays activity information recorded for the workflow.
If no activity has been recorded, the page displays No activity yet.
Steps to View Workflow Activity
- Open the required workflow.
- Select the Activity tab.
- Review the activity information displayed.
- If the page displays No activity yet, no activity entries are currently shown.
8.4 Difference Between Steps, Runs, and Activity
| Tab | Purpose |
|---|---|
| Steps | View the trigger and configured actions, and add more steps. |
| Runs | Review recorded workflow executions, their status, and execution duration. |
| Activity | View the activity information recorded for the workflow. |
9. Manage Workflows
The three-dot menu (⋯) provides additional actions for managing a workflow.
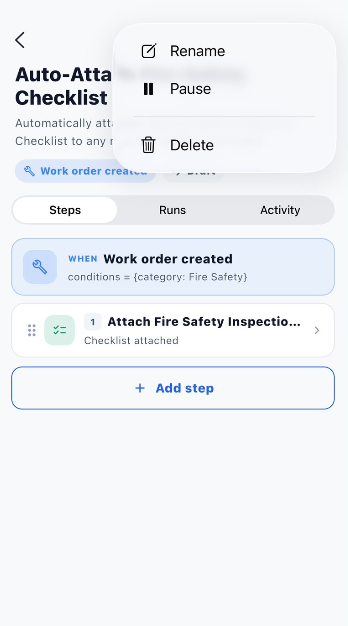
9.1 Available Options
| Option | Description |
|---|---|
| Rename | Changes the workflow name. |
| Pause | Pauses an active workflow. |
| Delete | Deletes the selected workflow. |
9.2 Steps to Manage a Workflow
- Open the Workflows module.
- Open the workflow you want to manage.
- Click the three-dot menu (⋯) in the top-right corner.
- Select the required option:
- Rename to change the workflow name.
- Pause to pause an active workflow.
- Delete to delete the workflow.
- Follow any confirmation prompts displayed by the application.
- Return to the workflow list and verify the displayed status, where applicable.
Important: Review the selected action carefully before deleting a workflow.
10. Workflow Status Categories
The Workflows page groups workflows according to their current status.
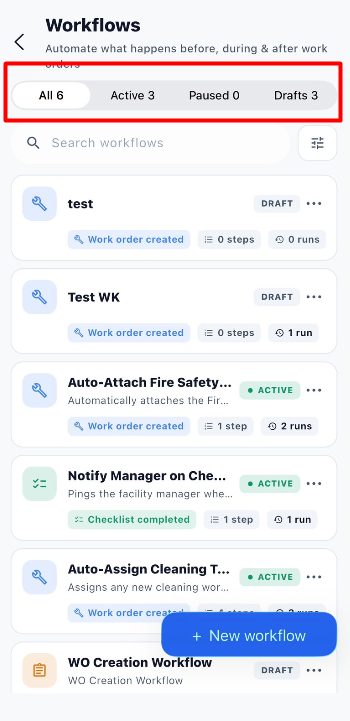
| Status | Description |
|---|---|
| All | Displays workflows regardless of status. |
| Active | Displays workflows that are currently active. |
| Paused | Displays workflows that have been paused. |
| Drafts | Displays workflows that have been created but remain in draft status. |
Steps to View Workflows by Status
- Open the Workflows module.
- Select All, Active, Paused, or Drafts.
- Review the workflows displayed under the selected tab.
- Open a workflow to review its trigger, steps, runs, and activity.
- Use the three-dot menu to manage the workflow, if required.
Note: The status determines which tab displays the workflow. For example, pausing an active workflow moves it to the Paused category.
11. Search and Filter Workflows
The Workflows page provides search and filter options to help users locate workflows more quickly. Search helps find a workflow by its name, while filters help narrow the list by trigger type.
11.1 Search Workflows
Use the Search workflows field to locate a particular workflow.
Steps to Search
- Open the Workflows module.
- Click the Search workflows field.
- Enter the workflow name or relevant search text.
- Review the matching results.
- Open the required workflow.
11.2 Apply Workflow Filters
Click the Filter icon beside the search field to open the Filters panel.
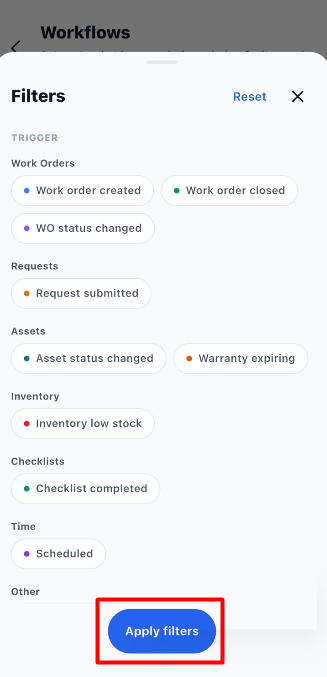
The panel groups trigger options into categories so users can find workflows associated with particular events.
Available Filter Options
| Category | Filter Option | Description |
|---|---|---|
| Work Orders | Work order created | Finds workflows triggered when a new work order is created. |
| Work Orders | Work order closed | Finds workflows triggered when a work order is marked as done. |
| Work Orders | WO status changed | Finds workflows triggered when a work order's status changes. |
| Requests | Request submitted | Finds workflows triggered when a maintenance request is submitted. |
| Assets | Asset status changed | Finds workflows triggered when an asset's status changes. |
| Assets | Warranty expiring | Finds workflows triggered when an asset warranty is about to expire. |
| Inventory | Inventory low stock | Finds workflows triggered when a part drops below its minimum stock level. |
| Checklists | Checklist completed | Finds workflows triggered when a checklist is submitted on a work order. |
| Time | Scheduled | Finds workflows triggered according to a schedule. |
11.3 Steps to Apply Workflow Filters
- Open the Workflows module.
- Click the Filter icon beside the search field.
- Review the categories in the Filters panel.
- Select the required trigger, such as Work order created, Request submitted, or Checklist completed.
- Select additional triggers if needed.
- Click Apply filters.
- Review the workflows displayed for the selected criteria.
11.4 Additional Filter Options
| Option | Description |
|---|---|
| Reset | Clears the selected filter options. |
| Close (X) | Closes the Filters panel. |
| Apply filters | Applies the selected trigger filters to the workflow list. |
Example: Select Work order created to find workflows associated with the creation of work orders.
Important: Use the status tabs to find workflows by their current status and the Filters panel to narrow down the list by trigger type.
12. Important Notes
- Give every workflow a clear and descriptive name.
- Choose a trigger that matches the event you want to automate.
- Configure priority and work type conditions when required.
- Keep conditions set to Any when no specific restriction is needed.
- Complete all mandatory fields before adding a step.
- Review each action before clicking Add step.
- Add multiple steps when the workflow needs to perform several actions.
- Use the Steps tab to review the workflow configuration.
- Use the Runs tab to check recorded executions and their durations.
- Use the Activity tab to review recorded workflow activity.
- Use the status tabs to find workflows by their current state.
- Use search and filters to locate workflows more efficiently.
- Review the three-dot menu carefully before renaming, pausing, or deleting a workflow.
13. End-to-End Workflow
The following workflow summarizes the process of creating, configuring, reviewing, and managing a workflow.
Open the Workflows Module
        ↓
View Existing Workflows
        ↓
Click + New workflow
        ↓
Enter Workflow Name
        ↓
Add Description if Required
        ↓
Select Workflow Trigger
        ↓
Configure Priority and Work Type Conditions
        ↓
Review Workflow Details
        ↓
Click Create & configure
        ↓
Open the Workflow Configuration
        ↓
Go to the Steps Tab
        ↓
Click + Add step
        ↓
Select a Step Type
        ↓
Complete the Required Configuration Fields
        ↓
Click Add step
        ↓
Verify the Step Appears in the Workflow
        ↓
Add More Steps if Required
        ↓
Review the Trigger, Conditions, and Steps
        ↓
Review Workflow Status
        ↓
Open the Runs Tab to Check Recorded Executions
        ↓
Open the Activity Tab to Review Recorded Activity
        ↓
Return to the Workflows List
        ↓
Search for or Filter the Workflow if Required
        ↓
Use the Three-Dot Menu to Rename, Pause, or Delete