

Configuring MQTT
MQTT Protocol Configuration
The MQTT (Message Queuing Telemetry Transport) protocol enables APEX to communicate securely with the BACSYS Platform or any third-party MQTT broker using a lightweight publish-subscribe messaging model. MQTT is commonly used for Industrial IoT (IIoT), real-time monitoring, telemetry, and cloud connectivity.
Configuring MQTT
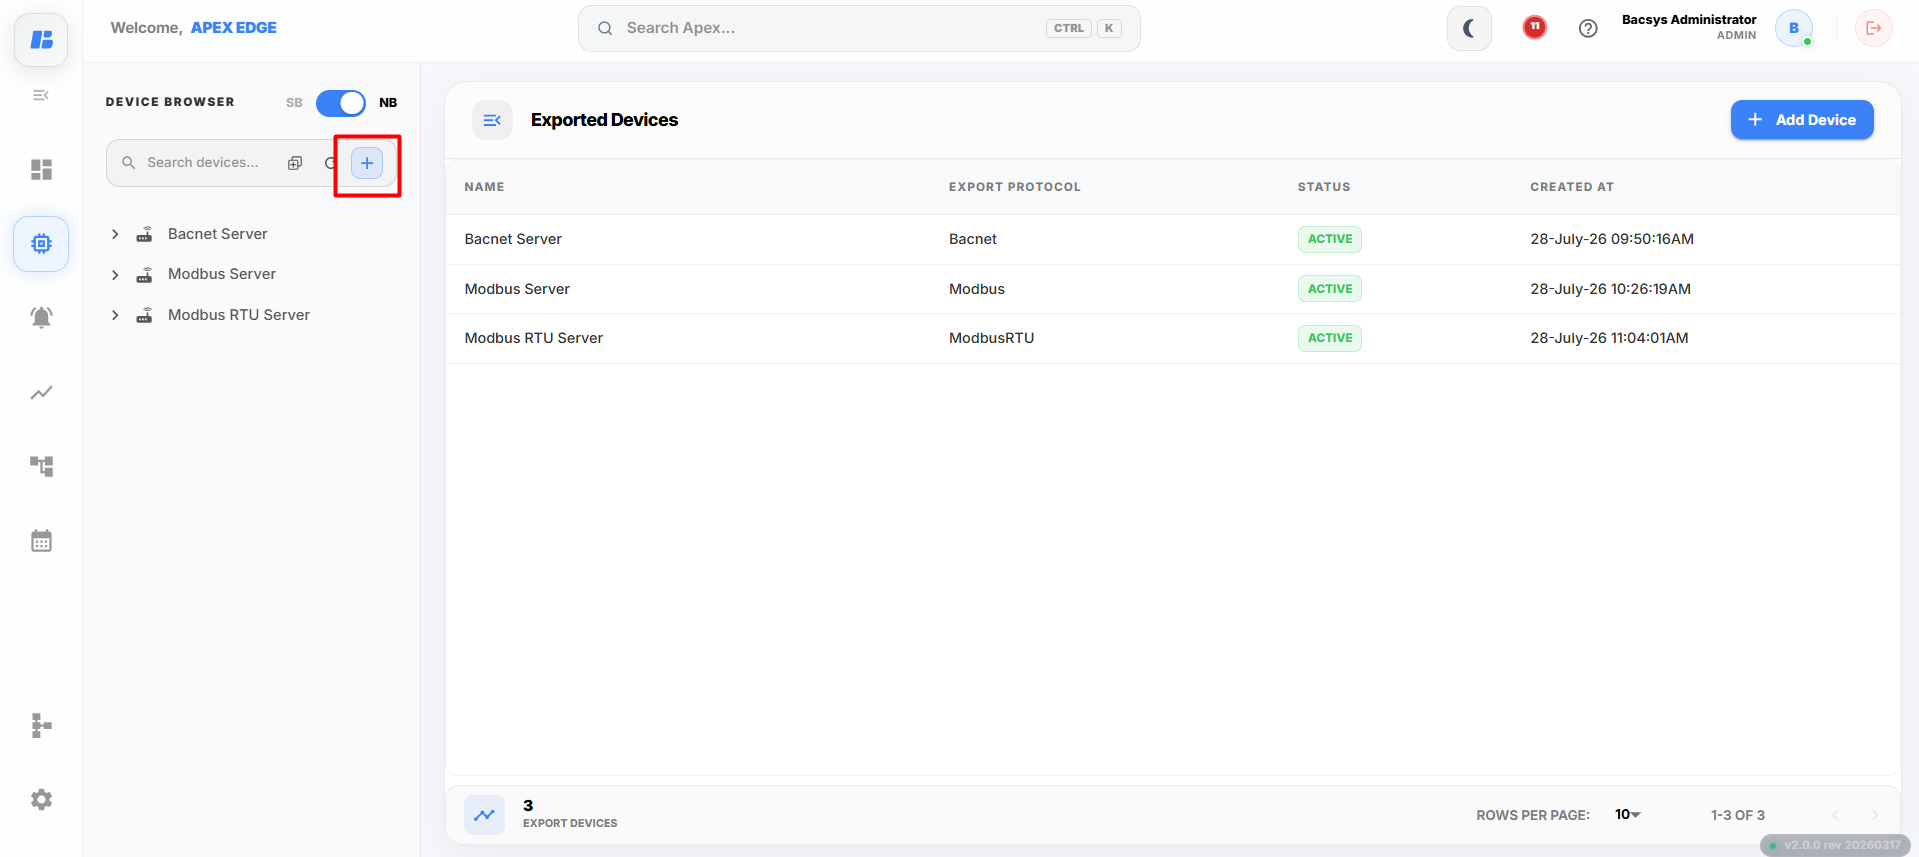
- Navigate to the Protocol section.
- Click Add Protocol or New Protocol.
- From the Protocol drop-down list, select MQTT.
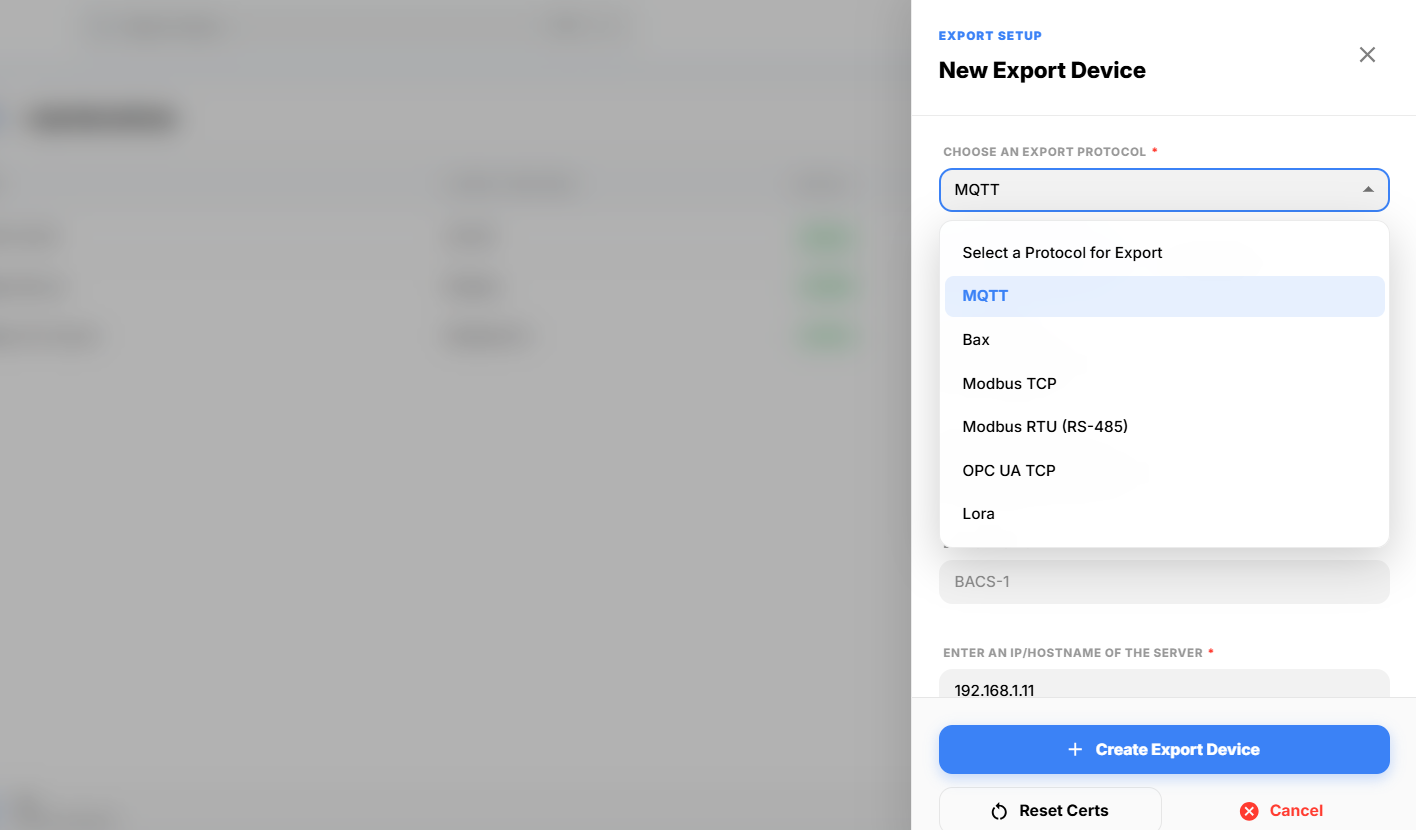
Select Platform
After selecting MQTT, choose the platform where the device will connect.
The available options are:
- BACSYS Platform
- Other Brokers
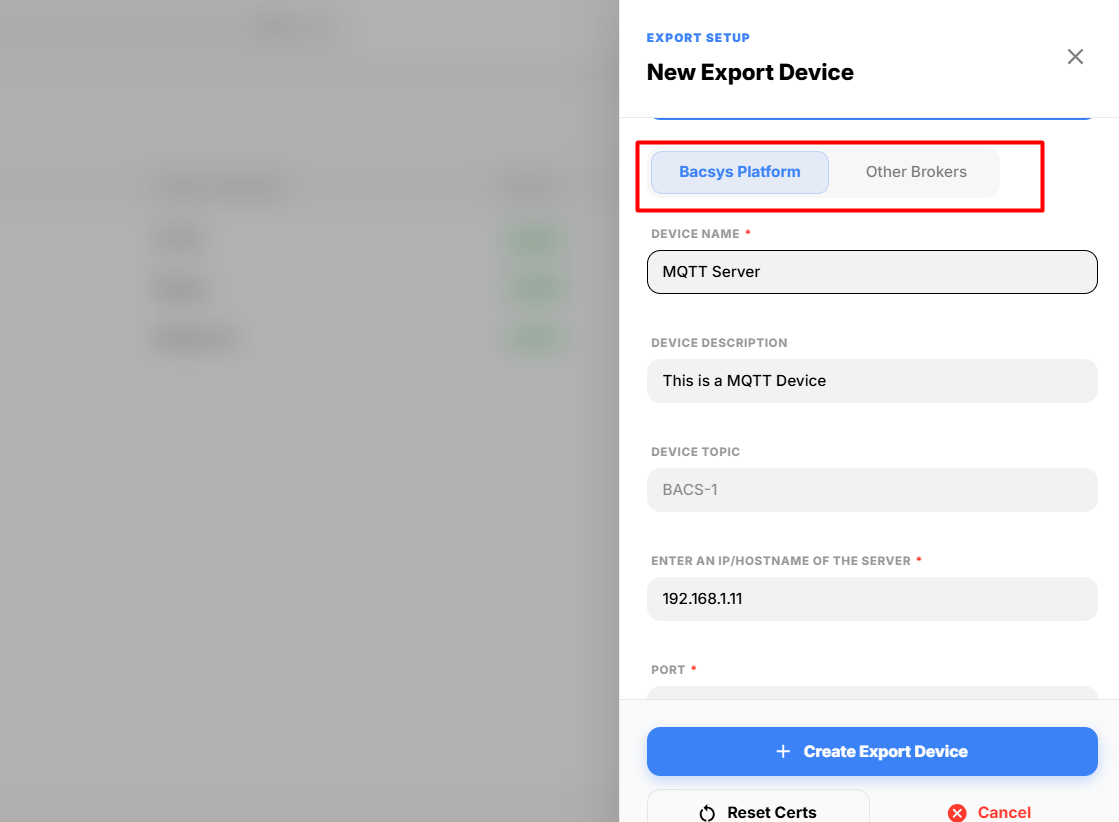
Option 1: BACSYS Platform
When BACSYS Platform is selected, enter the following details.
MQTT Configuration Fields
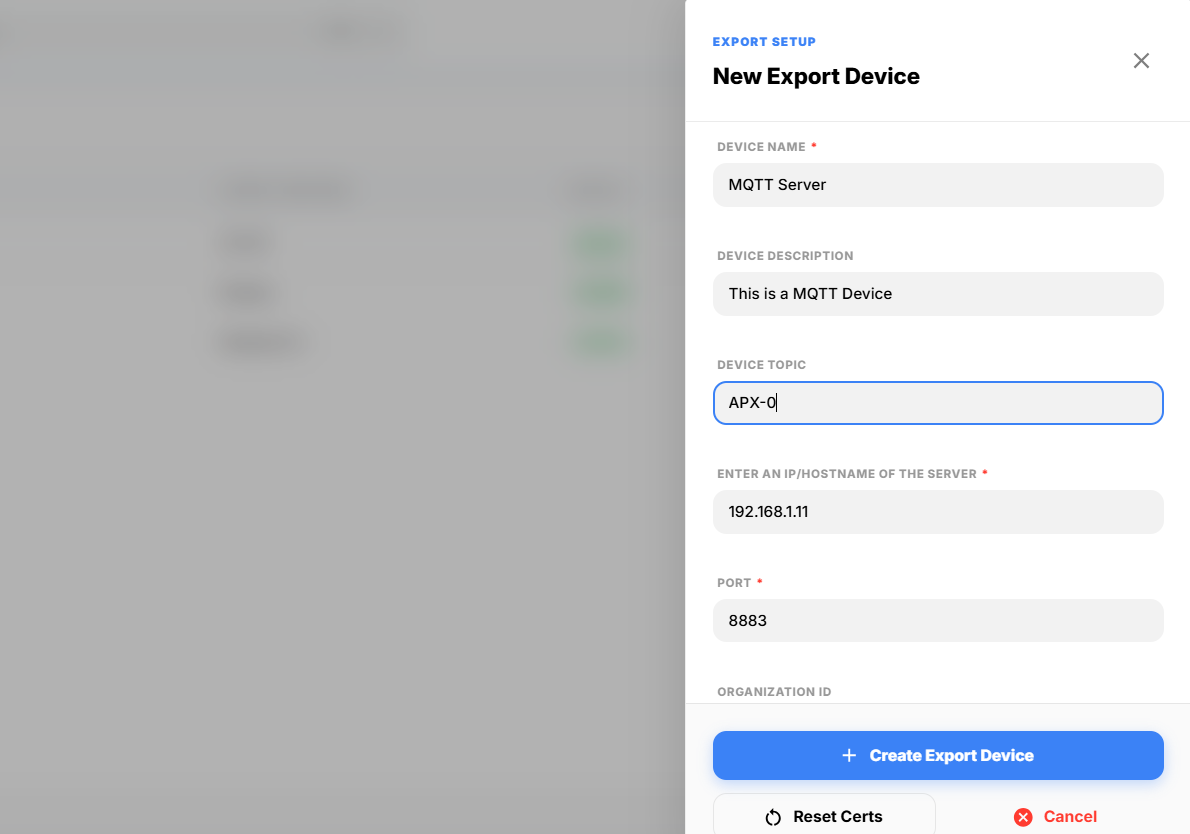
| Field | Description |
|---|---|
| Device Name | Enter a unique name to identify the MQTT device. This name is registered on the BACSYS Platform. Duplicate device names are not allowed. If the entered name already exists, choose a different name before proceeding. |
| Device Description | Enter a brief description of the device. This helps users easily identify the purpose or location of the MQTT device. |
| Device Topic | Specify the MQTT topic used for publishing and subscribing to messages. The topic should follow your organization's naming convention to simplify device management. |
| Server IP / Hostname | Enter the IP address or hostname of the MQTT Broker. Ensure that the APEX device can communicate with the broker over the network. When using the BACSYS Platform, the broker IP should match the platform configuration. |
| Port | Enter the MQTT Broker port number. The default MQTT port is 1883, while 8883 is commonly used for secure TLS communication. Ensure that the port matches the broker configuration. |
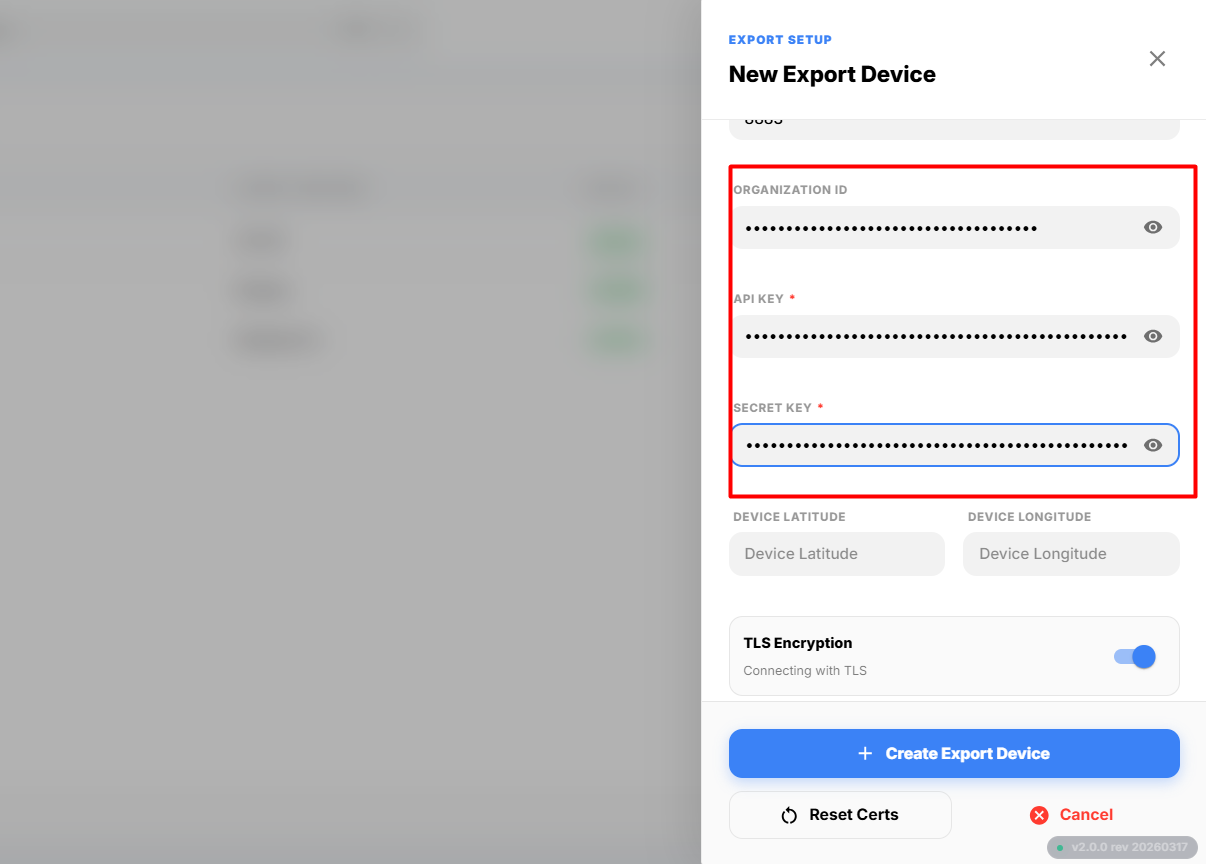
| Organization ID | Enter the Organization ID generated from the BACSYS Platform during device onboarding. This ID uniquely identifies your organization and is required for device authentication. |
| API Key | Enter the API Key generated from the BACSYS Platform. This key authenticates the APEX device when connecting to the MQTT Broker. |
| Secret Key | Enter the Secret Key generated along with the API Key. The Secret Key is used to securely authenticate the device with the BACSYS Platform. Keep this value confidential. |
| Device Latitude | Enter the geographical latitude of the device installation location. This information is optional but useful for mapping and asset management. |
| Device Longitude | Enter the geographical longitude of the device installation location. This information is optional but recommended for location tracking. |
| TLS Encryption | Enable this option to establish a secure encrypted MQTT connection using SSL/TLS certificates. When enabled, valid security certificates must be uploaded before the device can connect successfully. |
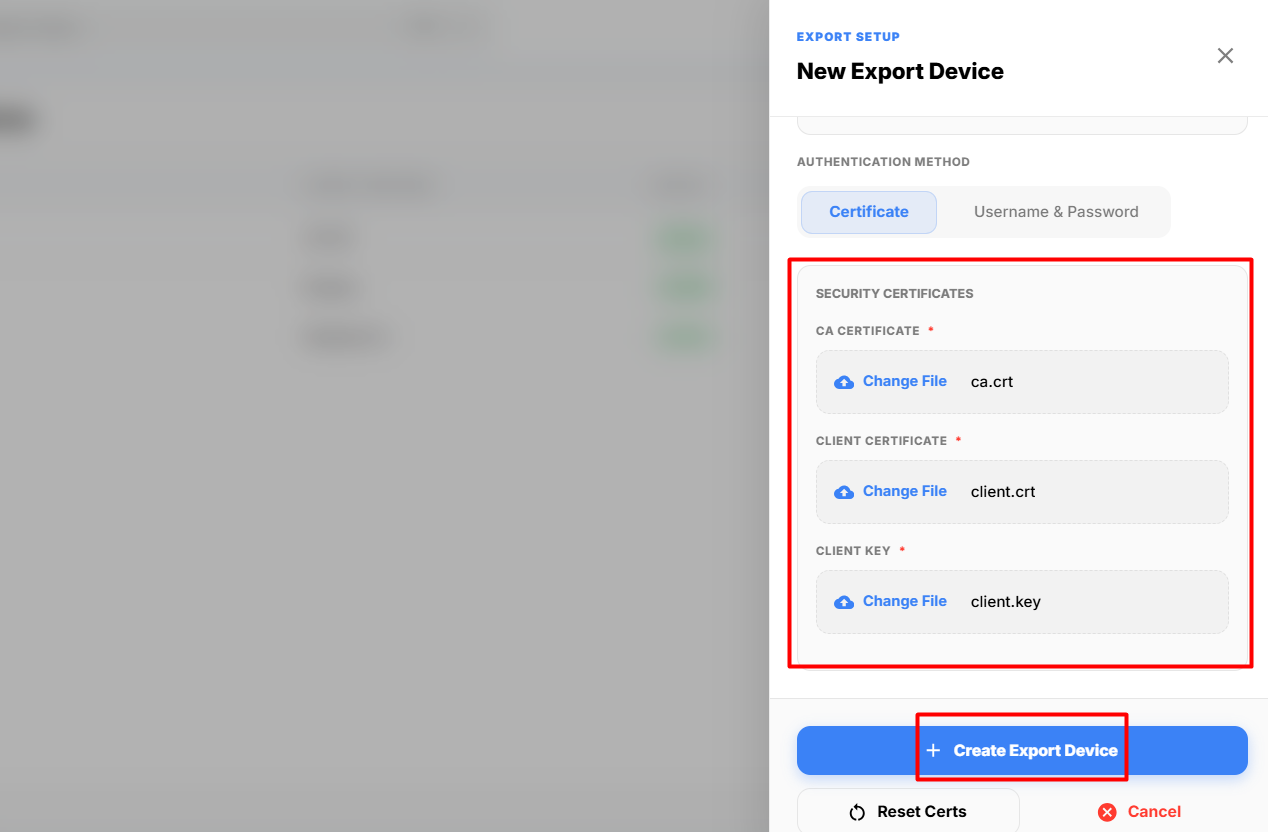
Security Certificates
| Certificate | Description |
|---|---|
| CA Certificate | Upload the Certificate Authority (CA) certificate used to verify the identity of the MQTT Broker. This ensures that the device connects only to a trusted server. |
| Client Certificate | Upload the client certificate issued for the APEX device. This certificate authenticates the device with the MQTT Broker during a secure TLS connection. |
| Client Key | Upload the private key associated with the Client Certificate. The Client Key is required to establish a secure and authenticated TLS connection. Keep this file secure and do not share it. |
Note
- The Device Name must be unique on the BACSYS Platform.
- The Server IP/Hostname and Port must match the MQTT Broker configuration.
- When TLS Encryption is enabled, uploading the CA Certificate, Client Certificate, and Client Key is mandatory.
- The Organization ID, API Key, and Secret Key can be generated from the BACSYS Platform by navigating to Onboard APEX → Generate License.
Generating Organization ID, API Key, and Secret Key
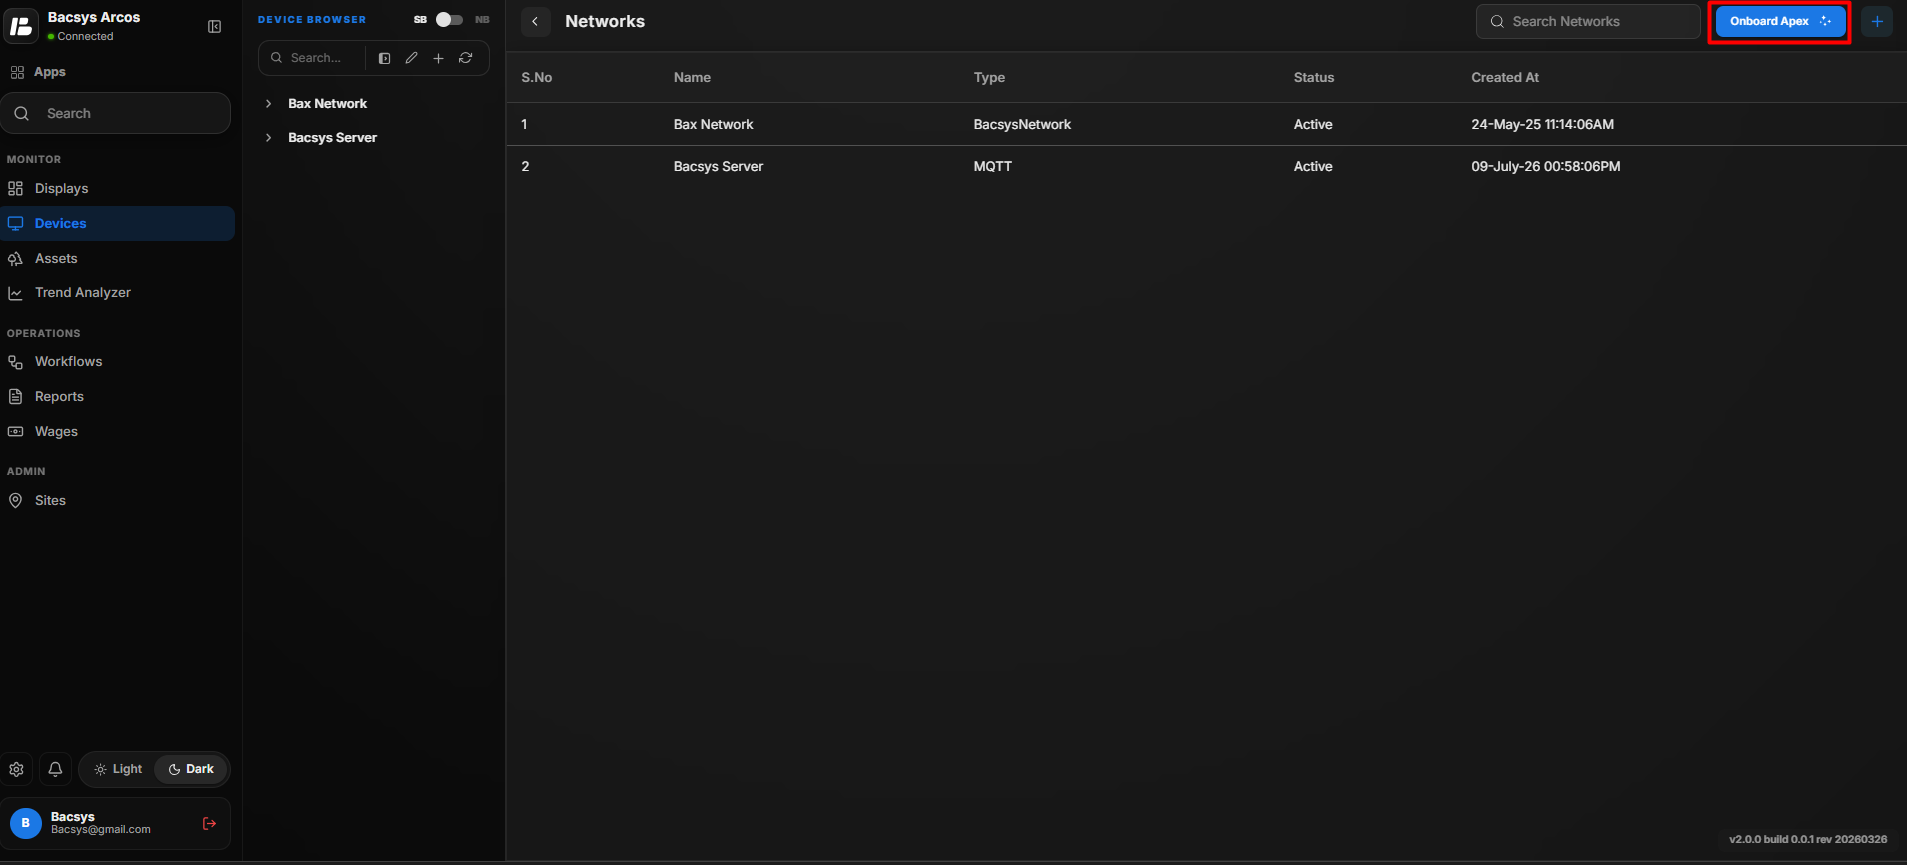
Follow the steps below to obtain the required credentials from the BACSYS Platform.
- Log in to the BACSYS Platform.
- Navigate to the Onboard APEX section.
- Click Onboard APEX.
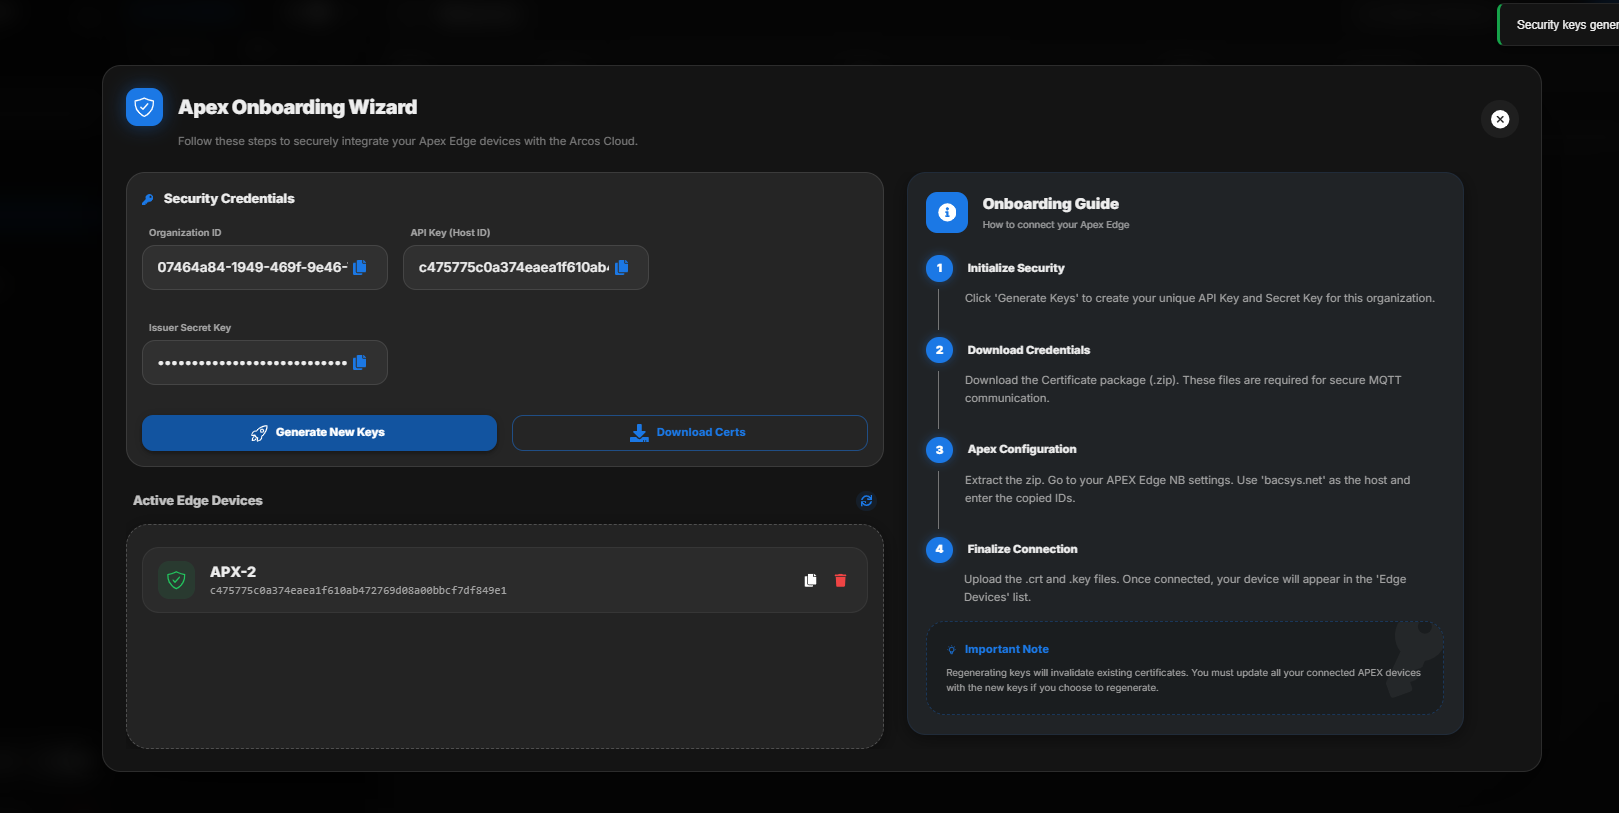
- The Onboard APEX dialog box appears.
- Click Generate License.
- The platform generates the following credentials:
- Organization ID
- API Key
- Secret Key
- Copy these values.
- Return to the APEX application.
- Paste the copied values into their respective fields.
Uploading MQTT Certificates
To establish a secure MQTT connection, upload the required SSL/TLS certificates.
Steps
- Open File Explorer.
- Navigate to the following directory:
C:\Arcos\Backend\certs-
Locate the following certificate files:
- CA Certificate
- Client Certificate
- Client Key
-
In the APEX MQTT configuration page, upload each certificate into its corresponding field.
| Certificate | Description |
|---|---|
| CA Certificate | Used to verify the identity of the MQTT Broker. |
| Client Certificate | Used to authenticate the APEX device with the MQTT Broker. |
| Client Key | The private key associated with the Client Certificate for secure communication. |
Important
Upload the correct certificate files. An invalid or mismatched certificate may prevent the MQTT connection from being established.
Export Device
After completing the MQTT configuration:
- Verify all the entered details.
- Click Export Device.
- Save the exported device configuration.
- The exported configuration can be imported into another APEX device if required.
Validation Checklist
Before saving the MQTT configuration, verify the following:
- MQTT protocol is selected.
- Correct platform (BACSYS Platform or Other Broker) is selected.
- Device Name is unique.
- Device Description is entered.
- Device Topic is configured correctly.
- Host/IP Address is reachable.
- Port number matches the MQTT Broker configuration.
- Organization ID is entered correctly.
- API Key is entered correctly.
- Secret Key is entered correctly.
- CA Certificate is uploaded.
- Client Certificate is uploaded.
- Client Key is uploaded.
- Device configuration has been exported successfully.
Option 2: Other Broker
Select Other Broker to connect the APEX device to a third-party MQTT Broker instead of the BACSYS Platform.
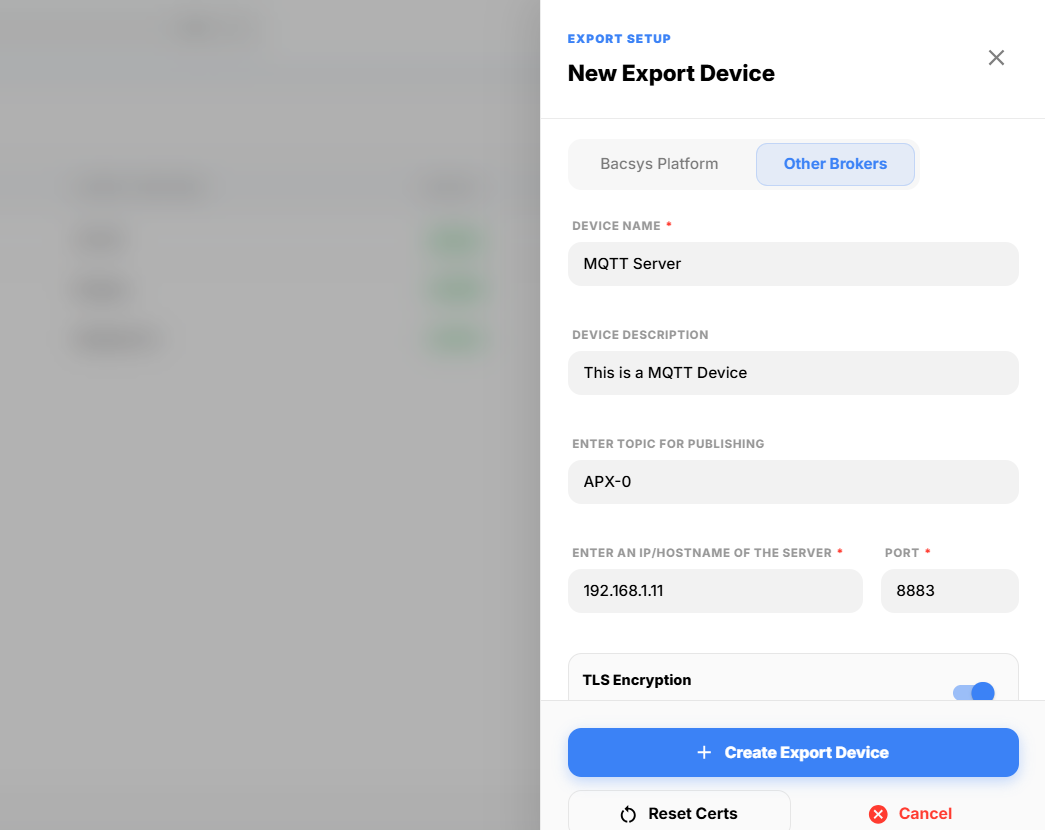
Configuration Fields
| Field | Description |
|---|---|
| Device Name | Enter a unique name to identify the MQTT device. |
| Device Description | Enter a brief description of the MQTT device. |
| APEX Topic for Publication | Enter the MQTT topic used by the APEX device to publish data to the MQTT Broker. |
| Server IP / Hostname | Enter the IP address or hostname of the MQTT Broker. Ensure the broker is reachable from the APEX device. |
| Port | Enter the MQTT Broker port number. The default port is 1883 for MQTT and 8883 for secure MQTT over TLS. |
| Authentication Scheme | Select the authentication method required by the MQTT Broker. Available options are None, Basic, and X.509. |
Authentication Scheme
None
Select None if the MQTT Broker does not require authentication.
Payload Format
When None is selected, the following payload format is available:
- None
No additional credentials are required.
Basic
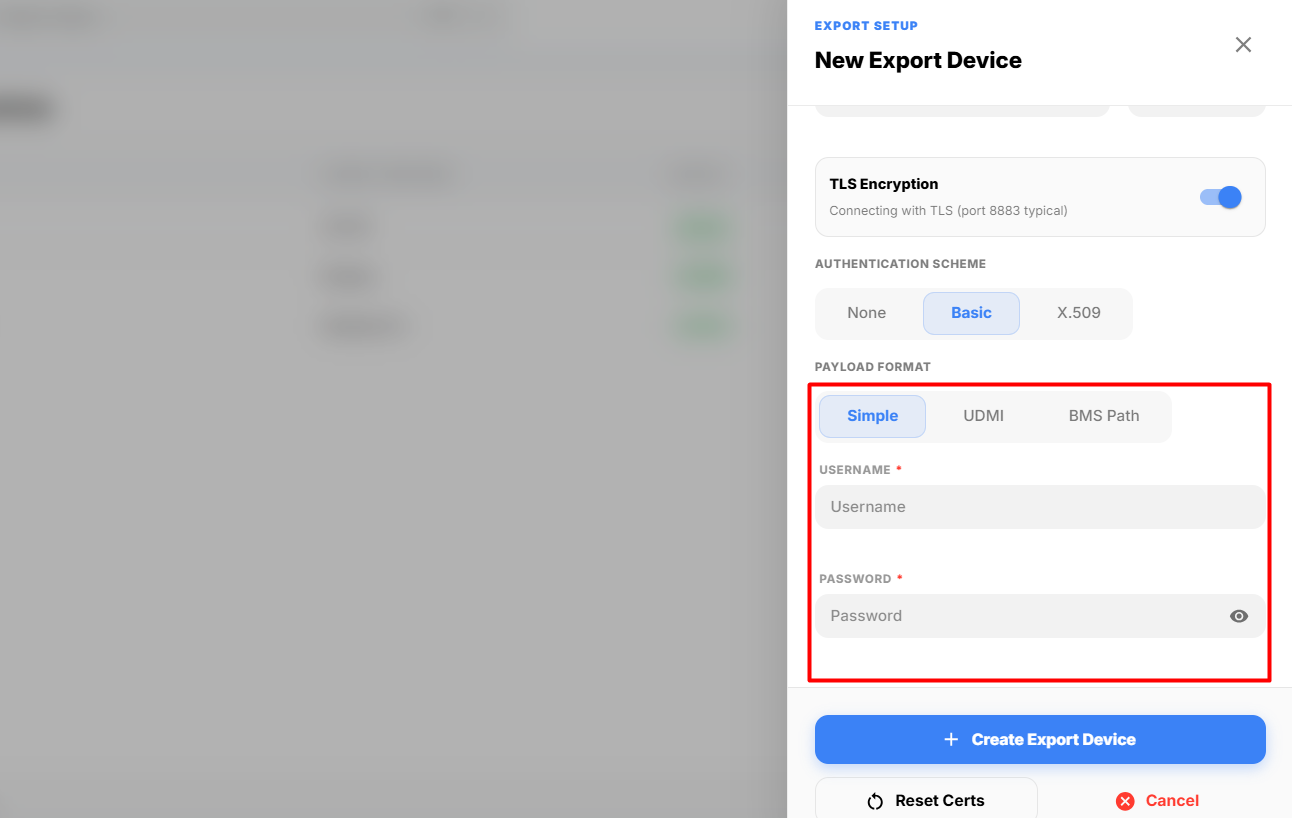
Select Basic if the MQTT Broker requires username and password authentication.
Payload Formats
The following payload formats are available:
- Simple
- UDMI
- BMS Path
For all payload formats, provide the following credentials.
| Field | Description |
|---|---|
| Username | Enter the username used to authenticate with the MQTT Broker. |
| Password | Enter the password associated with the username. |
X.509
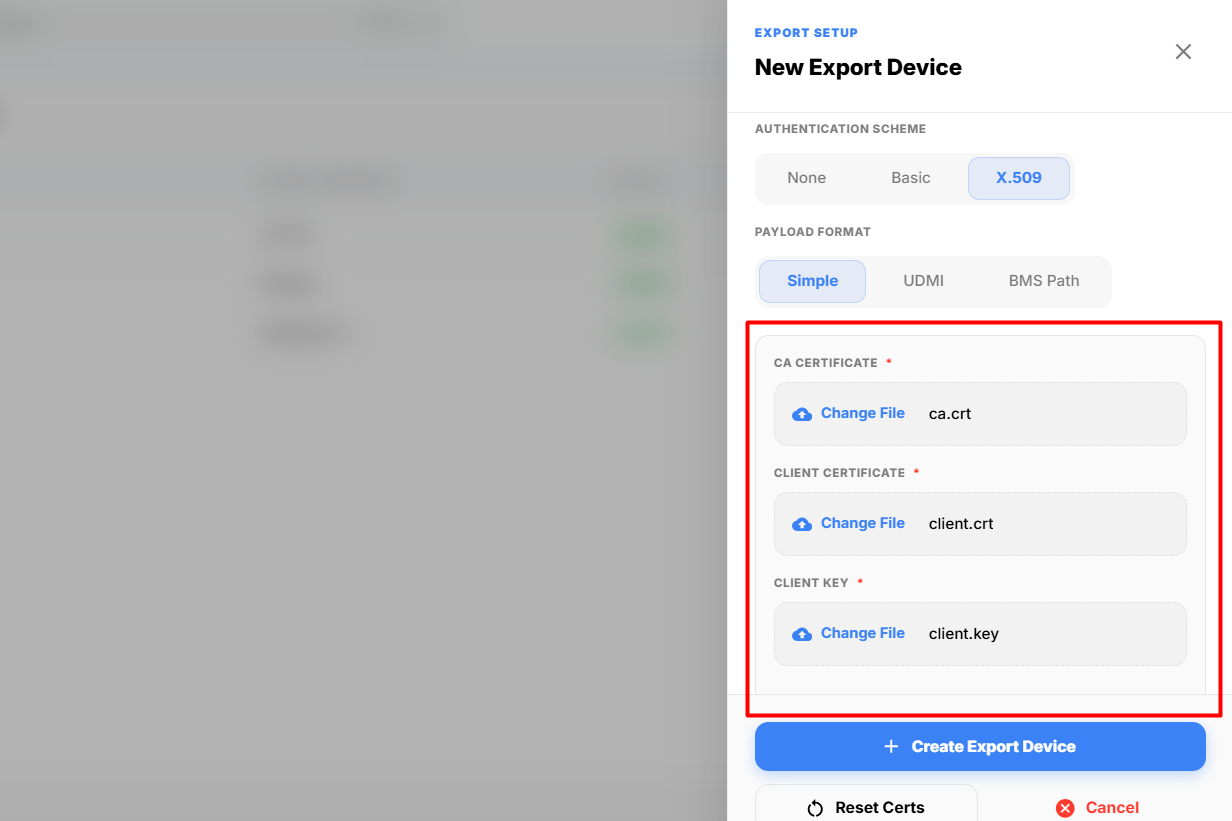
Select X.509 to use certificate-based authentication.
Payload Formats
The following payload formats are available:
- Simple
- UDMI
- BMS Path
For all payload formats, upload the required security certificates.
Security Certificates
| Certificate | Description |
|---|---|
| CA Certificate | Upload the Certificate Authority (CA) certificate used to verify the MQTT Broker. |
| Client Certificate | Upload the client certificate issued for the APEX device. |
| Client Key | Upload the private key associated with the client certificate. |
Adding Points to an MQTT Network
After successfully creating the MQTT network, you can add points that need to be published to the MQTT Broker or BACSYS Platform.
Steps to Add Points
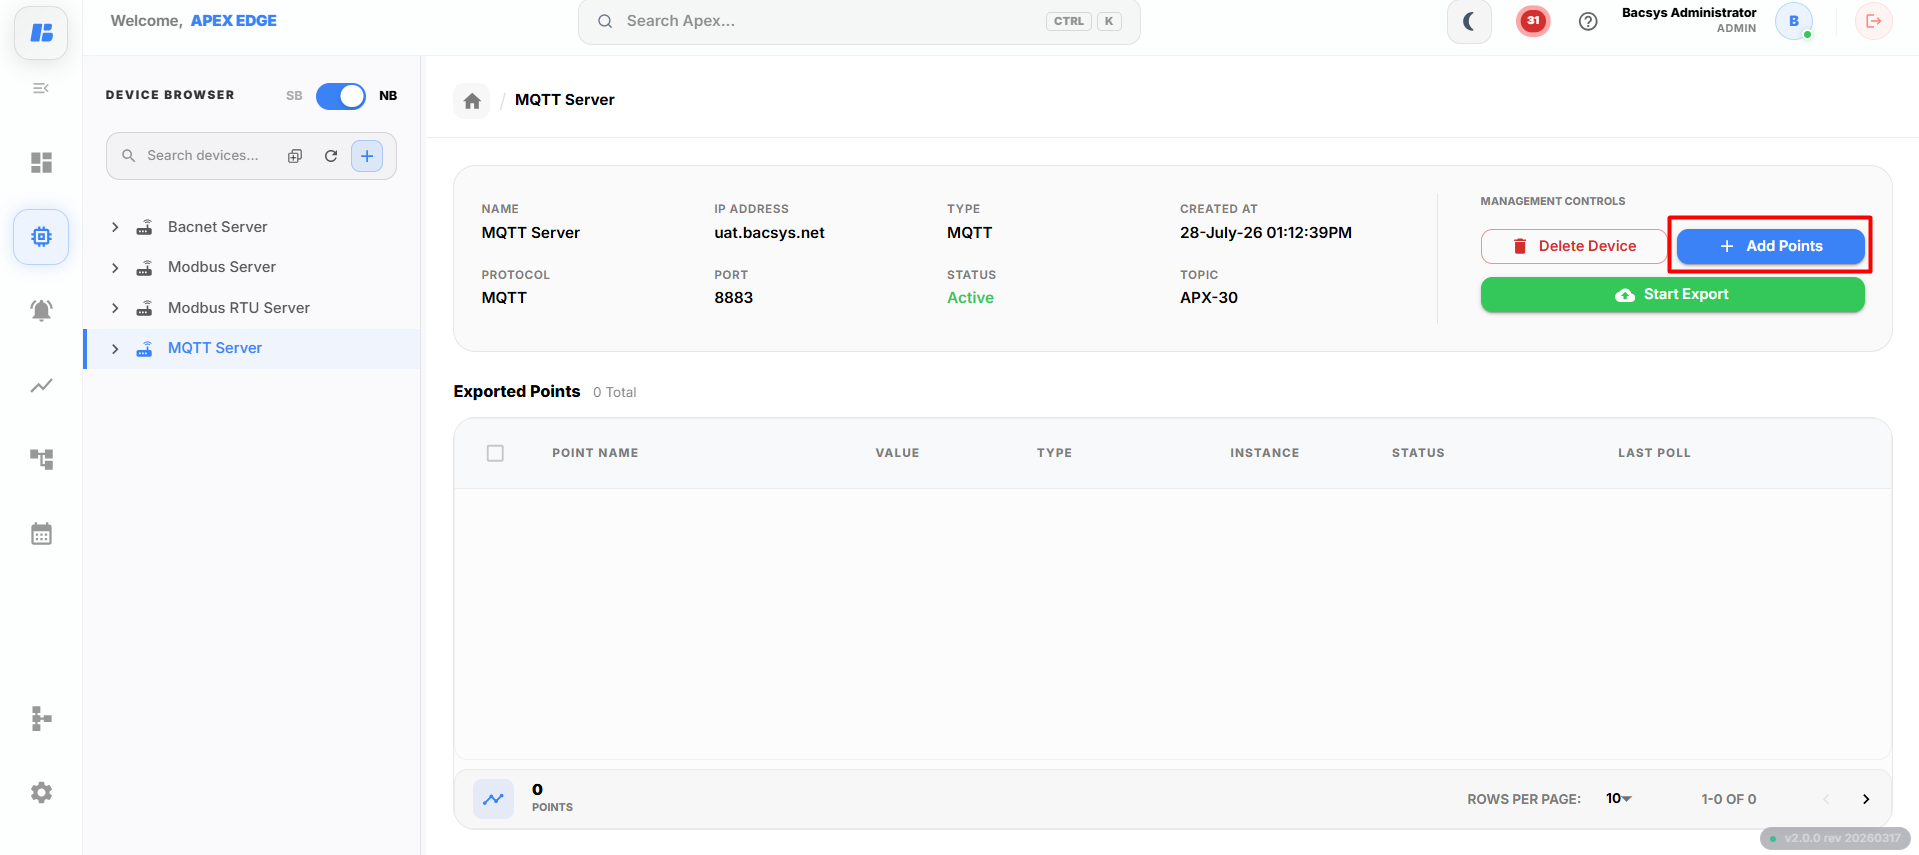
- Navigate to the Protocol page.
- Select the MQTT network that you created.
- Open the MQTT network.
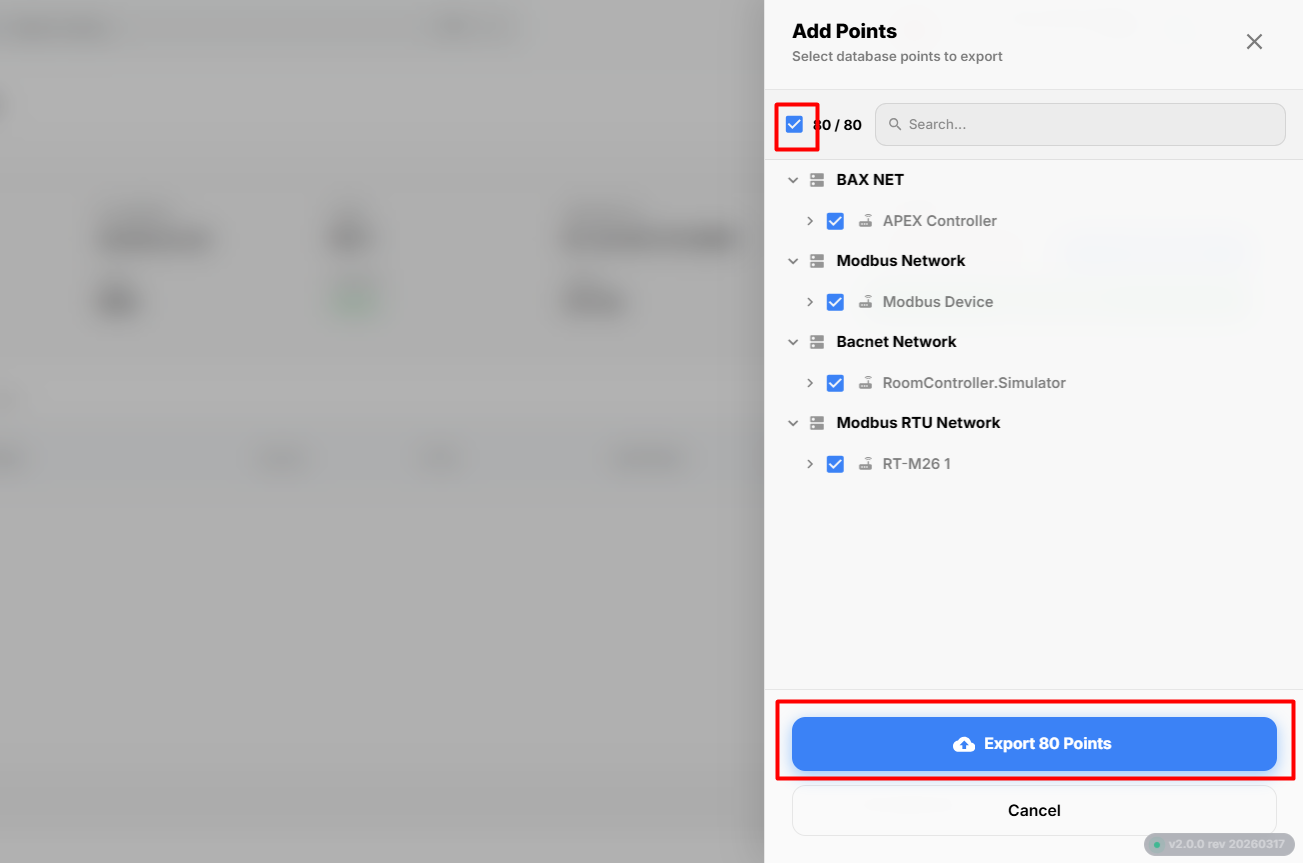
- Click Add Points.
The Add Points window displays all the available points configured in the APEX device.
- Select the required points that you want to publish.
- Click Export Points to include the selected points in the MQTT network.
Once the points have been added, they will be listed under the selected MQTT network.
Exporting Points
After adding the required points:
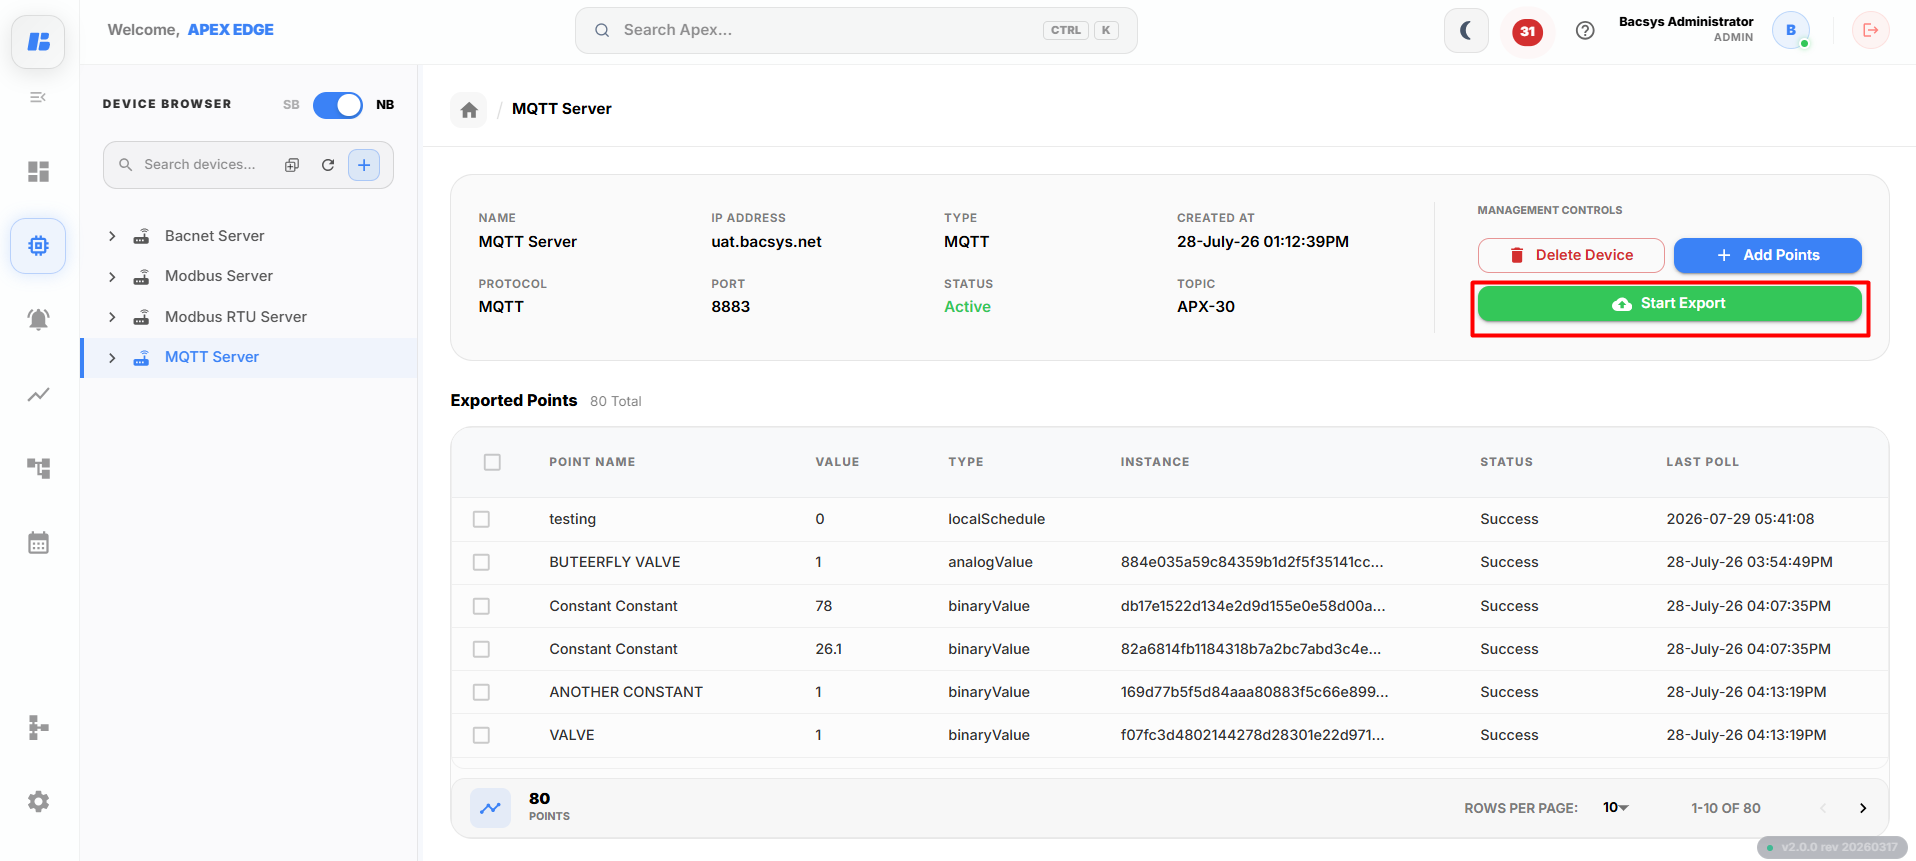
- Verify that all the required points have been added.
- Click Export Point to export the selected points.
- Once the export is completed, click Start Export.
The APEX device begins publishing the exported points to the configured MQTT Broker or BACSYS Platform.
Note
The Start Export button must be clicked after exporting the points. Until Start Export is enabled, the selected points will not be published to the MQTT Broker or BACSYS Platform.
Stopping the Export
If you need to stop publishing the selected points to the MQTT Broker or BACSYS Platform, you can stop the export at any time.
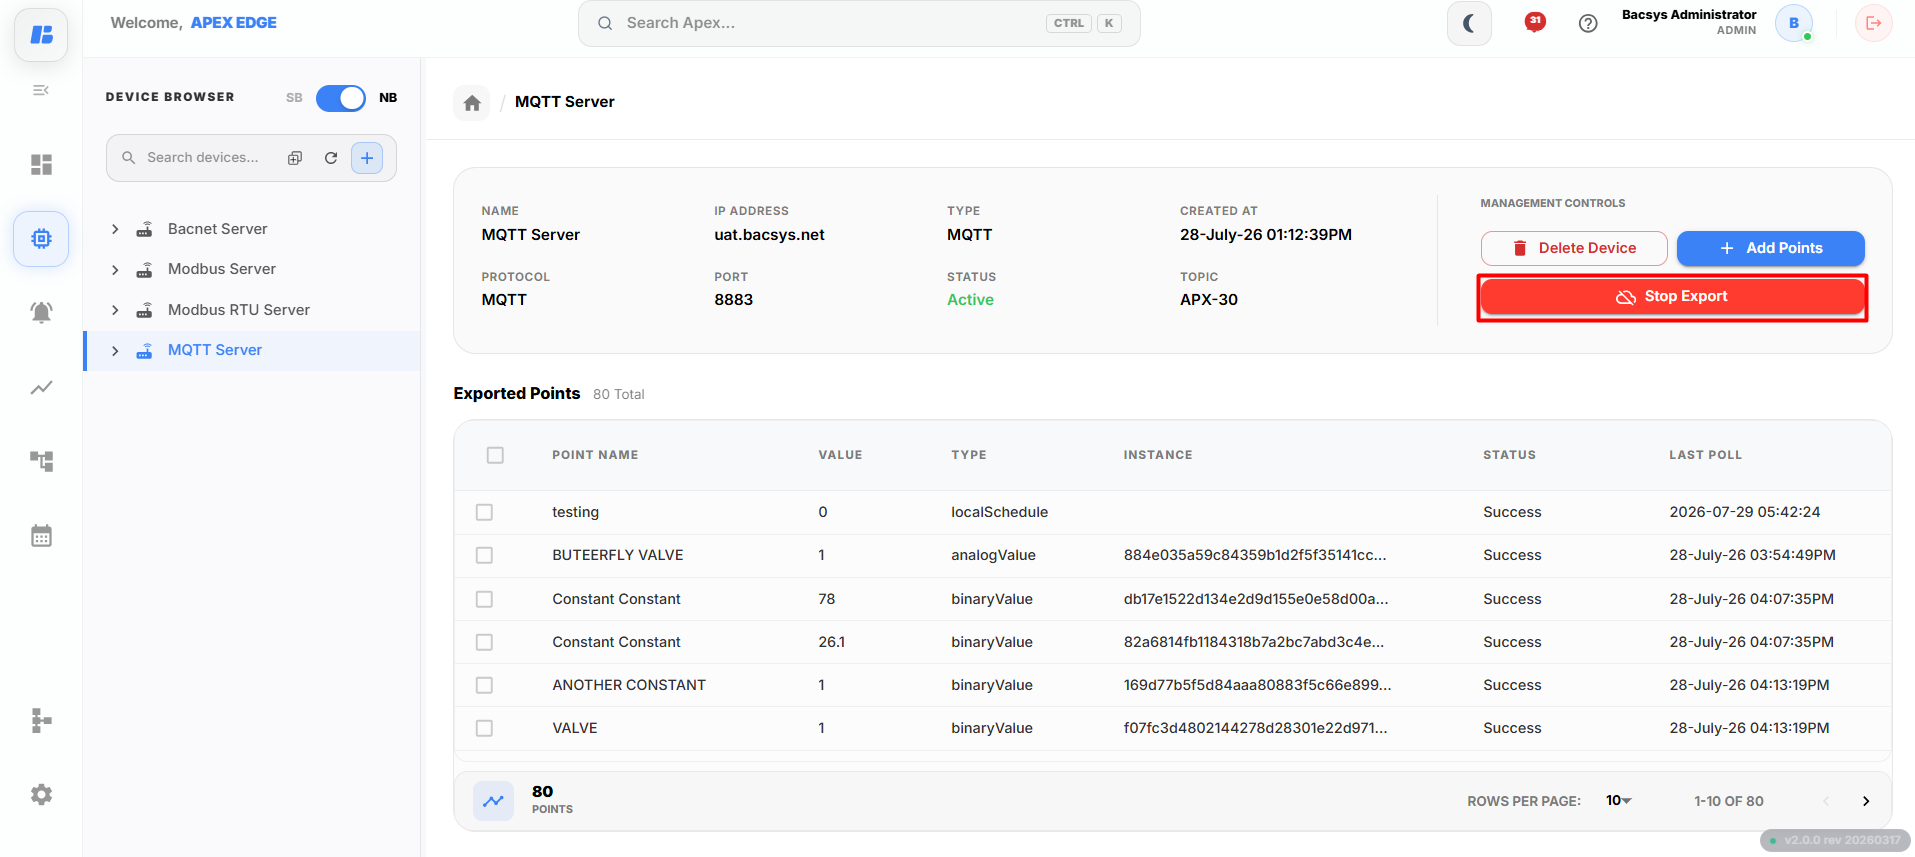
Steps
- Open the required MQTT network.
- Click Stop Export.
The APEX device immediately stops publishing the configured points to the MQTT Broker or BACSYS Platform.
Note
Clicking Stop Export only stops the export process. The MQTT network configuration and the added points remain unchanged and can be exported again by clicking Start Export.
Deleting an MQTT Device
If the MQTT device is no longer required, you can delete it from the APEX application.
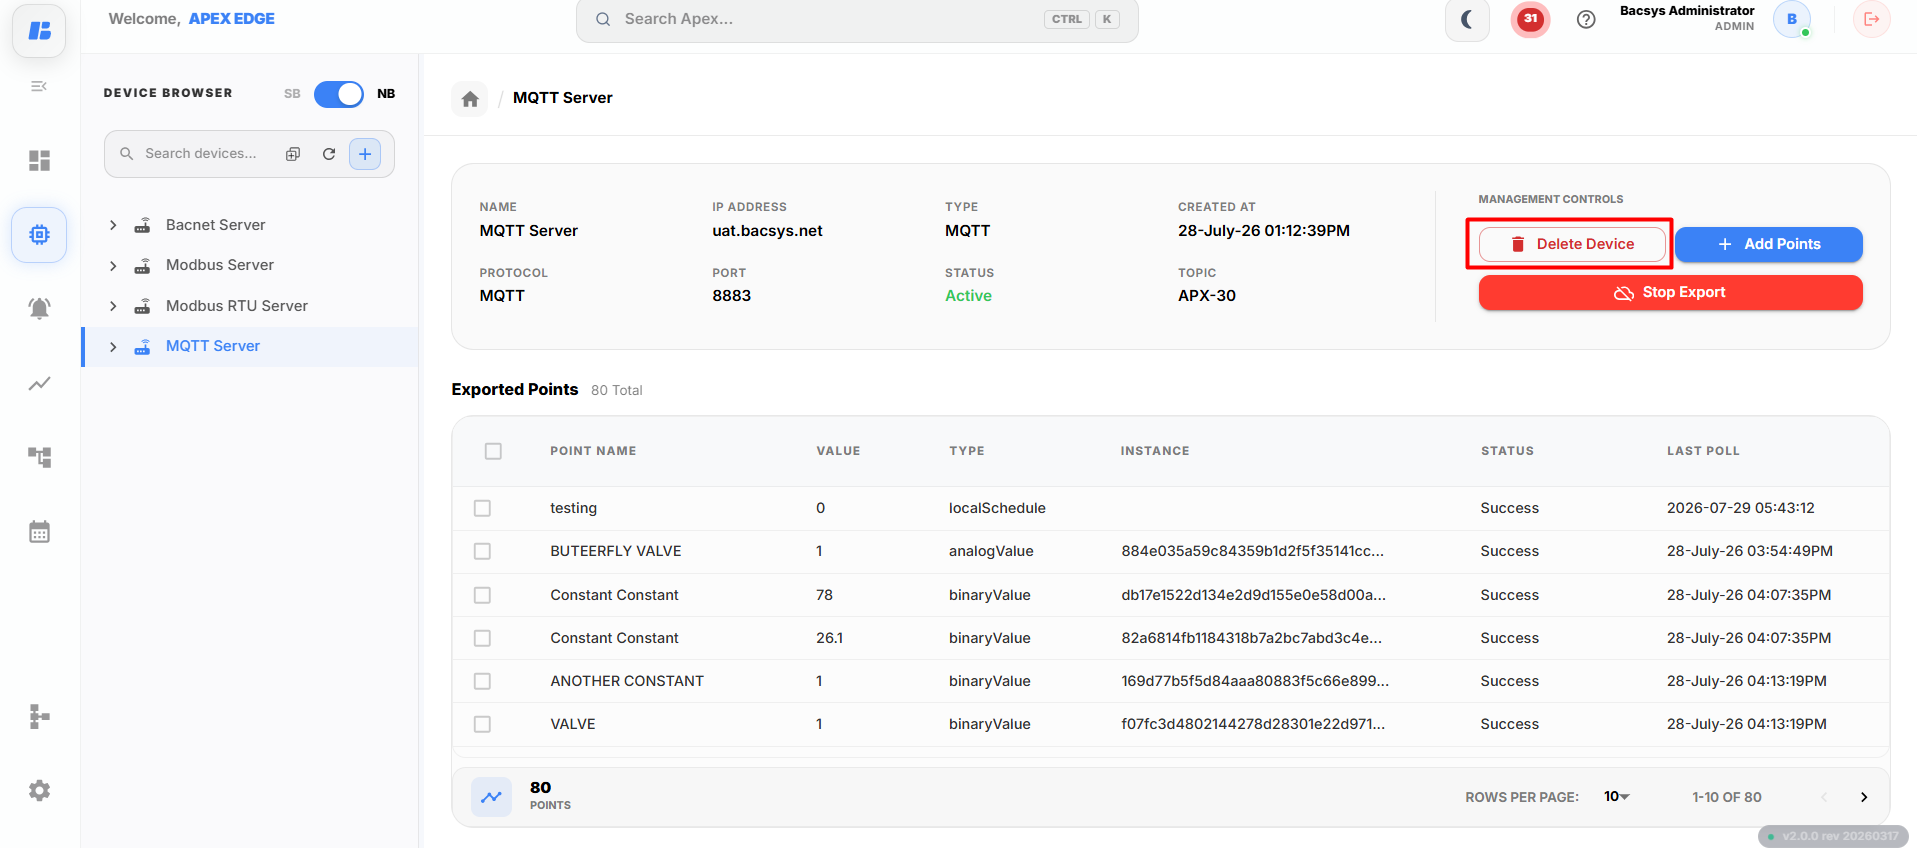
Steps
- Open the required MQTT network.
- Click Delete Device.
- Confirm the deletion when prompted.
The selected MQTT device is permanently deleted from the APEX application. All points associated with the device are also removed, and the device will no longer publish data to the configured MQTT Broker or BACSYS Platform.
Removing Exported Points
If you no longer want to export specific points, you can remove them from the MQTT network.
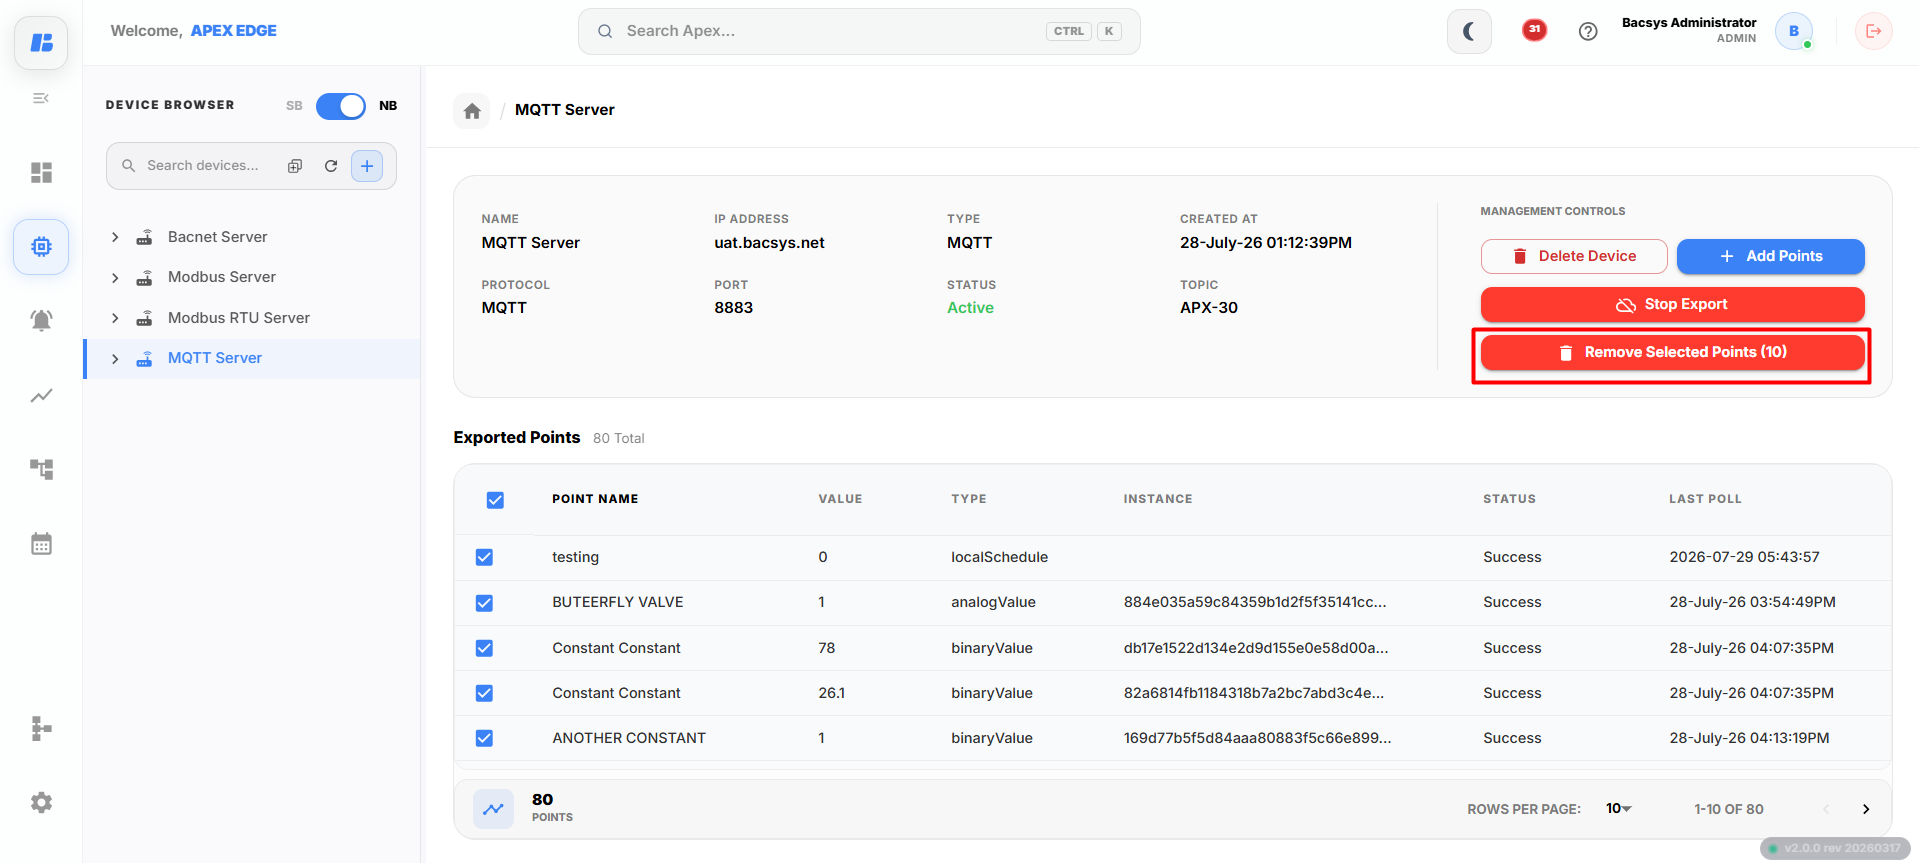
Steps
- Open the required MQTT network.
- Select the point(s) that you want to remove.
- The application displays the number of selected points.
- Click Remove Selected Points.
- Confirm the removal when prompted.
The selected points are removed from the MQTT network and will no longer be exported to the MQTT Broker or BACSYS Platform. The remaining points continue to be available in the MQTT network.