

Assets
Assets Module
The Assets module allows users to view and manage assets associated with maintenance operations.
1. Assets Overview
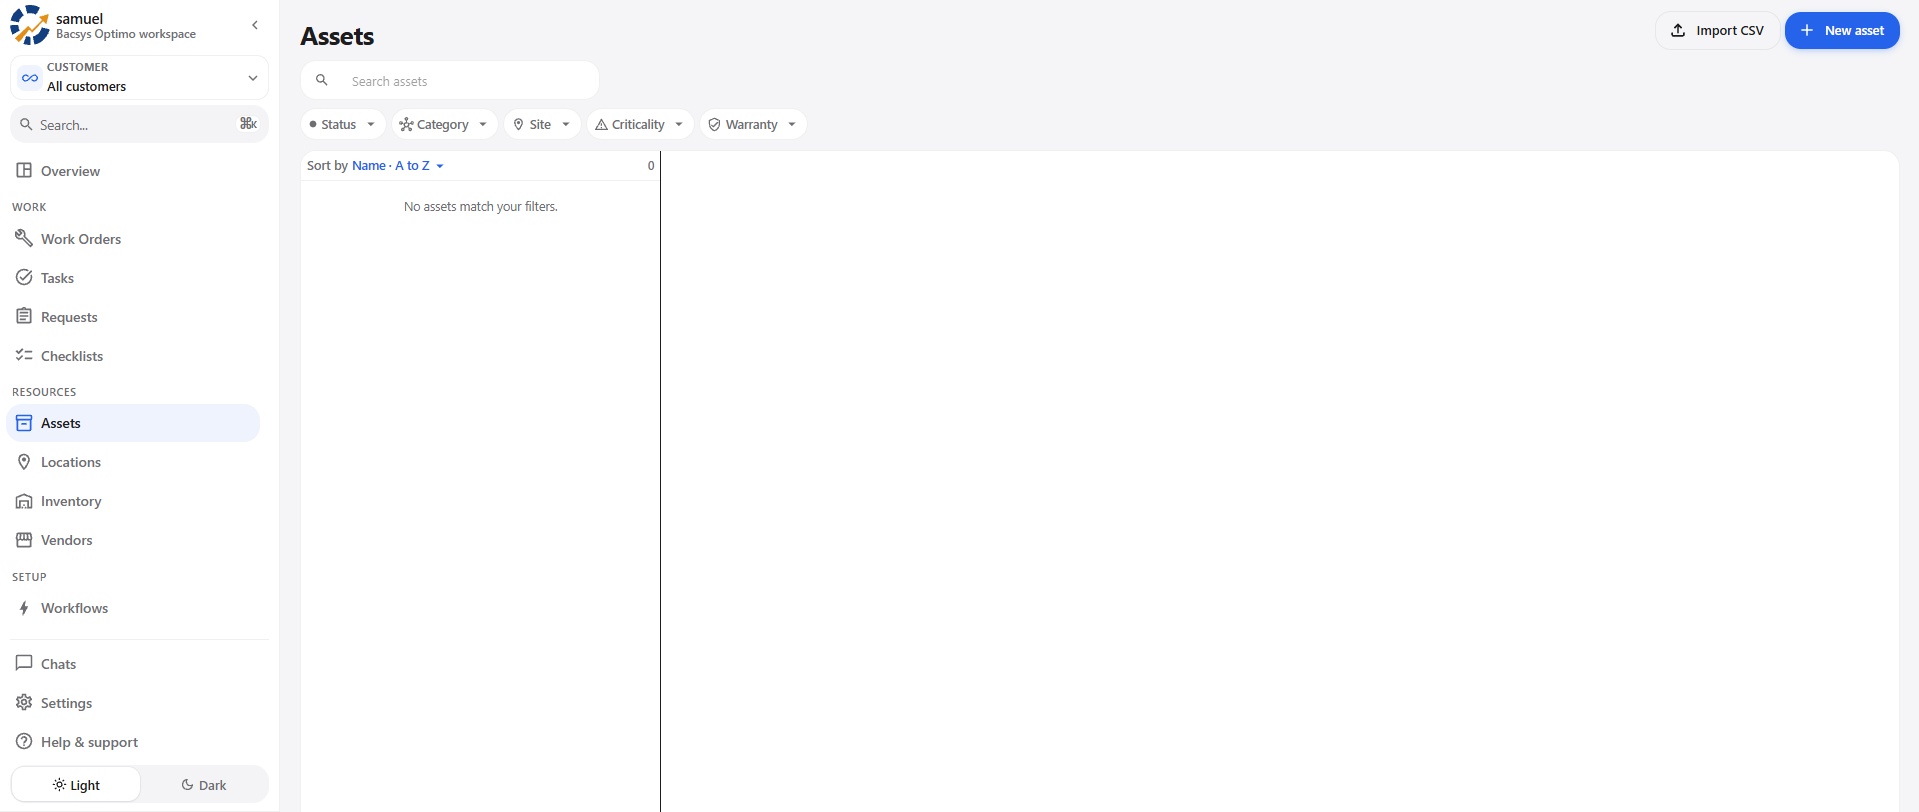
The Assets page displays the available assets in the system.
The page is divided into two main areas:
- Asset List
- Asset Details
1.1 Assets Page Options
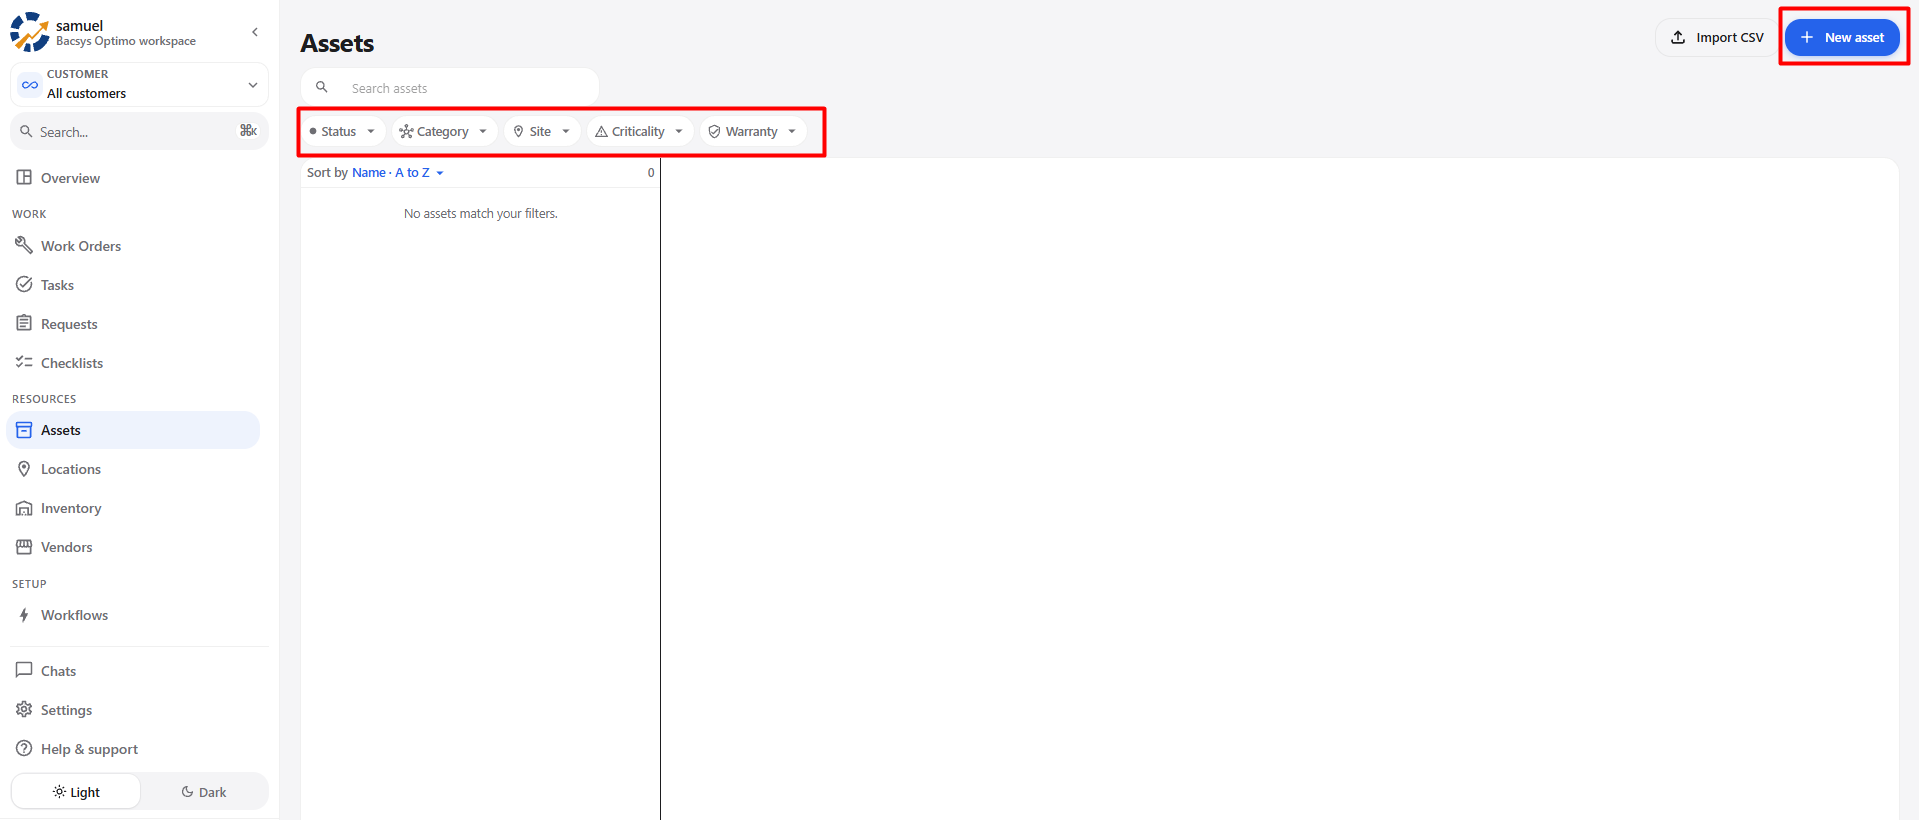
The top section of the Assets page provides the following options:
| Option | Description |
|---|---|
| Search assets | Search for an existing asset. |
| Status | Filter assets based on their current status. |
| Category | Filter assets based on their category. |
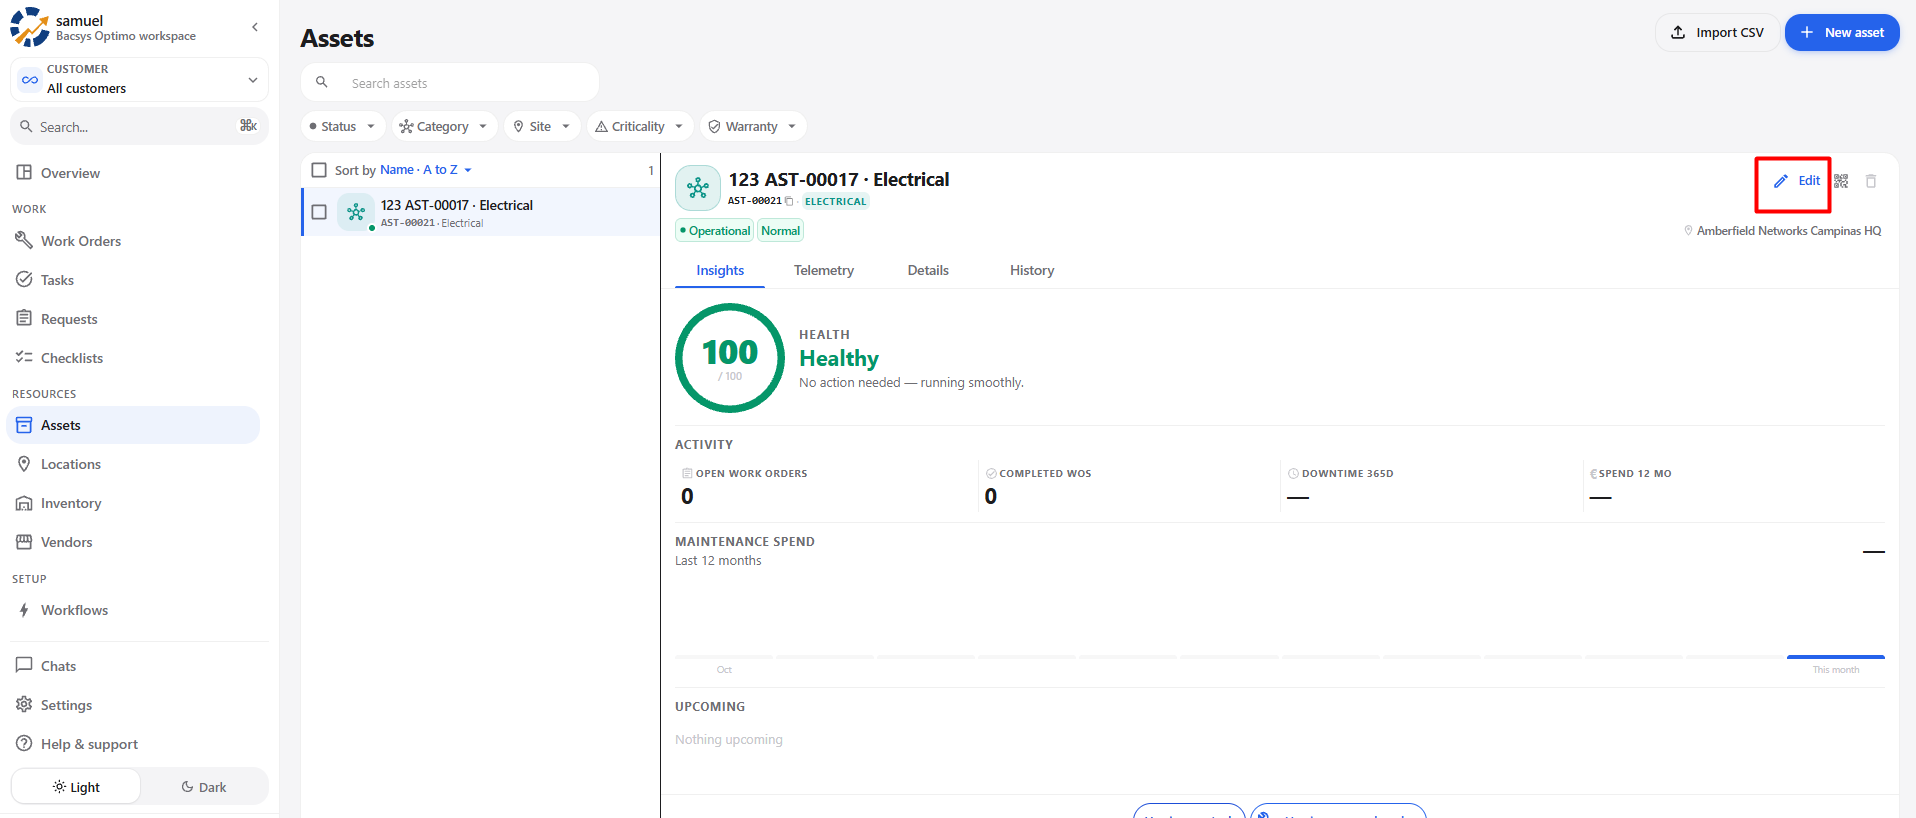
| Site | Filter assets based on the associated site. |
| Criticality | Filter assets based on their criticality level. |
| Warranty | Filter assets based on their warranty status. |
| Import CSV | Import asset information using a CSV file. |
| + New asset | Create a new asset. |
2. Creating a New Asset
To create a new asset:
- Open the Assets module.
- Click + New asset.
- The New asset pop-up is displayed.
- Enter the required asset information.
- Select the required site and other asset information.
- Click Create asset.
- The asset is created and saved in the Assets list.
2.1 New Asset Form
After clicking + New asset, the New asset pop-up is displayed.
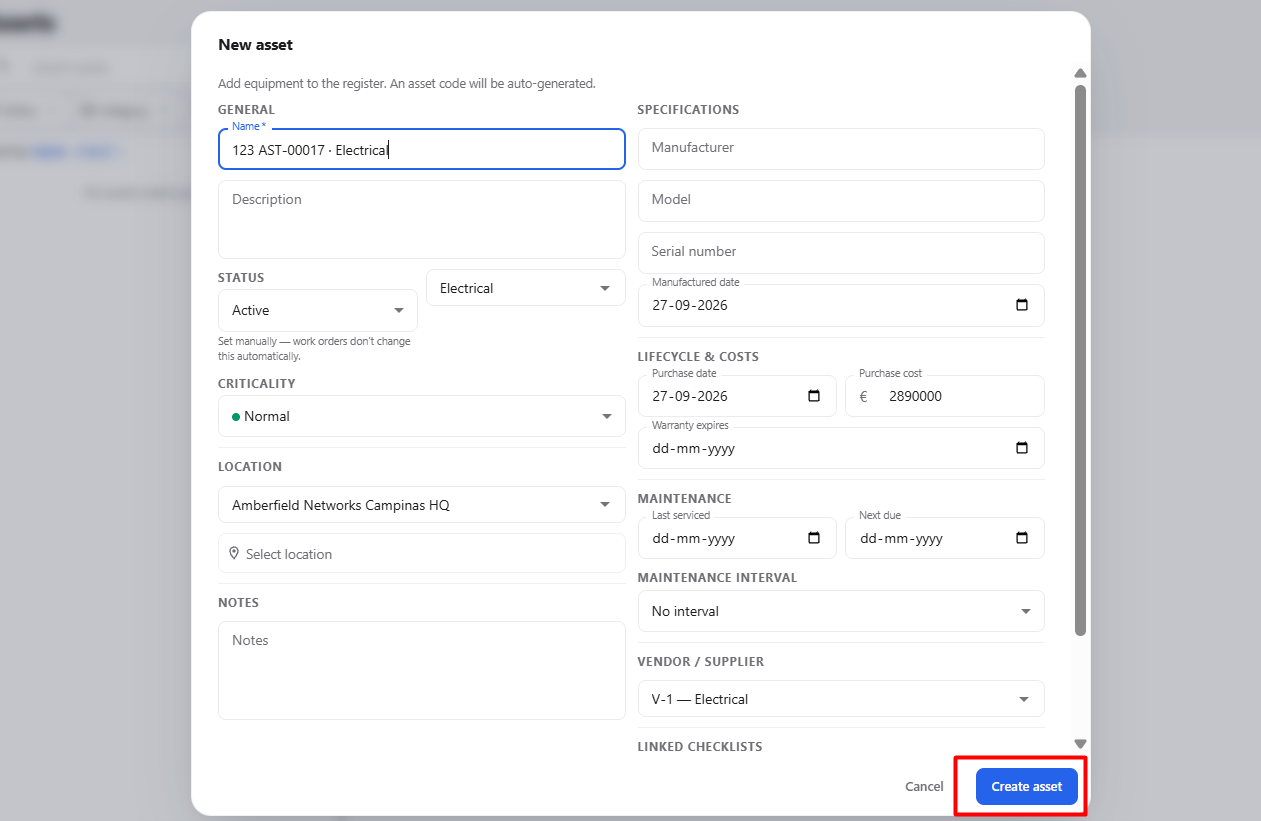
The form contains the following sections and fields:
| Section | Field | Description |
|---|---|---|
| General | Name * | Enter the name of the asset. The asset code is automatically generated. |
| General | Description | Enter a description of the asset. |
| Status | Status | Select the current status of the asset. |
| Status | Category | Select the category of the asset. |
| Criticality | Criticality | Select the criticality level of the asset. |
| Location | Select site * | Select the site where the asset is located. |
| Notes | Notes | Enter additional notes related to the asset. |
| Specifications | Manufacturer | Enter the manufacturer of the asset. |
| Specifications | Model | Enter the model of the asset. |
| Specifications | Serial number | Enter the serial number of the asset. |
| Specifications | Manufactured date | Select the date when the asset was manufactured. |
| Lifecycle & Costs | Purchase date | Select the date when the asset was purchased. |
| Lifecycle & Costs | Purchase cost | Enter the purchase cost of the asset. |
| Lifecycle & Costs | Warranty expires | Select the date when the asset warranty expires. |
| Maintenance | Last serviced | Select the date when the asset was last serviced. |
| Maintenance | Next due | Select the next maintenance due date. |
| Maintenance Interval | Maintenance interval | Select the maintenance interval for the asset. |
| Vendor / Supplier | Select vendor | Select the vendor or supplier associated with the asset. |
| Linked Checklists | Select checklists | Select the checklists linked to the asset. These checklists will auto-attach when the asset is used in a work order. |
| Actions | Cancel | Cancel the asset creation process without creating the asset. |
| Actions | Create asset | Create the asset using the entered information. |
2.2 Create Asset
After entering the required information:
- Verify the Name.
- Review the Description, if provided.
- Select the required Status.
- Select the Category.
- Select the Criticality.
- Select the required Site.
- Enter the asset specifications, if required.
- Enter the lifecycle and cost information, if required.
- Configure the maintenance information.
- Select the vendor or supplier, if required.
- Select the linked checklists, if required.
- Click Create asset.
The asset is created and saved in the Assets list.
Create Asset Workflow
Open Assets
      ↓
+ New asset
      ↓
New Asset Pop-up
      ↓
Enter Asset Information
      ↓
Select Site
      ↓
Configure Asset Details
      ↓
Select Linked Checklists
      ↓
Create asset
      ↓
Asset Saved
3. Asset List
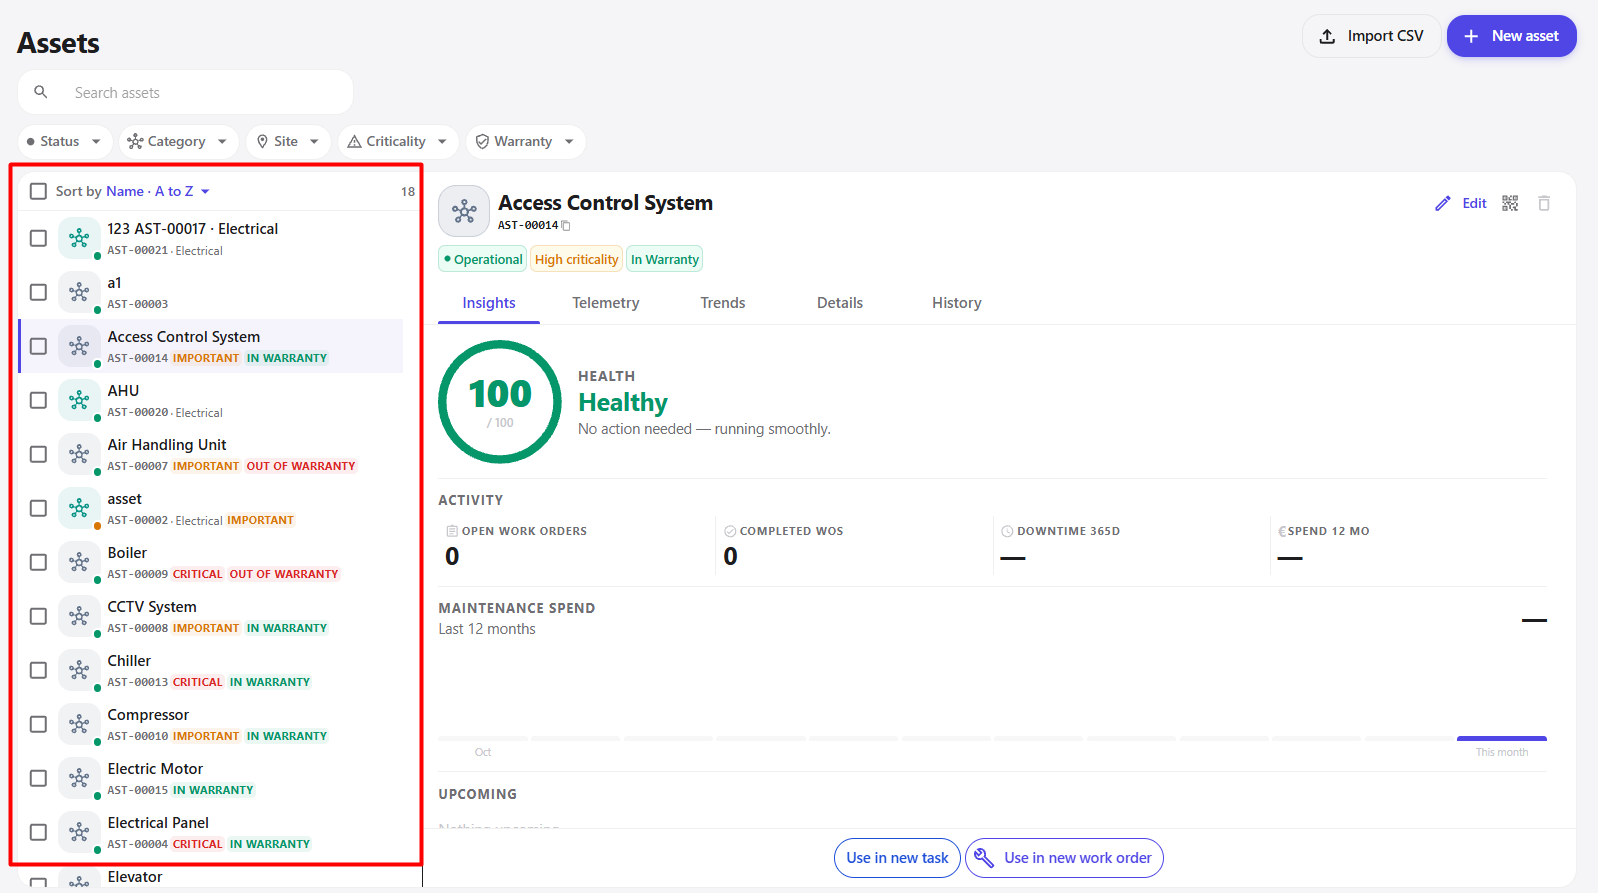
The left side of the Assets page displays the list of available assets.
Each asset in the list displays basic identification information.
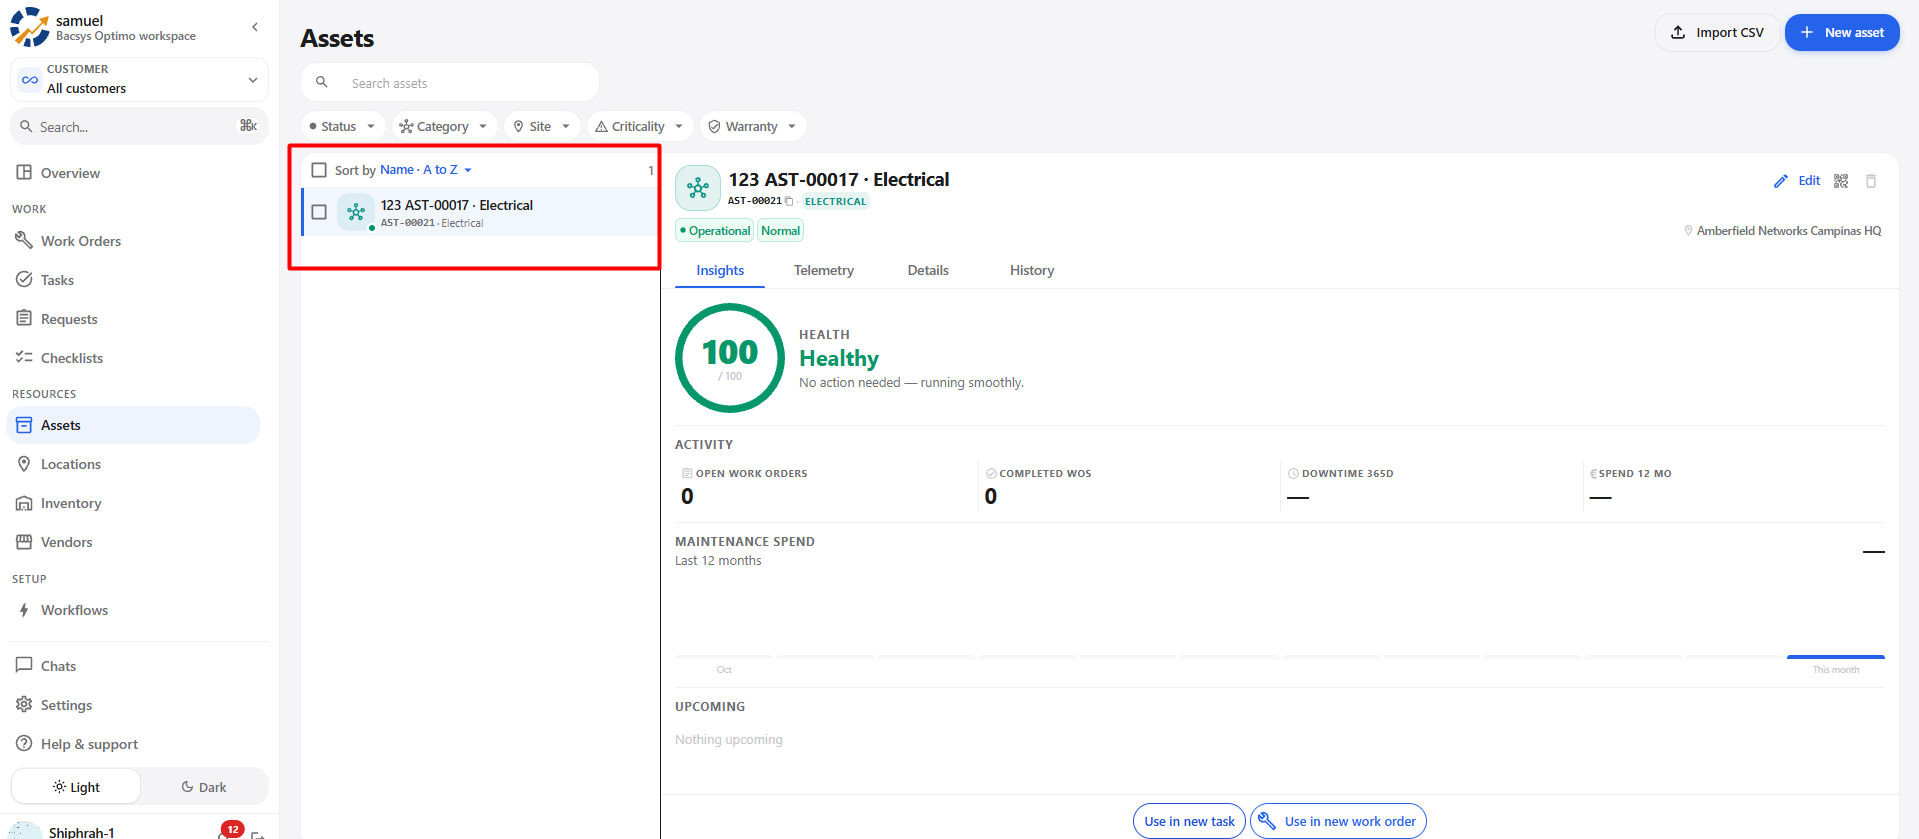
For example:
123
AST-00017 · Electrical
Another asset may be displayed as:
Password
AST-00018 · OUT OF WARRANTY
The asset list also displays status indicators associated with the asset.
3.1 Asset Selection
To view the details of an asset:
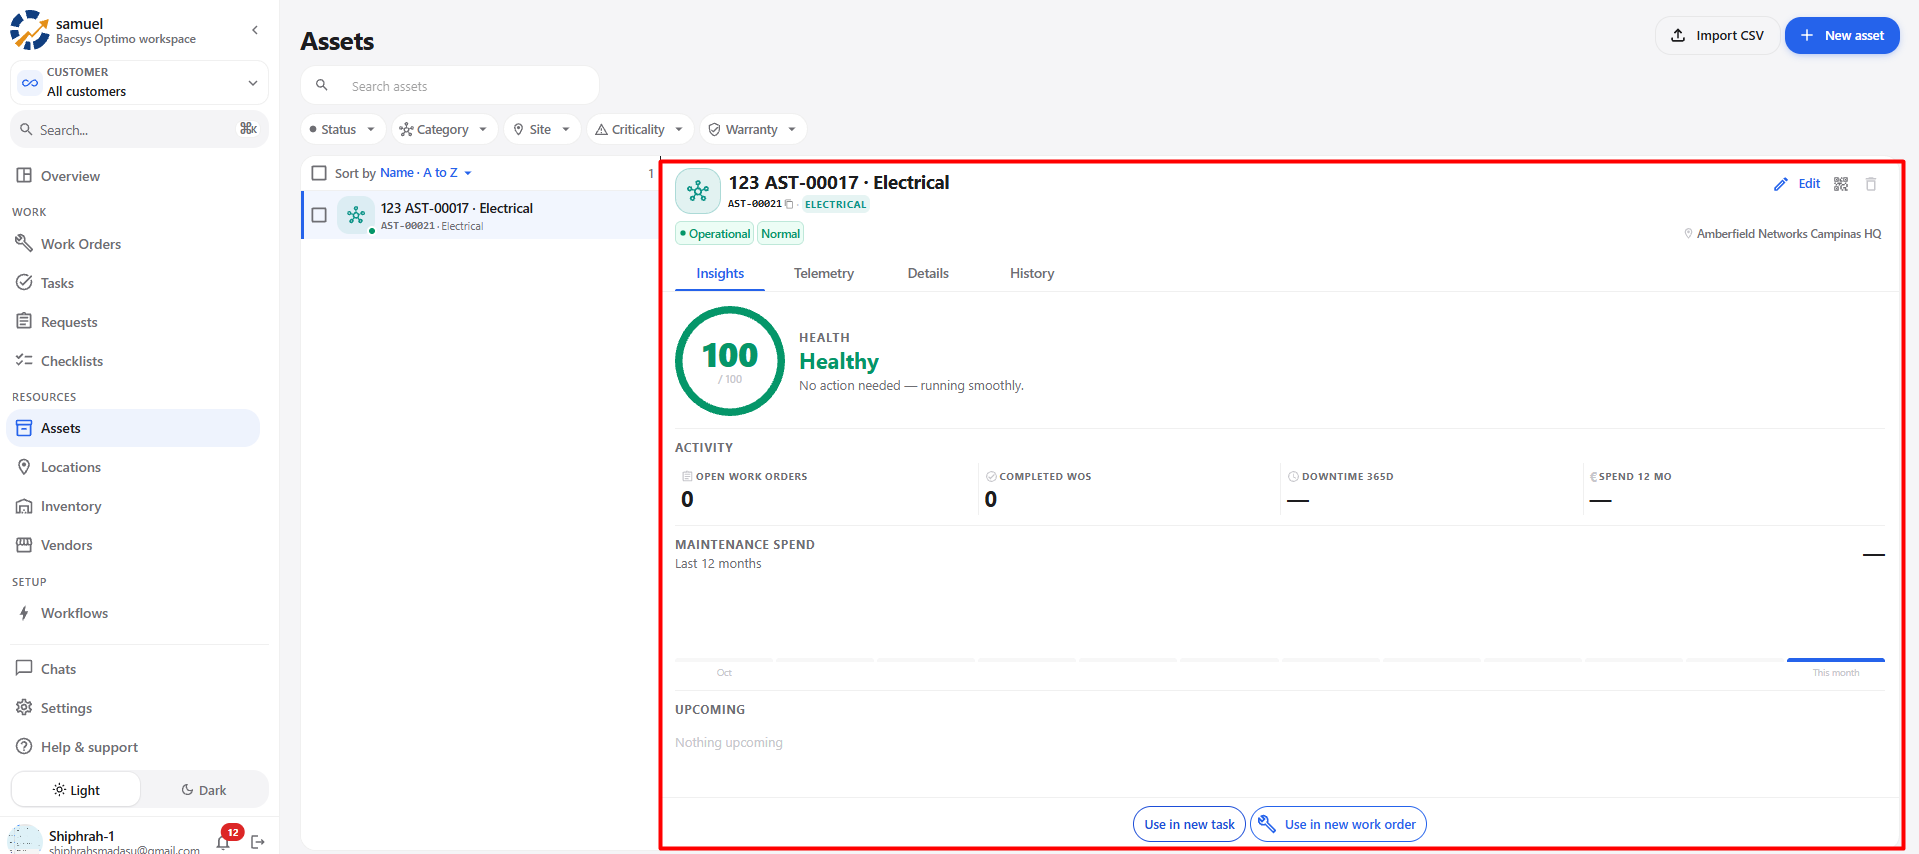
- Open the Assets module.
- Locate the required asset from the asset list.
- Click the asset.
- The selected asset is highlighted.
- The asset details are displayed on the right side.
4. Search Assets
The Search assets field allows users to search for an existing asset.
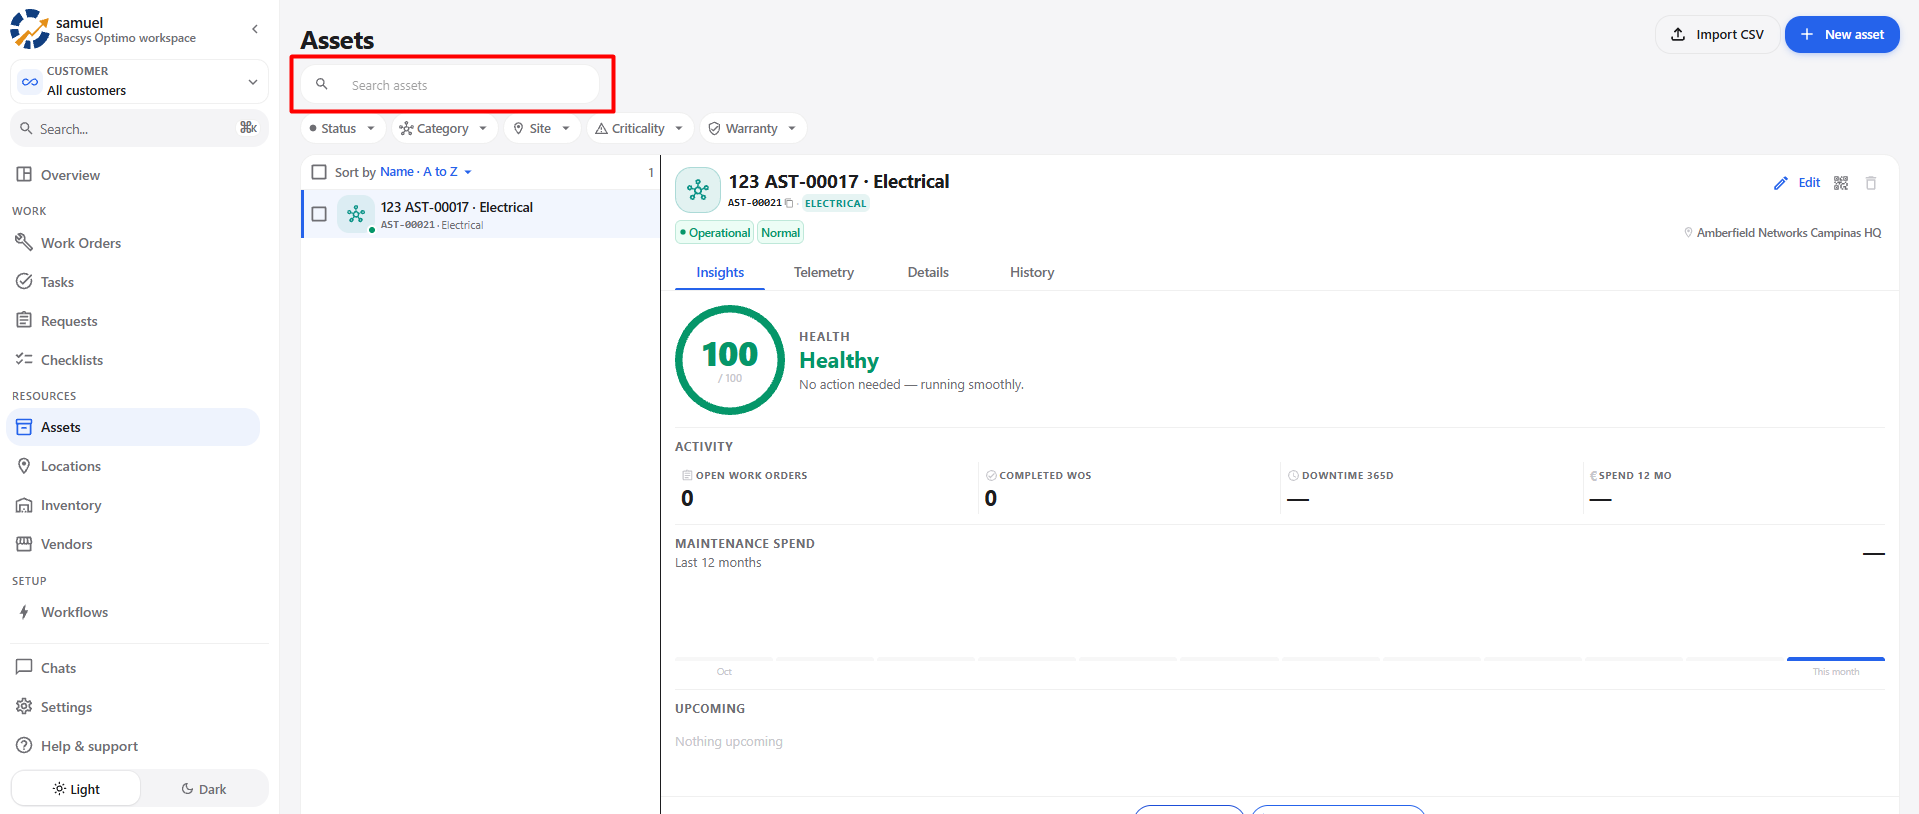
To search for an asset:
- Click the Search assets field.
- Enter the asset name or available asset information.
- Review the matching assets displayed in the asset list.
- Select the required asset to view its details.
Search Workflow
Open Assets
      ↓
Search assets
      ↓
Enter Asset Information
      ↓
View Matching Assets
      ↓
Select Asset
5. Asset Filters
The Assets module provides multiple filters to help users find specific assets.
5.1 Status Filter
The Status filter allows users to filter assets based on their current status.
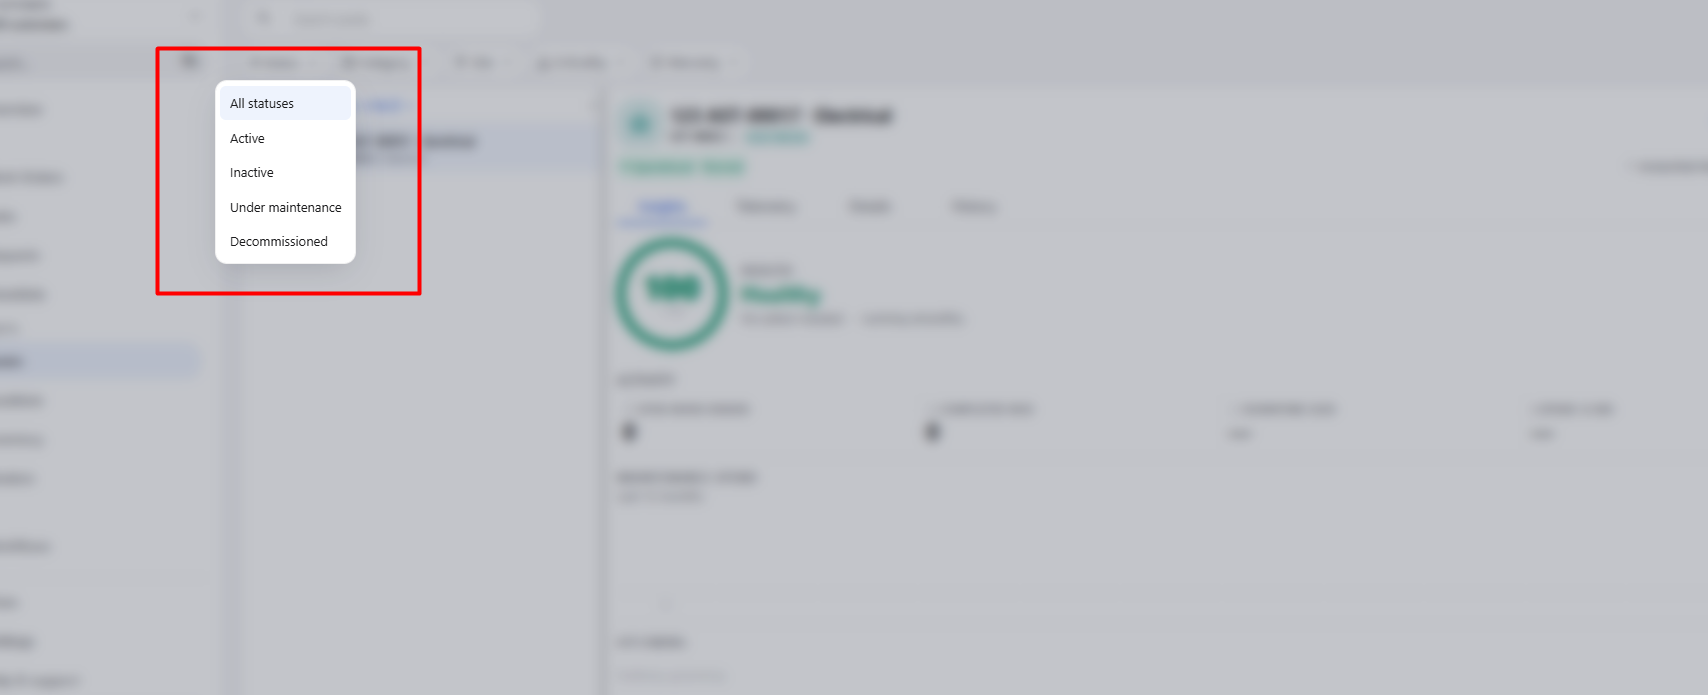
To use the filter:
- Click Status.
- Select the required status.
- The asset list is filtered based on the selected status.
5.2 Category Filter
The Category filter allows users to filter assets based on their category.
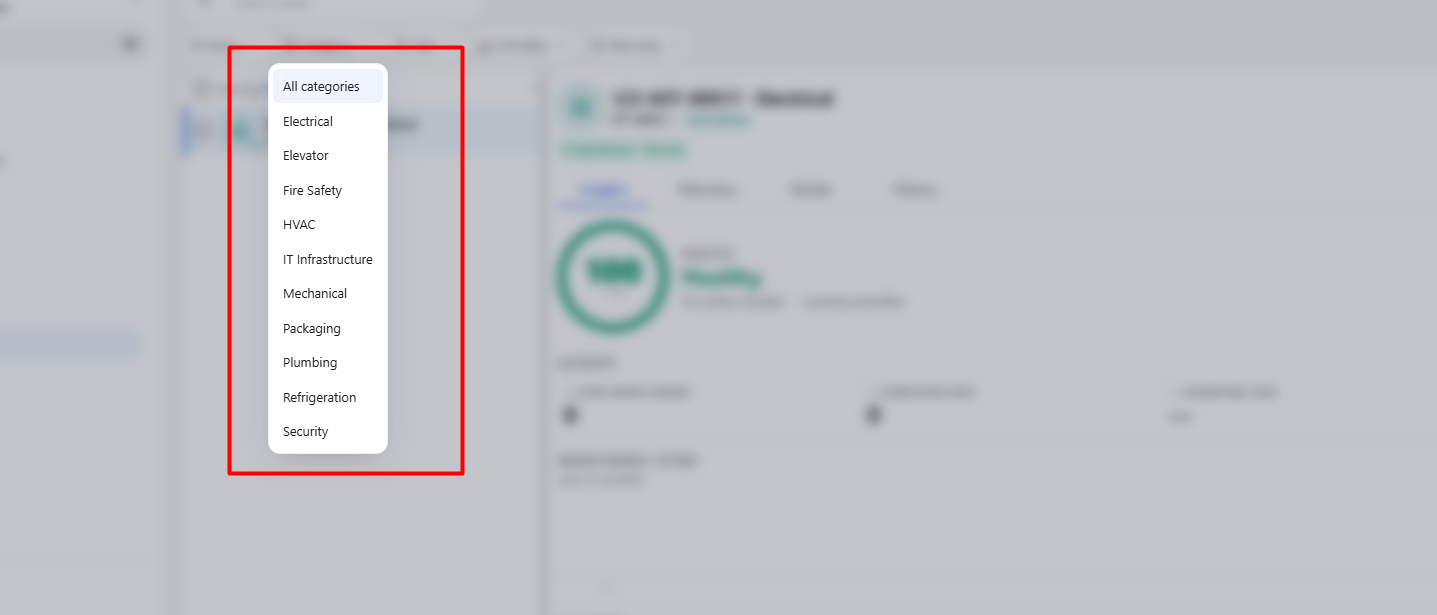
Example:
ElectricalTo use the filter:
- Click Category.
- Select the required category.
- The asset list is updated based on the selected category.
5.3 Site Filter
The Site filter allows users to filter assets based on their associated site.
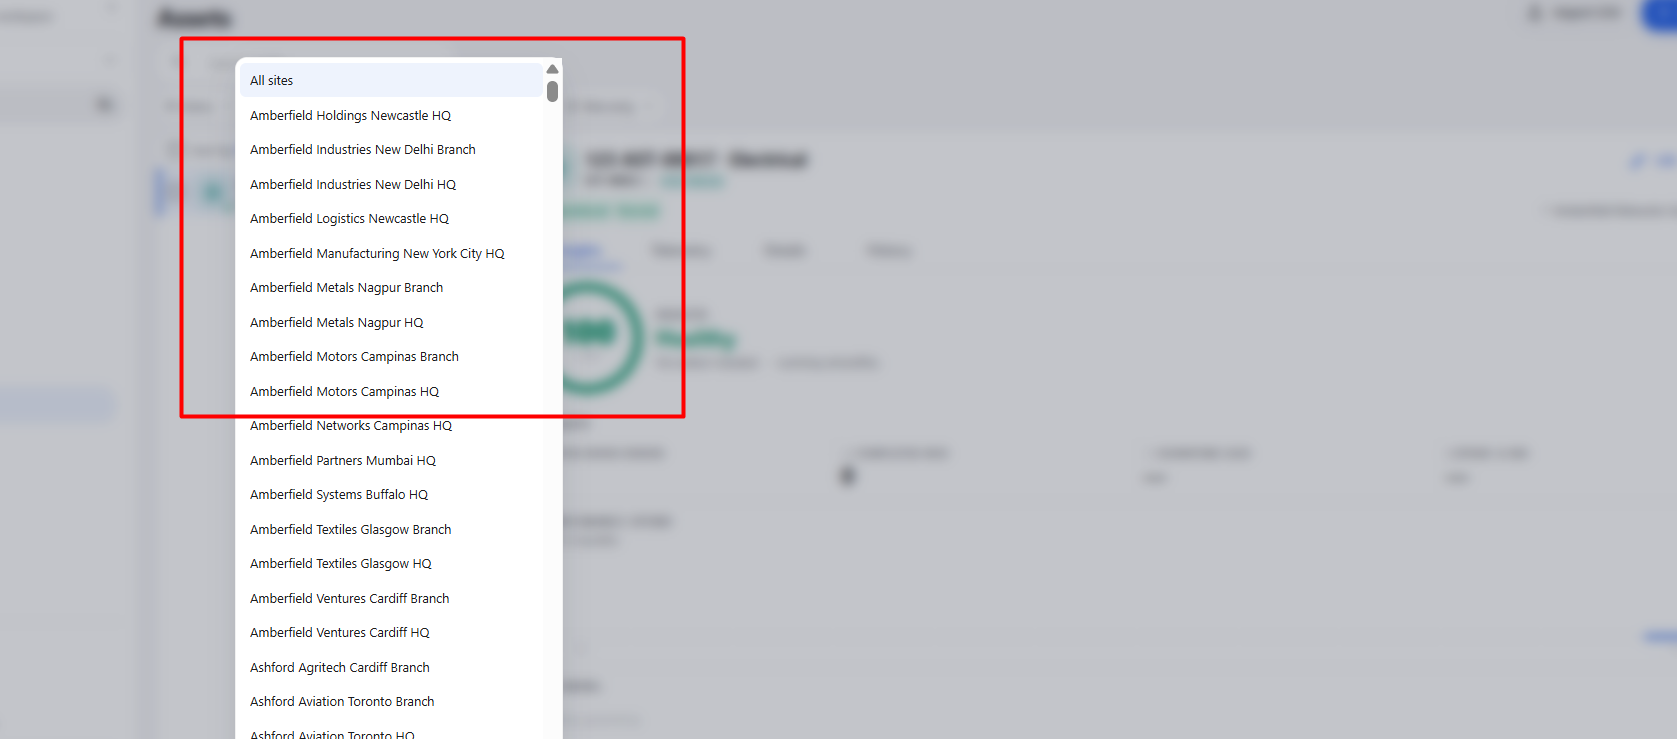
To use the filter:
- Click Site.
- Select the required site.
- The asset list displays the assets associated with the selected site.
5.4 Criticality Filter
The Criticality filter allows users to filter assets according to their criticality.
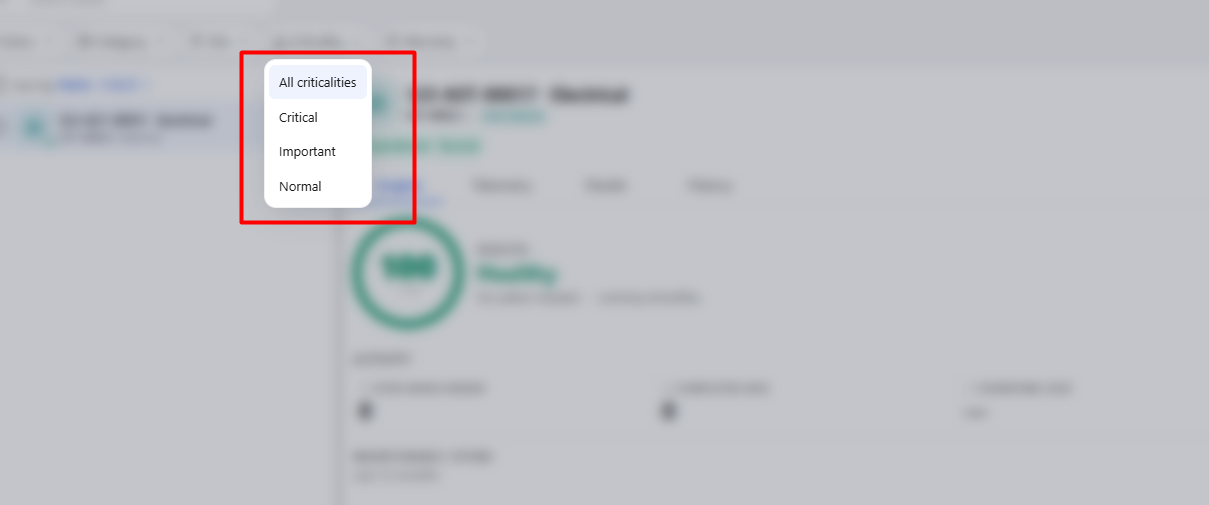
To use the filter:
- Click Criticality.
- Select the required criticality level.
- The asset list is filtered accordingly.
5.5 Warranty Filter
The Warranty filter allows users to filter assets based on their warranty status.
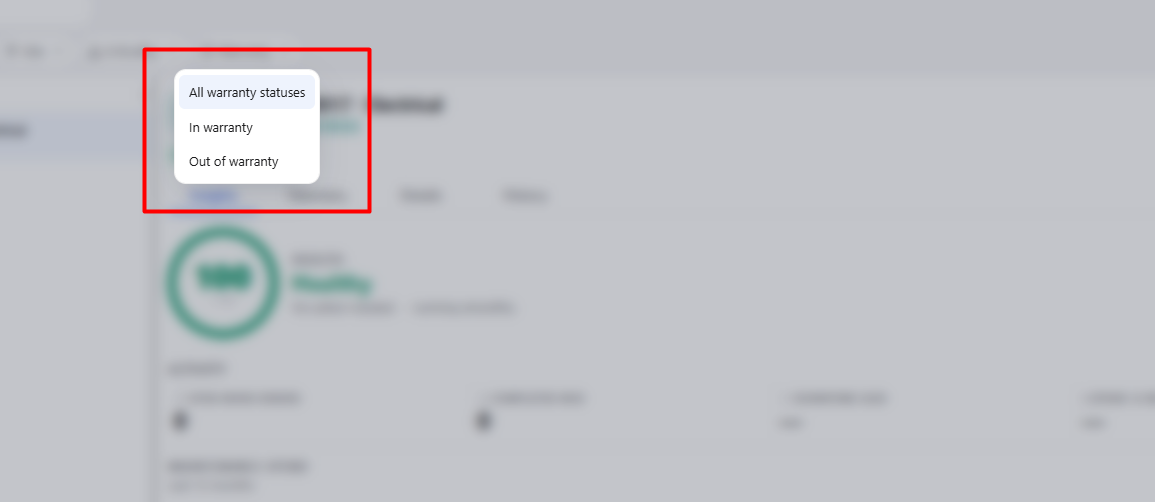
For example:
OUT OF WARRANTYTo use the filter:
- Click Warranty.
- Select the required warranty option.
- Review the filtered assets.
6. Sorting Assets
The asset list provides a sorting option.
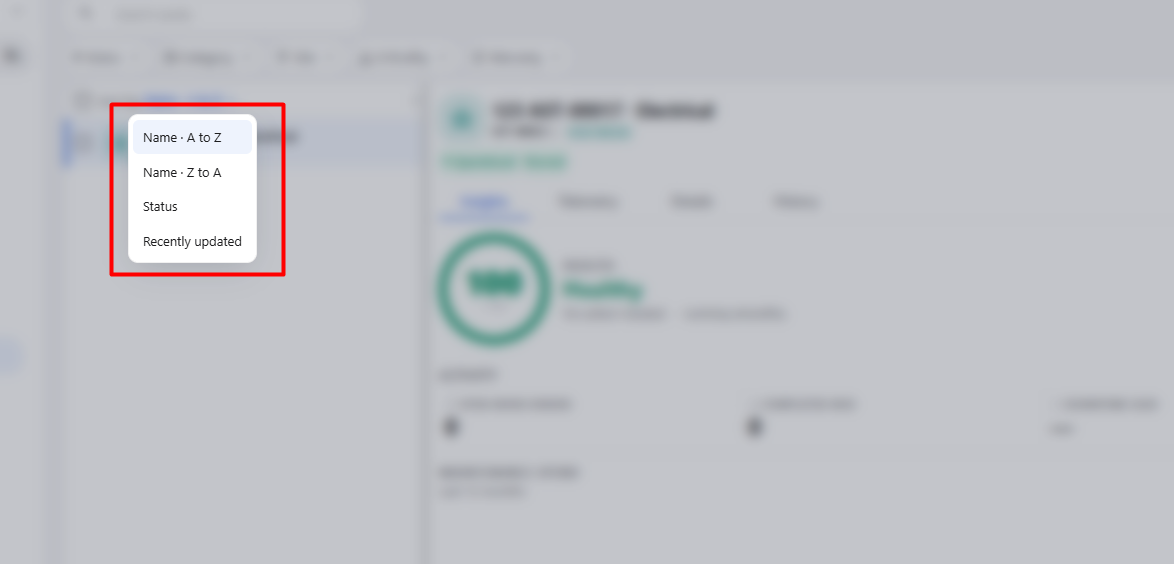
The available sorting option shown is:
Sort by Name · A to ZThis allows users to sort the asset list alphabetically by asset name.
6.1 Sorting Workflow
Open Assets
      ↓
Sort by Name
      ↓
Select A to Z
      ↓
Assets Sorted Alphabetically
7. Asset Details
When an asset is selected, its detailed information is displayed on the right side of the screen.
For the selected asset, the following information is visible:
Asset Name: 123
Asset ID: AST-00017
Category: ELECTRICAL
Status: Operational
Criticality: Normal
Site: Ashgrove Metals Victoria HQ
7.1 Asset Header
The asset header displays the main identification and status information.
The asset information includes:
- Asset Name:
123 - Asset ID:
AST-00017 - Category:
ELECTRICAL - Status:
Operational - Criticality:
Normal - Site:
Ashgrove Metals Victoria HQ (Ashgrove Group Pty) British Columbia
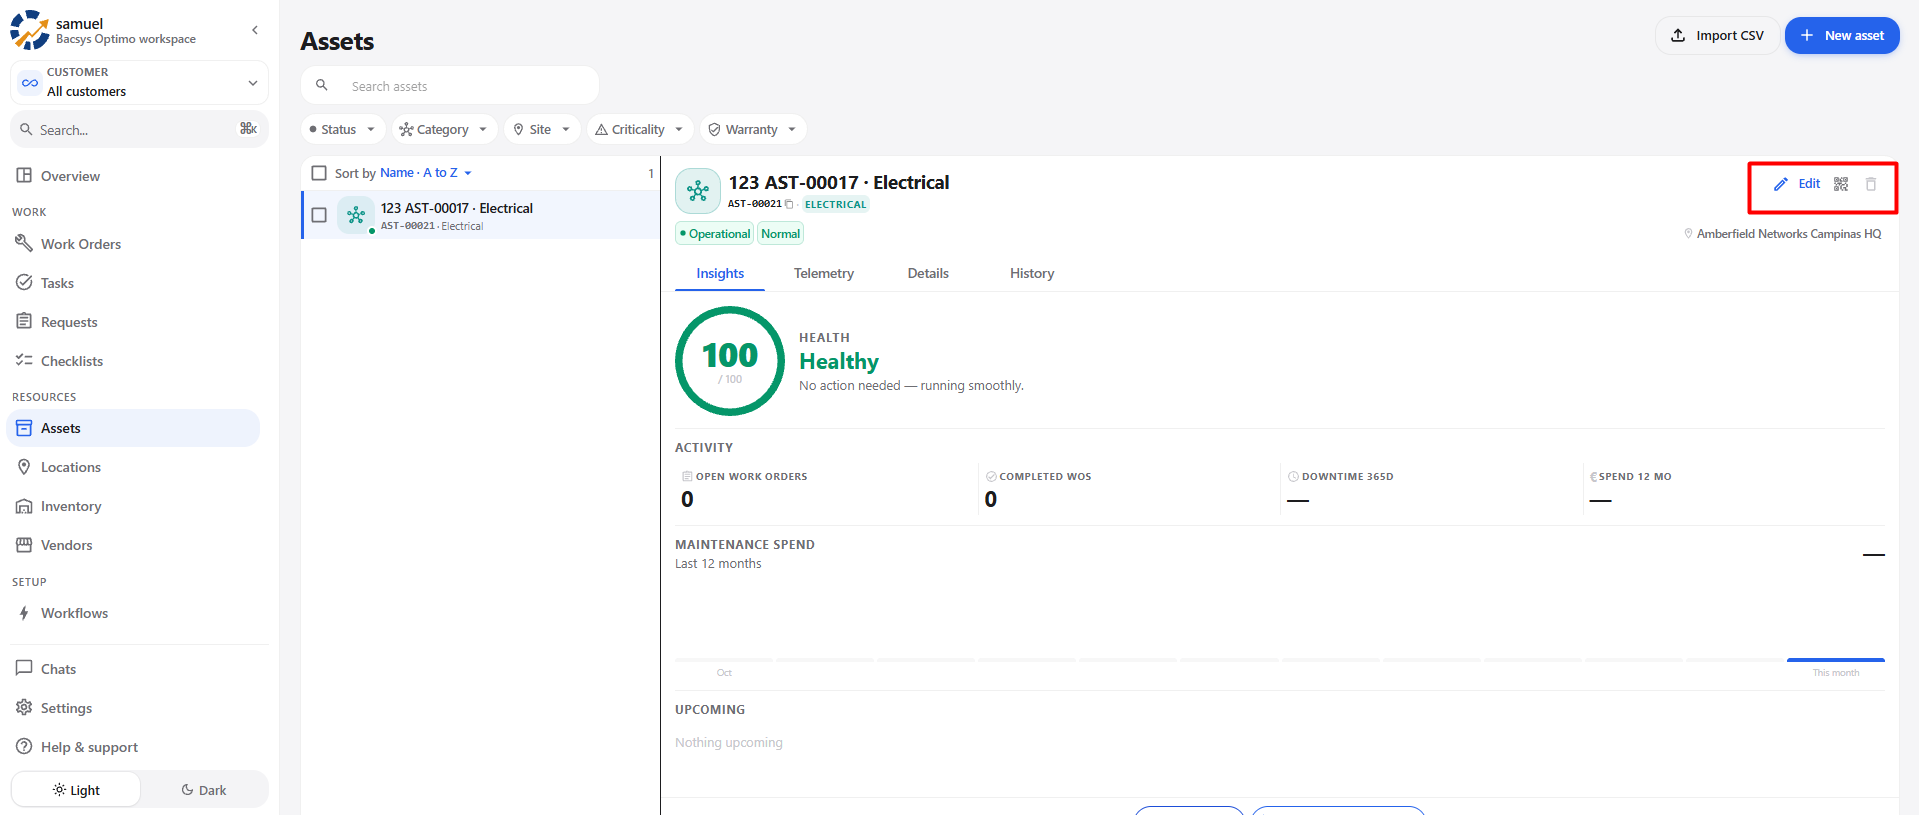
The header also provides action options.
| Action | Description |
|---|---|
| Edit | Allows the asset information to be edited. |
| QR Code | Provides access to the asset QR option shown in the asset header. |
| Delete | Allows the asset to be deleted. |
8. Asset Status
The selected asset displays its current status.
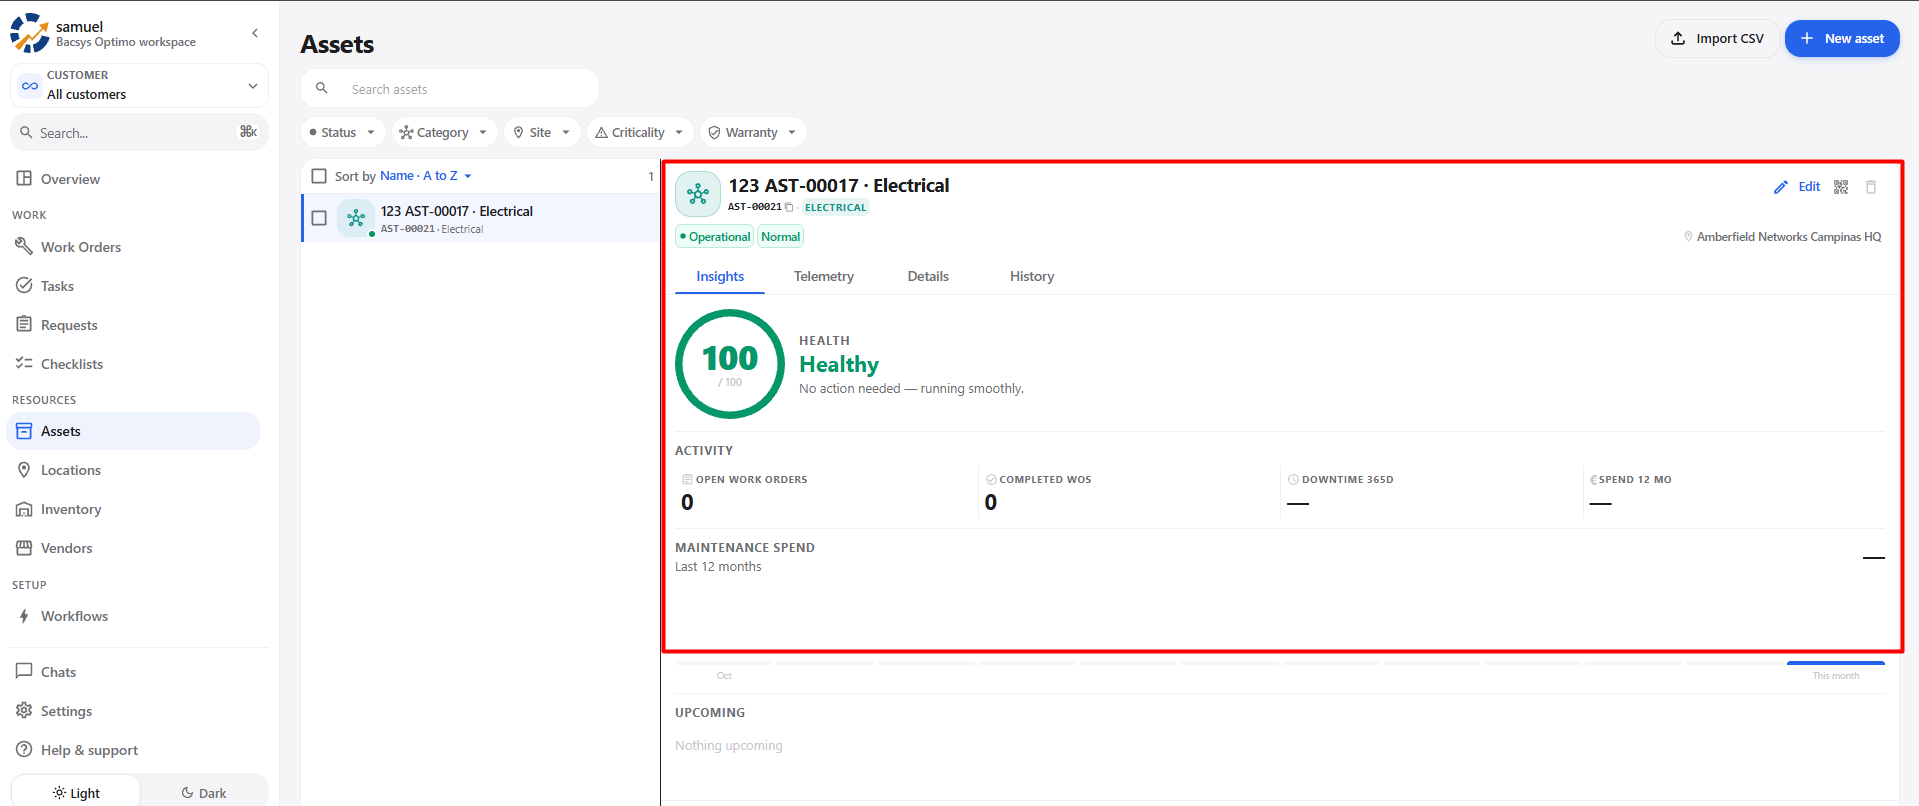
In the screenshot, the asset status is:
OperationalThe asset also displays its criticality:
NormalThese status indicators provide a quick overview of the selected asset.
9. Asset Tabs
The asset details section provides multiple tabs for viewing different types of asset information.
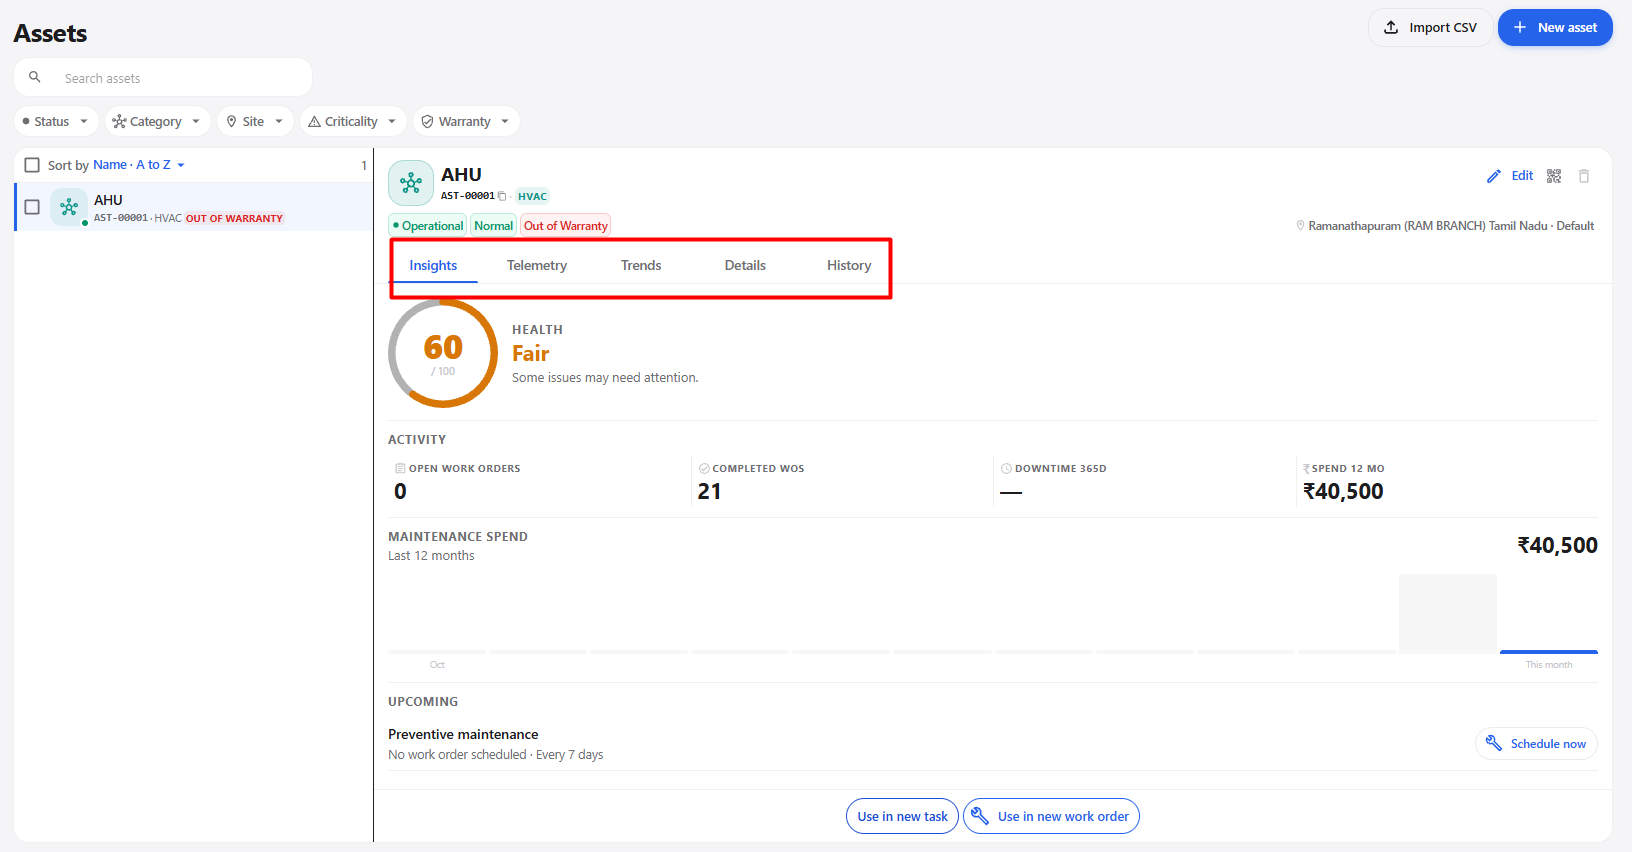
The available tabs are:
| Tab | Purpose |
|---|---|
| Insights | Displays the asset health and maintenance activity overview. |
| Telemetry | Provides access to the asset telemetry information. |
| Trends | Provides access to asset trend information. |
| Details | Displays detailed asset information. |
| History | Displays the asset history. |
10. Insights
The Insights tab provides an overview of the selected asset's current health and maintenance condition. It helps users quickly understand the current condition of the asset and review its maintenance activity.
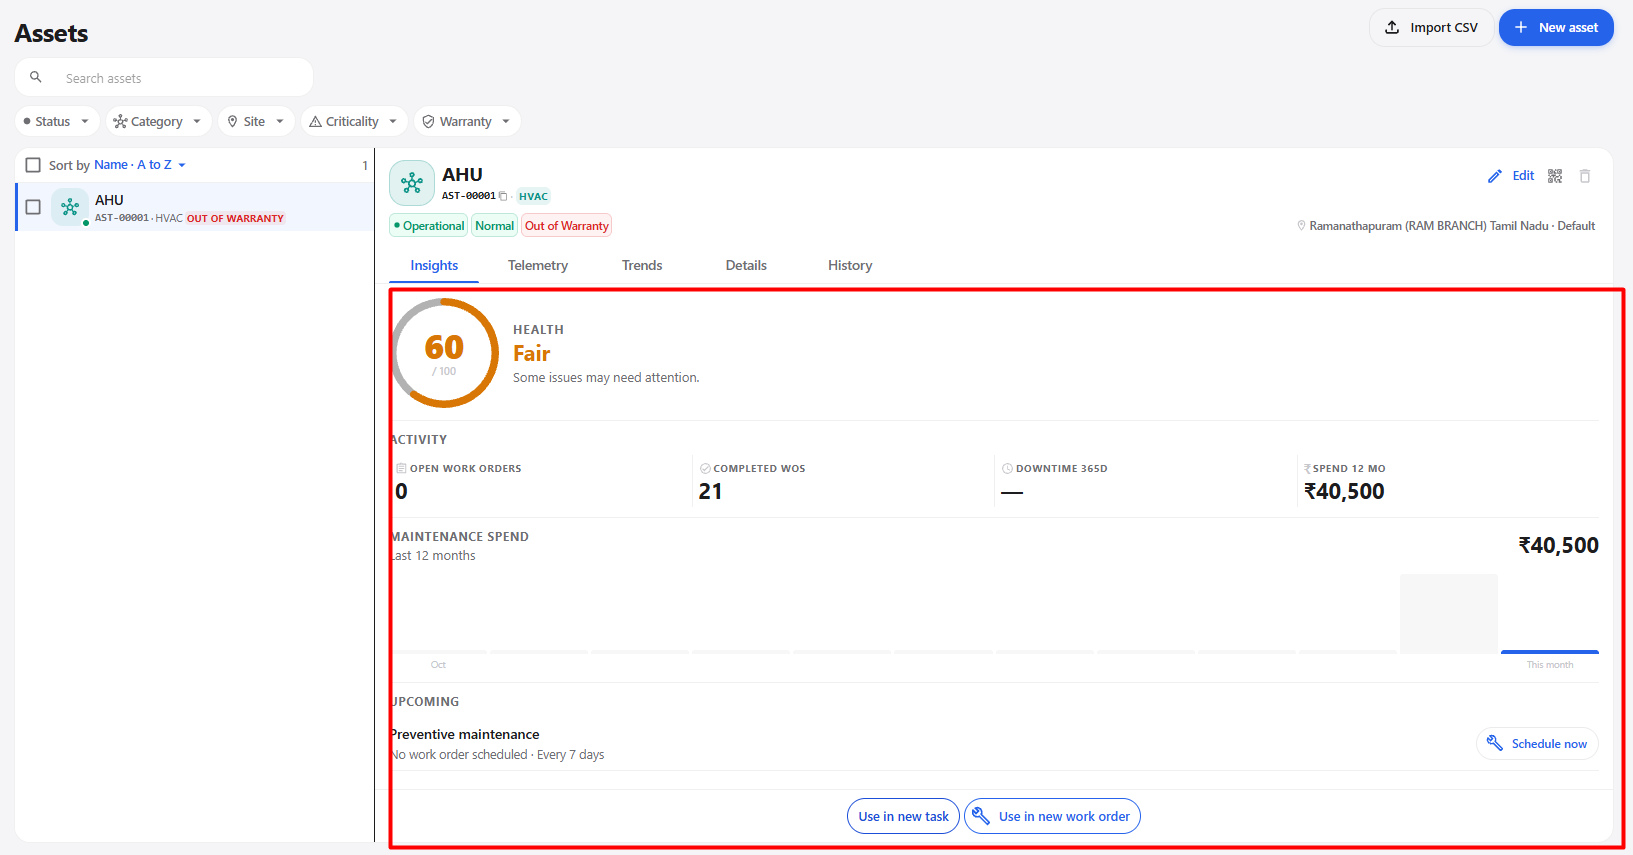
| Section | Information | Description | Example / Value |
|---|---|---|---|
| Asset Health | Health Score | Displays the current health score of the selected asset. | 100 / 100 |
| Asset Health | Health Status | Indicates the current condition of the asset. | Healthy |
| Asset Health | Health Message | Provides a brief message describing the current asset condition. | No action needed — running smoothly. |
| Activity | Open Work Orders | Displays the number of currently open work orders associated with the asset. | 0 |
| Activity | Completed WOs | Displays the number of completed work orders associated with the asset. | 21 |
| Activity | Downtime 365D | Displays the recorded downtime information for the previous 365 days. | — |
| Activity | Spend 12 Mo | Displays the maintenance-related spending information for the previous 12 months. | 40,500 |
| Maintenance Spend | Period | Displays the maintenance spending period covered by the chart. | Last 12 months |
| Maintenance Spend | Chart | Provides a time-based view of the maintenance spending for the selected asset. | Oct to This month |
| Upcoming | Upcoming Activities | Displays upcoming maintenance-related activities associated with the selected asset. | Nothing upcoming |
11. Telemetry
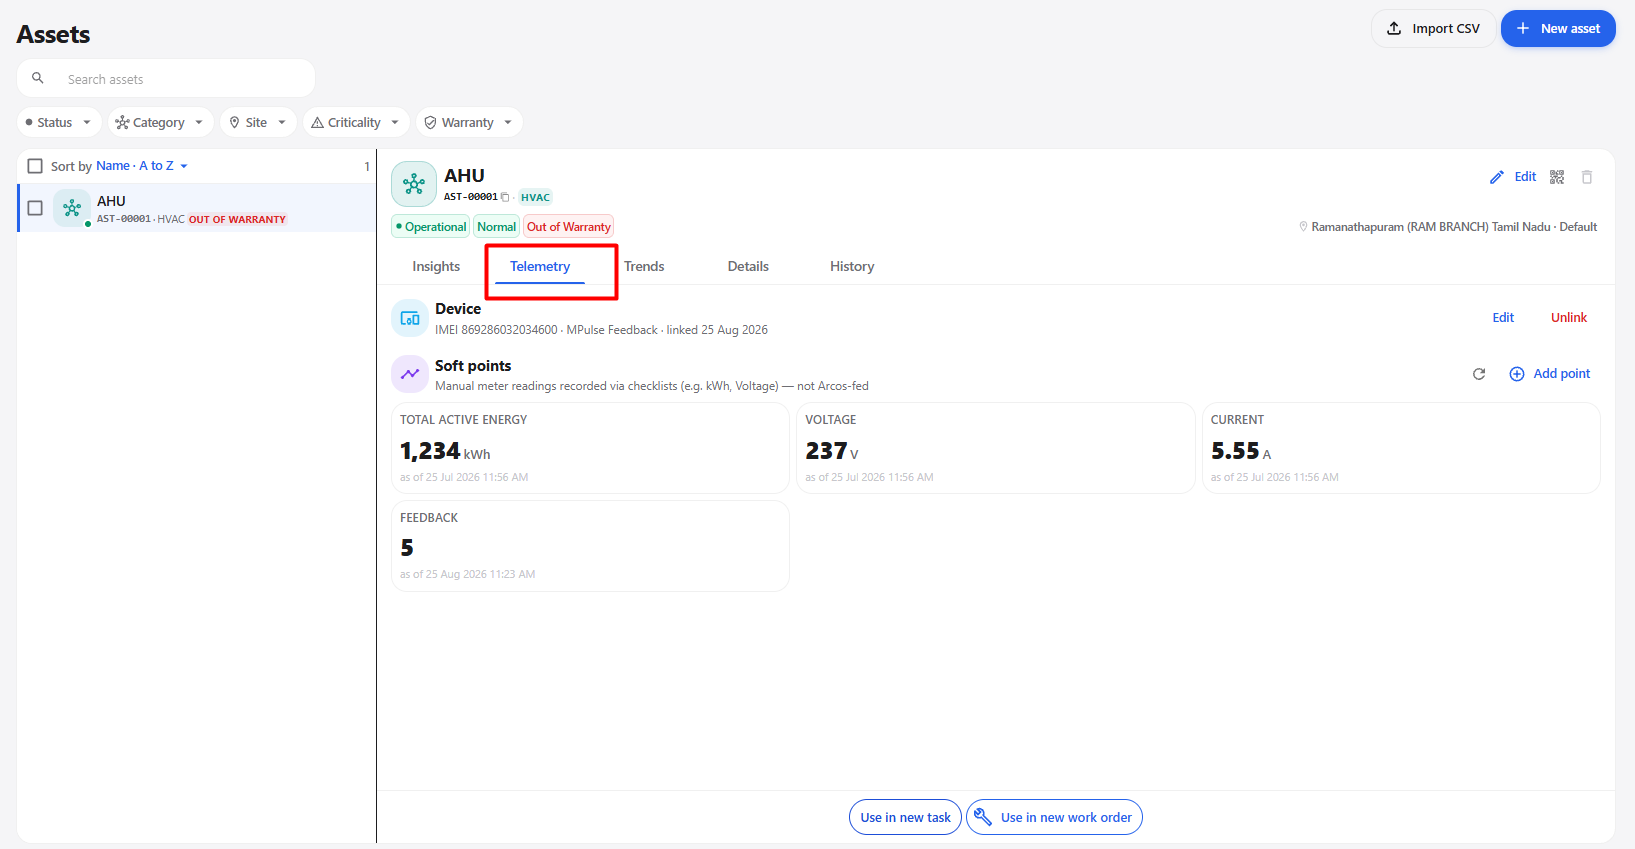
The Telemetry tab displays device and soft-point information associated with the selected asset. Users can view the linked device, review available telemetry values, add new soft points, edit device information, or unlink the device.
| Section / Action | Description | Steps / Details |
|---|---|---|
| Telemetry | Displays telemetry information associated with the selected asset. | 1. Select an asset. 2. Click Telemetry. 3. Review the available device and soft-point information. |
| Telemetry Page | Displays the linked device and configured soft points for the selected asset. | 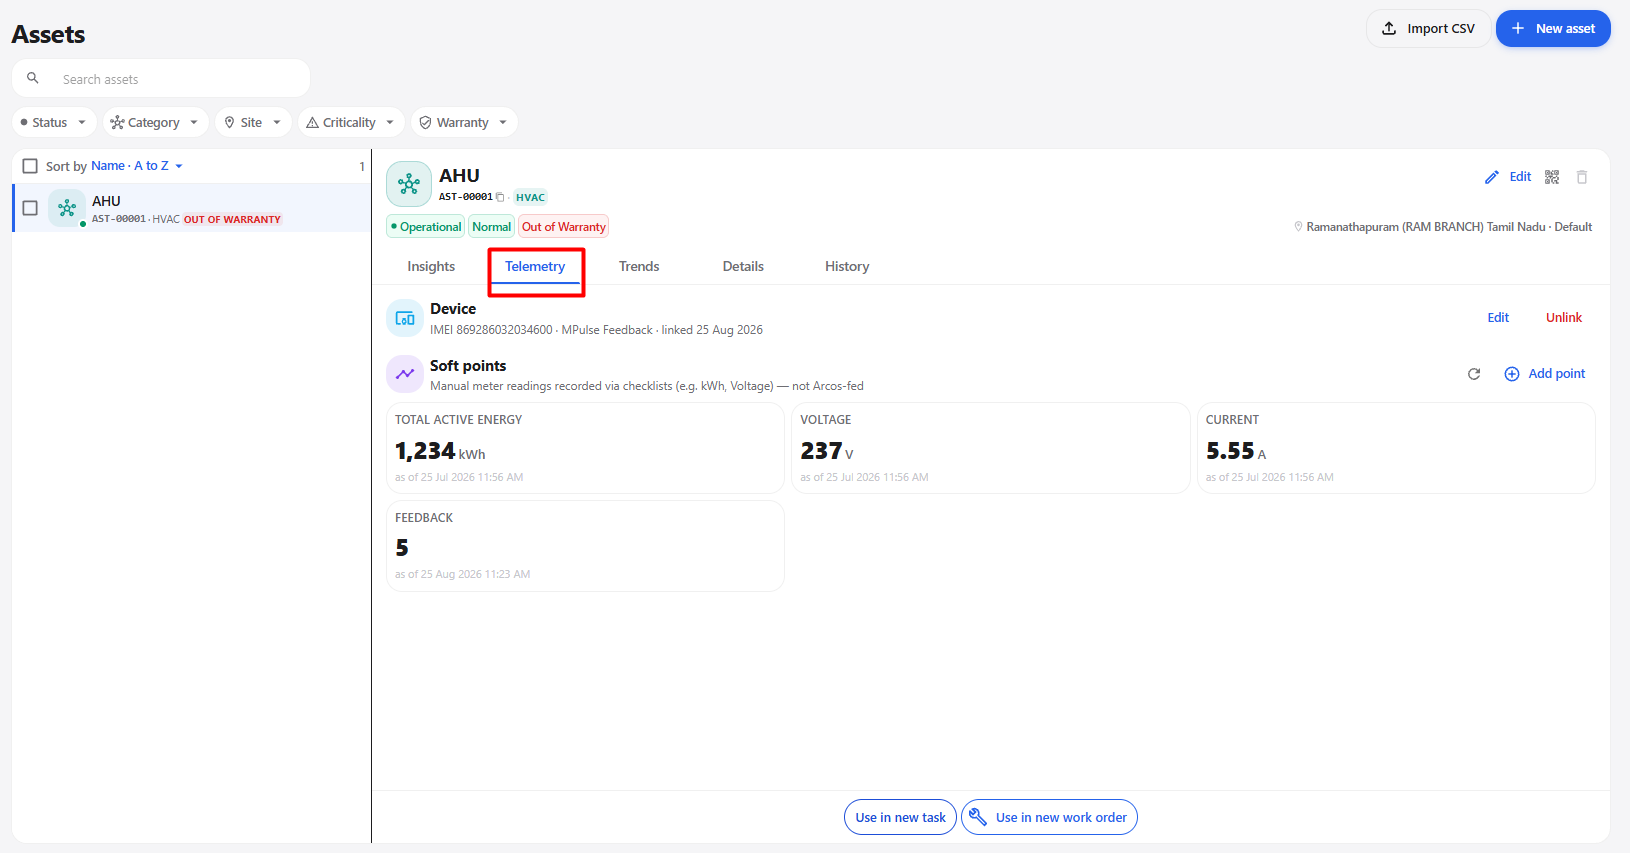 |
| Device | Displays the device linked to the selected asset, including device identification and linked date information. | The device details are displayed under the Device section. |
| Edit Device | Allows the user to edit the linked device information. | Click Edit in the Device section and update the required information. |
| Unlink Device | Removes the connection between the selected asset and its linked device. | Click Unlink. An Unlink device? confirmation pop-up is displayed. |
| Unlink Confirmation | Confirms whether the user wants to unlink the device. | The pop-up indicates that soft points mapped to the device will stop receiving new readings, while historical data will be retained. Click Cancel to keep the device linked or Unlink to remove the connection.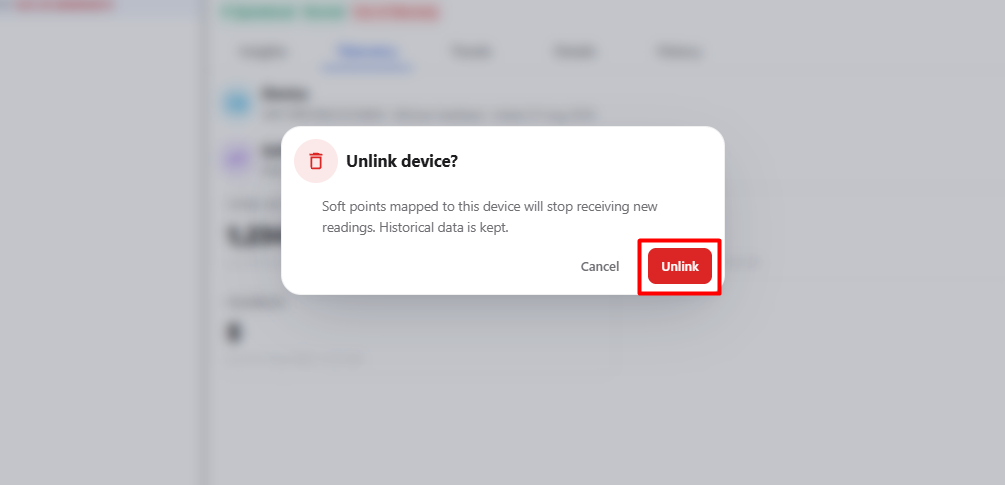 |
| Soft Points | Displays telemetry points associated with the device. Soft points can contain manually recorded or device-based readings. | Review the available soft points and their latest values. |
| Add Point | Allows the user to add a new soft point to the selected device. | Click Add point in the Soft points section. |
| Add Soft Point | Opens the Add soft point pop-up where the new point can be configured. | 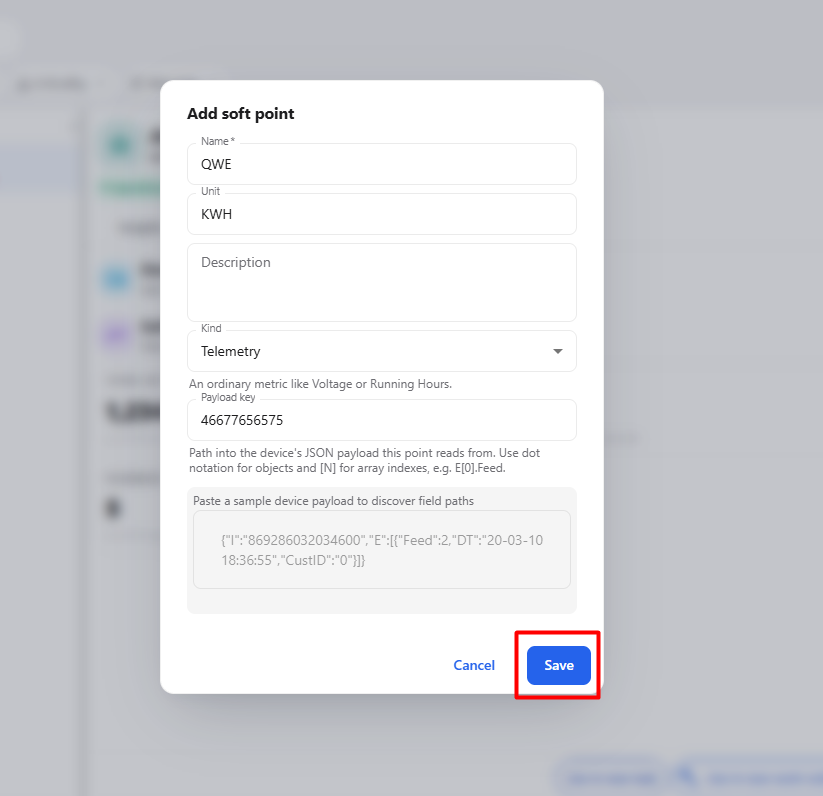 Enter the required information and click Save. |
| Name* | Specifies the name of the soft point. | Enter a name such as kWh, Voltage, or Current. This field is mandatory. |
| Unit | Specifies the measurement unit for the soft point. | Enter the appropriate unit for the selected point. |
| Description | Provides additional information about the soft point. | Enter a description explaining the purpose or measurement represented by the point. |
| Kind | Specifies the type of soft point. | Select the required type from the available options. The default option shown is Telemetry. |
| Payload Key | Specifies the path used to identify the required value from the device JSON payload. | Enter the payload path used to read the required telemetry value. Dot notation and array indexes can be used where required. |
| Sample Device Payload | Allows the user to paste a sample device payload to help discover the required field path. | Paste a sample JSON payload into the provided area and use it to identify the required payload key. |
| Save Soft Point | Saves the newly configured soft point. | Enter the required details in the Add soft point pop-up and click Save. |
| Cancel Add Point | Closes the Add Soft Point pop-up without saving the new point. | Click Cancel. |
| Telemetry Values | Displays the latest values received or recorded for the available soft points. | Values such as Total Active Energy, Voltage, Current, and Feedback can be displayed depending on the configured points. |
| Total Active Energy | Displays the current total active energy value recorded for the asset. | Example: 1,234 kWh |
| Voltage | Displays the current voltage value recorded for the asset. | Example: 237 V |
| Current | Displays the current value recorded for the asset. | Example: 5.55 A |
| Feedback | Displays the configured feedback value for the asset. | Example: 5 |
Telemetry Workflow
Select Asset
      ↓
Telemetry
      ↓
View Device and Soft Points
      ↓
      ├── Edit Device
      │      ↓
      │   Update Details
      │
      ├── Add Point
      │      ↓
      │   Add Soft Point
      │      ↓
      │   Enter Point Details
      │      ↓
      │   Save
      │
      └── Unlink
             ↓
       Unlink Device?
             ↓
      Cancel / Unlink
12. Trends
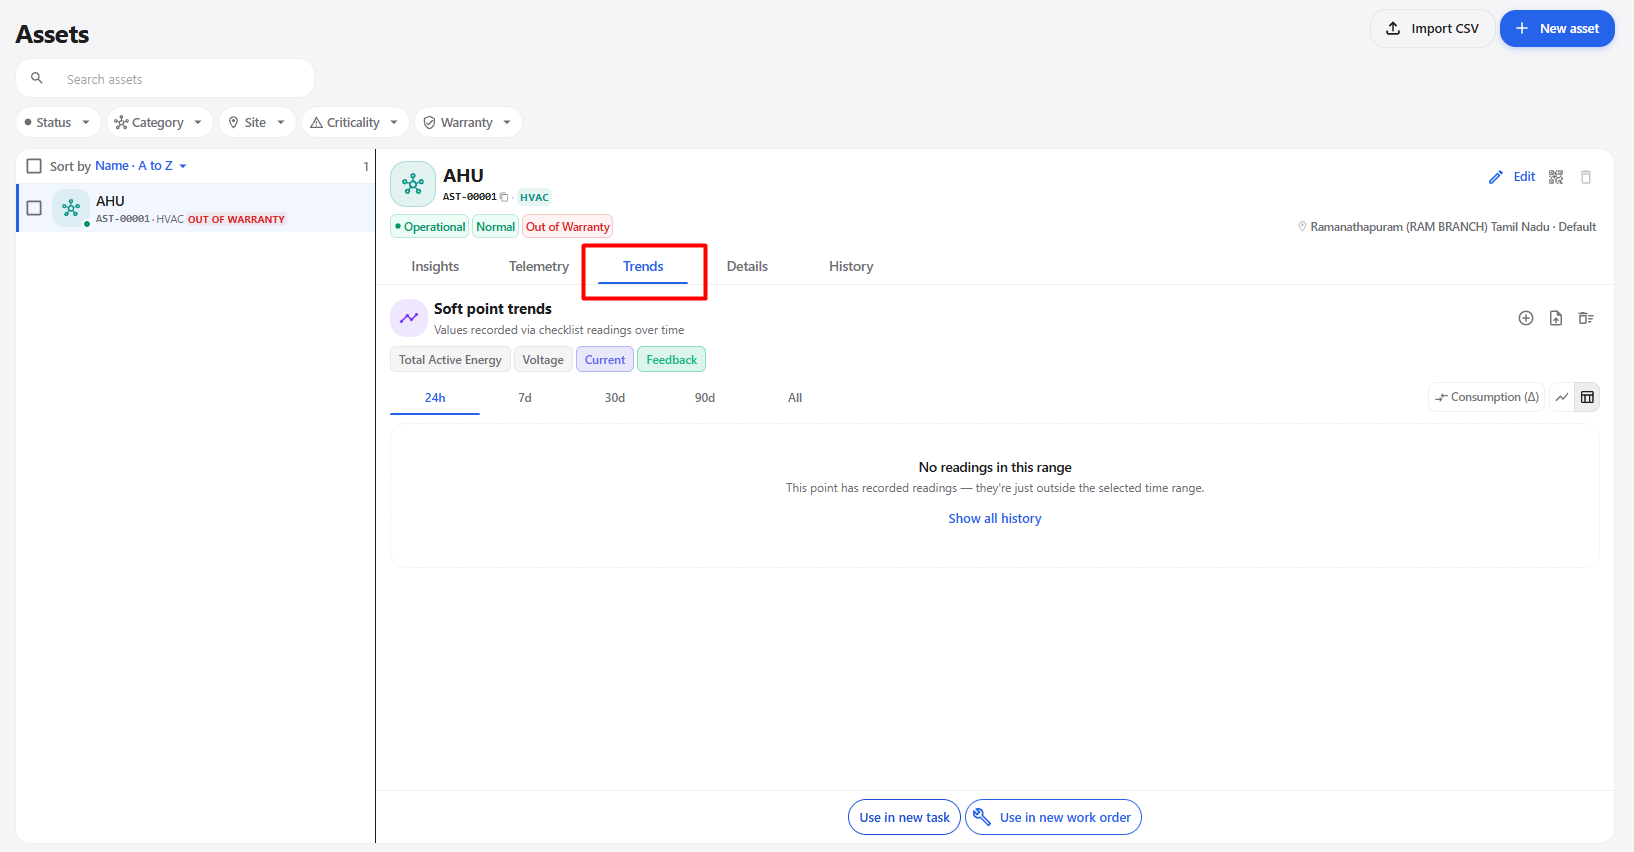
The Trends tab allows users to view and analyze the selected asset's soft-point readings over time. Users can add individual readings, import multiple readings using a CSV file, select different time ranges, view consumption data, display readings using different chart formats, and view the data in a table format.
12.1 Open the Trends Tab
To access the Trends information:
- Select the required asset from the Assets list.
- Open the asset details page.
- Click the Trends tab.
- The Soft point trends section is displayed.
- Review the available soft points and their recorded readings.
12.2 Soft Point Selection
The Soft point trends section displays the available soft points that can be selected for analysis.
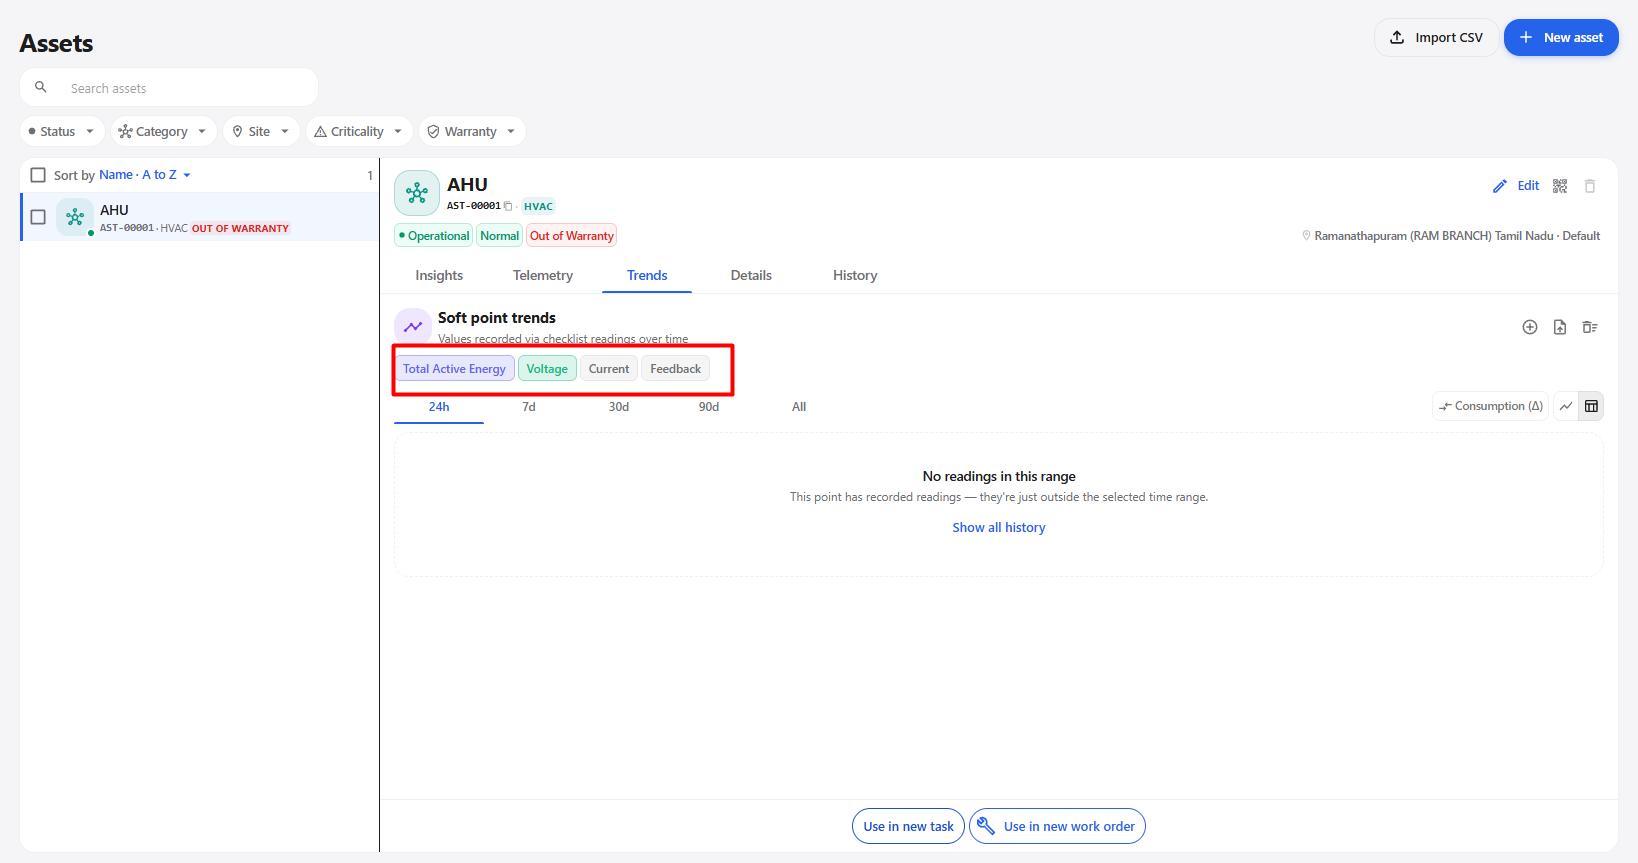
The available soft points can include:
- Total Active Energy
- Voltage
- Current
- Feedback
Steps
- Open the Trends tab.
- Review the available soft-point options.
- Select the required soft point.
- The selected soft point is displayed in the trend view.
- Review the available readings for the selected point.
12.3 Add a Reading
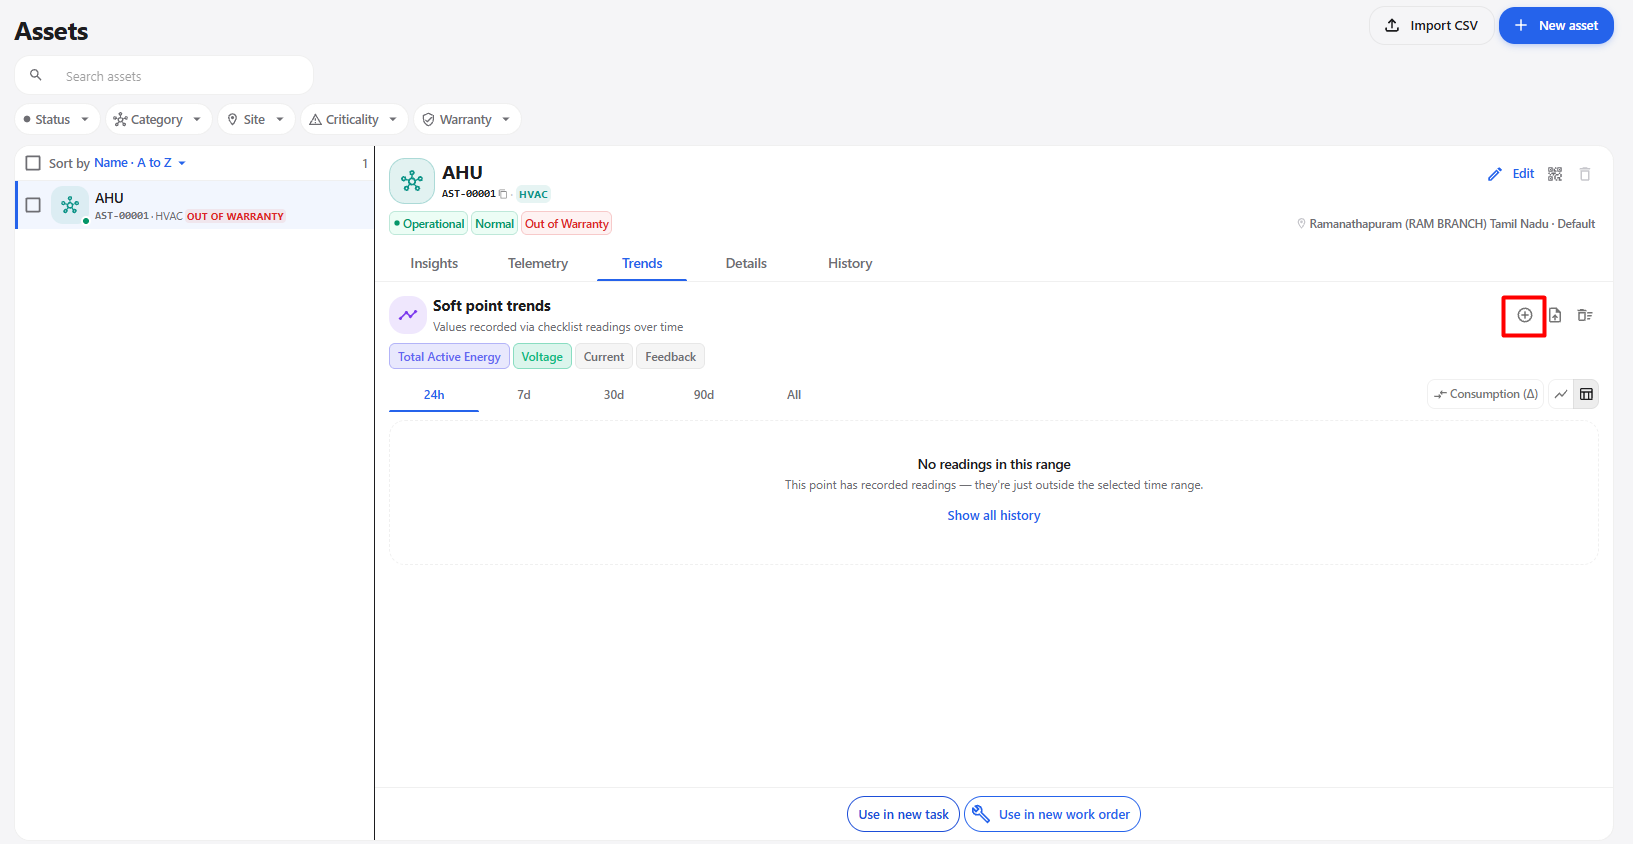
The Add a reading option allows users to manually add a reading for the selected soft point.
Steps
- Select the required soft point.
- Click Add Reading.
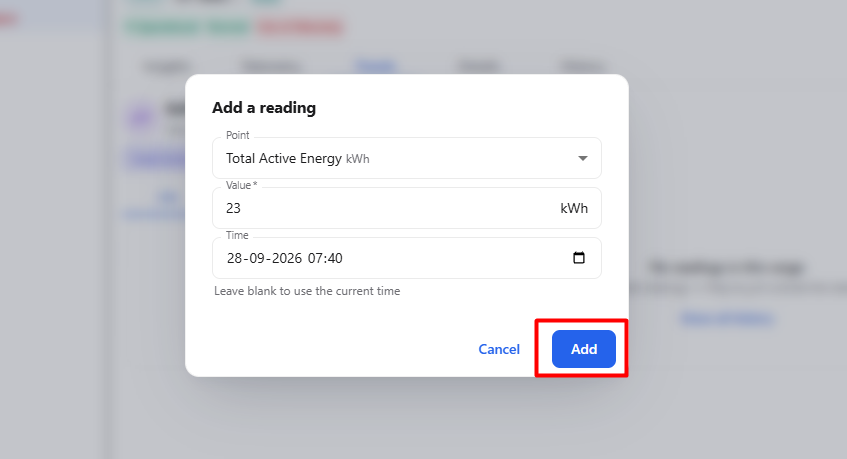
- The Add a reading pop-up is displayed.
- Select the required Point.
- Enter the Value* for the reading.
- Select the required Time.
- If the time is left blank, the current time is used.
- Click Add.
- The reading is added to the selected soft point and becomes available in the trend data.
Add a Reading Fields
| Field | Description |
|---|---|
| Point | Selects the soft point for which the reading is being added. |
| Value* | Specifies the value of the reading. This field is mandatory. |
| Unit | Displays the unit associated with the selected point, such as kWh. |
| Time | Specifies the date and time for the reading. |
| Add | Adds the reading to the selected soft point. |
| Cancel | Closes the pop-up without adding the reading. |
12.4 Import Readings from CSV
The Import readings from CSV option allows users to add multiple readings at once by uploading a CSV file.
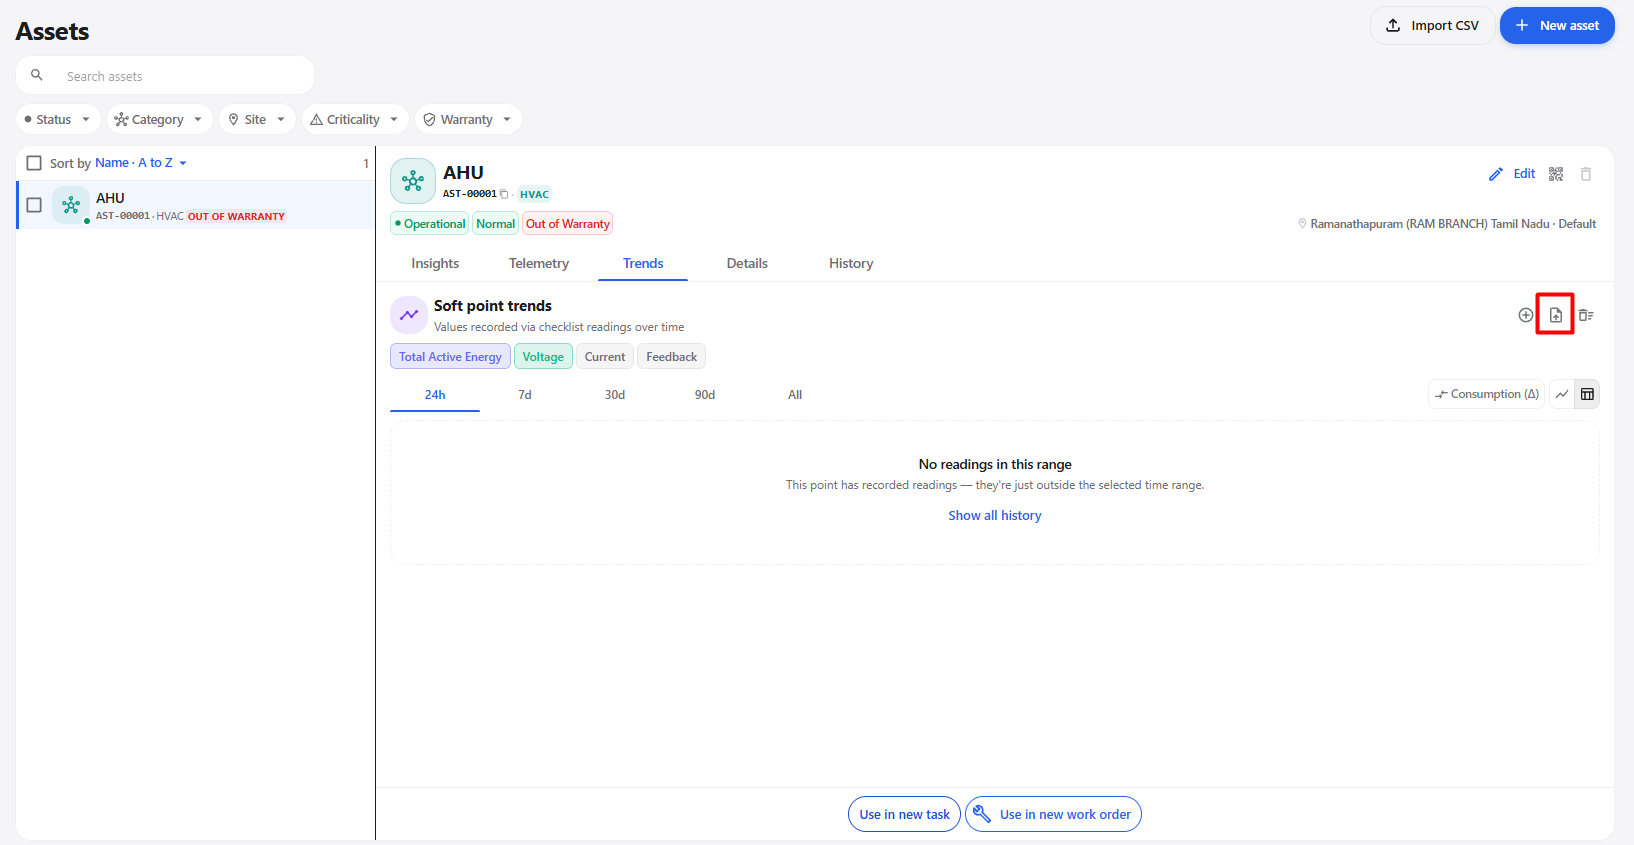
The import window provides the following options:
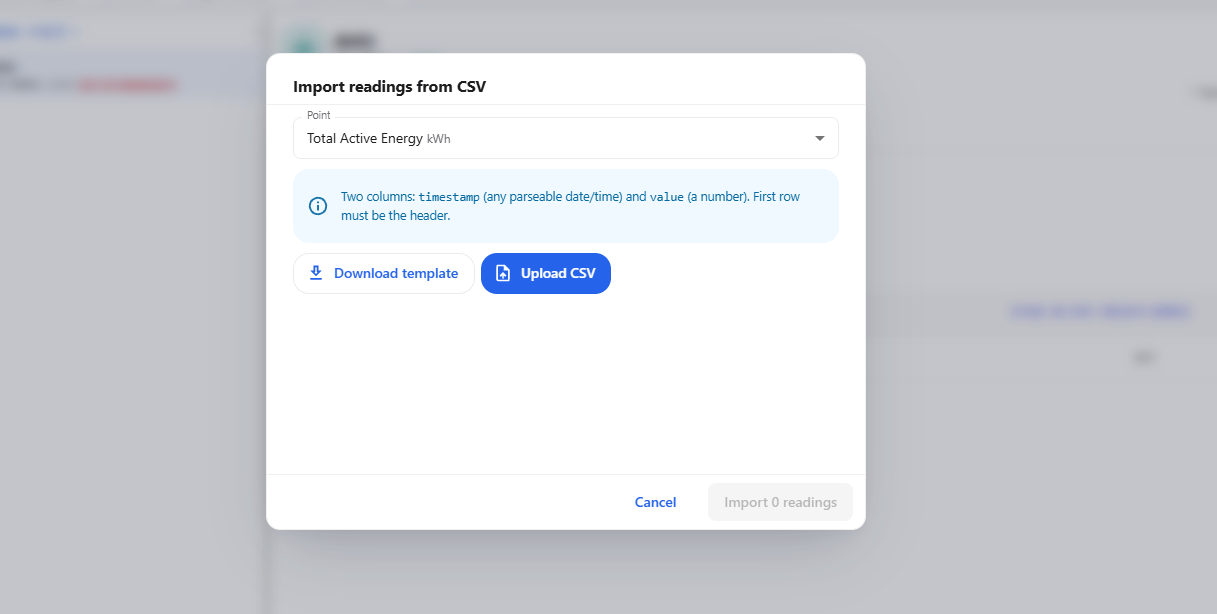
- Point
- Download template
- Upload CSV
- Import readings
The CSV file must contain the following columns:
| Column | Description |
|---|---|
| Timestamp | Contains the date and time of each reading. The timestamp must be in a parseable date/time format. |
| Value | Contains the numeric value of the reading. |
Note: The first row of the CSV file must contain the column headers.
Steps to Import Readings
- Open the Trends tab.
- Select the required soft point.
- Click Import Readings from CSV.
- The Import readings from CSV pop-up is displayed.
- Select the required Point.
- Click Download template to download the sample CSV template.
- Open the downloaded CSV file.
- Add or modify the required Timestamp and Value records.
- Save the CSV file.
- Return to the Import readings from CSV pop-up.
- Click Upload CSV.
- Select the modified CSV file.
- The system reads the uploaded readings.
- Review the number of readings available for import.
- Click Import to add the readings.
- The imported readings are added to the selected soft point.
12.5 CSV Template
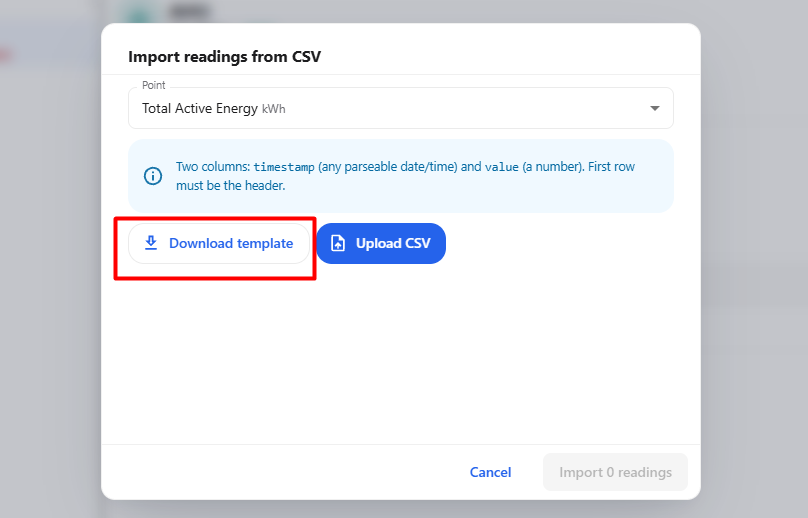
The Download template option provides a sample CSV format that can be used to prepare readings for import.
The CSV file should contain the following columns:
| Column | Description |
|---|---|
| Timestamp | Contains the date and time of the reading. |
| Value | Contains the numeric value of the reading. |
Steps
- Click Download template.
- Open the downloaded CSV file.
- Keep the required column headers.
- Add the required Timestamp and Value records.
- Save the CSV file.
- Upload the prepared file using Upload CSV.
12.6 Upload CSV
The Upload CSV option allows users to upload the prepared readings file.
Steps
- Prepare the CSV file using the provided template.
- Click Upload CSV.
- Select the prepared CSV file.
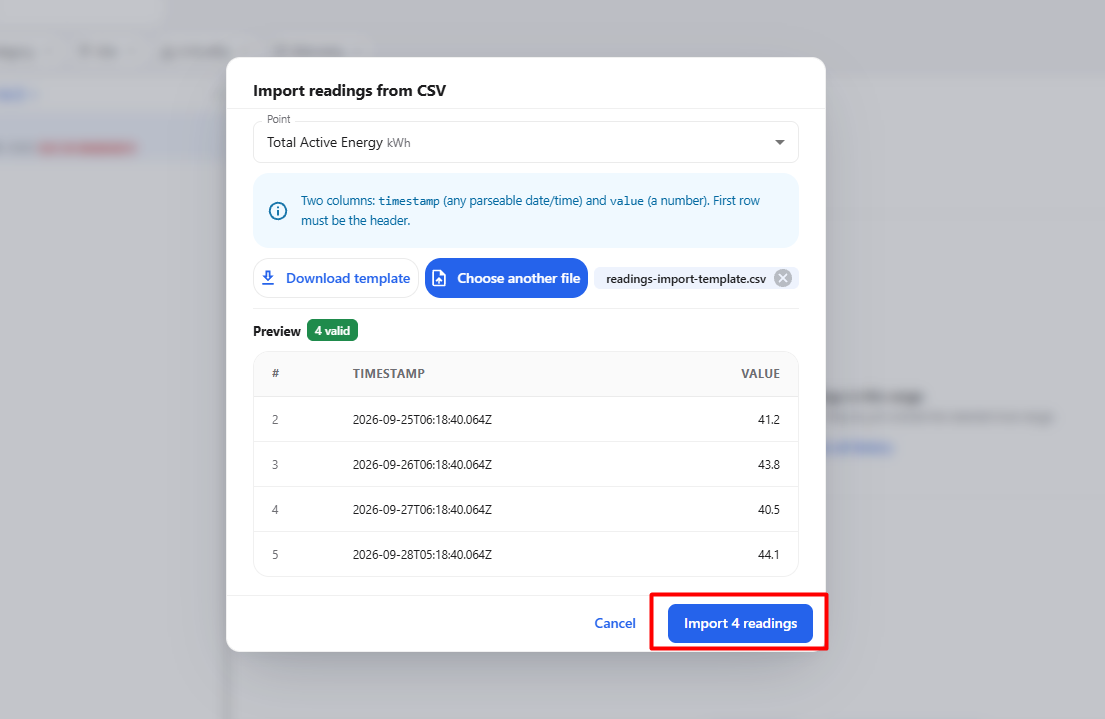
- The system reads the Timestamp and Value information from the uploaded file.
- Review the number of readings available for import.
- Click Import to add the readings.
- The uploaded readings are added to the selected soft point.
12.7 Clear Readings
The Clear option allows users to remove the recorded readings for the selected soft point.
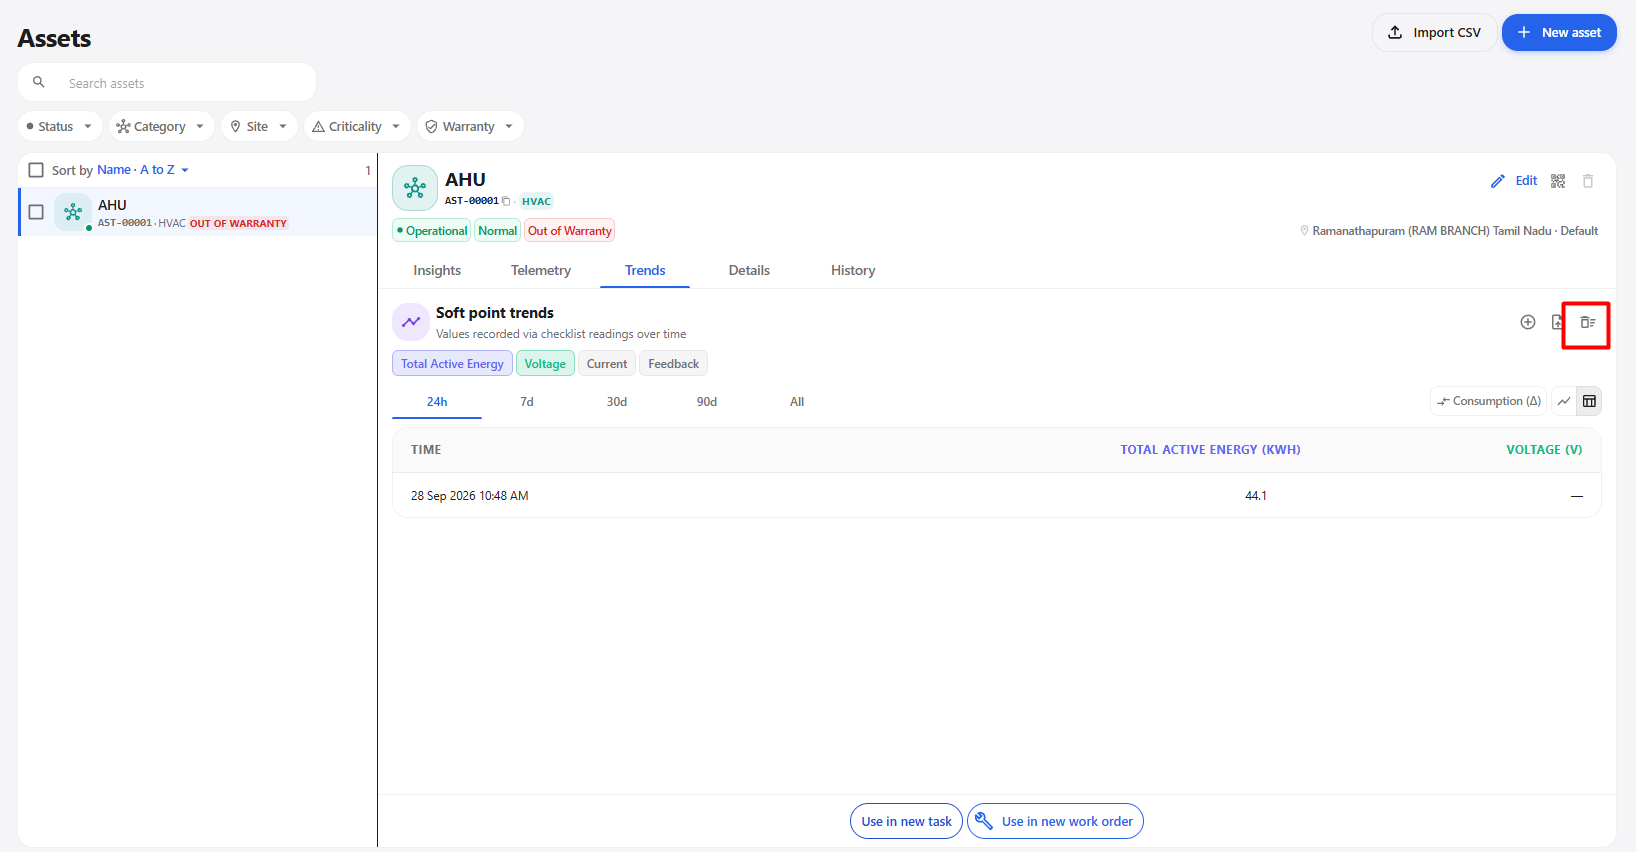
Steps
- Open the Trends tab.
- Select the required soft point.
- Locate the option to clear the recorded readings.
- Click Clear.
- Confirm the action if a confirmation message is displayed.
- The selected readings are cleared.
12.8 Select the Time Range
The Trends section provides different time-range options for viewing historical values.
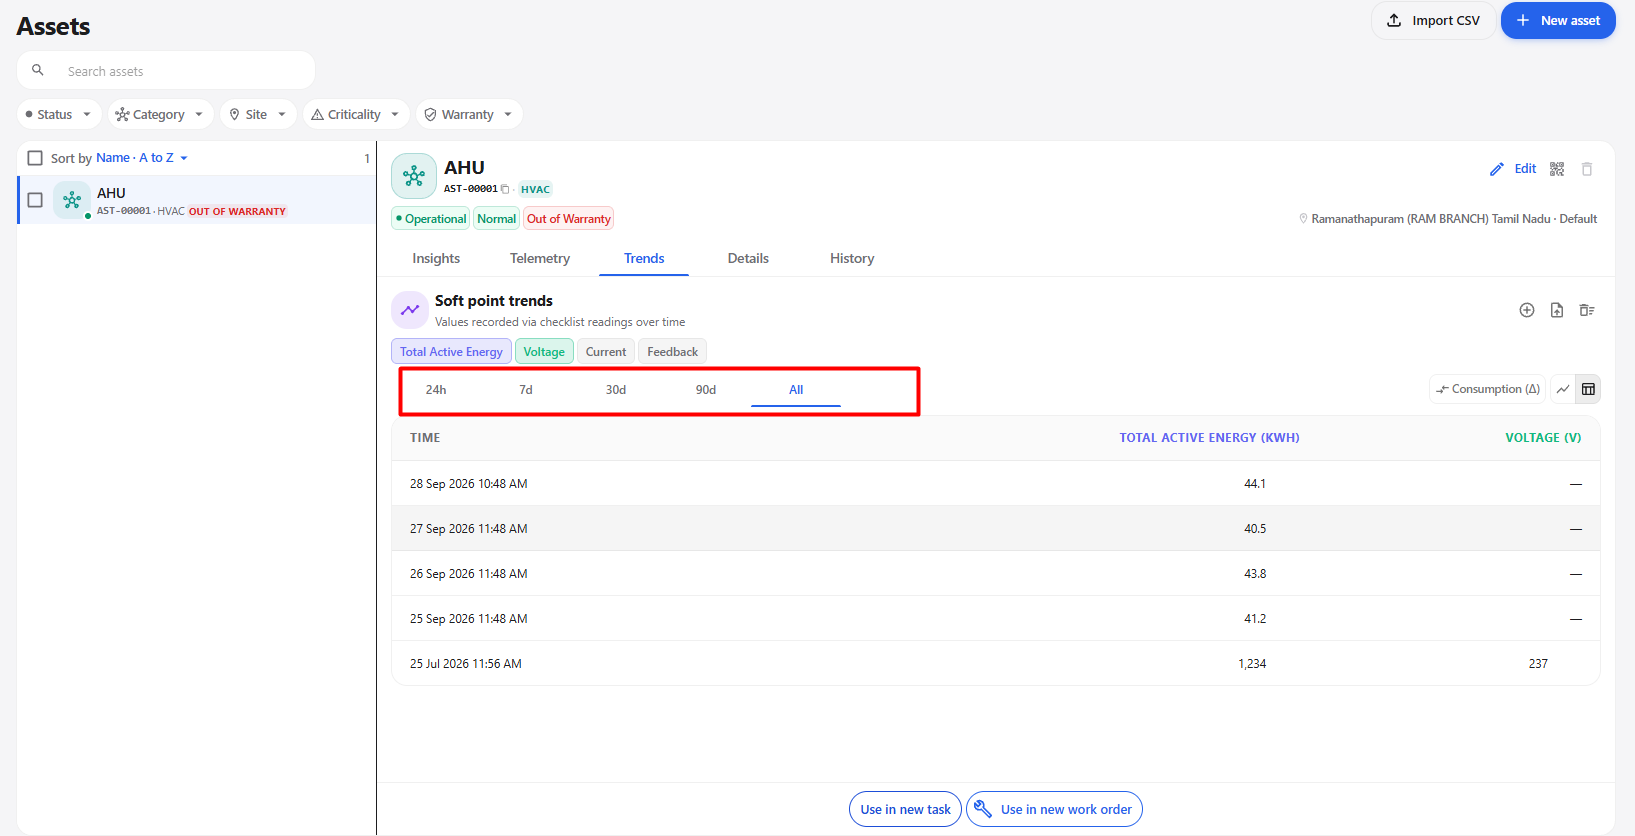
| Time Range | Description |
|---|---|
| 24h | Displays trend information for the last 24 hours. |
| 7d | Displays trend information for the last 7 days. |
| 30d | Displays trend information for the last 30 days. |
| 90d | Displays trend information for the last 90 days. |
| All | Displays all available trend information. |
Steps
- Open the Trends tab.
- Locate the time-range options.
- Select 24h, 7d, 30d, 90d, or All.
- The trend view updates according to the selected time range.
12.9 View Consumption
The Consumption option allows users to view consumption-related values for the selected trend data.
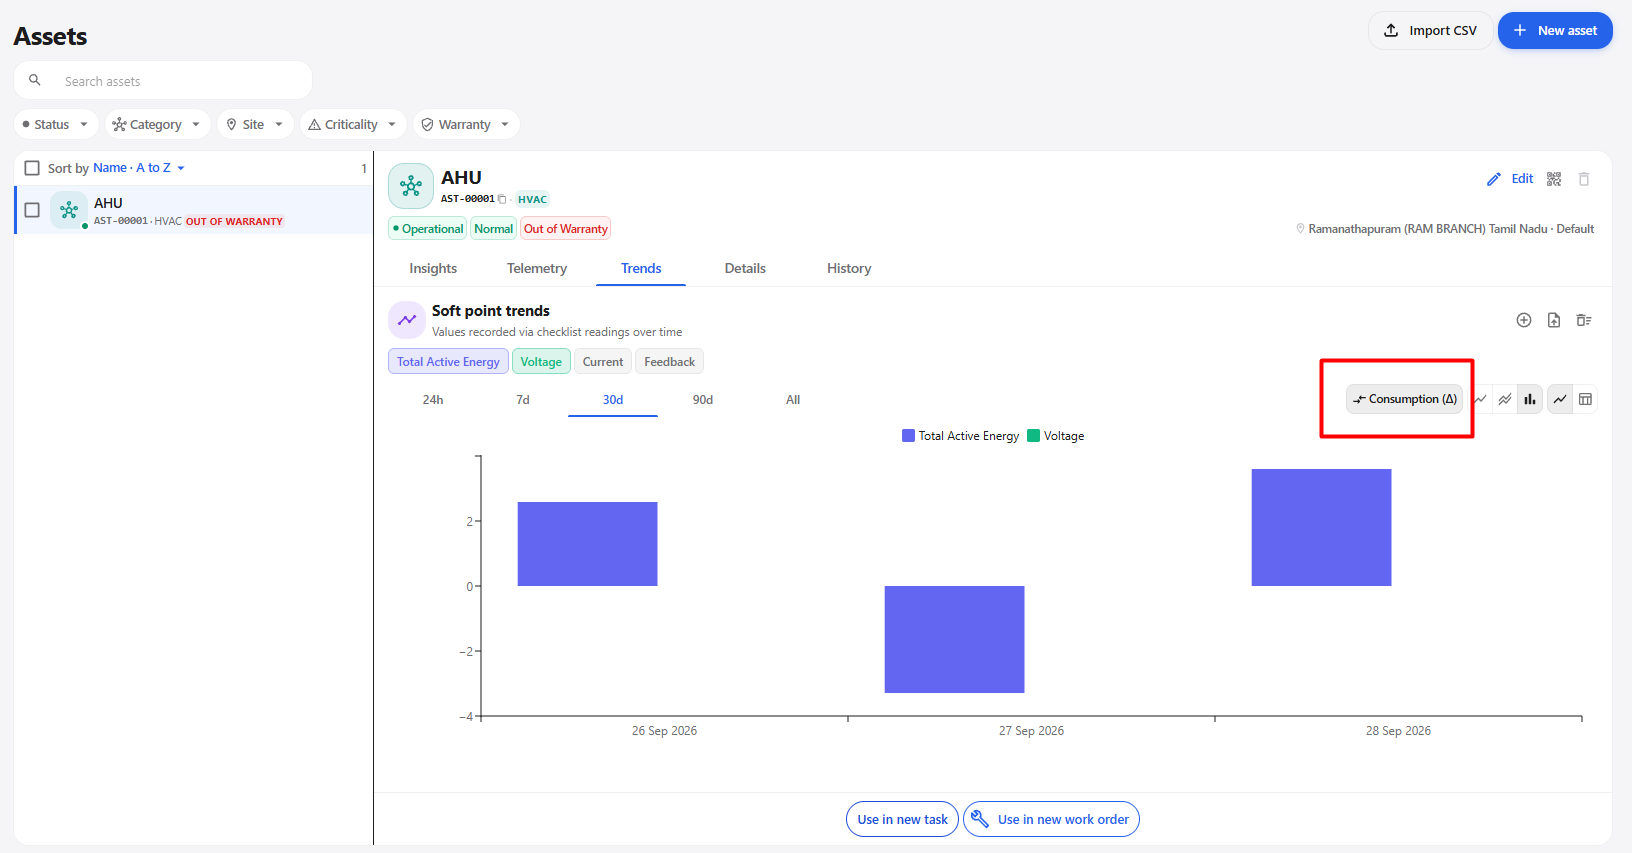
Steps
- Open the Trends tab.
- Select the required soft point.
- Select the required time range.
- Click Consumption.
- The trend view displays the consumption values for the selected data.
- Review the values in the chart.
12.10 View Trend as a Chart
The trend data can be viewed using different chart formats.
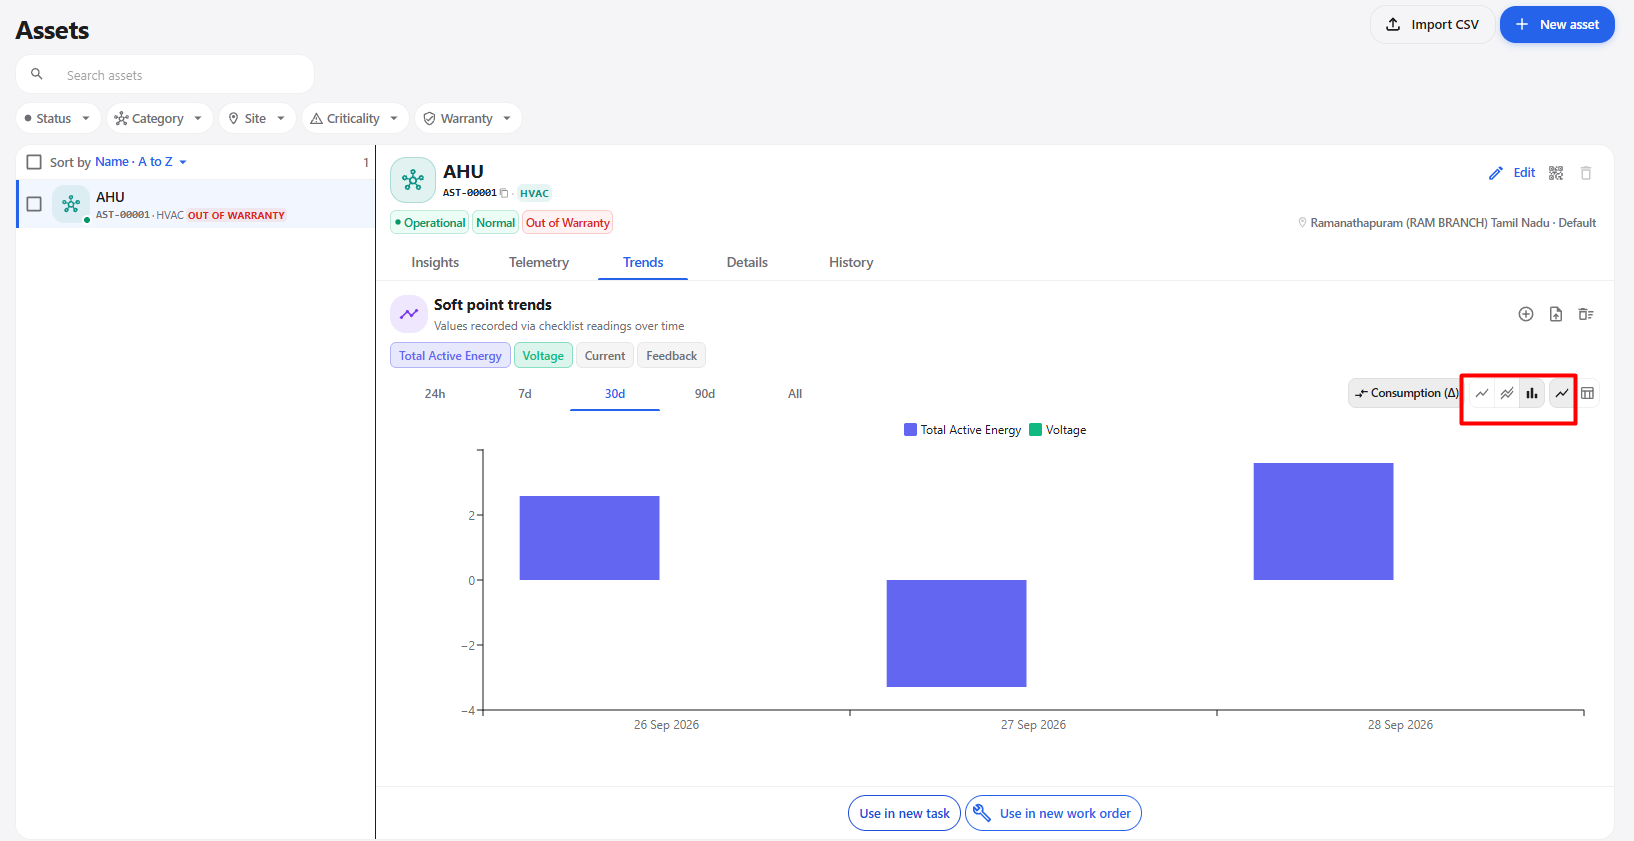
The available chart options include:
- Line Chart
- Area Chart
- Bar Chart
Steps
- Open the Trends tab.
- Select the required soft point.
- Select the required time range.
- Select the required chart type.
- The trend data is displayed in the selected chart format.
- Review the values and changes over the selected time period.
12.11 View Trends in Table Format
The trend information can also be viewed in a table format.
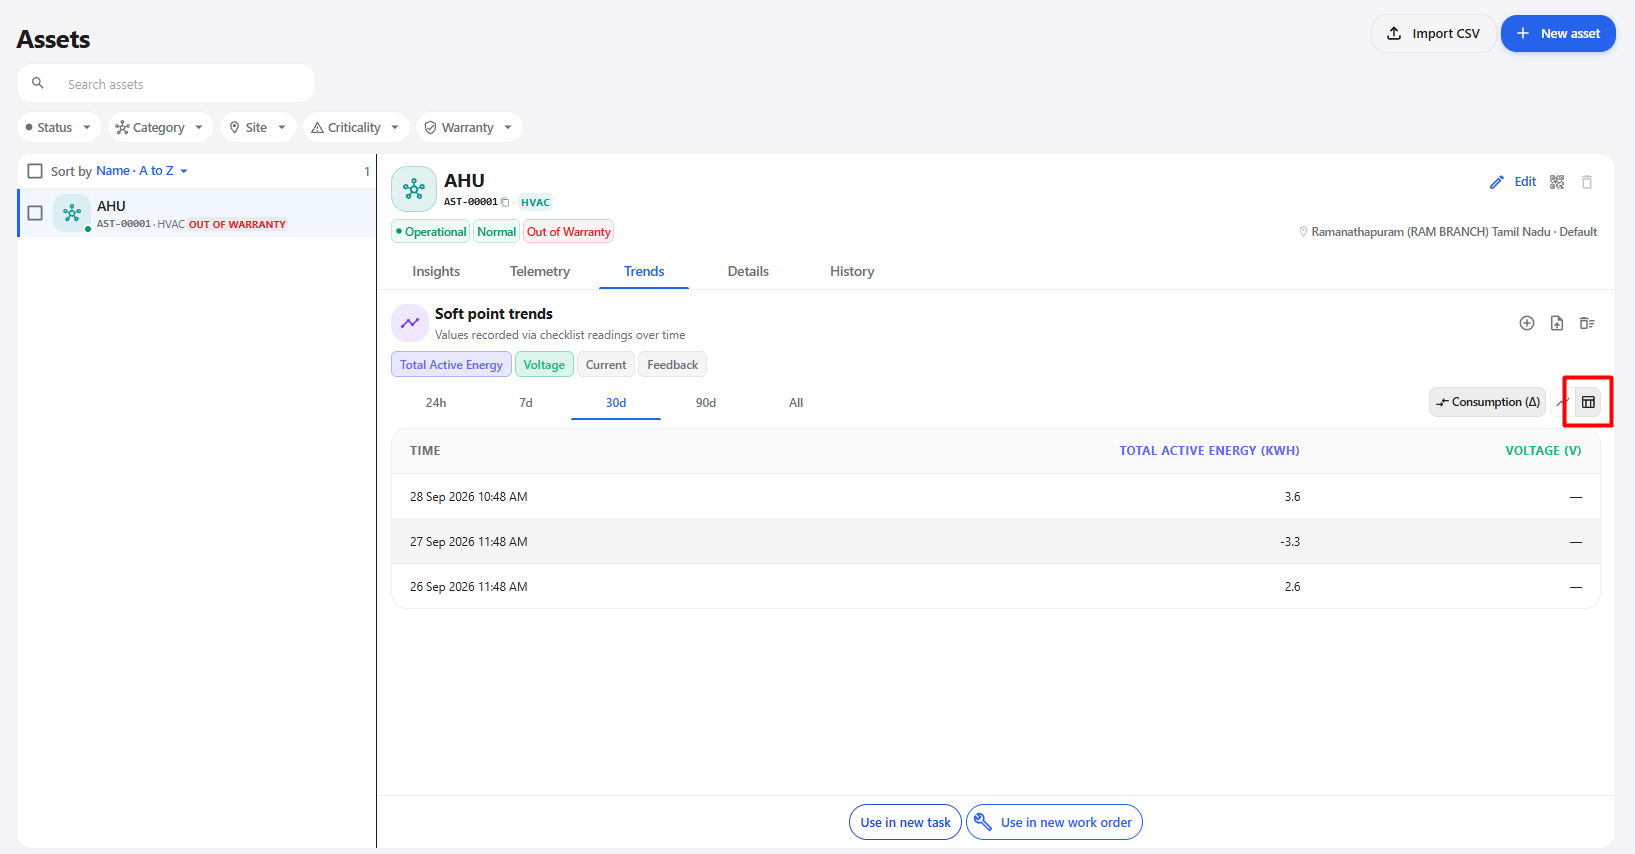
The table displays the recorded values along with their corresponding timestamps.
| Column | Description |
|---|---|
| Time | Displays the date and time when the value was recorded. |
| Total Active Energy (kWh) | Displays the recorded total active energy value. |
| Voltage (V) | Displays the recorded voltage value. |
| Current (A) | Displays the recorded current value. |
| Feedback | Displays the recorded feedback value. |
Steps
- Open the Trends tab.
- Select the required soft point and time range.
- Locate the available view options.
- Click the Table view option.
- The trend data changes from the chart view to a table.
- Review the recorded values and timestamps.
12.12 Complete Trends Workflow
The complete Trends workflow allows users to select an asset, choose a soft point, add or import readings, select a time range, and view the resulting data in different formats.
Select Asset
      ↓
Open Asset Details
      ↓
Click Trends
      ↓
Soft Point Trends
      ↓
Select Soft Point
      ↓
Choose Reading Method
      ↓
┌───────────────────┐
│                               │
│  Add Reading                  │
│       ↓                       │
│  Select Point                 │
│       ↓                       │
│  Enter Value                  │
│       ↓                       │
│  Select Time                  │
│       ↓                       │
│  Click Add                    │
│       ↓                       │
│  Reading Added                │
│                               │
└───────────────────┘

OR

┌───────────────────┐
│                               │
│  Import Readings from CSV     │
│       ↓                       │
│  Select Point                 │
│       ↓                       │
│  Download Template            │
│       ↓                       │
│  Modify CSV                   │
│       ↓                       │
│  Save CSV                     │
│       ↓                       │
│  Upload CSV                   │
│       ↓                       │
│  Review Readings              │
│       ↓                       │
│  Click Import                 │
│       ↓                       │
│  Readings Added               │
│                               │
└───────────────────┘

      ↓
Select Time Range
      ↓
24h / 7d / 30d / 90d / All
      ↓
Choose View
      ↓
┌───────────────────┐
│                               │
│  Consumption                  │
│       ↓                       │
│  View Consumption Values      │
│                               │
│  Line Chart                   │
│       ↓                       │
│  View Trend as Line Chart     │
│                               │
│  Area Chart                   │
│       ↓                       │
│  View Trend as Area Chart     │
│                               │
│  Bar Chart                    │
│       ↓                       │
│  View Trend as Bar Chart      │
│                               │
│  Table View                   │
│       ↓                       │
│  View Trend Data in Table     │
│                               │
└───────────────────┘

      ↓
Review Trend Data
13. Details
The Details tab provides detailed information about the selected asset, including asset information, location and criticality, lifecycle information, photos and documents, and linked checklists.
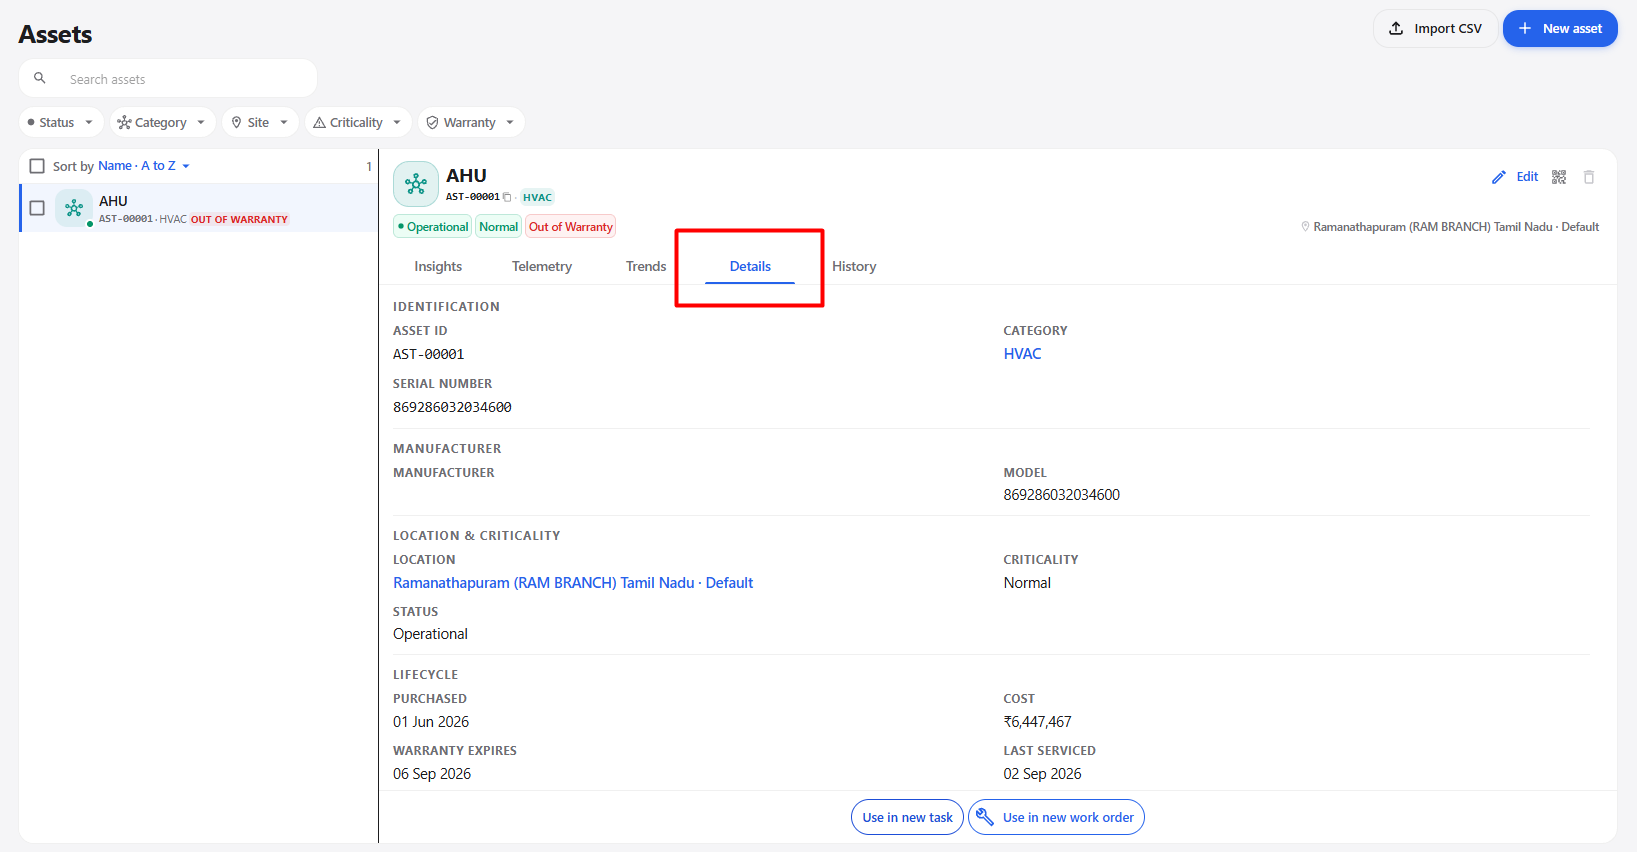
| Section | Details |
|---|---|
| Manufacturer & Model | Displays the asset's manufacturer and model information. |
| Location & Criticality | Displays the asset location, criticality level, and current status. |
| Lifecycle | Displays lifecycle information such as purchase date, cost, warranty expiry, last serviced date, next preventive maintenance date, and service interval. |
| Photos & Documents | Allows users to upload and manage documents or images associated with the asset. |
| Attachments | Provides an upload area where users can drag and drop files or click to upload. |
| Linked Checklists | Displays the checklists currently linked to the selected asset. |
| Link Checklist | Allows users to link an available checklist to the selected asset. |
| Remove Checklist | Allows users to remove a linked checklist from the asset. |
Select Asset
      ↓
Details
      ↓
View Asset Details
Note: The specific contents and fields of the Details tab are not included in the provided screenshot.
14. History
The History tab provides a complete record of activities and work orders associated with the selected asset. The history can be viewed in two sections:
- Meta Data
- Work Orders
14.1 Meta Data
The Meta Data section displays a timeline of important activities and changes related to the selected asset.
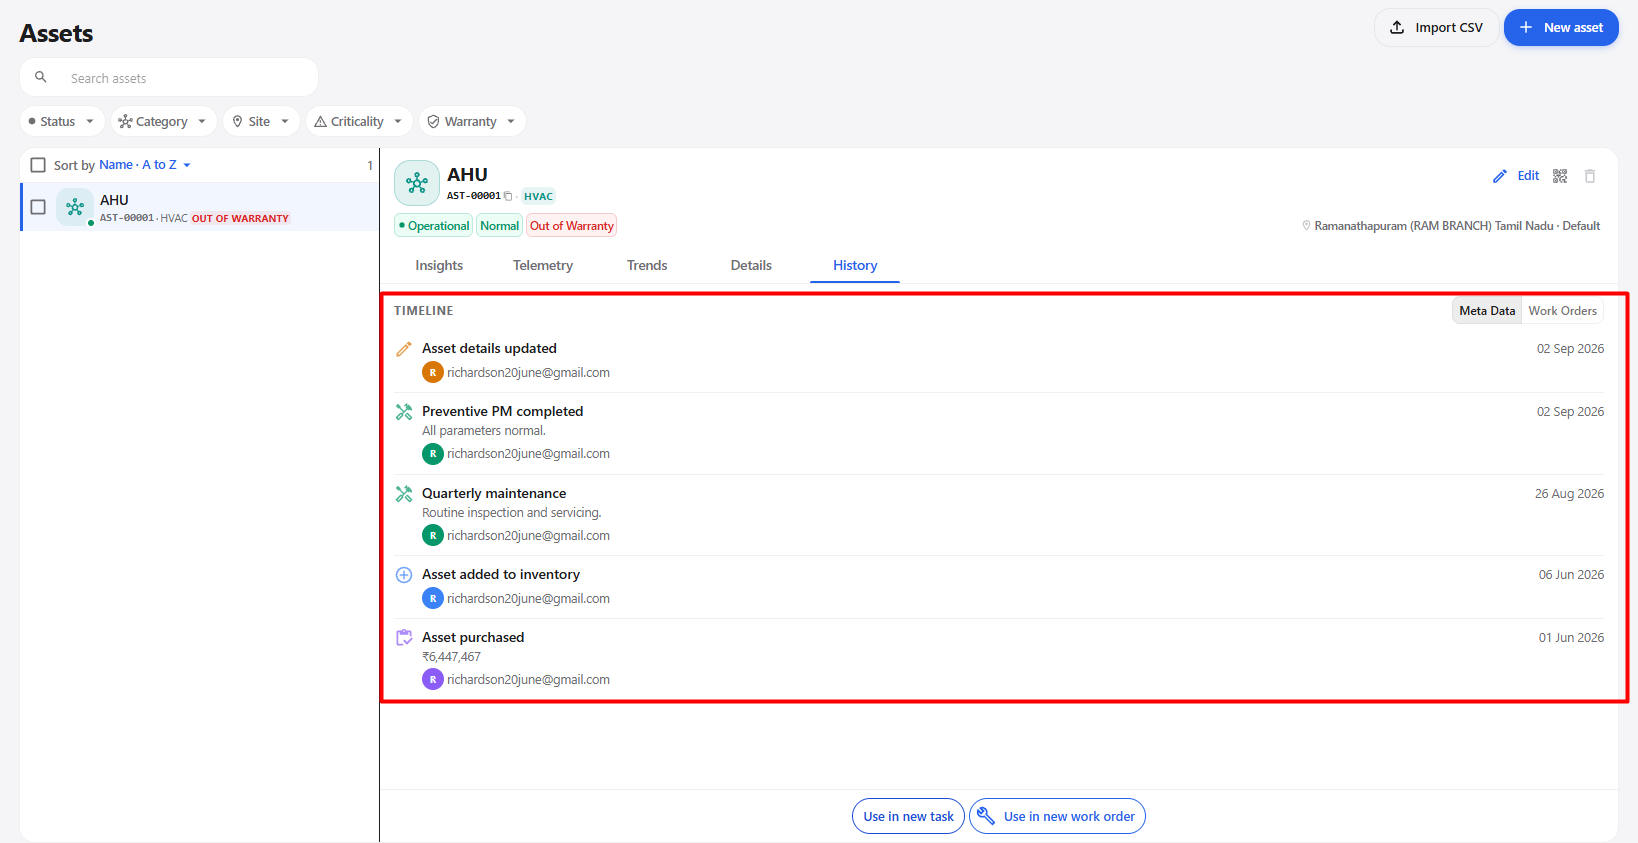
The timeline can include activities such as:
| History Activity | Description |
|---|---|
| Asset details updated | Displays when information related to the asset was updated. |
| Preventive PM completed | Displays completed preventive maintenance activities associated with the asset. |
| Quarterly maintenance | Displays scheduled or completed quarterly maintenance activities. |
| Asset added to inventory | Indicates when the asset was added to the inventory. |
| Asset purchased | Displays the asset purchase information and purchase amount. |
The timeline also displays information such as the activity date, user who performed the activity, and additional activity details where available.
14.2 Work Orders
The Work Orders section displays work orders associated with the selected asset.
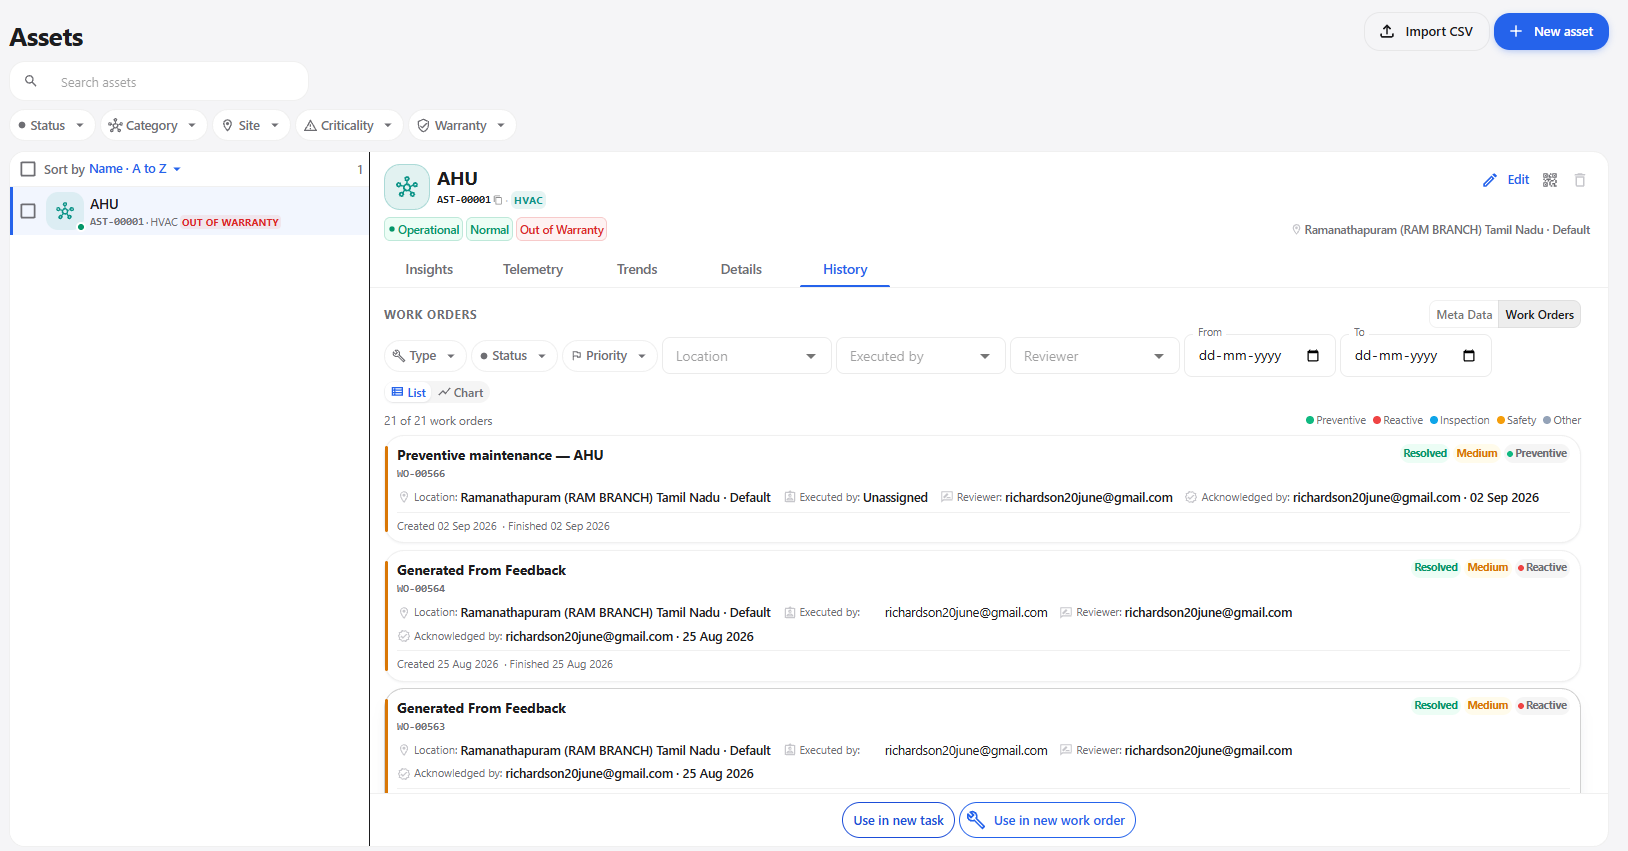
Each work order entry can display information such as:
| Information | Description |
|---|---|
| Work Order Title | Displays the name or title of the work order. |
| Work Order ID | Displays the unique identifier of the work order. |
| Location | Displays the location associated with the work order. |
| Executed By | Displays the user who executed the work order. |
| Reviewer | Displays the user responsible for reviewing the work order. |
| Acknowledged By | Displays the user who acknowledged the work order and the acknowledgement date. |
| Status | Displays the current status of the work order, such as Resolved. |
| Priority | Displays the priority of the work order, such as Medium. |
| Type | Displays the work order type, such as Reactive. |
| Created Date | Displays when the work order was created. |
| Finished Date | Displays when the work order was completed or finished. |
14.3 View Asset History
Steps
- Select the required asset from the Assets list.
- Open the asset details page.
- Click the History tab.
- The Meta Data section is displayed by default.
- Review the asset activity timeline.
- Click Work Orders to view work orders associated with the asset.
- Review the work order status, priority, type, location, users, and dates.
14.4 History View
The History tab provides two types of information:
| View | Purpose |
|---|---|
| Meta Data | Displays the timeline of asset-related activities, updates, maintenance activities, inventory changes, and purchase information. |
| Work Orders | Displays work orders associated with the selected asset, including their status, priority, type, users, location, and dates. |
15. Edit Asset
After an asset has been created and saved, the asset can be edited.
The Edit option allows the user to modify the existing asset information.
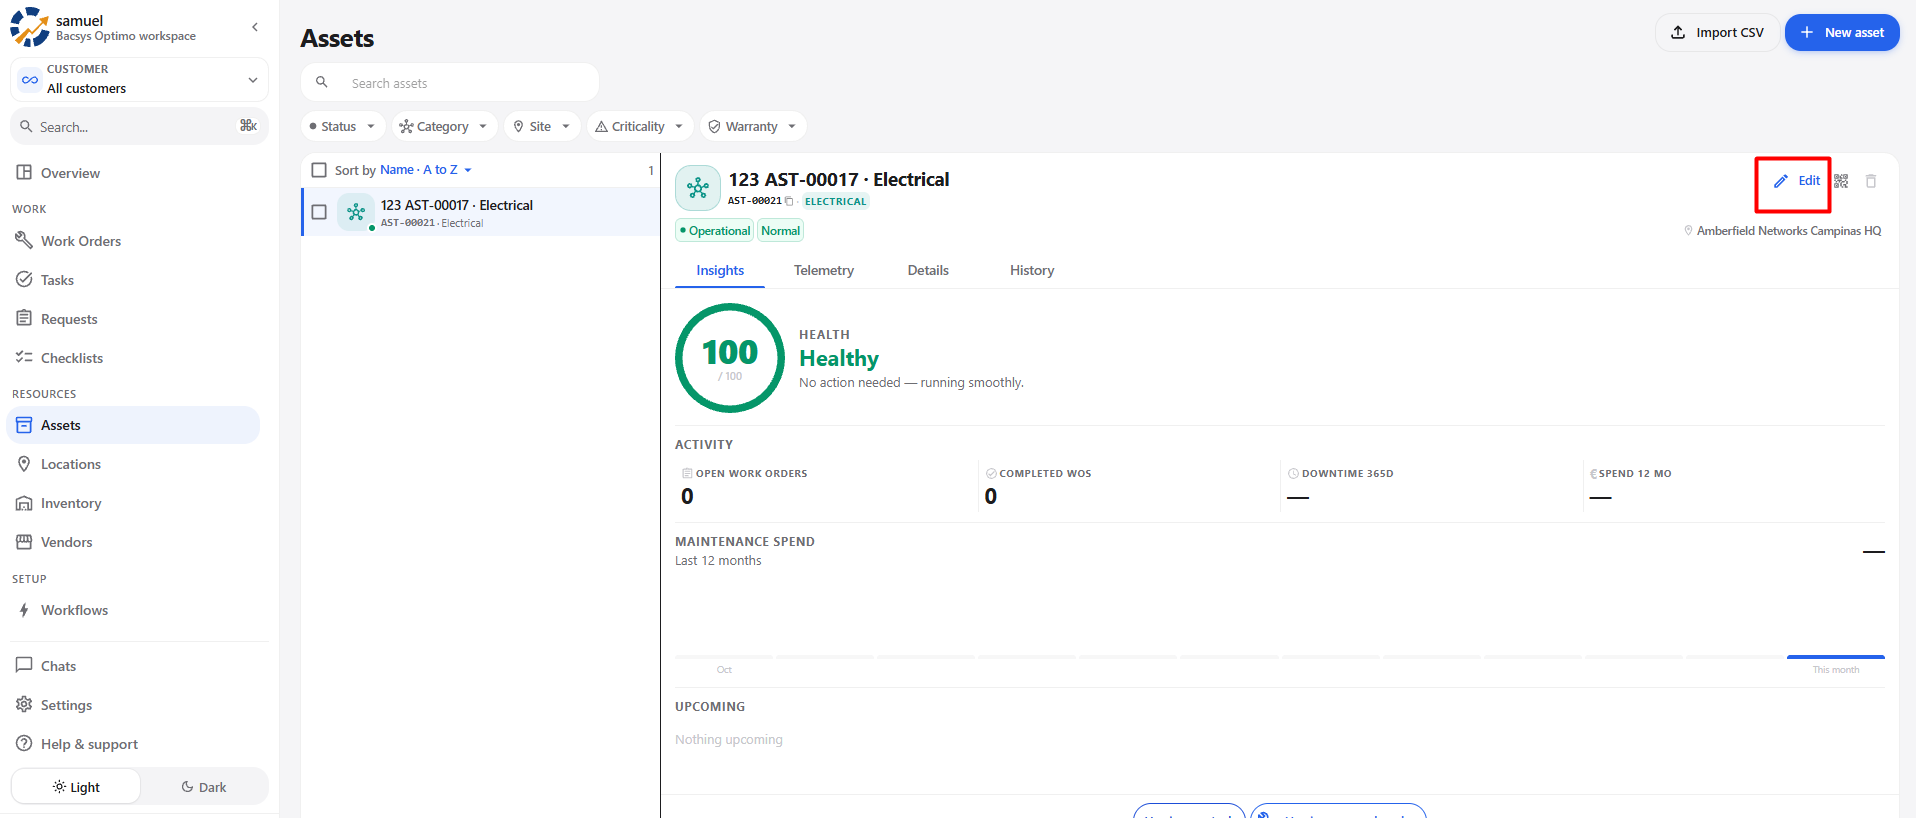
To edit an asset:
- Select the required asset from the Assets list.
- Click Edit.
- Update the required asset information.
- Save the changes.
Saved Asset
      ↓
Click Edit
      ↓
Edit Asset Information
      ↓
Save Changes
      ↓
Updated Asset
16. Show QR Code
The Show QR Code option allows the user to view the QR code associated with the asset.
The QR code can be scanned to access the asset details.
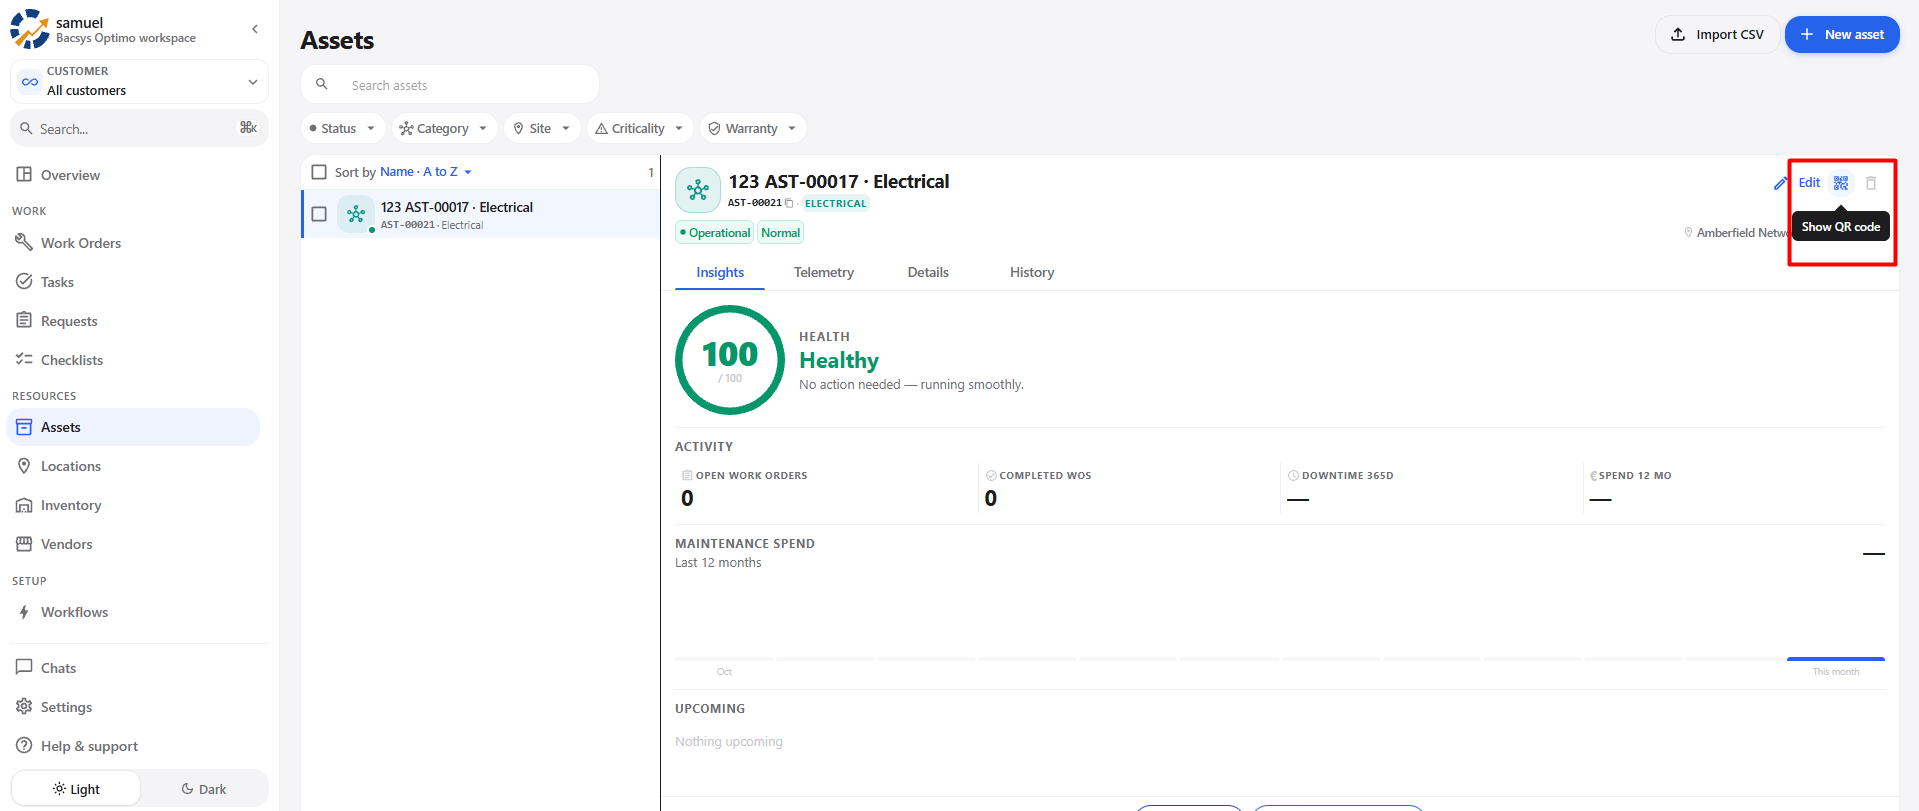
To access the QR code:
- Select the required asset.
- Click Show QR Code.
- The QR code is displayed.
- Scan the QR code to access the asset details.
Saved Asset
      ↓
Show QR Code
      ↓
Display QR Code
      ↓
Scan QR Code
      ↓
Access Asset
17. Delete Asset
The Delete option allows the user to remove the asset.
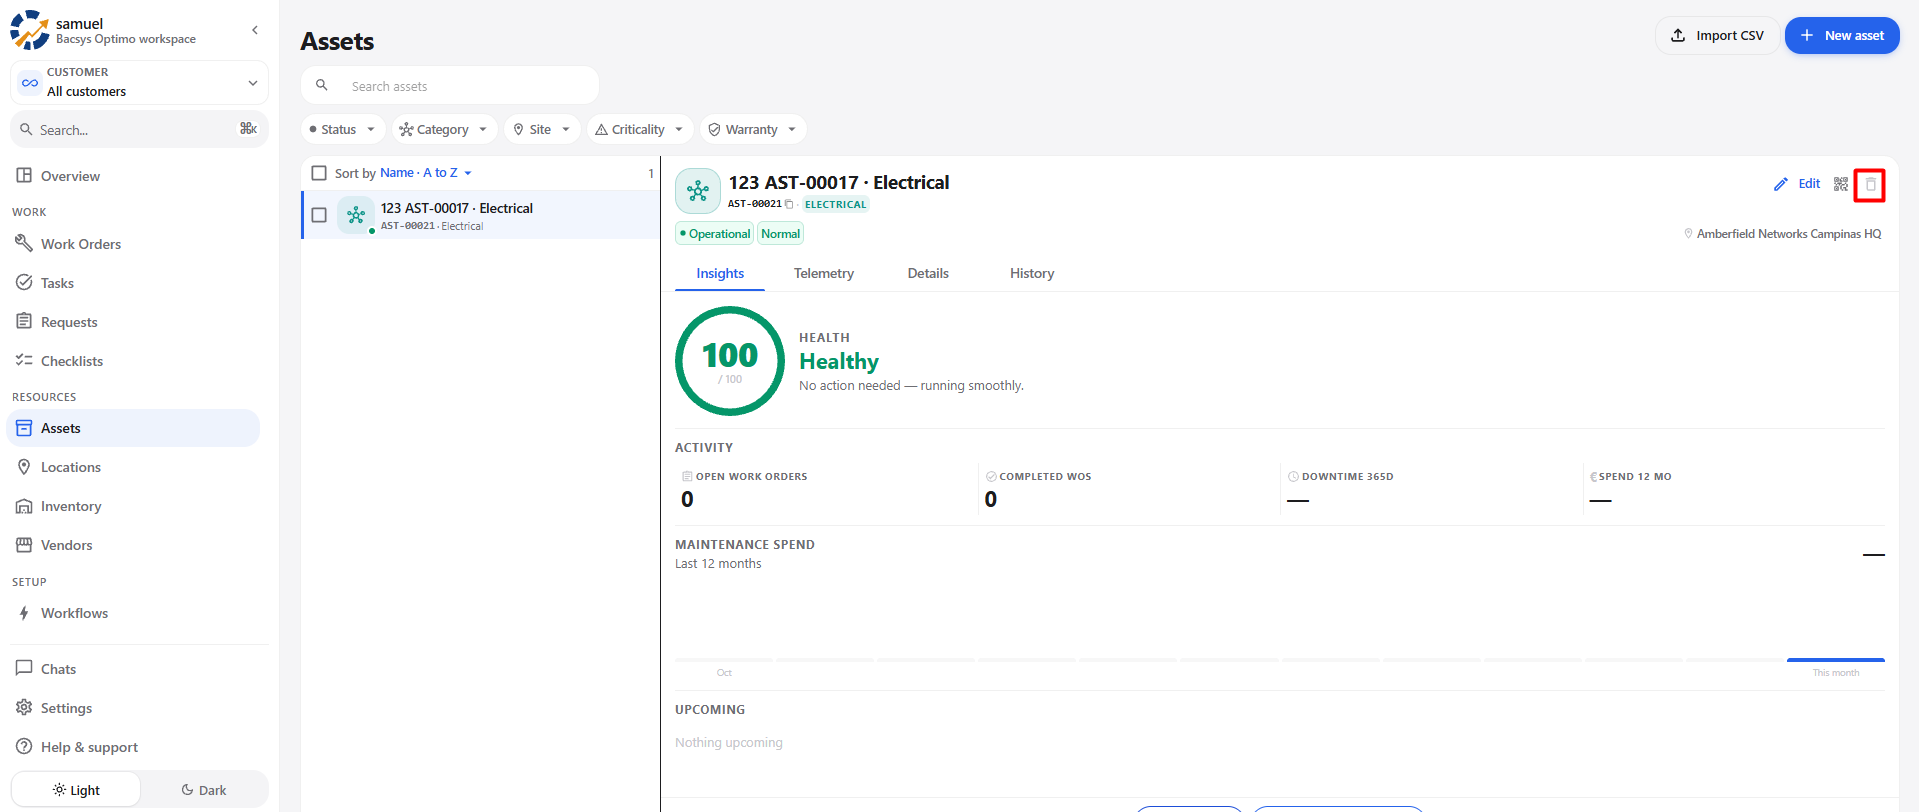
To delete an asset:
- Select the required asset.
- Click Delete.
- Confirm the deletion, if prompted.
- The asset is deleted.
Saved Asset
      ↓
Click Delete
      ↓
Confirm Delete
      ↓
Asset Deleted
18. Import CSV
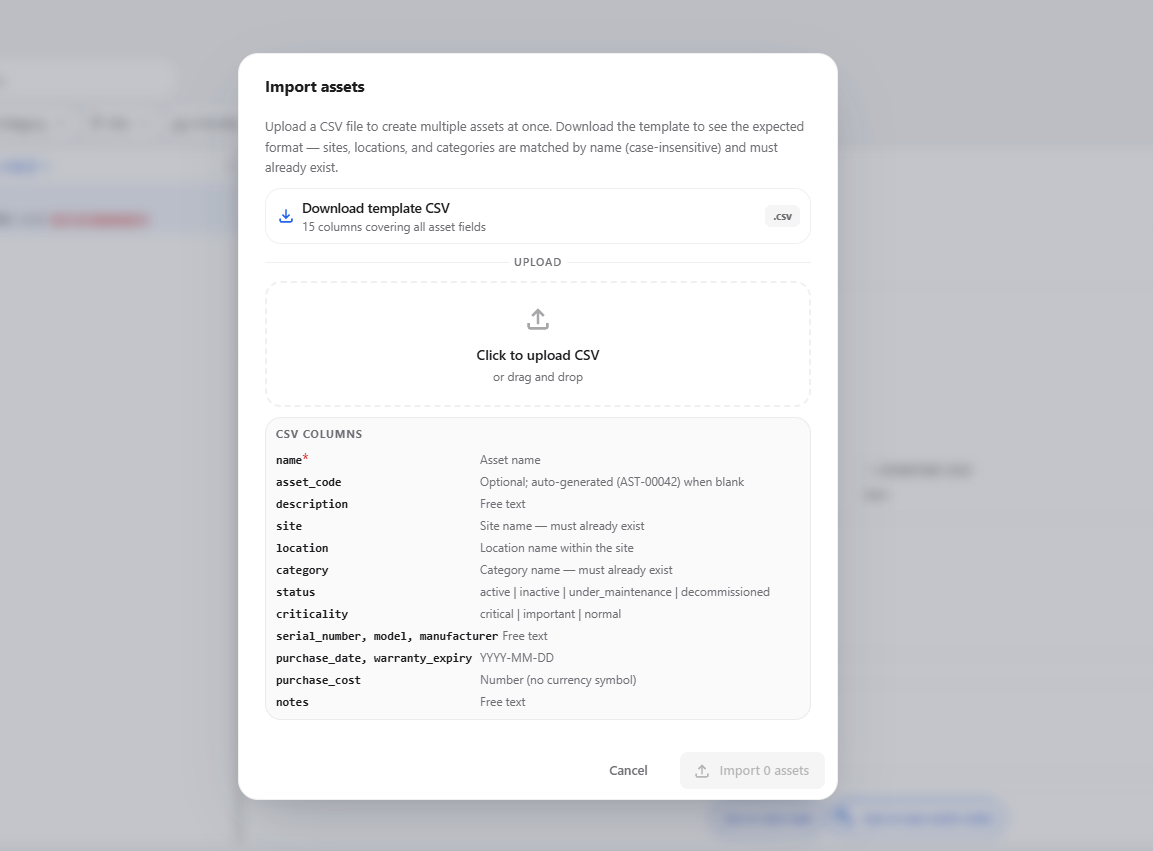
The Import CSV option allows users to create multiple assets at once by uploading a prepared CSV file.
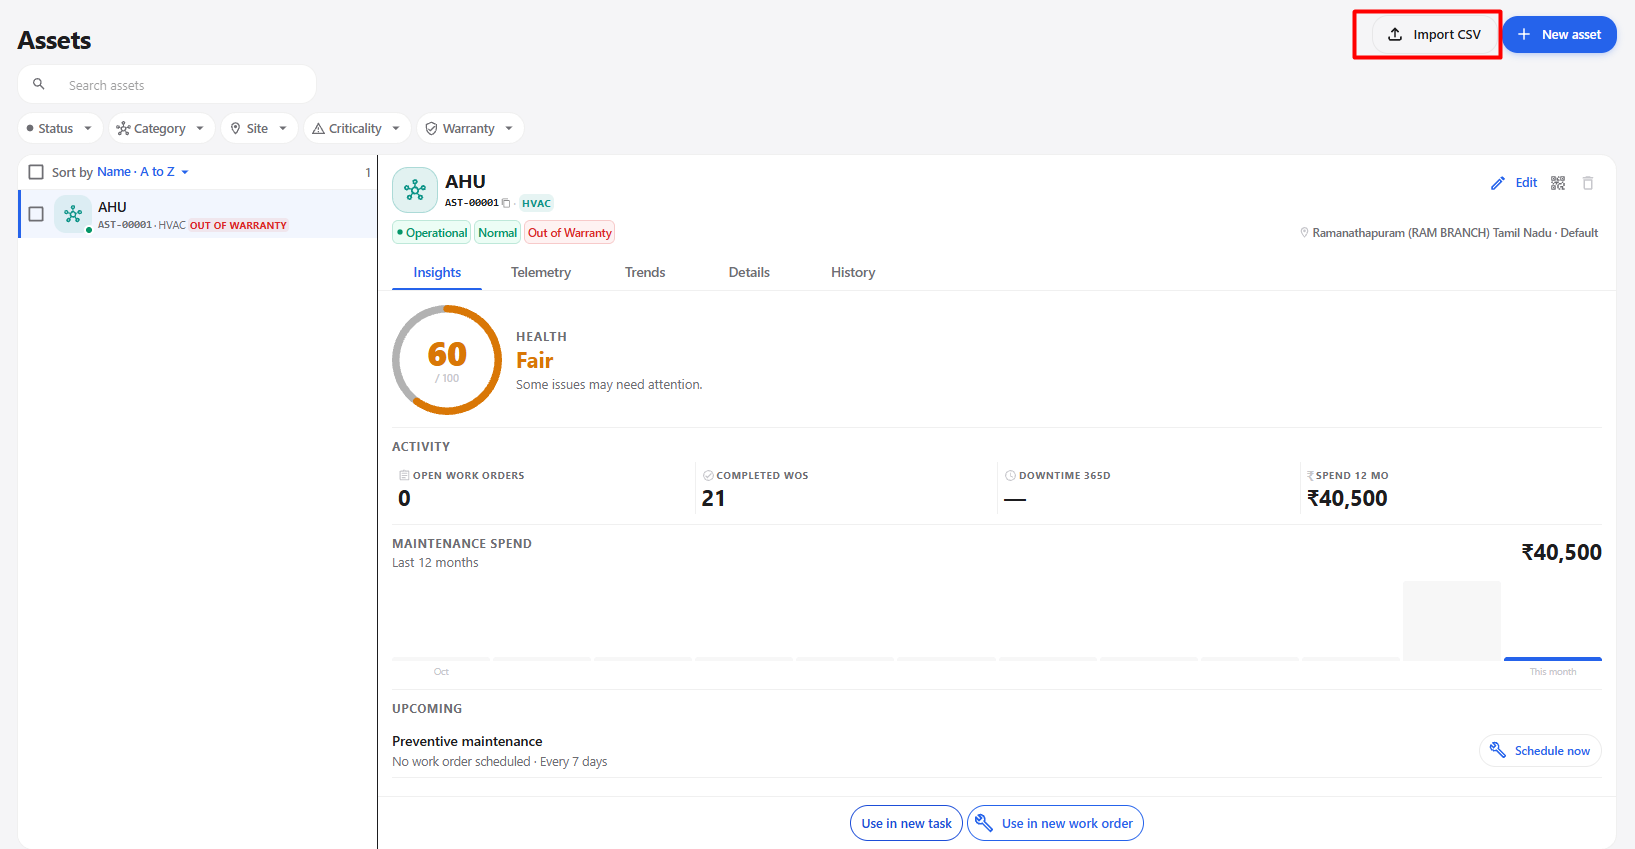
Steps
- Open the Assets module.
- Click Import CSV.
- The Import assets pop-up is displayed.
- Click Download template CSV to download the sample CSV template.
- Open the downloaded CSV file.
- Add or modify the required asset information.
- Save the updated CSV file.
- Return to the Import assets pop-up.
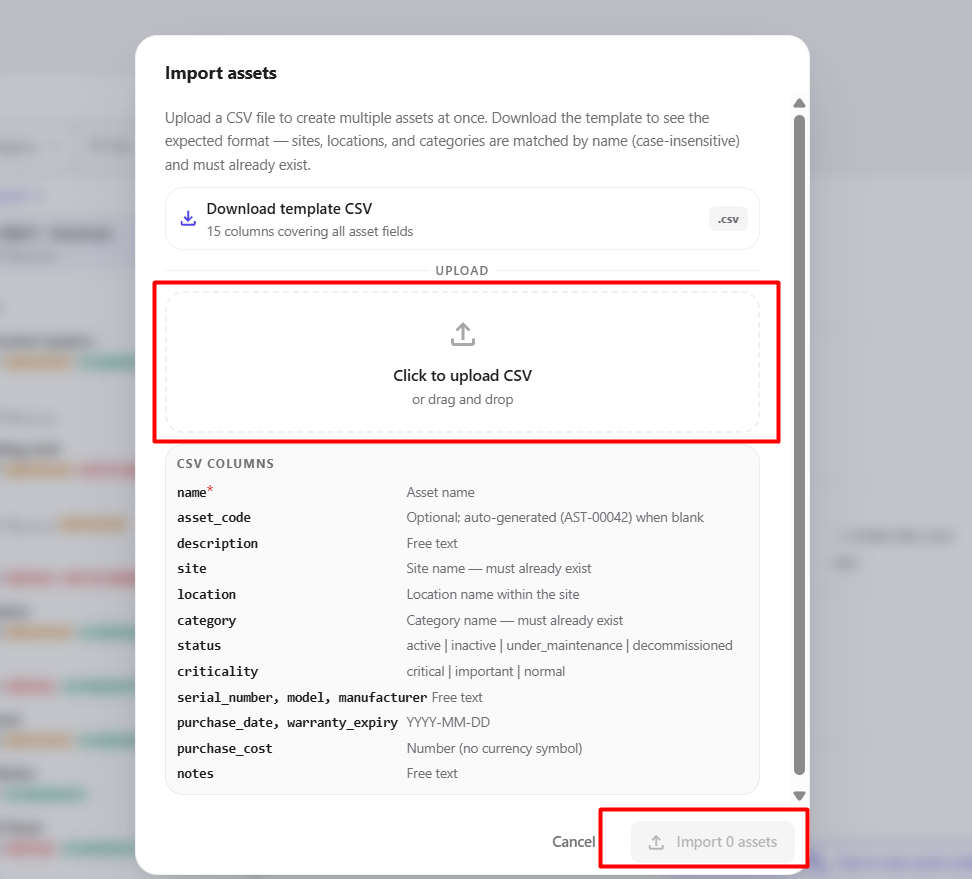
- Click Click to upload CSV or drag and drop the CSV file into the upload area.
- Select the prepared CSV file.
- The system reads the asset information from the uploaded file.
- Review the imported asset information.
- Click Import 0 assets / Import assets to complete the import.
- The assets are created and added to the Assets module.
18.1 Download Template CSV
The Download template CSV option provides a sample CSV file containing the required asset fields.
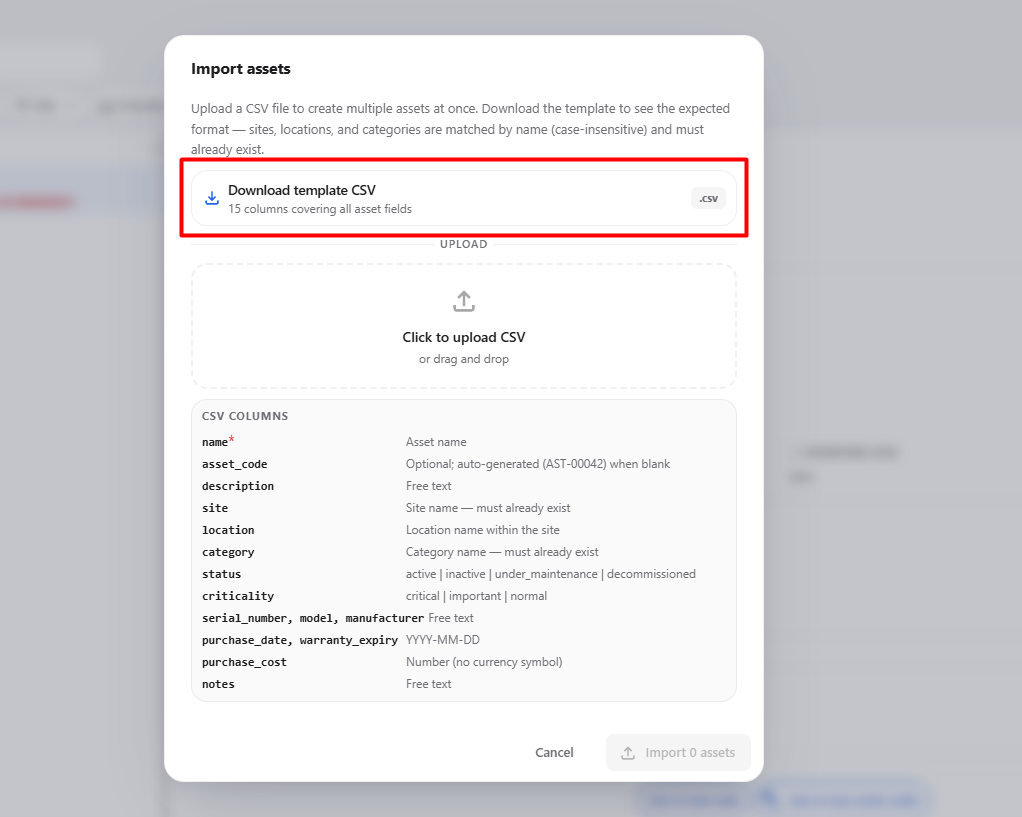
The template contains 15 columns covering the asset fields.
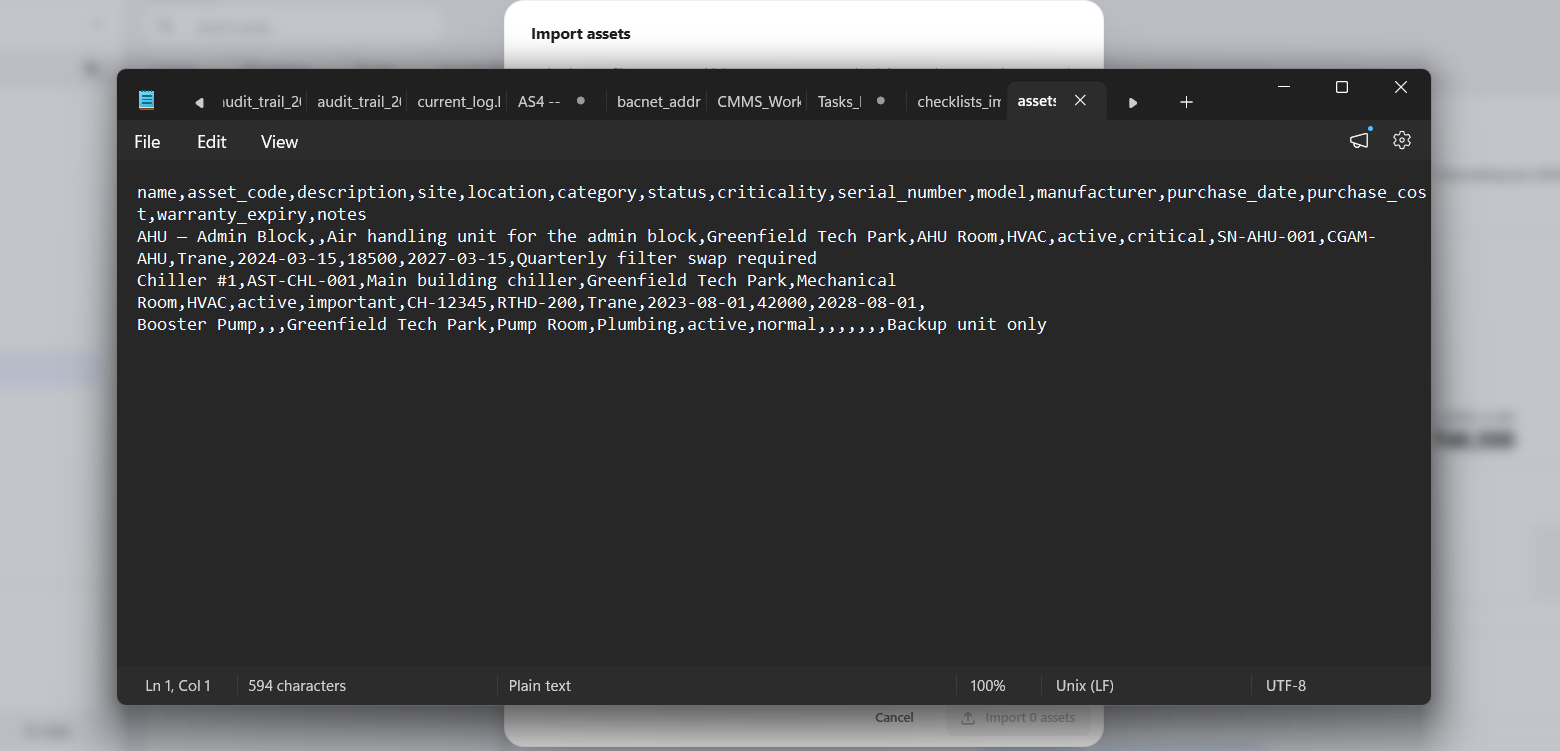
| CSV Column | Description |
|---|---|
| name* | Asset name. This field is mandatory. |
| asset_code | Optional asset code. If left blank, an asset code can be generated automatically. |
| description | Free-text description of the asset. |
| site | Site name. The site must already exist. |
| location | Location name within the selected site. |
| category | Category name. The category must already exist. |
| status | Asset status, such as active, inactive, under_maintenance, or decommissioned. |
| criticality | Asset criticality, such as critical, important, or normal. |
| serial_number | Serial number of the asset. |
| model | Model information of the asset. |
| manufacturer | Manufacturer information of the asset. |
| purchase_date | Purchase date in YYYY-MM-DD format. |
| warranty_expiry | Warranty expiry date in YYYY-MM-DD format. |
| purchase_cost | Purchase cost as a number without a currency symbol. |
| notes | Additional information about the asset. |
Steps
- Click Download template CSV.
- Open the downloaded CSV file.
- Enter the required asset information.
- Make sure the required fields and formats are followed.
- Save the modified CSV file.
- Upload the CSV using the Click to upload CSV option.
18.2 Upload CSV
The Click to upload CSV option allows users to upload the prepared asset CSV file.
Steps
- Prepare the CSV using the downloaded template.
- Click Click to upload CSV.
- Select the modified CSV file.
- The system reads the asset information from the CSV file.
- Review the imported asset information.
- Click Import assets to create the assets.
- The imported assets are added to the Assets module.
18.3 CSV Import Workflow
Open Assets
      ↓
Click Import CSV
      ↓
Import Assets Pop-up
      ↓
Download Template CSV
      ↓
Open CSV Template
      ↓
Enter / Modify Asset Information
      ↓
Save CSV
      ↓
Click to Upload CSV
      ↓
Select Prepared CSV
      ↓
System Reads Asset Data
      ↓
Review Imported Assets
      ↓
Import Assets
      ↓
Assets Created
      ↓
Assets Available in Assets Module
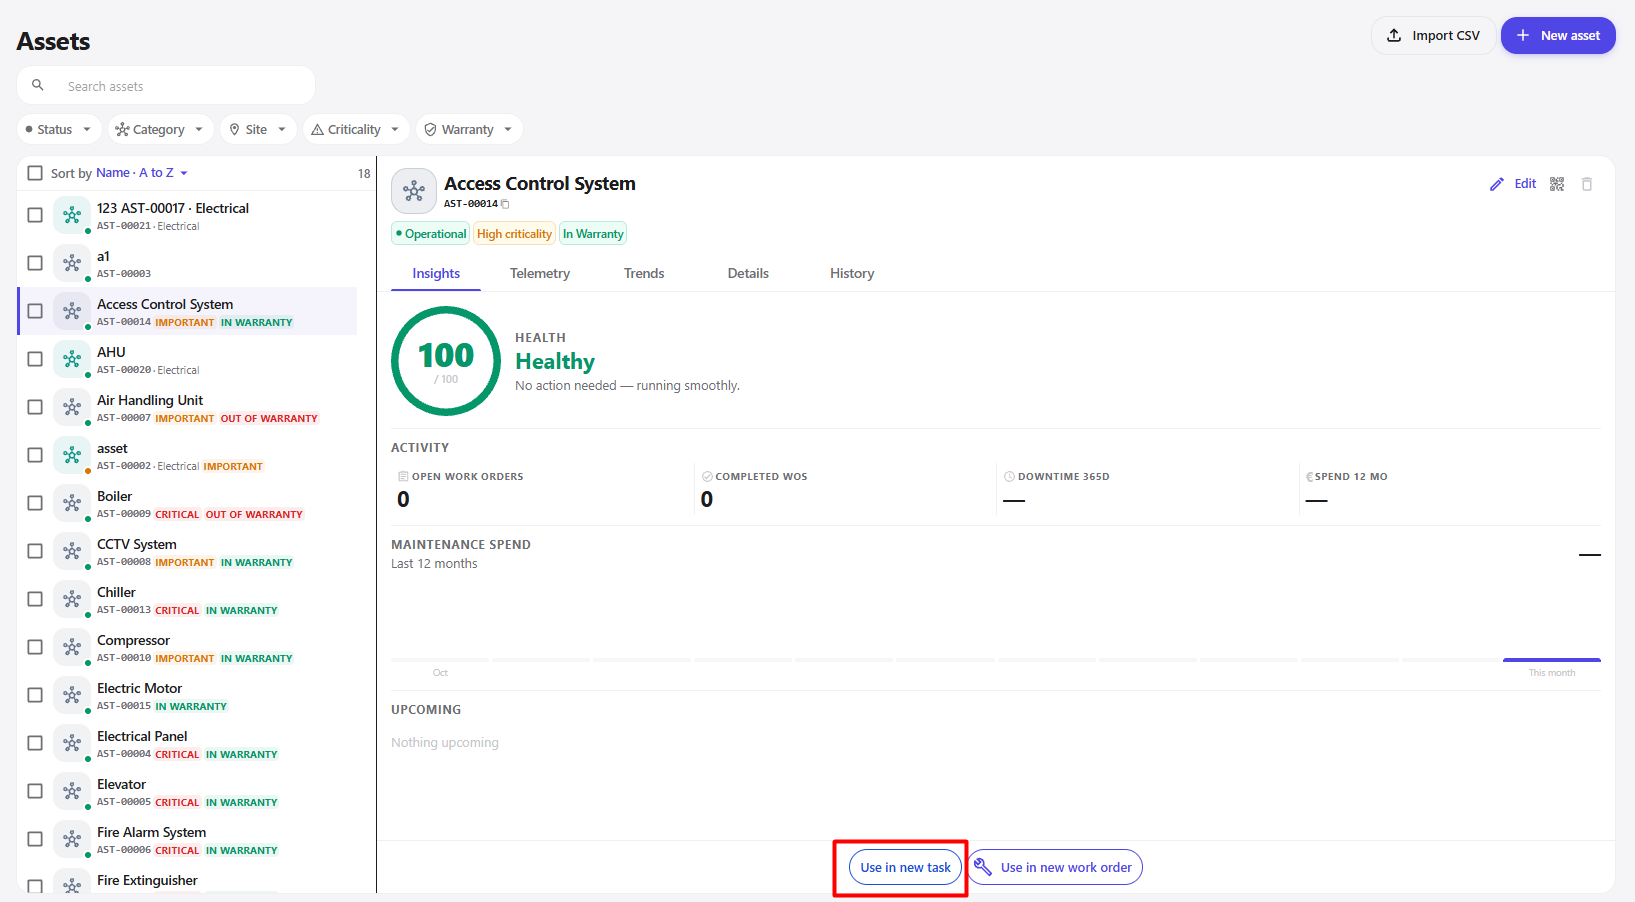
19. Use Asset in New Task
The Use in new task option allows users to create a task directly from the selected asset. When the option is selected, the New task form is displayed with the asset information linked to the task.
19.1 Create a Task from an Asset
Steps
- Open the Assets module.
- Select the required asset.
- Open the asset details page.
- Click Use in new task.
- The New task pop-up is displayed.
- Enter the required task information.
- Review the asset and location information linked to the task.
- Configure the required assignment, task type, priority, and other task details.
- Click Create task.
- The task is created with the asset linked to it.
- The newly created task is available in the Tasks module.
- The task is initially displayed in the Open status when it is created using the Unscheduled — start immediately task type.
19.2 New Task Form
The New task form contains the following sections:
| Section | Description |
|---|---|
| General | Enter the task title, description, priority, and task type. |
| Estimated Effort | Enter the estimated hours and minutes required to complete the task. |
| Task Type | Select when the task should be performed, such as starting immediately or according to a schedule. |
| Assignment | Assign the task to one or more people or a team. |
| Approval Chain | Add the users who need to approve or sign off on the completed task. |
| Location & Asset | Displays or selects the site, location, and asset associated with the task. |
| Linked Items | Allows related checklists, categories, or other supported items to be linked to the task. |
| Attach Files | Allows files to be attached to the task where supported. |
| Reporter / Reviewer | Specifies the reporter or reviewer for the task. |
| Digital Sign-Off | Allows digital signature requirements to be enabled for closing or acknowledging the task. |
19.3 Start the Task
After the task is created, it is available in the Tasks module.
Steps
- Open the Tasks module.
- Locate the task created from the asset.
- Open the task.
- Review the task details and linked asset.
- Click Start work.
- The task moves to In Progress.
- Complete the required work and checklist activities.
- Attach any required files or supporting information.
- Complete the task according to the configured requirements.
19.4 Resolve and Close the Task
After the work is completed:
- Complete the required checklist, if applicable.
- Submit the completed checklist.
- Review the completed task information.
- Click Close (work done).
- Complete the digital sign-off if it is required.
- The task moves to the Closed status.
- The task can then be acknowledged and resolved using Acknowledge & Resolve.
- The task is completed after the required acknowledgement and resolution process.
20. Asset Management Actions
The selected asset provides the following management actions:
| Action | Description |
|---|---|
| Edit | Edit the selected asset information. |
| Show QR Code | Display the QR code associated with the asset. |
| Delete | Delete the selected asset. |
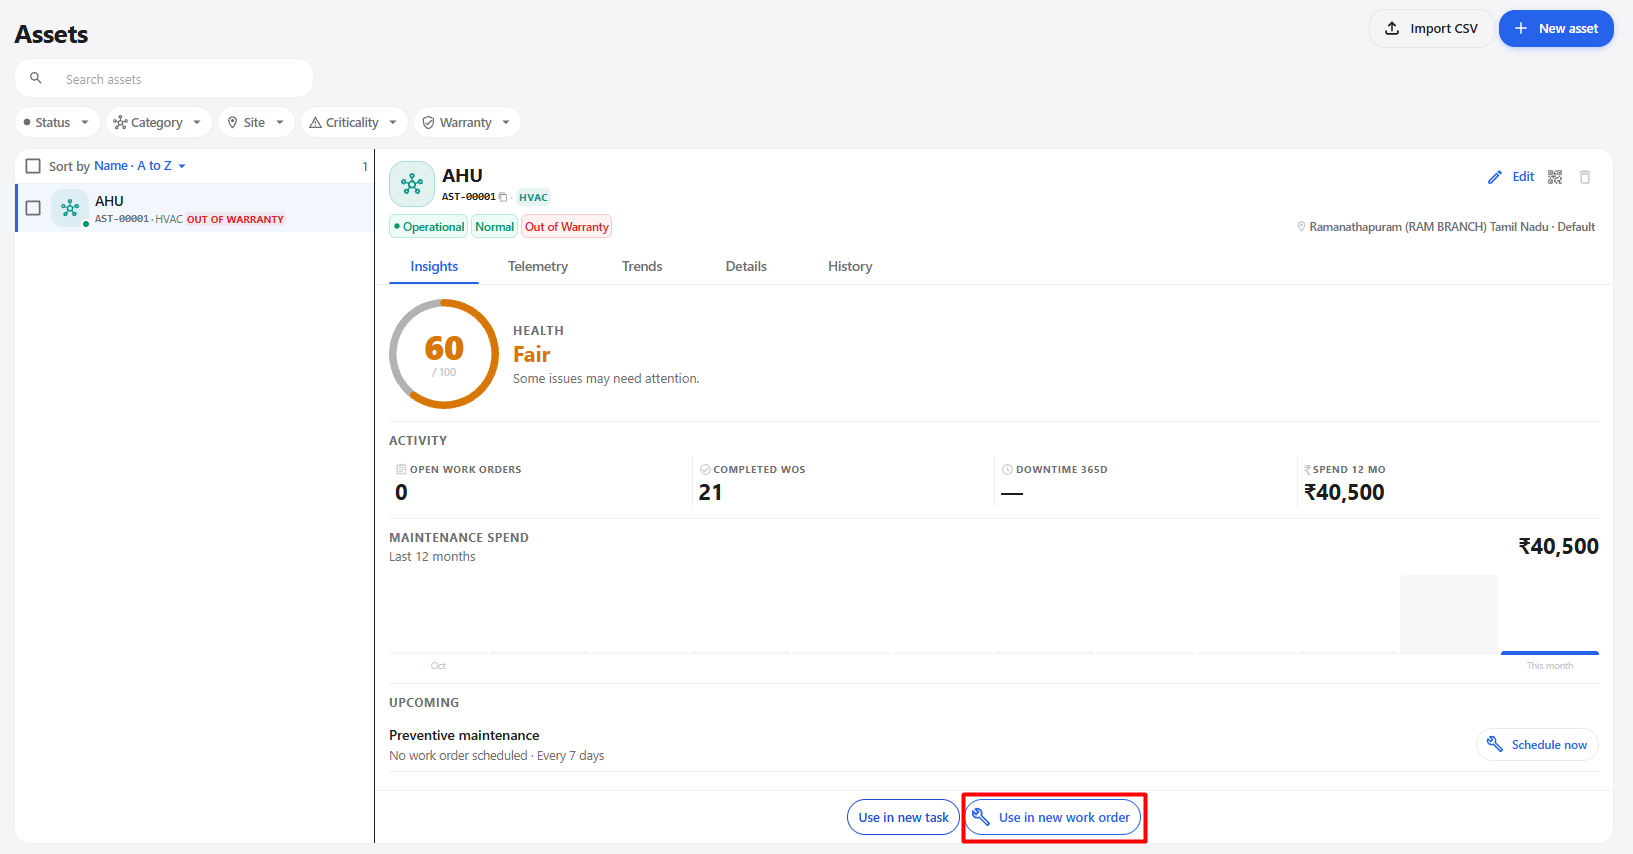
| Use in new task | Use the selected asset while creating a new task. |
| Use in new work order | Use the selected asset while creating a new work order. |
21. Asset Navigation Workflow
The general asset navigation workflow is:
Open Assets
      ↓
Search / Filter / Sort
      ↓
Select Asset
      ↓
View Asset Information
      ↓
Insights
      ↓
Telemetry
      ↓
Trends
      ↓
Details
      ↓
History
22. Asset Insights Workflow
The Insights workflow is:
Select Asset
      ↓
Insights
      ↓
View Health
      ↓
View Activity
      ↓
View Maintenance Spend
      ↓
View Upcoming Activities
23. Asset Creation Workflow
Open Assets
      ↓
Click + New asset
      ↓
New Asset Pop-up
      ↓
Enter Asset Information
      ↓
Select Site
      ↓
Configure Asset Details
      ↓
Select Linked Checklists
      ↓
Click Create asset
      ↓
Asset Created
      ↓
Asset Available in Asset List
24. Asset Management Workflow
Asset Created
      ↓
Asset Saved
      ↓
Select Asset
      ↓
   ┌──────────────────────────────────┐
   ↓                 ↓                ↓
 Edit            Show QR Code       Delete
   ↓                 ↓                ↓
Update Asset     Display QR Code   Confirm Delete
   ↓                 ↓                ↓
Save Changes     Scan QR Code      Asset Deleted
   ↓                 ↓
Updated Asset    Access Asset
25. Asset Import Workflow
Open Assets
      ↓
Click Import CSV
      ↓
Select CSV File
      ↓
Import Asset Information
      ↓
Assets Added
      ↓
Assets Available in Asset List
26. Asset to Task Workflow
Open Assets
      ↓
Select Asset
      ↓
Use in new task
      ↓
New Task
      ↓
Create Task
27. Asset to Work Order Workflow
Open Assets
      ↓
Select Asset
      ↓
Use in new work order
      ↓
New Work Order
      ↓
Create Work Order
28. Complete Asset Module Workflow
The complete workflow of the Assets module is:
Open Assets
      ↓
Search / Filter / Sort Assets
      ↓
Select Asset
      ↓
View Asset Overview
      ↓
Insights
      ↓
View Health
      ↓
View Activity
      ↓
View Maintenance Spend
      ↓
View Upcoming Activities
      ↓
      ┌─────────────────────────────────┐
      ↓        ↓          ↓             ↓
 Telemetry   Trends     Details       History
      ↓        ↓          ↓             ↓
 View Data  View Data  View Details  View History
      ↓
      ┌─────────────────────────────────┐
      ↓                                 ↓
Use in new task                Use in new work order
      ↓                                 ↓
New Task                         New Work Order
29. Final Asset Module Summary
The Assets module provides a centralized view for managing maintenance assets.
The main functions available from the Assets page are:
- Search assets
- Filter by Status
- Filter by Category
- Filter by Site
- Filter by Criticality
- Filter by Warranty
- Sort assets
- Create new assets
- Import assets using CSV
- View asset health
- View asset activity
- View maintenance spend
- View upcoming activities
- View telemetry
- View trends
- View asset details
- View asset history
- Edit assets
- Show QR Code
- Delete assets
- Use assets in new tasks
- Use assets in new work orders
Final Workflow
Assets Module
      ↓
Search / Filter / Sort
      ↓
Select Asset
      ↓
View Asset Information
      ↓
Insights
      ↓
Health
      ↓
Activity
      ↓
Maintenance Spend
      ↓
Upcoming
      ↓
      ┌──────────────────────────────┐
      ↓          ↓        ↓         ↓
Telemetry     Trends    Details   History
      ↓          ↓        ↓         ↓
 View Data    View Data  View      View
                         Details   History
      ↓
      ┌──────────────────────────────┐
      ↓                              ↓
Use in new task             Use in new work order
      ↓                              ↓
New Task                     New Work Order