

Checklists
Checklists Module
The Checklists module allows users to create and manage checklists for maintenance activities. Each checklist can contain sections and questions that guide users through inspections or maintenance work.
1. Checklists Overview
The Checklists page displays the available checklists and provides options to search, filter, create, import, and manage checklists.
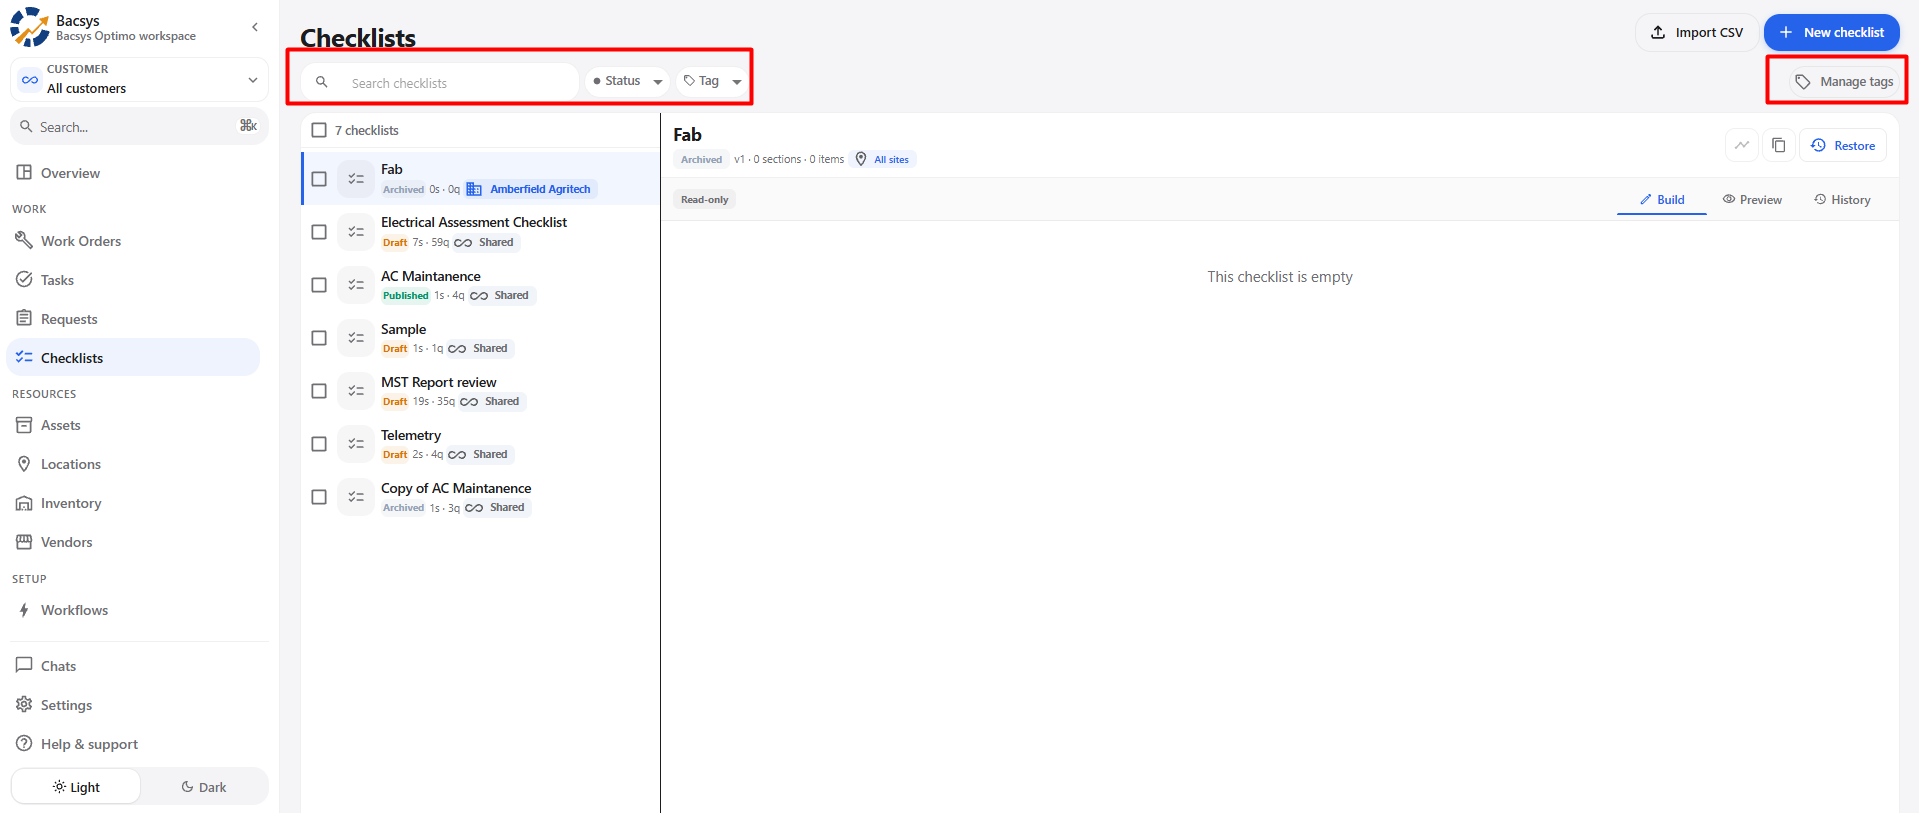
1.1 Checklists Page Options
| Option | Description |
|---|---|
| Search checklists | Search for an existing checklist by name. |
| Status | Filter checklists based on their status. |
| Tag | Filter checklists using tags. |
| Import CSV | Import checklist data from a CSV file. |
| Manage tags | Manage the tags used for checklists. |
| + New checklist | Create a new checklist. |
2. Creating a New Checklist
To create a new checklist:
- Open the Checklists module.
- Click + New checklist in the top-right corner.
- The New checklist pop-up window is displayed.
- Enter the required checklist information.
- Configure the customer scope, tags, and site availability.
- Click Create checklist.
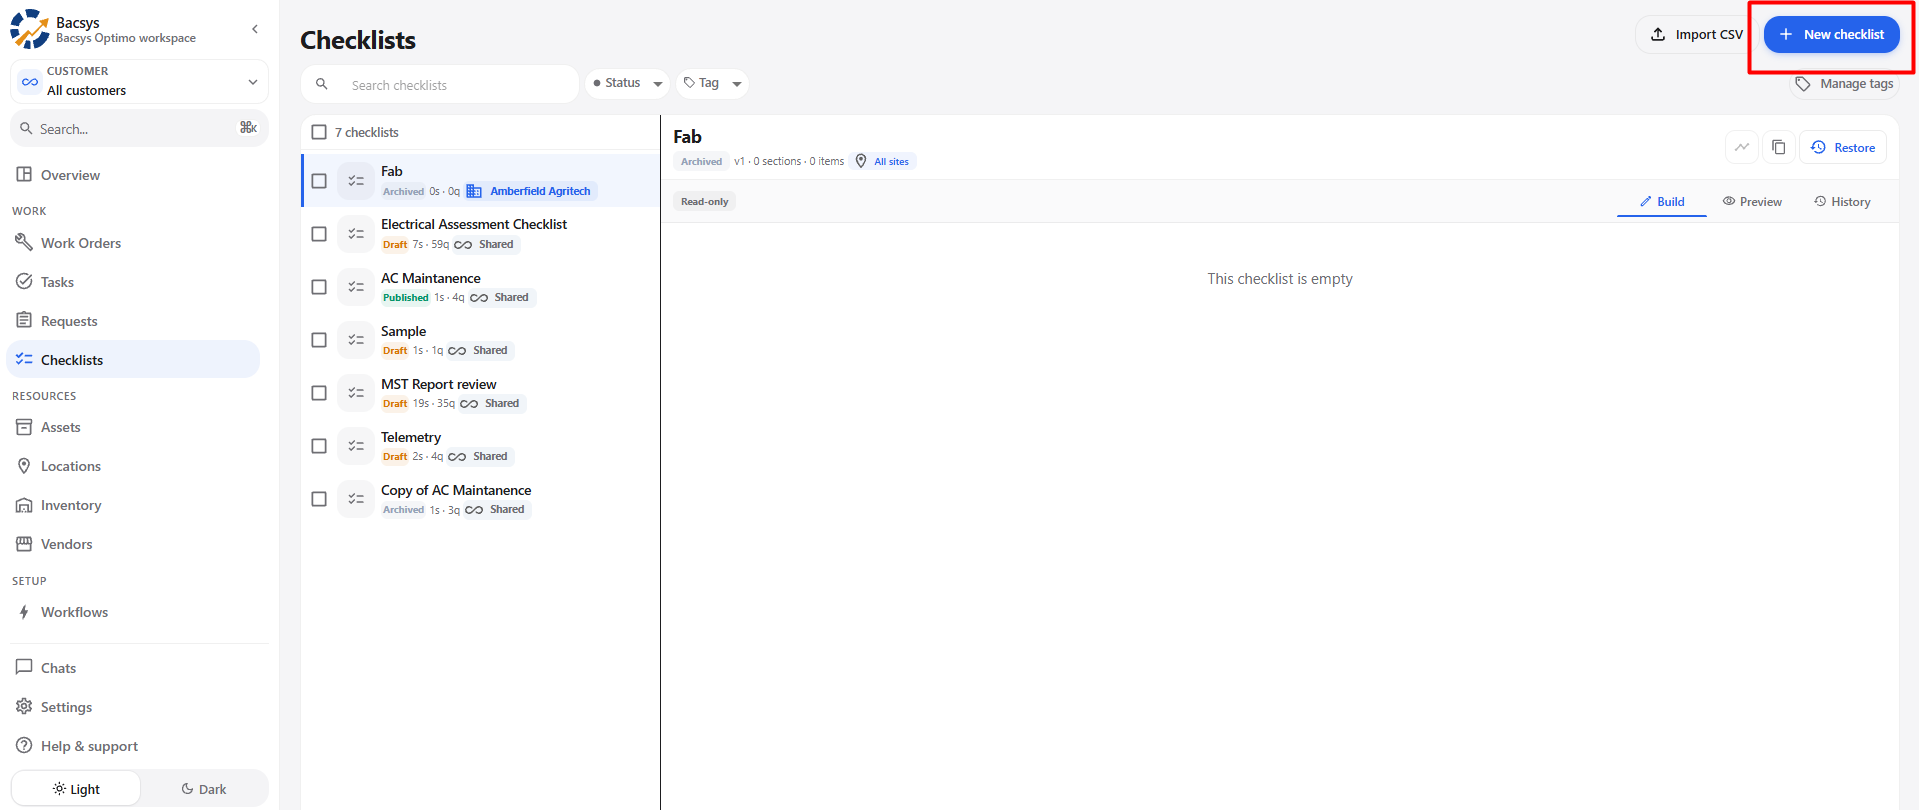
2.1 New Checklist Form
The New checklist pop-up contains the following fields:
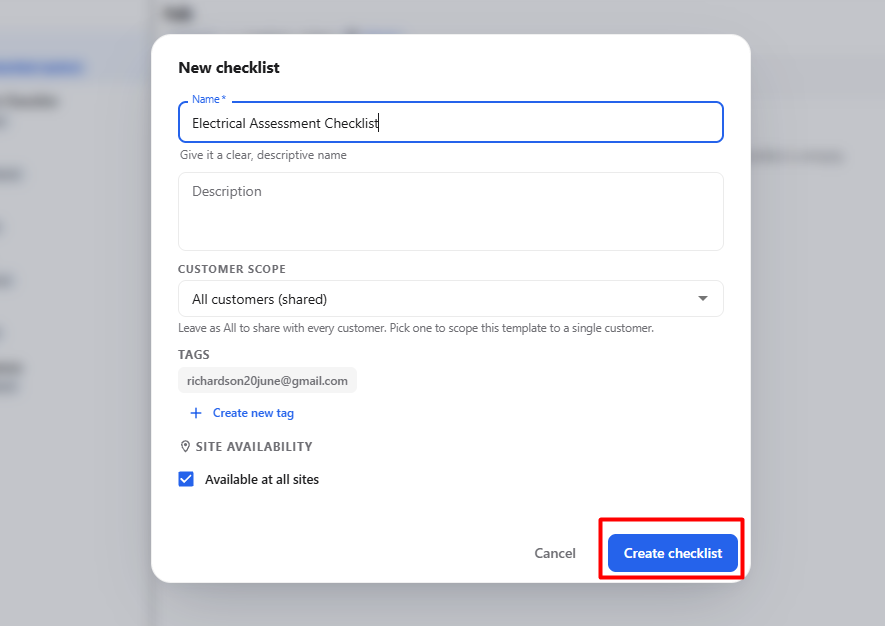
| Section | Field | Description |
|---|---|---|
| General | Name * | Enter a clear and descriptive name for the checklist. |
| General | Description | Enter additional information about the checklist. |
| Customer Scope | All customers (shared) | Make the checklist available to all customers, or select a specific customer. |
| Tags | Create new tag | Create a tag to organize the checklist. |
| Site Availability | Available at all sites | Make the checklist available at all sites. |
| Actions | Cancel | Close the pop-up without creating the checklist. |
| Actions | Create checklist | Create the checklist using the entered information. |
2.2 Name
The Name field is required and is used to identify the checklist.
For example:
HVAC Preventive MaintenanceEnter a clear and descriptive name so users can easily identify the checklist.
2.3 Description
The Description field allows the user to provide additional information about the checklist.
For example:
Checklist for inspecting and maintaining HVAC equipment.2.4 Customer Scope
The Customer Scope section controls which customers can access the checklist.
The user can leave the selection as All customers (shared) to share the checklist with every customer or select a specific customer.
2.5 Tags
The Tags section allows the user to organize the checklist using tags.
To create a new tag:
- Click + Create new tag.
- Enter the required tag information.
- Create the tag and associate it with the checklist.
2.6 Site Availability
The Site Availability section controls where the checklist is available.
When Available at all sites is selected, the checklist is available across all sites.
2.7 Create Checklist
After entering the required information:
- Verify the Name.
- Review the Description, if provided.
- Select the required Customer Scope.
- Configure the Tags, if required.
- Review the Site Availability.
- Click Create checklist.
The checklist is created and appears in the Checklists module, where it can be selected and configured.
3. Configuring the Checklist
After creating the checklist, select it from the checklist list to open its details.
The Build tab allows the user to add sections and questions.
3.1 Add a Section
The checklist can be organized into multiple sections.
To add a section:
- Open the required checklist.
- Go to the Build tab.
- Click Add section.
- Configure the section as required.
- Add questions to the section.
Multiple sections can be added to the same checklist.
3.2 Add Questions
After creating a section, questions can be added to the section.
The Add a Question section provides the following question types:
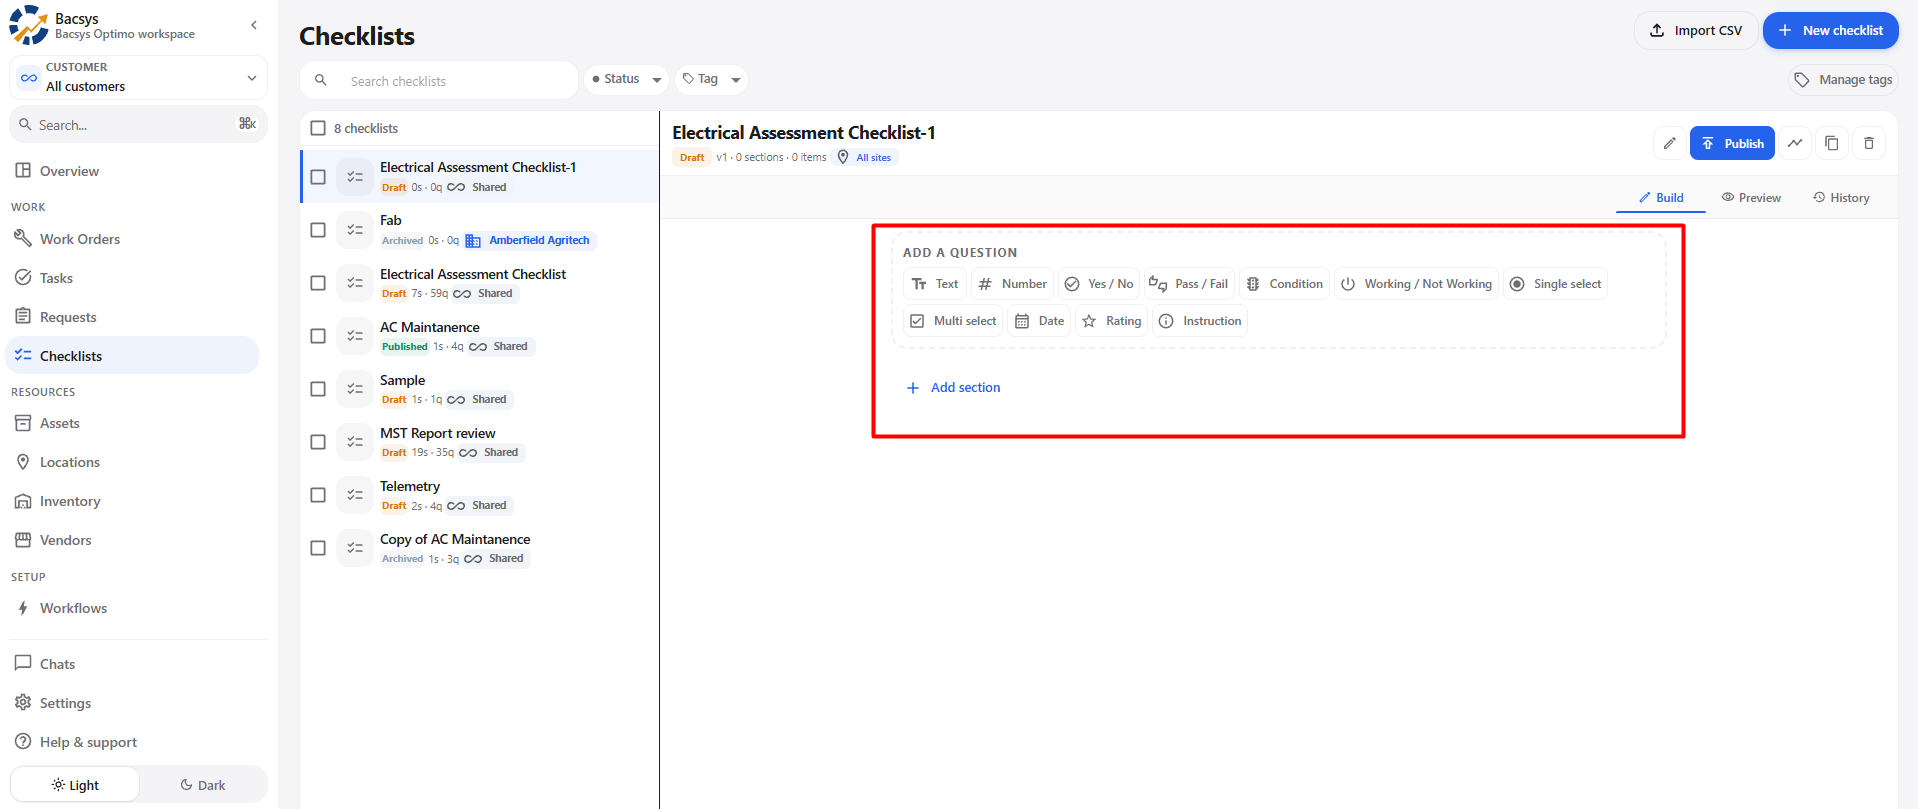
| Question Type | Description |
|---|---|
| Text | Allows the user to enter a text response. |
| Number | Allows the user to enter a numeric response. |
| Yes / No | Allows the user to select Yes or No. |
| Pass / Fail | Allows the user to record whether an item passed or failed. |
| Condition | Allows the user to record a condition. |
| Working / Not Working | Allows the user to indicate whether an item is working. |
| Single select | Allows the user to select one option. |
| Multi select | Allows the user to select multiple options. |
| Date | Allows the user to select a date. |
| Rating | Allows the user to provide a rating. |
| Instruction | Allows the user to add instructions to the checklist. |
3.3 Configure Questions
Each question can be configured according to the selected question type.
Depending on the question type, the user can configure the available options and settings.
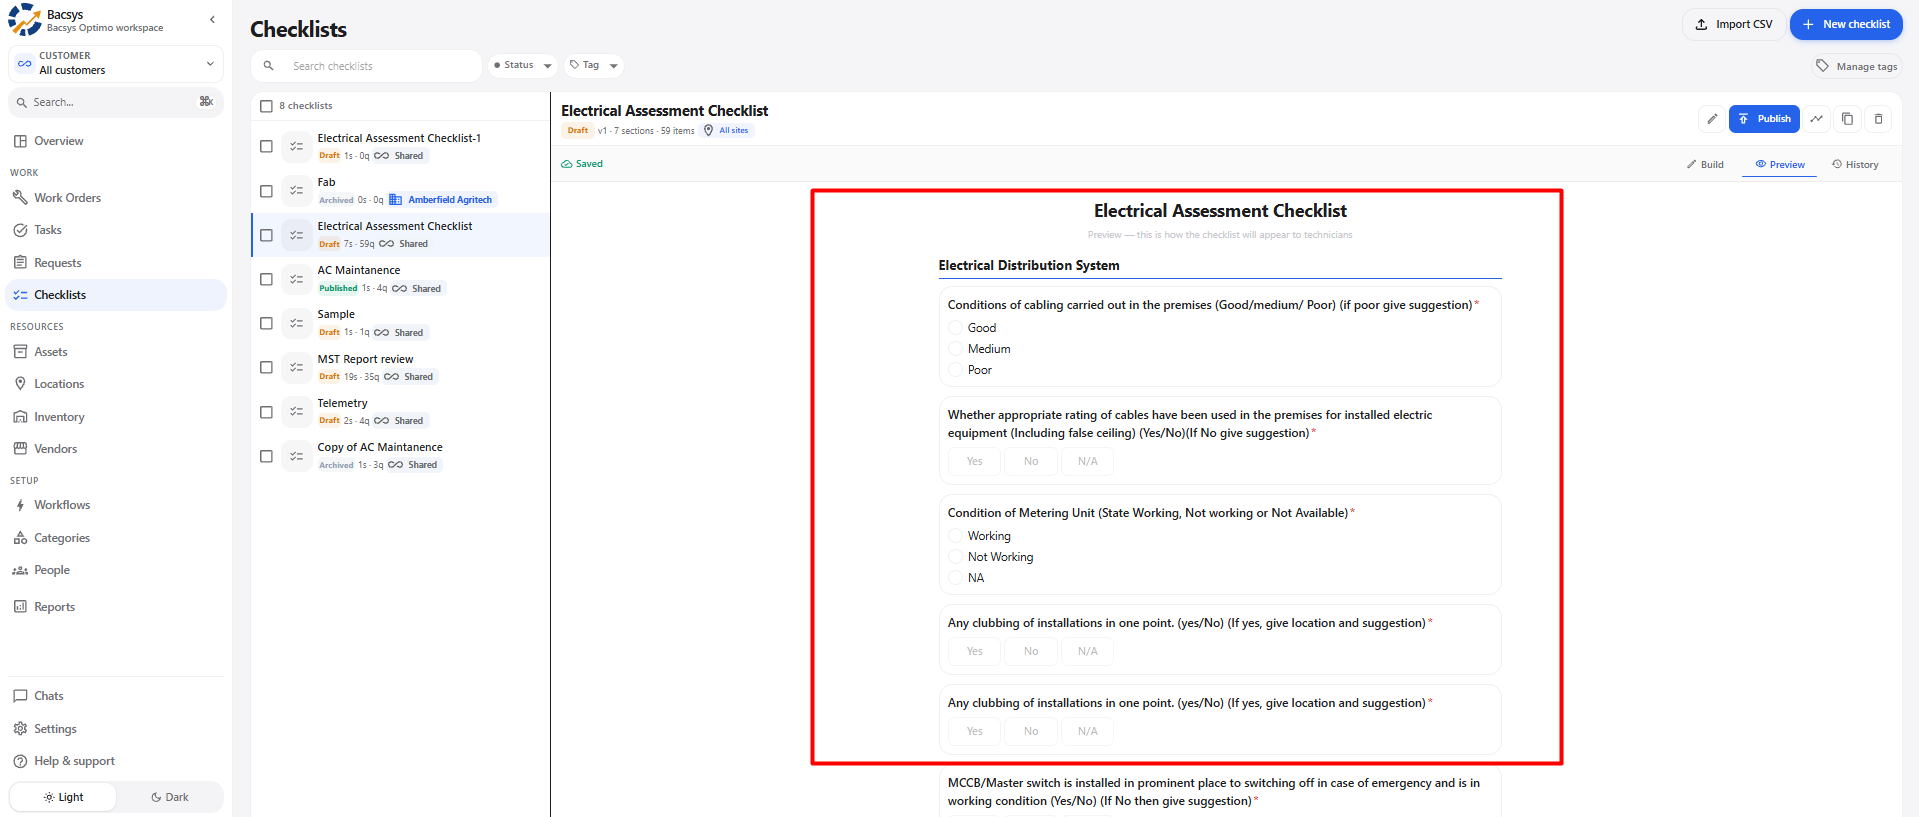
For example:
- Add answer options for Single select.
- Add multiple answer options for Multi select.
- Configure the required settings for the question.
- Add conditions where applicable.
- Enable additional options such as comments, images, or voice notes when available.
3.4 Question Settings
Depending on the question type, the user can configure additional settings.
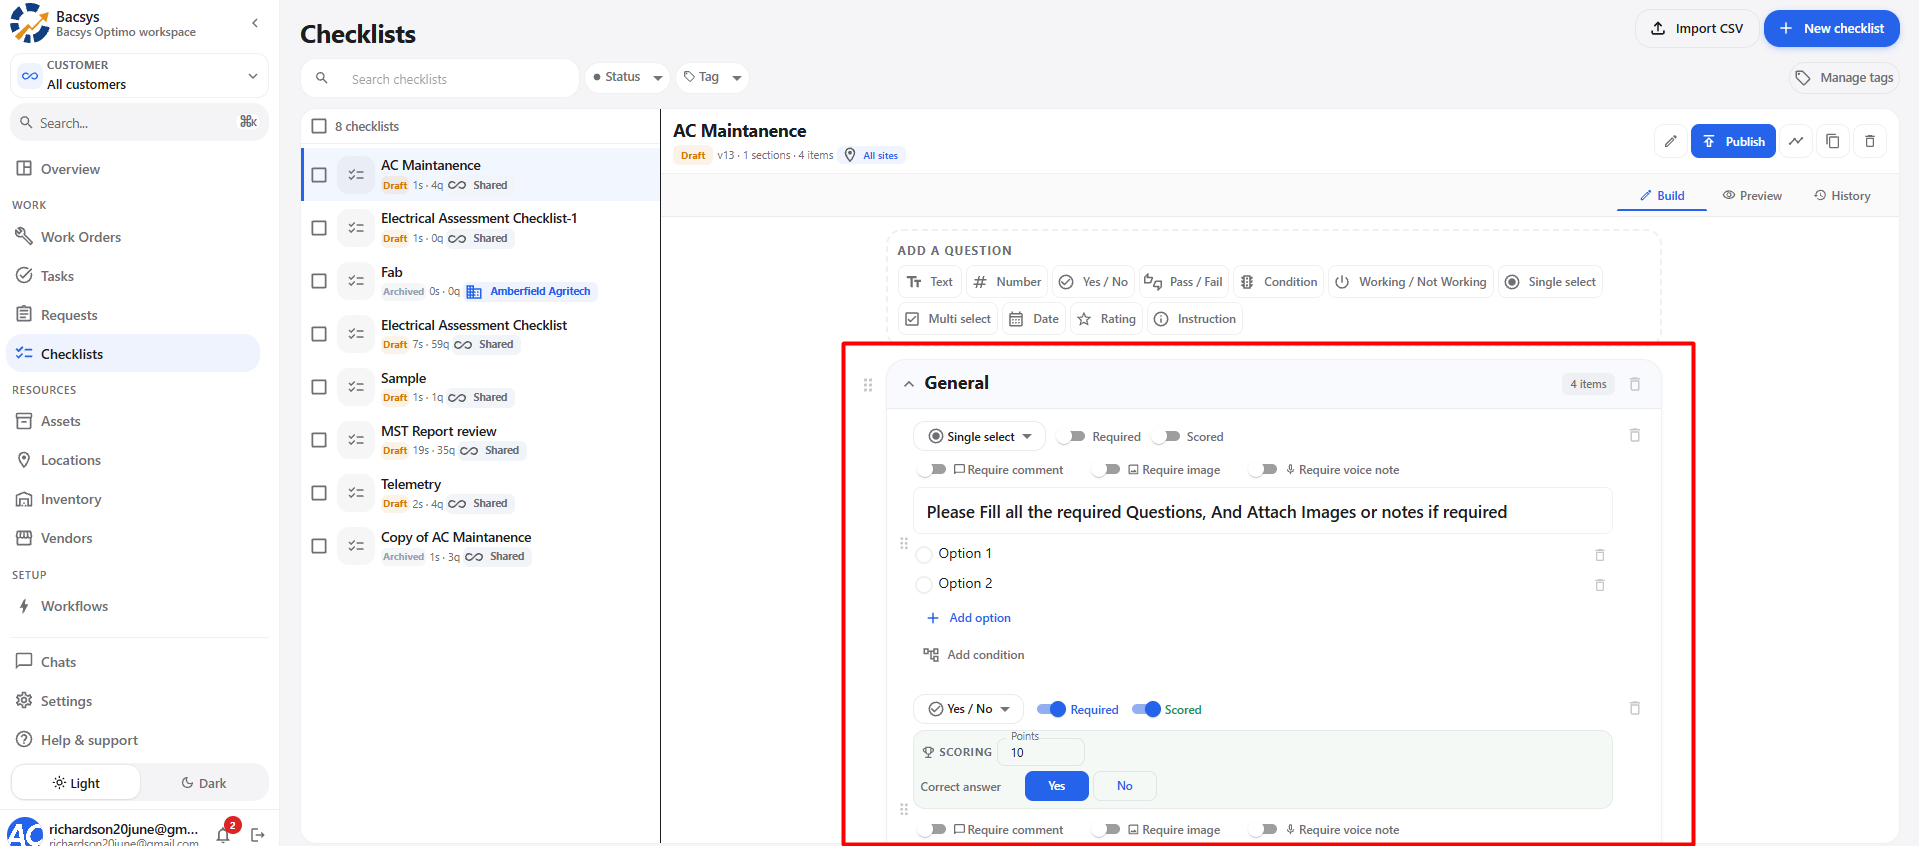
| Setting | Description |
|---|---|
| Required | Makes the question mandatory. |
| Scored | Enables scoring for the question. |
| Require comment | Requires a comment when answering the question. |
| Require image | Requires an image when answering the question. |
| Require voice note | Requires a voice note when answering the question. |
| Add option | Adds another answer option to a selection question. |
| Add condition | Adds a condition to the question. |
3.5 Edit a Question
If changes are required, an existing question can be edited.
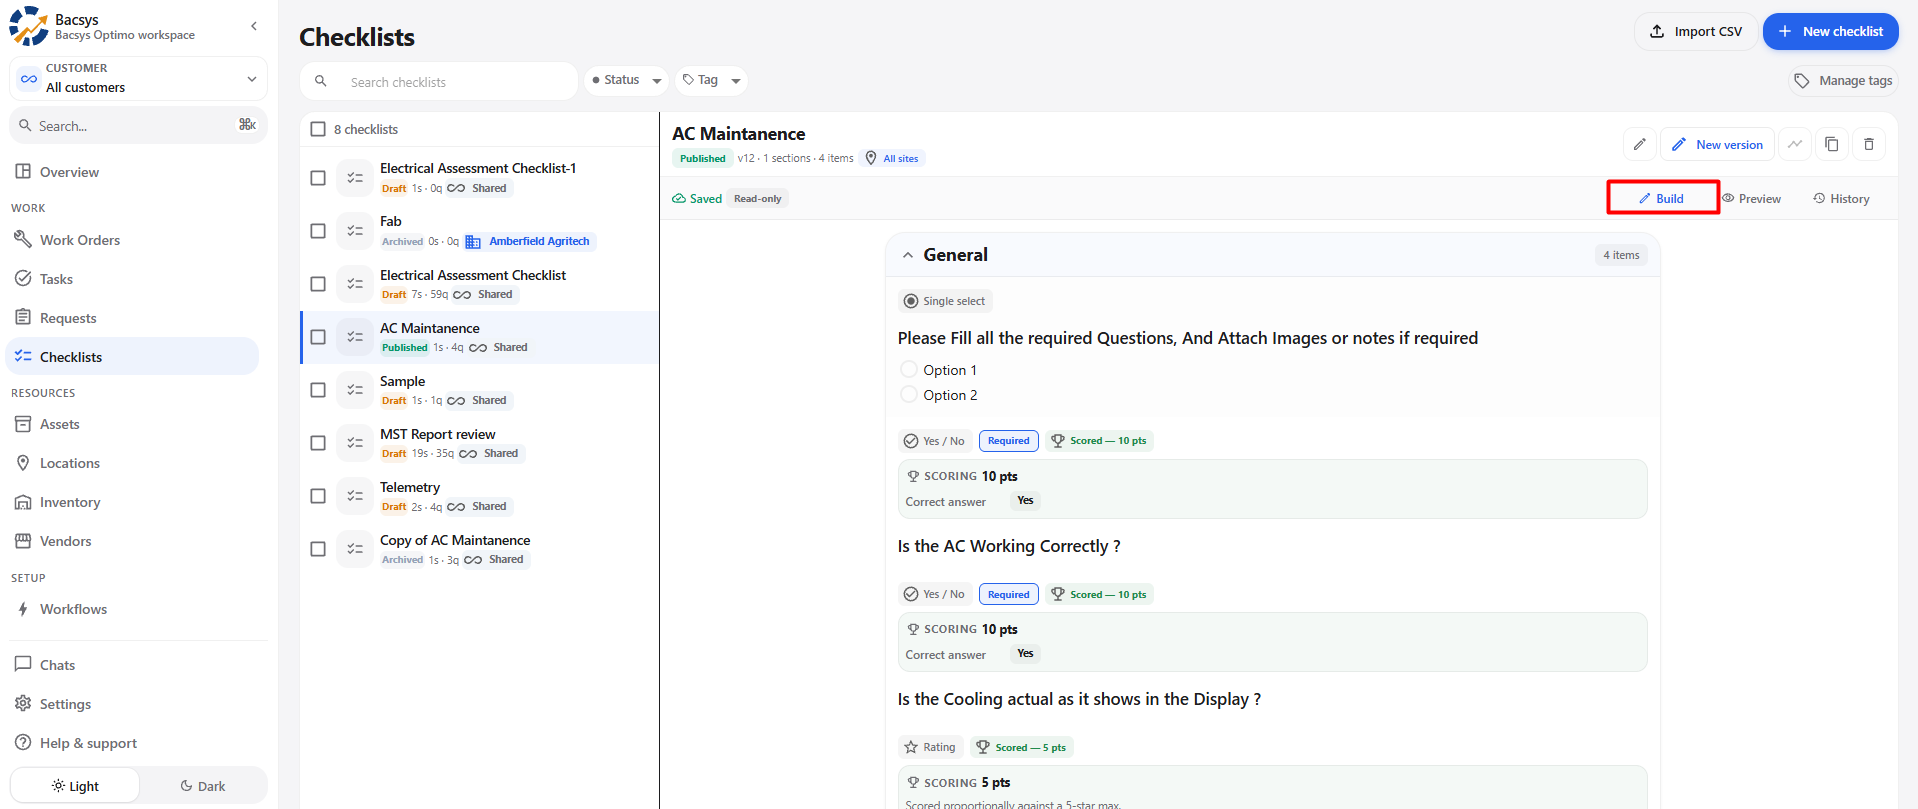
To edit a question:
- Select the required question.
- Modify the question or its configuration.
- Update the required options or settings.
- Save the changes.
The updated question remains within the checklist section.
3.6 Delete a Question
If a question is no longer required, it can be deleted.
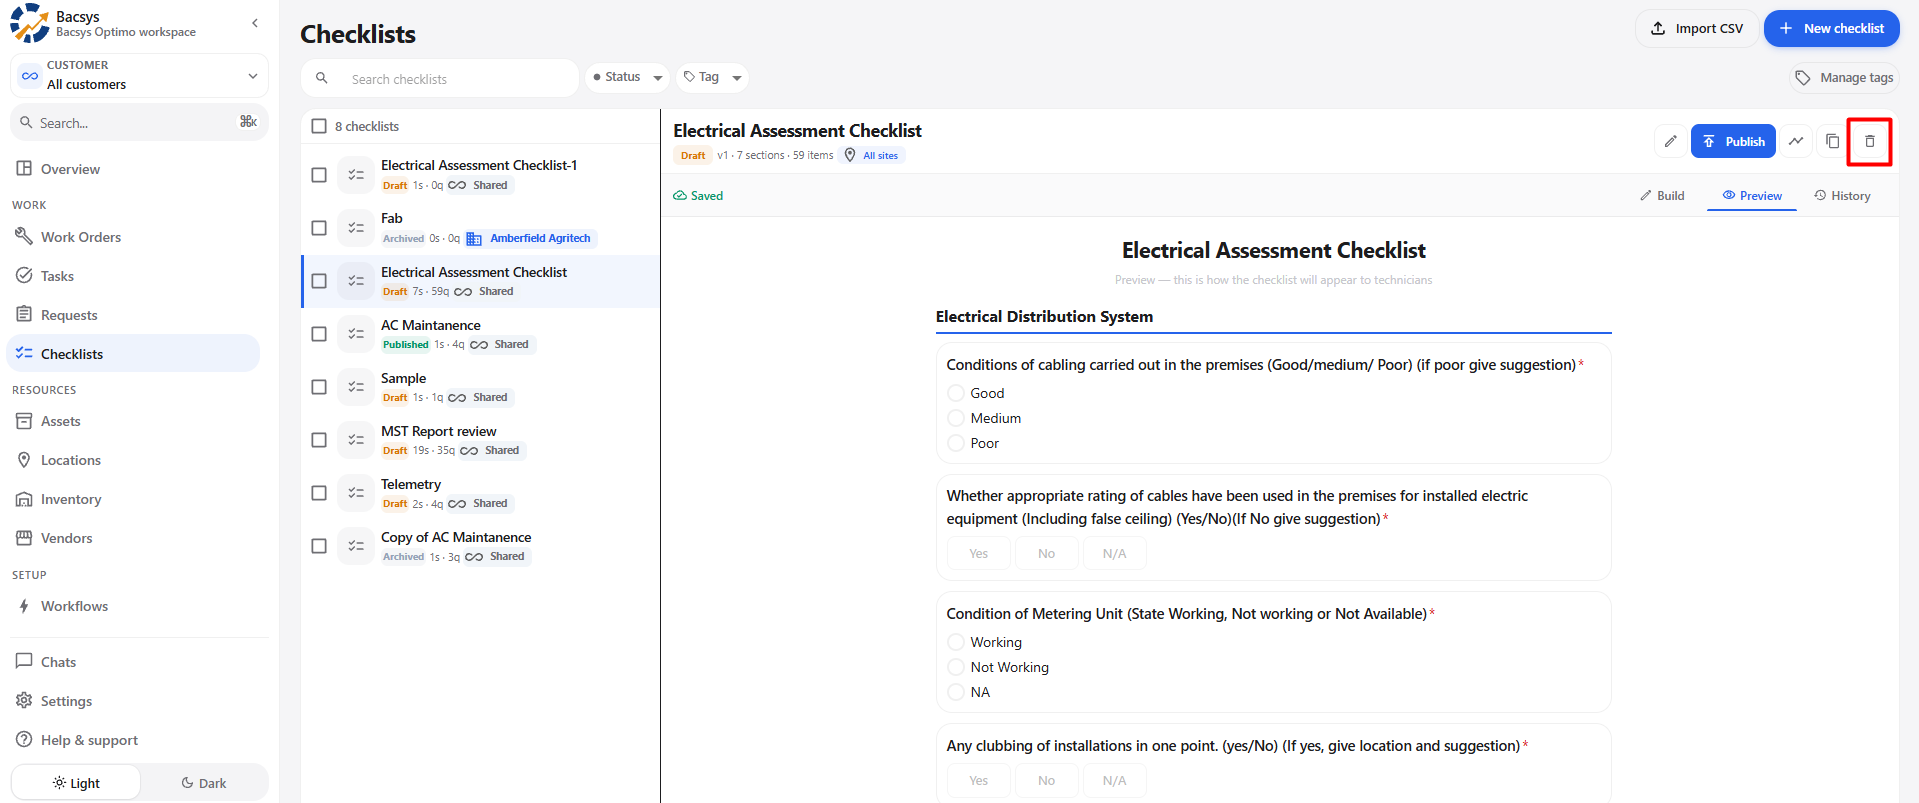
To delete a question:
- Locate the question that needs to be removed.
- Click the Delete option.
- Confirm the deletion, if prompted.
The question is removed from the checklist.
4. Save and Publish the Checklist
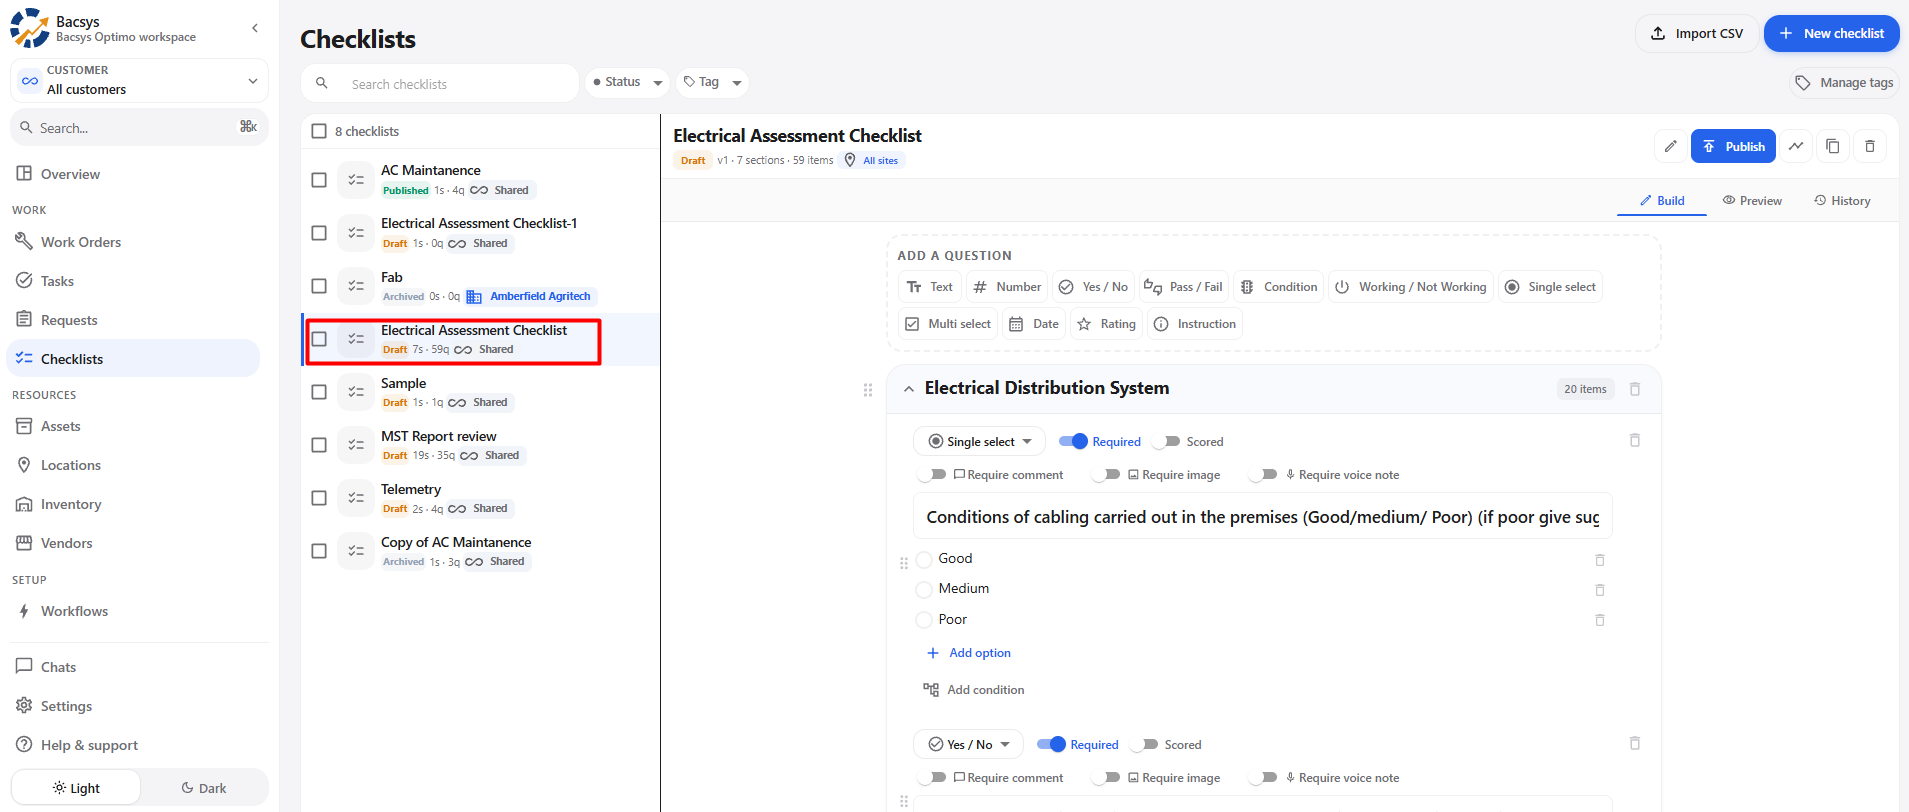
After configuring the checklist, the checklist is saved as a Draft until it is published.
4.1 Draft Status
Before publishing, the checklist remains saved as Draft.
The user can continue to review, edit, add questions, or delete questions while the checklist is in Draft status.
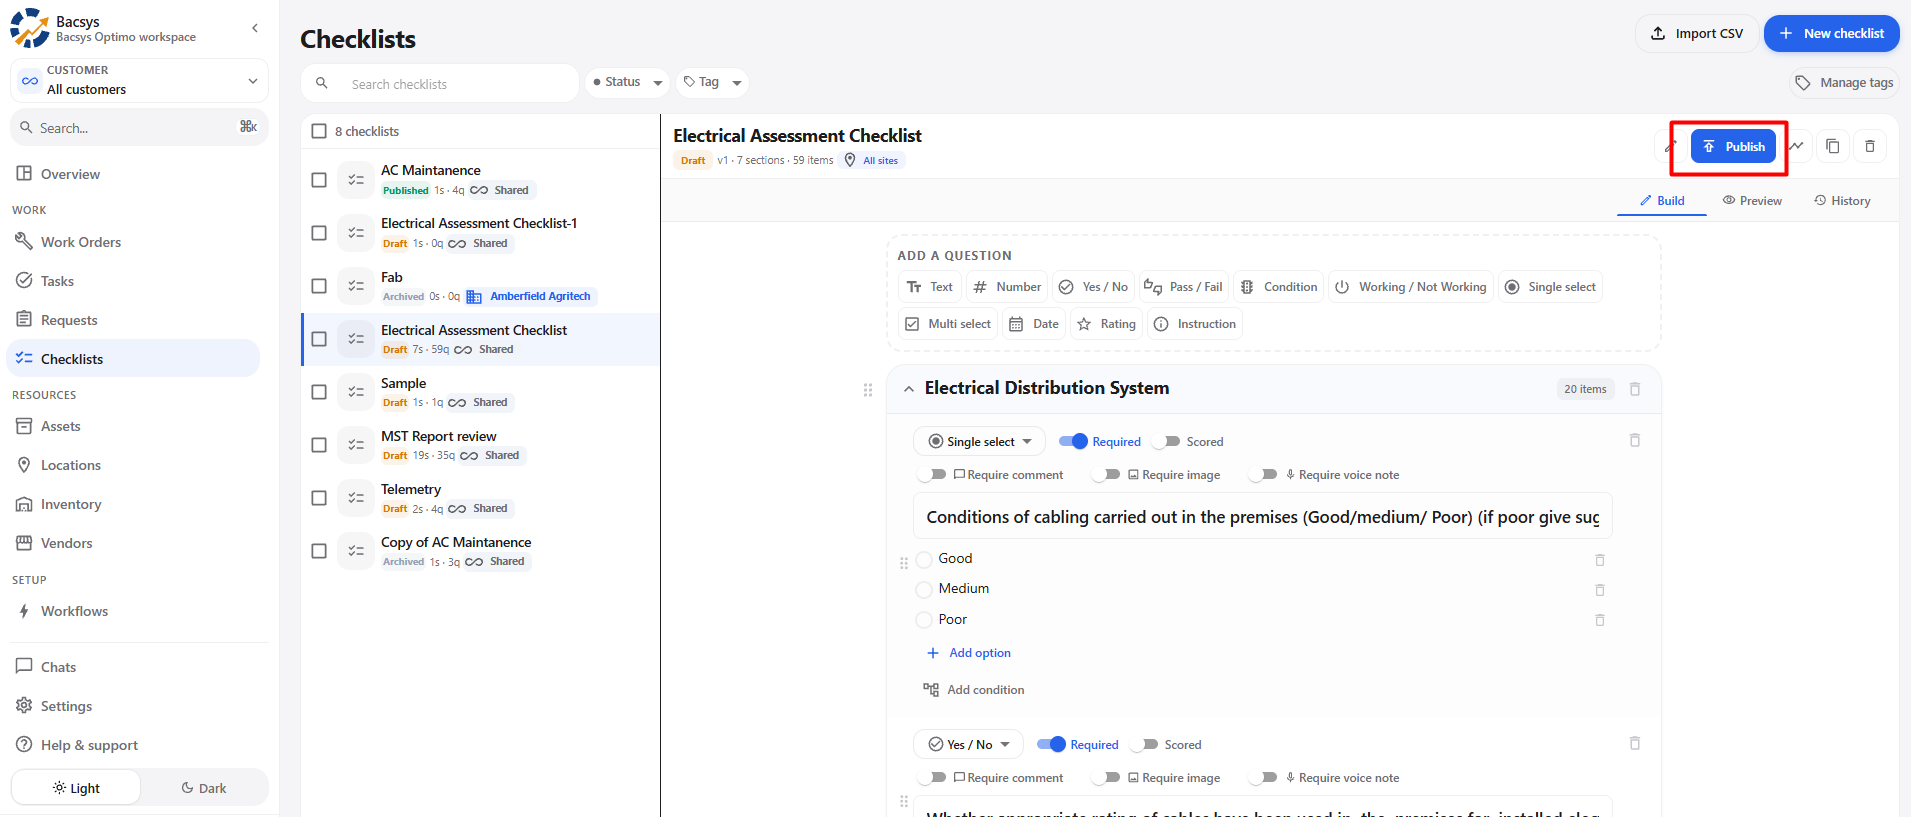
4.2 Publish Checklist
To publish the checklist:
- Complete the checklist configuration.
- Review the sections and questions.
- Make any required edits or changes.
- Click Publish.
- The checklist is published and its status changes from Draft to Published.
4.3 Draft and Published Status
| Status | Description |
|---|---|
| Draft | The checklist is saved but has not yet been published. |
| Published | The checklist has been published and is available for use. |
4.4 Checklist Publishing Workflow
Create Checklist
      ↓
Configure Sections
      ↓
Add Questions
      ↓
Configure Questions
      ↓
Save Checklist
      ↓
Draft
      ↓
Review / Edit
      ↓
Click Publish
      ↓
Published
5. Duplicate Checklist
The Duplicate option allows the user to create a duplicate copy of an existing checklist.
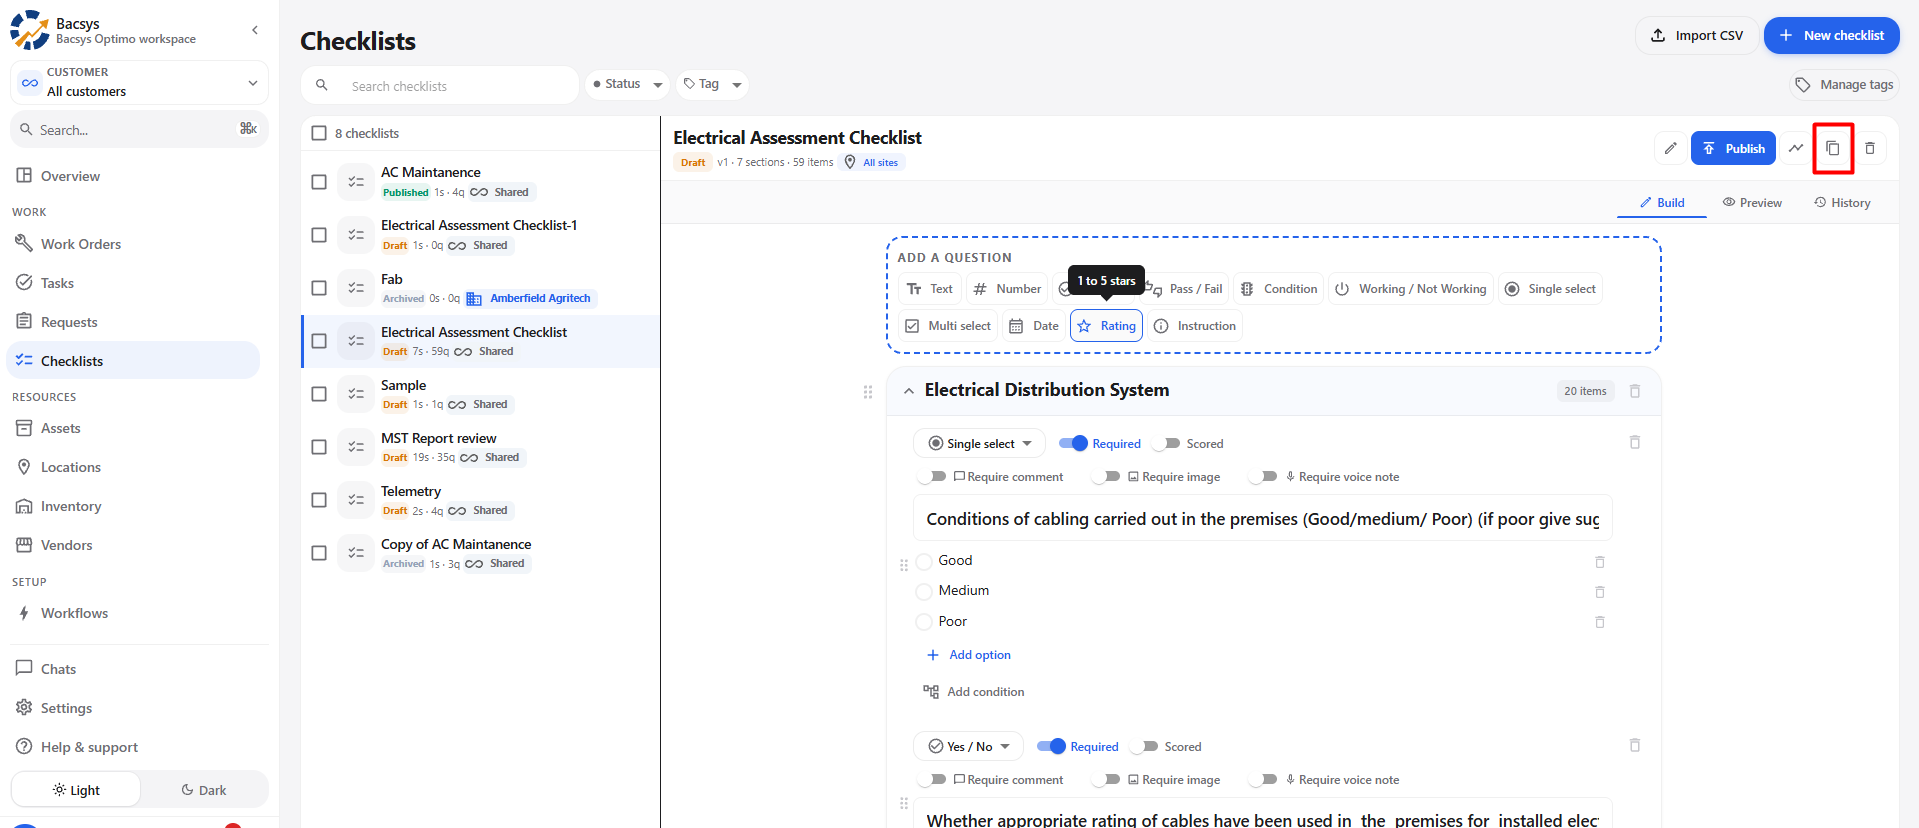
To duplicate a checklist:
- Open the required checklist.
- Click the Duplicate button.
- A duplicate copy of the checklist is created.
- The duplicated checklist can then be edited or configured as required.
5.1 Duplicate Checklist Workflow
Open Checklist
      ↓
Click Duplicate
      ↓
Checklist Duplicated
      ↓
Edit / Configure if Required
6. Preview Checklist
The Preview option allows the user to view the checklist before using it.
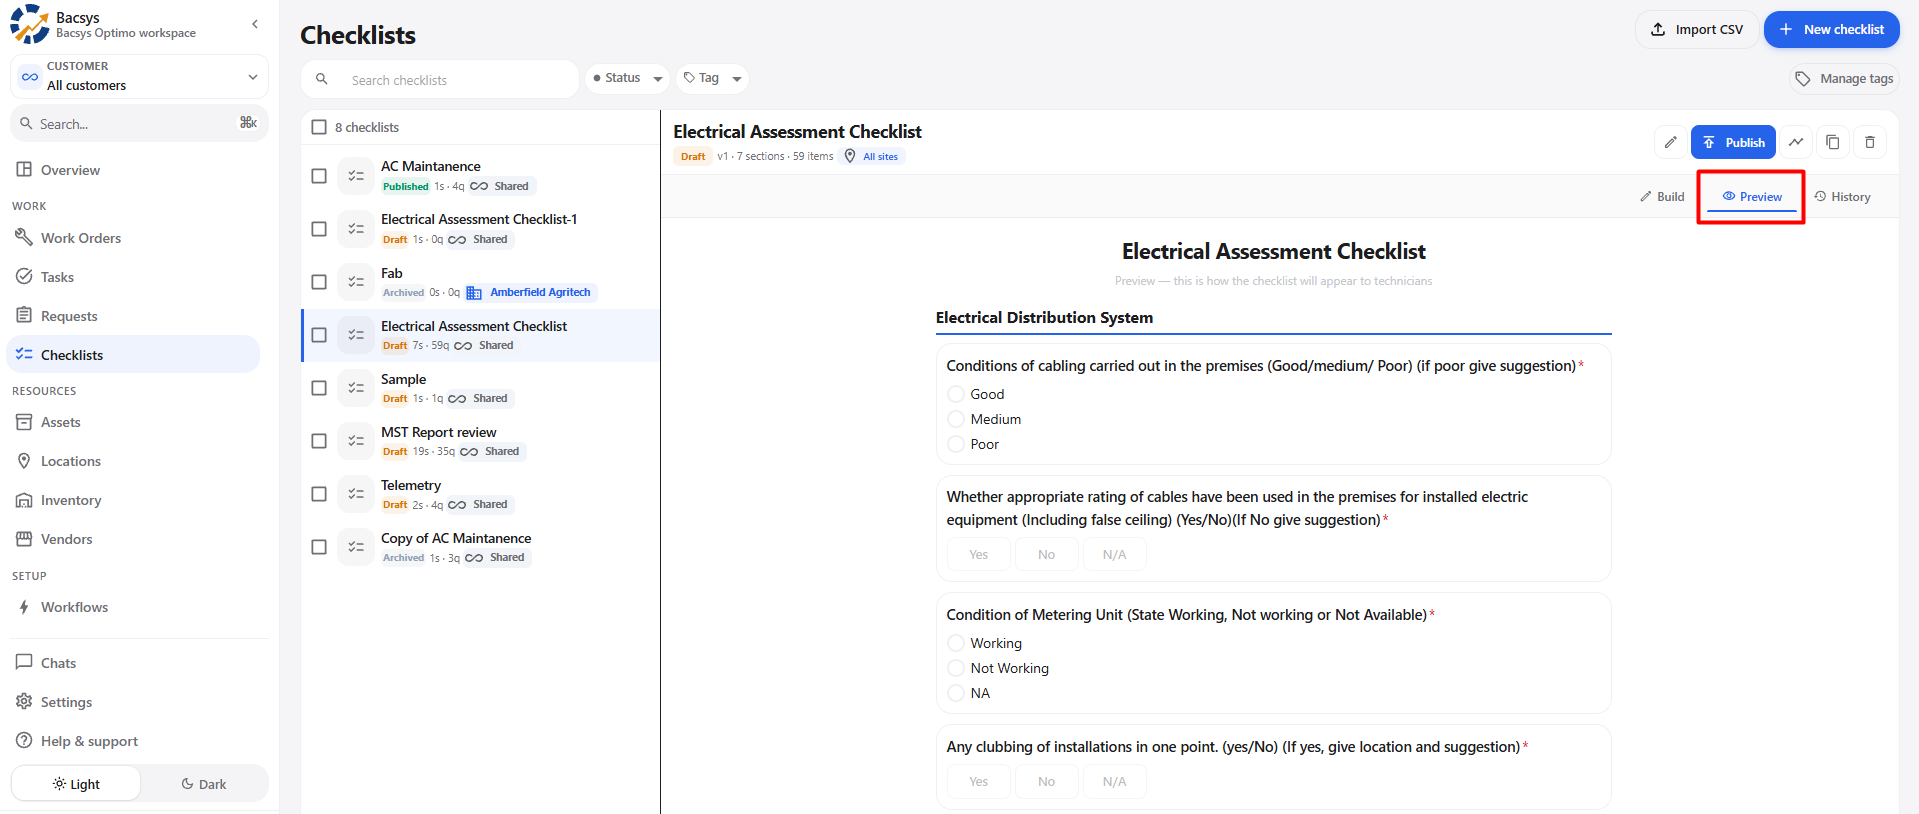
To preview the checklist:
- Open the required checklist.
- Click the Preview tab.
- Review the checklist and its questions.
- Verify that the checklist is configured as expected.
7. Checklist History
The History option allows the user to view the history of the checklist.
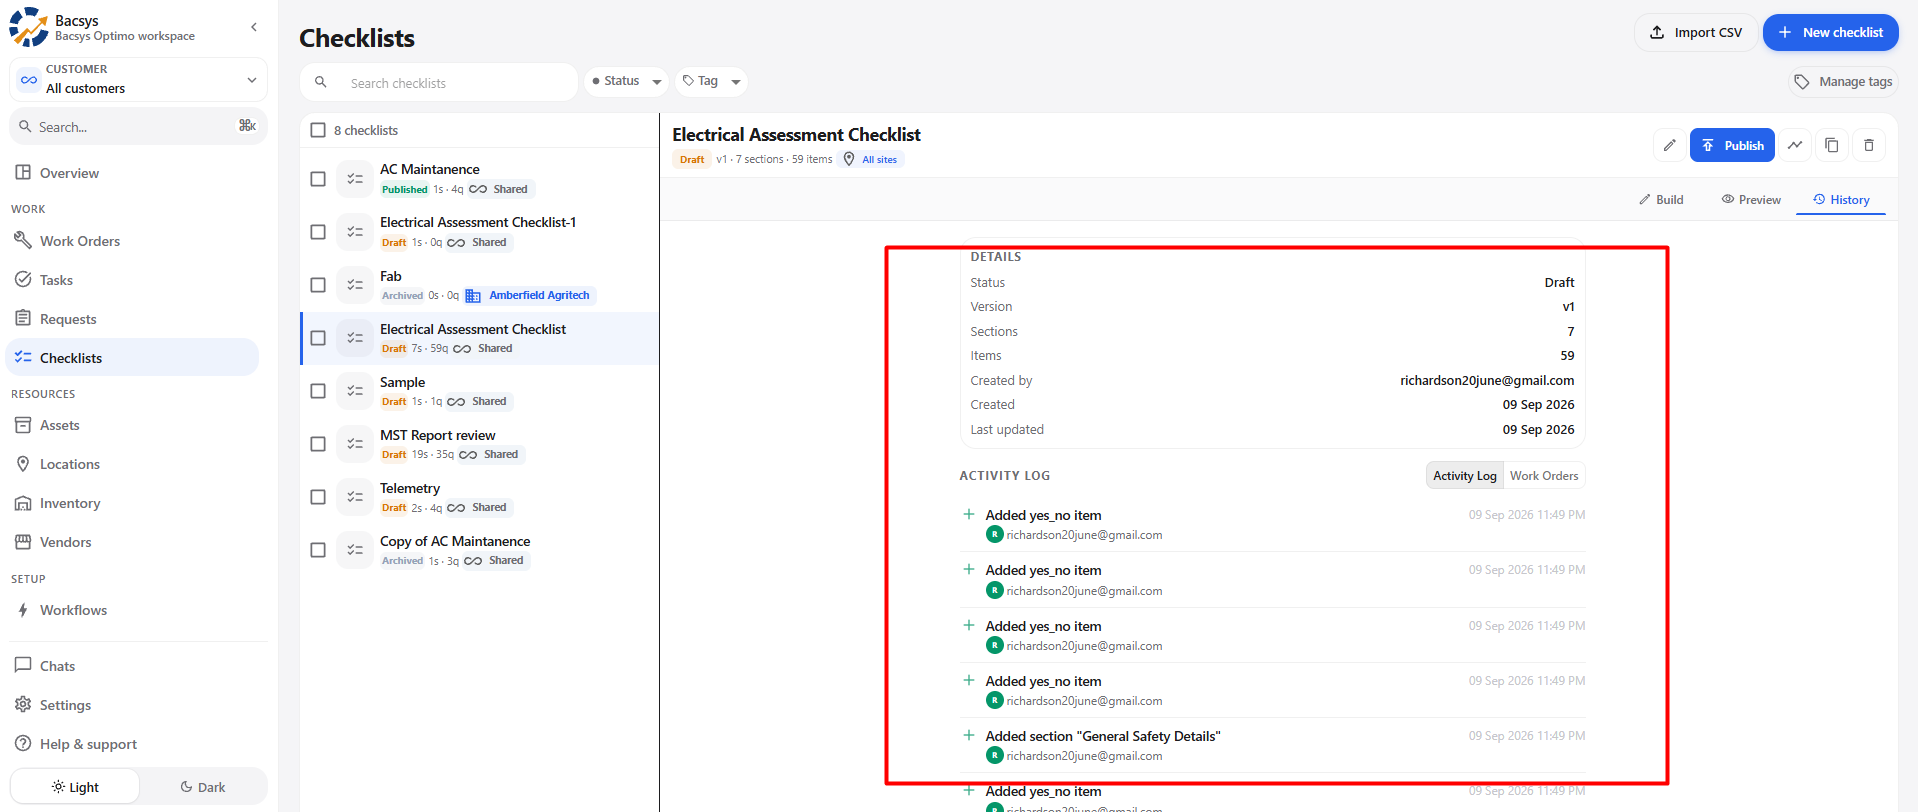
The history displays the changes and activities performed on the checklist, allowing the user to review the details of previous updates.
To view the checklist history:
- Open the required checklist.
- Click the History tab.
- Review the available history records.
- View the details of the changes and activities recorded for the checklist.
7.1 Preview and History Workflow
Open Checklist
      ↓
   ┌───────────┐
   ↓           ↓
Preview      History
   ↓           ↓
View        View Checklist
Checklist   History Details
8. Import Checklist Using CSV
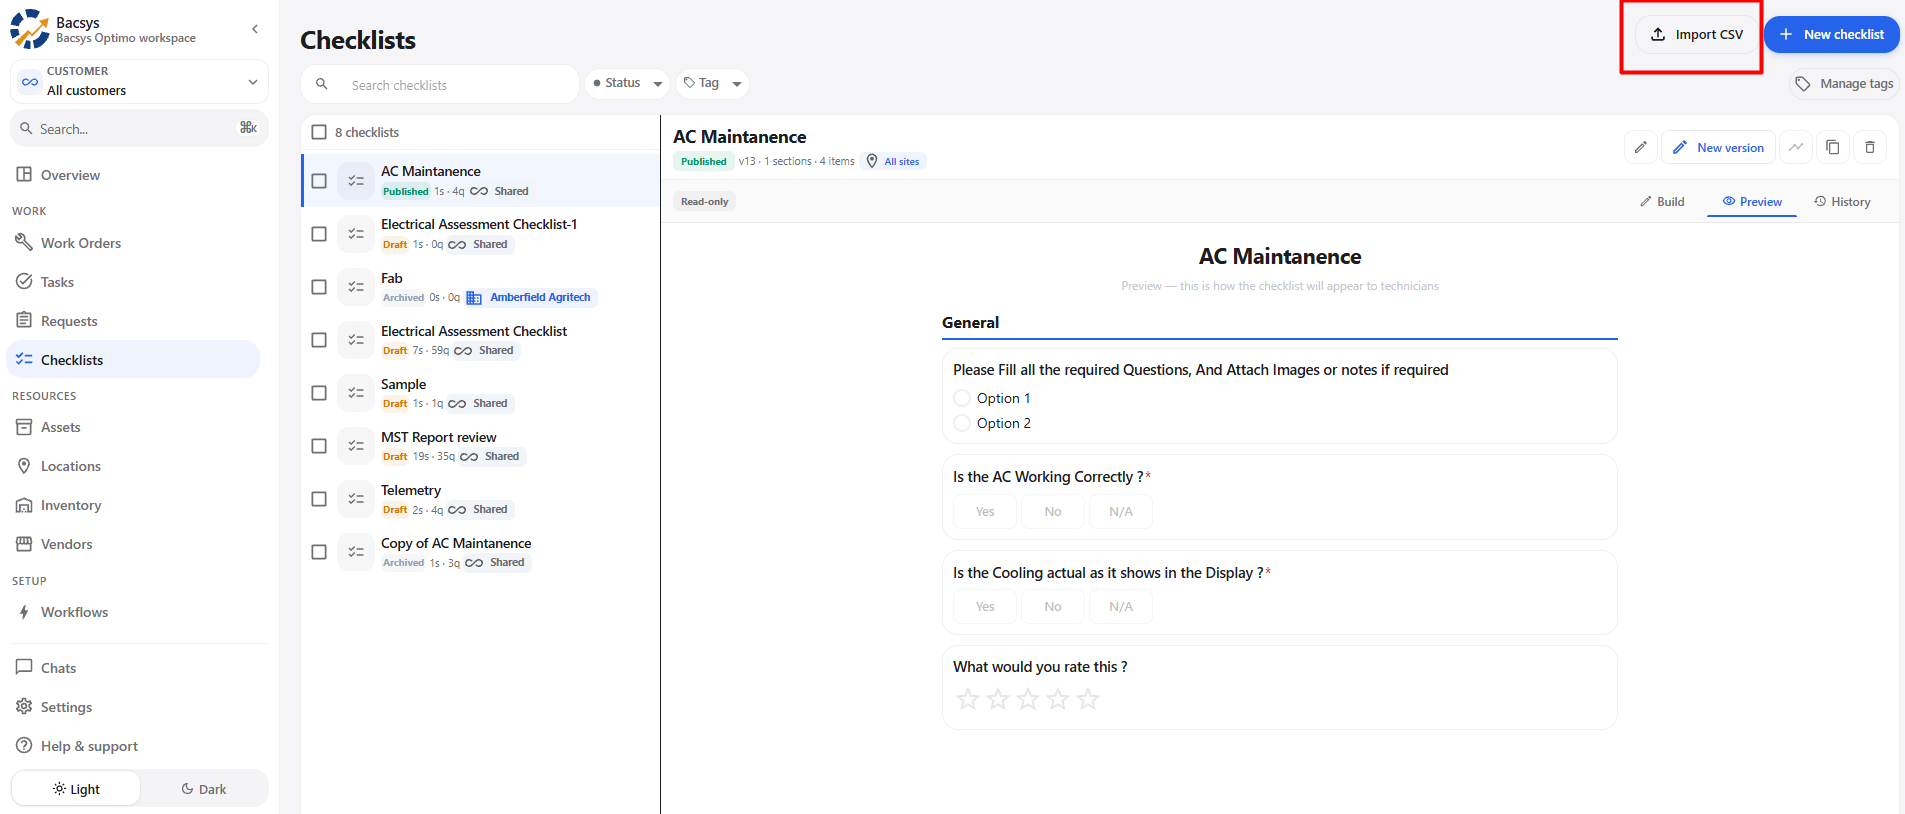
The Import CSV option allows the user to create one or more checklist templates using a CSV file.
When the user clicks Import CSV, the Import checklists pop-up is displayed.
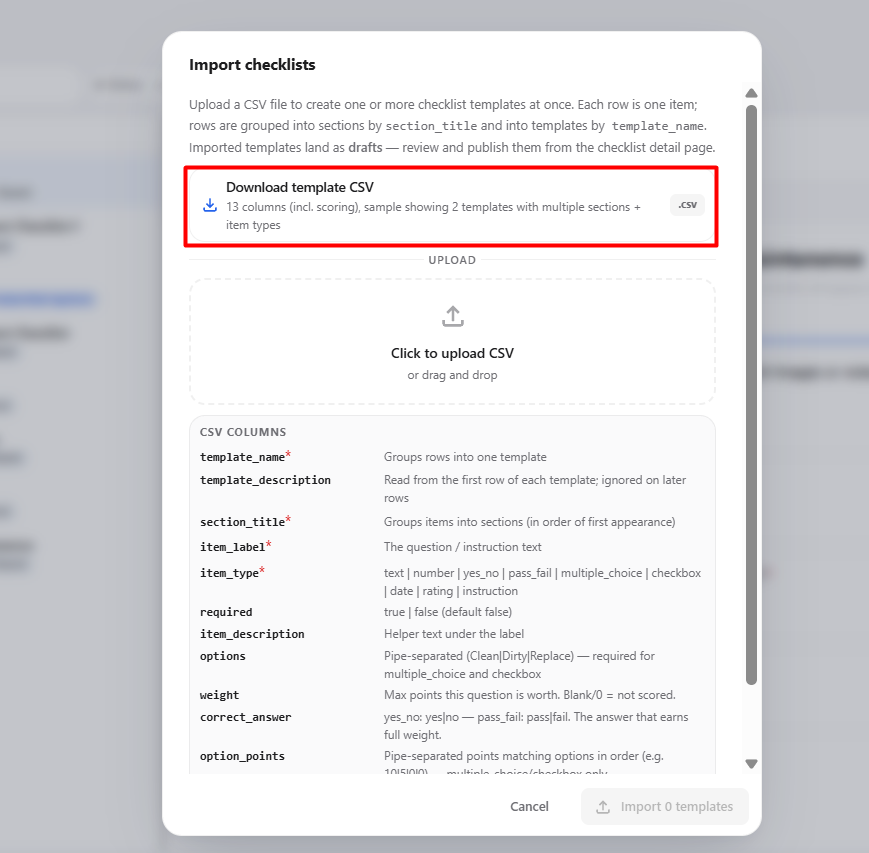
8.1 Download Template CSV
The Download template CSV option provides a CSV template that can be used to prepare checklist information for import.
To download and prepare the template:
- Click Import CSV.
- The Import checklists pop-up is displayed.
- Click Download template CSV.
- The CSV template is downloaded.
- Open the downloaded CSV file.
- Enter or edit the checklist information according to the template format.
- Save the CSV file.
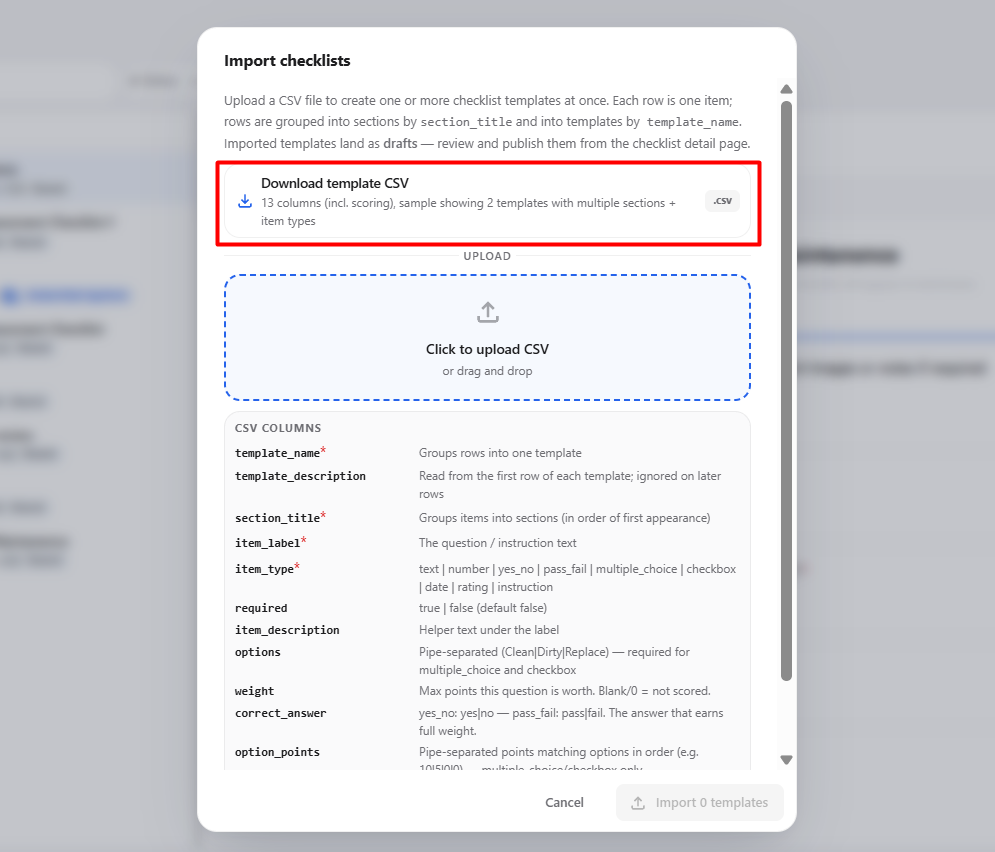
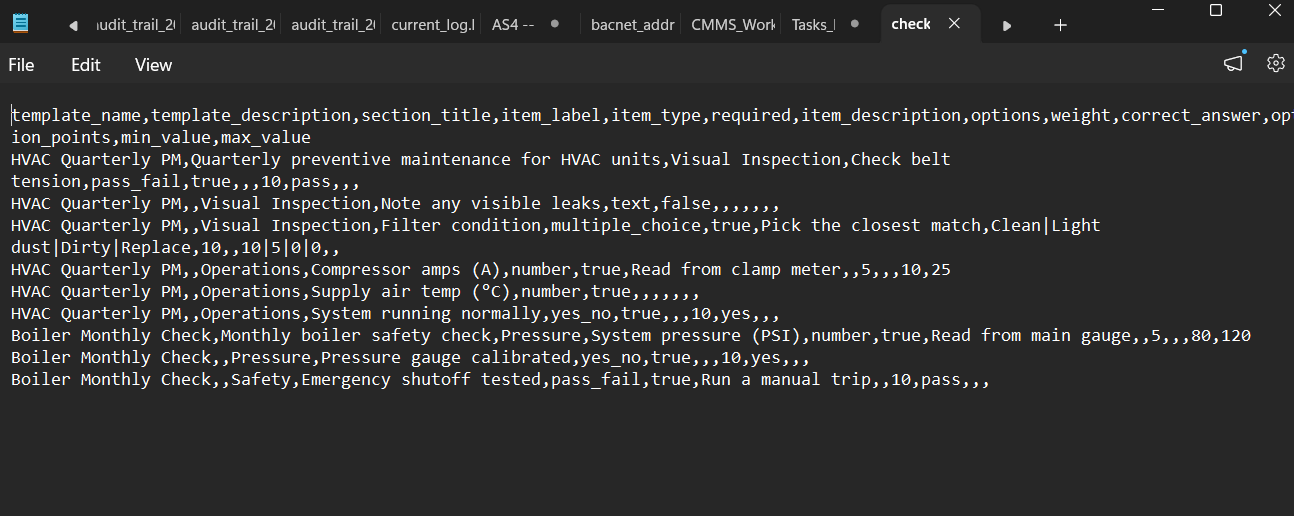
The CSV file can contain information for one or more checklist templates.
8.2 Upload CSV
After preparing the CSV file, it can be uploaded to the system.
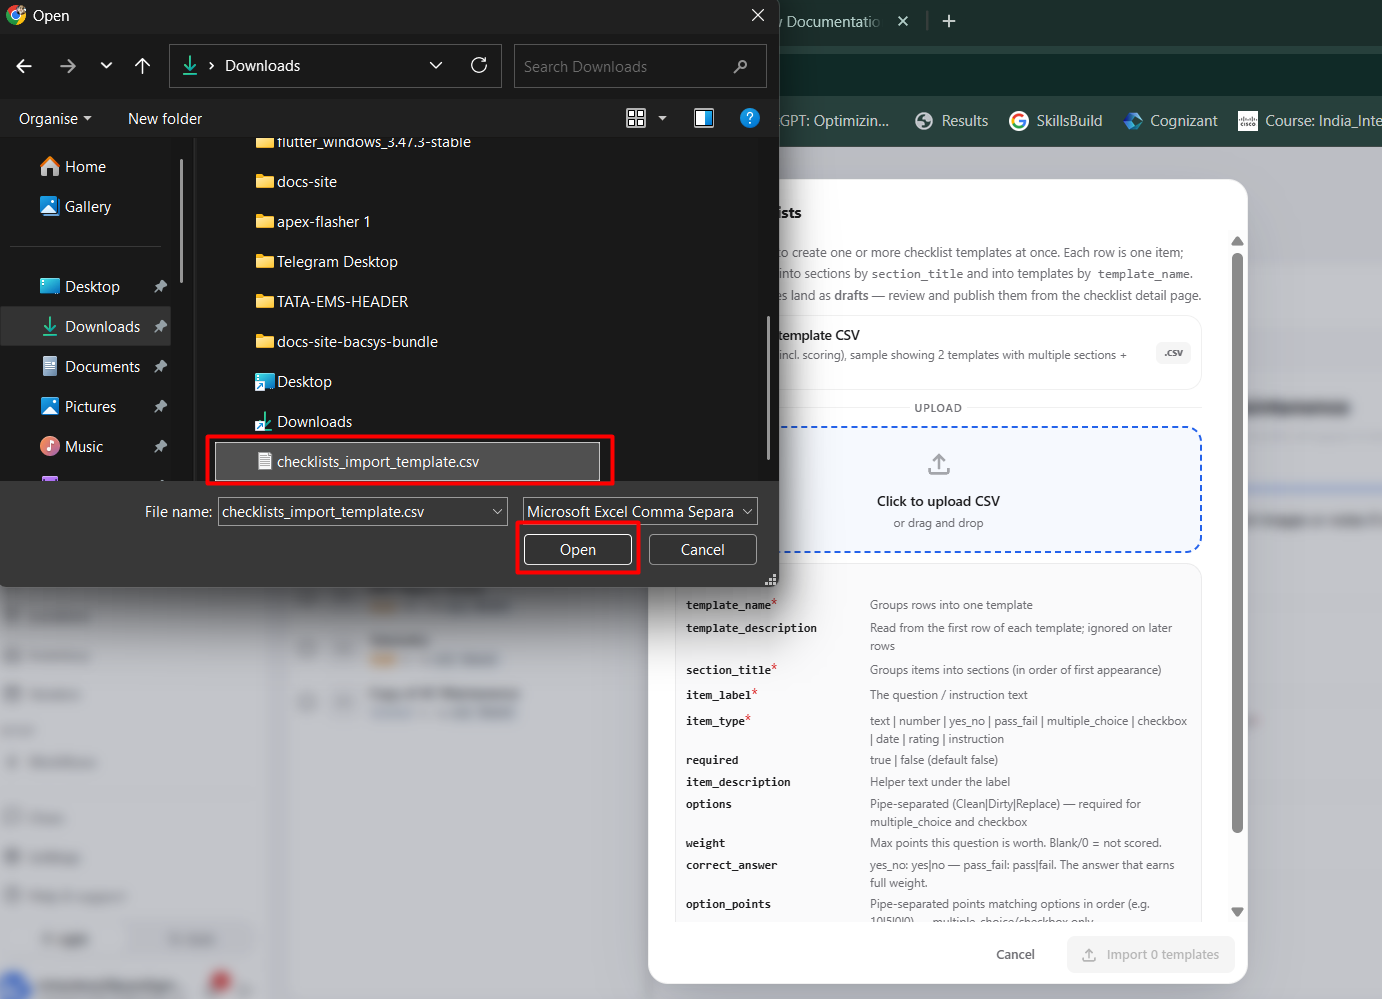
To upload the CSV:
- Open the Import checklists pop-up.
- Click Click to upload CSV.
- Select the prepared CSV file.
Alternatively, the CSV file can be dragged and dropped into the upload area.
- The system reads the CSV file.
- Review the imported checklist information.
- Click Import to import the checklist templates.
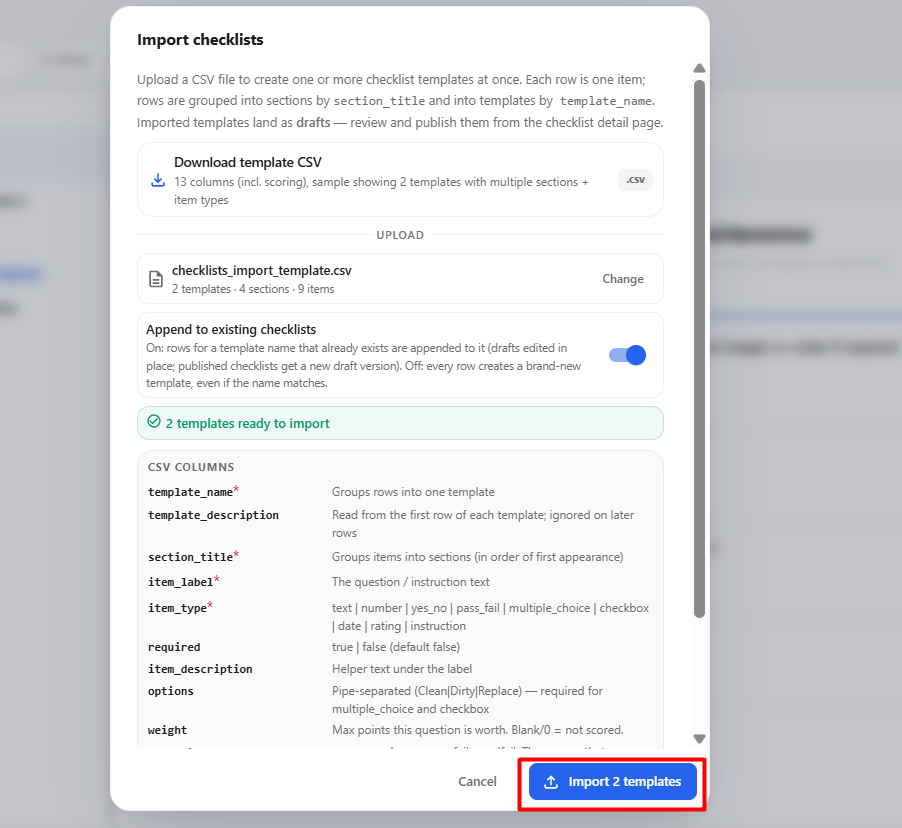
8.3 Imported Checklist Status
After the CSV file is uploaded and imported, the checklist templates are saved as Drafts.
Multiple checklist templates can be imported at the same time.
Each imported checklist is initially saved with Draft status.
The imported checklists can then be reviewed and published.
8.4 Publish Imported Checklists
After importing the CSV:
- The checklist templates are created.
- The imported checklists are saved as Drafts.
- Review the imported checklist details.
- Make any required changes.
- Select the checklist or checklists to be published.
- Click Publish.
- The selected checklist or checklists are published.
Multiple checklists can be published at the same time.
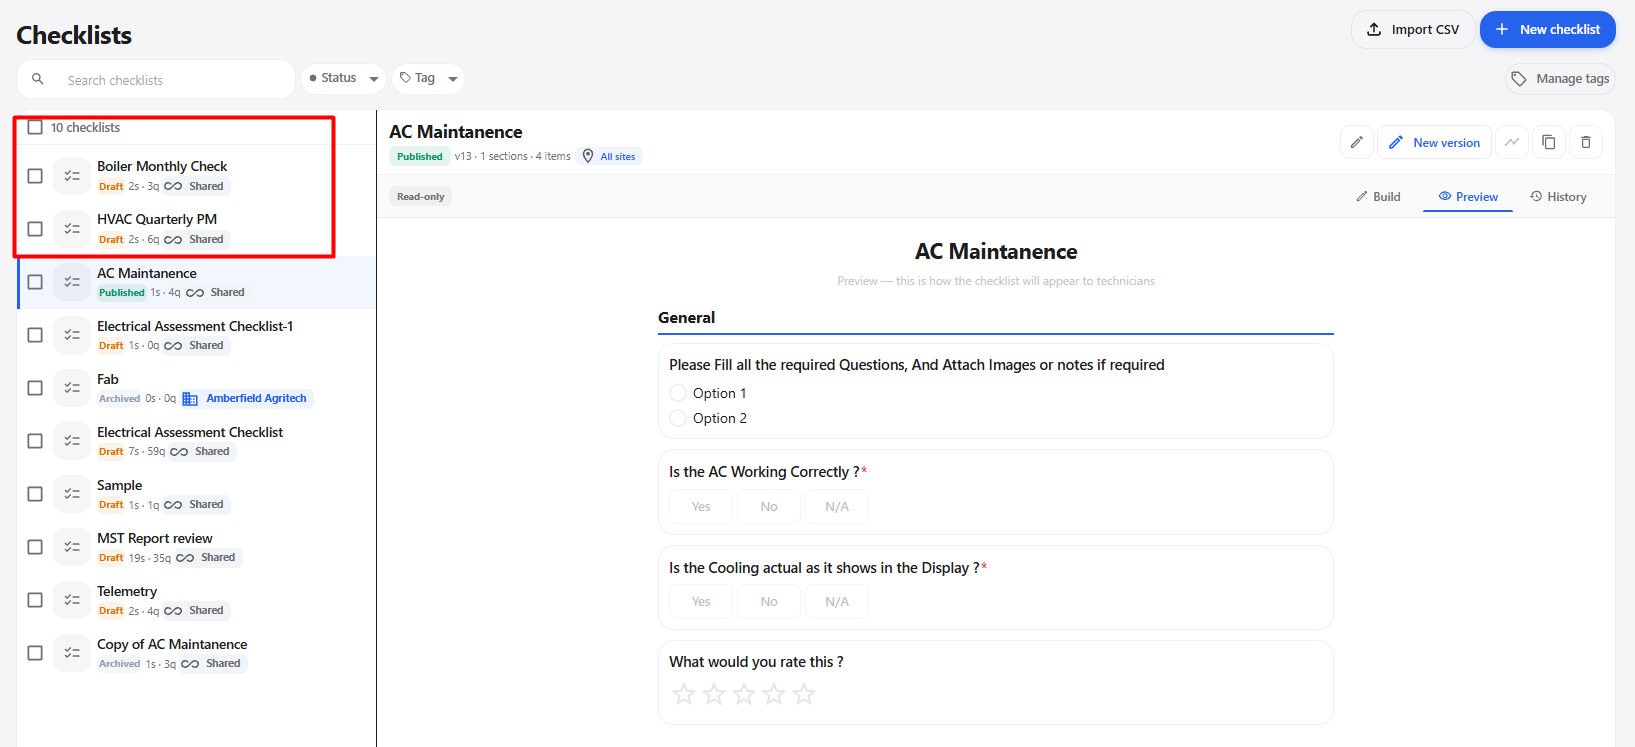
8.5 CSV Import Structure
The Import checklists pop-up displays the CSV columns required for importing checklist templates.
| CSV Column | Description |
|---|---|
| template_name | Groups rows into one checklist template. |
| template_description | Description of the checklist template. |
| section_title | Groups items into sections. |
| item_label | The question or instruction text. |
| item_type | Defines the type of checklist item, such as text, number, yes/no, pass/fail, multiple choice, checkbox, date, rating, or instruction. |
| required | Defines whether the item is required. |
| item_description | Helper text displayed below the item label. |
| options | Options used for multiple-choice or checkbox items. |
| weight | Maximum points the question is worth. |
| correct_answer | Defines the correct answer for scored questions. |
| option_points | Defines the points assigned to the available options. |
9. Checklist Management
After a checklist has been created, the user can manage the checklist using the available actions.
The main checklist management options are:
- Build
- Preview
- History
- Publish
- Duplicate
- Edit
- Delete
The user can configure the checklist, review it, view its history, duplicate it, and publish it as required.
10. Complete Checklist Workflow
The complete checklist creation and management workflow is:
Open Checklists
      ↓
      ┌─────────────────────────┐
      ↓                         ↓
+ New checklist             Import CSV
      ↓                         ↓
New Checklist              Download Template CSV
      ↓                         ↓
Enter Checklist Details     Edit CSV
      ↓                         ↓
Create checklist            Upload CSV
      ↓                         ↓
Draft                       Import
      ↓                         ↓
Add Section                 Draft
      ↓                         ↓
Add Questions               Review / Edit
      ↓                         ↓
Select Question Type        Select Checklist / Checklists
      ↓                         ↓
Configure Questions         Publish
      ↓                         ↓
Edit / Delete               Published
      ↓
Review
      ↓
Publish
      ↓
Published
10.1 Standard Checklist Workflow
+ New checklist
      ↓
New Checklist
      ↓
Enter Checklist Details
      ↓
Create checklist
      ↓
Draft
      ↓
Add Section
      ↓
Add Question
      ↓
Select Question Type
      ↓
Configure Question
      ↓
Edit / Delete if Required
      ↓
Review
      ↓
Publish
      ↓
Published
10.2 Imported Checklist Workflow
Import CSV
      ↓
Download Template CSV
      ↓
Edit CSV
      ↓
Upload CSV
      ↓
Import
      ↓
Draft
      ↓
Review / Edit
      ↓
Select Checklist / Checklists
      ↓
Publish
      ↓
Published
10.3 Checklist Management Workflow
Preview Workflow
Open Checklist
      ↓
Preview
      ↓
View Checklist
      ↓
Review Questions
History Workflow
Open Checklist
      ↓
History
      ↓
View Checklist History
      ↓
Review Changes and Activities
Duplicate Workflow
Open Checklist
      ↓
Duplicate
      ↓
Checklist Duplicated
      ↓
Edit / Configure
      ↓
Review
      ↓
Publish
11. Final Checklist Module Workflow
The complete end-to-end workflow for the Checklists module is:
Open Checklists
      ↓
      ┌───────────────────────────────┐
      ↓                               ↓
Create New Checklist              Import CSV
      ↓                               ↓
Enter Checklist Details           Download Template CSV
      ↓                               ↓
Create Checklist                  Edit CSV
      ↓                               ↓
Draft                             Upload CSV
      ↓                               ↓
Add Section                       Import
      ↓                               ↓
Add Question                      Draft
      ↓                               ↓
Select Question Type              Review / Edit
      ↓                               ↓
Configure Question                Select Checklist / Checklists
      ↓                               ↓
Edit / Delete if Required         Publish
      ↓                               ↓
Review                            Published
      ↓
Preview / History
      ↓
Publish
      ↓
Published
Final Status Flow
Create Checklist
      ↓
Draft
      ↓
Configure
      ↓
Review
      ↓
Publish
      ↓
Published
Final CSV Flow
Import CSV
      ↓
Download Template
      ↓
Edit CSV
      ↓
Upload CSV
      ↓
Import
      ↓
Draft
      ↓
Review / Edit
      ↓
Publish One or More Checklists
      ↓
Published