

Inventory
Inventory Module
The Inventory module allows users to view, search, filter, and manage inventory parts and their stock status. Users can create new parts, view part details, reorder parts from vendors, and import multiple parts using a CSV file.
1. Inventory Overview
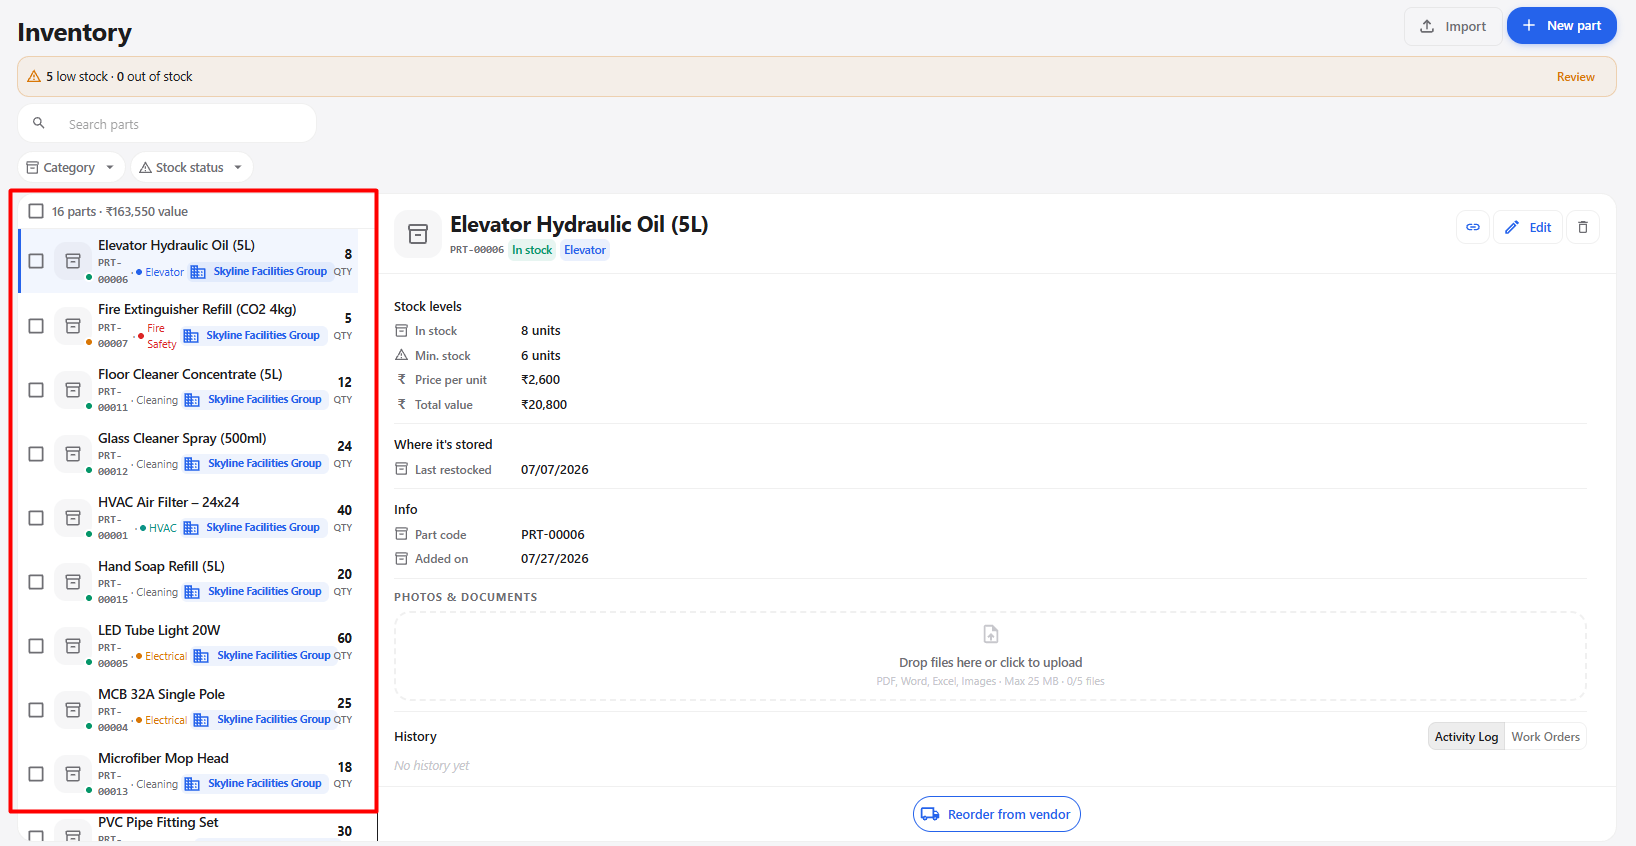
The Inventory page displays the available inventory parts along with their current stock information.
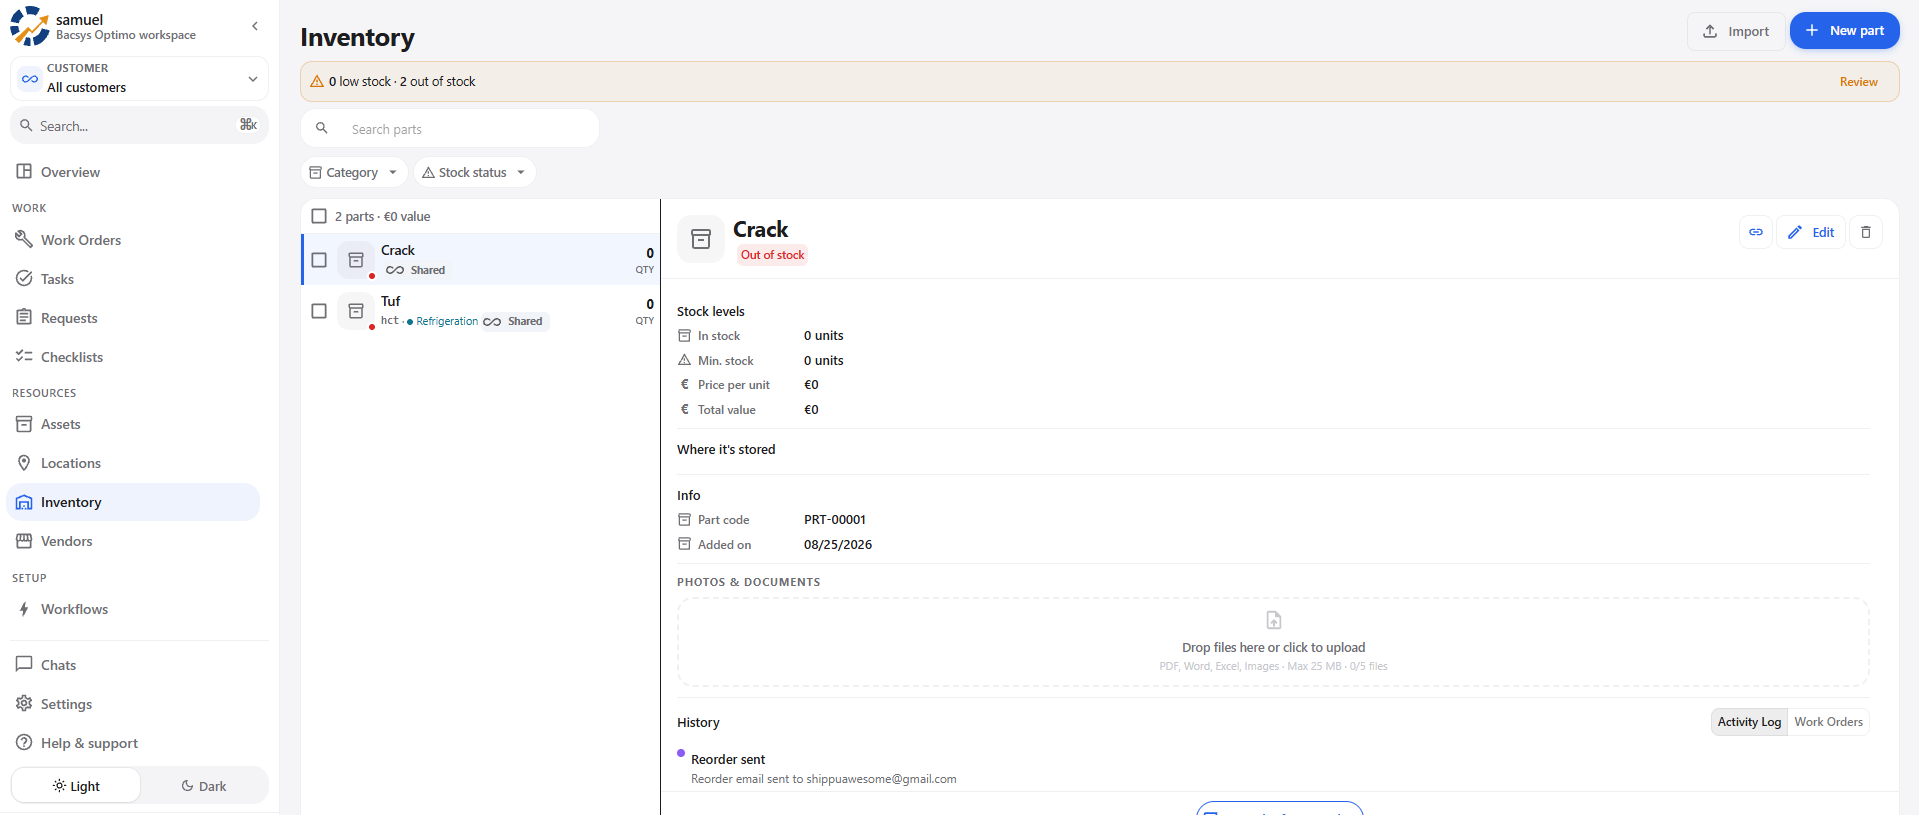
Inventory Page Options
| Option | Description |
|---|---|
| Import | Allows users to import multiple inventory parts using a CSV file. |
| New part | Allows users to create a new inventory part. |
| Low stock / Out of stock | Displays an alert when parts have low or zero stock. |
| Review | Allows users to review parts identified by the stock alert. |
| Search parts | Allows users to search for a specific inventory part. |
| Category | Allows users to filter parts based on their category. |
| Stock status | Allows users to filter parts based on their current stock status. |
| Part List | Displays the available inventory parts. |
2. Inventory Stock Alert
The inventory page displays a stock alert when one or more parts require attention.
Stock Alert Options
| Option | Description |
|---|---|
| Low stock | Indicates that one or more parts have reached the configured minimum stock level. |
| Out of stock | Indicates that one or more parts have zero available quantity. |
| Review | Allows users to review the parts associated with the stock alert. |
Steps
- Open the Inventory module.
- Review the stock alert displayed at the top of the page.
- Click Review to view the affected parts.
- Review the parts with low or zero stock.
3. Search Parts
The Search parts option allows users to quickly find a specific inventory part.
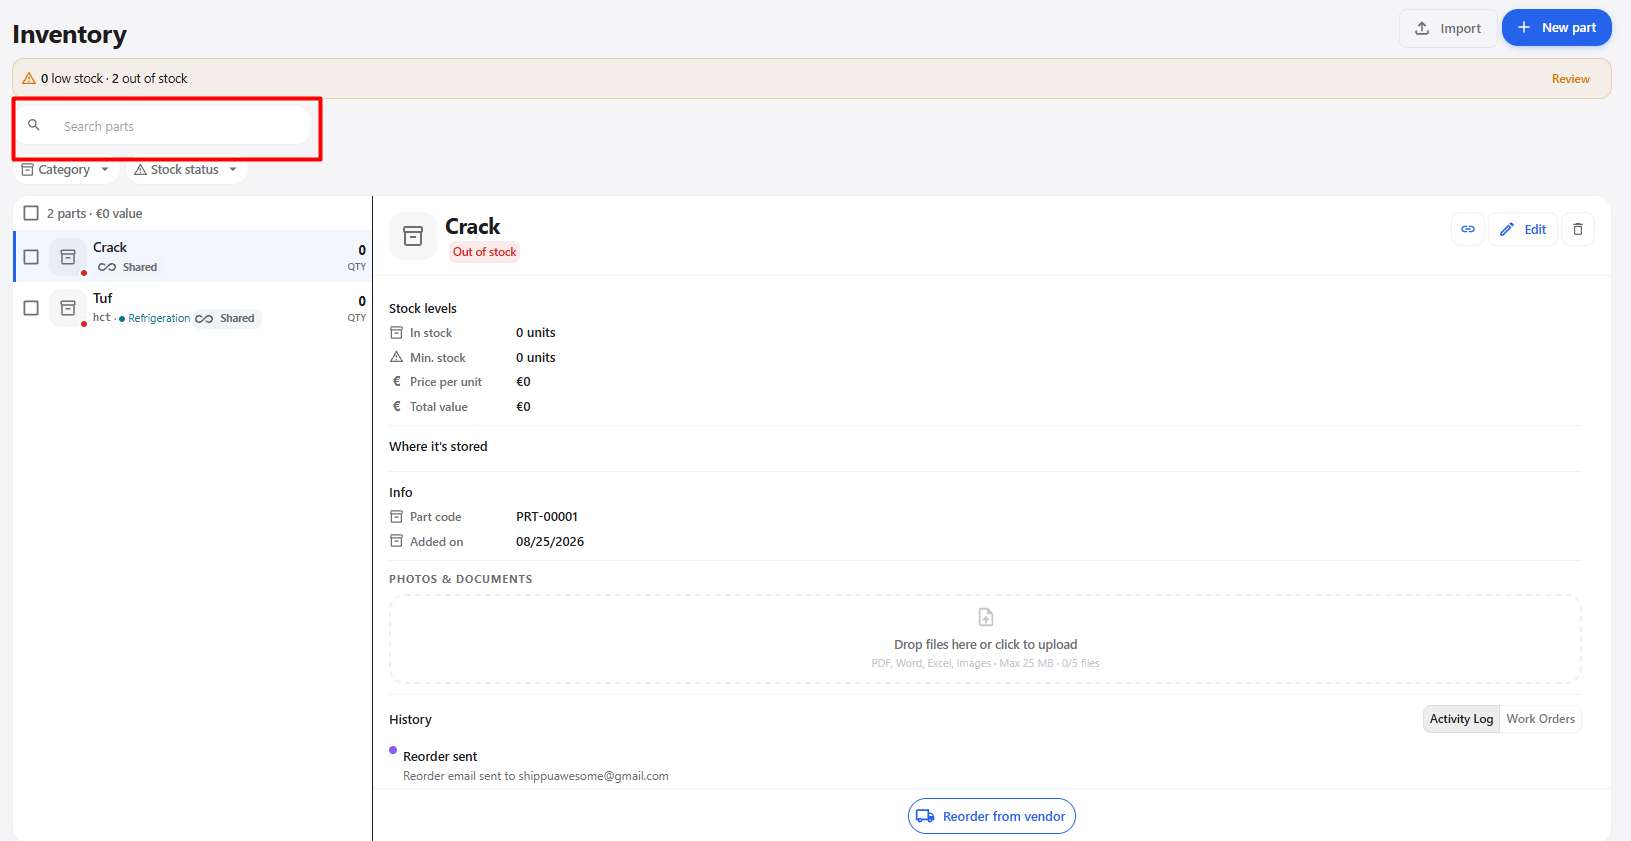
Steps
- Open the Inventory module.
- Click the Search parts field.
- Enter the part name or relevant search information.
- The inventory list displays the matching parts.
Search Field
| Field | Description |
|---|---|
| Search parts | Enter the name or relevant information of the part to search the inventory. |
4. Filter Parts by Category
The Category filter allows users to display parts based on their category.
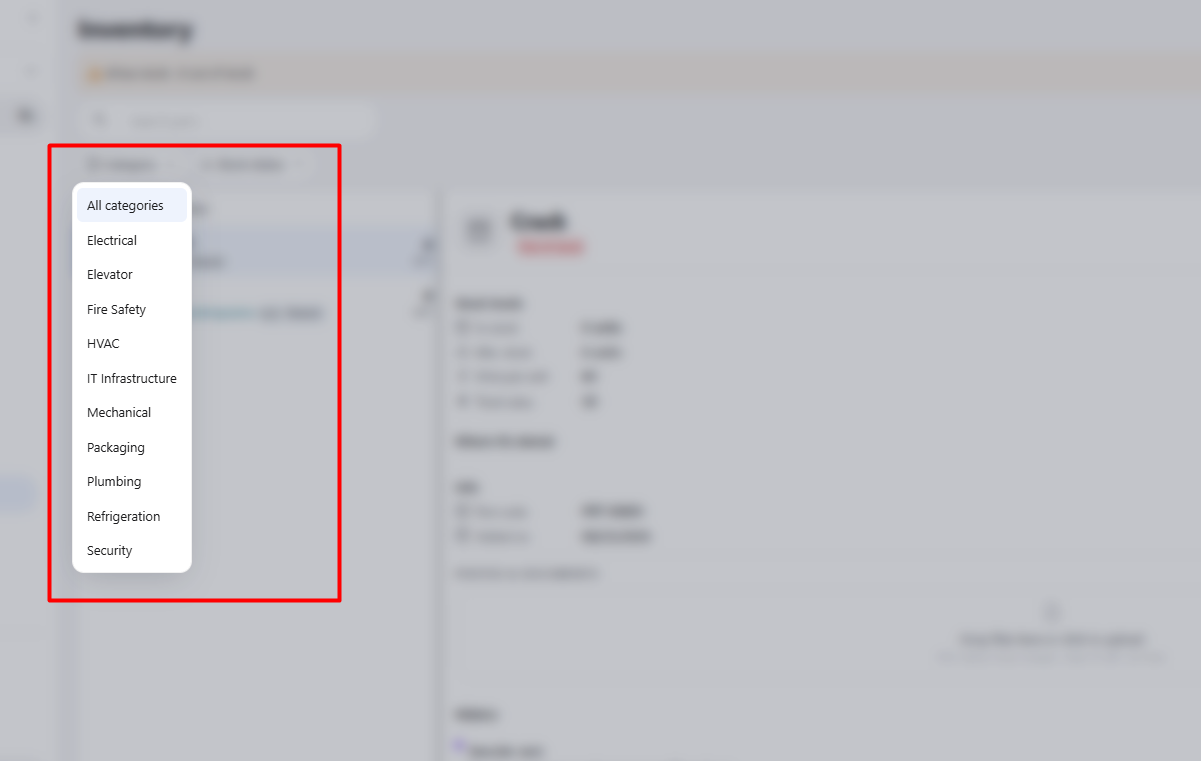
Steps
- Open the Inventory module.
- Click Category.
- The category dropdown is displayed.
- Select the required category.
- The inventory list is filtered based on the selected category.
Category Options
| Category | Description |
|---|---|
| All categories | Displays parts from all available categories. |
| Electrical | Displays parts categorized under Electrical. |
| Elevator | Displays parts categorized under Elevator. |
| Fire Safety | Displays parts categorized under Fire Safety. |
| HVAC | Displays parts categorized under HVAC. |
| IT Infrastructure | Displays parts categorized under IT Infrastructure. |
| Mechanical | Displays parts categorized under Mechanical. |
| Packaging | Displays parts categorized under Packaging. |
| Plumbing | Displays parts categorized under Plumbing. |
| Refrigeration | Displays parts categorized under Refrigeration. |
| Security | Displays parts categorized under Security. |
5. Filter Parts by Stock Status
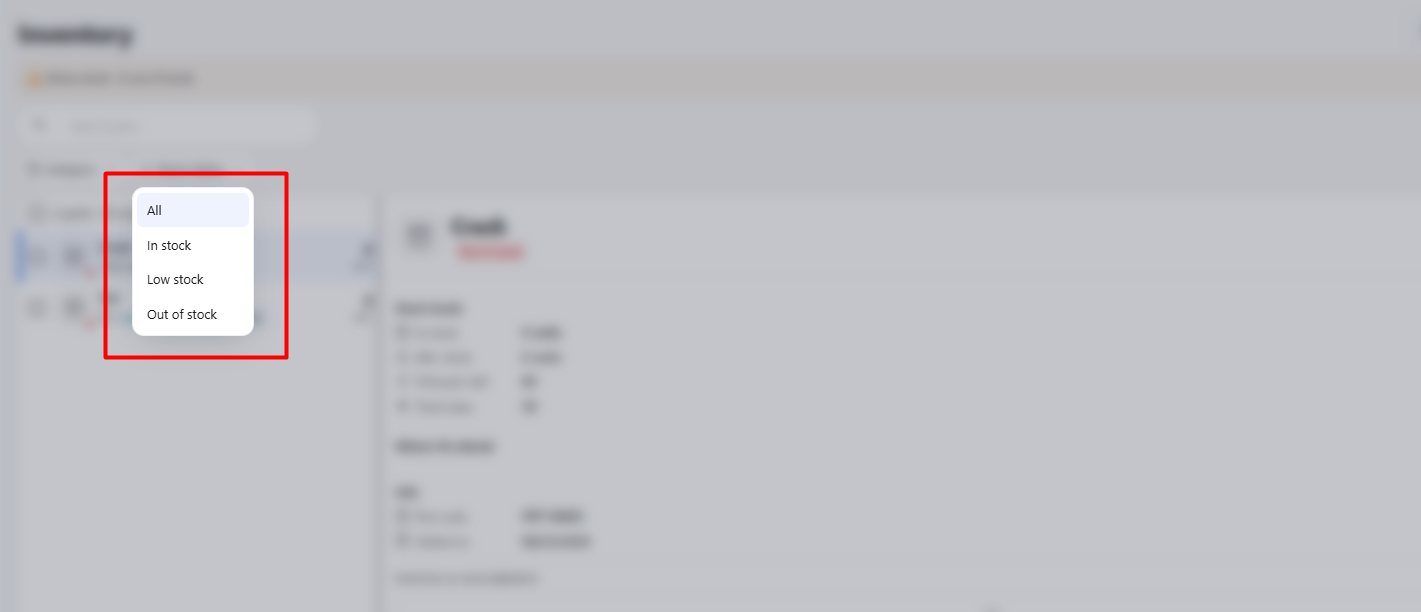
The Stock status filter allows users to display parts according to their current stock availability.
Stock Status Options
| Stock Status | Description |
|---|---|
| All | Displays parts with all stock statuses. |
| In stock | Displays parts that currently have available stock. |
| Low stock | Displays parts whose stock has reached the low-stock level. |
| Out of stock | Displays parts with zero available stock. |
Steps
- Open the Inventory module.
- Click Stock status.
- The stock status dropdown is displayed.
- Select the required stock status.
- The inventory list is filtered according to the selected status.
6. Create a New Part
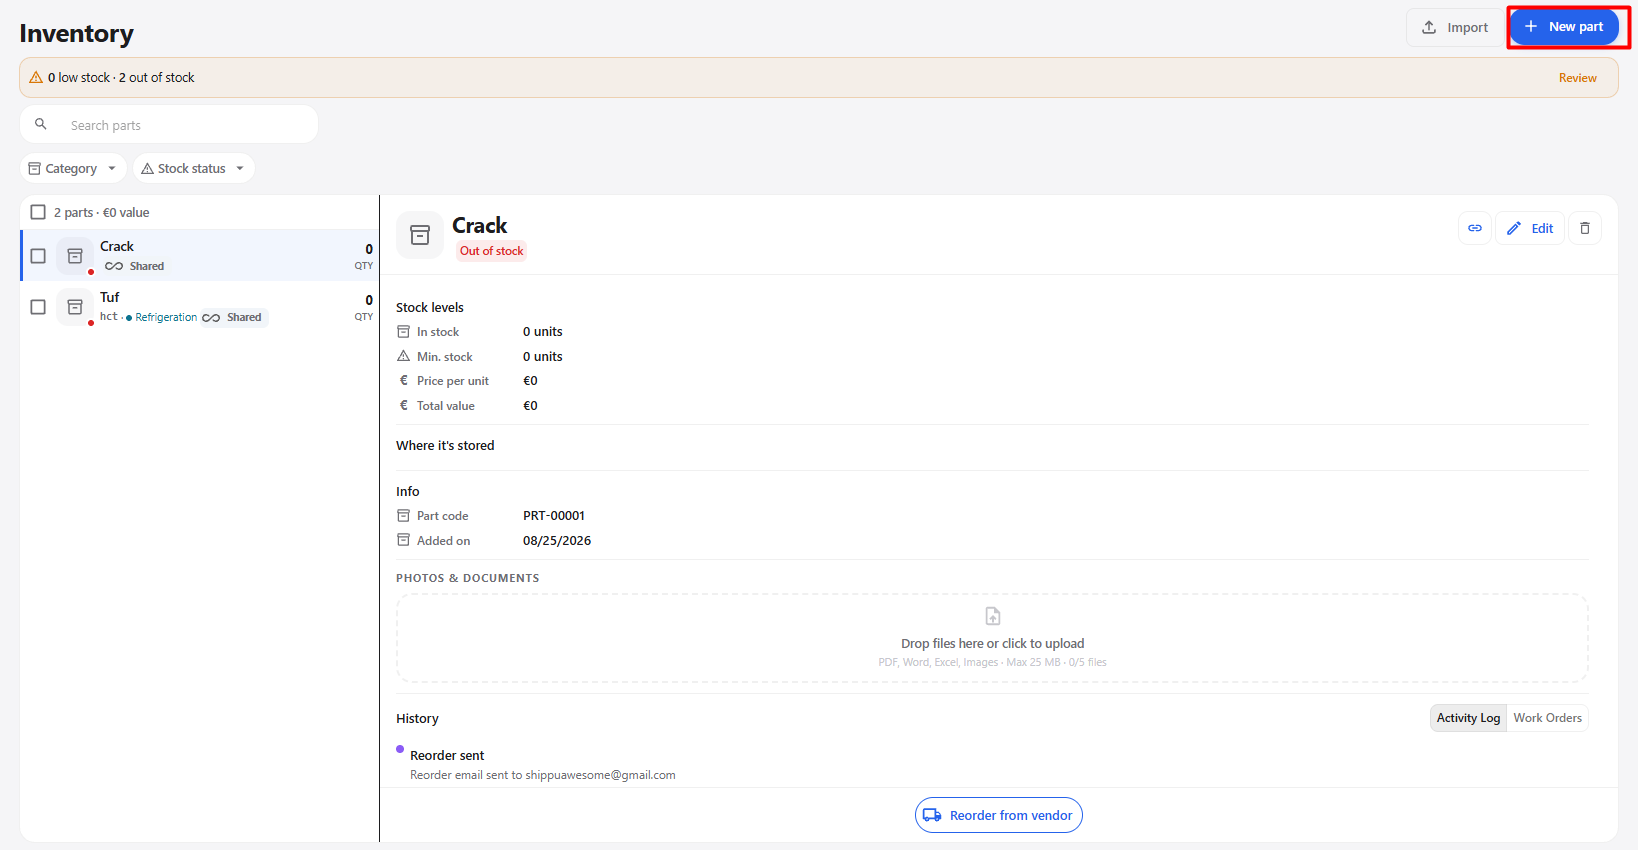
The New part option allows users to create a new inventory part.
Steps
- Open the Inventory module.
- Click New part.
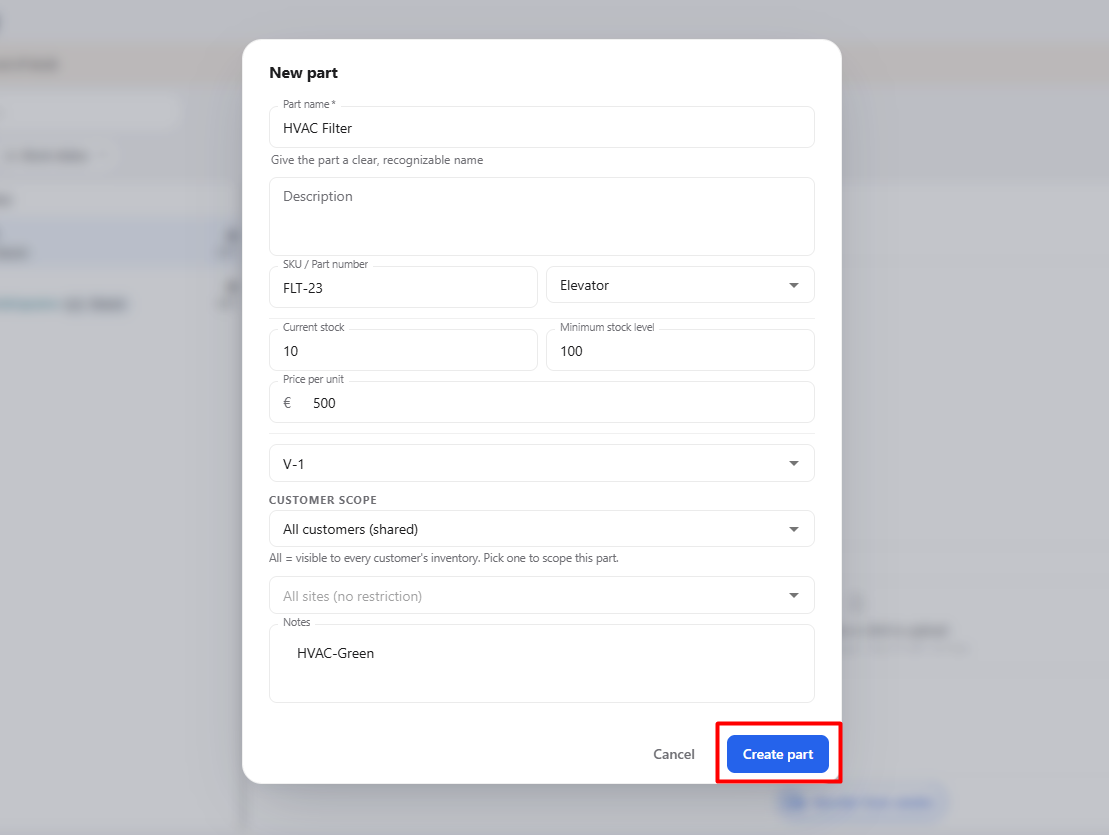
- The New part pop-up is displayed.
- Enter the required part information.
- Review the entered information.
- Click Create part.
- The part is created and added to the Inventory list.
New Part Fields
| Field | Description |
|---|---|
| Part name* | Enter a clear and recognizable name for the part. This field is mandatory. |
| Description | Enter additional information about the part. |
| SKU / Part number | Enter the SKU or part number associated with the part. |
| Select category | Select the appropriate category for the part. |
| Current stock | Enter the current quantity available for the part. |
| Minimum stock level | Specify the minimum quantity that should be maintained for the part. |
| Price per unit | Enter the price for one unit of the part. |
| Select supplier / vendor | Select the supplier or vendor associated with the part. |
| Customer scope | Select the customers for whom the part should be available. The default option is All customers (shared). |
| Sites | Select the sites where the part should be available. The default option is All sites (no restriction). |
| Notes | Enter any additional information about the part. |
| Cancel | Closes the pop-up without creating the part. |
| Create part | Creates the part using the entered information. |
7. View Part Details
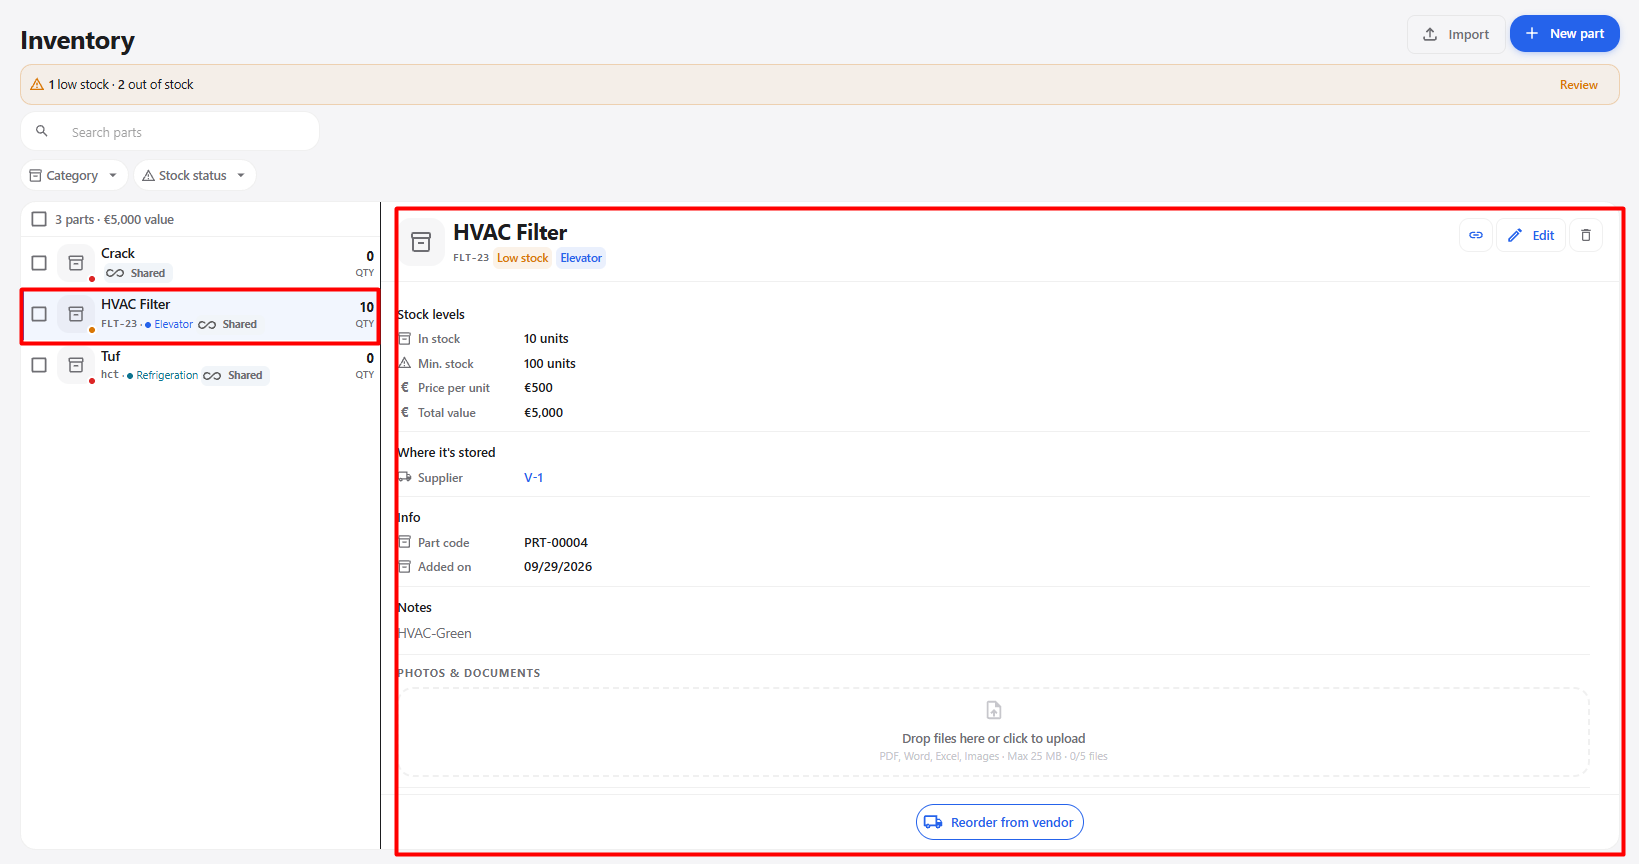
After a part is created, it is saved and displayed in the Inventory list.
Steps
- Open the Inventory module.
- Select the required part from the inventory list.
- The part details are displayed.
- Review the available part, stock, supplier, attachment, and history information.
Part Details
| Section | Field | Description |
|---|---|---|
| Part Information | Part Name | Displays the name of the selected part. |
| Part Information | Part Code | Displays the unique code assigned to the part. |
| Part Information | Category | Displays the category associated with the part. |
| Part Information | Stock Status | Displays the current stock status, such as Low stock. |
| Stock Levels | In stock | Displays the current quantity available for the part. |
| Stock Levels | Min. stock | Displays the configured minimum stock level. |
| Stock Levels | Price per unit | Displays the price of one unit of the part. |
| Stock Levels | Total value | Displays the total value of the available stock. |
| Where it's stored | Supplier | Displays the supplier or vendor associated with the part. |
| Info | Part code | Displays the unique part code. |
| Info | Added on | Displays the date on which the part was added to the inventory. |
| Notes | Notes | Displays additional information entered for the part. |
| Photos & Documents | Attachments | Allows users to upload supporting documents or images for the part. |
| History | Activity Log | Displays activities and inventory changes associated with the selected part. |
| History | Work Orders | Displays work orders associated with the selected part. |
| Reorder | Reorder from vendor | Allows the user to initiate a reorder from the associated vendor. |
8. Copy Link
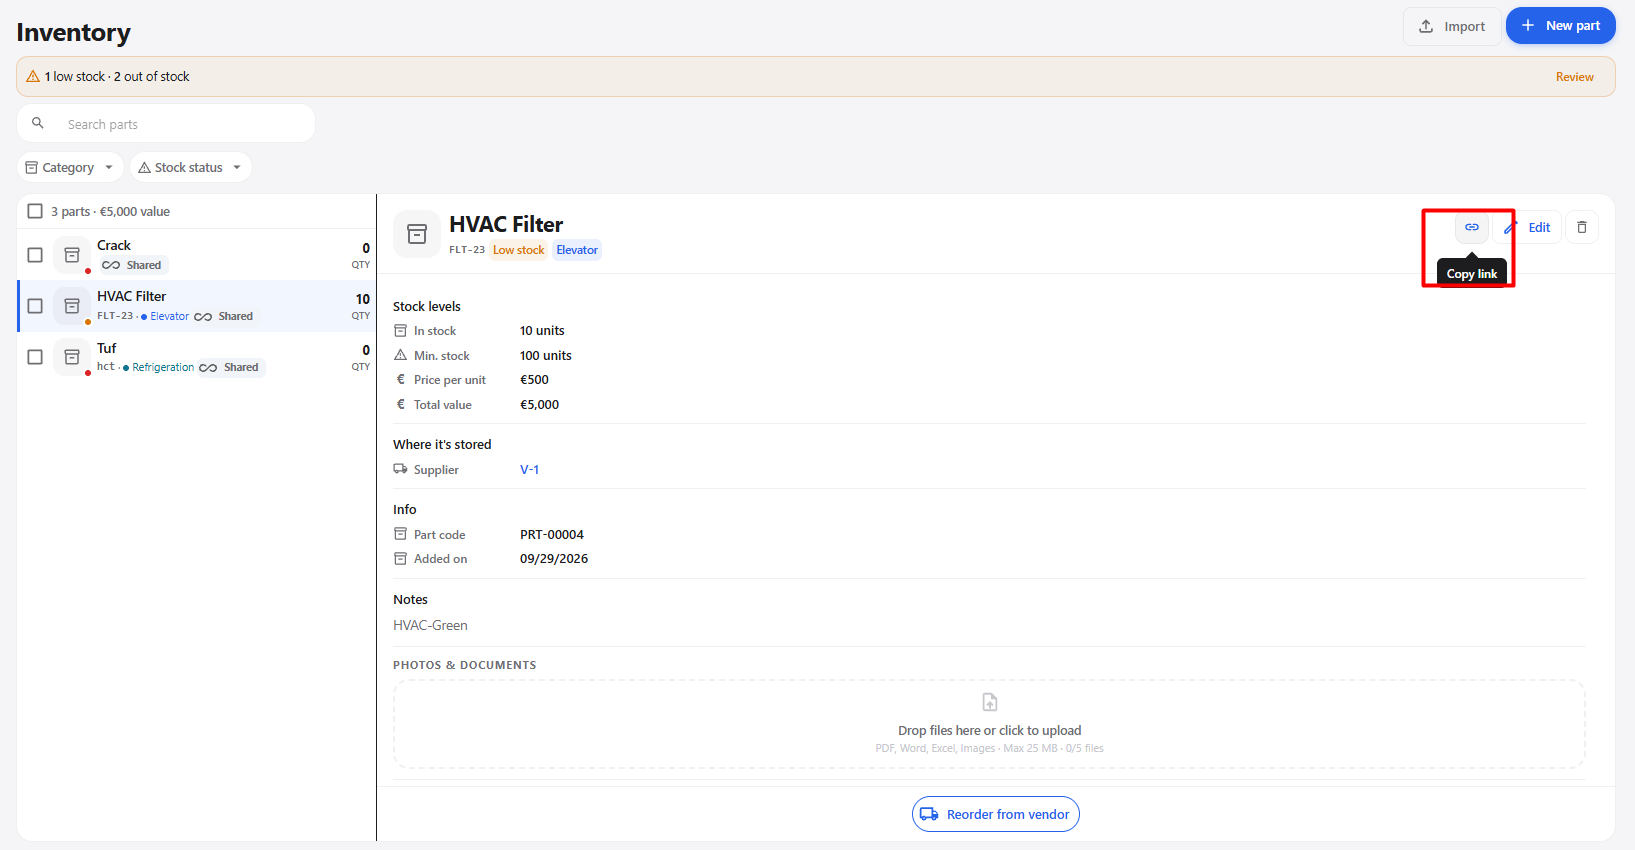
The Copy Link option allows users to copy the link of the selected inventory part.
Steps
- Open the Inventory module.
- Select the required part.
- The part details page is displayed.
- Click the Copy Link icon at the top of the part details page.
- The link of the selected part is copied.
- The copied link can be shared or opened as required.
9. Edit Part
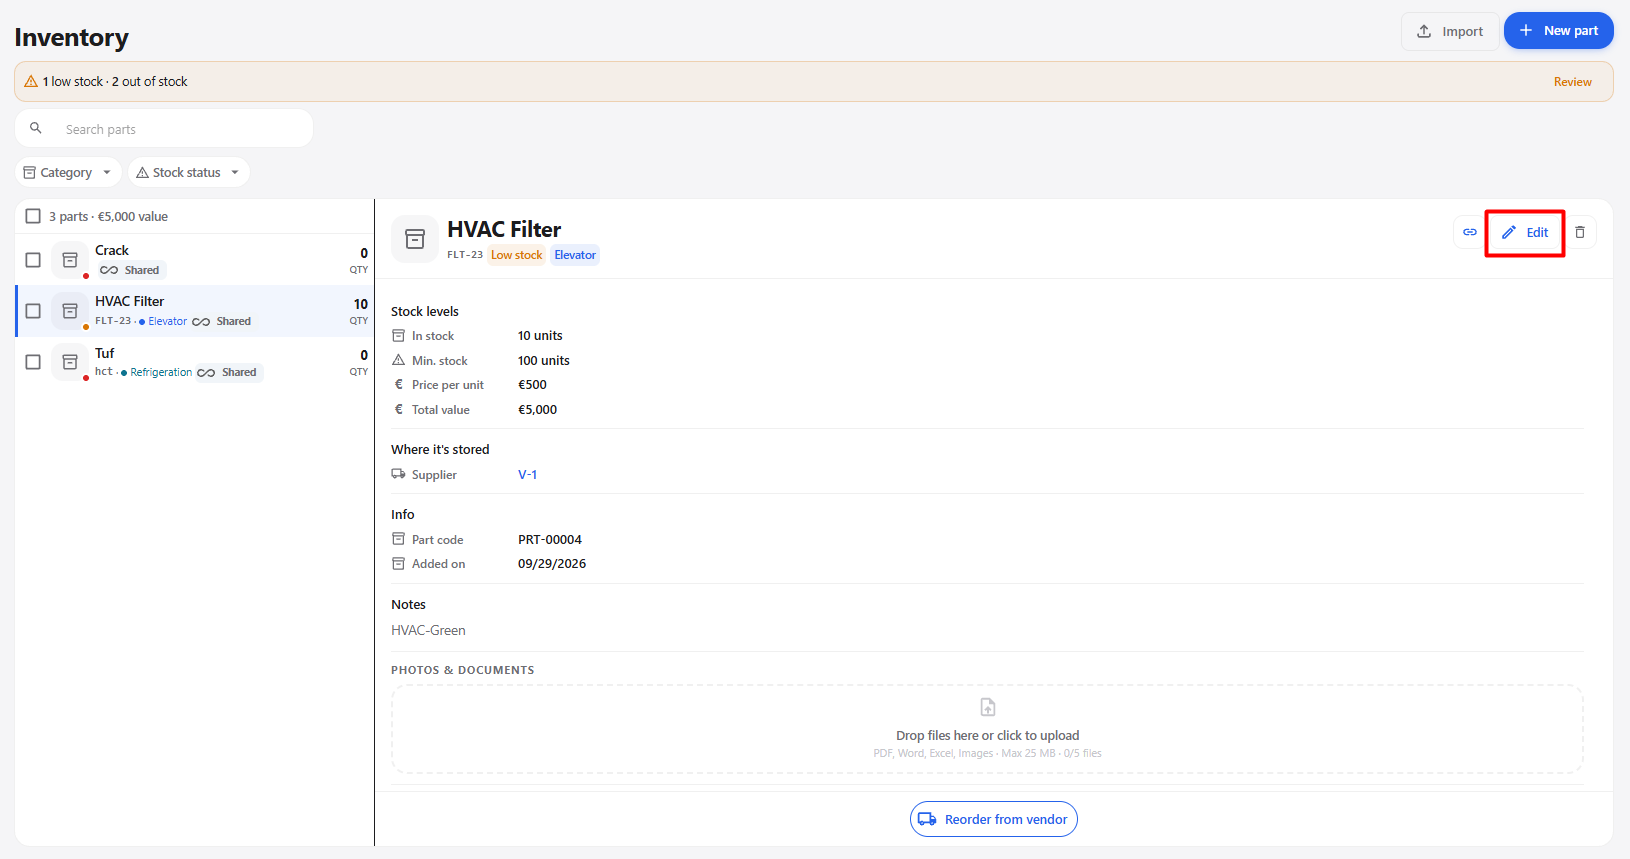
The Edit option allows users to modify the information of an existing inventory part.
Steps
- Open the Inventory module.
- Select the required part.
- The part details page is displayed.
- Click Edit.
- Update the required part information.
- Review the updated information.
- Save the changes.
- The updated part information is displayed in the inventory.
10. Delete Part
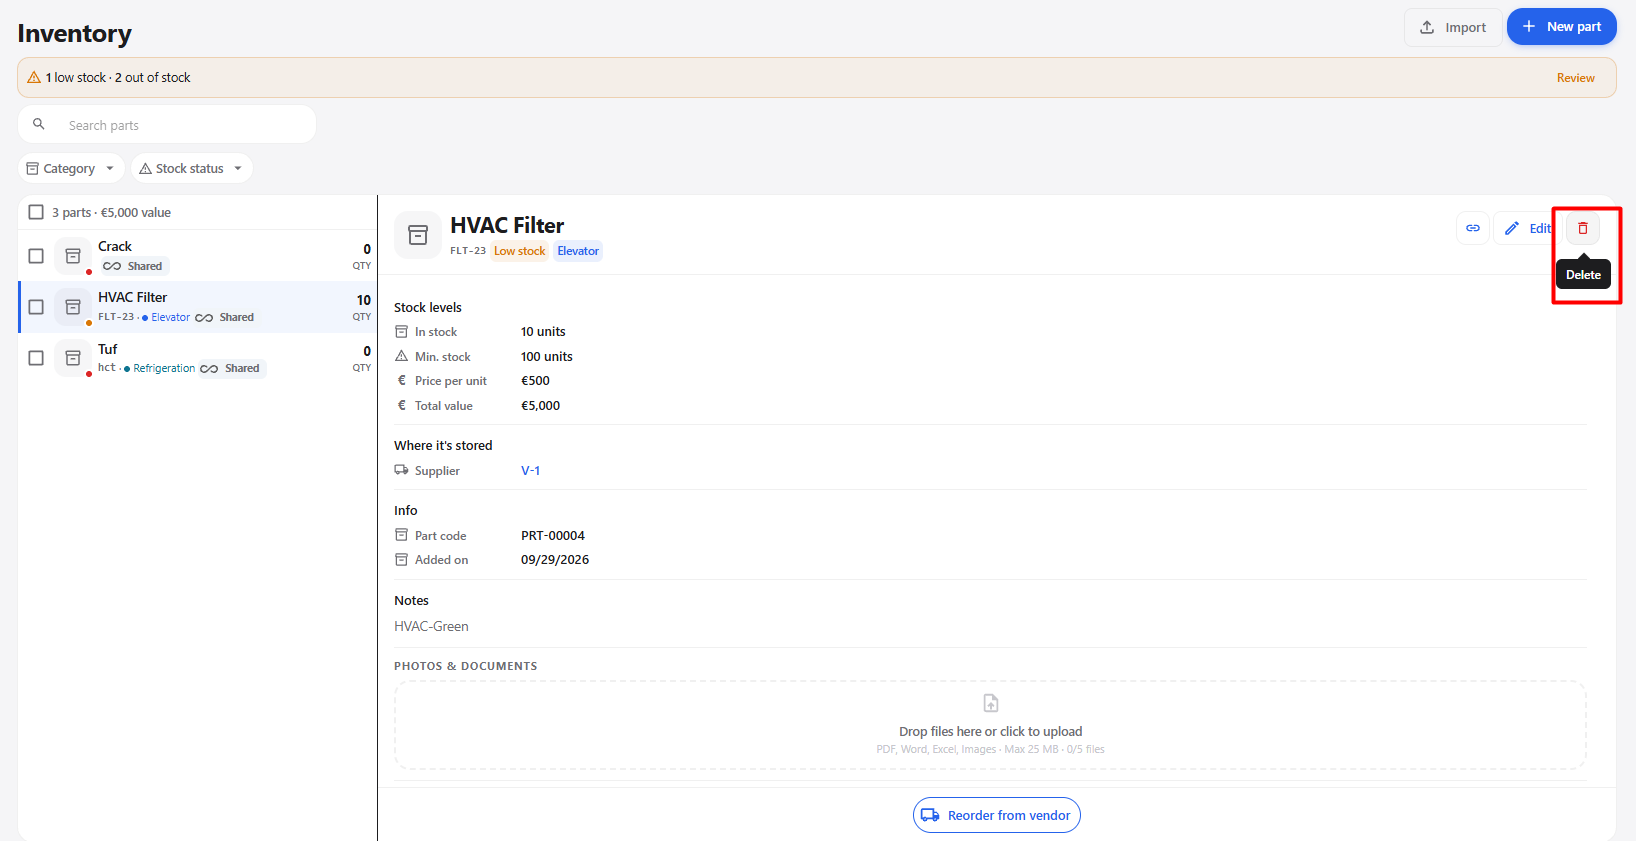
The Delete option allows users to remove the selected part from the inventory.
Steps
- Open the Inventory module.
- Select the required part.
- The part details page is displayed.
- Click the Delete icon.
- A confirmation message may be displayed.
- Confirm the deletion.
- The selected part is removed from the inventory.
11. Reorder from Vendor
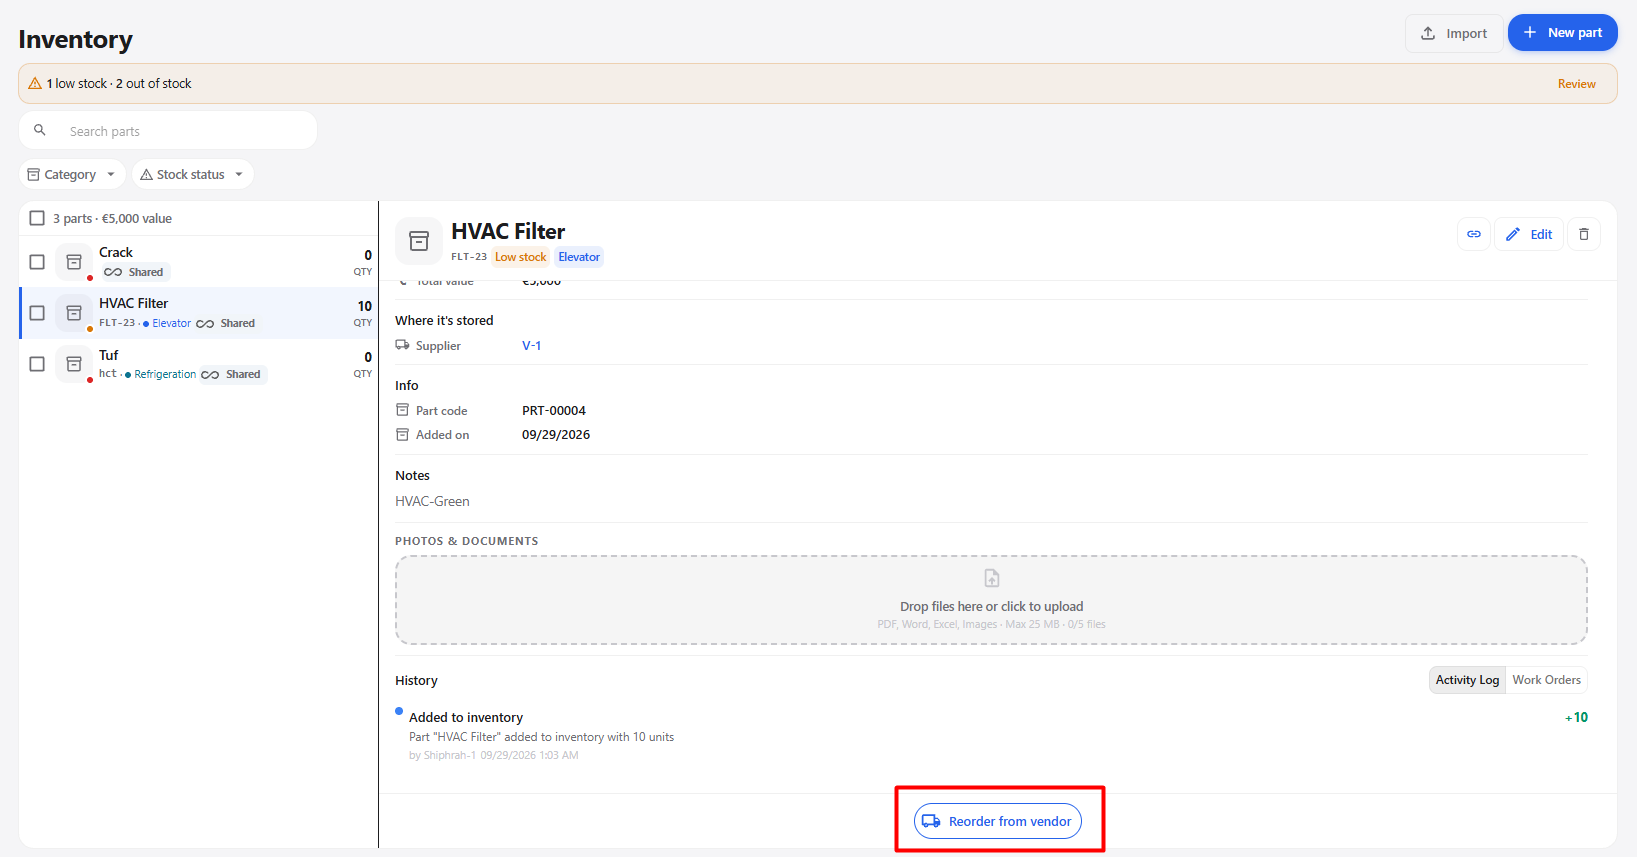
The Reorder from vendor option allows users to send a reorder request for the selected part to the associated vendor.
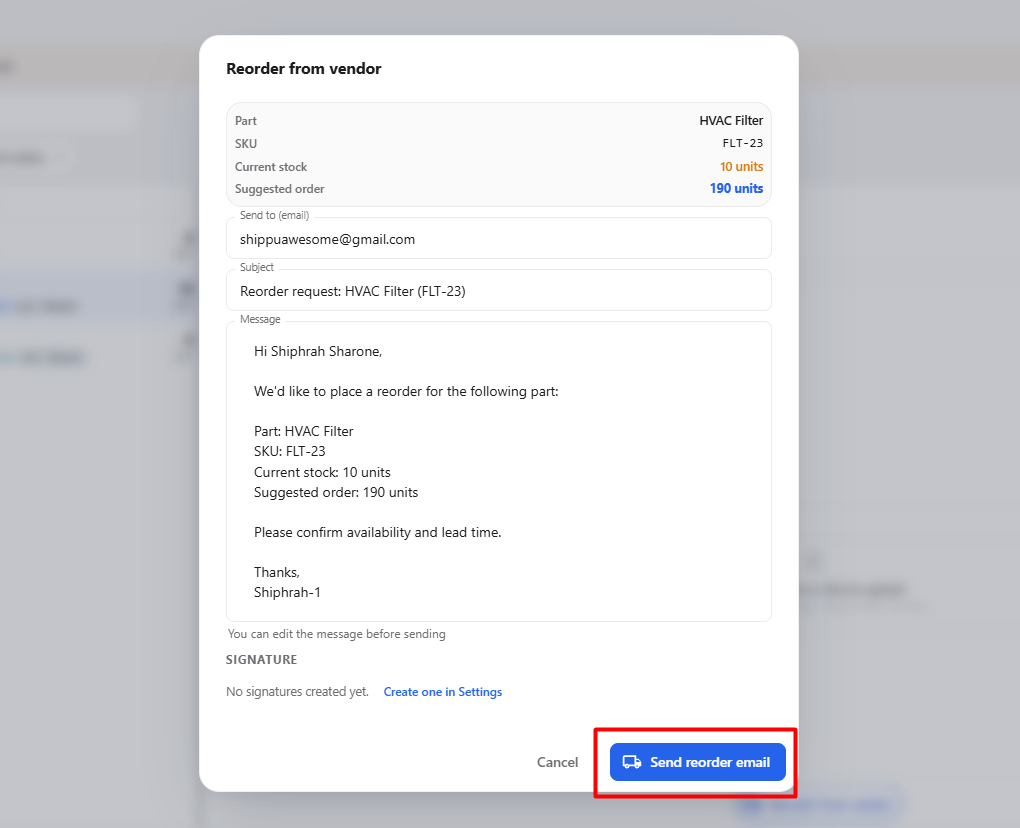
The Reorder from vendor pop-up displays the current part and reorder information.
Reorder Information
| Field | Description |
|---|---|
| Part | Displays the name of the part that needs to be reordered. |
| SKU | Displays the SKU or part number of the selected part. |
| Current stock | Displays the current quantity available in inventory. |
| Suggested order | Displays the suggested quantity to reorder. |
| Send to (email) | Specifies the email address where the reorder request will be sent. |
| Subject | Displays the subject of the reorder email. |
| Message | Displays the reorder request message. The message can be edited before sending. |
| Signature | Displays the available signature information. |
| Cancel | Closes the pop-up without sending the reorder request. |
| Send reorder email | Sends the reorder request to the specified email address. |
Steps
- Open the Inventory module.
- Select the required part.
- The part details are displayed.
- Click Reorder from vendor.
- The Reorder from vendor pop-up is displayed.
- Review the Part, SKU, Current stock, and Suggested order information.
- Enter or verify the Send to (email) address.
- Review the Subject.
- Review or edit the Message as required.
- Review the Signature information.
- Click Send reorder email.
- The reorder request is sent to the specified email address.
12. Import CSV
The Import option allows users to add multiple inventory parts using a CSV file.
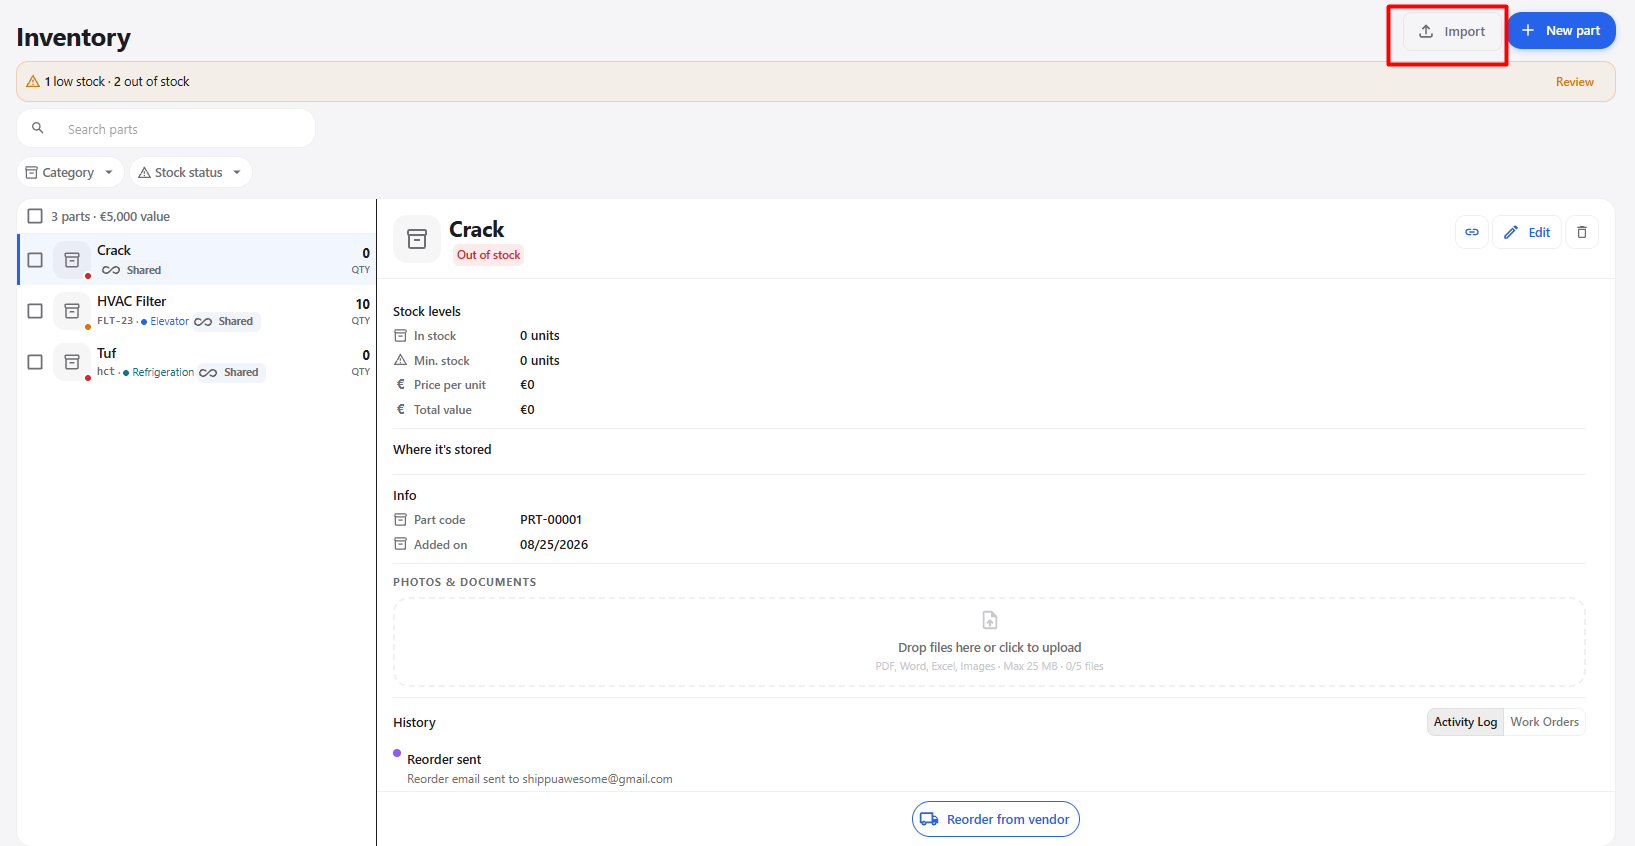
Steps
- Open the Inventory module.
- Click Import.
- The Import pop-up is displayed.
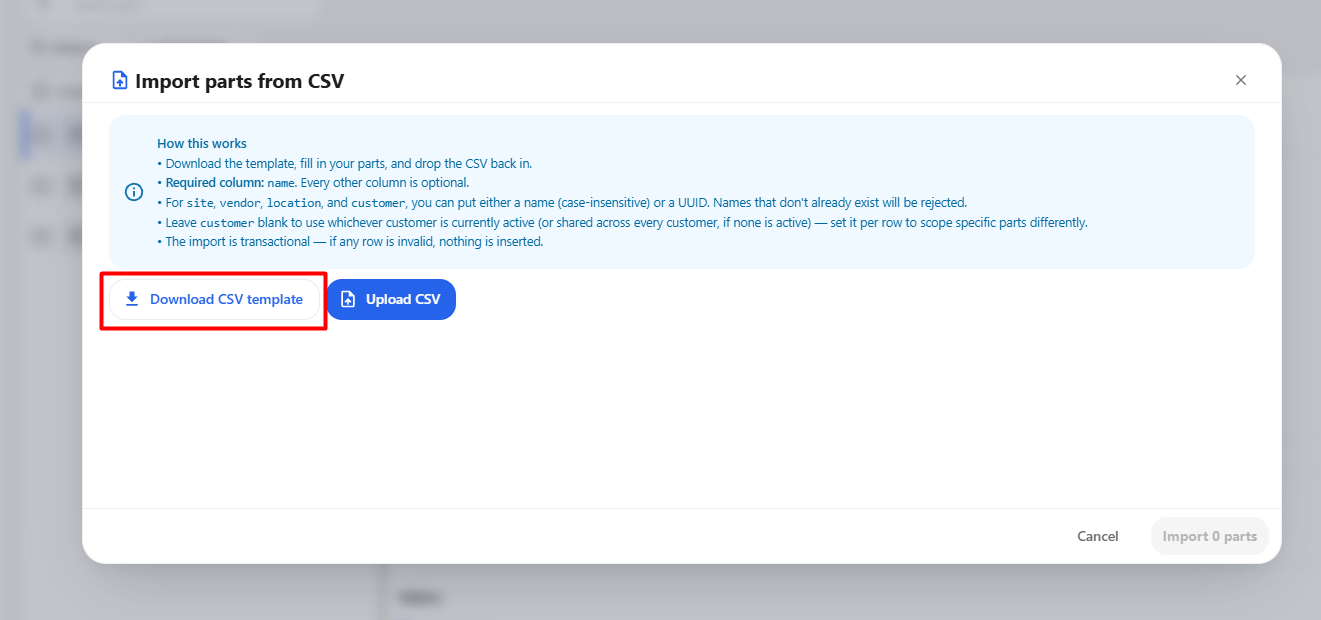
- Click Download template.
- The sample CSV template is downloaded.
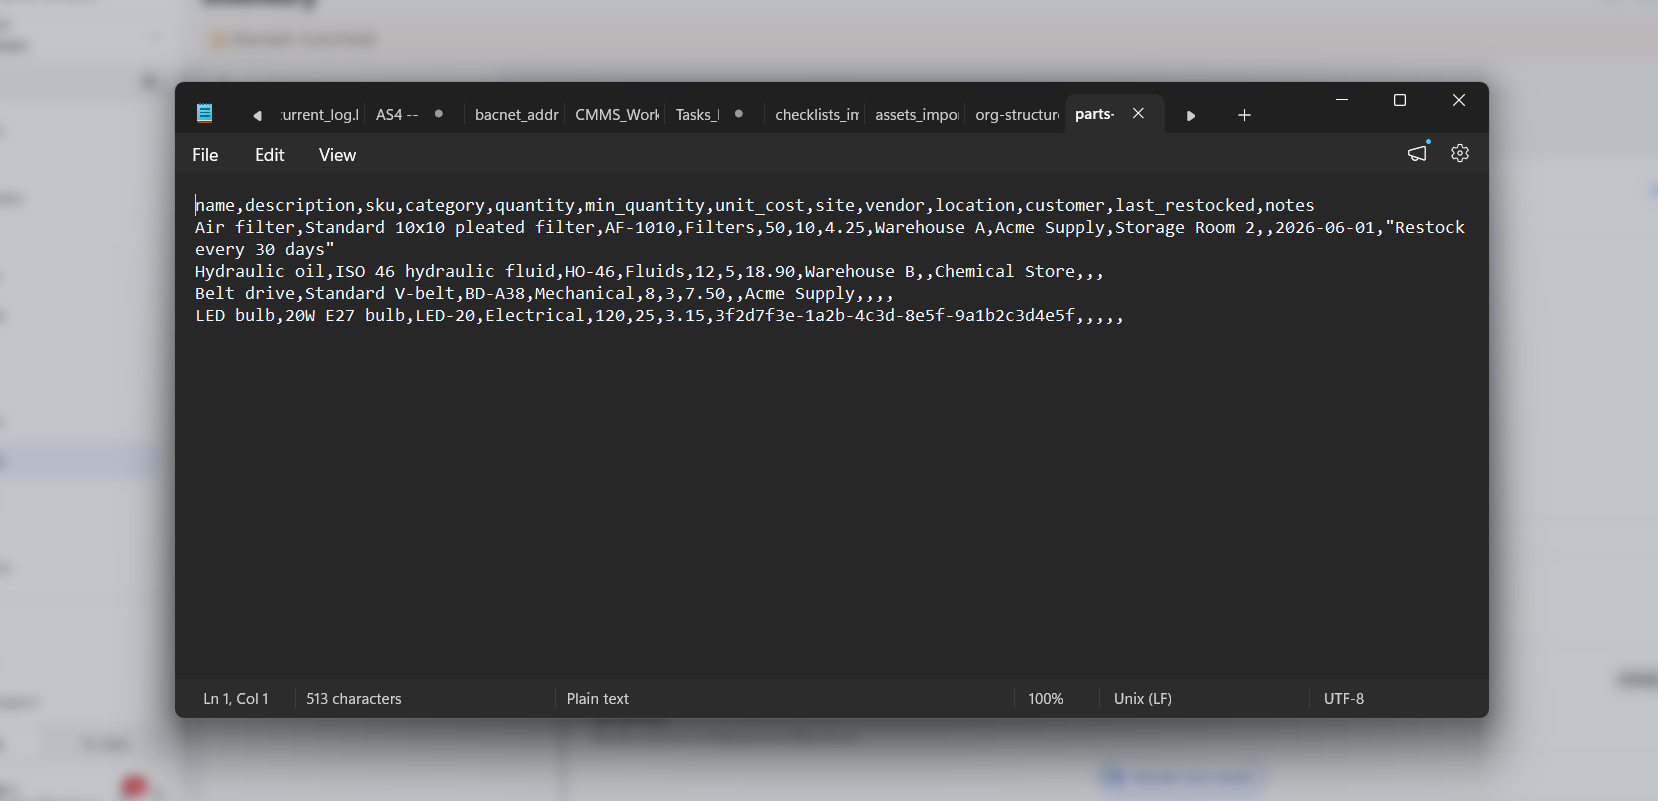
- Open the downloaded CSV file.
- Add or update the required inventory part information.
- Save the modified CSV file.
- Return to the Import pop-up.
- Click the option to upload the CSV file.
- Select the prepared CSV file from your computer.
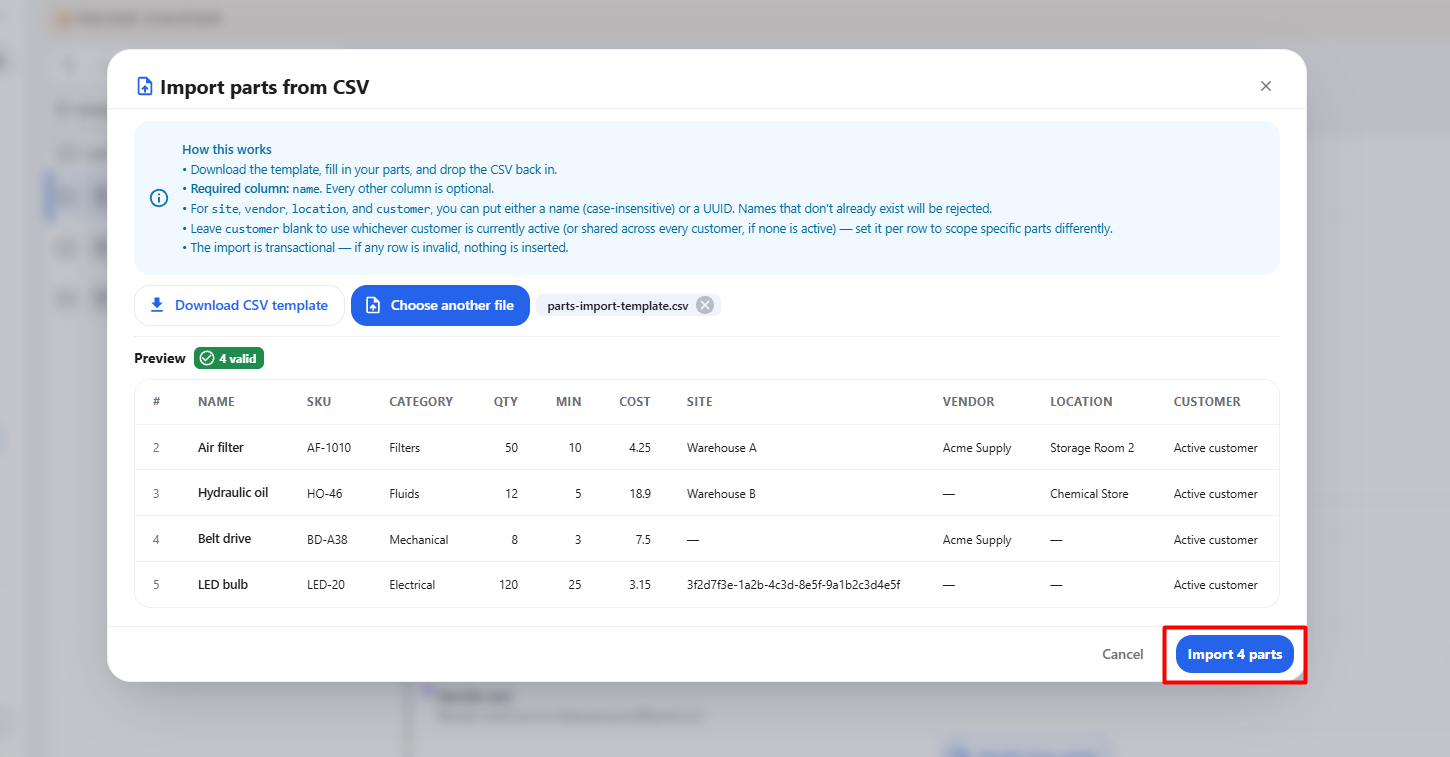
- The system reads the inventory information from the uploaded CSV file.
- Review the uploaded information.
- Continue with the import process.
- The inventory parts from the CSV file are added to the Inventory list.
13. Complete Inventory Workflow
The complete Inventory module workflow is as follows:
Open Inventory
      ↓
View Inventory Parts
      ↓
Search / Filter Parts
      ↓
┌─────────────────────────────┐
│                                               │
│  Create New Part                              │
│       ↓                                       │
│  Enter Part Information                       │
│       ↓                                       │
│  Click Create part                            │
│       ↓                                       │
│  Part Added to Inventory                      │
│                                               │
└─────────────────────────────┘
      ↓
Select Part
      ↓
View Part Details
      ↓
┌─────────────────────────────┐
│                                               │
│  Copy Link                                    │
│       ↓                                       │
│  Copy Part Link                               │
│                                               │
│  Edit                                         │
│       ↓                                       │
│  Update Part Information                      │
│       ↓                                       │
│  Save Changes                                 │
│                                               │
│  Delete                                       │
│       ↓                                       │
│  Confirm Deletion                             │
│       ↓                                       │
│  Part Removed                                 │
│                                               │
│  Reorder from vendor                          │
│       ↓                                       │
│  Review Reorder Information                   │
│       ↓                                       │
│  Enter / Verify Email                         │
│       ↓                                       │
│  Review Message                               │
│       ↓                                       │
│  Send reorder email                           │
│                                               │
└──────────────────────────────┘
      ↓
Import Multiple Parts
      ↓
Click Import
      ↓
Download Template
      ↓
Edit CSV
      ↓
Upload CSV
      ↓
Review Uploaded Information
      ↓
Import Parts
      ↓
Parts Added to Inventory