

People
People Module
The People module is used to manage users, teams, and invitations within the application.
The People module contains three main sections:
- Members
- Teams
- Invites
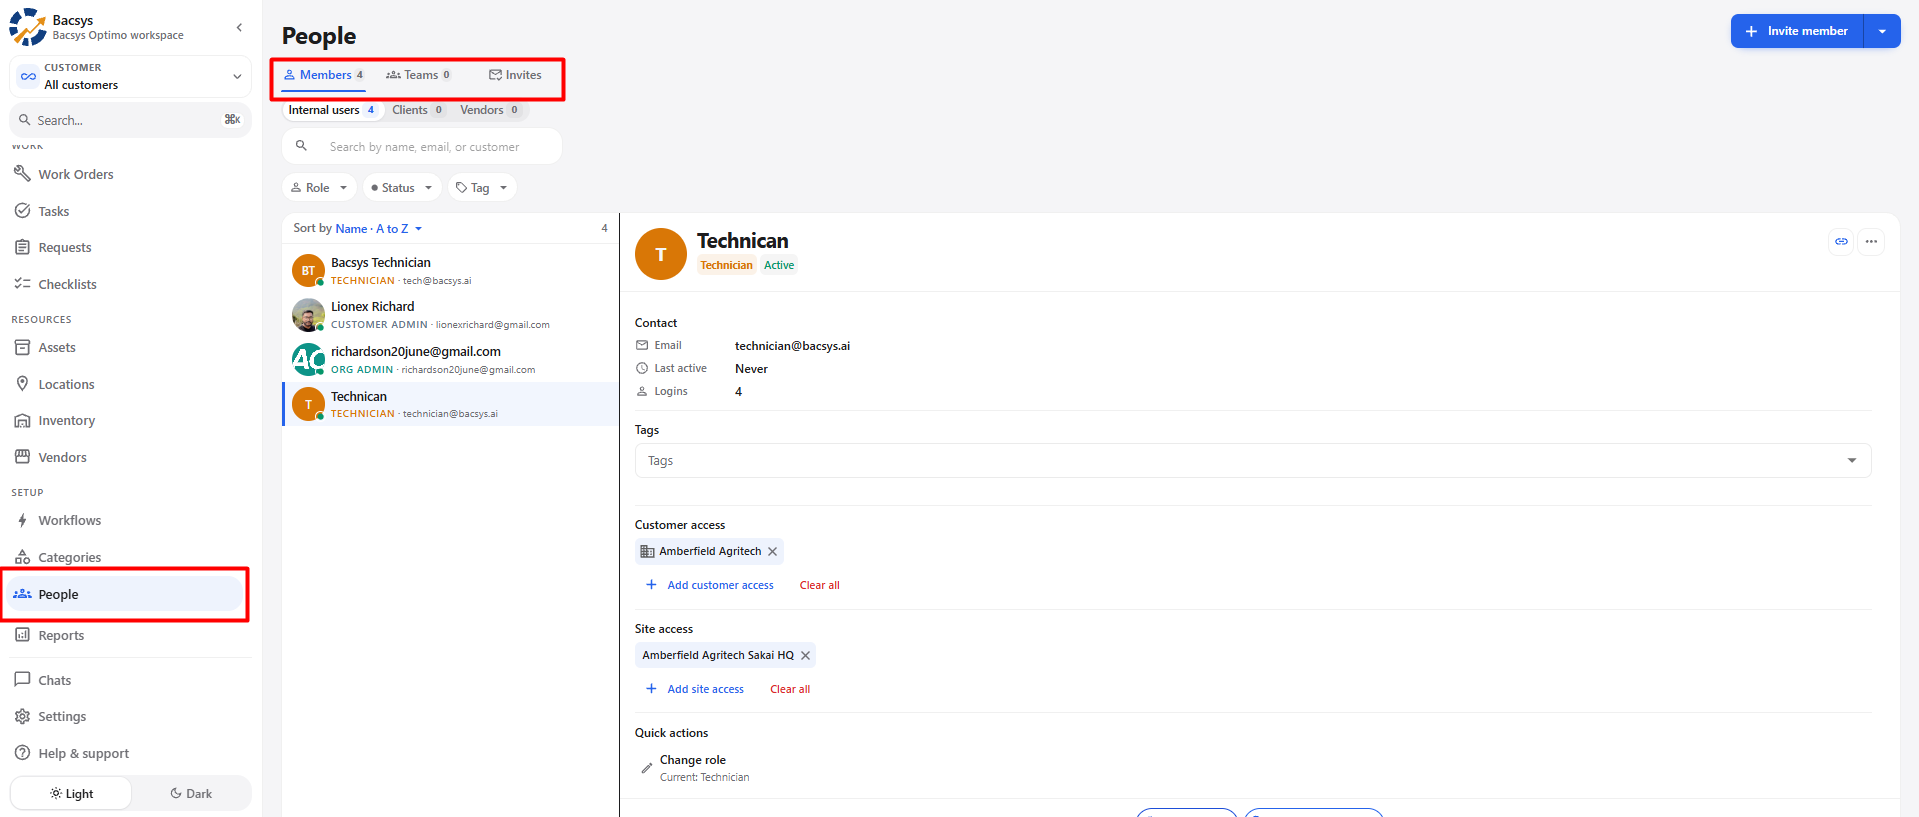
1. People Overview
| Section | Description |
|---|---|
| Members | Displays users available in the system, including internal users, clients, and vendors. |
| Teams | Displays teams created for assigning work together. |
| Invites | Displays invitations sent to users who have not yet completed their access setup. |
2. Members
The Members section displays users available in the system.
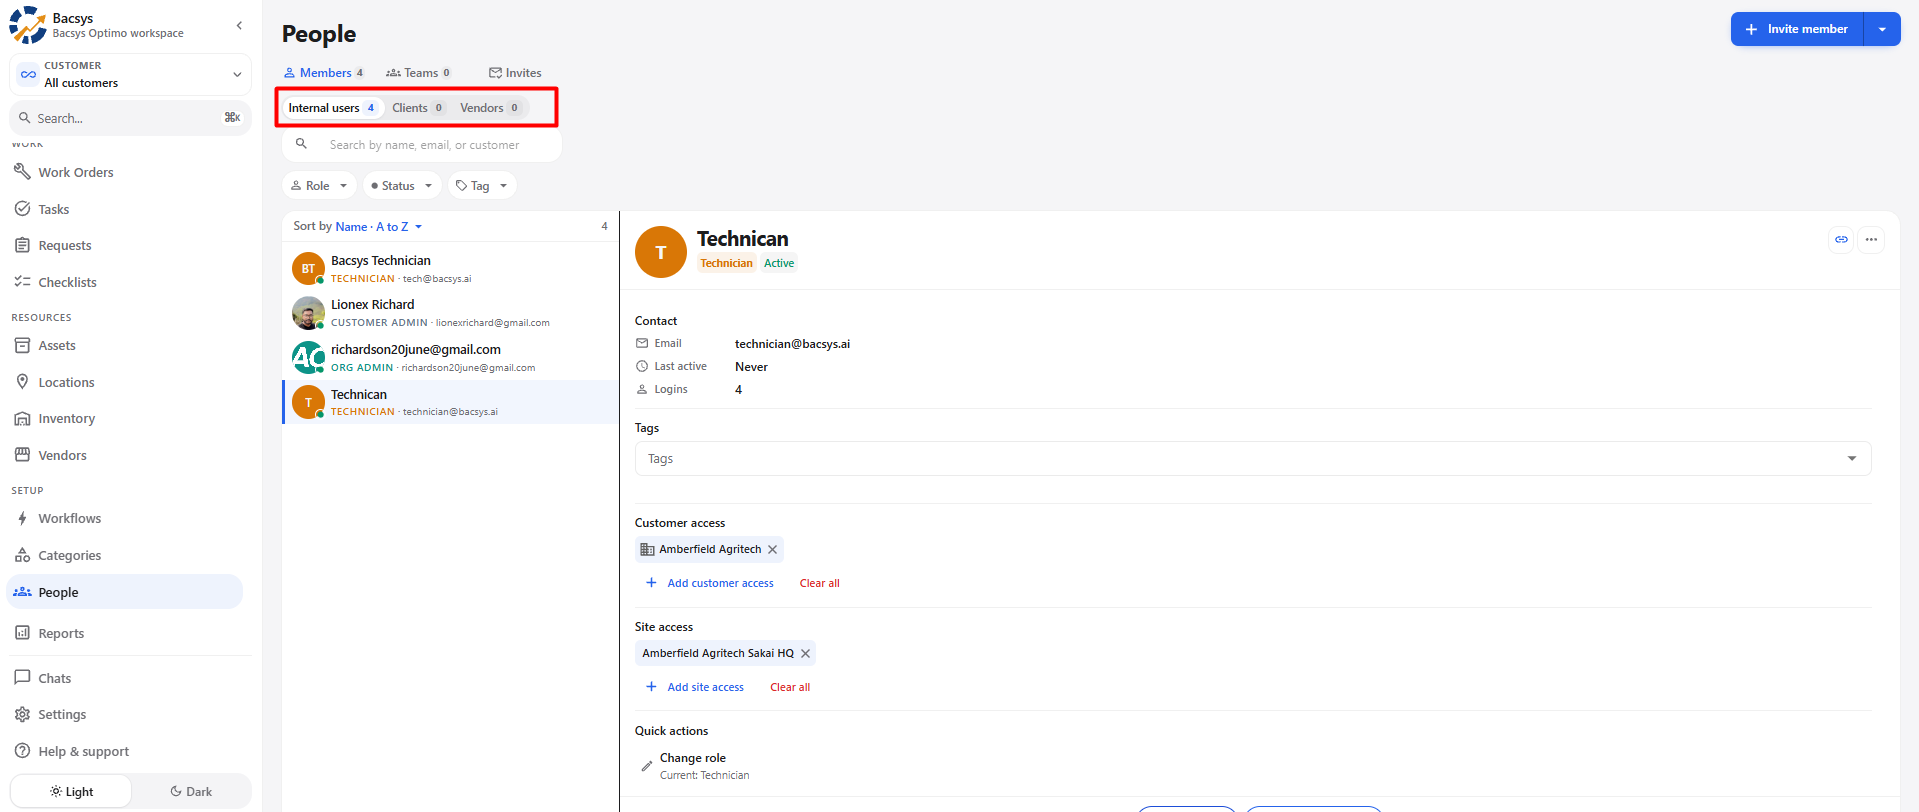
2.1 Member Types
| Member Type | Description |
|---|---|
| Internal users | Users who belong to the internal organization. |
| Clients | Client users who have access to the system. |
| Vendors | Vendor users who have access to the system. |
2.2 Filter Members by Type
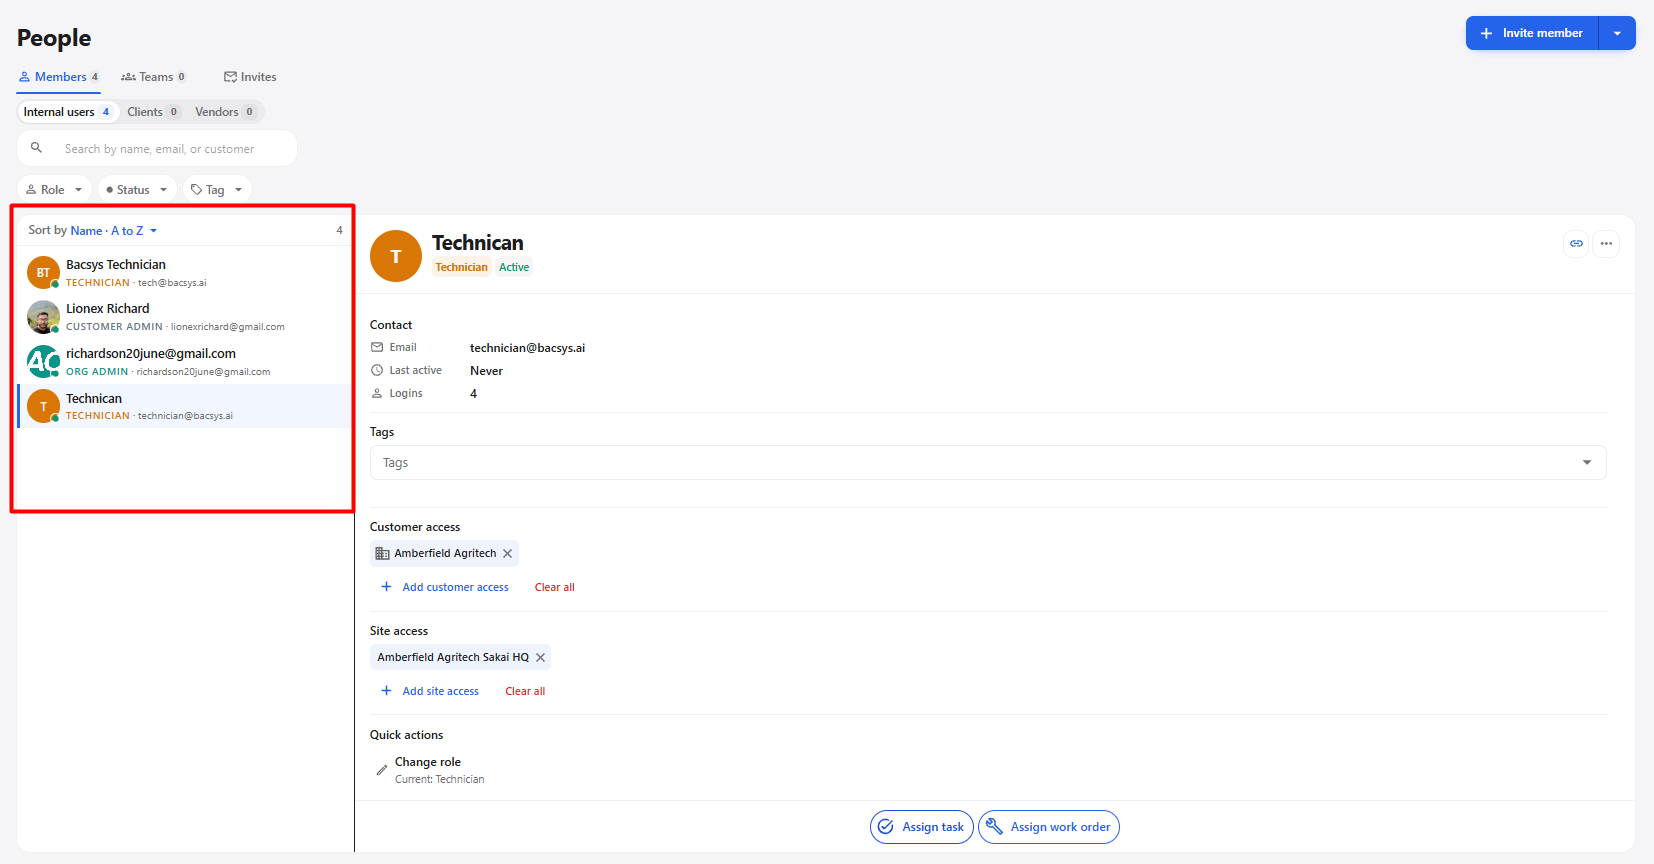
- Open the People module.
- Select Members.
- Select Internal users, Clients, or Vendors.
- The member list is filtered according to the selected type.
3. Search Members
The Search option allows users to find members using their available information.
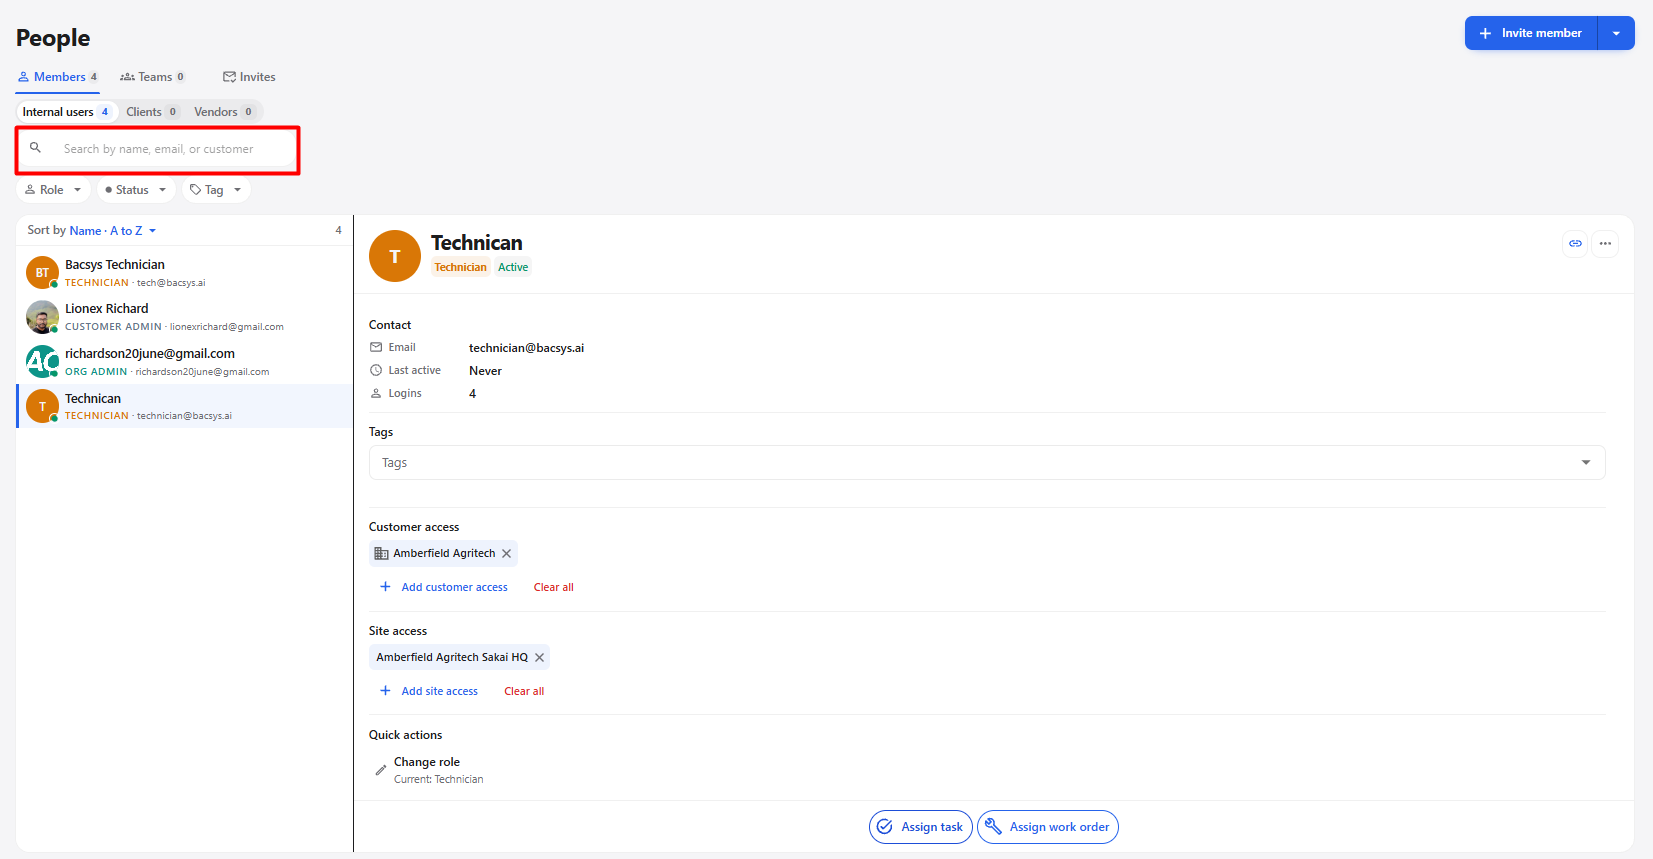
| Search Option | Description |
|---|---|
| Name | Searches for members by name. |
| Searches for members by email address. | |
| Customer | Searches for members associated with a customer. |
Steps
- Click the Search field.
- Enter the member's name, email, or customer information.
- The matching members are displayed.
4. Member Filters
The Members section provides filters to narrow down the member list.
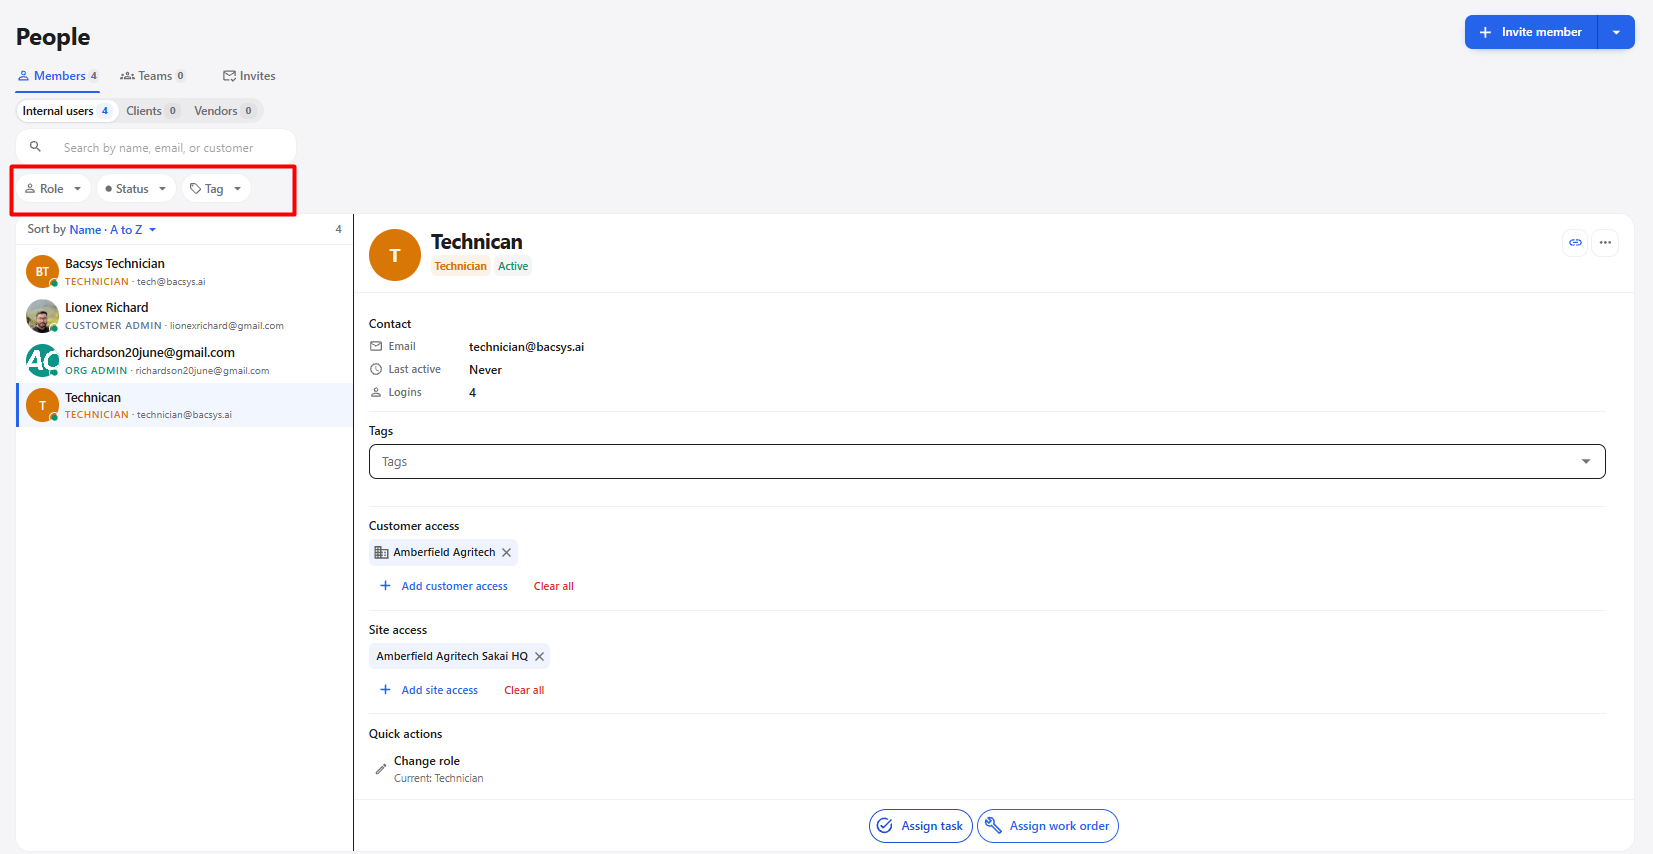
| Filter | Description |
|---|---|
| Role | Filters members according to their assigned role. |
| Status | Filters members by active or inactive status. |
| Tag | Filters members using assigned tags. |
4.1 Role Filter
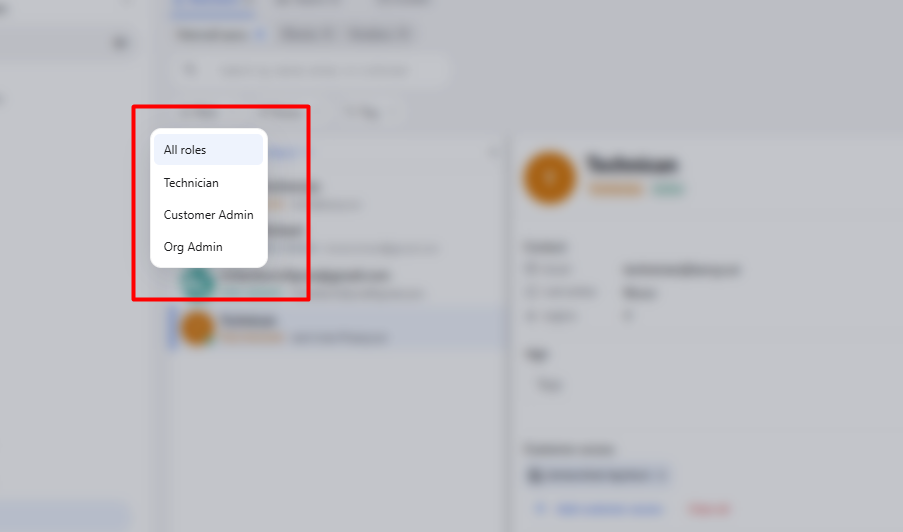
| Role | Description |
|---|---|
| All roles | Displays members from all available roles. |
| Technician | Displays members assigned the Technician role. |
| Customer Admin | Displays members assigned the Customer Admin role. |
| Org Admin | Displays members assigned the Org Admin role. |
4.2 Status Filter
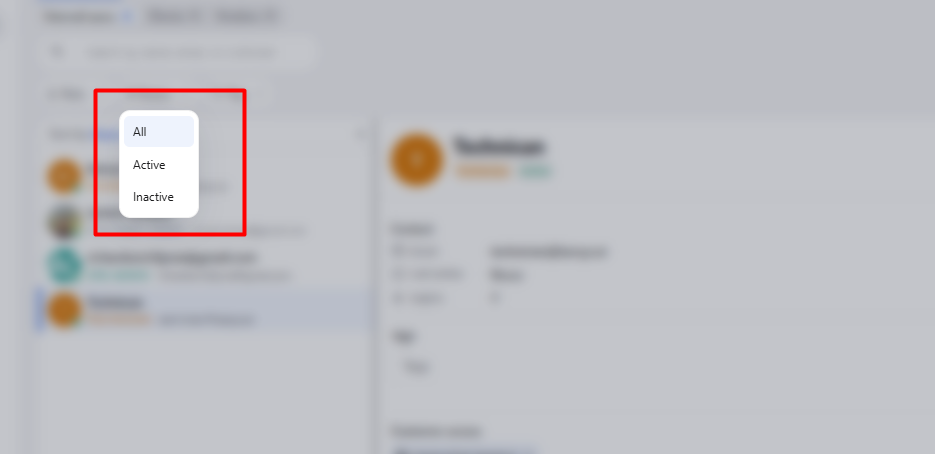
| Status | Description |
|---|---|
| All | Displays members with all account statuses. |
| Active | Displays active member accounts. |
| Inactive | Displays inactive member accounts. |
4.3 Tag Filter
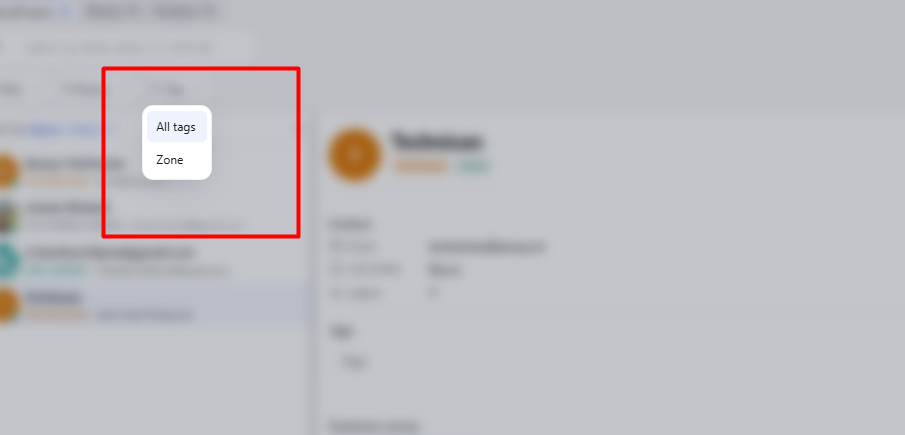
The Tag filter displays members associated with the selected tag.
5. Member List
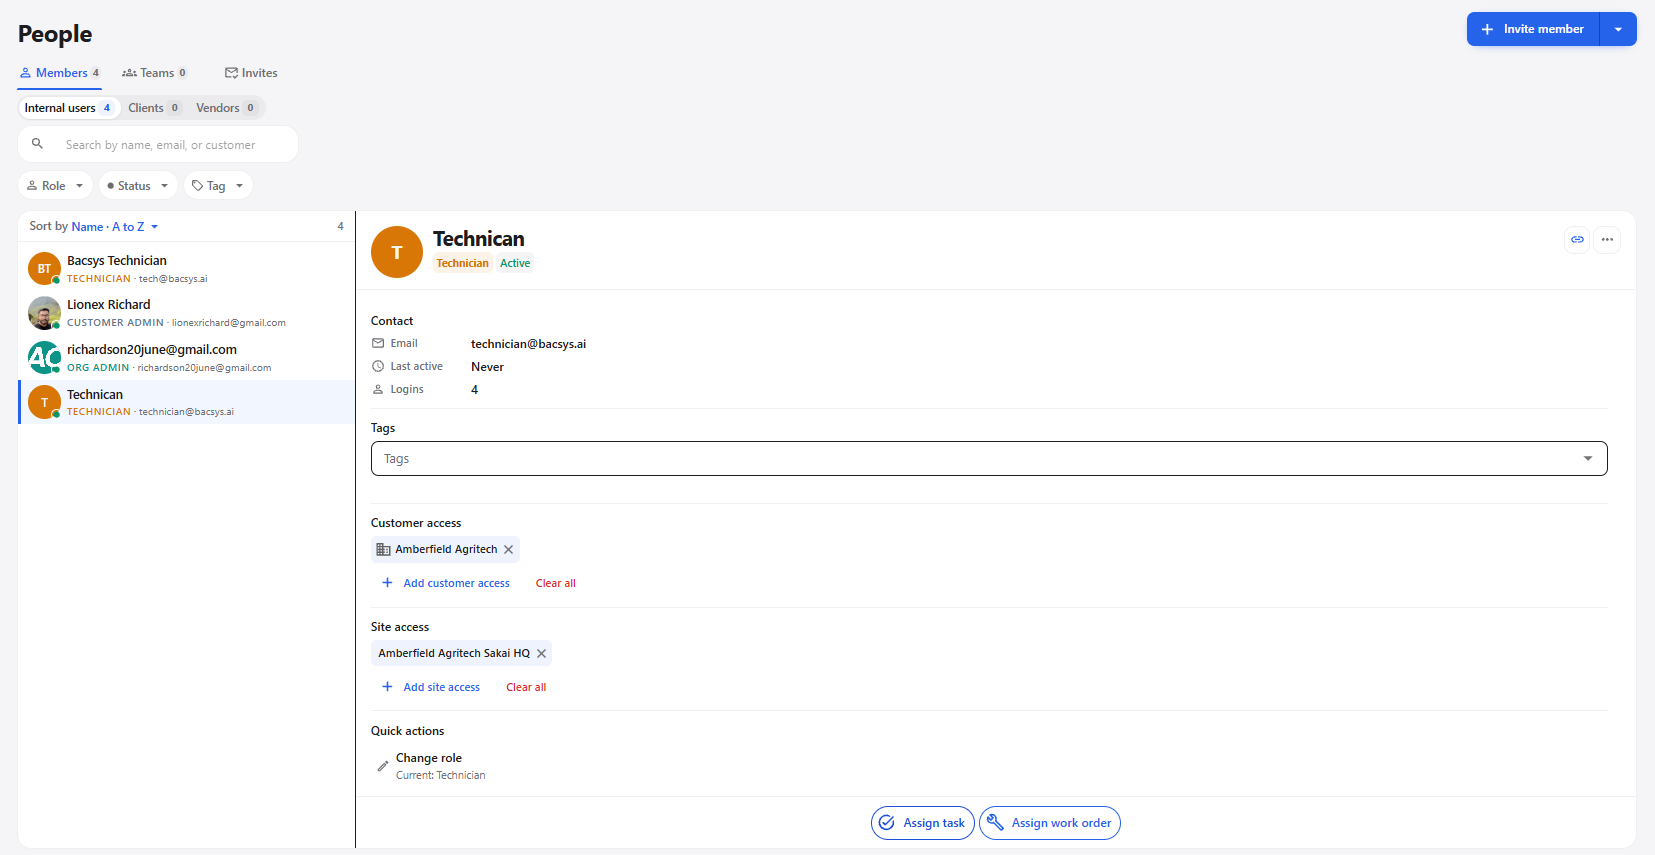
| Information | Description |
|---|---|
| Member Name | Displays the member's name. |
| Displays the member's email address. | |
| Role | Displays the assigned role. |
| Status | Displays whether the member is active or inactive. |
| Customer | Displays the associated customer, when applicable. |
| Member Type | Indicates whether the member is an internal user, client, or vendor. |
Selecting a Member
- Select Members.
- Use search or filters when required.
- Click the required member.
- The member details are displayed.
6. Member Details
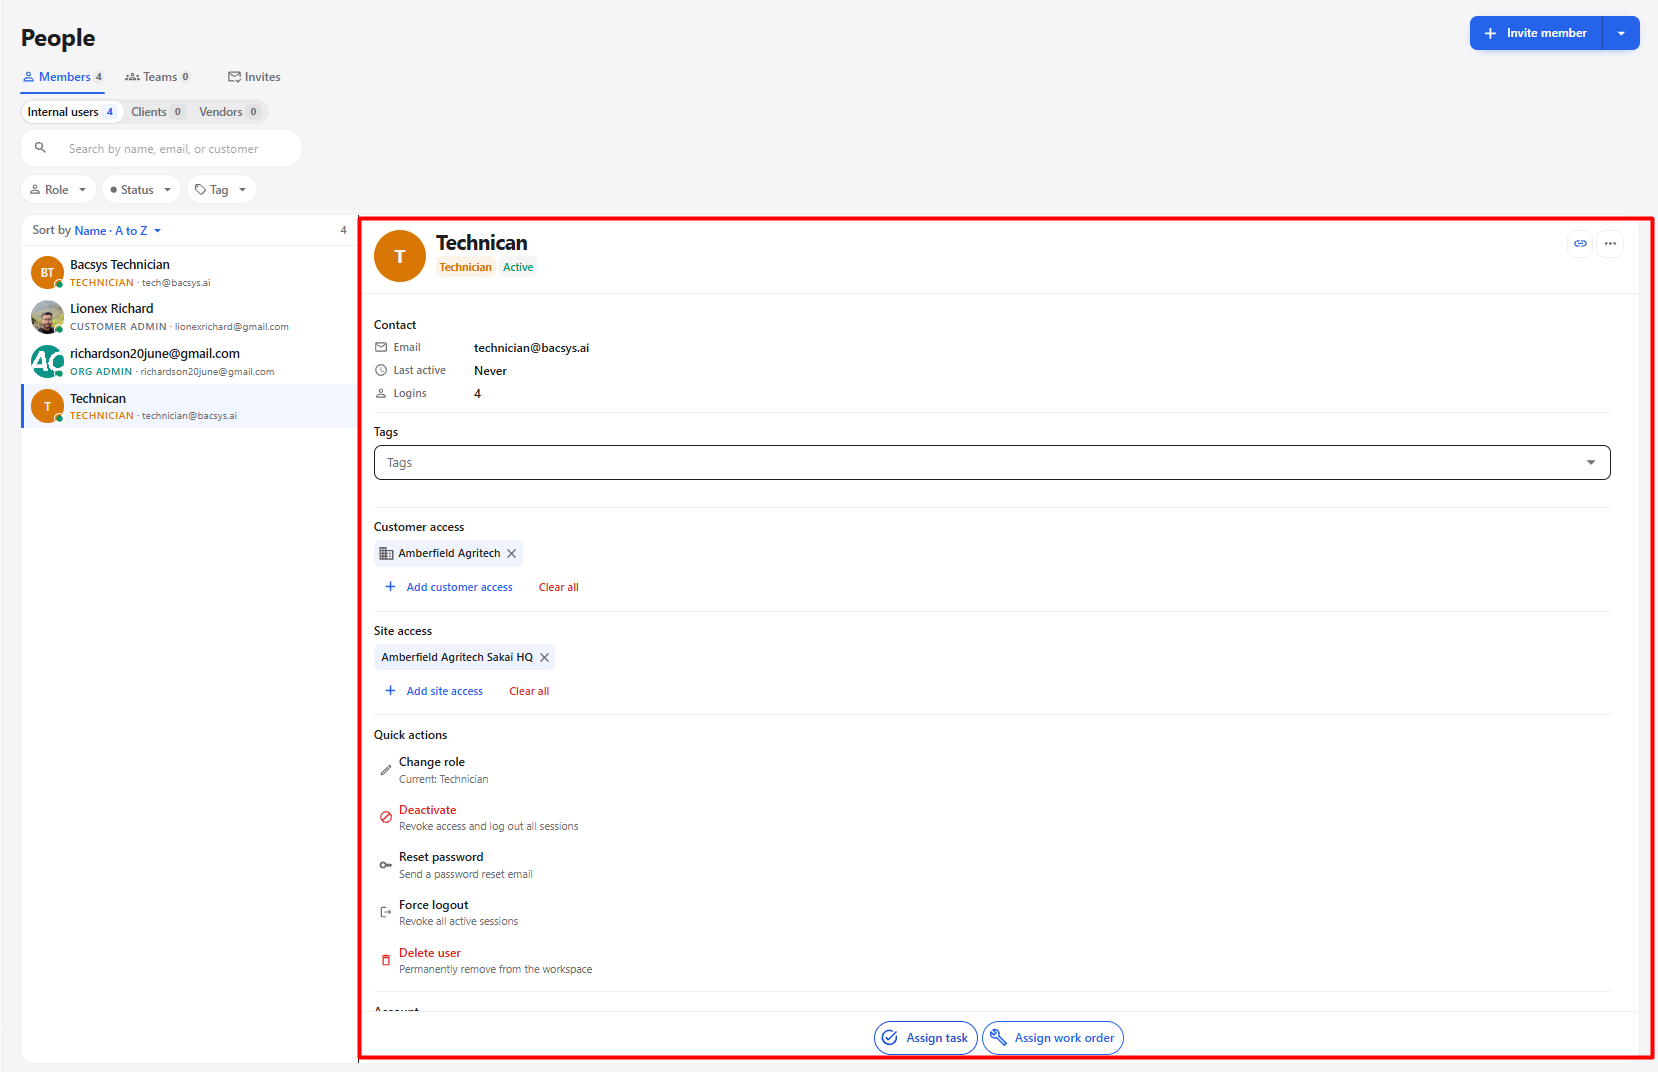
| Information | Description |
|---|---|
| Member Name | Displays the selected member's name. |
| Role | Displays the assigned role. |
| Account Status | Displays the current account status. |
| Contact Information | Displays contact and activity information. |
| Tags | Displays tags associated with the member. |
| Customer Access | Displays customers accessible to the member. |
| Site Access | Displays sites accessible to the member. |
| Quick Actions | Provides actions such as changing the member's role. |
6.1 Contact Information
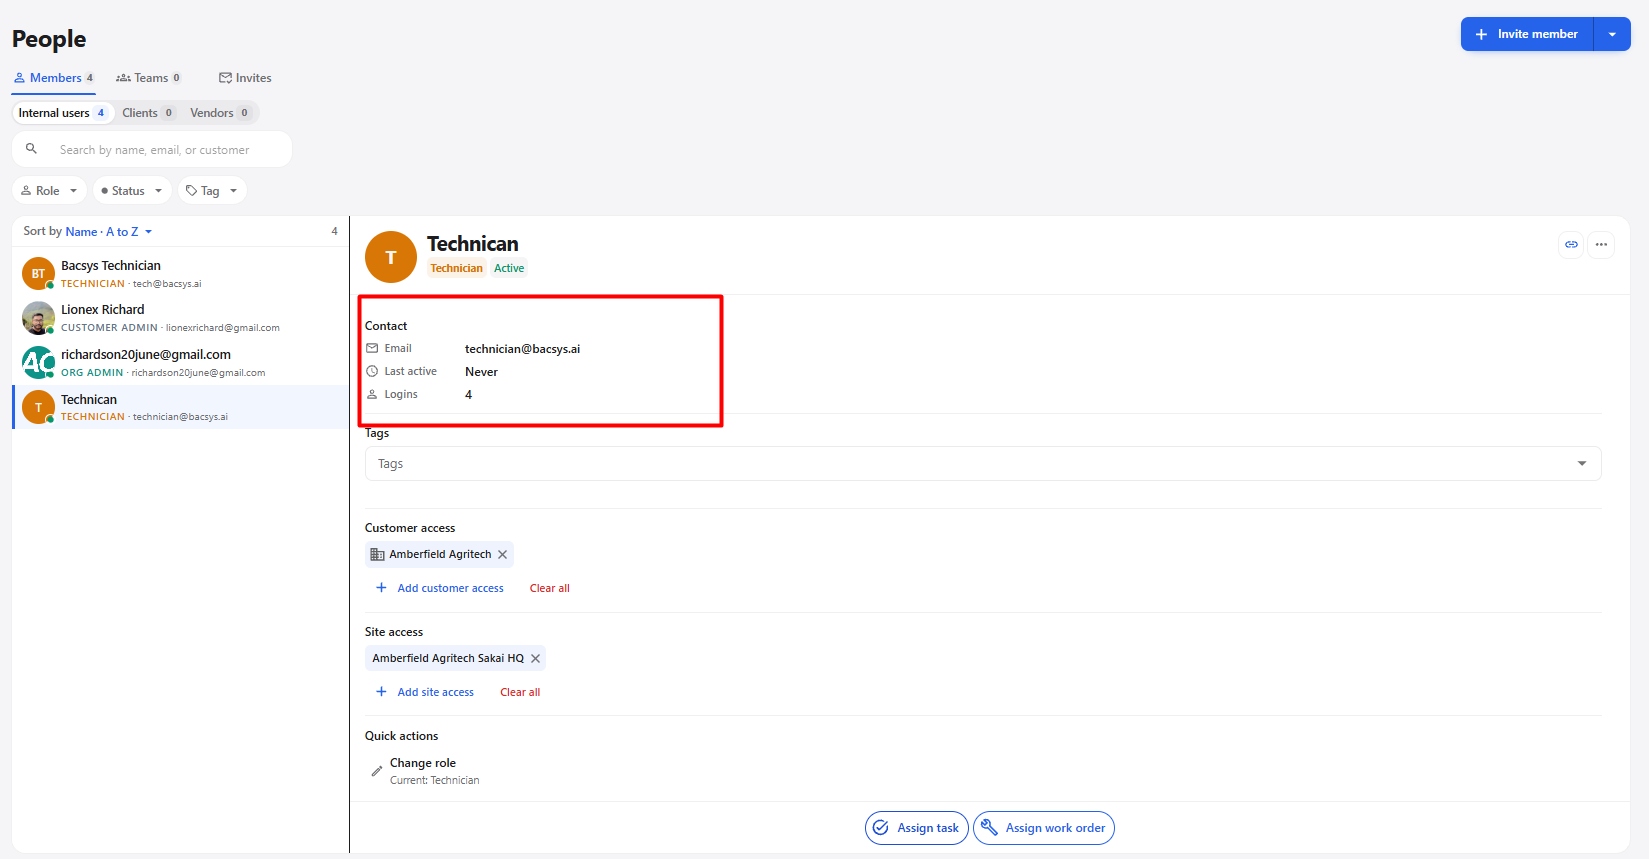
| Field | Description |
|---|---|
| Displays the member's email address. | |
| Last active | Displays the member's last recorded activity. |
| Logins | Displays the number of recorded logins. |
7. Tags
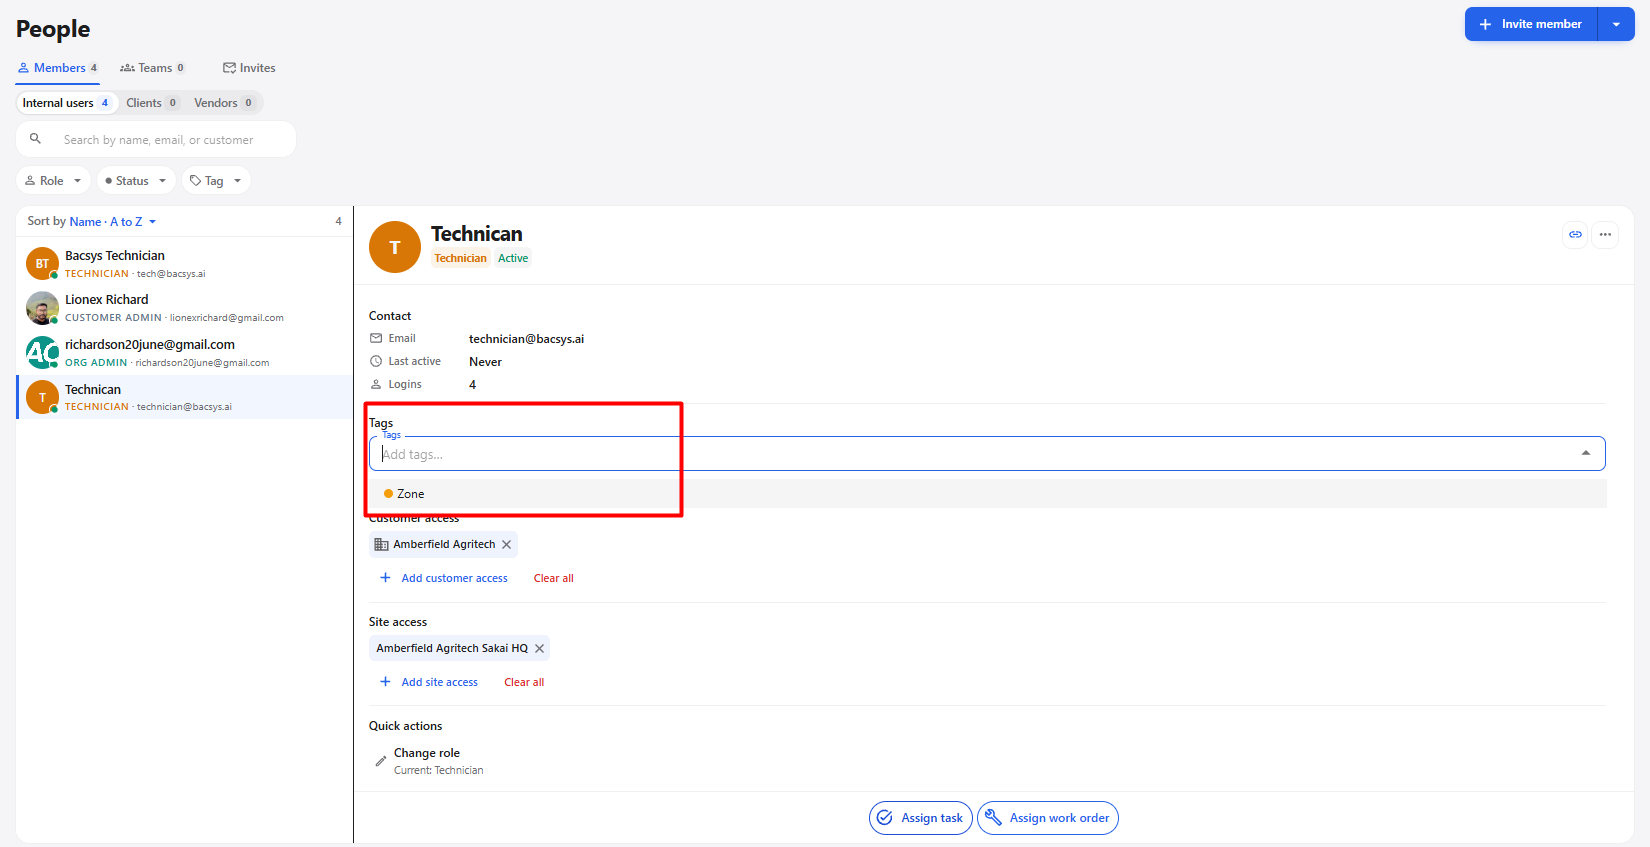
The Tags section allows tags to be associated with a member.
- Select a member.
- Locate Tags.
- Select the required tag.
- The tag is associated with the member.
8. Customer Access
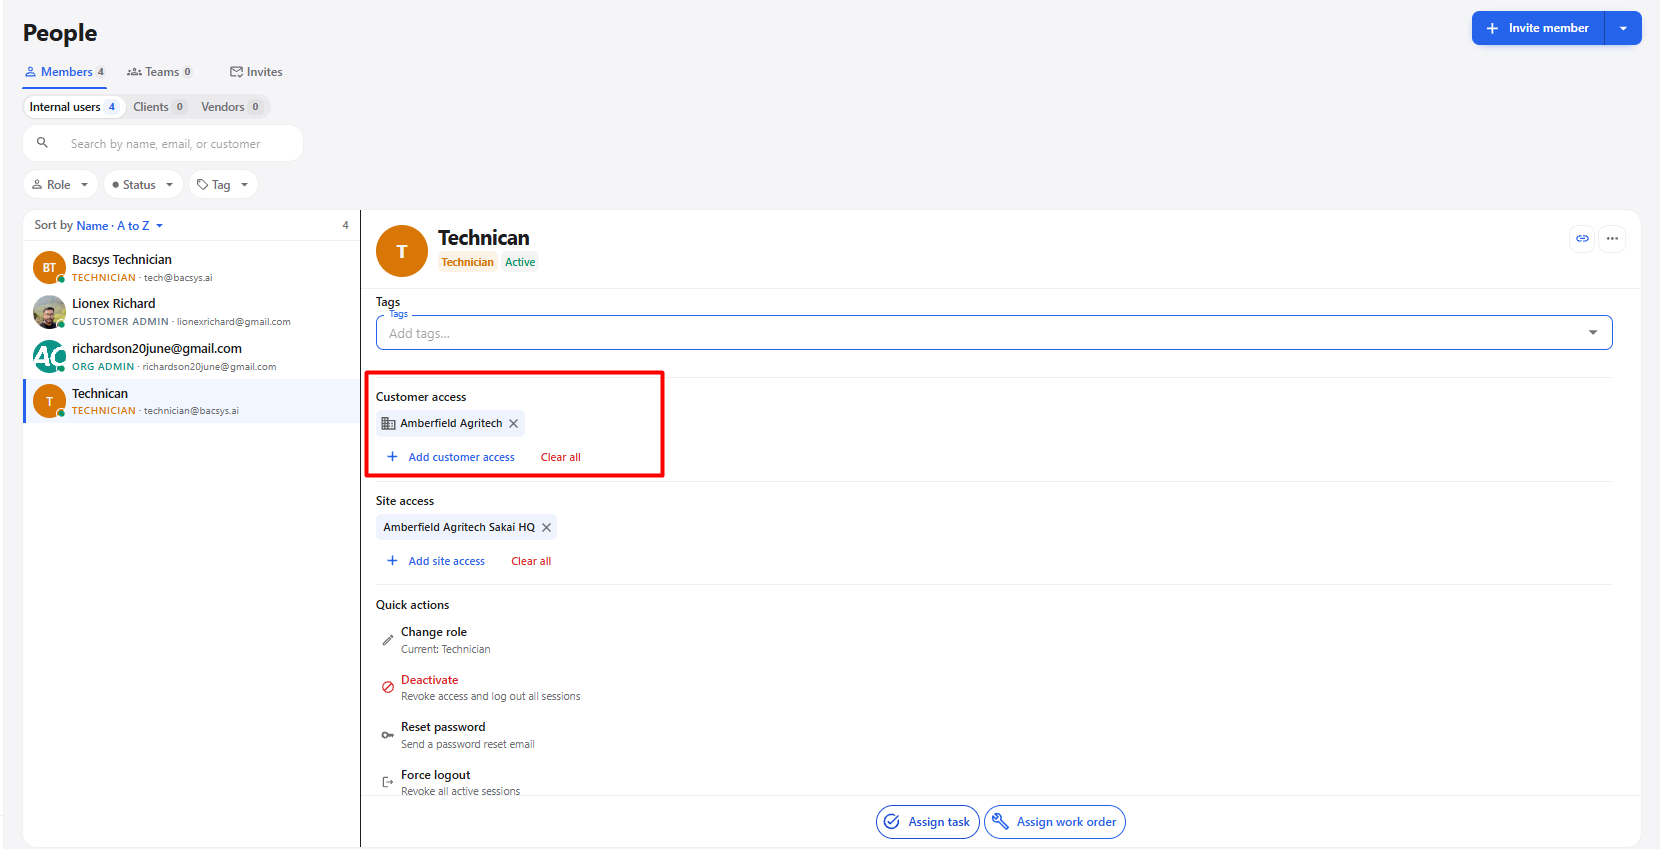
| Option | Description |
|---|---|
| Customer Access | Displays customers currently assigned to the member. |
| Add customer access | Adds additional customer access. |
| Clear all | Removes the currently assigned customer access. |
Steps
- Select the required member.
- Open Customer access.
- Review the assigned customers.
- Click Add customer access to add another customer.
- Use Clear all to remove all customer access.
9. Site Access
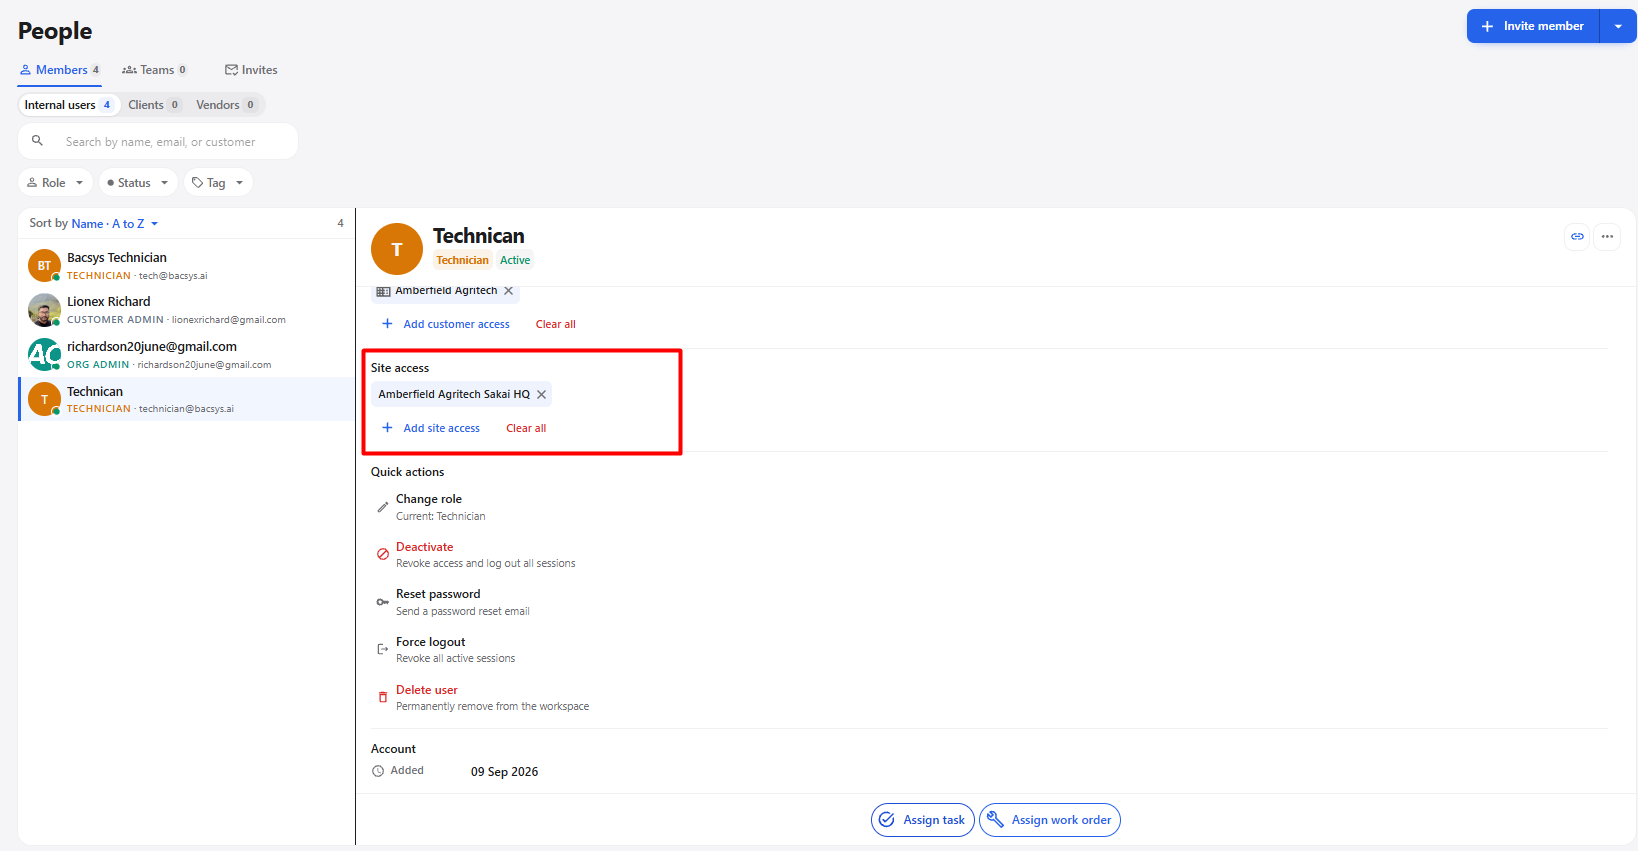
| Option | Description |
|---|---|
| Site Access | Displays sites currently assigned to the member. |
| Add site access | Adds additional site access. |
| Clear all | Removes the currently assigned site access. |
Steps
- Select the required member.
- Open Site access.
- Review the assigned sites.
- Click Add site access to add another site.
- Use Clear all to remove all site access.
10. Quick Actions
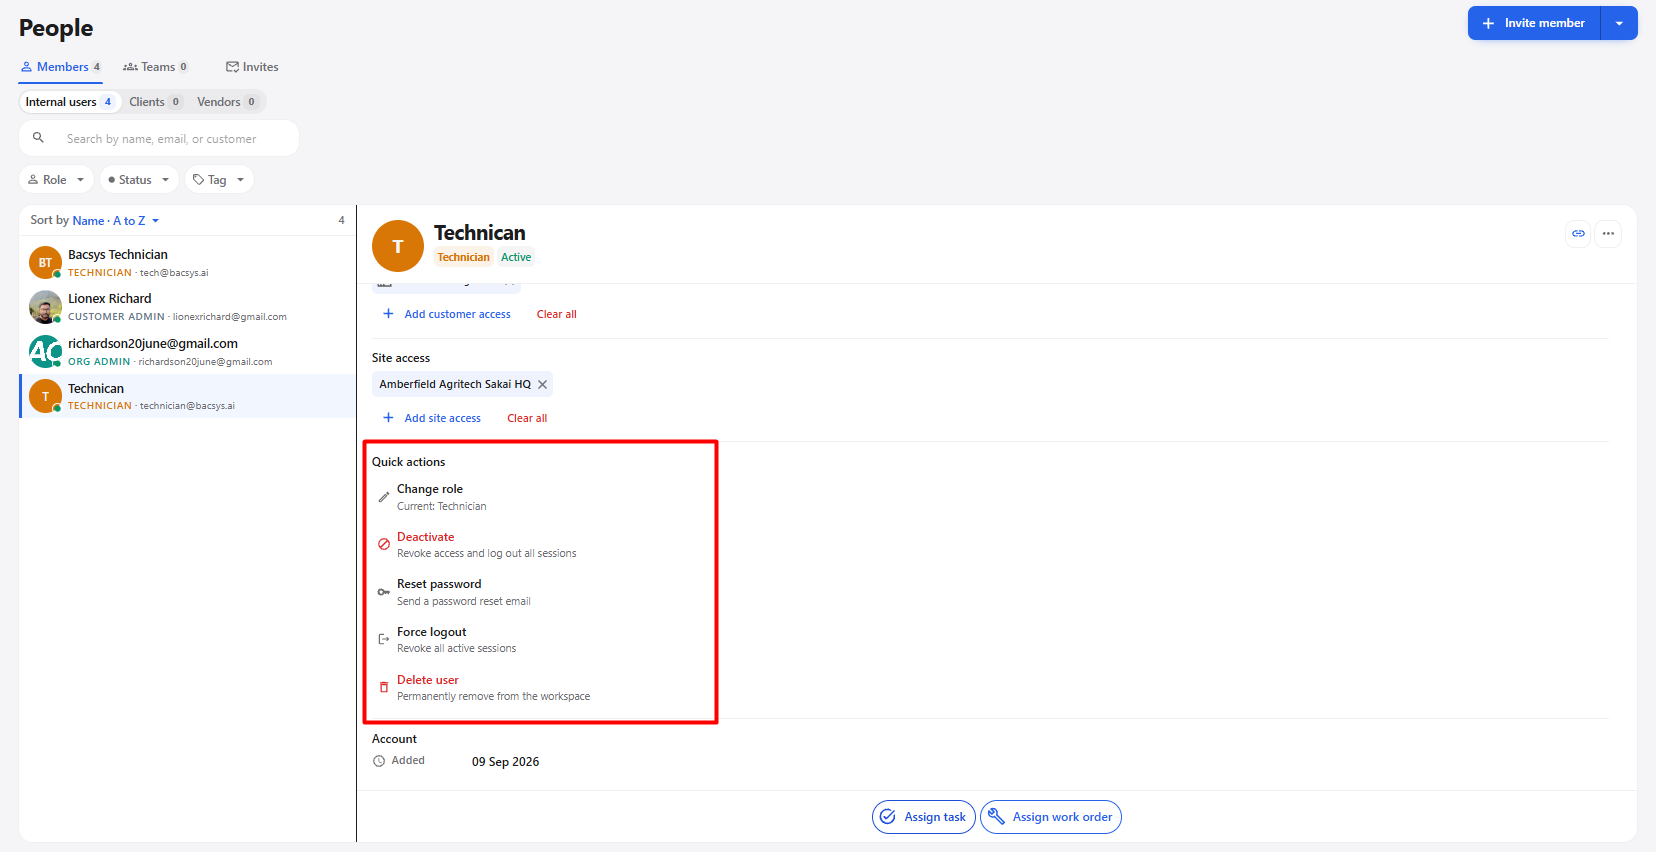
Change Role
| Option | Description |
|---|---|
| Change role | Allows the assigned role to be changed. |
| Current role | Displays the member's current role. |
Steps
- Open Quick actions.
- Click Change role.
- Select the required role.
- Save or confirm the change.
11. Teams
The Teams section allows users to group people together so that work can be assigned to the team.
11.1 Teams Page
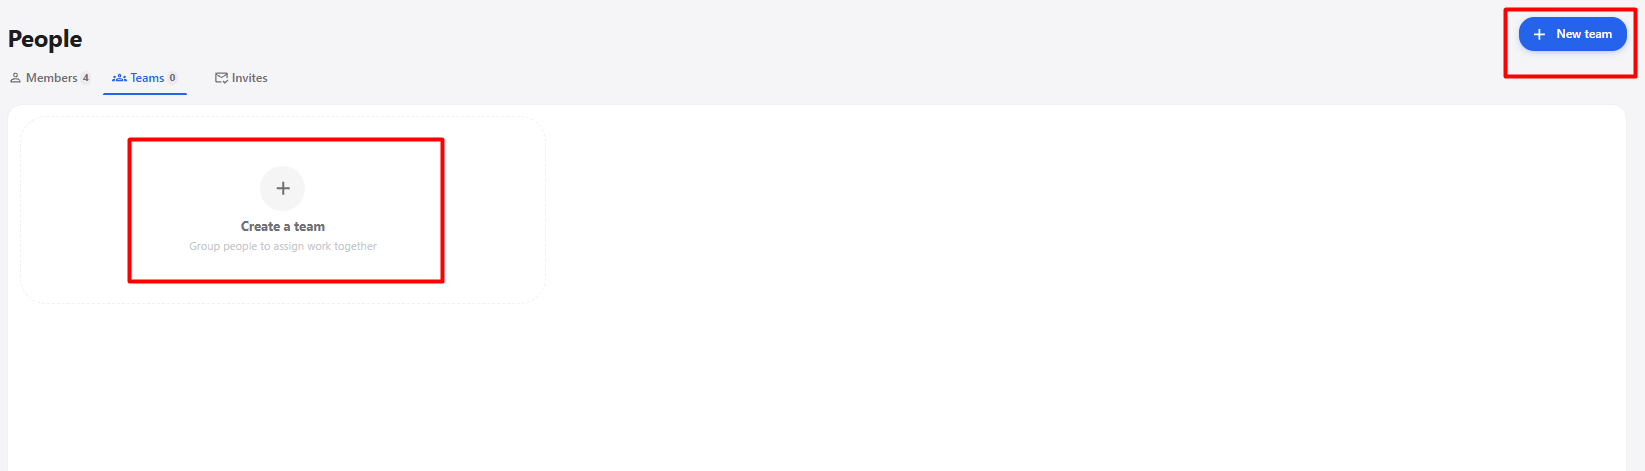
| Option | Description |
|---|---|
| Members | Opens the Members section. |
| Teams | Displays created teams. |
| Invites | Displays pending invitations. |
| Create a team | Creates a new team. |
| Group people to assign work together | Indicates that teams can be used for group work assignment. |
12. Create a Team
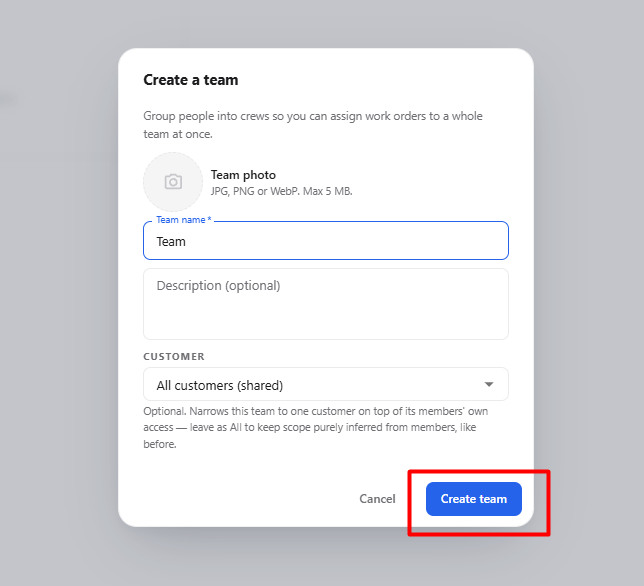
- Open the People module.
- Select Teams.
- Click Create a team or + New team.
- The Create a team pop-up is displayed.
- Enter the required information.
- Click Create team.
- The team is created.
12.1 Create Team Fields
| Section | Field / Option | Description |
|---|---|---|
| Team Details | Team photo | Adds a team photo. Supported formats are JPG, PNG, or WebP, with a maximum size of 5 MB. |
| Team Details | Team name* | Enter the team name. |
| Team Details | Description (optional) | Enter a description when required. |
| Customer | Customer | Select the customer scope for the team. |
| Customer | All customers (shared) | Makes the team available across customers. |
| Customer | Customer-specific scope | Limits the team to a specific customer. |
| Action | Cancel | Closes the pop-up without creating the team. |
| Action | Create team | Creates the team. |
13. Add Members to a Team
After creating a team, members can be added to it.
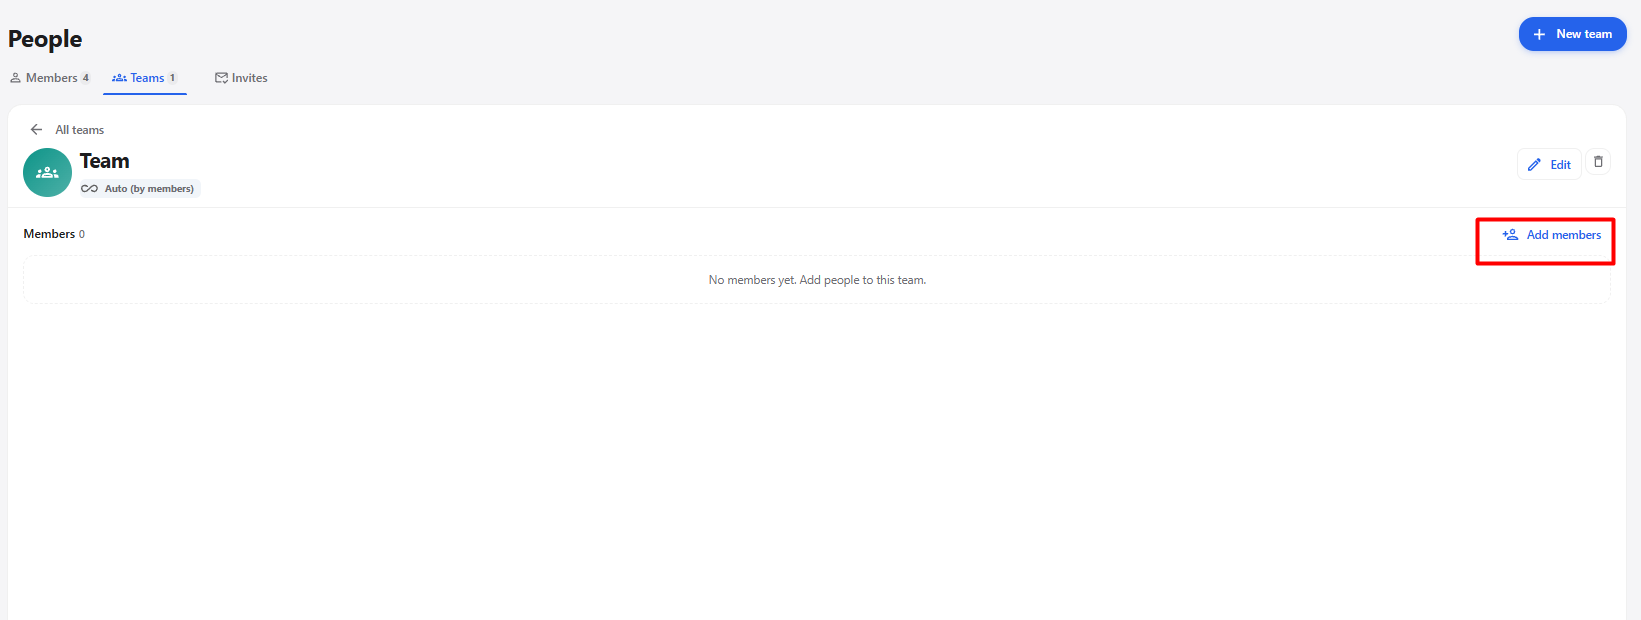
- Open the required team.
- Click + Add member.
- The Add members to Team pop-up is displayed.
- Select the required members.
- Click Add members.
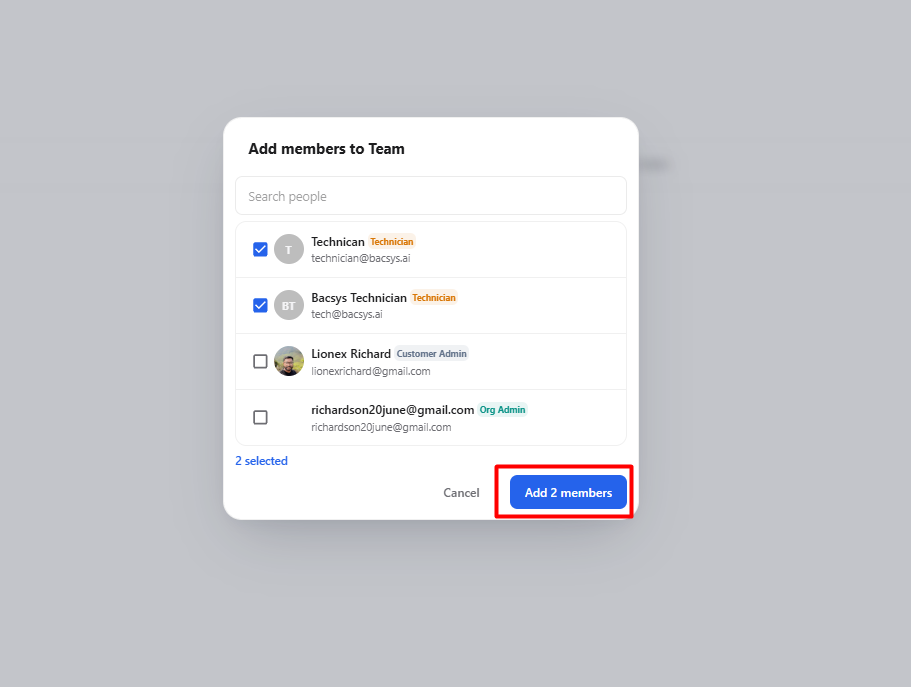
| Field / Option | Description |
|---|---|
| Search people | Searches for a specific member. |
| Member List | Displays available members. |
| Checkbox | Selects or deselects a member. |
| Member Name | Displays the member's name. |
| Role | Displays the member's assigned role. |
| Displays the member's email address. | |
| Selected Count | Displays the number of selected members. |
| Cancel | Closes the pop-up without adding members. |
| Add members | Adds the selected members to the team. |
14. Remove a Team Member
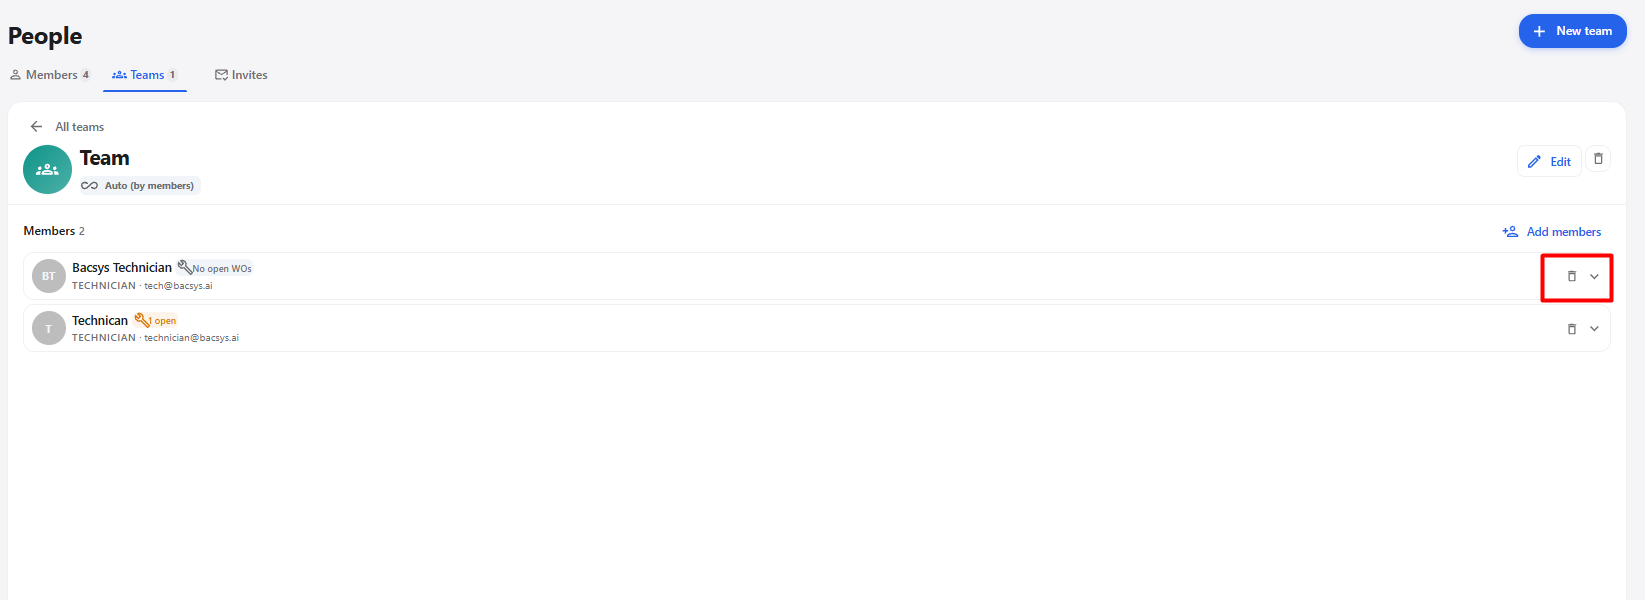
| Action | Description |
|---|---|
| Remove member | Removes the selected member from the current team. |
| Member list | Displays members currently assigned to the team. |
Steps
- Open the required team.
- Locate the member.
- Click Remove or Delete.
- Confirm the removal if prompted.
- The member is removed from the team.
Note: Removing a member from a team does not delete the member from the People module.
15. Team Management
| Action | Description |
|---|---|
| Edit | Allows the team name to be changed. |
| Delete | Deletes the selected team. |
15.1 Edit Team
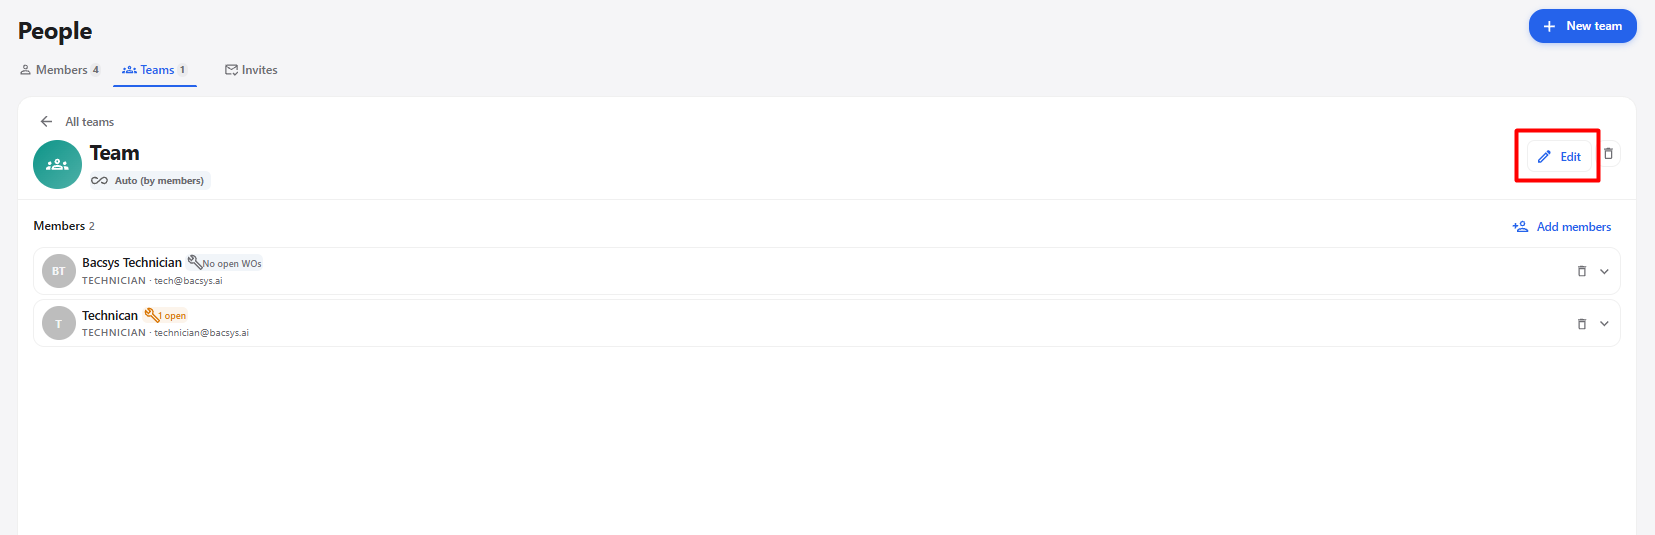
- Open the required team.
- Click Edit.
- Update the Team name.
- Save the changes.
15.2 Delete Team
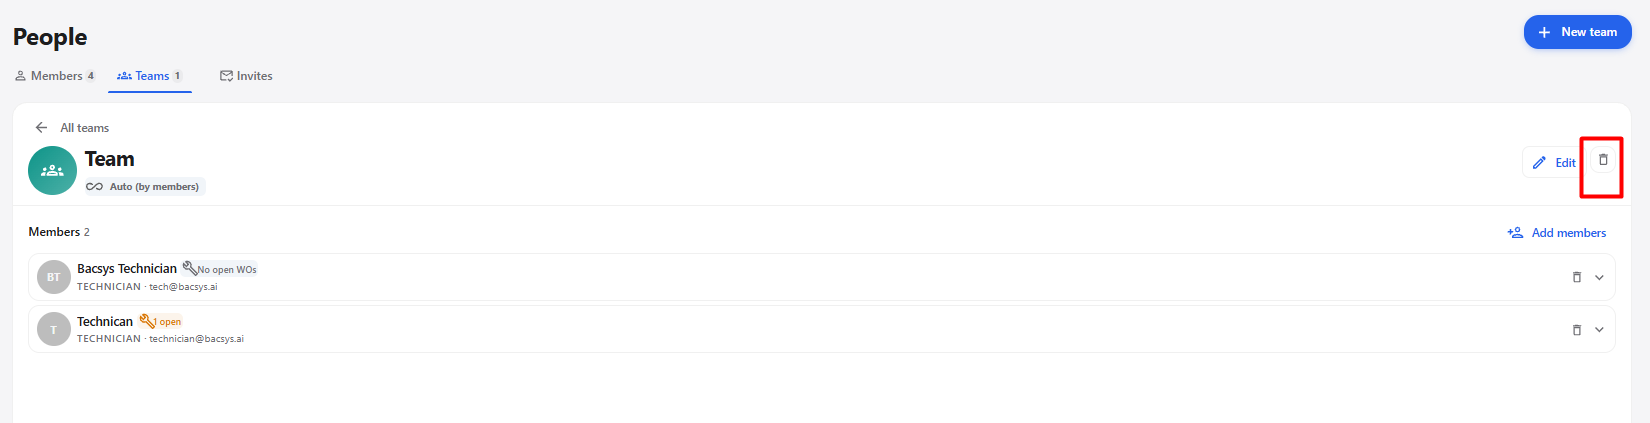
- Open the required team.
- Click Delete.
- Confirm the deletion if prompted.
- The team is deleted.
16. Invites
The Invites section allows administrators to invite new users to the workspace.
16.1 Invite Member
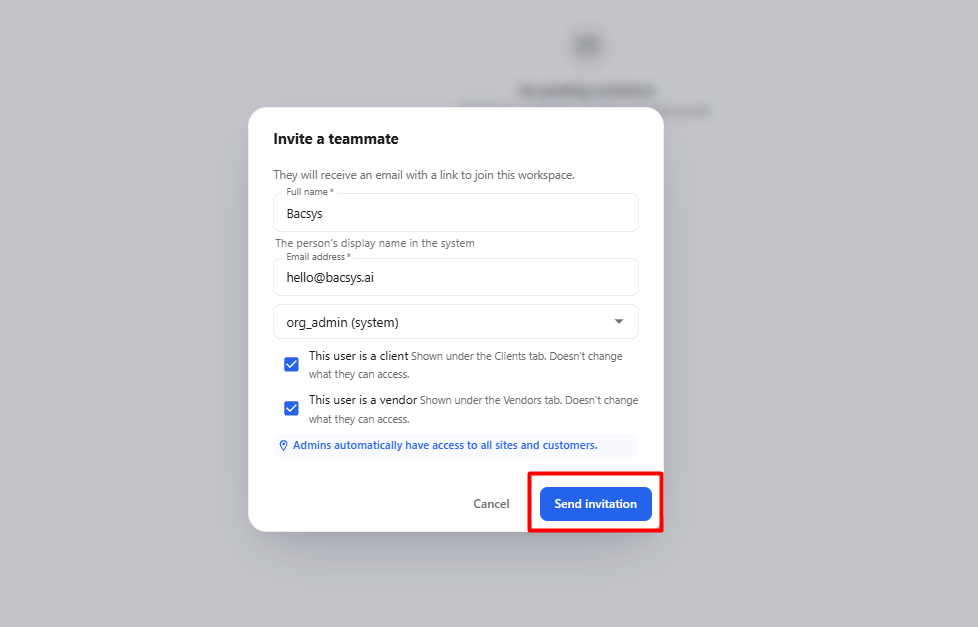
| Field / Option | Description |
|---|---|
| Full name* | Enter the person's full name. |
| Email address* | Enter the email address where the invitation should be sent. |
| Select a role* | Select the role for the invited user. |
| This user is a client | Identifies the invited user as a client. |
| This user is a vendor | Identifies the invited user as a vendor. |
| Cancel | Closes the invitation without sending it. |
| Send invitation | Sends the invitation to the specified email address. |
Steps
- Click + Invite member.
- Enter the Full name and Email address.
- Select the required Role.
- Select This user is a client or This user is a vendor, if required.
- Click Send invitation.
- The invitation is sent to the specified email address.
- The invited user opens the invitation link, sets a password, and logs in according to the assigned role.
17. Invitation Management
After an invitation is sent, it can be resent or revoked.
| Action | Description |
|---|---|
| Resend | Sends the invitation again to the same email address. |
| Revoke | Cancels the pending invitation so it can no longer be used. |
17.1 Resend Invitation
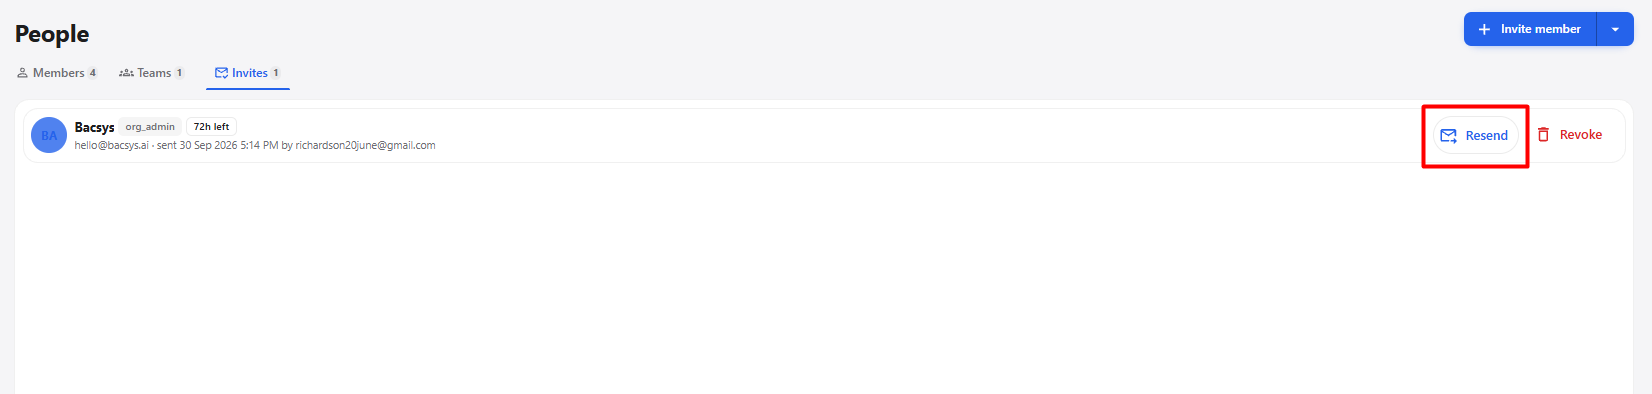
- Locate the pending invitation.
- Click Resend.
- The invitation is sent again.
17.2 Revoke Invitation

- Locate the pending invitation.
- Click Revoke.
- Confirm the action if prompted.
- The invitation is revoked.
15. Team Member Assignment
After members are added to a team, the selected members can be used for work assignment.
15.1 Assign Task
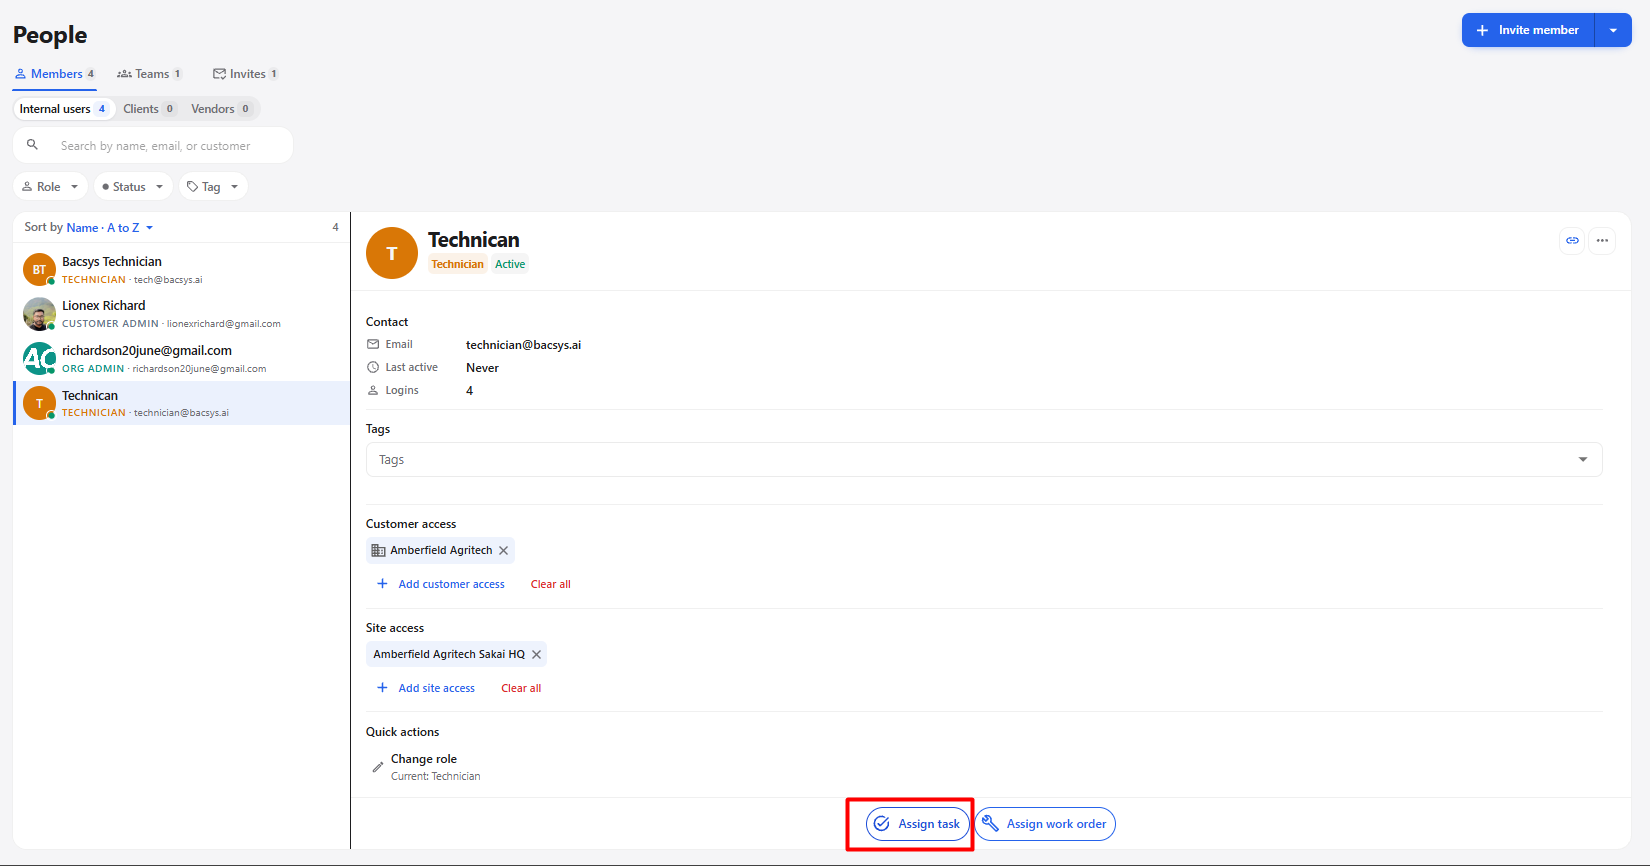
The Assign task option allows a task to be assigned to a team member.
| Option | Description |
|---|---|
| Assign task | Assigns a task to a selected team member. |
Steps
- Open the required team.
- Select the required member.
- Click Assign task.
- Select the required task.
- Assign the task to the member.
15.2 Assign Work Order
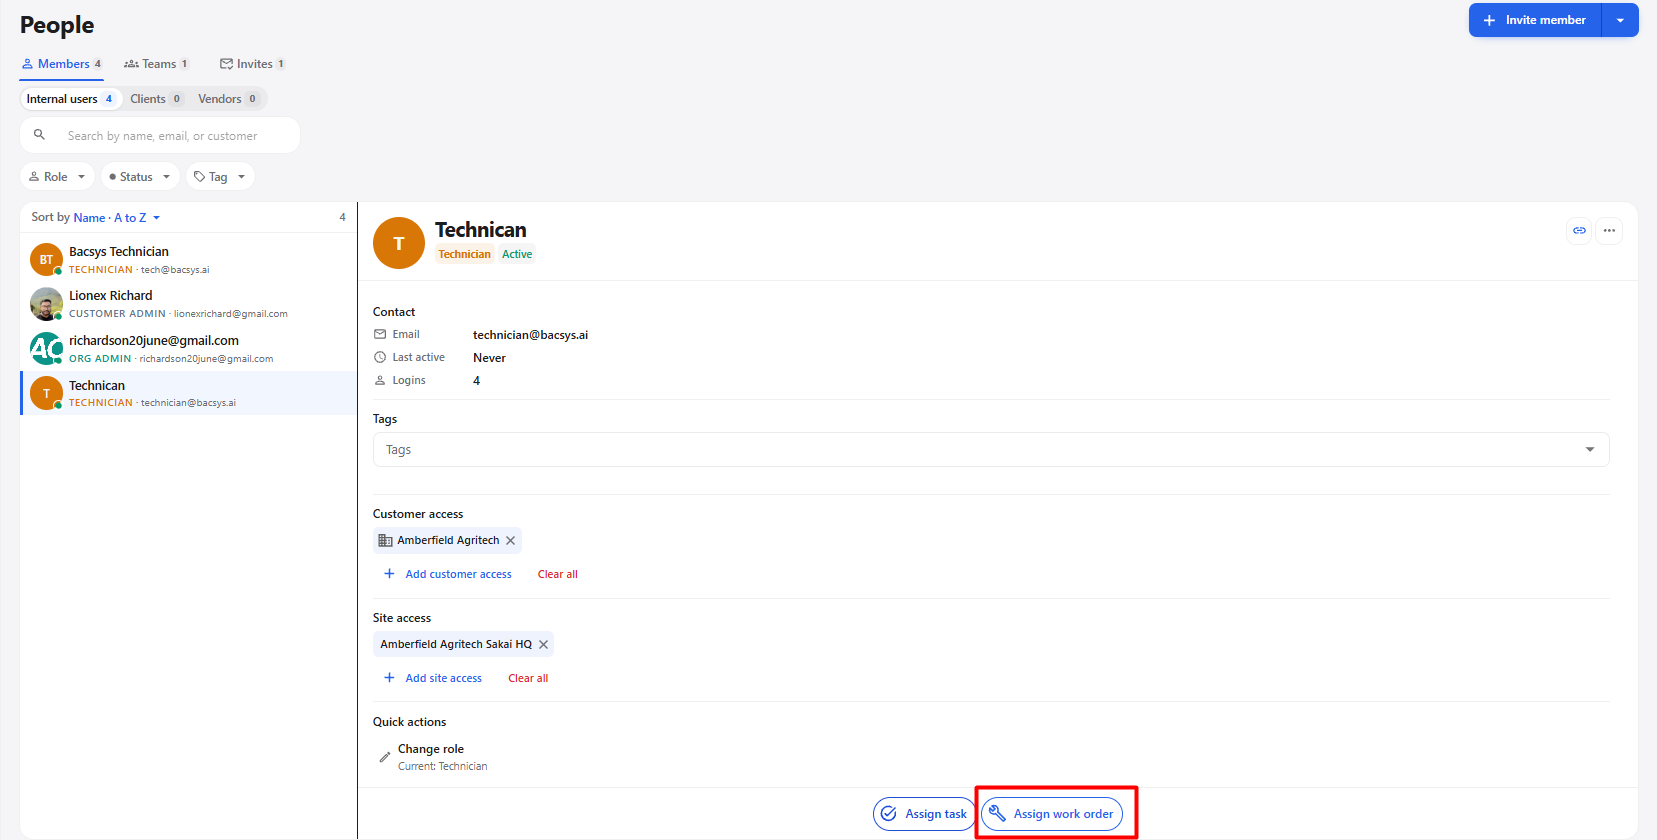
The Assign work order option allows a work order to be assigned to a team member.
| Option | Description |
|---|---|
| Assign work order | Assigns a work order to a selected team member. |
Steps
- Open the required team.
- Select the required member.
- Click Assign work order.
- Select the required work order.
- Assign the work order to the member.
18. Complete People Module Workflow
Open People
      ↓
View Members
      ↓
Select Member Type
      ↓
Search / Filter Members
      ↓
Select Member
      ↓
View Member Details
      ↓
Review Contact Information
      ↓
Manage Tags
      ↓
Manage Customer Access
      ↓
Manage Site Access
      ↓
Change Role if Required
      ↓
Teams
      ↓
Create a Team
      ↓
Enter Team Information
      ↓
Create Team
      ↓
Open Team
      ↓
+ Add Member
      ↓
Select Required Members
      ↓
Add Members
      ↓
Manage Team Members
      ↓
Assign Task / Assign Work Order
      ↓
Edit Team or Delete Team if Required
      ↓
Invites
      ↓
Click + Invite Member
      ↓
Enter Full Name
      ↓
Enter Email Address
      ↓
Select Role
      ↓
Select Client / Vendor if Required
      ↓
Send Invitation
      ↓
Invitation Sent to Email
      ↓
User Opens Invitation Link
      ↓
Complete Account Setup
      ↓
Set Password
      ↓
Login
      ↓
User Appears in Members
      ↓
Access Available According to Assigned Role
      ↓
Manage Customer / Site Access if Required
      ↓
Assign Task / Assign Work Order if Required
      ↓
Resend or Revoke Invitation if Required