

Workflows
Workflows Module
The Workflows module allows users to automate actions based on specific events in the system. Users can create workflows, select a trigger, configure workflow steps, and manage the workflow status.
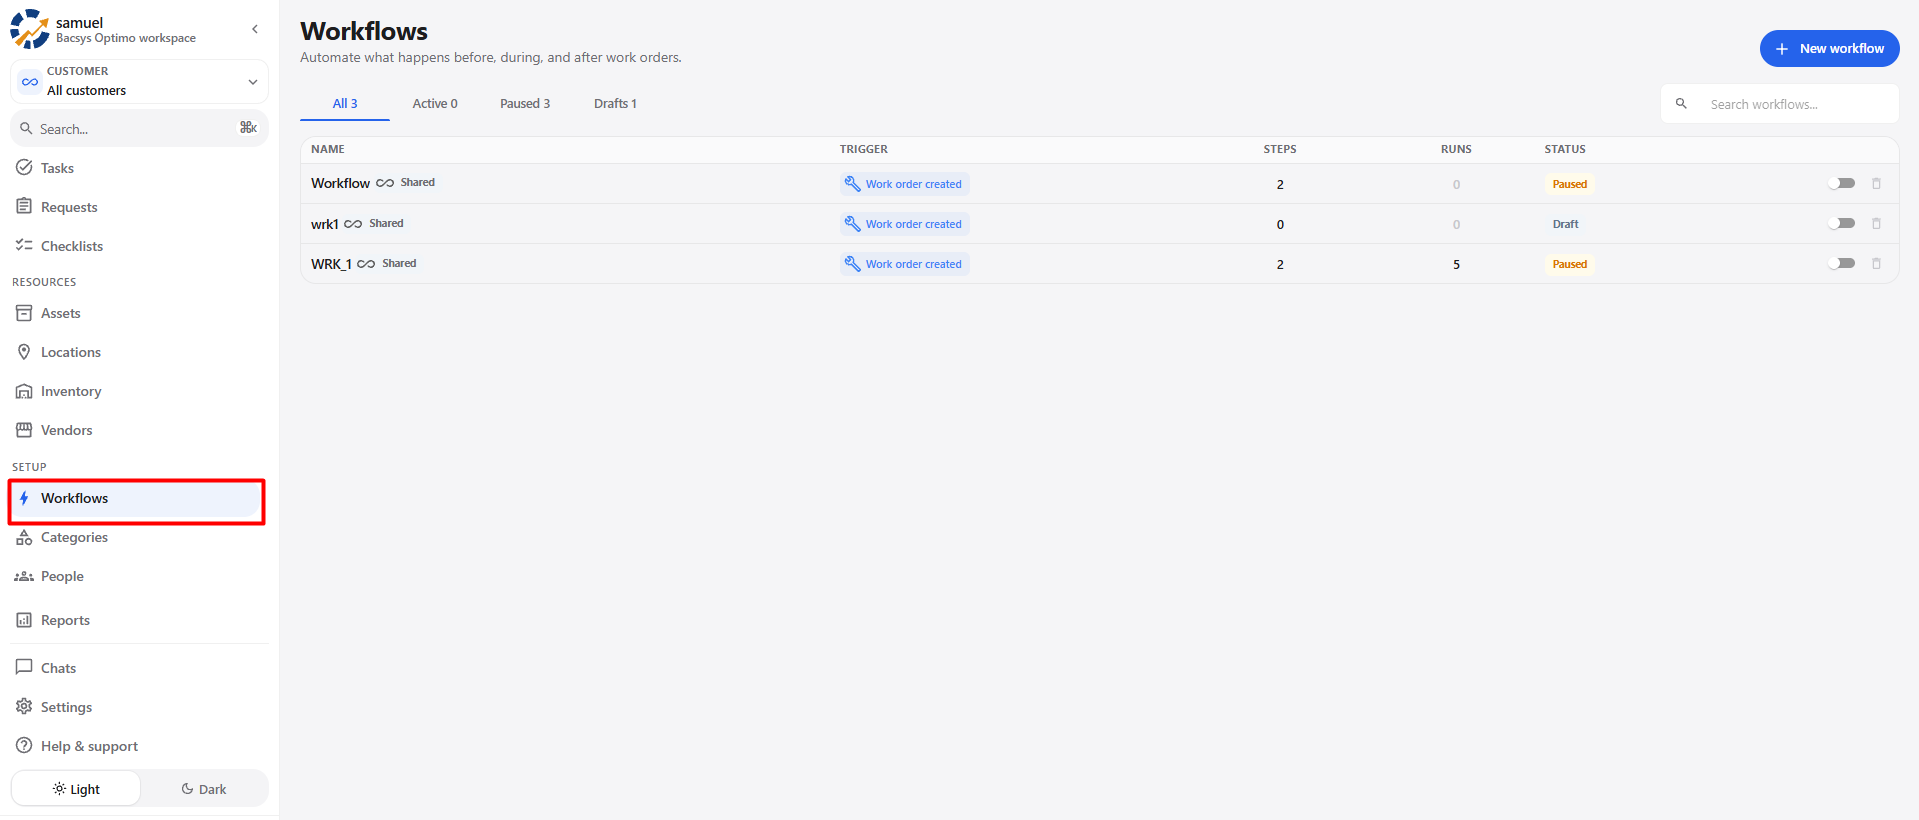
1. Workflows Overview
The Workflows page displays all available workflows and provides options to search, filter, create, and manage workflows.
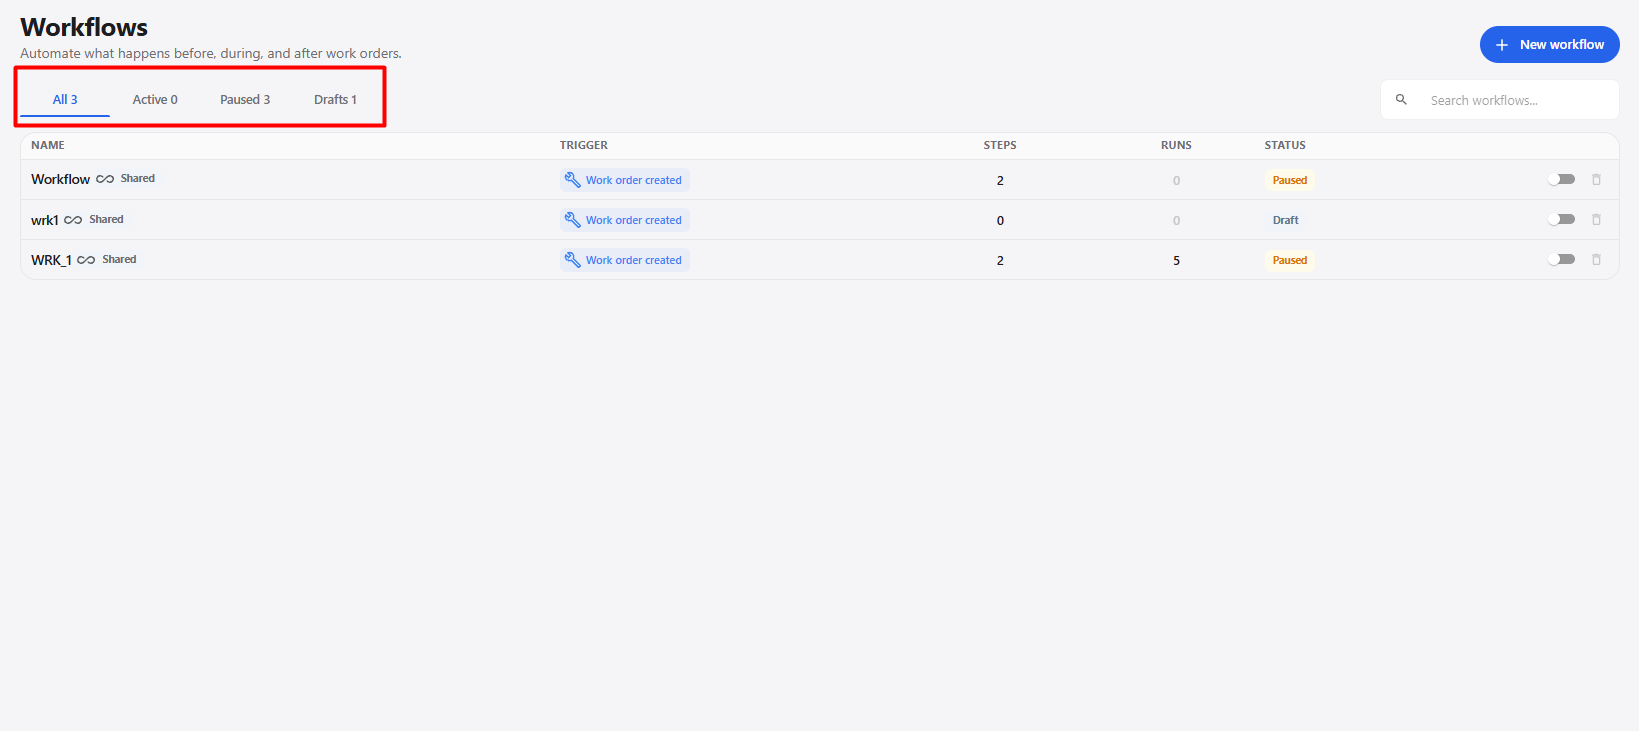
1.1 Workflow Status
| Status | Description |
|---|---|
| All | Displays all workflows available in the system. |
| Active | Displays workflows that are currently active. |
| Paused | Displays workflows that are currently paused. |
| Drafts | Displays workflows that are saved as drafts and are not yet configured or activated. |
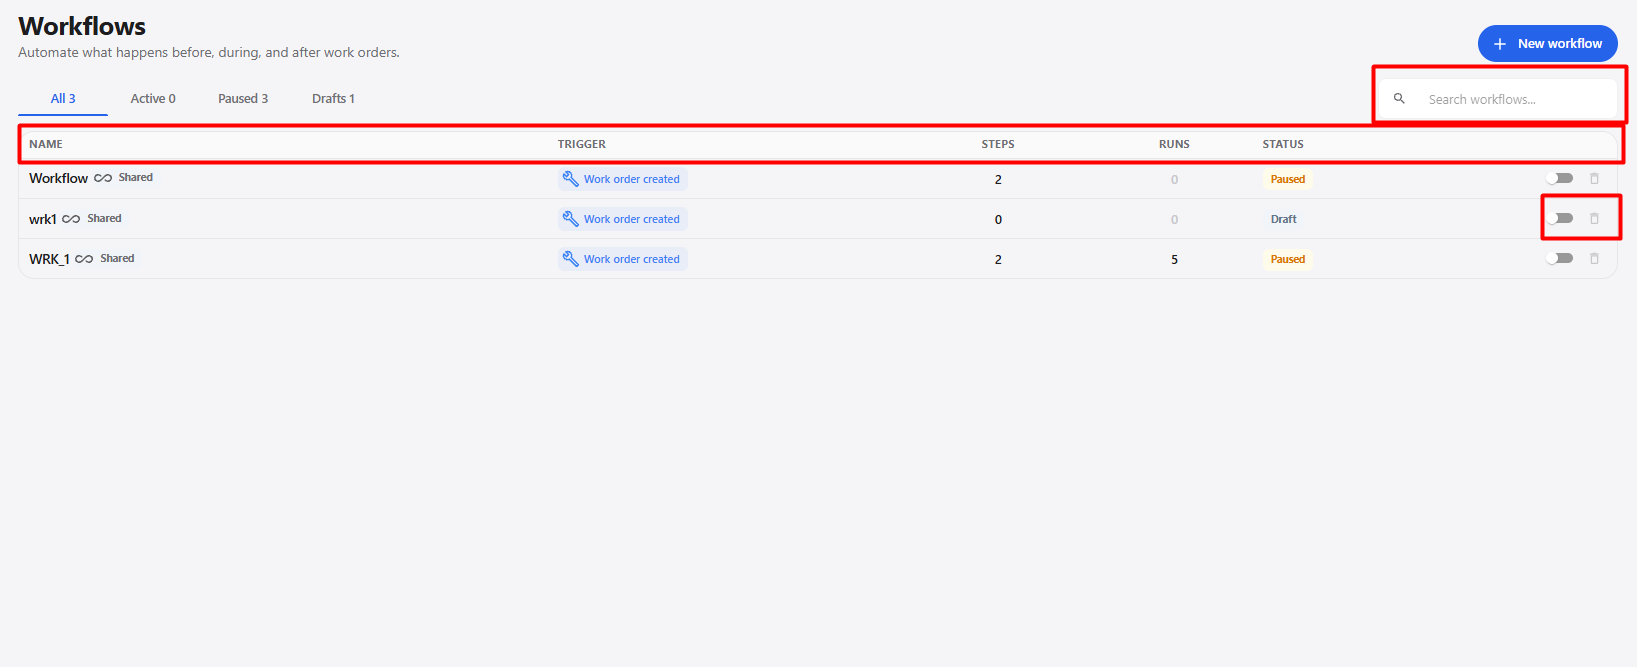
1.2 Workflow List
| Column / Option | Description |
|---|---|
| Name | Displays the name of the workflow. |
| Trigger | Displays the event that starts the workflow. |
| Steps | Displays the number of configured workflow steps. |
| Runs | Displays the number of times the workflow has been executed. |
| Status | Displays the current status of the workflow. |
| Toggle | Allows the workflow to be enabled or disabled when applicable. |
| Delete | Allows the workflow to be removed. |
| Search workflows | Allows users to search for a specific workflow by name. |
| New workflow | Opens the workflow creation form. |
2. Search Workflows
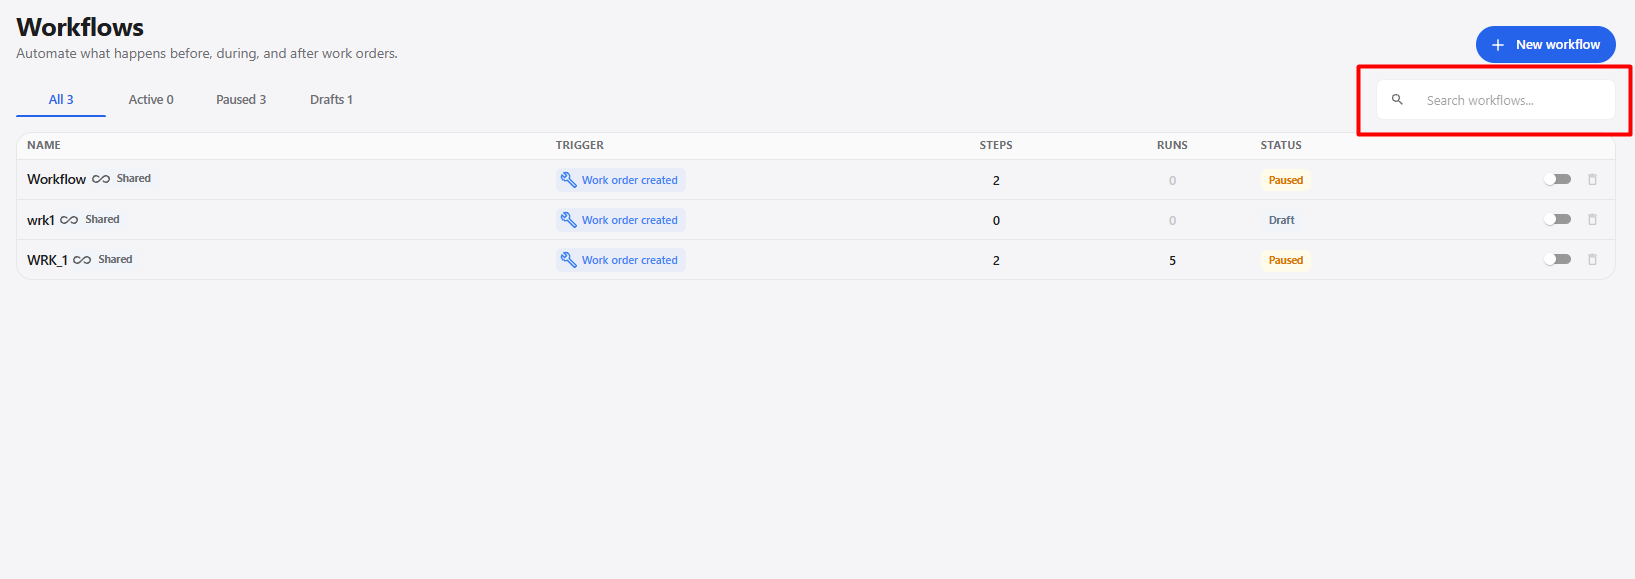
The Search workflows option allows users to quickly find a specific workflow from the workflow list.
Steps
- Open the Workflows module.
- Locate the Search workflows field.
- Enter the workflow name or relevant search text.
- The workflow list is filtered based on the entered search text.
- Select the required workflow to view or manage it.
3. View Workflows by Status
Workflows can be viewed based on their current status.
Steps
- Open the Workflows module.
- Select the required status tab.
- The workflow list displays workflows belonging to the selected status.
| Status | Description |
|---|---|
| All | Displays all workflows. |
| Active | Displays workflows that are currently active. |
| Paused | Displays workflows that are currently paused. |
| Drafts | Displays workflows that are still in draft status. |
4. Create a New Workflow
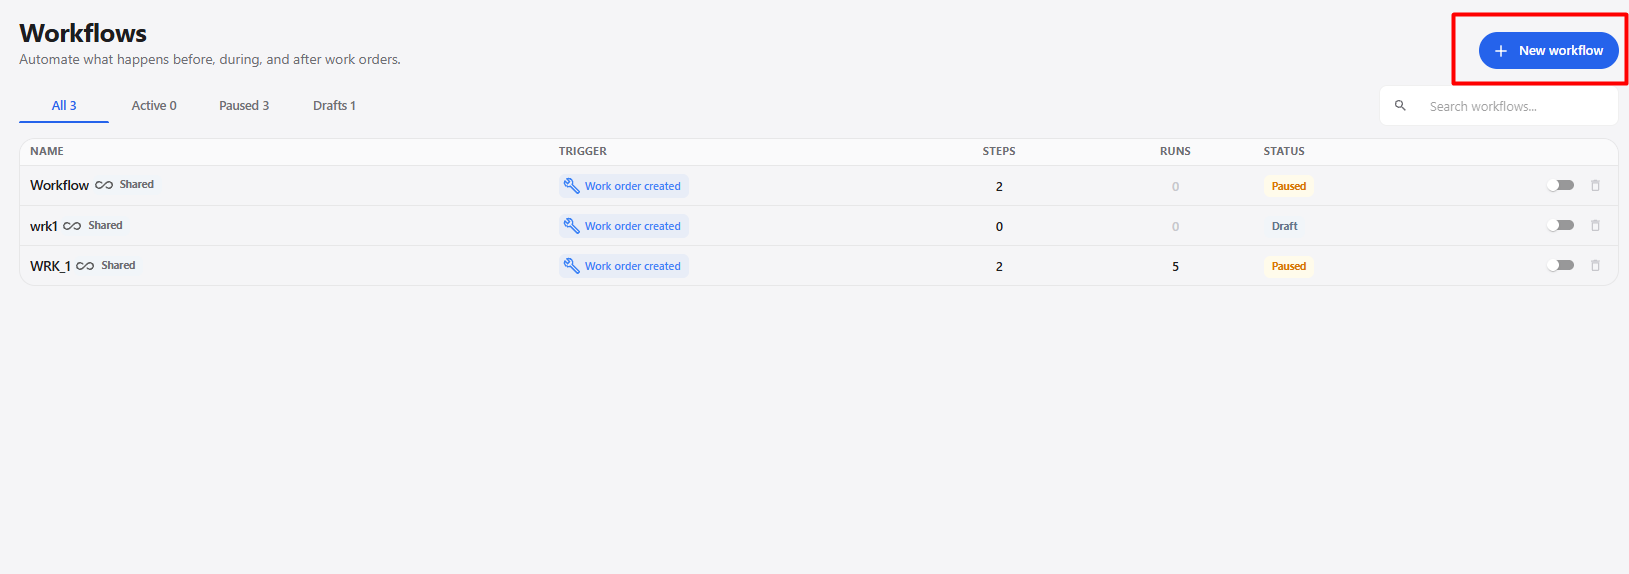
The New workflow option allows users to create a new automation workflow.
Steps
- Open the Workflows module.
- Click New workflow.
- The New workflow pop-up is displayed.
- Enter the required Workflow name*.
- Enter a Description, if required.
- Select the required Customer Scope.
- Select the event that should trigger the workflow.
- Review the selected trigger.
- Click Create & configure.
5. New Workflow Fields
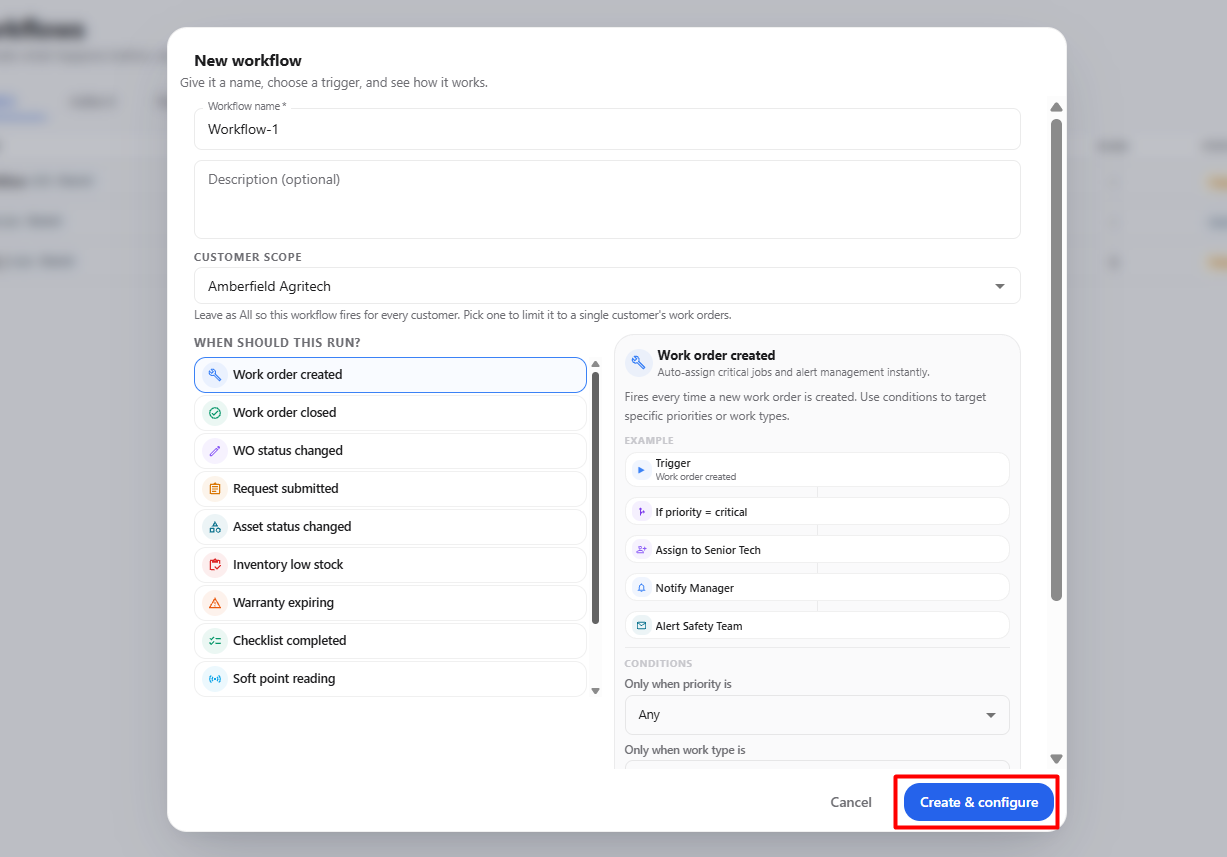
| Field / Option | Description |
|---|---|
| Workflow name* | Enter the name of the workflow. This field is mandatory. |
| Description | Enter an optional description explaining the purpose of the workflow. |
| Customer Scope | Defines whether the workflow applies to all customers or a specific customer. |
| Work order created | Starts the workflow when a work order is created. |
| Work order closed | Starts the workflow when a work order is closed. |
| WO status changed | Starts the workflow when the status of a work order changes. |
| Request submitted | Starts the workflow when a request is submitted. |
| Asset status changed | Starts the workflow when an asset status changes. |
| Inventory low stock | Starts the workflow when inventory reaches a low-stock condition. |
| Warranty expiring | Starts the workflow when a warranty is approaching its expiry. |
| Checklist completed | Starts the workflow when a checklist is completed. |
| Soft point reading | Starts the workflow based on a soft-point reading event. |
| Cancel | Closes the pop-up without creating the workflow. |
| Create & configure | Creates the workflow and continues to workflow configuration. |
6. Select a Workflow Trigger
The When should this run? section allows users to select the event that starts the workflow.
6.1 Available Triggers
| Trigger | Description |
|---|---|
| Work order created | Starts the workflow when a new work order is created. |
| Work order closed | Starts the workflow when a work order is closed. |
| WO status changed | Starts the workflow when a work order status changes. |
| Request submitted | Starts the workflow when a request is submitted. |
| Asset status changed | Starts the workflow when an asset status changes. |
| Inventory low stock | Starts the workflow when inventory reaches a low-stock condition. |
| Warranty expiring | Starts the workflow when a warranty is approaching its expiry. |
| Checklist completed | Starts the workflow when a checklist is completed. |
| Soft point reading | Starts the workflow based on a soft-point reading event. |
Steps
- Open the New workflow pop-up.
- Enter the Workflow name.
- Select the required Customer Scope.
- Locate When should this run?.
- Select the required trigger.
- Review the trigger details.
- Click Create & configure.
7. Work Order Created Trigger
The Work order created trigger starts the workflow whenever a new work order is created.
Steps
- Open the Workflows module.
- Click New workflow.
- Enter the required Workflow name*.
- Enter a Description, if required.
- Select the required Customer Scope.
- Under When should this run?, select Work order created.
- Review the trigger information.
- Configure the required conditions.
- Click Create & configure.
7.1 Trigger Details
| Option | Description |
|---|---|
| Work order created | Starts the workflow whenever a new work order is created. |
| If priority = critical | Allows the workflow to continue only when the work order matches the selected priority condition. |
| Assign to Senior Tech | Example action that automatically assigns the work order to a technician. |
| Notify Manager | Example action that notifies a manager. |
| Alert Safety Team | Example action that notifies the safety team. |
7.2 Conditions
| Condition | Description |
|---|---|
| Only when priority is | Filters the workflow based on work order priority. |
| Only when work type is | Filters the workflow based on work type. |
| Only for site | Limits the workflow to a selected site. |
| Only for location | Limits the workflow to a specific location within the selected site. |
| Condition Value | Description |
|---|---|
| Any | Applies the workflow regardless of the selected value. |
| Priority | Select the priority that should trigger the workflow. |
| Work type | Select the work type that should trigger the workflow. |
| Site | Select the site where the workflow should apply. |
| Location | Select a location after selecting the required site. |
Note: The available condition options depend on the selected trigger.
8. Configure Workflow Steps
After creating the workflow, the workflow configuration page is displayed.
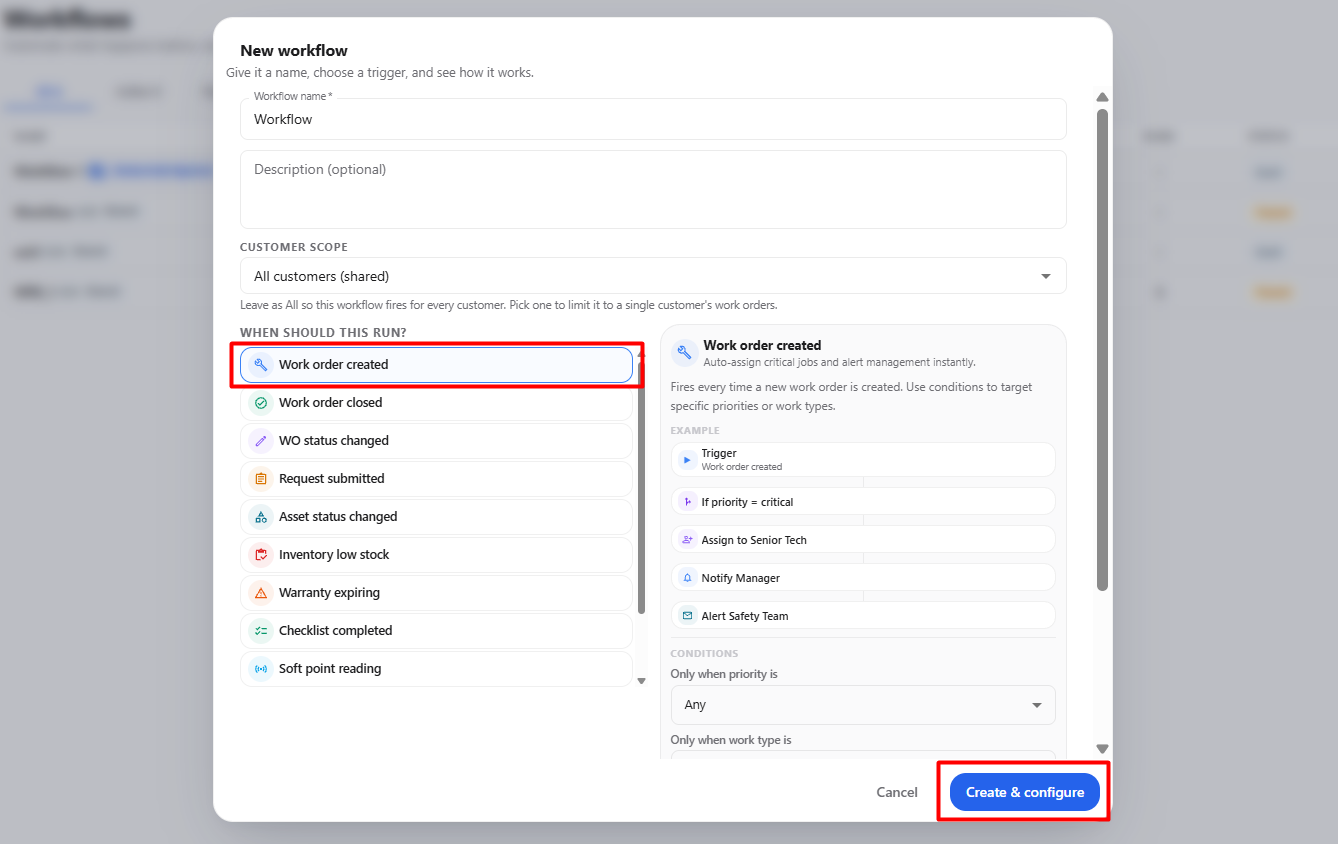
The selected trigger, such as Work order created, is displayed at the top of the workflow.
8.1 Add a Workflow Step
- Locate the + icon below the workflow trigger.
- Click the + icon.
- The Add a step pop-up is displayed.
- The pop-up provides different Actions and Control Flow options.
- Select the required step based on the workflow requirement.
8.2 Available Actions
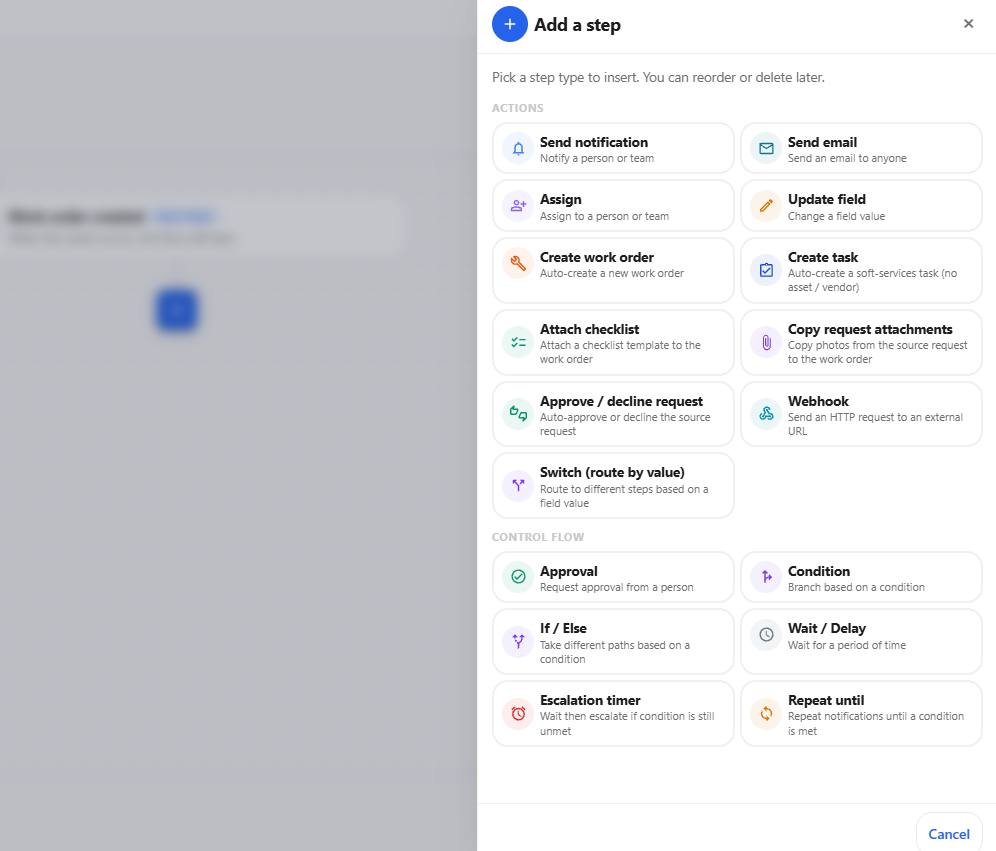
| Action | What it does |
|---|---|
| Send notification | Sends a notification to a selected person or team. |
| Send email | Sends an email to the required recipient. |
| Assign | Assigns the work to a person or team. |
| Update field | Changes the value of a selected field. |
| Create work order | Automatically creates a new work order. |
| Create task | Automatically creates a task. |
| Attach checklist | Attaches a checklist template to the work order. |
| Copy request attachments | Copies attachments from the source request to the work order. |
| Approve / decline request | Automatically approves or declines the source request. |
| Webhook | Sends an HTTP request to an external URL. |
| Switch (route by value) | Routes the workflow to different steps based on a field value. |
8.3 Available Control Flow Options
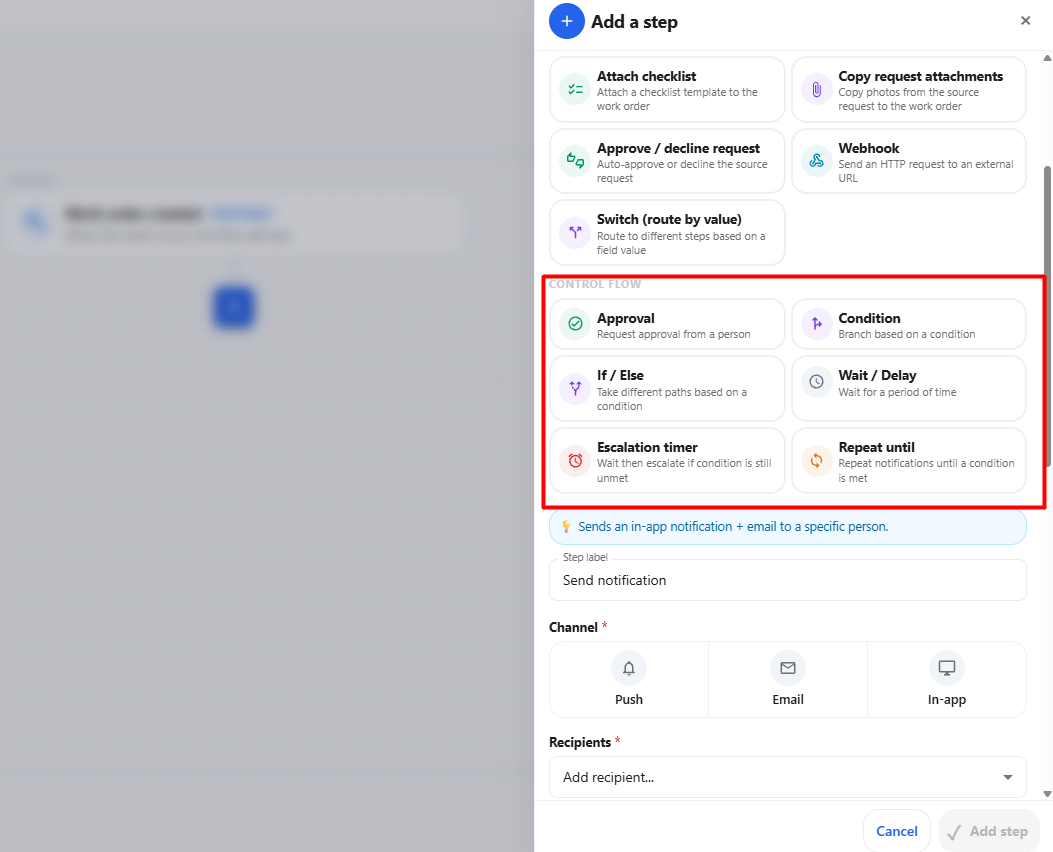
| Control Flow | What it does |
|---|---|
| Approval | Requests approval from a person. |
| Condition | Branches the workflow based on a condition. |
| If / Else | Creates different workflow paths based on a condition. |
| Wait / Delay | Pauses the workflow for a specified period. |
| Escalation timer | Waits and escalates if a condition remains unmet. |
| Repeat until | Repeats an action until the specified condition is met. |
9. Send Notification Configuration
When Send notification is selected from the Add a step pop-up, the notification configuration panel is displayed. Scroll through the panel to configure all available notification settings.
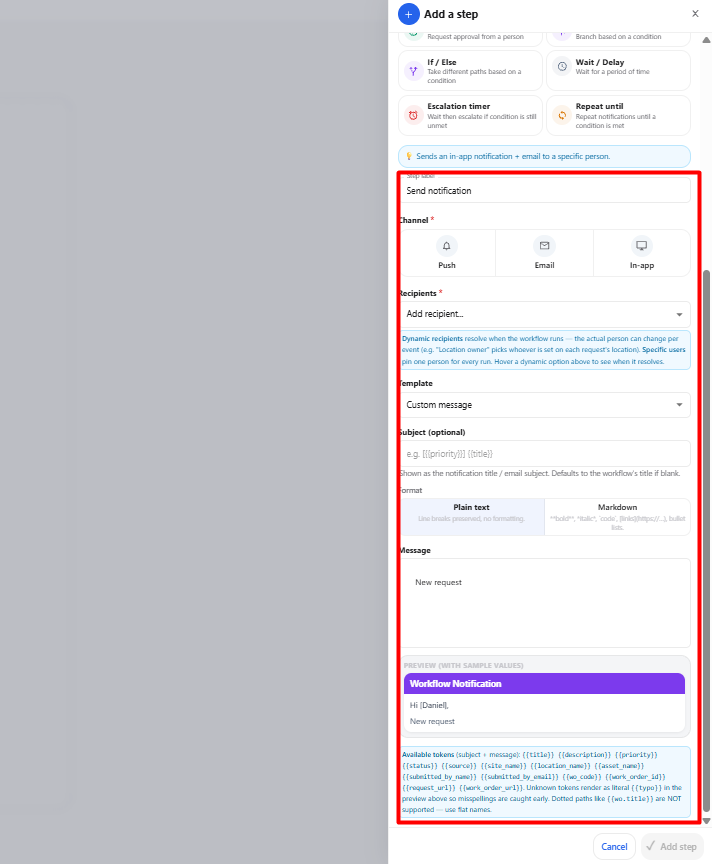
9.1 Send Notification Fields
| Section | Field / Option | Description |
|---|---|---|
| General | Step label | Defines the name of the workflow step. The default value is Send notification. |
| Notification | Channel* | Selects how the notification should be delivered. The available options are Push, Email, and In-app. |
| Recipient | Recipients* | Selects the person who should receive the notification. Click Add recipient... to select a recipient. |
| Recipient | Dynamic recipients | Allows the workflow to determine the actual recipient when the workflow runs. |
| Template | Template | Defines the notification template. Custom message can be selected to create a custom notification. |
| Subject | Subject (optional) | Defines the notification or email subject. Workflow values can be used dynamically in the subject. |
| Message | Format | Defines how the notification message is formatted. The available options are Plain text and Markdown. |
| Message | Message | Contains the main notification content that will be sent to the selected recipient. Workflow values can be included dynamically. |
| Preview | Preview | Displays a sample preview of the notification using sample values. |
9.2 Notification Configuration
| Section | Field / Option | Description |
|---|---|---|
| Notification Channel | Push | Sends the notification as a push notification. |
| Notification Channel | Sends the notification through email. | |
| Notification Channel | In-app | Displays the notification inside the application. |
| Recipient Configuration | Add recipient... | Selects the person who should receive the notification. |
| Recipient Configuration | Dynamic recipient | Allows the recipient to be determined automatically when the workflow runs. |
| Template Configuration | Template | Selects the notification template to use. |
| Template Configuration | Custom message | Allows the user to create the notification content manually. |
| Subject Configuration | Subject (optional) | Defines the notification or email subject. |
| Subject Configuration | Workflow values | Allows dynamic workflow values to be included in the subject where supported. |
| Subject Configuration | Blank subject | The subject can be left blank when it is not required. |
| Message Format | Plain text | Displays the message as plain text. Line breaks are preserved and formatting is not applied. |
| Message Format | Markdown | Allows Markdown formatting such as bold, italic, code, links, and bullet lists. |
| Message Configuration | Message | Enter the content that should be sent to the recipient. |
| Message Configuration | Workflow values | Allows dynamic values from the workflow to be included automatically in the message. |
| Message Configuration | Preview | Displays a preview of the configured notification using sample values. |
10. Send Email Configuration
The Send email action allows the workflow to automatically send an email to a specified recipient.
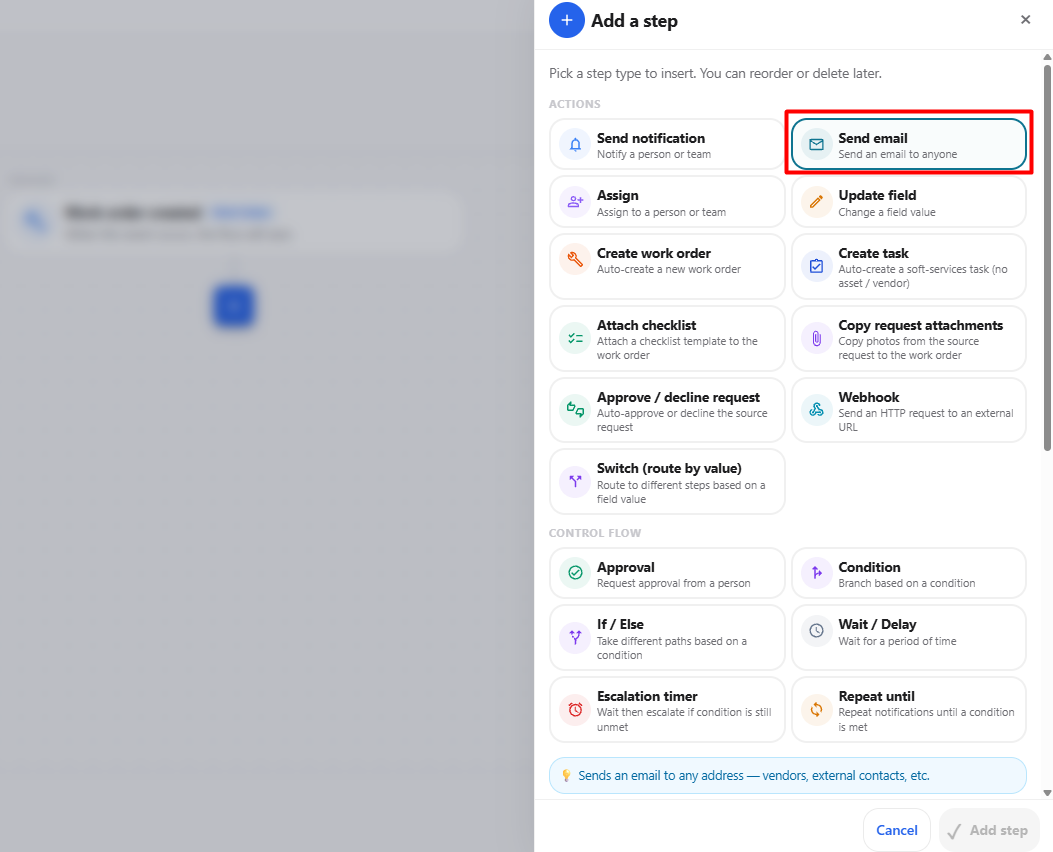
When Send email is selected and the configuration panel is scrolled down, the following fields are available.
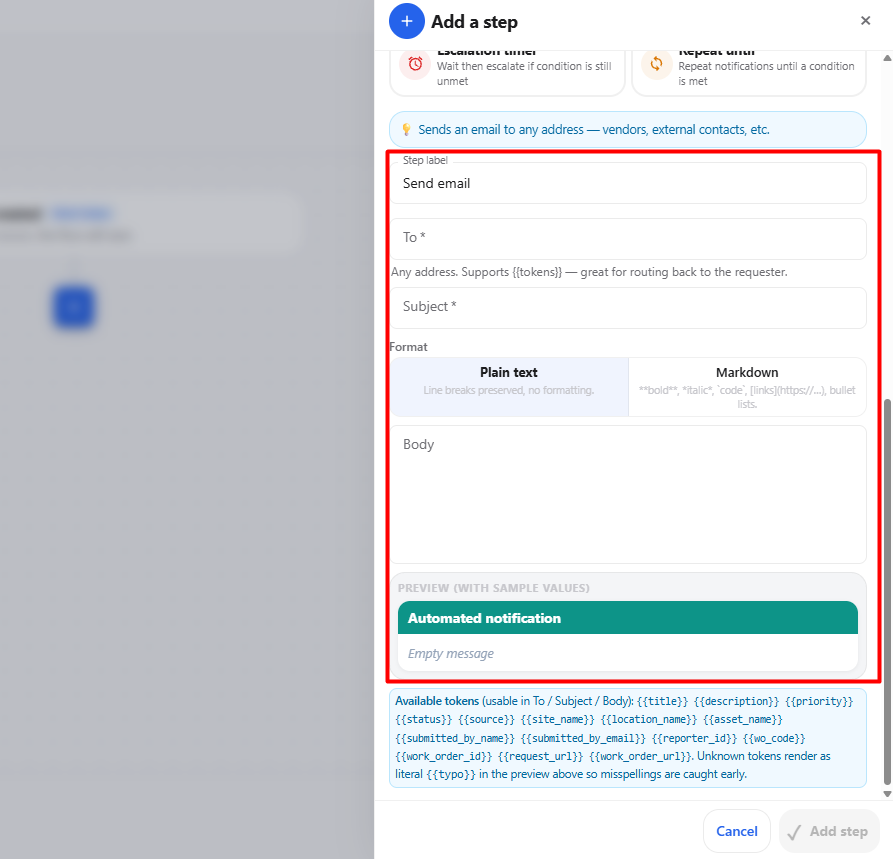
| Section | Field / Option | Description |
|---|---|---|
| General | Step label | Defines the name of the workflow step. The default value is Send email. |
| Recipient | To* | Enter the email address of the recipient. Dynamic workflow tokens can also be used for routing the email to the appropriate person. |
| Subject* | Enter the subject of the email. | |
| Message Format | Plain text | Sends the email as plain text. Line breaks are preserved without additional formatting. |
| Message Format | Markdown | Allows Markdown formatting such as bold, italic, code, links, and bullet lists. |
| Message Content | Body | Enter the main content of the email that will be sent to the recipient. |
| Preview | Preview (with sample values) | Displays a preview of how the email will appear using sample workflow values. |
| Dynamic Values | Available tokens | Provides workflow tokens that can be inserted into the To, Subject, or Body fields. |
11. Assign Configuration
The Assign action allows you to automatically assign a user or team to a work order.
This is particularly useful for Work order created triggers, where you want to ensure the work is assigned immediately when the work order is created.
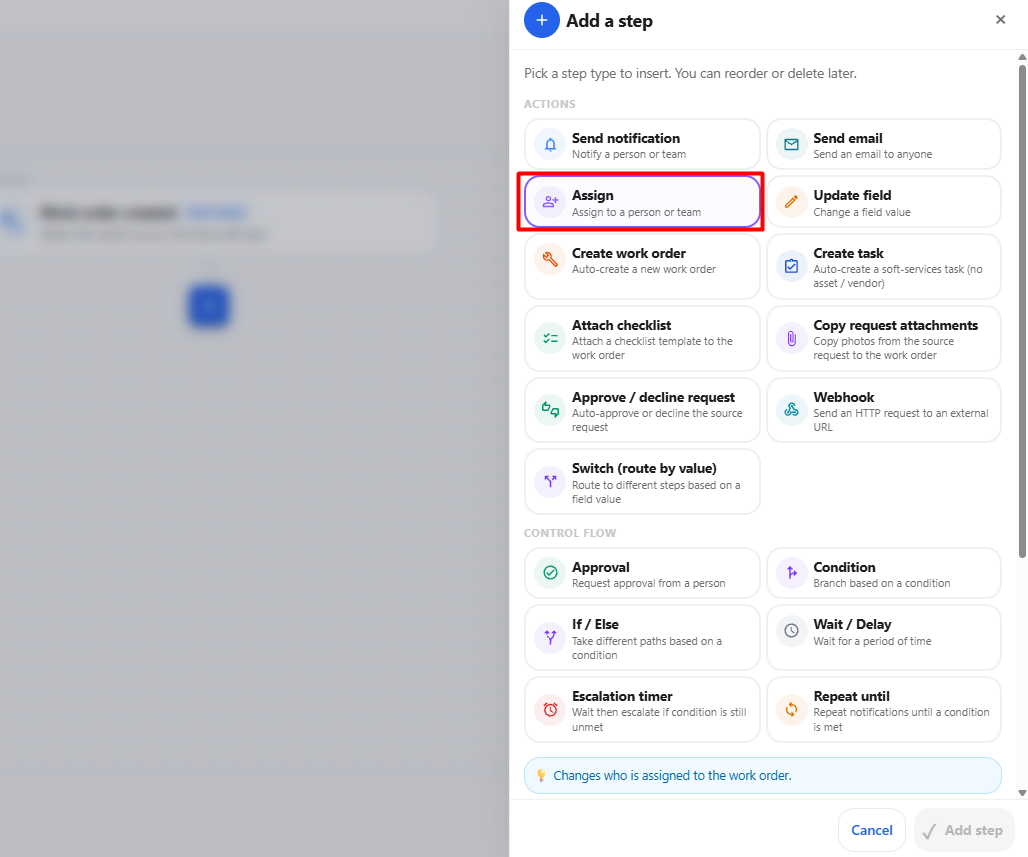
When Assign is selected from the Add a step options, the assignment configuration panel is displayed.
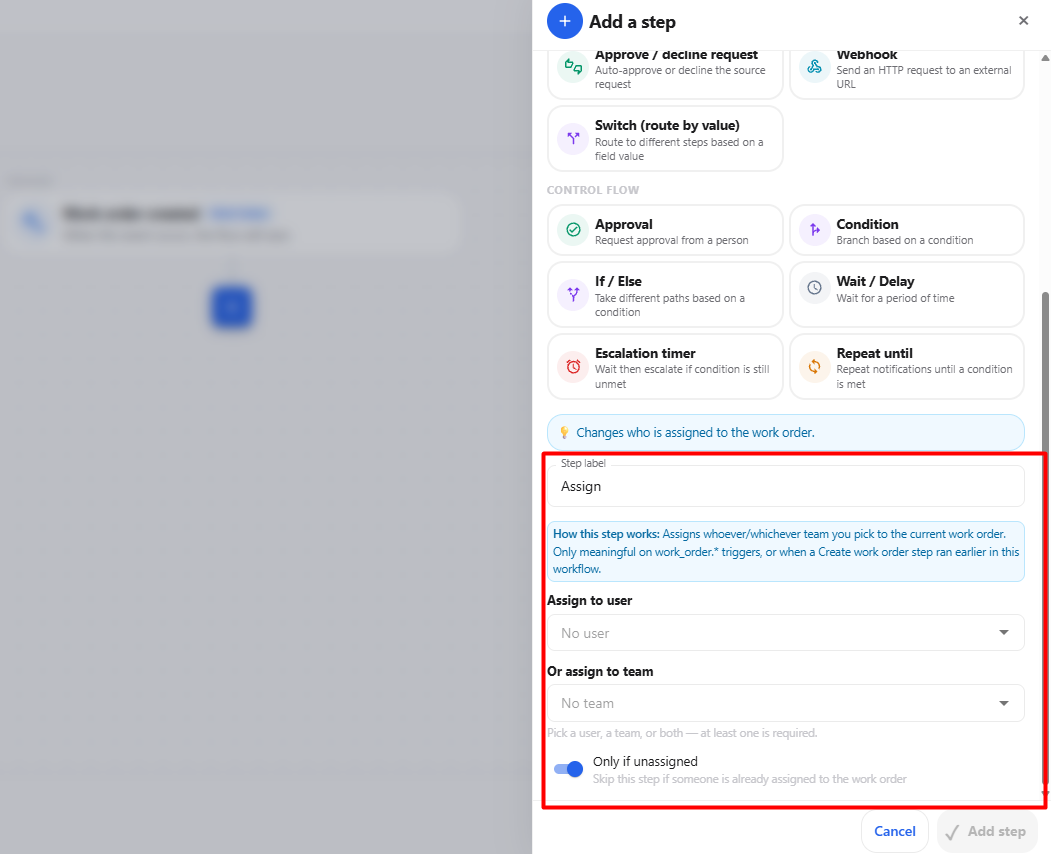
| Section | Field / Option | Description |
|---|---|---|
| General | Step label | Defines the name of the workflow step. The default value is Assign. |
| Information | How this step works | Assigns the selected user or team to the current work order. This step is meaningful for work_order_created triggers or when a Create work order step has run earlier in the workflow. |
| Assignment | Assign to user | Select the user who should be assigned to the current work order. |
| Assignment | Or assign to team | Select the team that should be assigned to the current work order. |
| Assignment Requirement | User or team | A user, a team, or both can be selected. At least one assignment is required. |
| Condition | Only if unassigned | Runs the assignment step only when the work order does not already have an assigned user or team. |
| Condition Description | Skip this step if someone is already assigned to the work order | Prevents the workflow from changing an existing assignment when the option is enabled. |
| Action | Add step | Adds the configured Assign action to the workflow after the required assignment information is provided. |
| Action | Cancel | Closes the configuration panel without adding the step. |
12. Update Field Configuration
The Update field action allows the workflow to automatically update a field such as priority, status, or category when the workflow reaches this step.
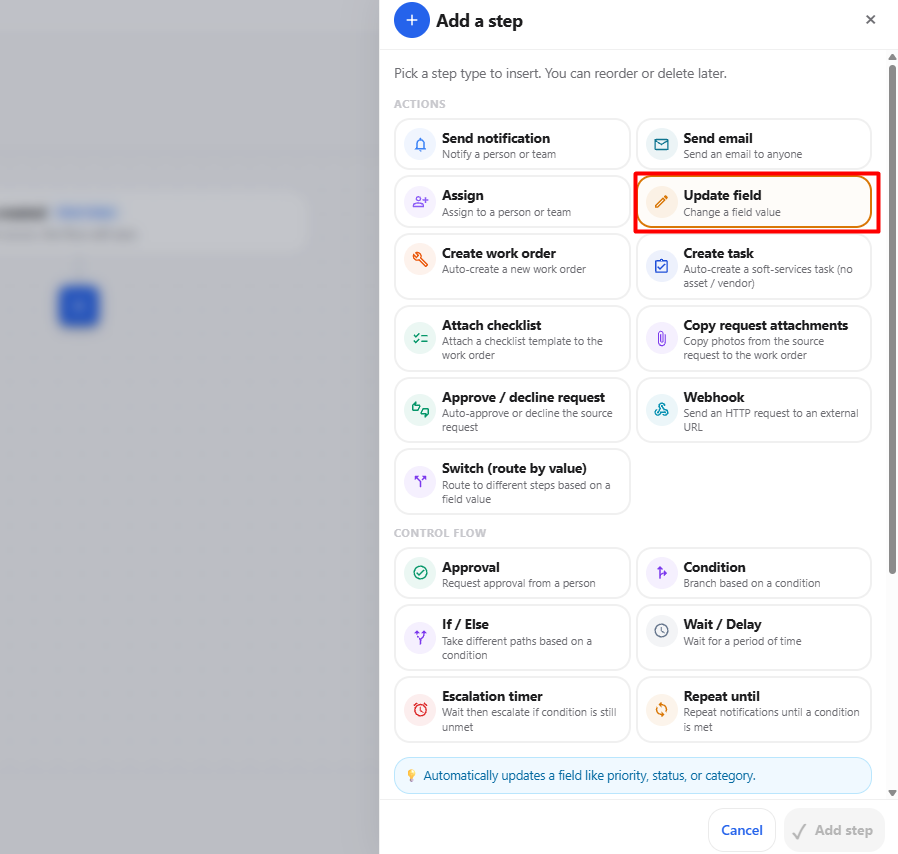
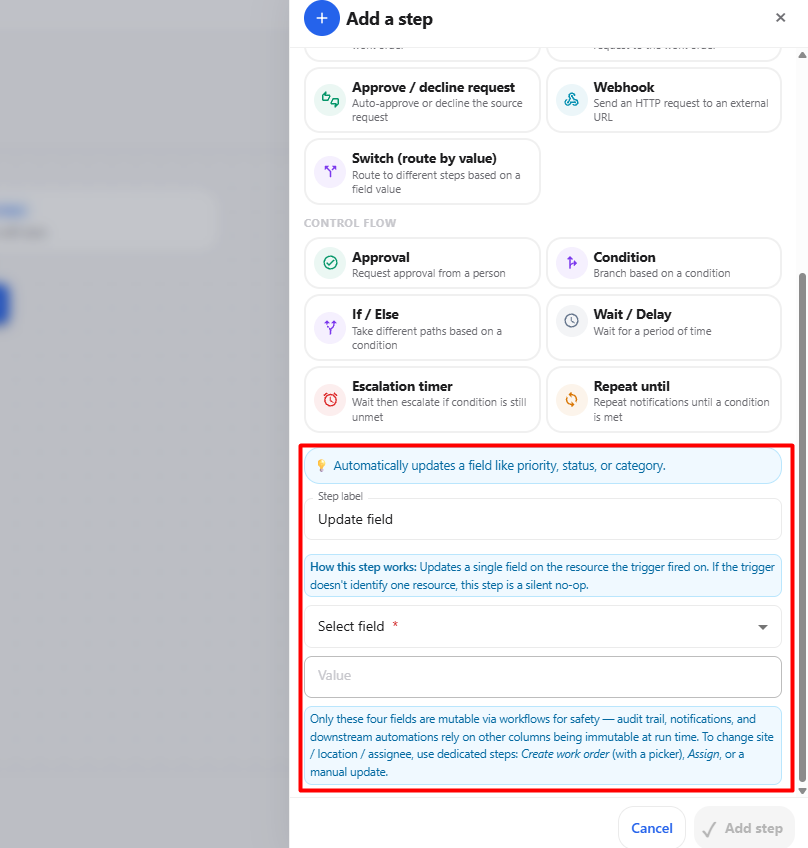
| Section | Field / Option | Description |
|---|---|---|
| Information | Update field | Automatically updates a field such as priority, status, or category. |
| General | Step label | Defines the name of the workflow step. The default value is Update field. |
| Information | How this step works | Updates a single field on the resource identified by the workflow trigger. If the trigger does not identify a resource, the step does not perform any action. |
| Field Configuration | Select field* | Select the field that needs to be updated. |
| Field Configuration | Value | Enter or select the new value for the selected field. |
| Information | Field restrictions | Only supported fields can be modified through workflows. Other fields remain unchanged to maintain workflow safety and ensure audit trail, notifications, and other automations continue to work correctly. |
| Action | Add step | Adds the configured Update field action to the workflow. The required field and value must be provided. |
| Action | Cancel | Closes the configuration panel without adding the step. |
13. Create Work Order Configuration
The Create work order action allows the workflow to automatically create a new work order when the workflow reaches this step.
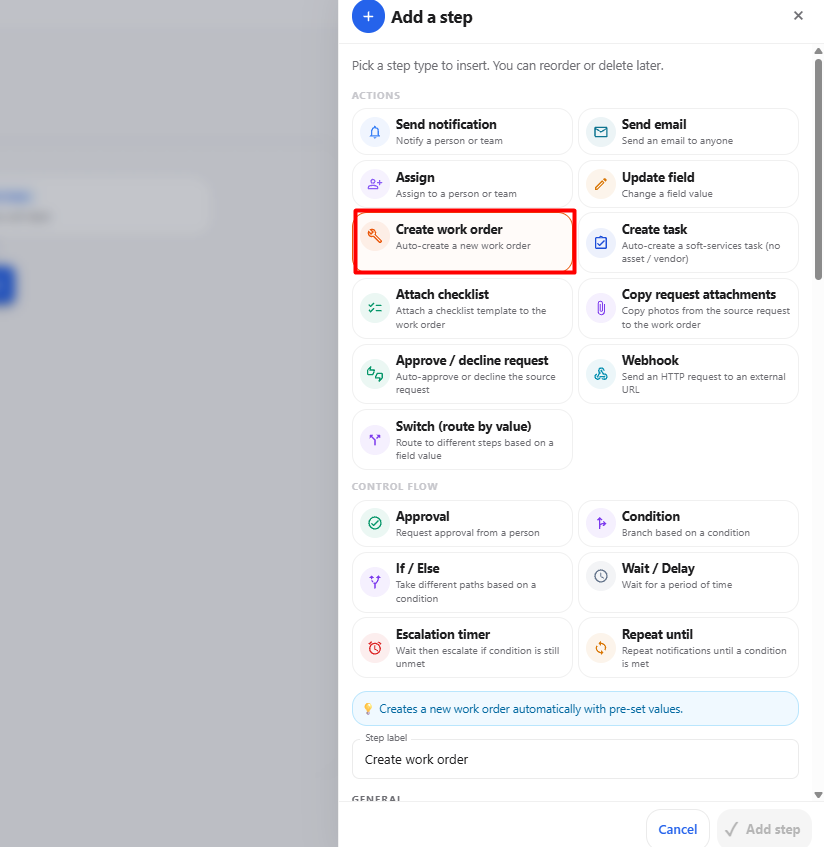
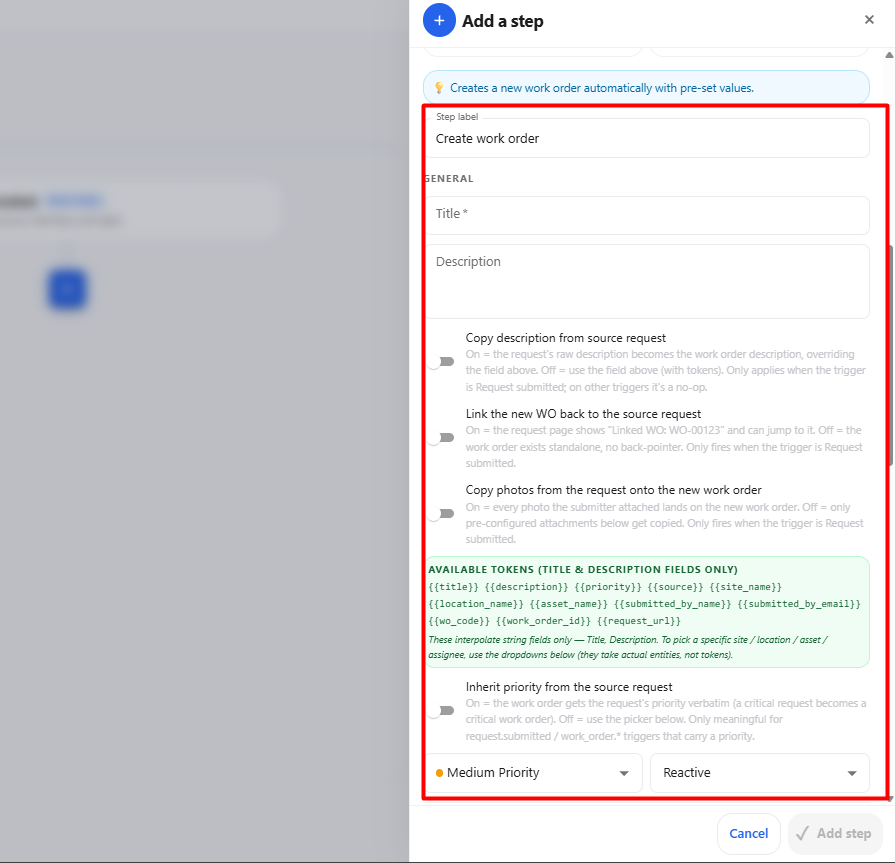
| Section | Field / Option | Description |
|---|---|---|
| General | Step label | Defines the name of the workflow step. The default value is Create work order. |
| General | Title* | Enter the title of the work order that will be created. |
| General | Description | Enter the description of the work order. |
| Description | Copy description from source request | Copies the description from the source request into the newly created work order. |
| Description | Link the new WO back to the source request | Links the newly created work order to the source request when the workflow is triggered by a request. |
| Description | Copy photos from the request onto the new work order | Copies photos attached to the source request to the newly created work order. |
| Priority | Inherit priority from the source request | Uses the priority of the source request for the newly created work order. |
| Priority | Priority | Select the priority for the new work order, such as Medium Priority. |
| Work Type | Work Type | Select the work type for the new work order, such as Reactive. |
| Assignment | Assign to person | Select the person who should be assigned to the newly created work order. |
| Assignment | Assign to team | Select the team that should be assigned to the newly created work order. |
| Reporter | Reporter | Select who should be recorded as the reporter of the new work order. Default — the person who triggered the workflow can be used. |
| Location & Asset | Inherit the trigger's location when the picker below is empty | Uses the trigger's location as a fallback when no specific location is selected. |
| Location & Asset | Site | Select the site for the new work order. Leave empty to inherit the site from the trigger. |
| Location & Asset | Location | Select a location after selecting a site. Leave empty to inherit the location from the trigger. |
| Location & Asset | Asset | Select an asset for the new work order. Leave empty to inherit the asset from the trigger where applicable. |
| Schedule | Start date | Select the planned start date for the work order. |
| Schedule | Due date | Select the planned due date for the work order. |
| Schedule | Est. hours | Enter the estimated number of hours required to complete the work order. |
| Schedule | Est. minutes | Enter the estimated number of minutes required to complete the work order. |
| Schedule | Create immediately when workflow runs | Creates the work order immediately when the workflow reaches this step. |
| Linked Items | Select checklists | Select a checklist to attach to the newly created work order. |
| Linked Items | No vendor | Select a vendor for the work order when required. |
| Linked Items | Select category | Select the category for the new work order. |
| Linked Items | Report template — use org default | Select a report template or use the organization's default report template. |
| Attachments | Upload files | Upload files that will be attached to the newly created work order. |
| Available Tokens | Workflow tokens | Allows workflow values such as title, description, priority, site name, location, asset name, and other supported values to be used dynamically in the work order fields. |
14. Create Task Configuration
The Create task action allows the workflow to automatically create a new task when the workflow reaches this step.
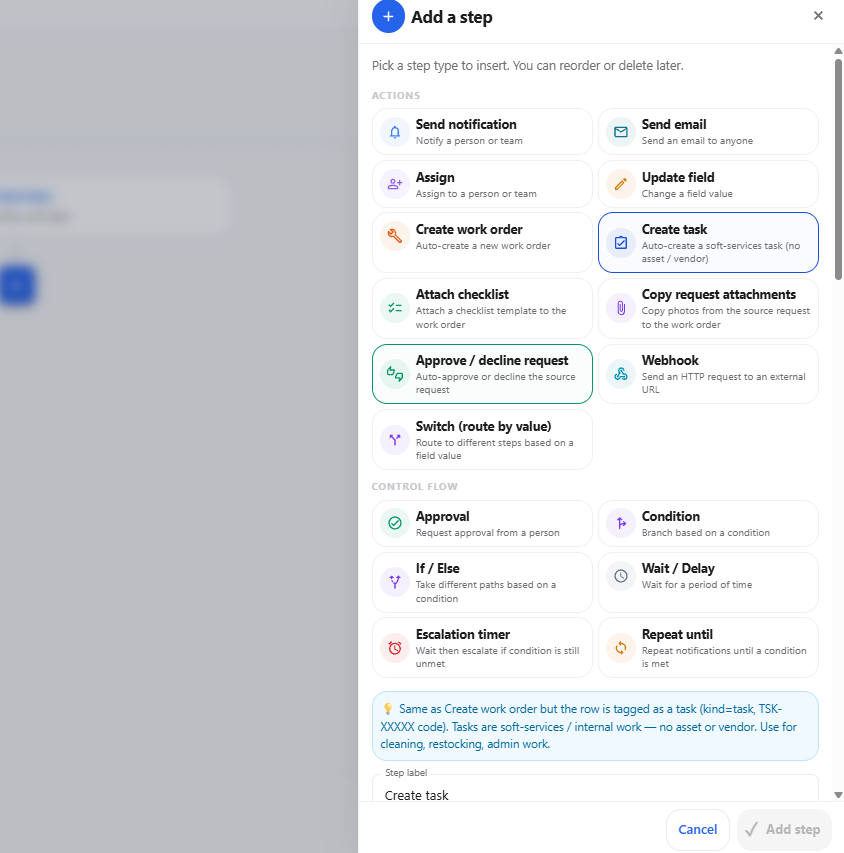
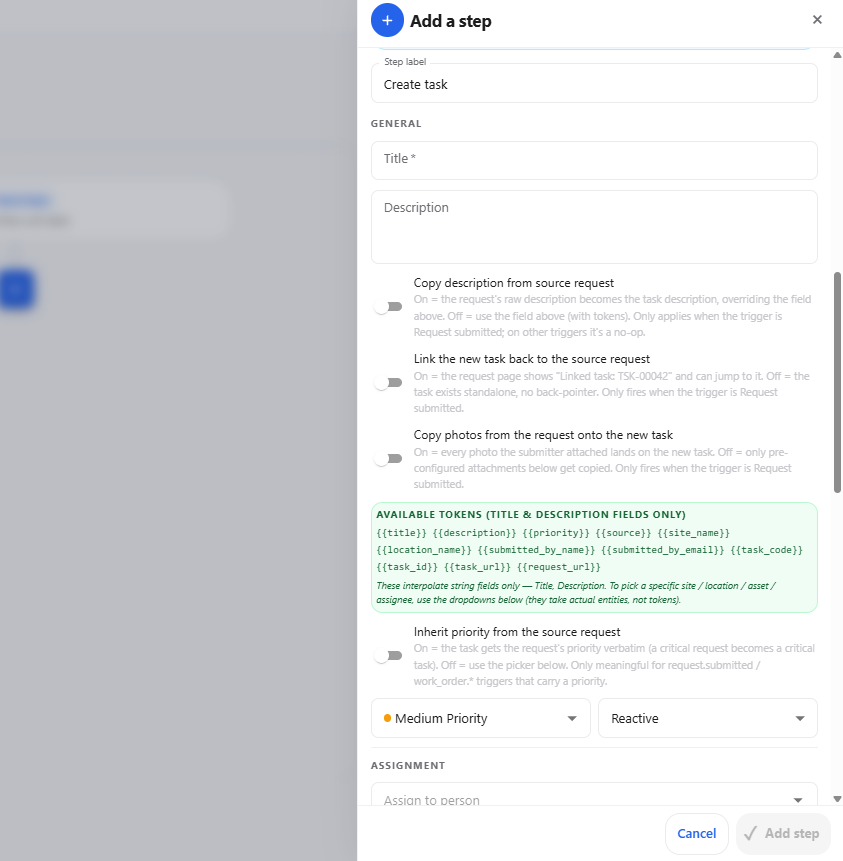
| Section | Field / Option | Description |
|---|---|---|
| General | Step label | Defines the name of the workflow step. The default value is Create task. |
| General | Title* | Enter the title of the task that will be created. |
| General | Description | Enter the description of the task. |
| Description | Copy description from source request | Copies the description from the source request into the newly created task. |
| Description | Link the new task back to the source request | Links the newly created task to the source request when the workflow is triggered by a request. |
| Description | Copy photos from the request onto the new task | Copies photos attached to the source request to the newly created task. |
| Priority | Inherit priority from the source request | Uses the priority of the source request for the newly created task. |
| Priority | Priority | Select the priority for the new task, such as Medium Priority. |
| Work Type | Work Type | Select the work type for the new task, such as Reactive. |
| Assignment | Assign to person | Select the person who should be assigned to the newly created task. |
| Assignment | Assign to team | Select the team that should be assigned to the newly created task. |
| Reporter | Reporter | Select who should be recorded as the reporter of the new task. Default — the person who triggered the workflow can be used. |
| Location & Asset | Inherit the trigger's location when the picker below is empty | Uses the trigger's location as a fallback when no specific location is selected. |
| Location & Asset | Site | Select the site for the new task. Leave empty to inherit the site from the trigger. |
| Location & Asset | Location | Select a location after selecting a site. Leave empty to inherit the location from the trigger. |
| Location & Asset | Asset | Select an asset for the new task. Leave empty to inherit the asset from the trigger where applicable. |
| Schedule | Start date | Select the planned start date for the task. |
| Schedule | Due date | Select the planned due date for the task. |
| Schedule | Est. hours | Enter the estimated number of hours required to complete the task. |
| Schedule | Est. minutes | Enter the estimated number of minutes required to complete the task. |
| Schedule | Create immediately when workflow runs | Creates the task immediately when the workflow reaches this step. |
| Linked Items | Select checklists | Select a checklist to attach to the newly created task. |
| Linked Items | Select category | Select the category for the new task. |
| Linked Items | Report template — use org default | Select a report template or use the organization's default report template. |
| Attachments | Upload files | Upload files that will be attached to the newly created task. |
| Available Tokens | Workflow tokens | Allows supported workflow values such as title, description, priority, site name, location, asset name, and other available values to be used dynamically in the task fields. |
15. Attach Checklist Configuration
The Attach checklist action allows the workflow to automatically attach a checklist template to a work order when the workflow reaches this step.
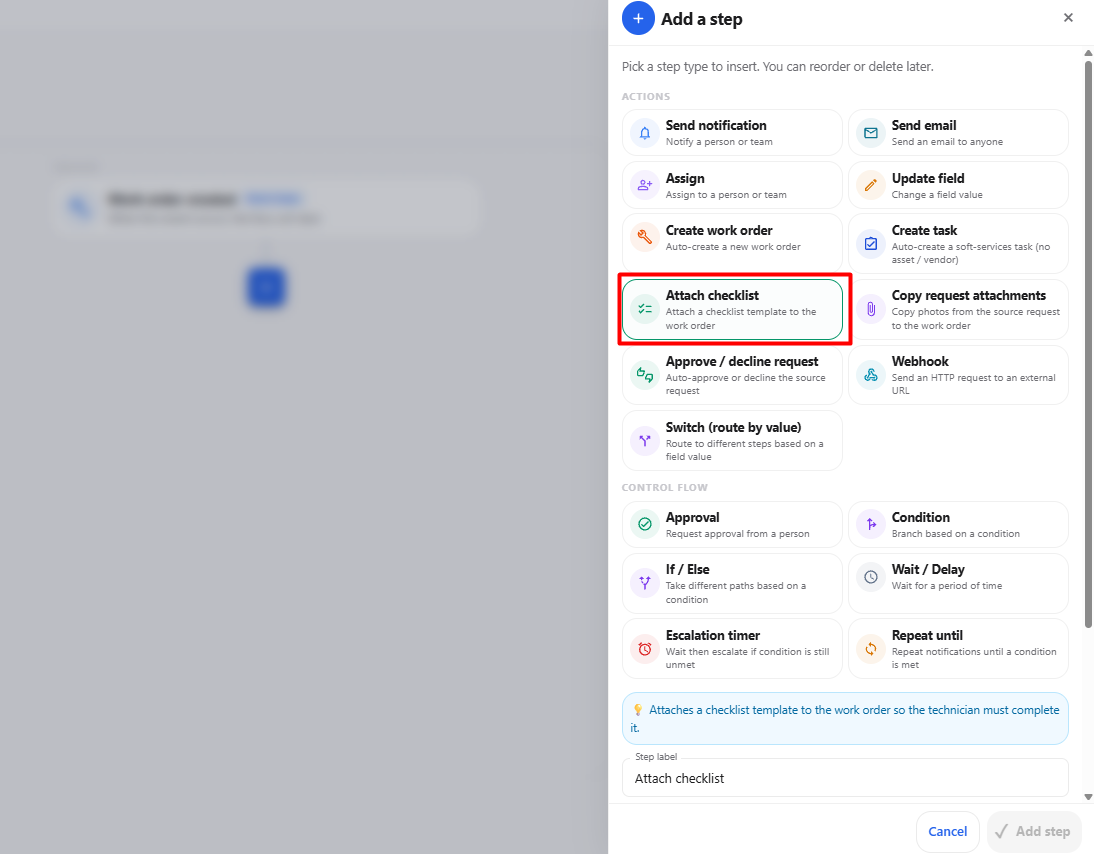
When Attach checklist is selected from the Add a step options, the checklist configuration panel is displayed.
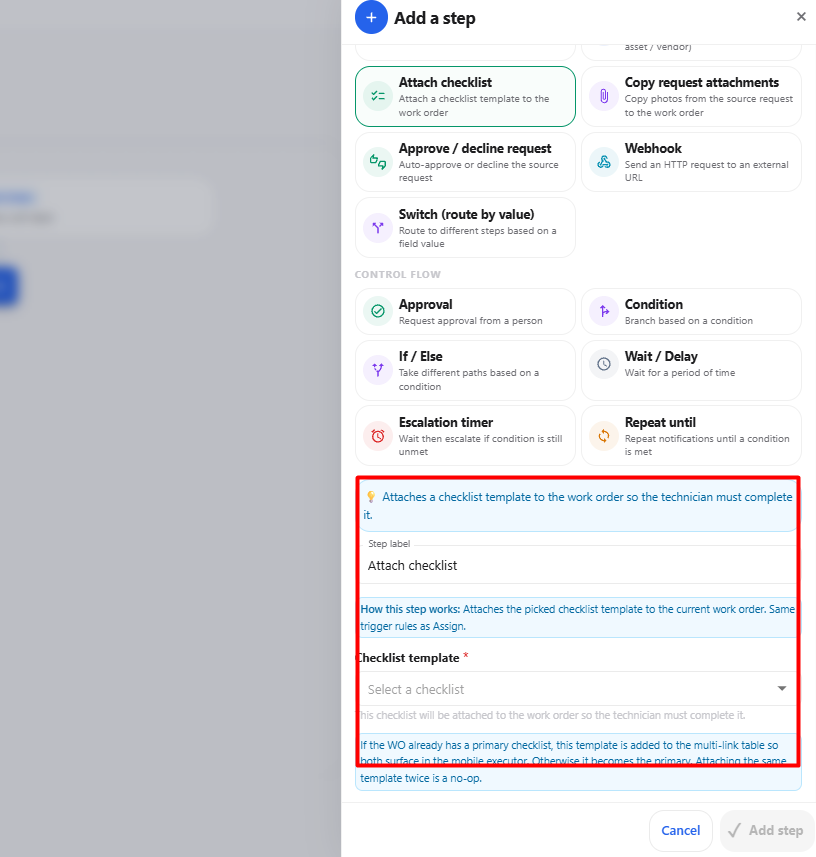
| Section | Field / Option | Description |
|---|---|---|
| Information | Attach checklist | Automatically attaches a checklist template to the work order. |
| General | Step label | Defines the name of the workflow step. The default value is Attach checklist. |
| Checklist | Select checklist | Select the checklist template that should be attached to the work order. |
| Action | Add step | Adds the configured Attach checklist action to the workflow. |
| Action | Cancel | Closes the configuration panel without adding the step. |
16. Copy Request Attachments Configuration
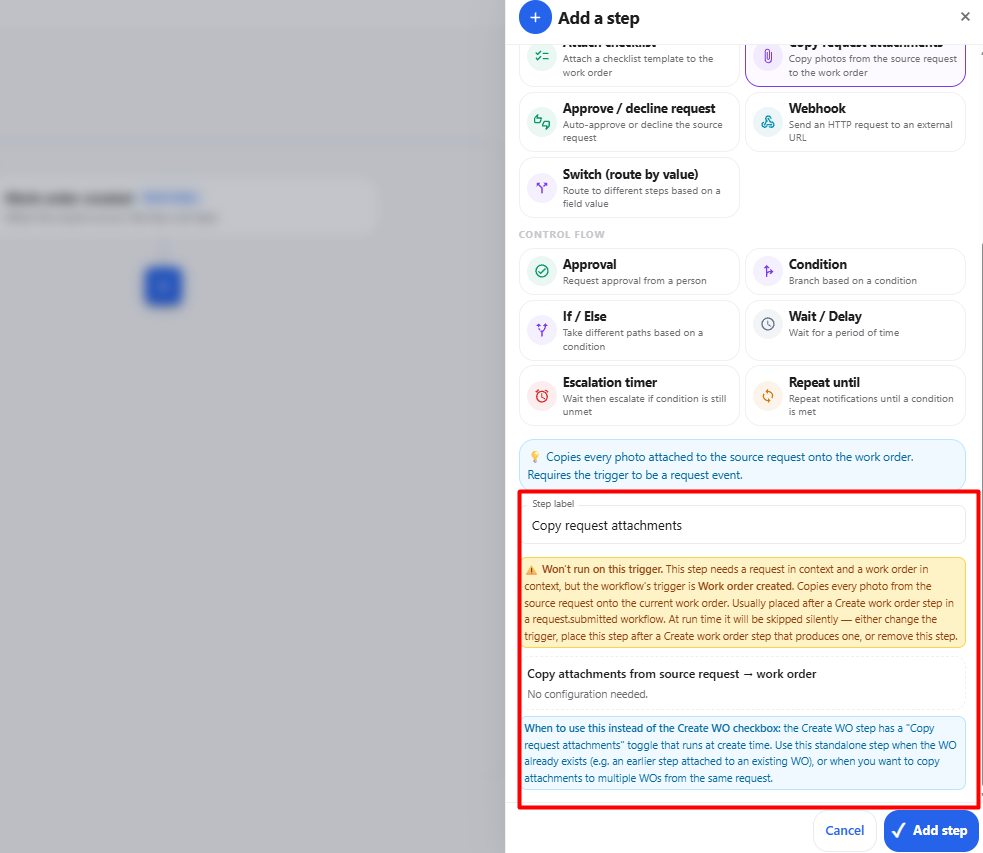
The Copy request attachments action allows the workflow to copy attachments from a source request to the current work order.
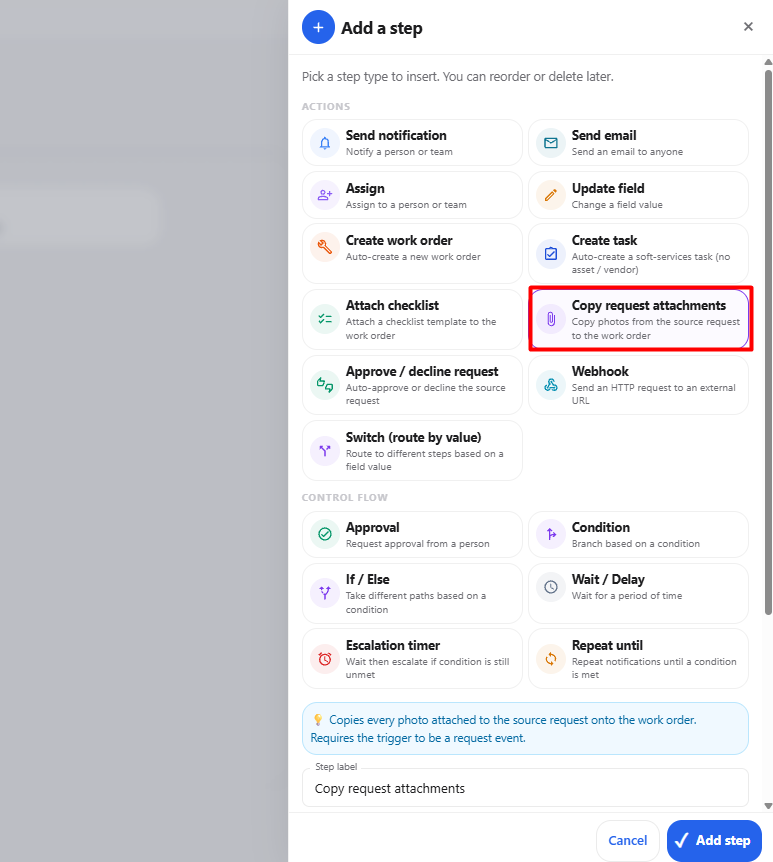
| Section | Field / Option | Description |
|---|---|---|
| General | Step label | Defines the name of the workflow step. The default value is Copy request attachments. |
| Information | Trigger Requirement | This step requires a request and a work order in the workflow context. |
| Action | Copy attachments from source request → work order | Copies the attachments from the source request to the current work order. |
| Configuration | No configuration needed | No additional fields or settings are required for this action. |
| Usage | Copy request attachments | Can be used as a standalone workflow step when the work order already exists, or when attachments need to be copied to multiple work orders from the same request. |
| Action | Add step | Adds the Copy request attachments action to the workflow. |
| Action | Cancel | Closes the configuration panel without adding the step. |
Important: This step requires both a request and a work order in the workflow context. If the selected trigger does not provide the required context, the step will not run.
17. Approve / Decline Request Configuration
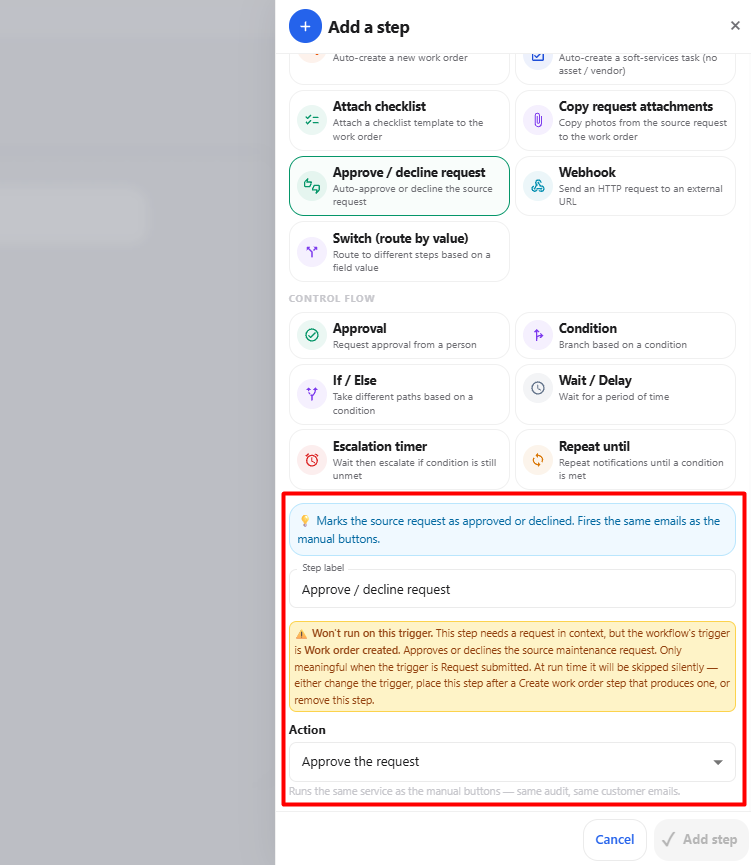
The Approve / decline request action allows the workflow to mark the source request as either approved or declined. It performs the same service as the corresponding manual buttons and sends the same customer emails.
| Section | Field / Option | Description |
|---|---|---|
| Information | Approve / decline request | Marks the source request as either approved or declined. |
| General | Step label | Defines the name of the workflow step. The default value is Approve / decline request. |
| Trigger Requirement | Request context required | This step requires a request in the workflow context. |
| Trigger Compatibility | Request submitted | The action is intended to run meaningfully when the workflow is triggered by Request submitted. |
| Action | Approve the request | Approves the source request and performs the same service as the manual Approve action, including the associated customer emails. |
| Action | Decline the request | Declines the source request and performs the same service as the manual Decline action, including the associated customer emails. |
| Configuration | Action dropdown | Select whether the workflow should Approve the request or Decline the request. |
| Action | Add step | Adds the configured Approve / decline request action to the workflow. |
| Action | Cancel | Closes the configuration panel without adding the step. |
Important: The selected trigger must provide a request context. If the workflow is triggered by Work order created, this step will not run because the required request context is not available.
18. Webhook Configuration
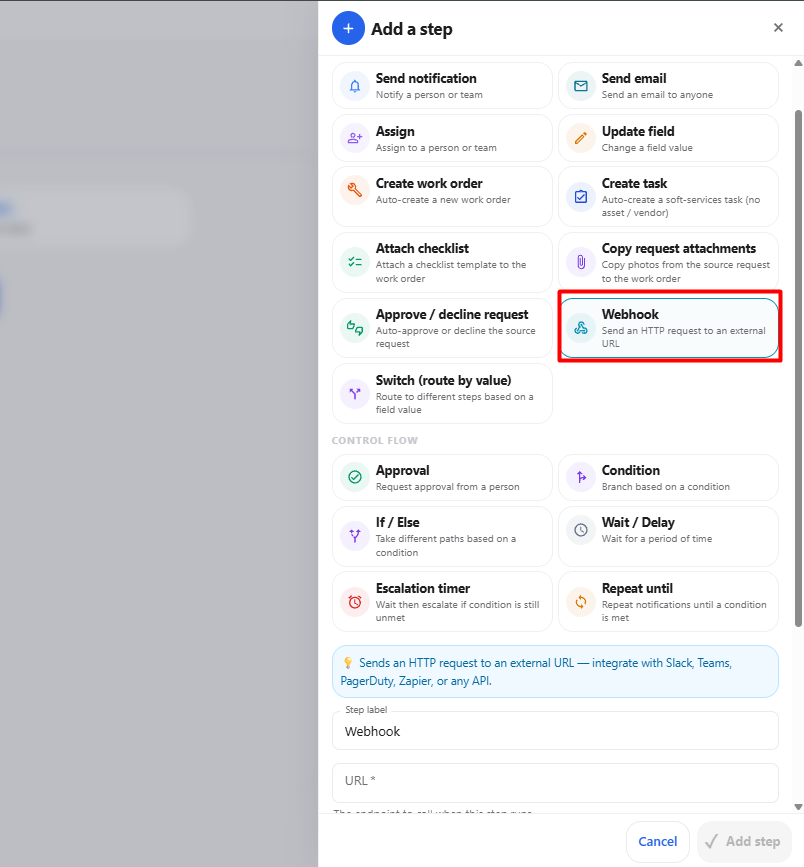
The Webhook action allows the workflow to send an HTTP request to an external URL. This can be used to integrate the workflow with external services such as Slack, Microsoft Teams, PagerDuty, Zapier, or other APIs.
| Section | Field / Option | Description |
|---|---|---|
| Information | Webhook | Sends an HTTP request to an external URL when the workflow reaches this step. |
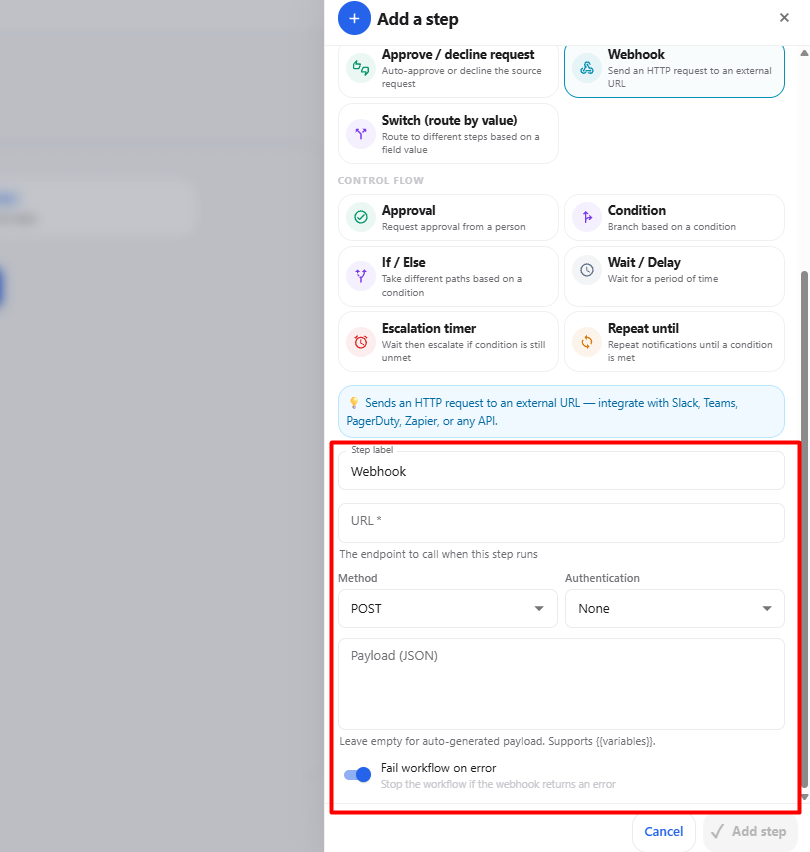
| General | Step label | Defines the name of the workflow step. The default value is Webhook. |
| Connection | URL* | Enter the external endpoint URL that should receive the HTTP request. |
| Request | Method | Select the HTTP method used for the request. The available value shown is POST. |
| Security | Authentication | Defines how the request is authenticated. The available value shown is None. |
| Request Data | Payload (JSON) | Enter the JSON data that should be sent to the external endpoint. |
| Request Data | Variables | Workflow variables can be used in the payload where supported. |
| Error Handling | Fail workflow on error | When enabled, the workflow stops if the webhook request returns an error. |
19. Workflow Steps
After configuring and adding the required workflow steps, the workflow is displayed in sequence under the selected trigger.
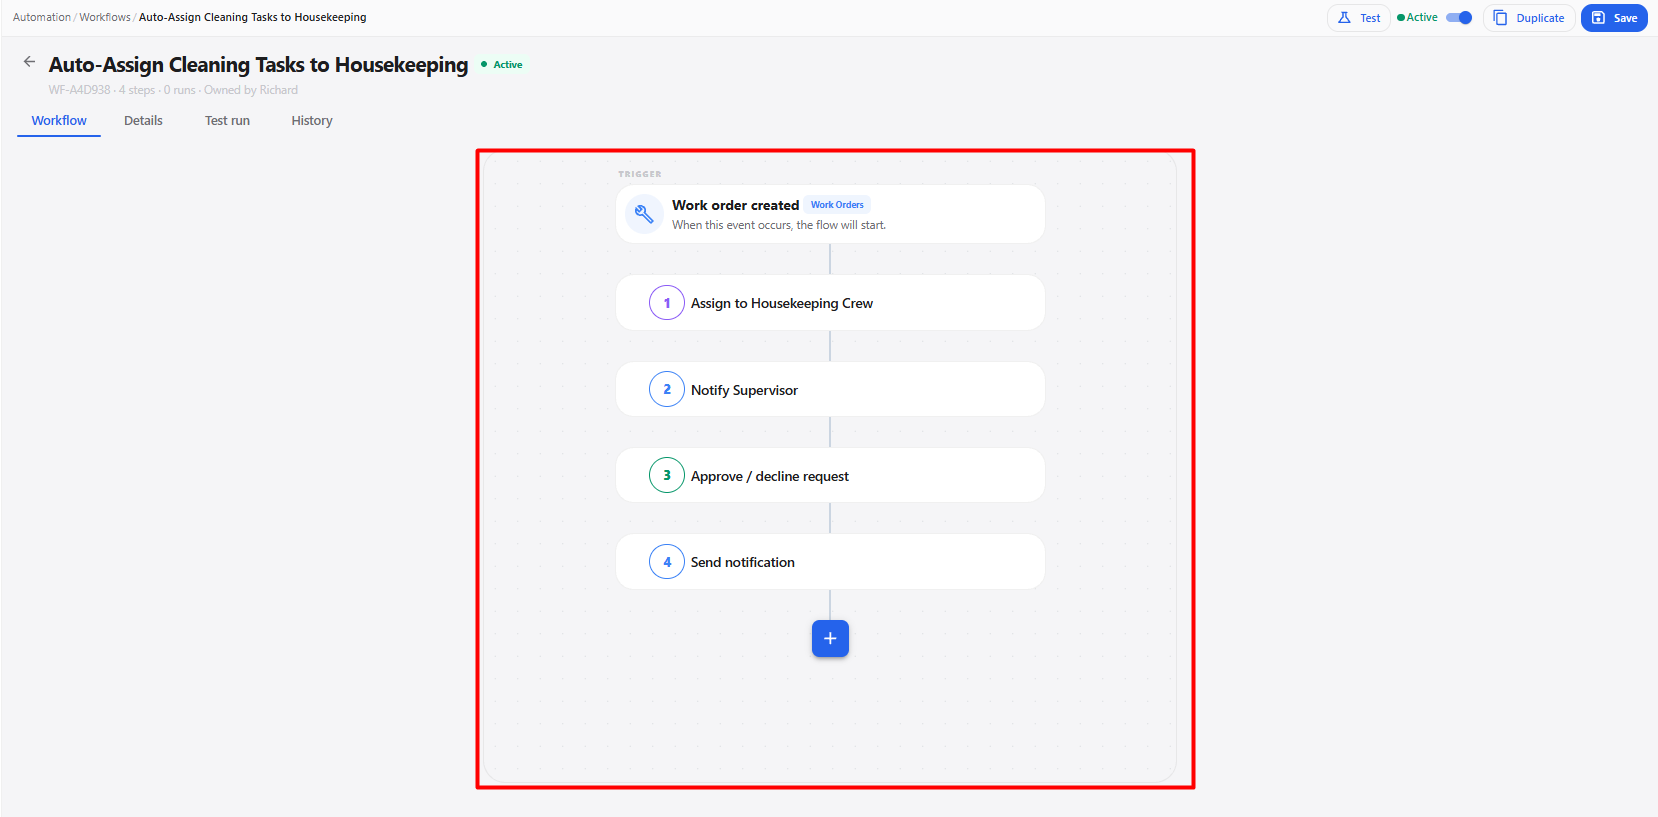
| Step | Workflow Step | Description |
|---|---|---|
| Trigger | Work order created | Starts the workflow whenever a new work order is created. |
| 1 | Assign to Housekeeping Crew | Assigns the work order to the selected housekeeping team. |
| 2 | Notify Supervisor | Sends a notification to the configured supervisor. |
| 3 | Approve / decline request | Approves or declines the applicable request according to the configured action. |
| 4 | Send notification | Sends the configured notification after the previous workflow steps are completed. |
| + | Add step | Allows additional workflow actions to be added to the sequence. |
20. Workflow Actions
The available actions are displayed in the toolbar above the workflow diagram when editing a workflow.
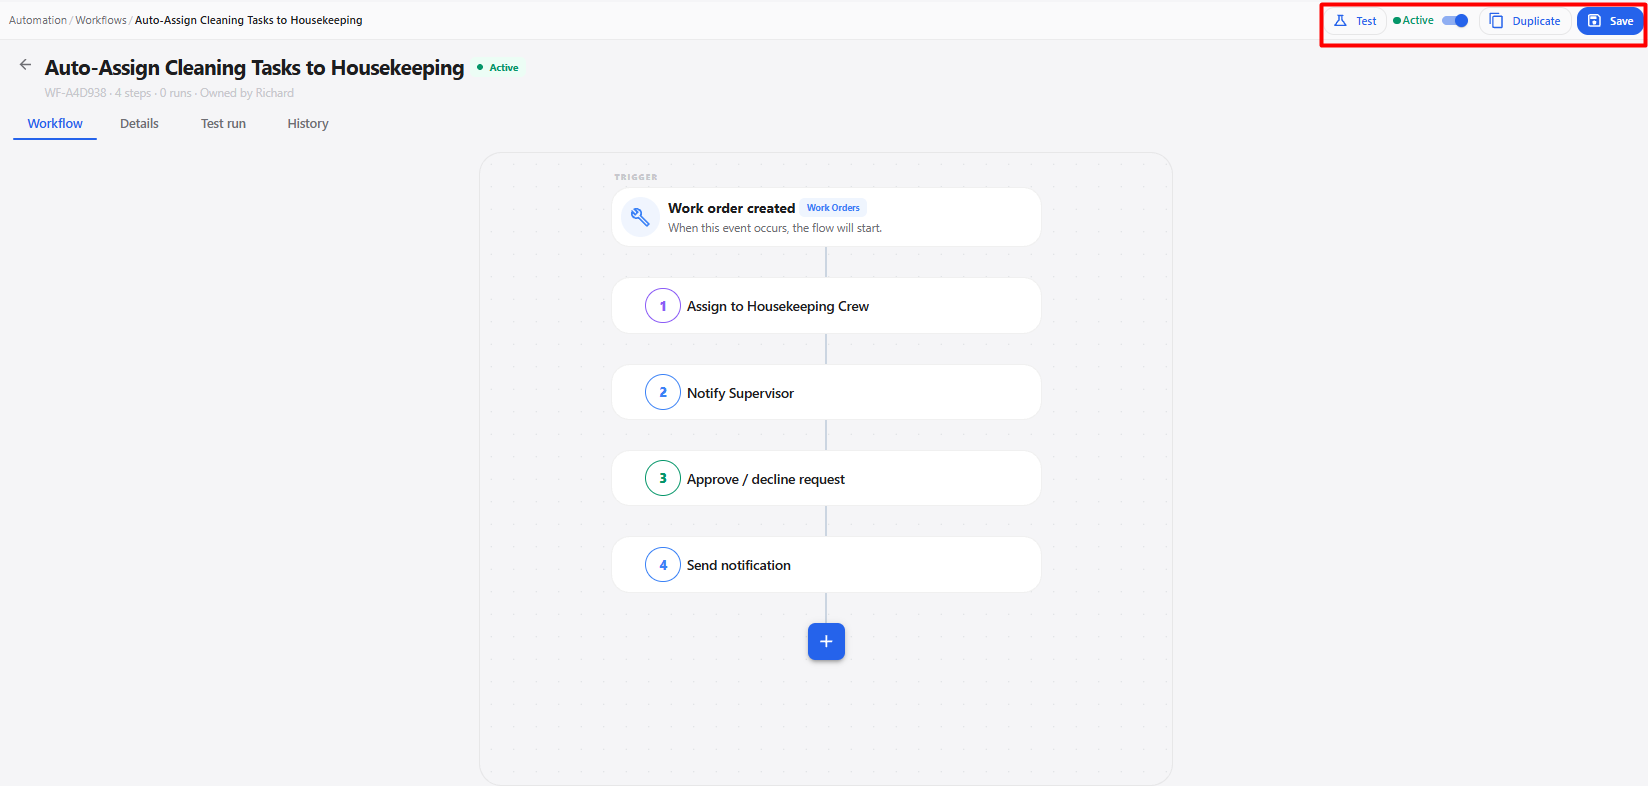
| Action | Description |
|---|---|
| Test | Allows you to test the workflow and verify how the configured workflow behaves before enabling it. |
| Active | Indicates that the workflow is enabled and will run automatically when its configured trigger occurs. |
| Inactive | Indicates that the workflow is disabled and will not run when the configured trigger occurs. |
| Duplicate | Creates a copy of the current workflow so it can be reused or modified as a separate workflow. |
| Save | Saves the workflow configuration and any changes made to it. |
21. Complete Workflow
The complete workflow explains how a user creates, configures, manages, and activates a workflow.
Open Workflows
      ↓
View Workflows List
      ↓
Search Workflow / Select Status
      ↓
Click New workflow
      ↓
New Workflow Pop-up
      ↓
Enter Workflow Name
      ↓
Enter Description if Required
      ↓
Select Customer Scope
      ↓
Select Workflow Trigger
      ↓
Review Trigger Conditions
      ↓
Click Create & configure
      ↓
Workflow Configuration Page
      ↓
Review Selected Trigger
      ↓
Click +
      ↓
Add a step
      ↓
Select Required Action
      ↓
Configure Action
      ↓
Add Step
      ↓
Review Added Step
      ↓
Click + to Add Another Step
      ↓
Configure Additional Steps
      ↓
Review Complete Workflow
      ↓
Test Workflow
      ↓
Save Workflow
      ↓
Set Workflow Status
      ↓
Active
      ↓
Workflow Runs Automatically
      ↓
Trigger Event Occurs
      ↓
Configured Workflow Steps Execute