

Request
Request Module
The Request Module allows users to report maintenance issues and submit requests to the maintenance team for review and further action.
Users can create a new request, provide issue details, set the priority, select the affected site, and submit the request. Submitted requests can then be reviewed and moved through different request statuses.
1. Request Overview
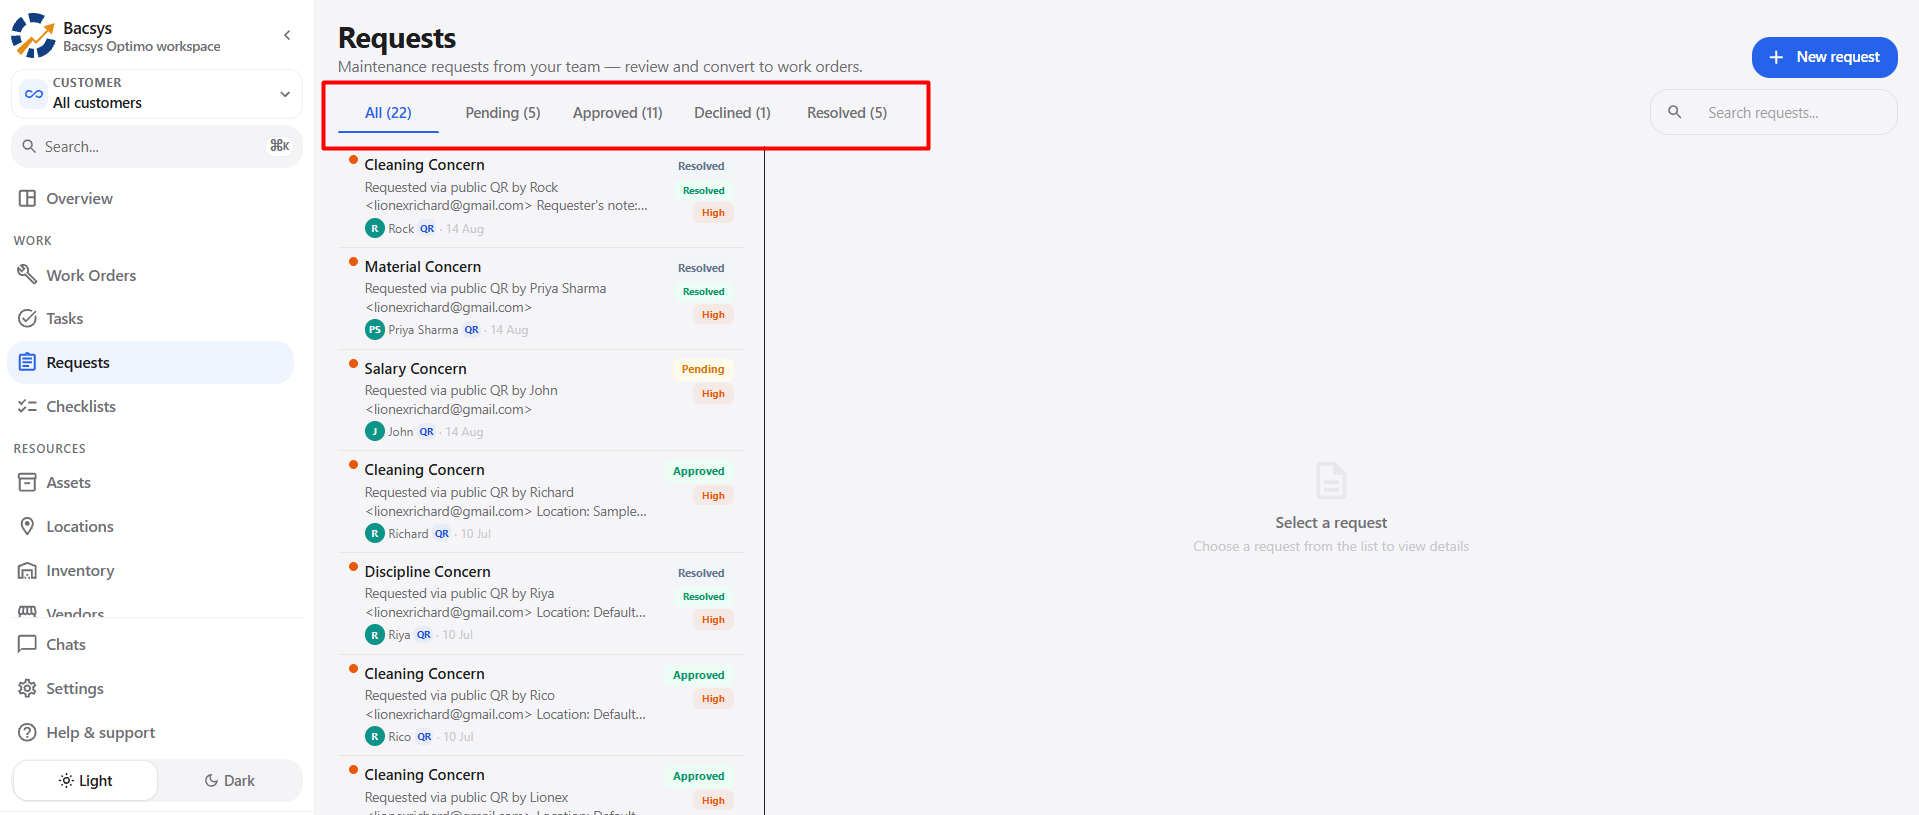
The Requests page provides an overview of all maintenance requests.
The page displays the following request status tabs:
| Status | Description |
|---|---|
| All | Displays all submitted requests. |
| Pending | Displays requests that are waiting for review or approval. |
| Approved | Displays requests that have been approved. |
| Declined | Displays requests that have been declined. |
| Resolved | Displays requests that have been resolved. |
The Requests page also provides:
- + New request — Create a new maintenance request.
- Search requests — Search for an existing request.
- Request List — Displays submitted requests.
- Request Details — Displays details when a request is selected.
2. Creating a New Request
The Requests module allows users to report maintenance issues and submit them to the maintenance team for review.
To create a new request:
- Open the Requests module.
- Click + New request.
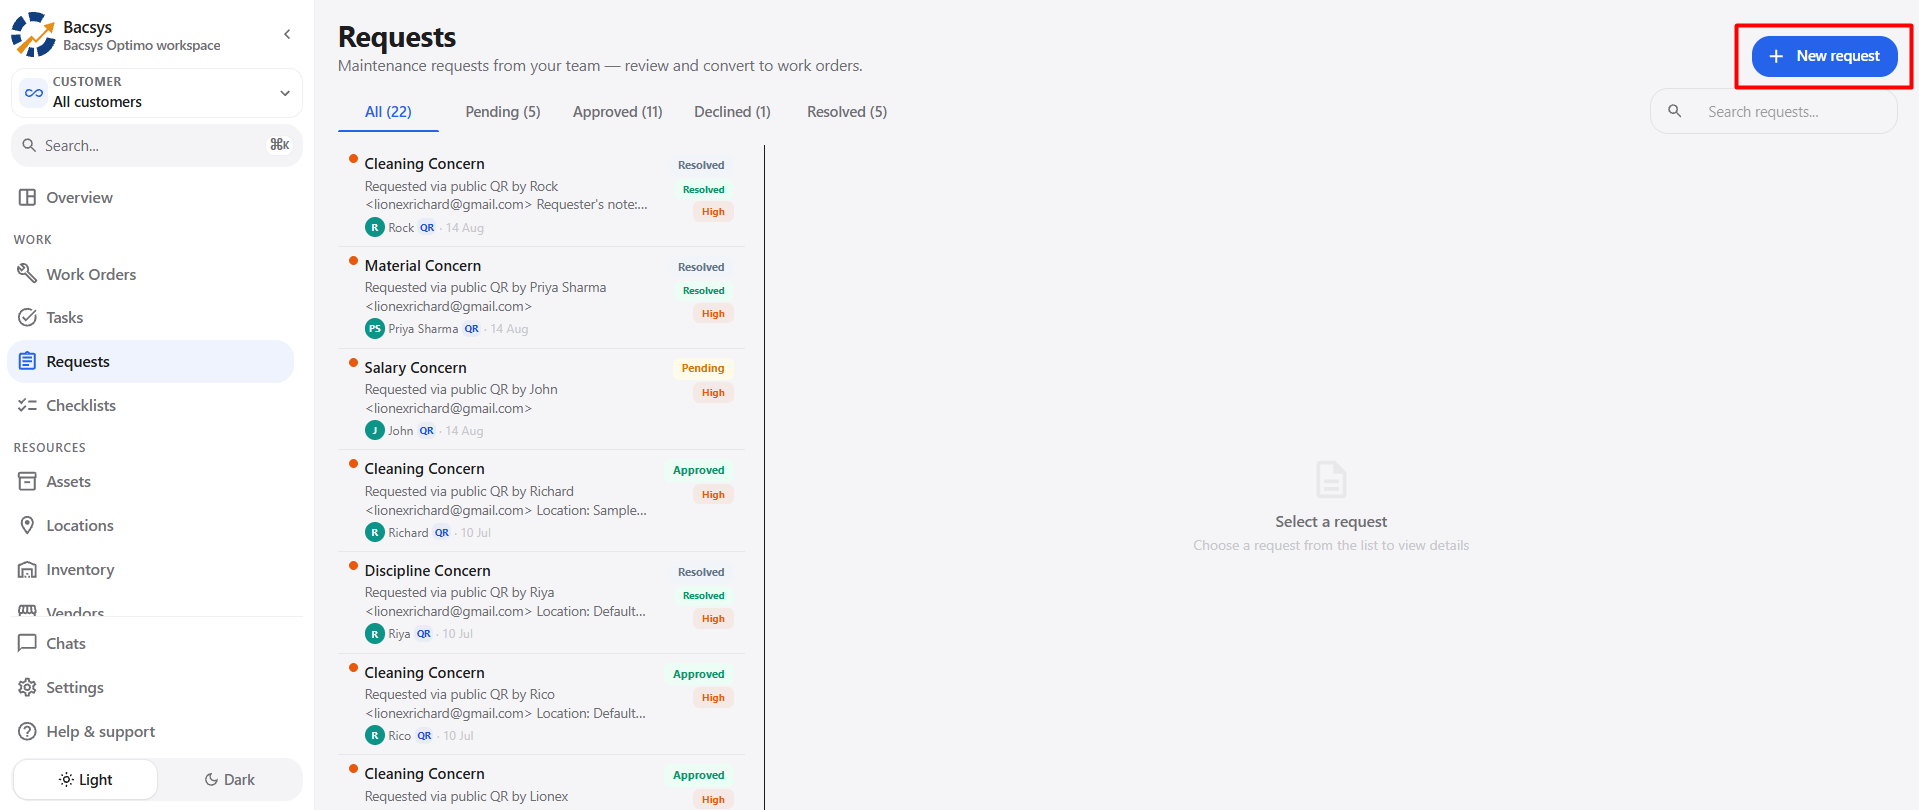
- The Report an issue pop-up window is displayed.
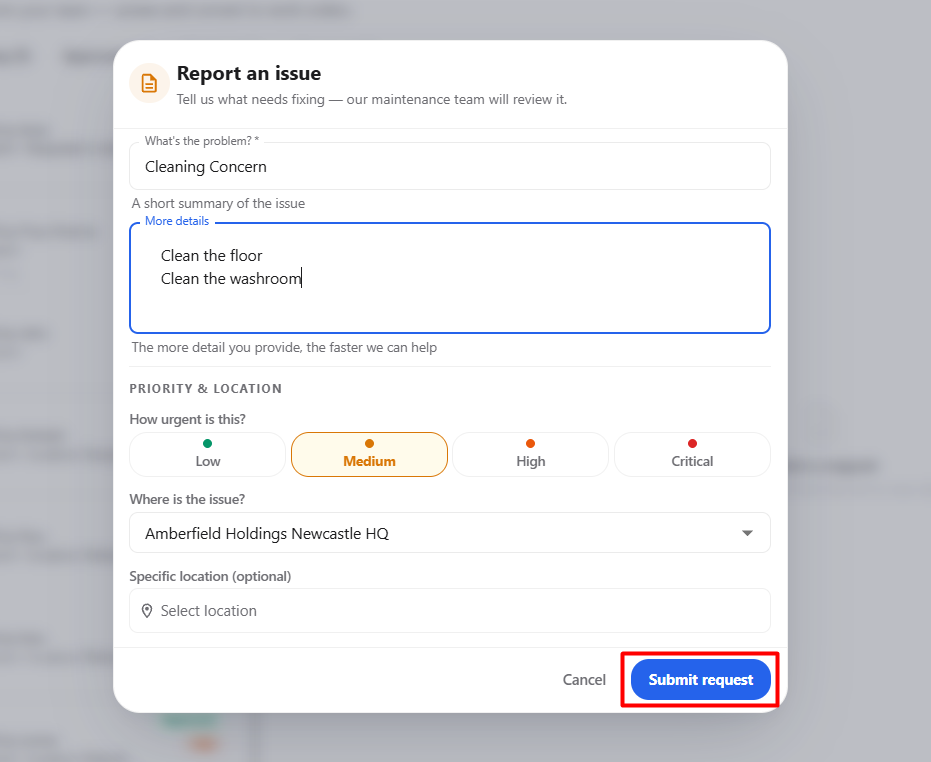
- Enter the issue details.
- Select the required priority.
- Select the site where the issue occurred.
- Select the Specific location, if required.
- Review the entered information.
- Click Submit request.
3. Report an Issue
3.1 Report an Issue Form
| Section | Field | Description |
|---|---|---|
| Issue Details | What's the problem? | Enter a short summary of the issue. |
| Issue Details | More details | Enter additional information about the issue. |
| Priority & Location | Low | Select Low when the issue has low urgency. |
| Priority & Location | Medium | Select Medium when the issue has moderate urgency. |
| Priority & Location | High | Select High when the issue requires higher attention. |
| Priority & Location | Critical | Select Critical when the issue requires immediate attention. |
| Priority & Location | Where is the issue? | Select the site where the issue occurred. |
| Actions | Cancel | Cancel the request without submitting it. |
| Actions | Submit request | Submit the completed request for review. |
4. Request Approval Workflow
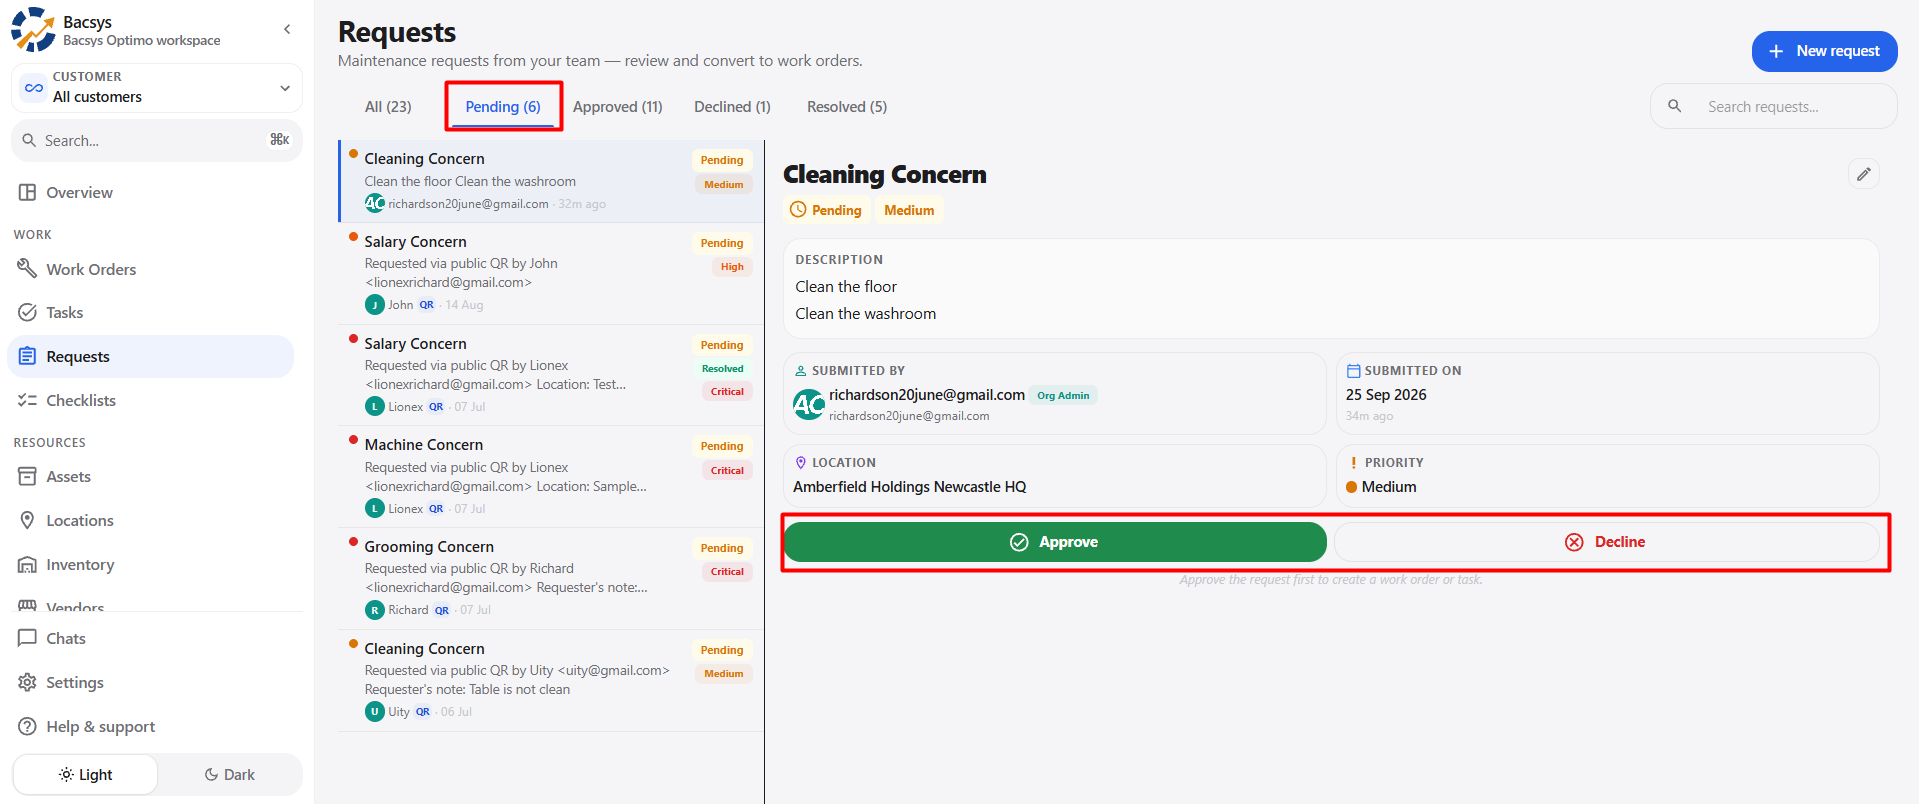
After the user submits the request, the request is initially saved under the Pending status.
The request can then be reviewed and either Approved or Declined.
4.1 Pending Request
After clicking Submit request, the request is added to the Pending section.
Submit request
      ↓
   Pending
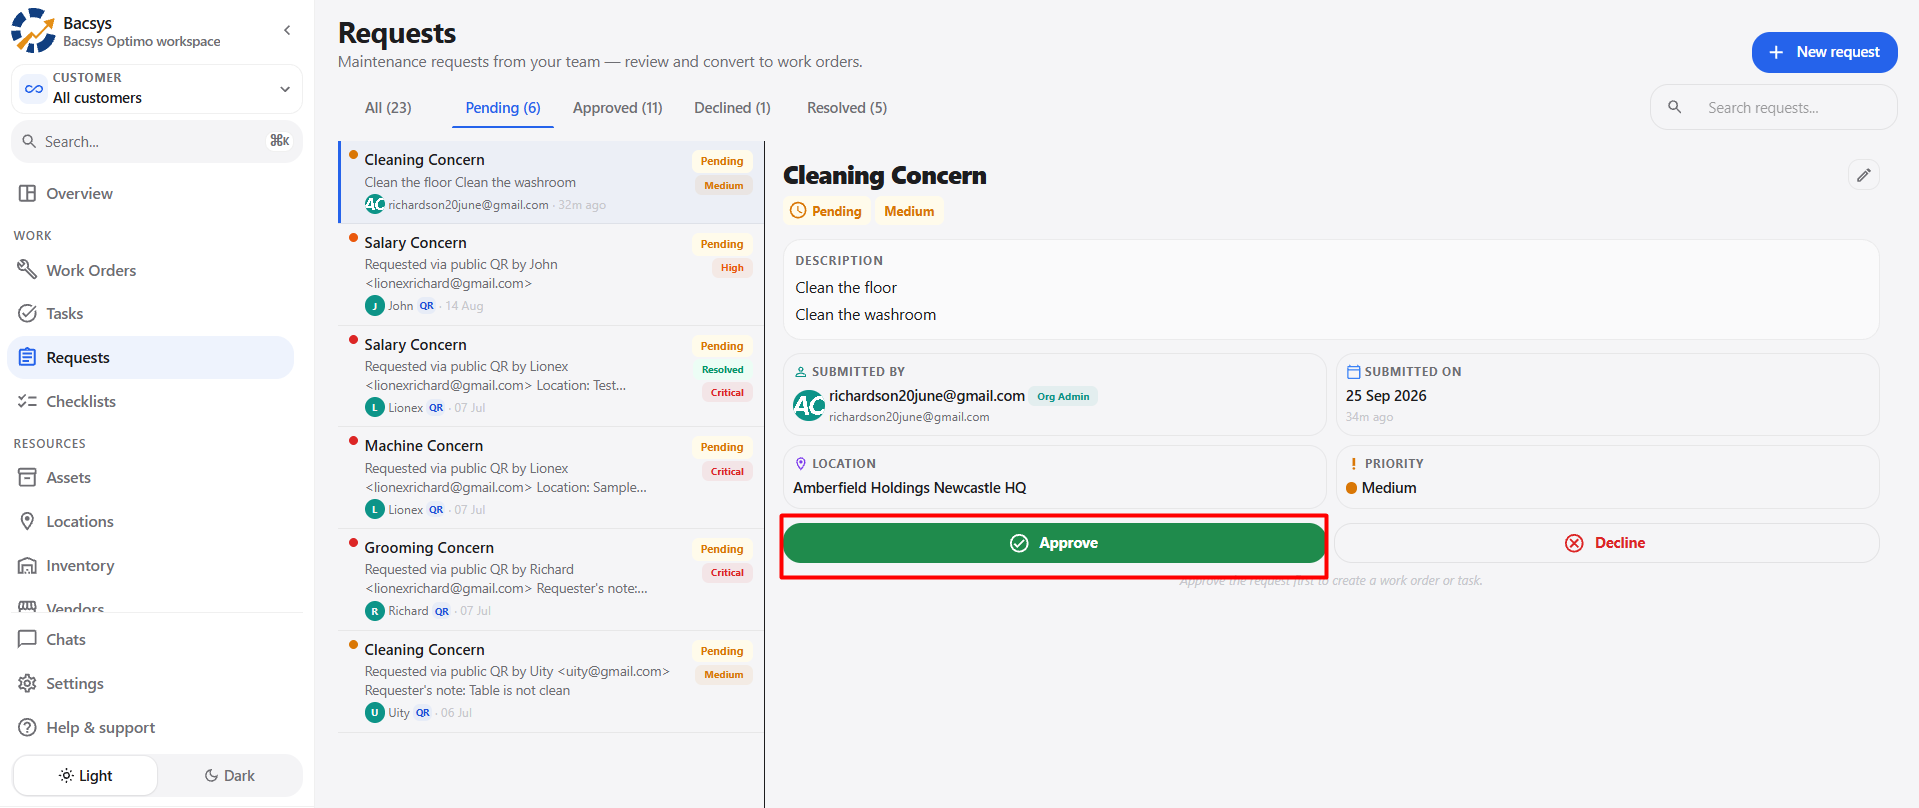
4.2 Approve or Decline the Request
From the Pending section, the request can be reviewed and one of the following actions can be taken:
- Approve the request
- Decline the request
4.3 Approved Request
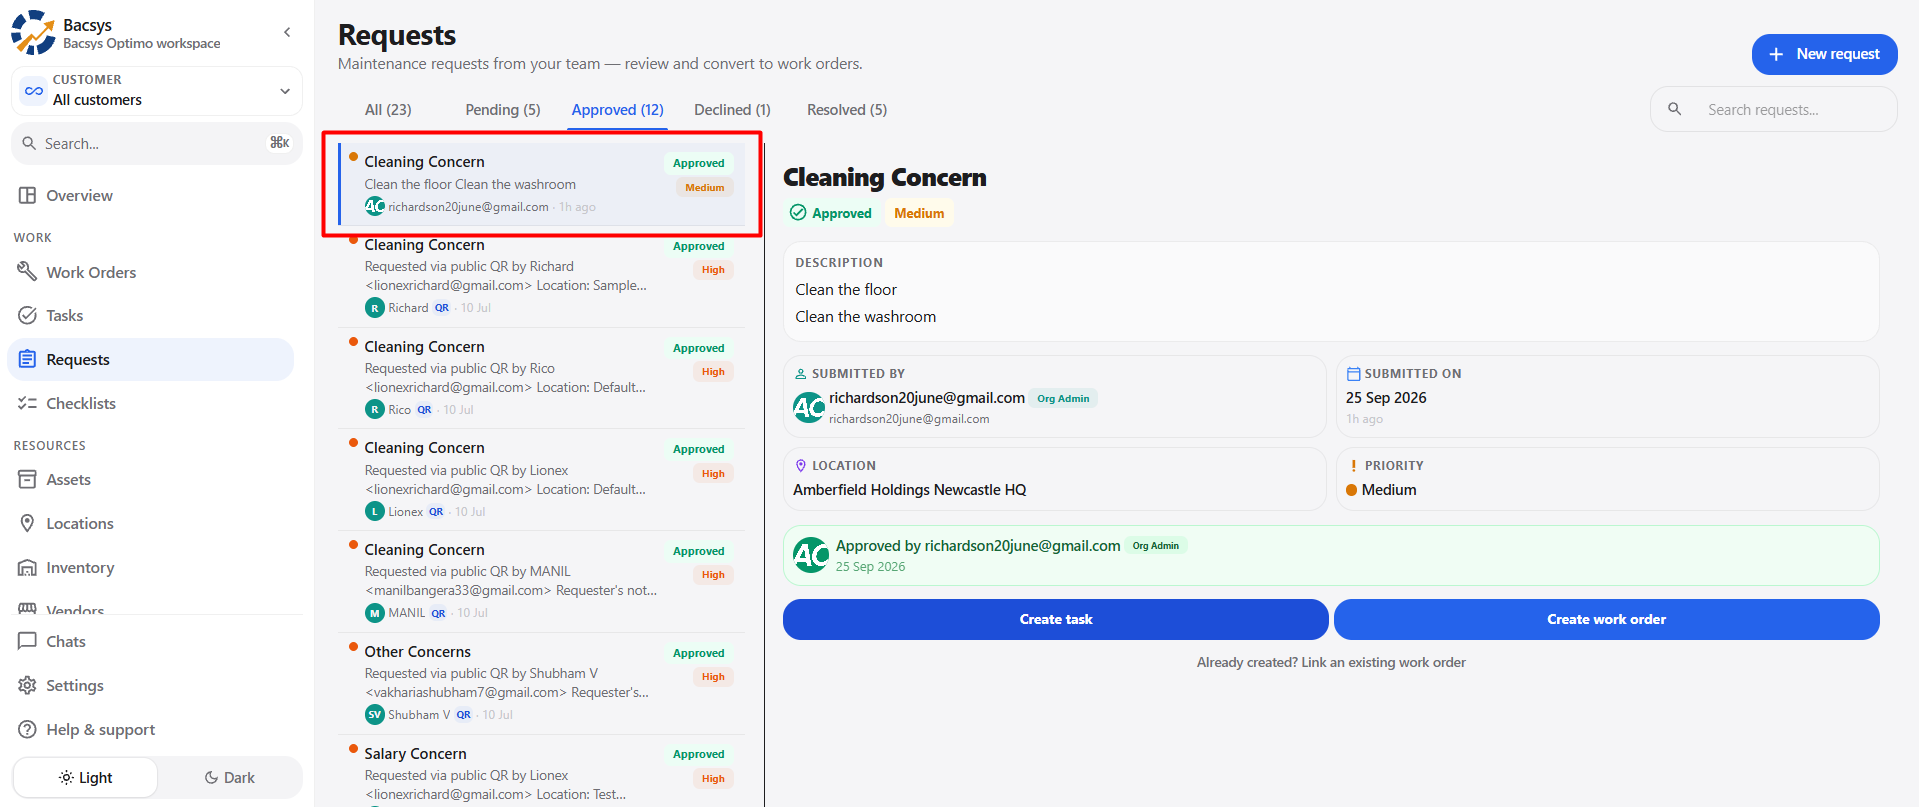
If the request is approved, it is moved from Pending to the Approved section.
Pending
   ↓
Approve
   ↓
Approved
4.4 Create Task
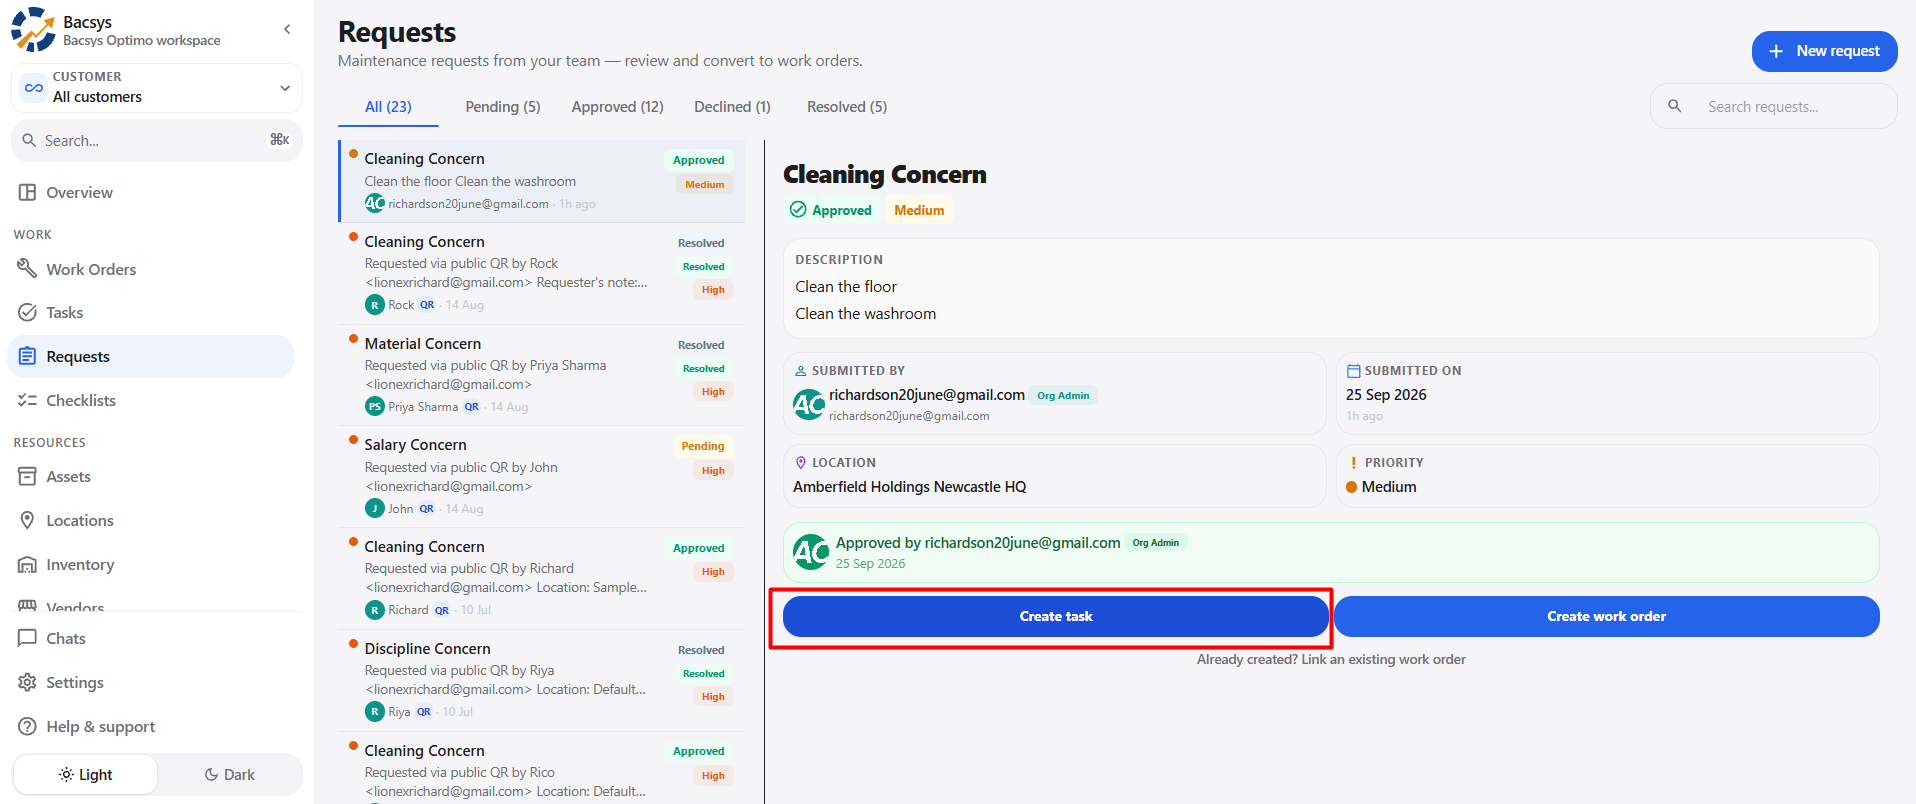
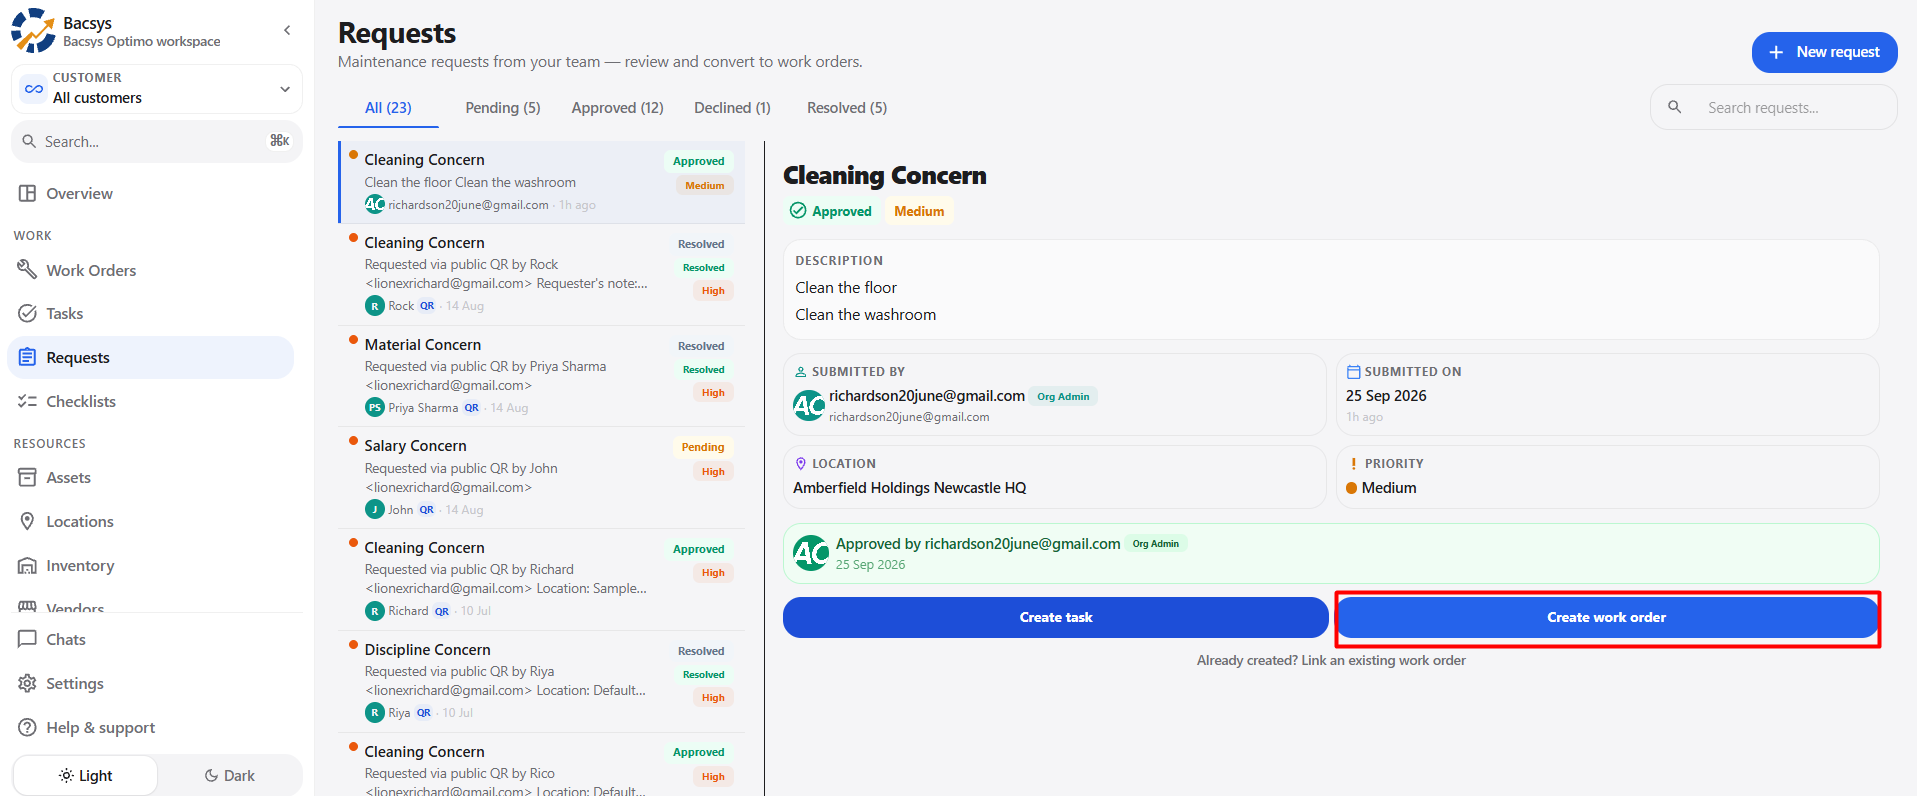
After a request is Approved, the user can proceed with the next action by creating a Task or Work Order.
The approved request provides the starting point for creating the required maintenance activity.
The available actions are:
- Create Task
- Create Work Order
4.5 Create Task
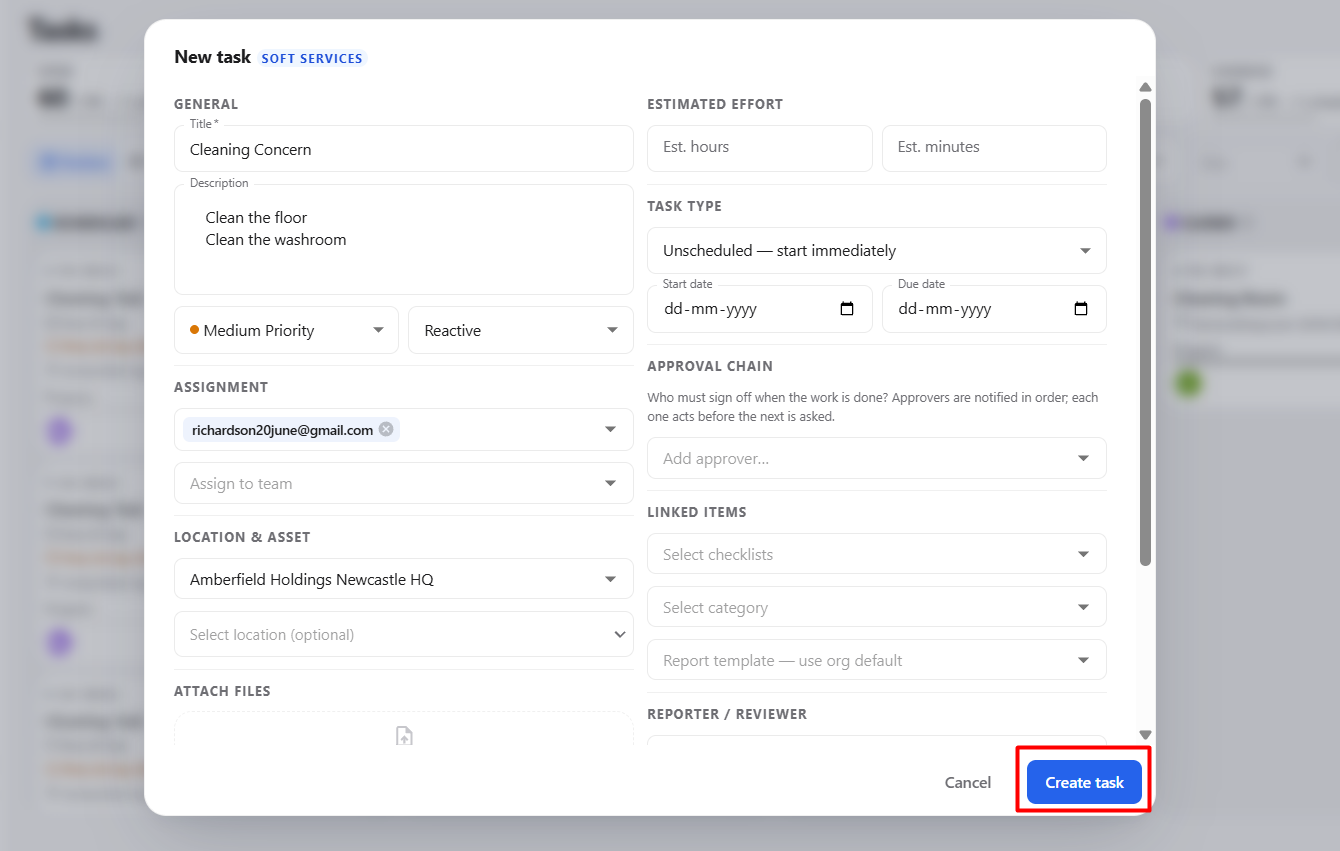
When the user selects Create Task, the New task form is displayed.
The form allows the user to configure the task before creating it.
The following information can be configured:
| Section | Field |
|---|---|
| General | Title |
| General | Description |
| General | Priority |
| General | Work Type |
| Estimated Effort | Est. hours |
| Estimated Effort | Est. minutes |
| Task Type | Task Type |
| Task Type | Start date |
| Task Type | Due date |
| Assignment | Assign to one or more people |
| Assignment | Assign to team |
| Approval Chain | Add approver |
| Location & Asset | Site |
| Location & Asset | Location |
| Linked Items | Select checklists |
| Linked Items | Select category |
| Linked Items | Report template |
| Attach Files | Attach Files |
| Reporter / Reviewer | Reporter / Reviewer |
| Digital Sign-Off | Require signature to close |
| Digital Sign-Off | Require signature to acknowledge |
4.6 Creating the Task
After entering the required task information:
- Enter the Title.
- Enter the Description.
- Select the Priority.
- Select the Work Type.
- Enter the Estimated Effort, if required.
- Select the required Task Type.
- Set the Start date and Due date, when applicable.
- Assign the task to one or more people or a team.
- Add an Approver, if required.
- Select the Site and Location.
- Select the required Checklist, Category, and Report Template.
- Configure the Reporter / Reviewer.
- Configure the required Digital Sign-Off options.
- Click Create task.
After clicking Create task, the task is created and saved in the Tasks module.
4.7 Request to Task Workflow
The workflow from an approved request to a task is:
Approved Request
      ↓
Create Task
      ↓
New Task Form
      ↓
Enter Task Details
      ↓
Assign Task
      ↓
Select Site & Location
      ↓
Add Checklist / Category
      ↓
Configure Approval & Sign-Off
      ↓
Create task
      ↓
Task Saved
      ↓
Tasks Module
4.8 Create Work Order
After a request is Approved, the user can select Create Work Order to convert the approved request into a work order.
When Create Work Order is selected, the New work order form is displayed.
The New work order form contains the following sections:
| Section | Field | Description |
|---|---|---|
| General | Title * | Enter the title of the work order. |
| General | Description | Enter detailed information about the work order. |
| General | Priority | Select the required priority level. |
| General | Work Type | Select the applicable work type. |
| Estimated Effort | Est. hours | Enter the estimated number of hours required to complete the work order. |
| Estimated Effort | Est. minutes | Enter the estimated number of minutes required to complete the work order. |
| Schedule | Schedule | Select when the work order should be created or scheduled. |
| Schedule | Start date | Select the date on which the work order should start. |
| Schedule | Due date | Select the date by which the work order should be completed. |
| Assignment | Assign to one or more people | Select one or more people responsible for completing the work order. |
| Assignment | Assign to team | Select the team responsible for the work order. |
| Approval Chain | Add approver | Select the user or users who need to approve or sign off on the work order. |
| Location & Asset | Site | Select the site where the work order needs to be performed. |
| Location & Asset | Location | Select the location associated with the selected site. |
| Location & Asset | Asset | Select the asset associated with the work order, if applicable. |
| Linked Items | Select checklists | Select a checklist associated with the work order. |
| Linked Items | Vendor | Select the vendor associated with the work order, if applicable. |
| Linked Items | Select category | Select the applicable category. |
| Linked Items | Report template — use org default | Select a report template or use the organization default. |
| Attach Files | Attach Files | Supporting files can be attached after creating the work order. |
| Reporter / Reviewer | Reporter / Reviewer | Select the user responsible for reporting or reviewing the work order. |
| Digital Sign-Off | Require signature to close | Enable this option if a digital signature is required when closing the work order. |
4.8.1 Digital Sign-Off
The Digital Sign-Off section controls whether a signature is required when closing the work order.
| Option | Description |
|---|---|
| Require signature to close | Requires the user to provide a digital signature when closing the work order. |
The signer can draw a signature using a pen or upload an image.
4.2 Creating the Work Order
After entering the required work order information:
- Enter the Title.
- Add the Description, if required.
- Select the Priority.
- Select the Work Type.
- Enter the Estimated Effort, if required.
- Select the required Schedule.
- Set the Start date and Due date.
- Assign the work order to one or more people or a team.
- Configure the Approval Chain, if required.
- Select the Site.
- Select the Location, if required.
- Select the Asset, if required.
- Select the required Checklist, Vendor, Category, and Report Template.
- Configure the Reporter / Reviewer.
- Configure the required Digital Sign-Off option.
- Click Create Work order.
After clicking Create Work order, the work order is created and saved in the Work Orders module.
4.3 Work Order Creation Workflow
The workflow for creating a work order from an approved request is:
Approved Request
      ↓
Create Work Order
      ↓
New Work Order
      ↓
Enter General Details
      ↓
Set Estimated Effort
      ↓
Configure Schedule
      ↓
Assign Person / Team
      ↓
Configure Approval Chain
      ↓
Select Site / Location / Asset
      ↓
Add Checklist / Vendor / Category
      ↓
Configure Reporter / Reviewer
      ↓
Configure Digital Sign-Off
      ↓
Create Work Order
      ↓
Work Order Created
      ↓
Work Orders Module
4.4 Create Task or Work Order
After a request is Approved, the user can proceed with either Create Task or Create Work Order.
Approved Request
      ↓
   ┌─────────────────┐
   ↓                             ↓
Create Task               Create Work Order
   ↓                             ↓
New Task                   New Work Order
   ↓                             ↓
Create Task                Create Work Order
   ↓                             ↓
Tasks Module               Work Orders Module
4.5 Complete Request Module Workflow
The complete Request Module process can be summarized as:
+ New request
      ↓
Report an Issue
      ↓
Submit request
      ↓
    Pending
      ↓
    Review
      ↓
   ┌─────────────────┐
   ↓                            ↓
Approved                     Declined
   ↓
   ┌─────────────────┐
   ↓                             ↓
Create Task                Create Work Order
   ↓                             ↓
Tasks Module               Work Orders Module
4.4 Decline Request
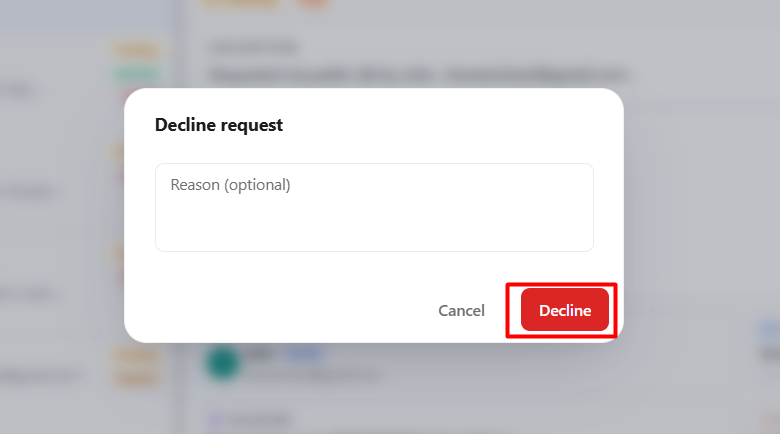
When the user selects Decline from the Pending request, the Decline request pop-up is displayed.
The pop-up contains a Reason (optional) field where the user can provide the reason for declining the request.
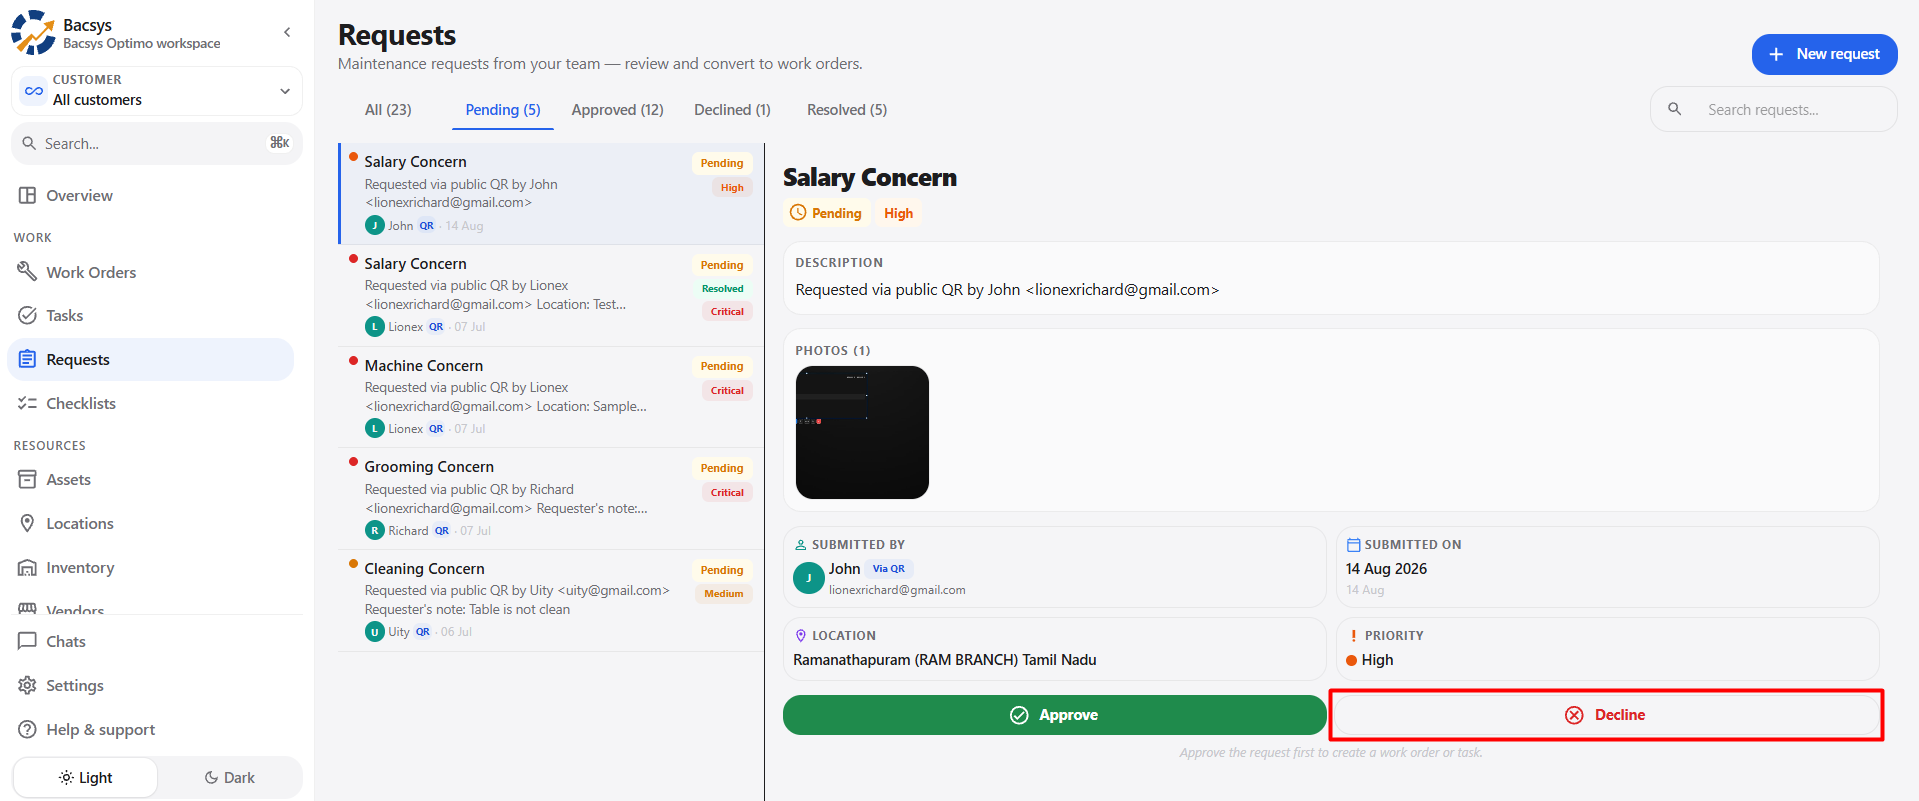
Decline Request Steps
- Open the request from the Pending section.
- Review the request details.
- Click Decline.
- The Decline request pop-up is displayed.
- Enter the reason in the Reason (optional) field, if required.
- Click Decline to reject the request.
- The request is moved from Pending to the Declined section.
Decline Request Fields
| Field | Description | Required |
|---|---|---|
| Reason (optional) | Enter the reason for declining the request. | No |
Decline Request Actions
| Action | Description |
|---|---|
| Cancel | Closes the pop-up without declining the request. |
| Decline | Declines the request and moves it to the Declined section. |
Decline Request Workflow
Pending
   ↓
Decline
   ↓
Decline request
   ↓
Enter Reason (optional)
   ↓
Click Decline
   ↓
Declined
4.4 Decline Request
When the user selects Decline, the Decline request pop-up is displayed.
- Enter the Reason (optional), if required.
- Click Decline.
- The request is declined.
- The declined request is saved in the Declined section.
Decline Request Workflow
Pending
   ↓
Decline
   ↓
Decline request
   ↓
Enter Reason (optional)
   ↓
Click Decline
   ↓
Declined
   ↓
Saved in Declined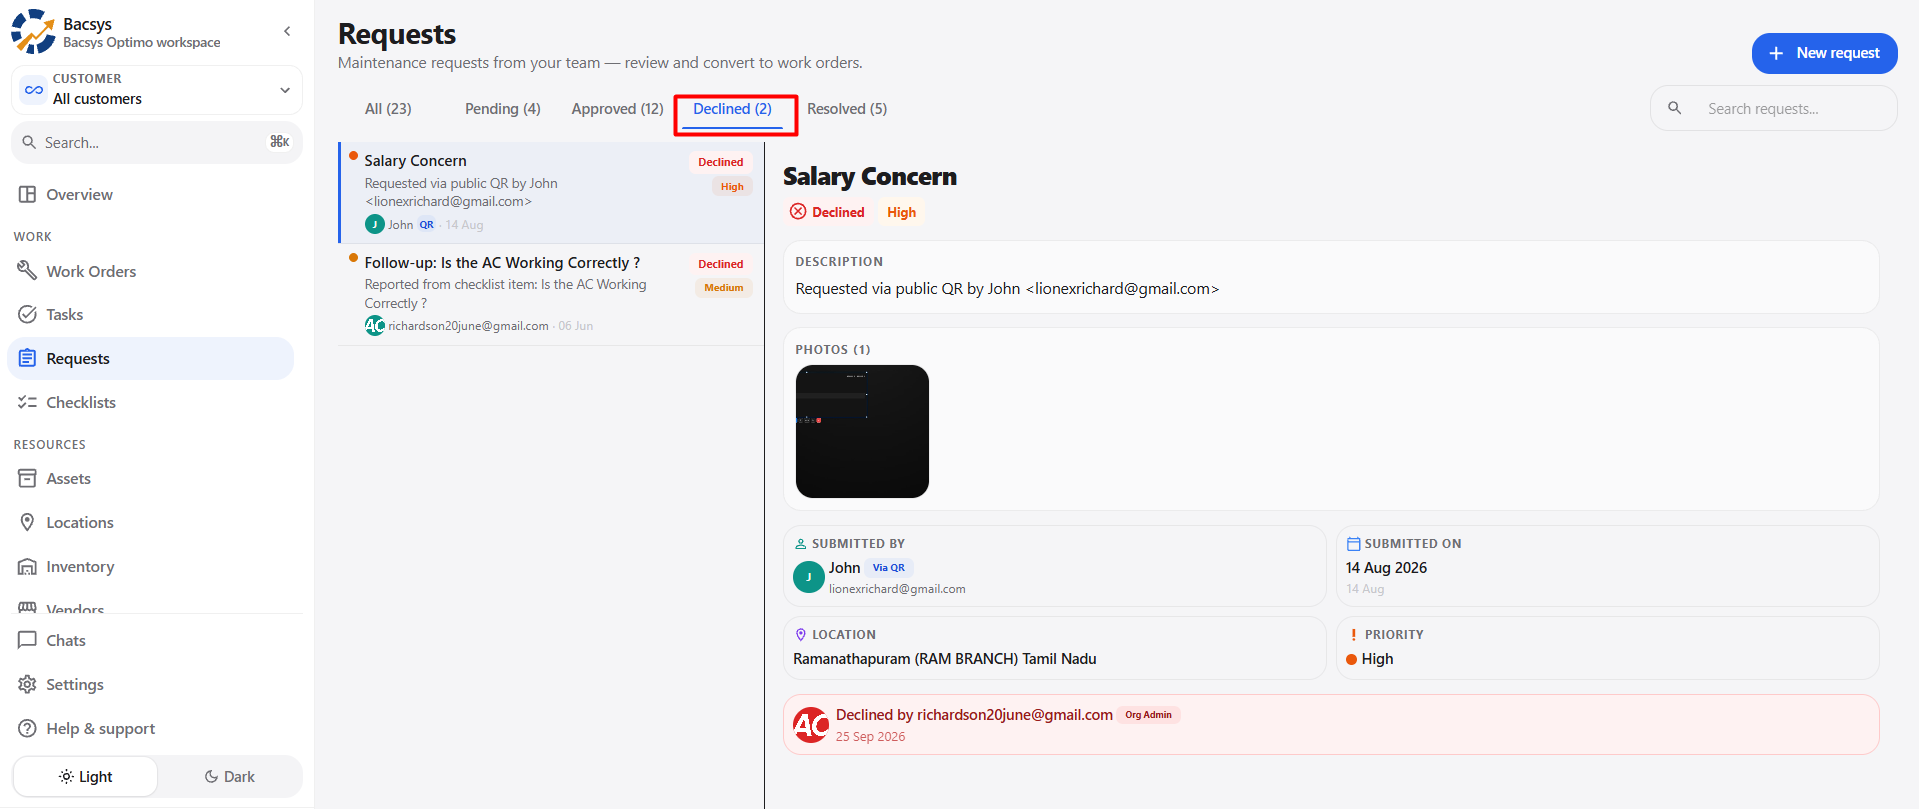
4.5 Request Status Workflow
The complete approval workflow is:
Submit request
      ↓
   Pending
      ↓
  ┌───────┐
  ↓            ↓
Approve     Decline
  ↓            ↓
Approved    Declined
5. Resolved Request
Once the request has been resolved, it is moved to the Resolved section.
The Resolved section displays the resolved requests along with their details and the linked work order.
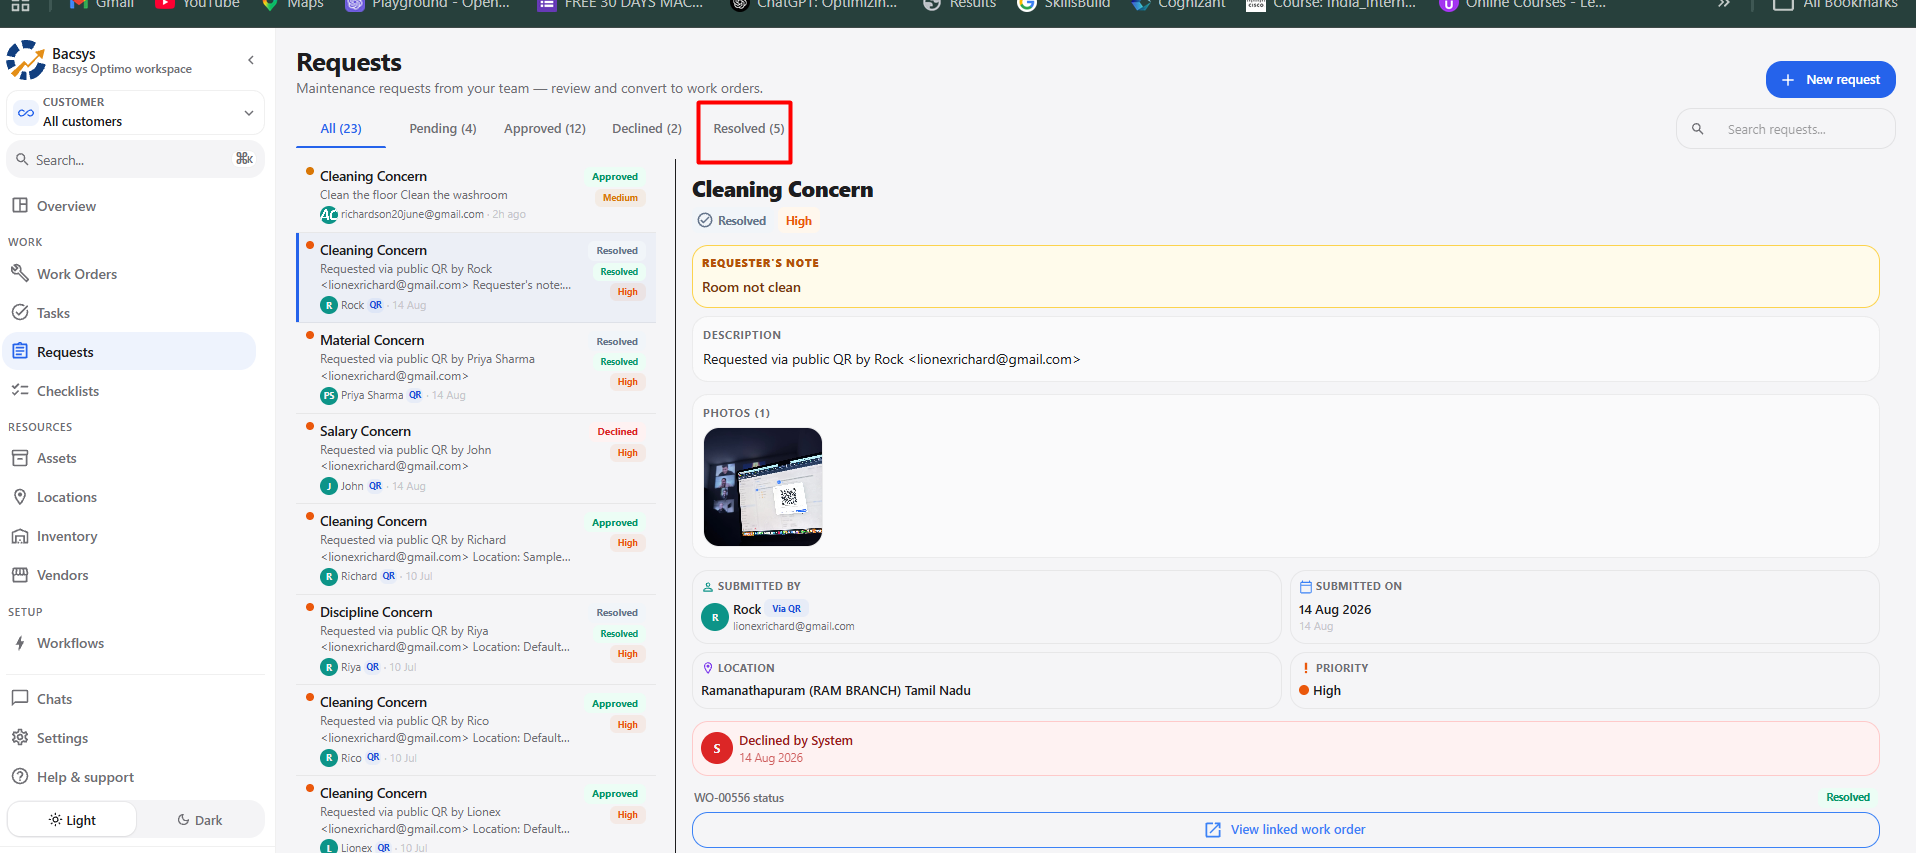
5.1 Viewing the Resolved Request
To view a resolved request:
- Open the Requests module.
- Select the Resolved tab.
- Select the required resolved request from the request list.
- The request details are displayed.
- Review the request information, requester details, location, priority, and resolution information.
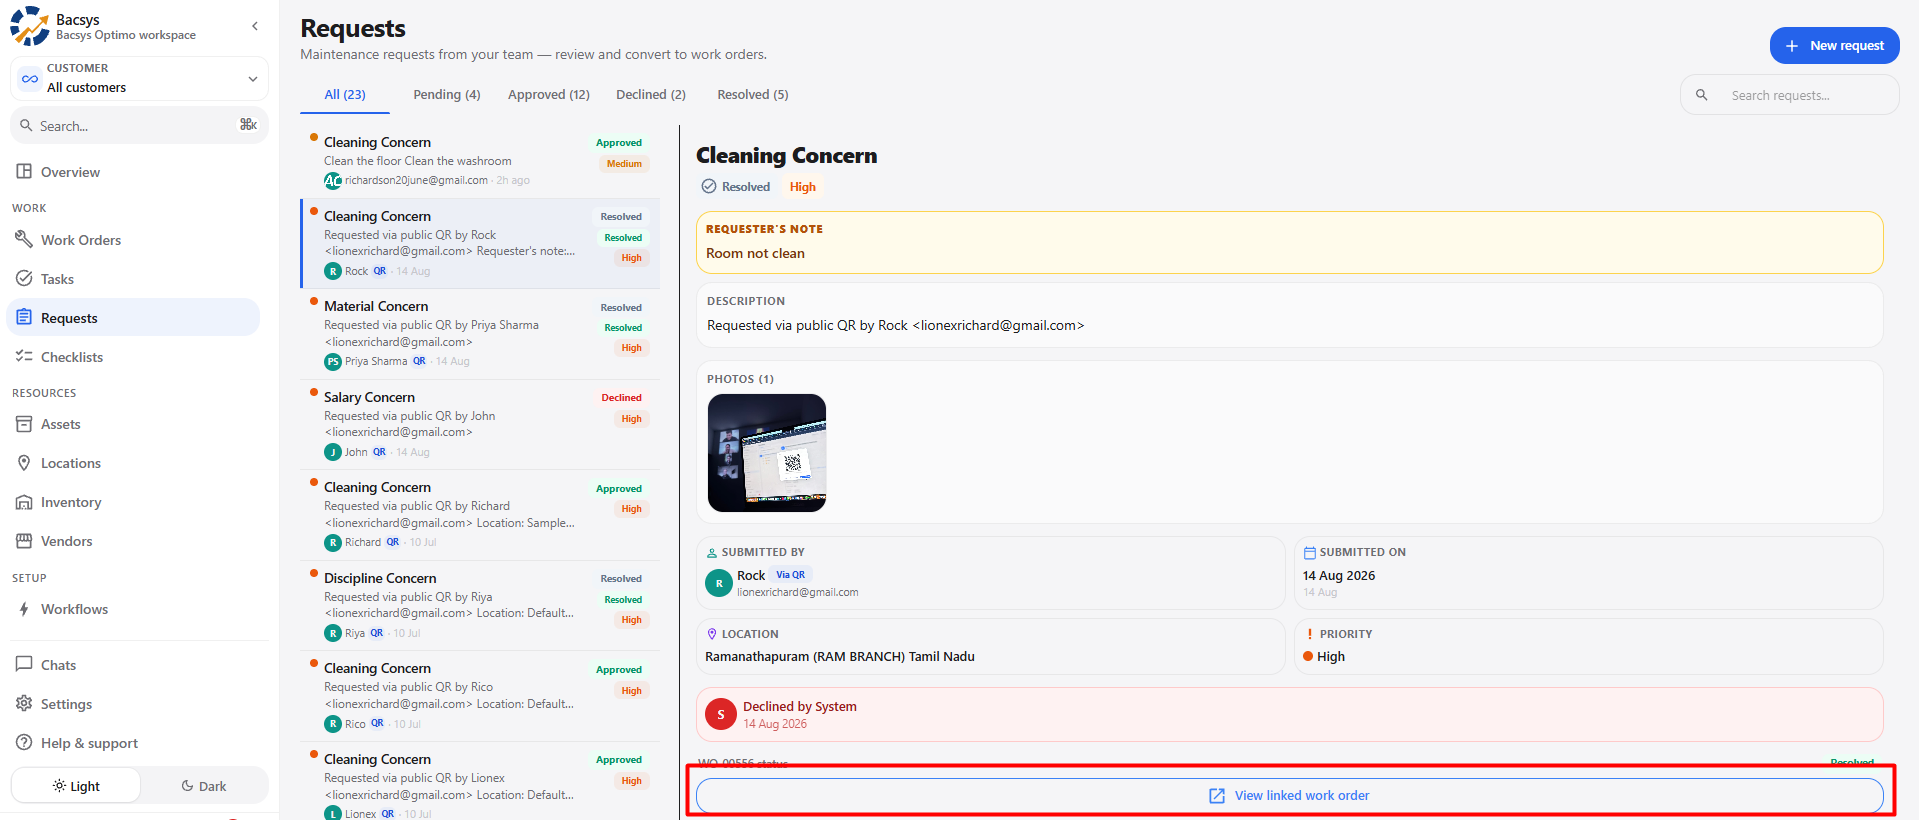
- Check the linked work order displayed at the bottom of the request details.
5.2 View Linked Work Order
The resolved request displays the linked work order.
Click View linked work order to open the associated work order and check its current status.
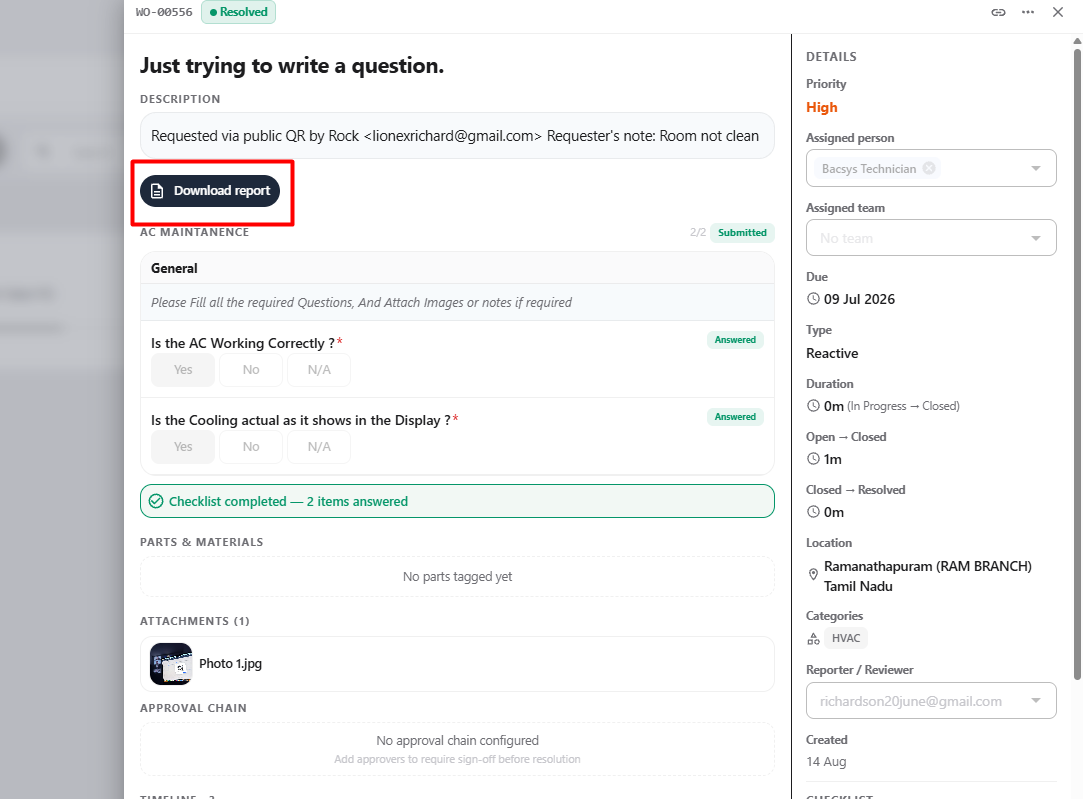
The linked work order allows the user to verify whether the maintenance work has been completed.
Resolved Request
       ↓
View linked work order
       ↓
Linked Work Order
       ↓
Check Work Order Status
       ↓
Verify Work Completion