

Tasks
Tasks
The Tasks module allows users to create, assign, schedule, track, and manage maintenance tasks. Tasks can be viewed based on their current status and managed using different views, filters, and task details.
1. Tasks Overview
The Tasks page provides an overview of all tasks and their current status.
1.1 Task Status Summary
| Status | Description |
|---|---|
| Open | Tasks that have been created and are available to be started. |
| In Progress | Tasks that are currently being worked on. |
| Due Today | Tasks that are scheduled to be completed today. |
| Overdue | Tasks that have passed their due date and are not yet completed. |
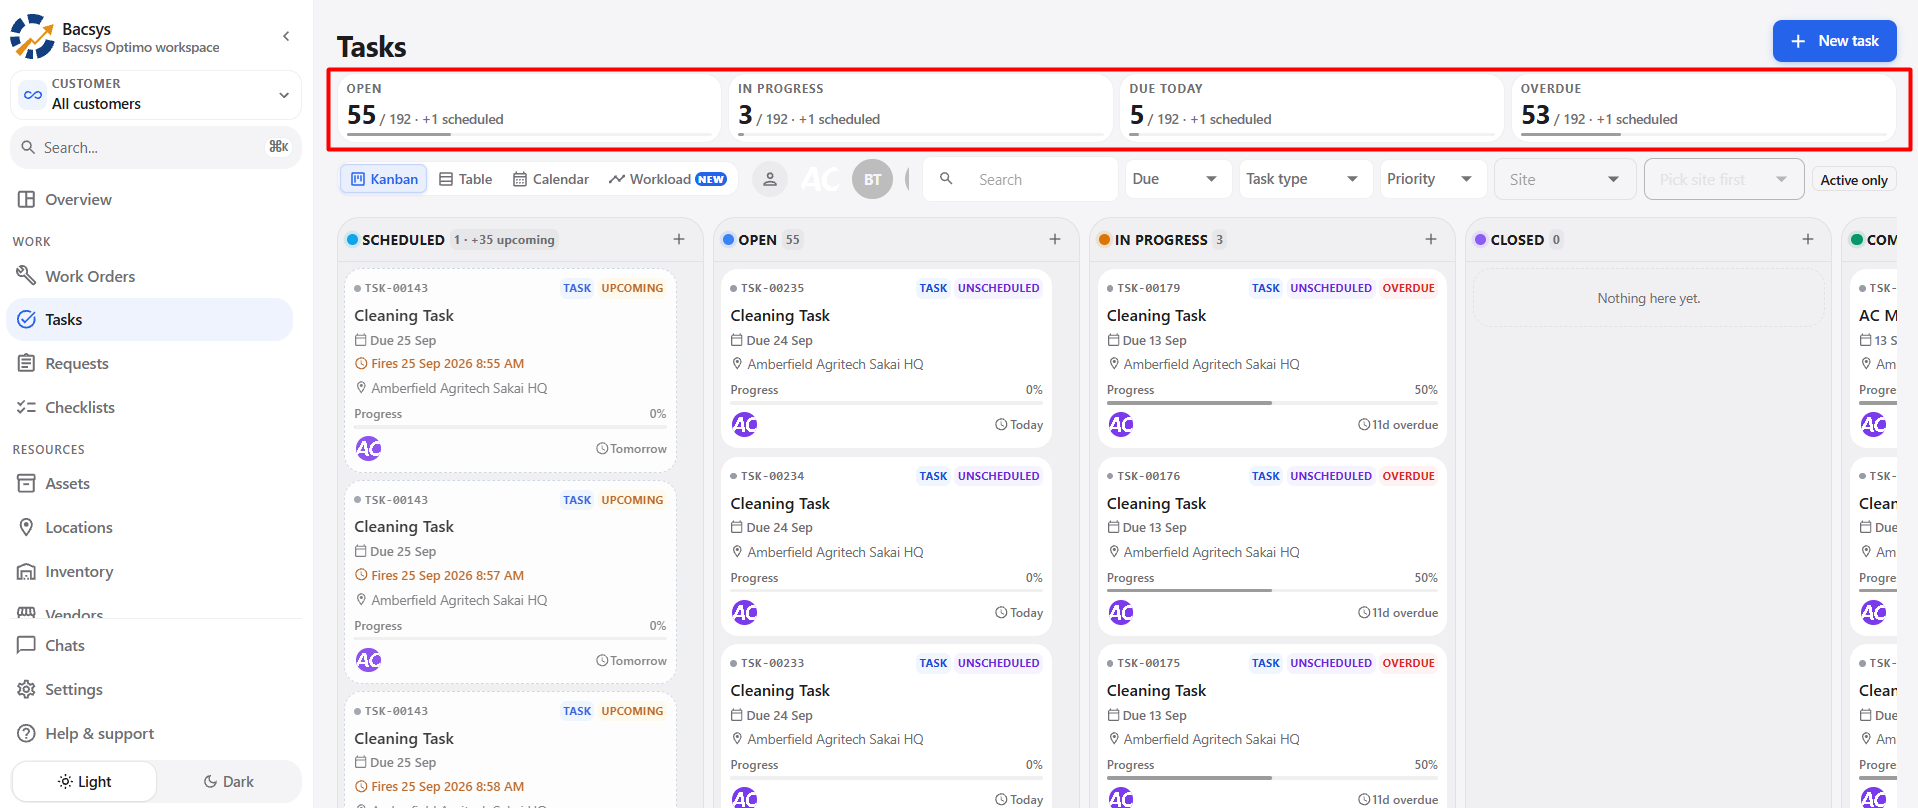
The summary also displays the total number of tasks and scheduled tasks associated with each status.
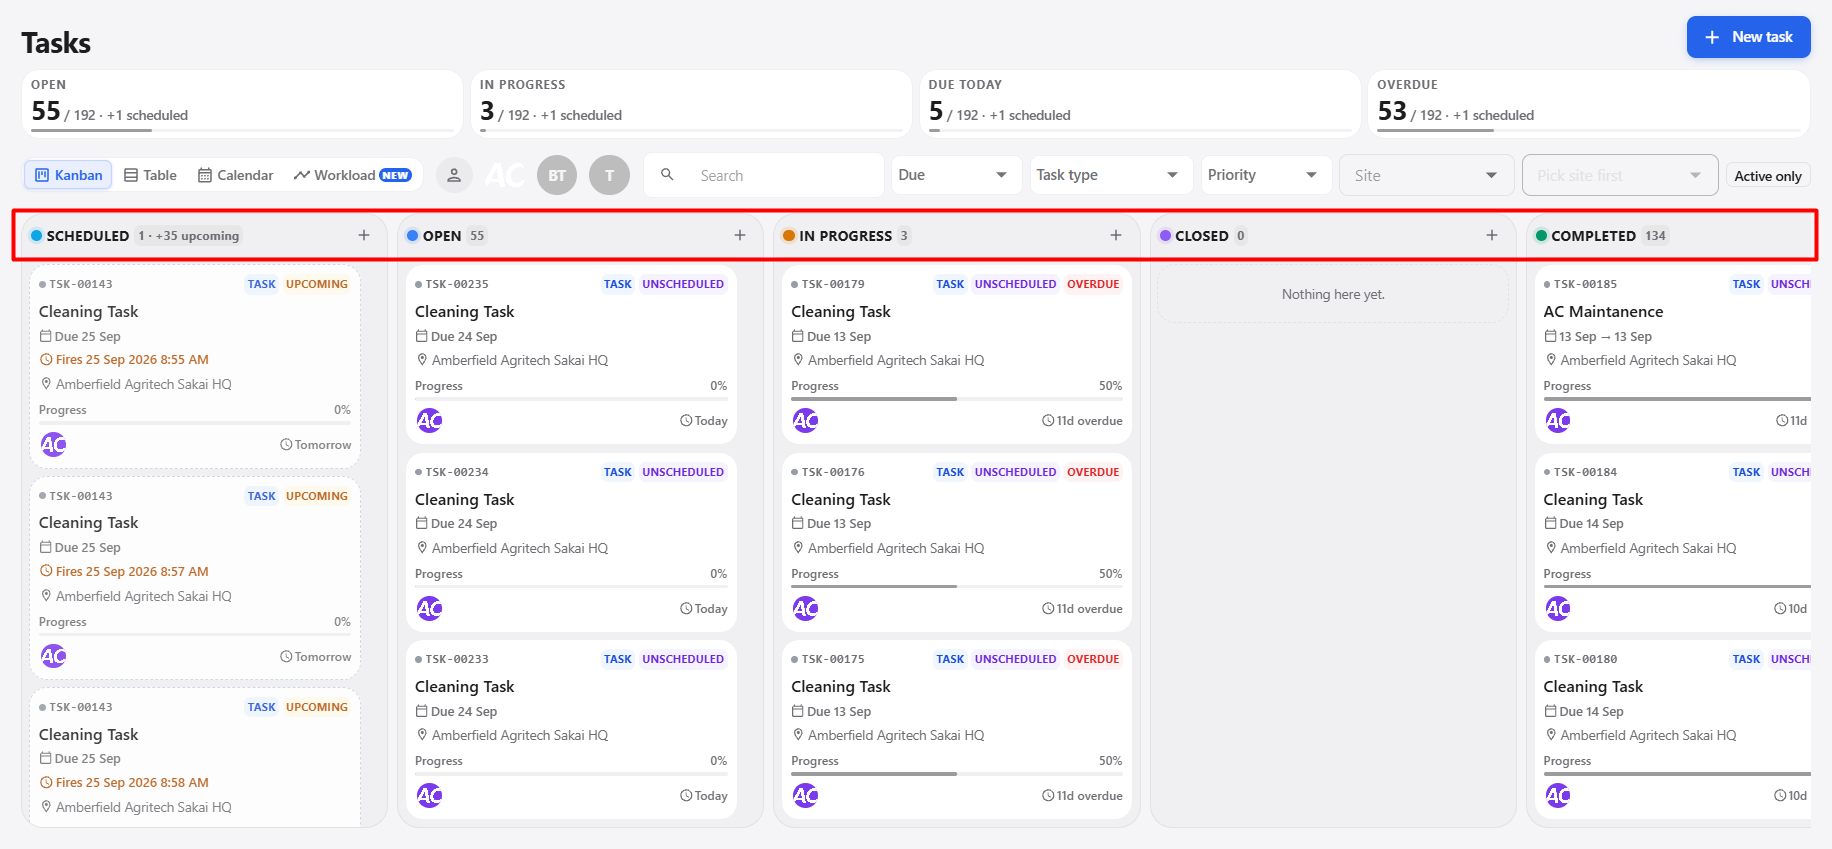
1.2 Task Status Columns
In the Kanban view, tasks are organized into different status columns.
| Column | Description |
|---|---|
| Scheduled | Displays scheduled tasks and upcoming tasks. |
| Open | Displays tasks that are ready to be started. |
| In Progress | Displays tasks that are currently being worked on. |
| Closed | Displays tasks that have been closed. |
| Completed | Displays completed tasks. |
2. Task Views
Tasks can be displayed using different views.
2.1 Available Views
| View | Description |
|---|---|
| Kanban | Displays tasks in status-based columns. |
| Table | Displays tasks in a tabular format. |
| Calendar | Displays tasks based on their scheduled dates. |
| Workload | Provides a workload-oriented view of tasks. |
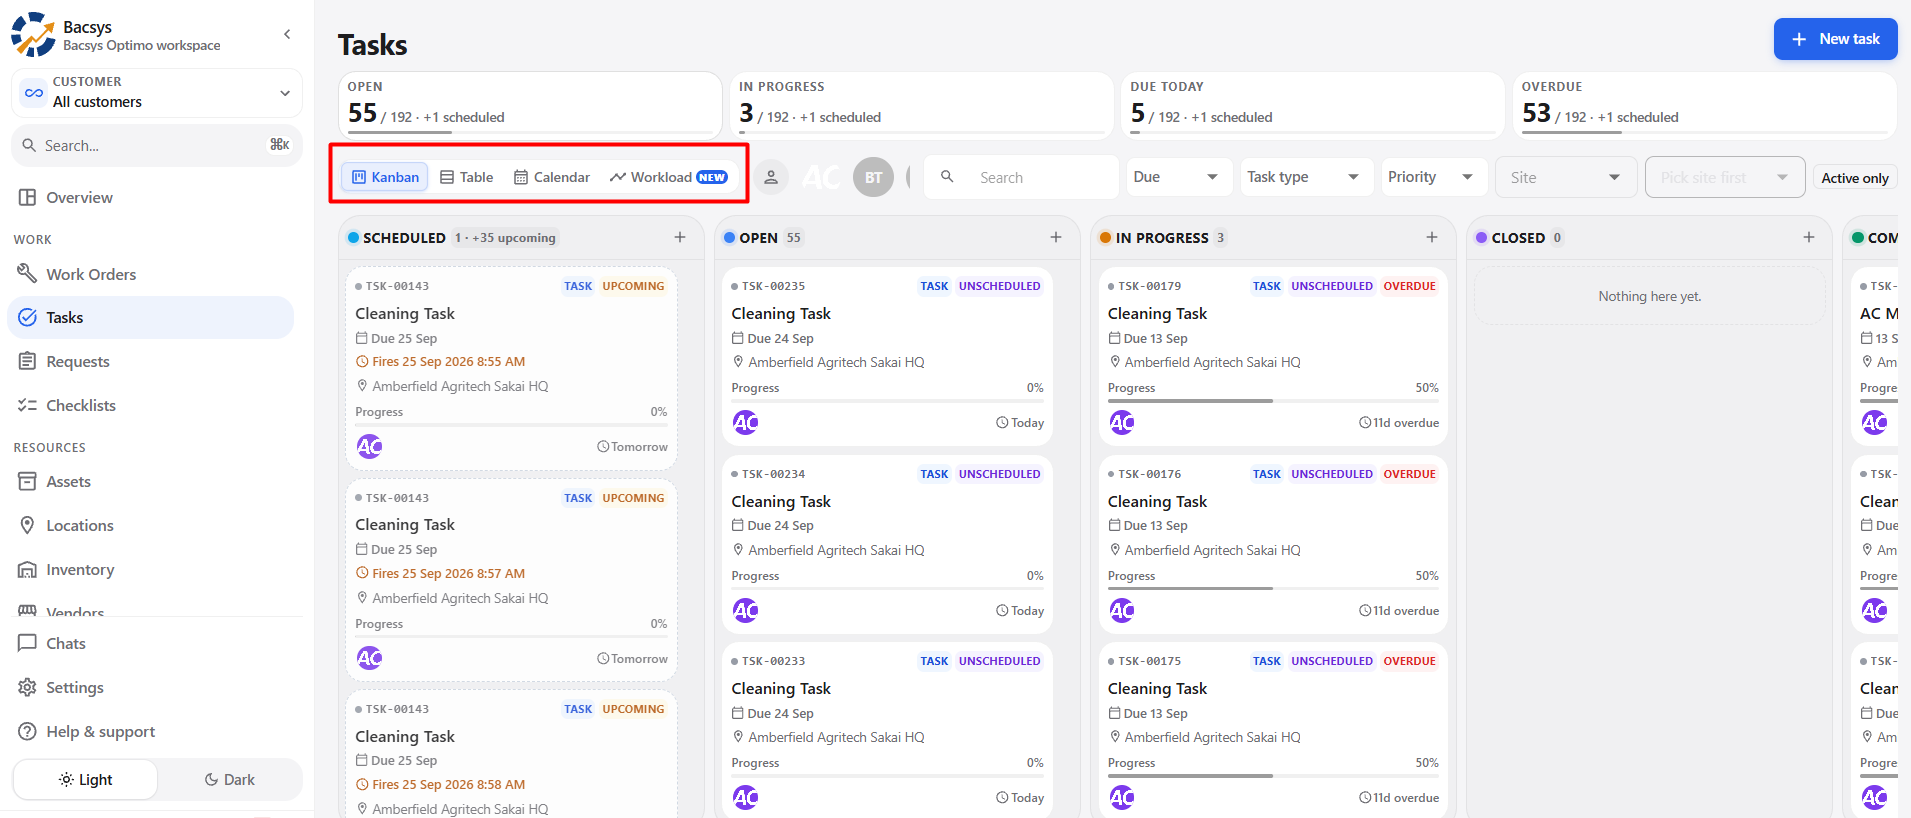
The Kanban view is selected by default.
3. Task Search and Filters
The Tasks page provides search and filtering options to help users quickly find and manage tasks.
3.1 Search and Filter Options
| Option | Description |
|---|---|
| Search | Search for a specific task using relevant task information. |
| Due | Filter tasks based on their due date or due status. |
| Task type | Filter tasks based on the selected task type. |
| Priority | Filter tasks based on their priority level. |
| Site | Filter tasks based on the selected site. |
| Pick site first | Select a site first before selecting the related location or site-specific filter. |
| Active only | Enable this option to display only active tasks. |
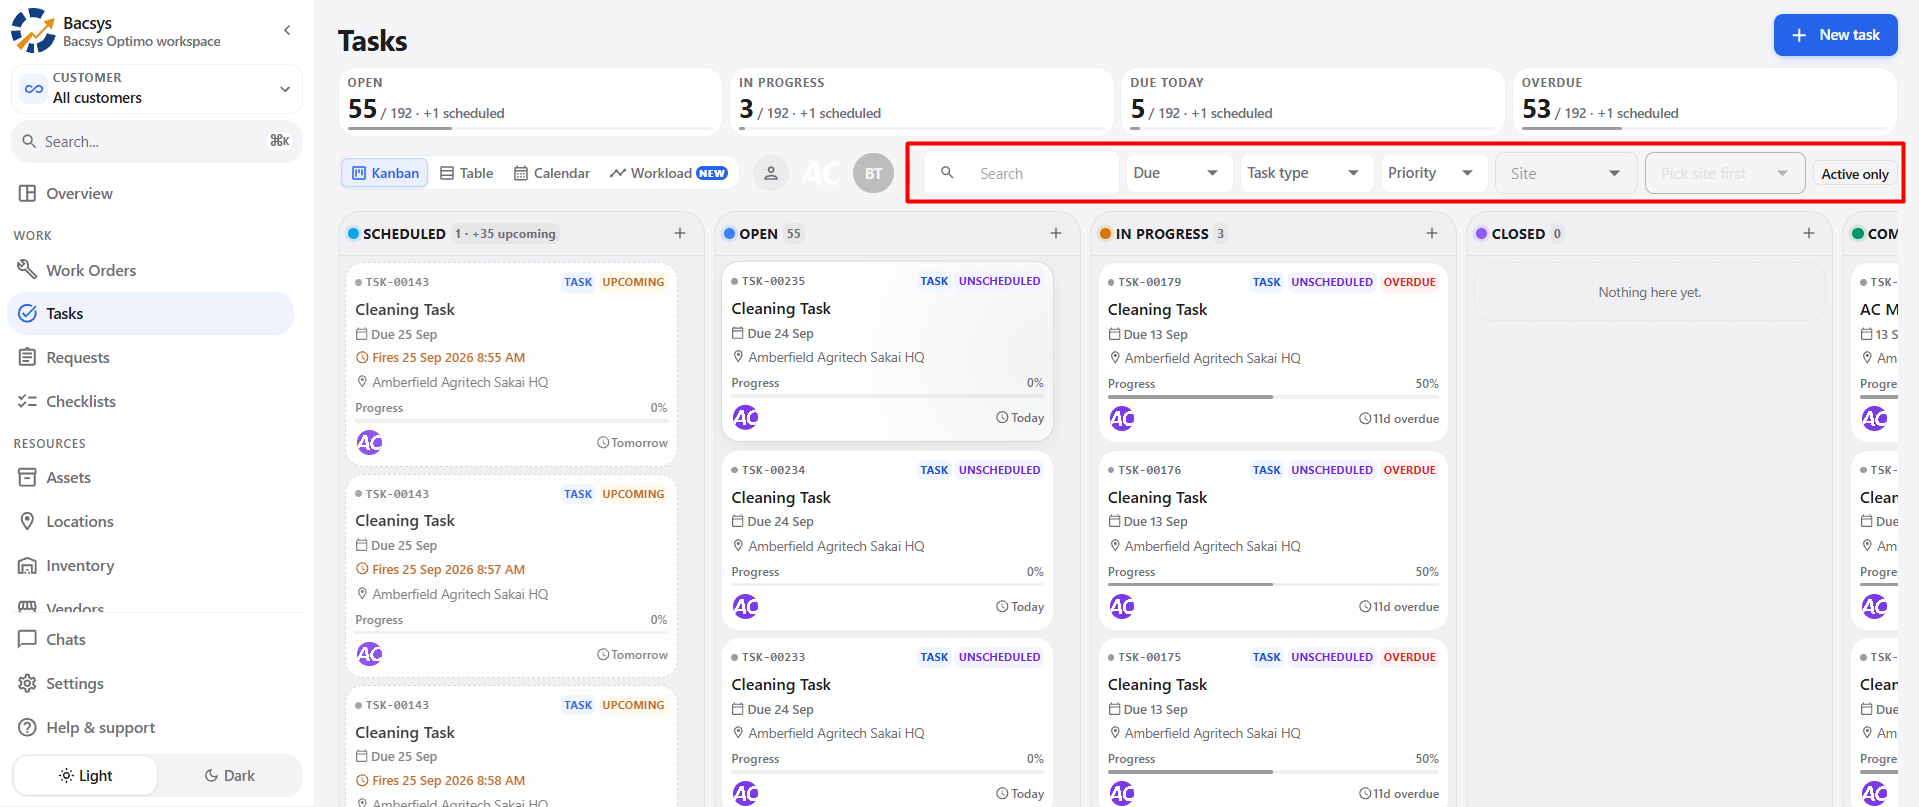
3.2 Steps to Filter Tasks
- Enter the required task information in the Search field, if needed.
- Select a value from Due to filter tasks by due status.
- Select the required Task type.
- Select the required Priority.
- Select a Site.
- If required, select the related option after choosing the site.
- Enable Active only to display only active tasks.
- The task list is updated based on the selected search and filter options.
4. Creating a New Task
When the user clicks the + New task button on the Tasks page, a New task pop-up window is displayed.
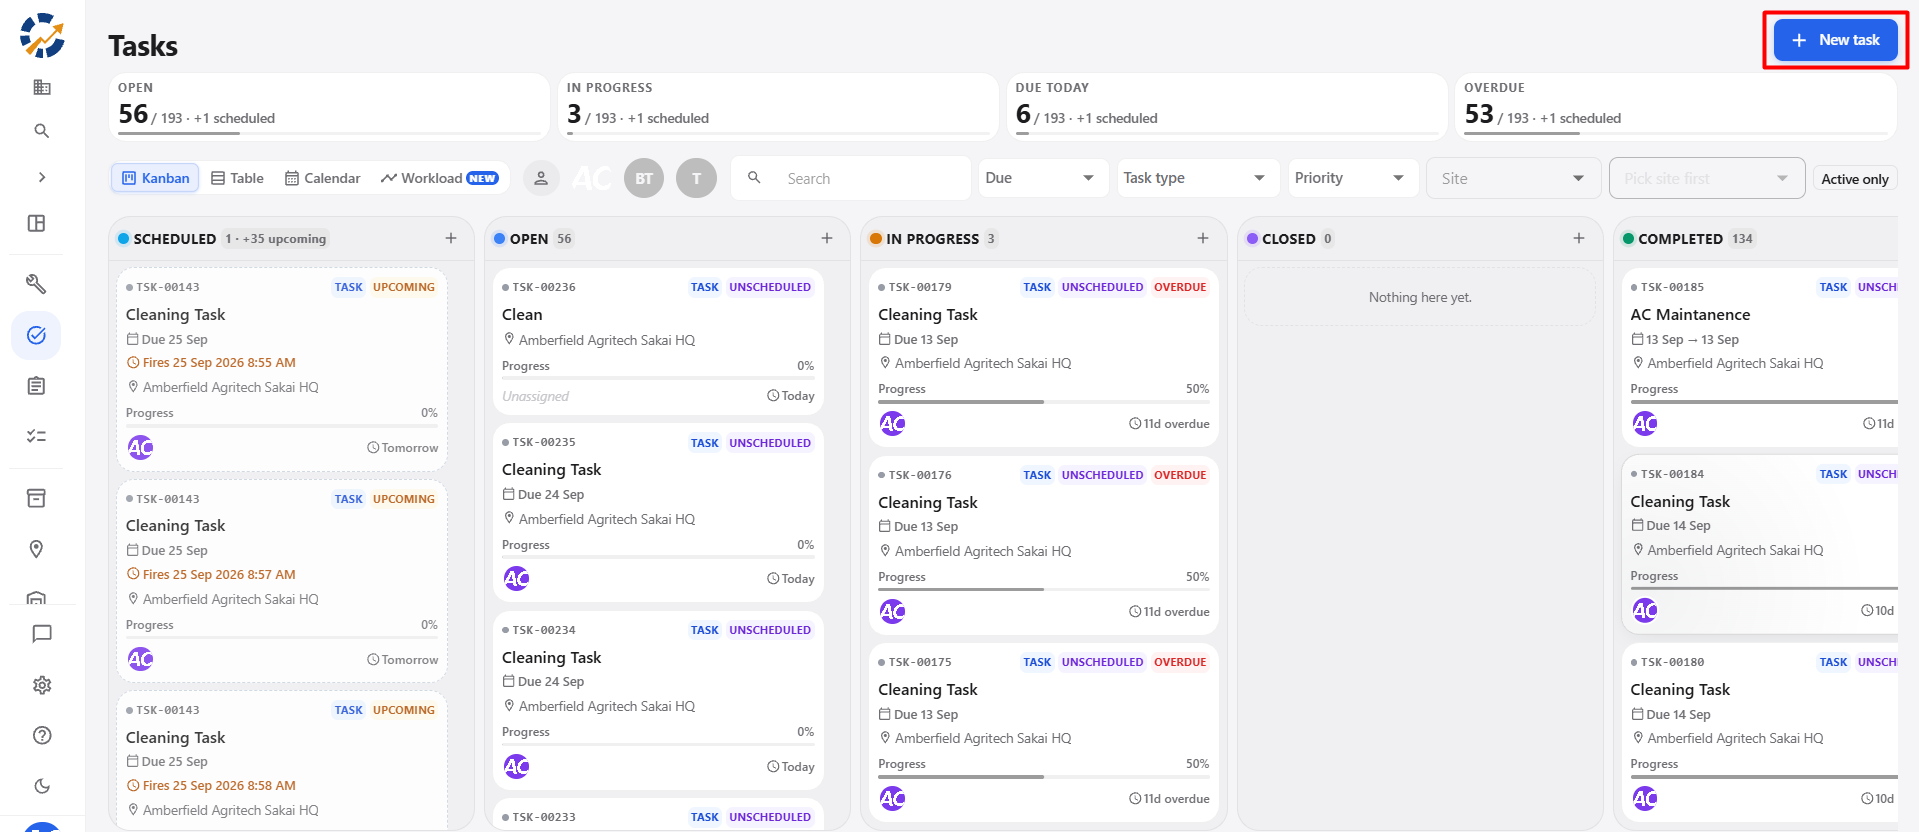
The pop-up contains several sections that allow the user to configure the task before creating it.
4.1 New Task Form
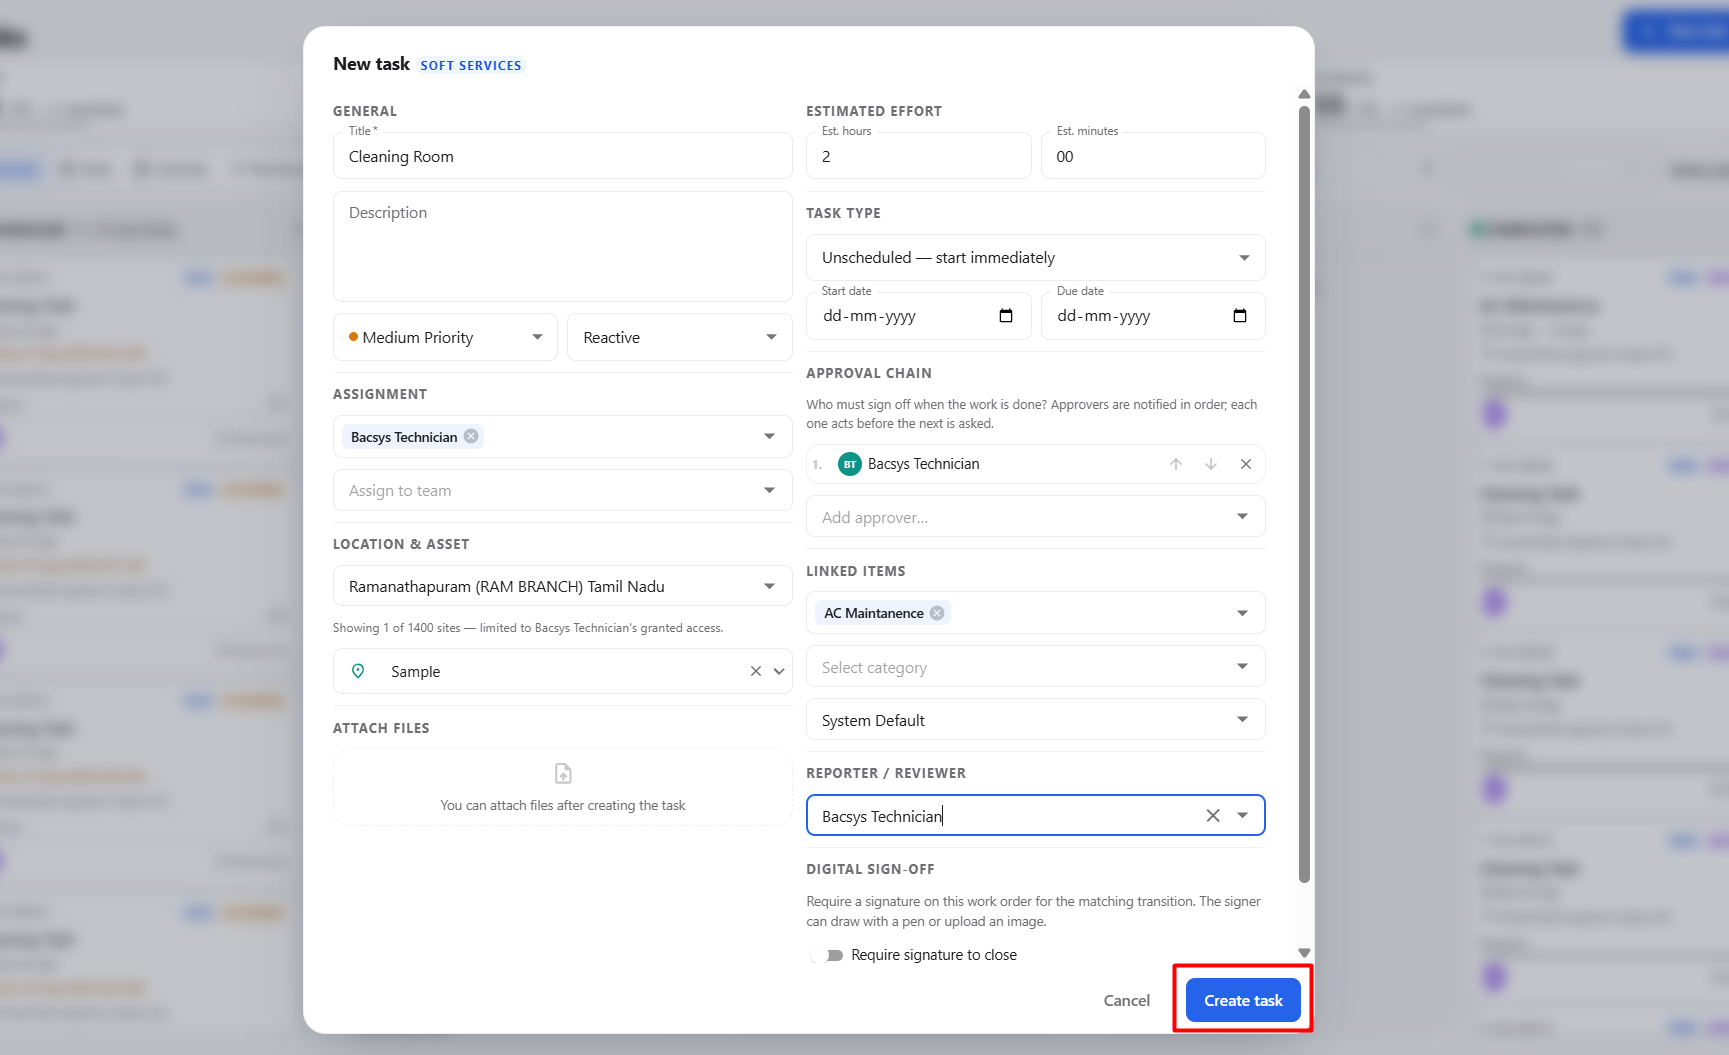
| Section | Field | Description |
|---|---|---|
| General | Title * | Enter the name or title of the task. This is a required field. |
| General | Description | Enter detailed information about the task. |
| General | Priority | Select the priority of the task. |
| General | Work Type | Select the applicable work type. |
| Estimated Effort | Est. hours | Enter the estimated number of hours required to complete the task. |
| Estimated Effort | Est. minutes | Enter the estimated number of minutes required to complete the task. |
| Task Type | Task Type | Select how the task should be scheduled or started. |
| Task Type | Start date | Select the date on which the task should start. |
| Task Type | Due date | Select the date by which the task should be completed. |
| Assignment | Assign to one or more people | Select the user or users responsible for completing the task. |
| Assignment | Assign to team | Select the team responsible for the task. |
| Approval Chain | Add approver | Select the users who need to approve or sign off on the task. |
| Location & Asset | Select site * | Select the site where the task needs to be performed. |
| Location & Asset | Location | Select the location related to the selected site. |
| Linked Items | Select checklists | Select a checklist that needs to be associated with the task. |
| Linked Items | Select category | Select the applicable task category. |
| Linked Items | Report template | Select a report template or use the organization default. |
| Attach Files | Attach Files | Supporting files can be attached after the task is created. |
| Reporter / Reviewer | Reporter / Reviewer | Select the user responsible for reporting or reviewing the task. By default, it is the task creator. |
| Digital Sign-Off | Require signature to close | Enable this option if a digital signature is required when closing the task. |
| Digital Sign-Off | Require signature to acknowledge | Enable this option if a digital signature is required when acknowledging the task. |
Note: Fields marked with
*are required.
4.2 General
The General section contains the basic information required for the task.
| Field | Description |
|---|---|
| Title * | Enter the task name. |
| Description | Enter the details or instructions for the task. |
| Priority | Select the required priority level. |
| Work Type | Select the type of work to be performed. |
4.3 Estimated Effort
The Estimated Effort section defines the expected time required to complete the task.
| Field | Description |
|---|---|
| Est. hours | Enter the estimated hours required. |
| Est. minutes | Enter the estimated minutes required. |
4.4 Task Type
The Task Type field determines how the task should be scheduled.
| Task Type | Description |
|---|---|
| Specific Date | Schedule the task for a specific start date and due date. |
| Recurring | Schedule the task to repeat based on a defined recurring schedule. |
4.4.1 Specific Date
Select Specific Date when the task needs to be performed on a particular date.
| Field | Description |
|---|---|
| Start Date | Select the date on which the task should start. |
| Due Date | Select the date by which the task should be completed. |
4.4.2 Scheduled — Recurring
Select Scheduled — recurring when the task needs to repeat automatically based on a defined schedule.
| Field | Description |
|---|---|
| Every | Select the frequency of the recurring task, such as day. |
| Time(s) of day | Set the time at which the recurring task should be scheduled. |
| Add time | Add additional times for the same recurring task. |
| Stops on | Select an optional end date for the recurring schedule. Leave it blank if the task should have no end date. |
| Show upcoming work orders ahead of time | Enable this option to display upcoming recurring tasks ahead of their scheduled date. |
Recurring Schedule Steps
- Select Scheduled — recurring from the Task Type field.
- Select the required frequency in Every.
- Set the required Time(s) of day.
- Click Add time if the task needs to run at more than one time per day.
- Select a Stops on date if the recurring schedule should have an end date.
- Enable Show upcoming work orders ahead of time if upcoming tasks should be displayed in advance.
- Complete the remaining task details.
- Click Create task.
4.5 Assignment
The Assignment section is used to define who is responsible for the task.
| Field | Description |
|---|---|
| Assign to one or more people | Select one or more users who are responsible for the task. |
| Assign to team | Select the team responsible for the task. |
4.6 Approval Chain
The Approval Chain section allows users to configure the users who need to sign off on the task.
| Field | Description |
|---|---|
| Add approver | Select the user who needs to approve or sign off on the task. |
Approvers are notified in order, with each approver acting before the next approver is asked to sign off.
4.7 Location & Asset
The Location & Asset section associates the task with the required site and location.
| Field | Description |
|---|---|
| Select site * | Select the site where the task needs to be performed. |
| Location | Select the location associated with the selected site. |
Note: A site must be selected before the related location can be selected.
4.8 Linked Items
The Linked Items section allows related information to be associated with the task.
| Field | Description |
|---|---|
| Select checklists | Select a checklist associated with the task. |
| Select category | Select the applicable category. |
| Report template — use org default | Select a report template or use the organization default. |
4.9 Attach Files
The Attach Files section is used to add supporting documents or files.
The form displays:
You can attach files after creating the task
Attachments can therefore be added after the task has been created.
4.10 Reporter / Reviewer
The Reporter / Reviewer section allows the user responsible for reporting or reviewing the task to be selected.
The default option is:
Same as creator (default)
| Option | Description |
|---|---|
| Same as creator (default) | The task creator is used as the reporter/reviewer. |
| Other user | A different user can be selected when required. |
4.11 Digital Sign-Off
The Digital Sign-Off section controls whether a signature is required for specific task transitions.
| Option | Description |
|---|---|
| Require signature to close | Requires the user to provide a digital signature when closing the task. |
| Require signature to acknowledge | Requires the user to provide a digital signature when acknowledging the task. |
The signer can draw a signature using a pen or upload an image.
5. Creating and Saving the Task
5.1 Create the Task
After entering all the required task information:
- Enter the Title.
- Add the Description, if required.
- Select the Priority.
- Select the Work Type.
- Enter the Estimated Effort.
- Select the Task Type.
- Set the Start date and Due date, when applicable.
- Assign the task to one or more people or a team.
- Configure the Approval Chain, if required.
- Select the Site and Location.
- Select the required Checklist, Category, and Report Template.
- Configure the Reporter / Reviewer.
- Configure the required Digital Sign-Off options.
- Click Create task.
5.2 Where the Task Is Saved
The location of the newly created task depends on the selected task type.
5.2.1 Unscheduled — Start Immediately
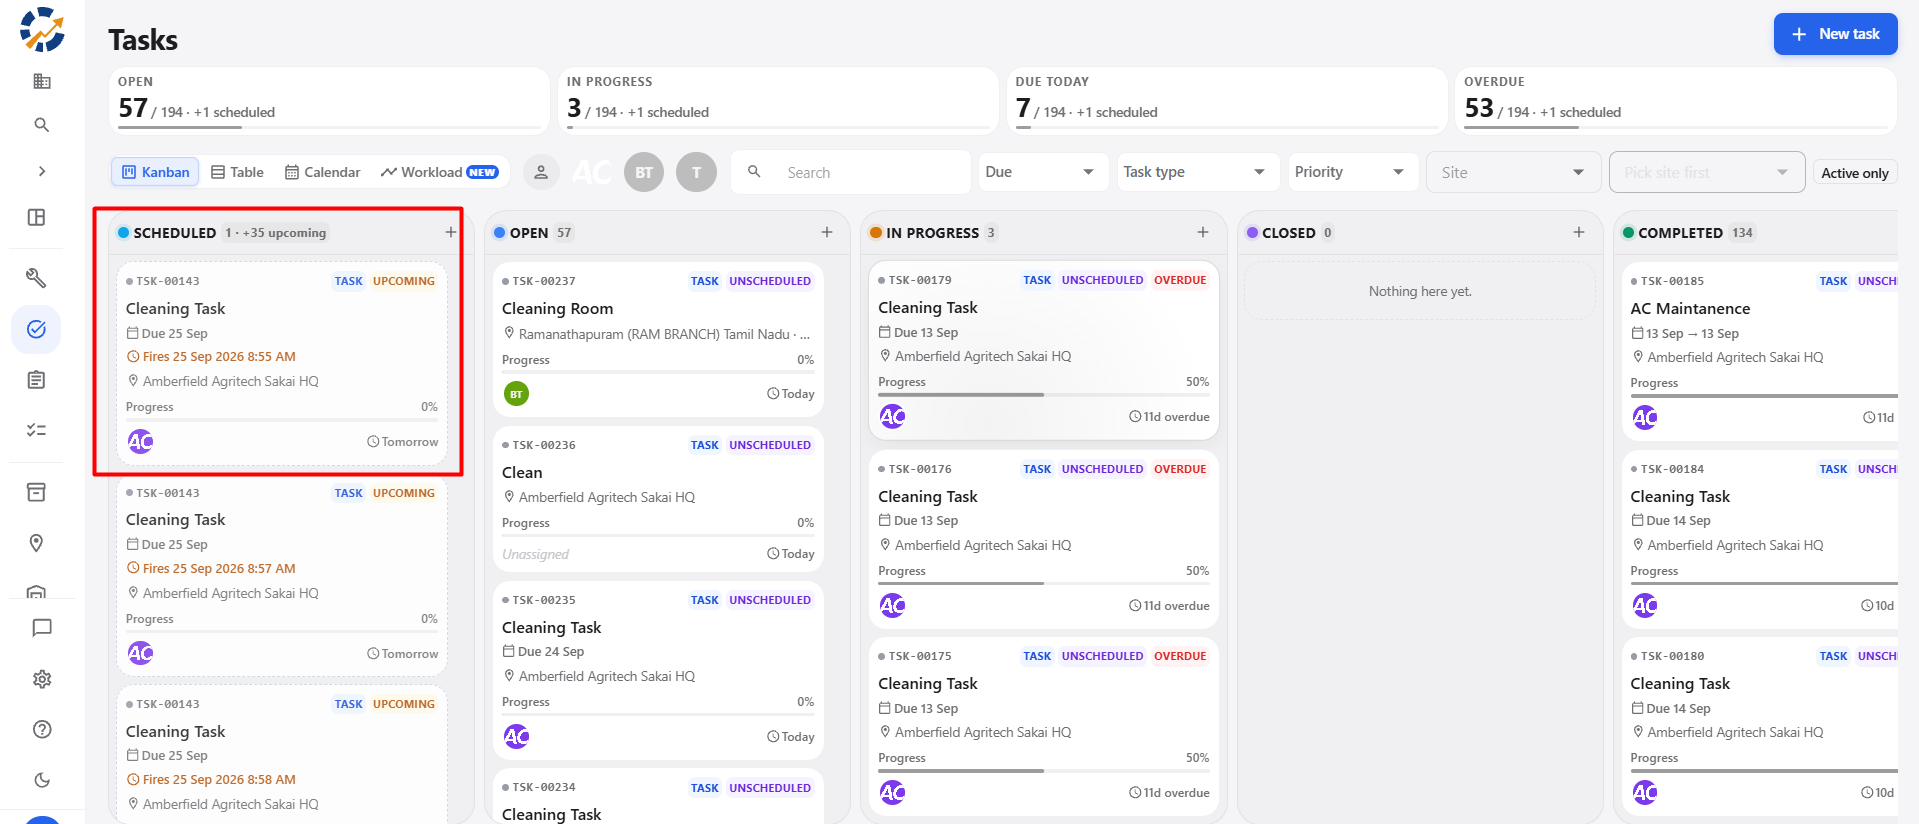
Unscheduled — start immediately is used for a one-time task that should begin immediately after creation.
Since no specific date is set, the task is saved in the Open section.
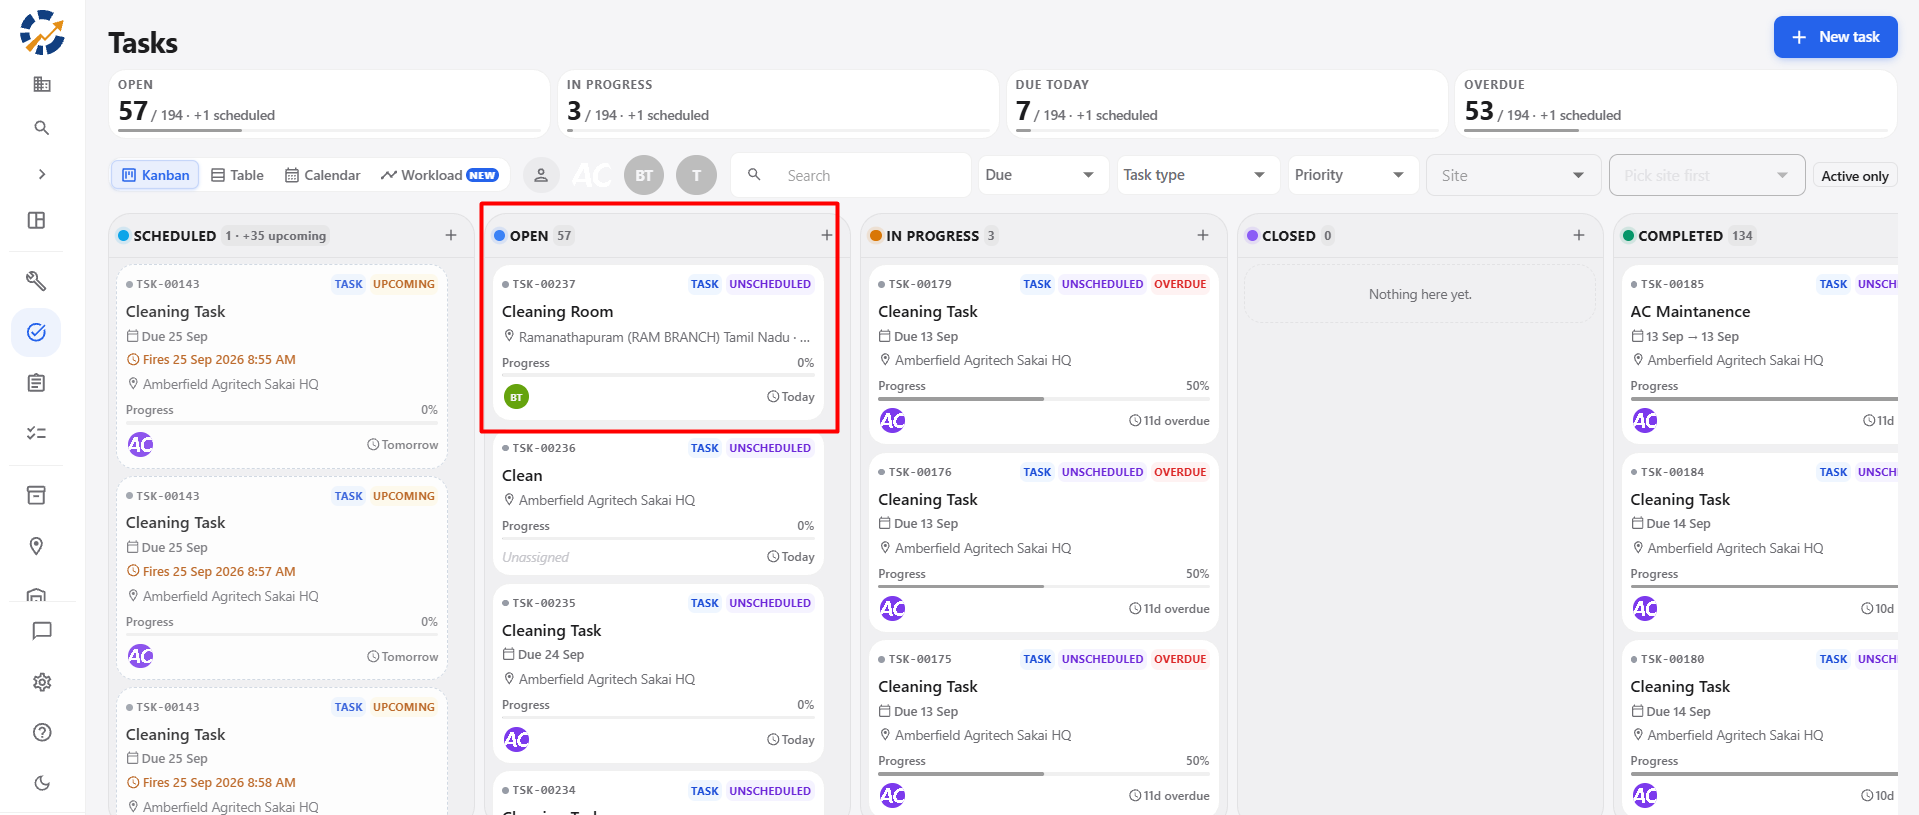
Task Saving Flow
+ New task
     ↓
New Task Form
     ↓
Unscheduled — start immediately
     ↓
Create task
     ↓
Open
16. Closed Task
After clicking Close (work done) and completing the required closing steps, the task moves from In Progress to Closed.
The Closed task displays the completed checklist and task details.
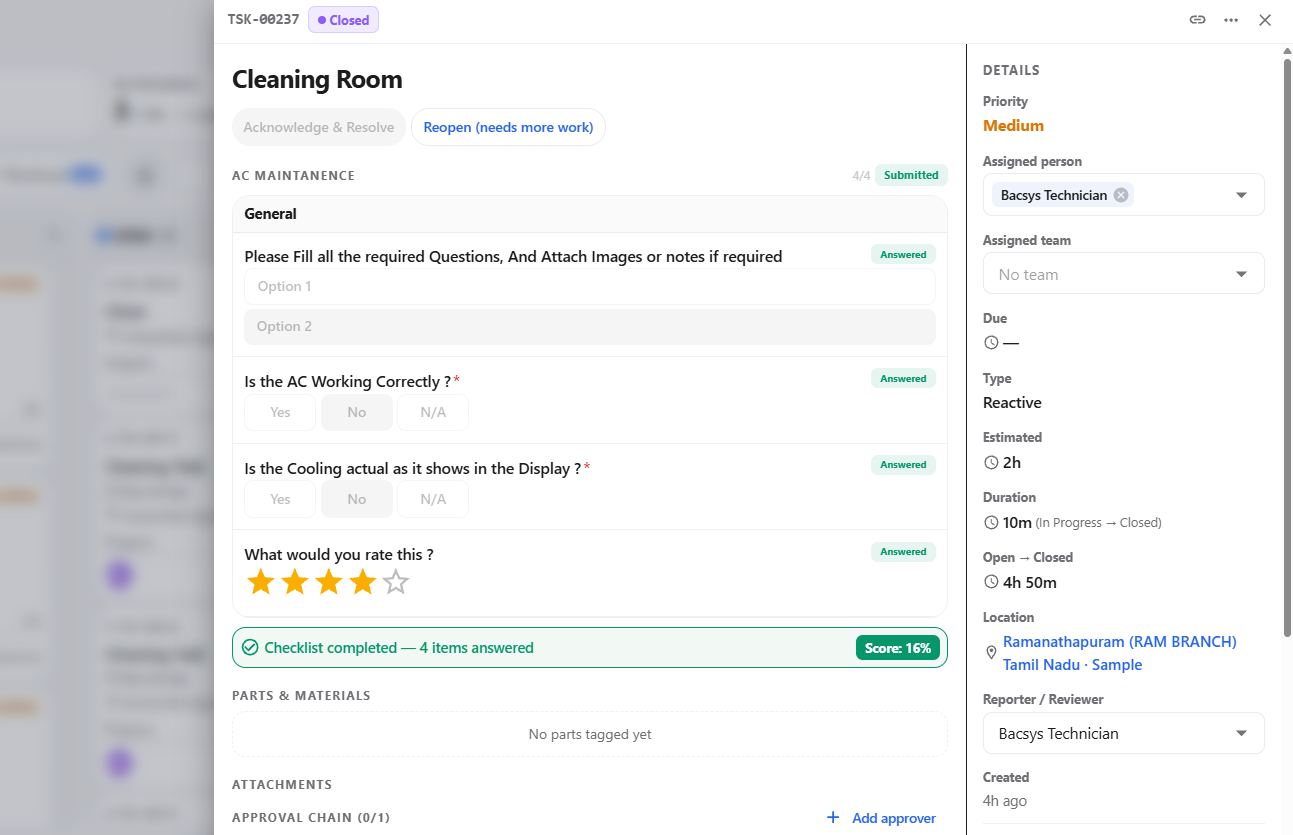
Closed Task Options
| Option | Description |
|---|---|
| Acknowledge & Resolve | Allows the user to acknowledge the completed work and move the task toward resolution. |
| Reopen (needs more work) | Allows the user to reopen the task when additional work is required. |
Closed Task Details
The task details page can display:
| Section | Information |
|---|---|
| Status | Displays the current Closed status. |
| Priority | Displays the task priority. |
| Assigned Person | Displays the user assigned to the task. |
| Assigned Team | Displays the assigned team. |
| Due | Displays the task due date. |
| Type | Displays the task work type. |
| Estimated | Displays the estimated effort. |
| Duration | Displays the actual time spent on the task. |
| Open → Closed | Displays the total time from opening the task until it was closed. |
| Location | Displays the site and location associated with the task. |
| Reporter / Reviewer | Displays the selected reporter or reviewer. |
| Checklist | Displays the completed and submitted checklist. |
| Parts & Materials | Displays parts or materials associated with the task. |
| Attachments | Displays files attached to the task. |
| Approval Chain | Displays the configured approval information. |
Closed Task Workflow
In Progress
     ↓
Close (work done)
     ↓
     Closed
              Closed
              ↓    ↓
             /      \
            ↓        ↓
Acknowledge &     Reopen
   Resolve      (needs more work)
     ↓              ↓
  Resolved      In Progress
17. Acknowledge & Resolve
After the task is moved to Closed, the assigned person can review the completed task and acknowledge the work.
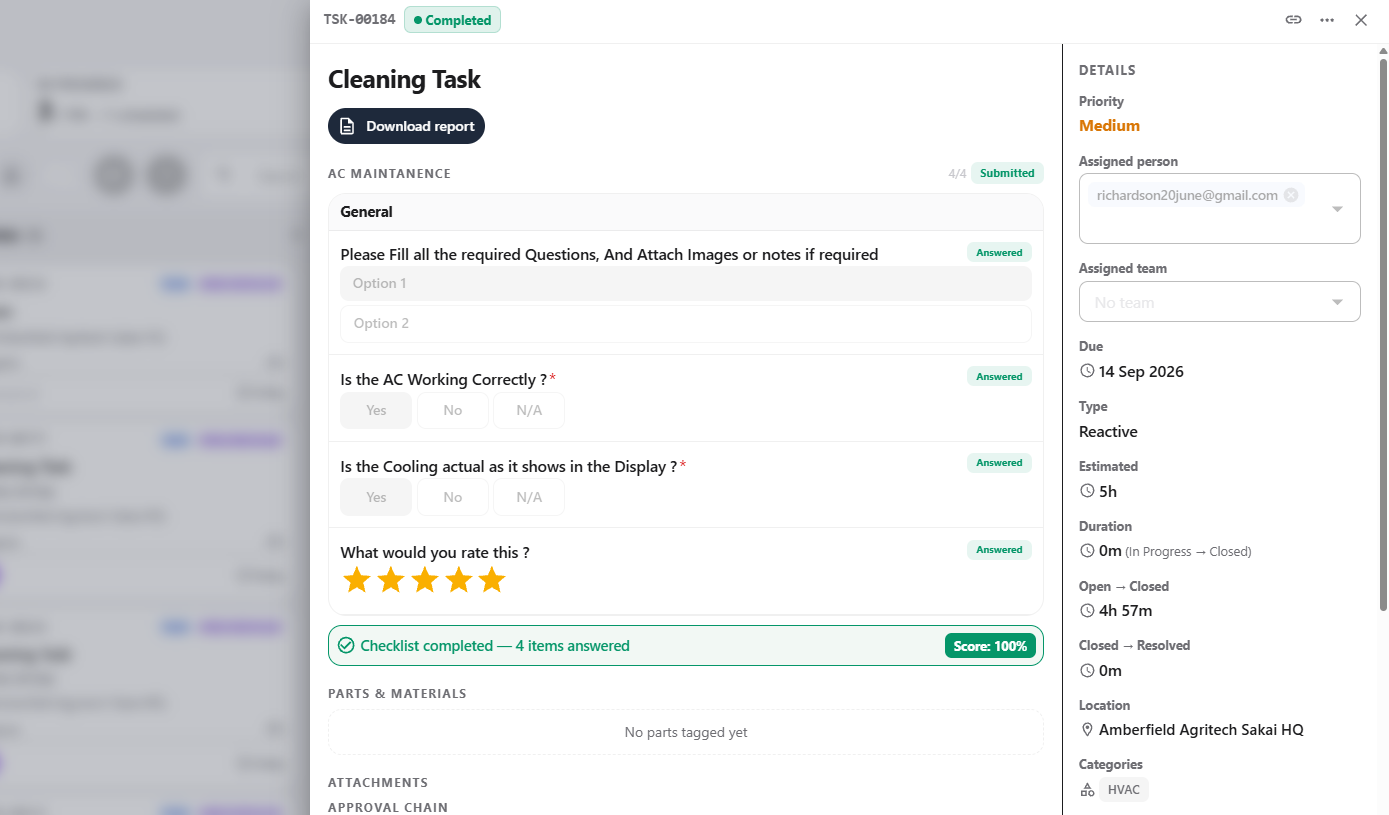
Steps to Acknowledge and Resolve
- Open the task from the Closed section.
- Review the completed checklist and task details.
- The assigned person reviews the completed work.
- Click Acknowledge & Resolve.
- Complete the required acknowledgement, if applicable.
- After the acknowledgement is completed, the task moves to Completed.
Task Status Flow
In Progress
     ↓
Close (work done)
     ↓
   Closed
     ↓
Assigned Person Reviews
     ↓
Acknowledge & Resolve
     ↓
  Completed
18. Download Task Report
After the task is moved to Completed, users can download the task report when required.
The report can be downloaded in PDF format for documentation and record-keeping.
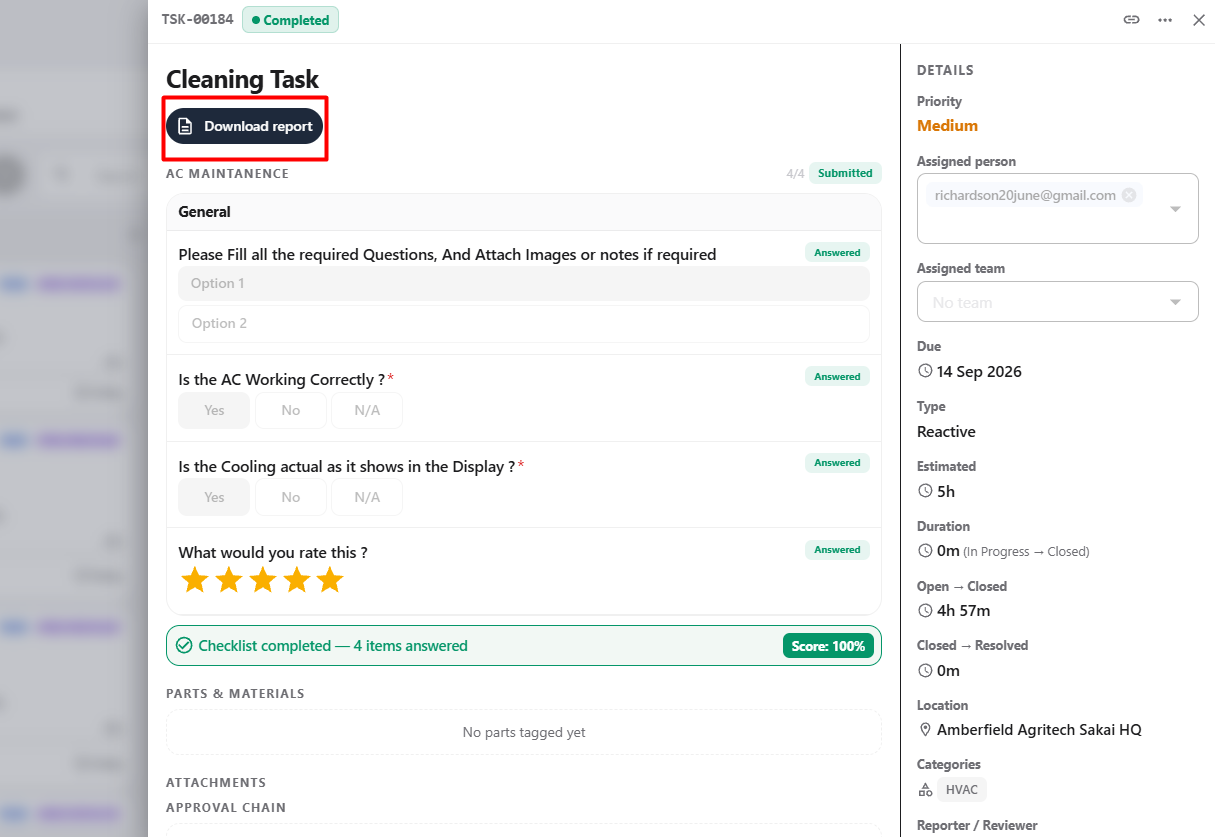
Steps to Download the Report
- Open the task from the Completed section.
- Review the completed task details.
- Click Download Report.
- The system generates the task report.
- Download the report in PDF format.
- The completed task remains available in the Completed section.
Report Workflow
Completed
    ↓
Download Report
    ↓
Generate Report
    ↓
Download PDF
18. Download Task Report
After the task is moved to Completed, users can download the task report when required.
The report can be downloaded in PDF format for documentation and record-keeping.
Steps to Download the Report
- Open the task from the Completed section.
- Review the completed task details.
- Click Download Report.
- The system generates the task report.
- Download the report in PDF format.
- The completed task remains available in the Completed section.
Report Workflow
Completed
    ↓
Download Report
    ↓
Generate Report
    ↓
Download PDF
Complete Workflow
Create Task
   ↓
Select Task Type
   ↓
Assign Person / Team
   ↓
Select Site & Location
   ↓
Add Checklist / Category / Report Template
   ↓
Create Task
   ↓
Open / Scheduled
   ↓
Start Work
   ↓
In Progress
   ↓
Complete Checklist
   ↓
Close (work done)
   ↓
Closed
   ↓
Assigned Person Reviews
   ↓
Acknowledge & Resolve
   ↓
Completed
   ↓
Download Report
Task Type Workflows
1. Unscheduled — Start Immediately
+ New task
   ↓
New Task Form
   ↓
Unscheduled — start immediately
   ↓
Create task
   ↓
Open
   ↓
Start work
   ↓
In Progress
2. Specific Date
+ New task
   ↓
New Task Form
   ↓
Specific Date
   ↓
Set Start Date
   ↓
Set Due Date
   ↓
Create task
   ↓
Scheduled
   ↓
Start work
   ↓
In Progress
   ↓
Close (work done)
   ↓
Closed
   ↓
Acknowledge & Resolve
   ↓
Completed
3. Scheduled — Recurring
+ New task
   ↓
New Task Form
   ↓
Scheduled — recurring
   ↓
Select frequency
   ↓
Set Time(s) of day
   ↓
Add time (if required)
   ↓
Set Stops on (if required)
   ↓
Show upcoming work orders ahead of time
   ↓
Create task
   ↓
Scheduled
   ↓
Recurring Task
   ↓
Start work
   ↓
In Progress
   ↓
Close (work done)
   ↓
Closed
   ↓
Acknowledge & Resolve
   ↓
Completed
The recurring configuration includes Every, Time(s) of day, Add time, Stops on, and Show upcoming work orders ahead of time.
Closed Task Decision Workflow
Once a task reaches Closed, there are two documented paths:
Closed
   ↓
   ├── Acknowledge & Resolve
   │       ↓
   │    Completed
   │
   └── Reopen (needs more work)
           ↓
        In Progress
           ↓
        Complete Work
           ↓
        Close (work done)
           ↓
        Closed
The documentation explicitly defines Acknowledge & Resolve and Reopen (needs more work) as the two actions available from Closed.
Final Reporting Workflow
Completed
   ↓
Download Report
   ↓
Generate Report
   ↓
Download PDF