

Locations
Locations Module
The Locations module allows users to view and manage sites and their associated locations within the system. The module provides a map view of available sites and allows users to access site management options.
1. Locations Overview
The Locations page displays the available sites and their locations on a map.
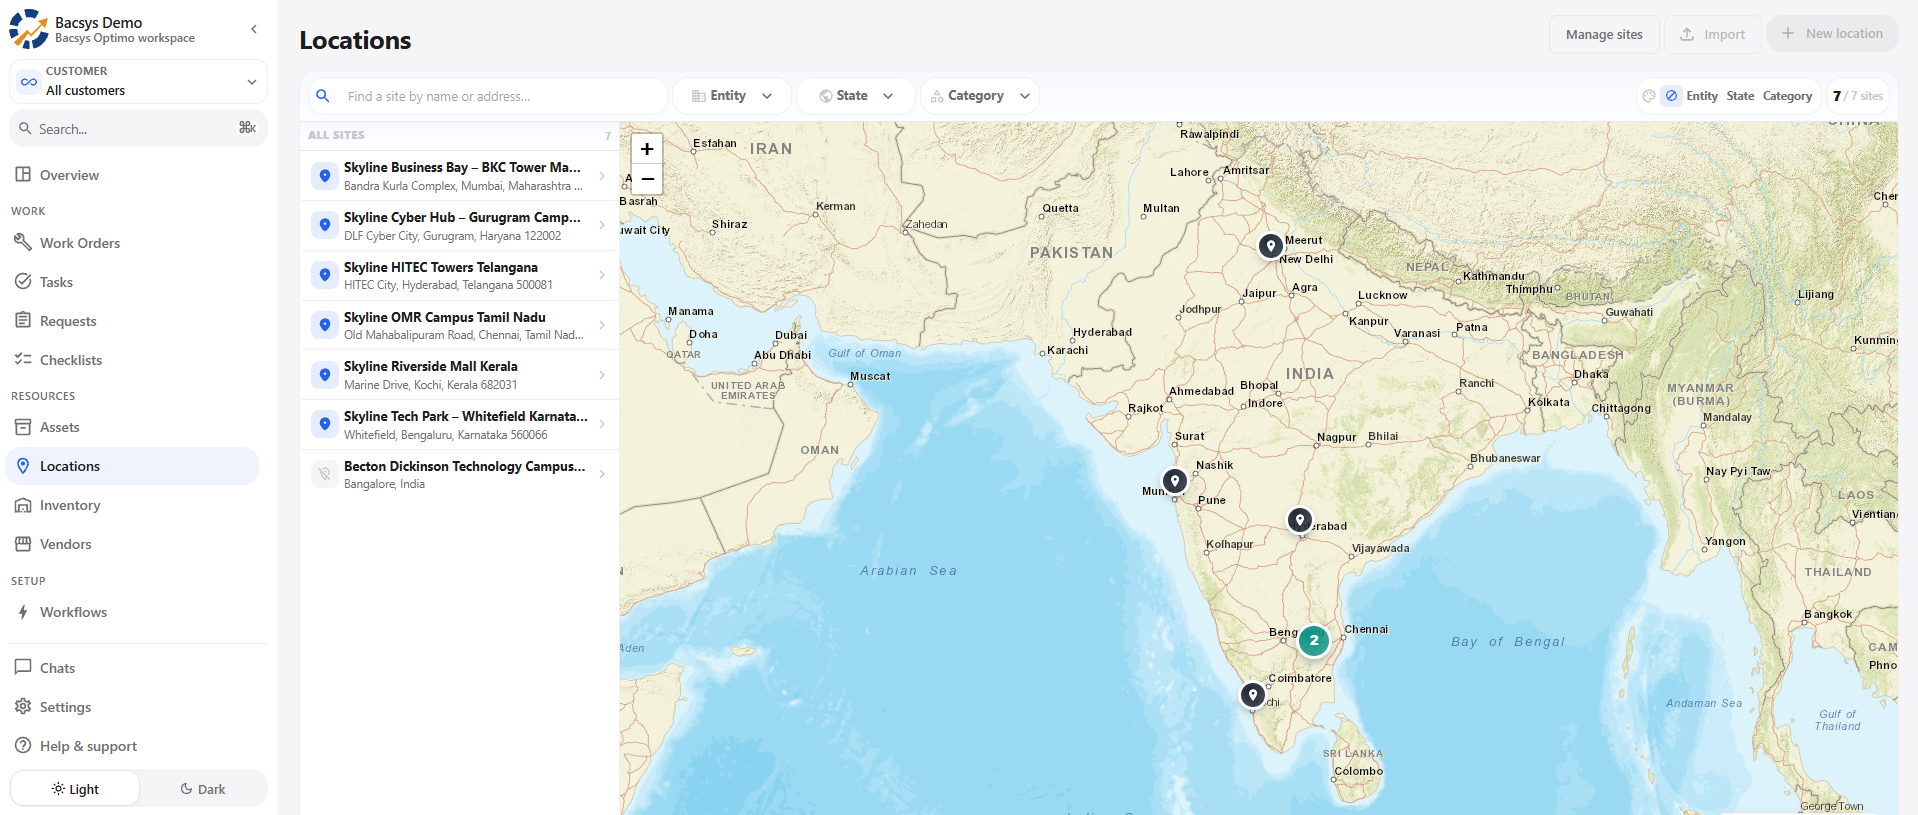
| Option | Description |
|---|---|
| Search | Allows users to search for a site by name or address. |
| Entity | Filters the displayed sites based on the selected entity. |
| State | Filters sites based on the selected state. |
| Category | Filters sites based on the selected category. |
| Manage sites | Opens the site and organizational structure management area. |
| Import | Allows site information to be imported. |
| New location | Allows users to create a new location. |
| Site List | Displays the available sites on the left side of the page. |
| Map View | Displays the geographical locations of the available sites. |
2. Manage Sites
The Manage sites option opens the Org Structure page, where groups, customers, and sites can be managed.
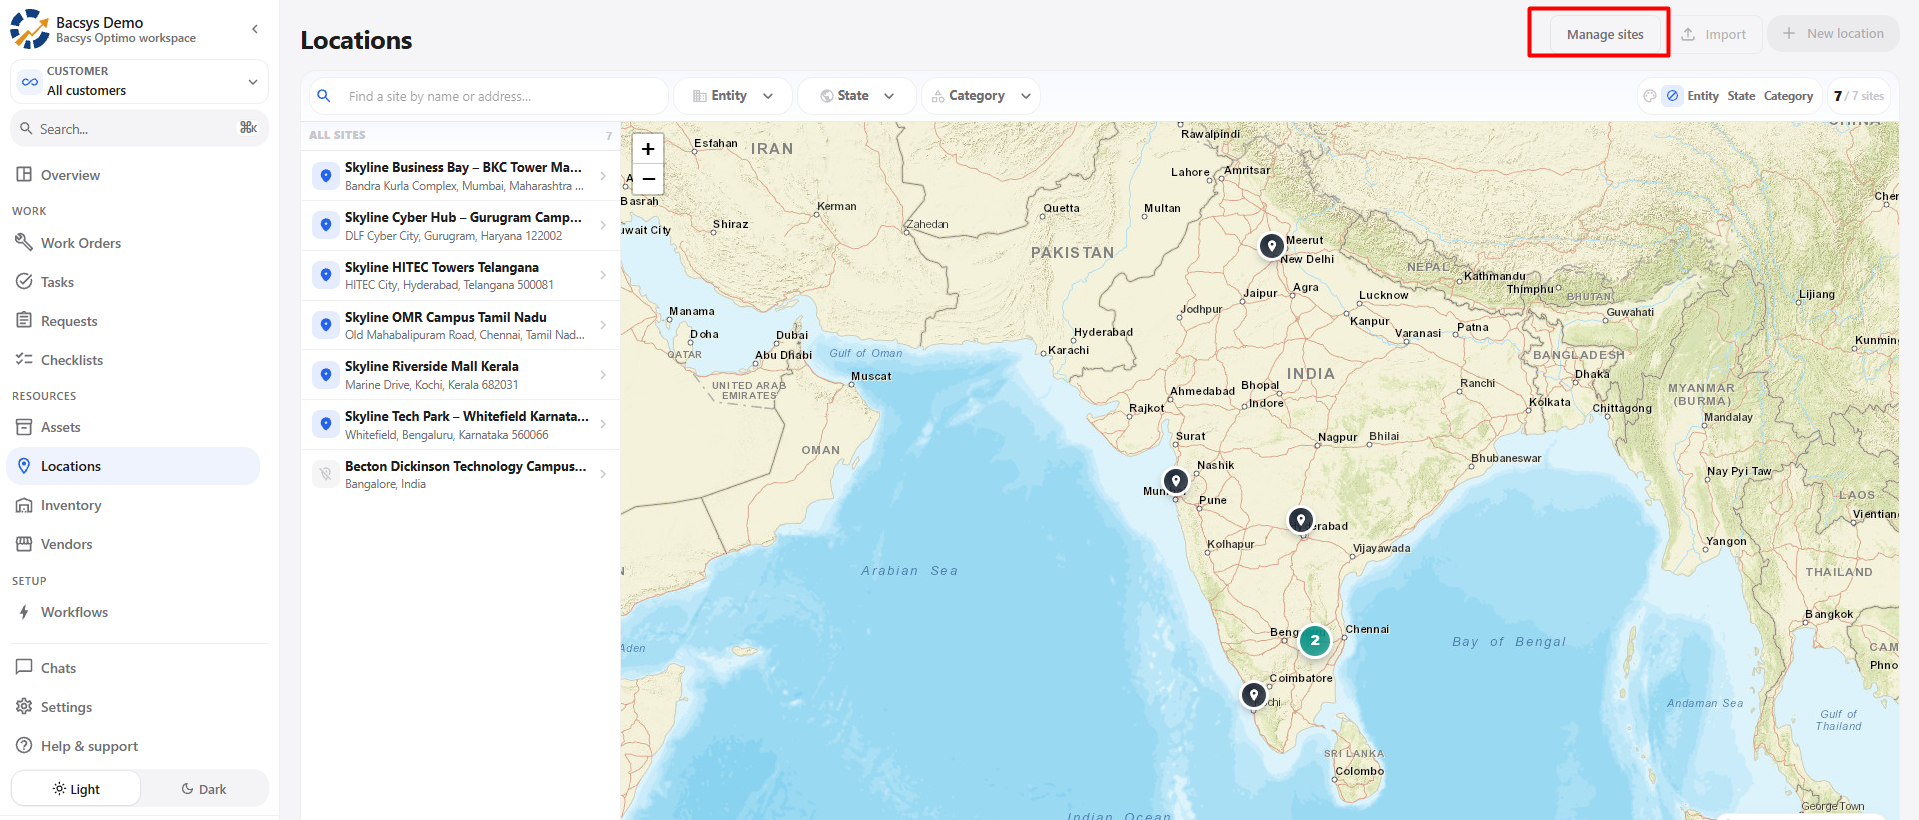
Steps
- Open the Locations module.
- Click Manage sites.
- The Settings page opens with the Org Structure section selected.
- The organizational hierarchy is displayed.
3. Create a New Customer
The New customer option allows users to create a customer within the Org Structure.
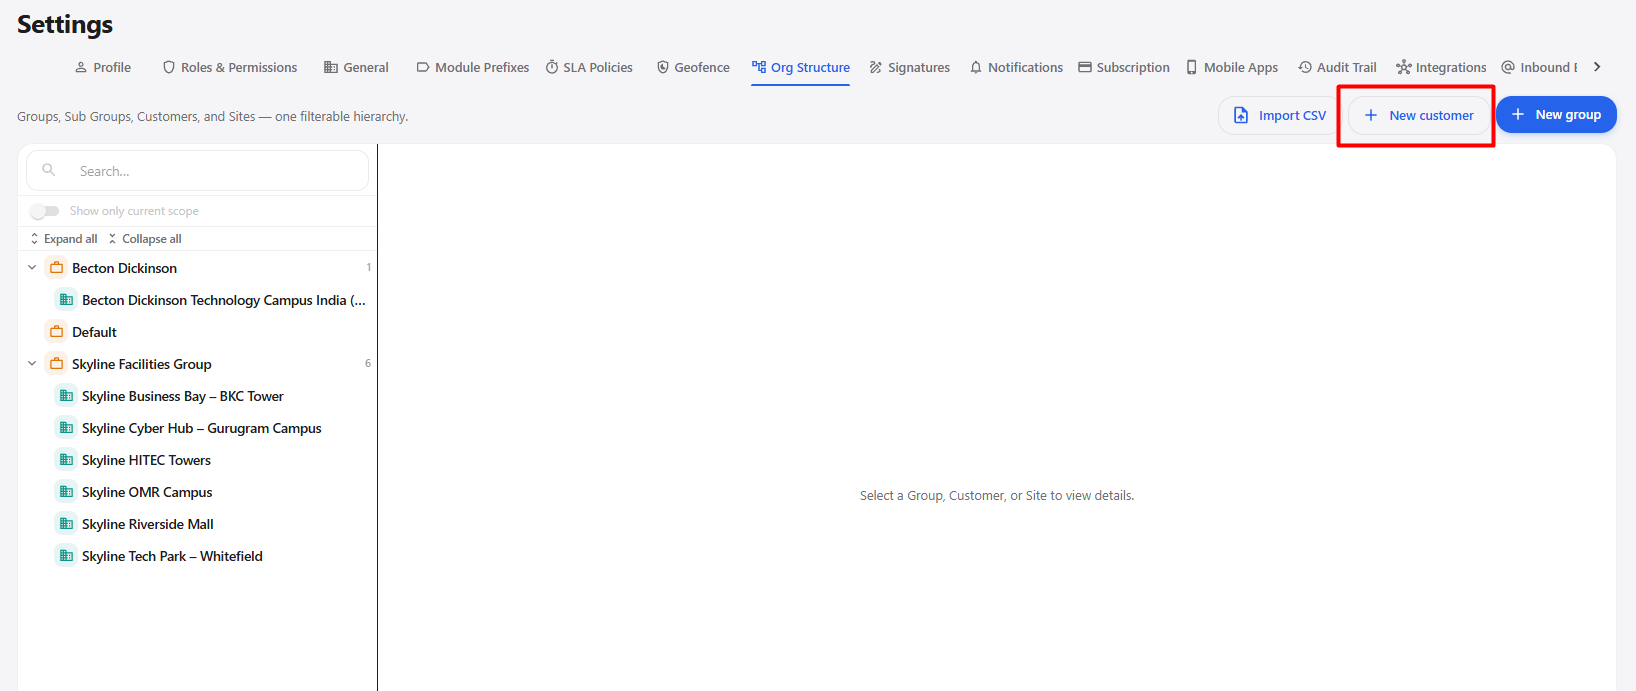
Steps
- Open Manage sites.
- Click New customer.
- The Create a new customer pop-up is displayed.
- Enter the required Customer name*.
- Enter the Slug if required.
- Enter the Description if required.
- Select the required Status.
- Click Create customer.
- The customer is created and added to the organizational structure.
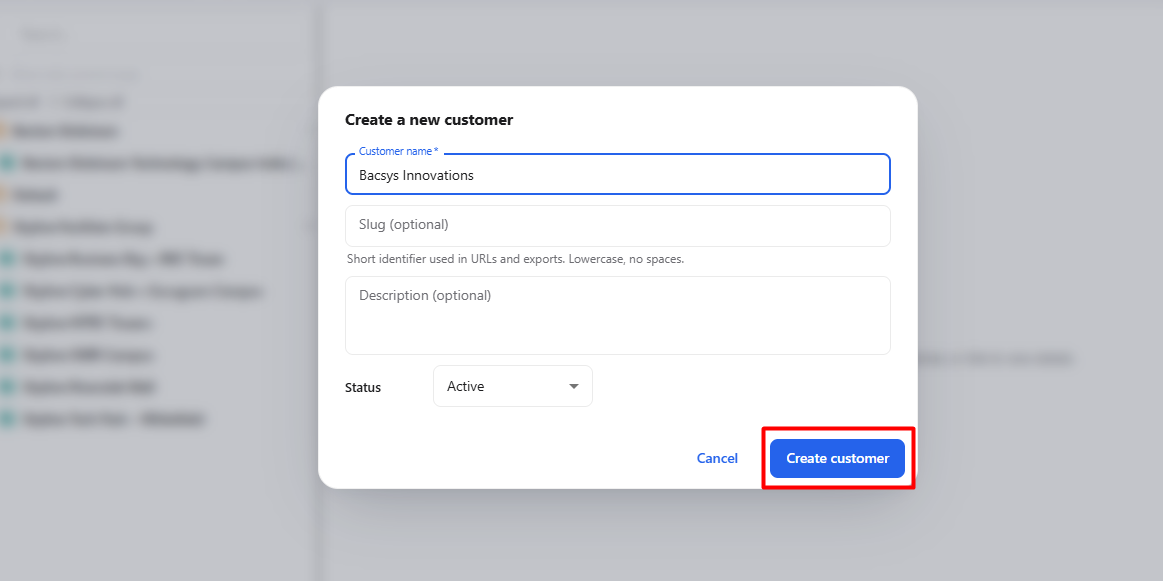
Customer Fields
| Field | Description |
|---|---|
| Customer name* | Enter the name of the customer. This field is mandatory. |
| Slug (optional) | Enter a short identifier used in URLs and exports. The slug should use lowercase characters without spaces. |
| Description (optional) | Enter additional information about the customer. |
| Status | Select the customer status. The available status shown is Active. |
| Cancel | Closes the pop-up without creating the customer. |
| Create customer | Creates the customer using the entered information. |
4. Create a New Group
The New group option allows users to create groups within the Org Structure. Multiple groups can be created as required, and each group is saved and displayed in the organizational structure.
Steps
- Open the Locations module.
- Click Manage sites.
- The Org Structure page is displayed.
- Click New group.
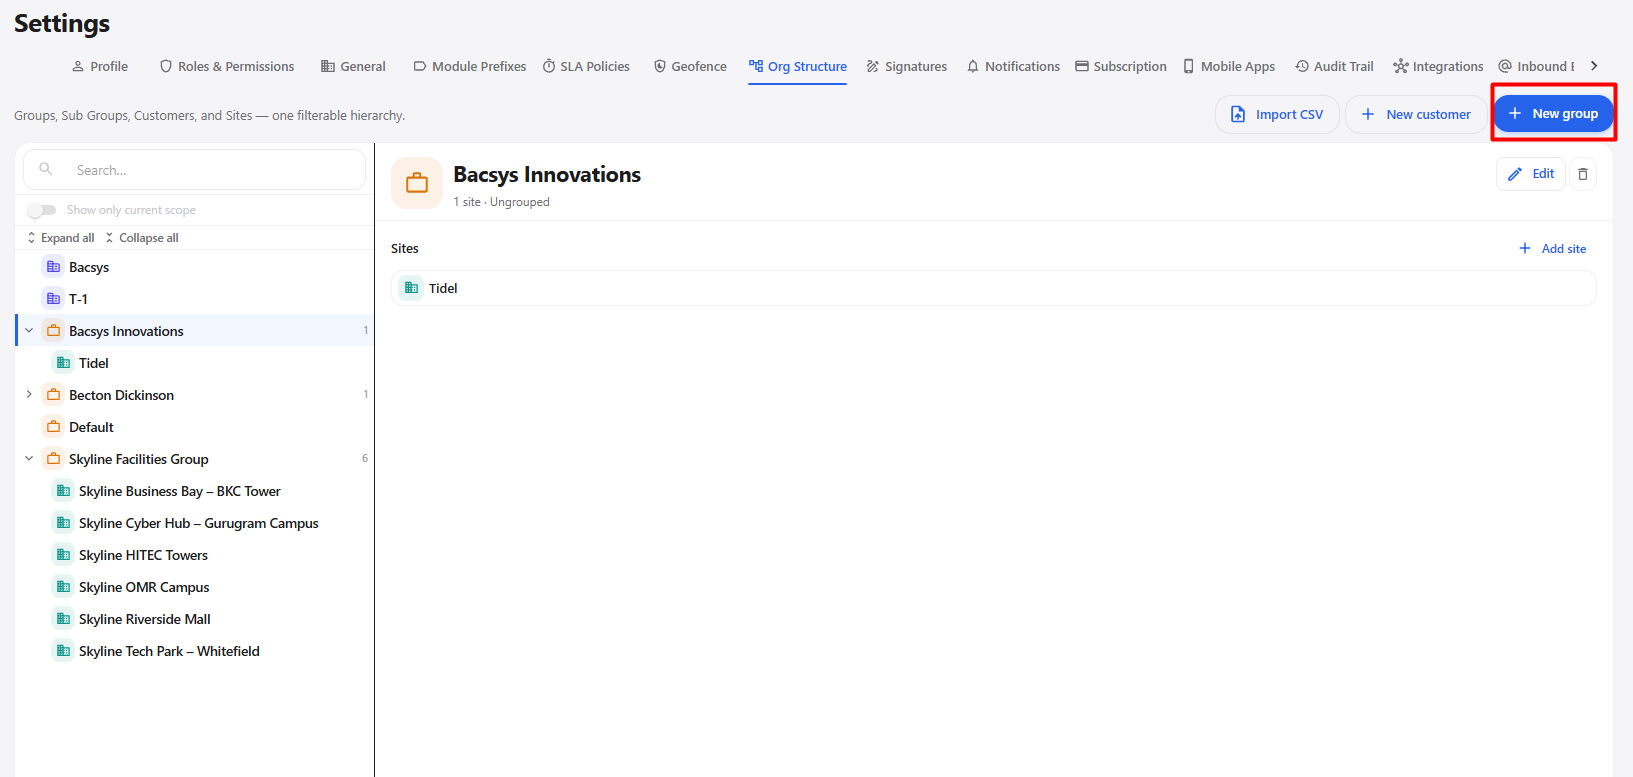
- The Create a new group pop-up is displayed.
- Enter the required Name* for the group.
- Click Save.
- The group is created and saved in the Org Structure.
- The created group is displayed in the group list.
- Click New group again to create additional groups.
- Enter the new group name and click Save.
- The additional group is also saved in the Org Structure.
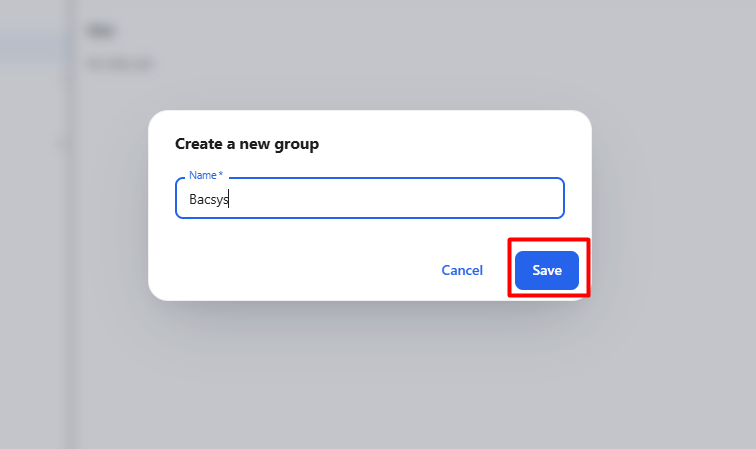
New Group Fields
| Field | Description |
|---|---|
| Name* | Enter the name of the group. This field is mandatory. |
| Cancel | Closes the pop-up without creating the group. |
| Save | Creates and saves the group in the Org Structure. |
5. Create a New Site
After creating a customer, users can create a site under the customer using the + New location option.
The Create a new site pop-up allows users to enter the site information and select its location on the map.
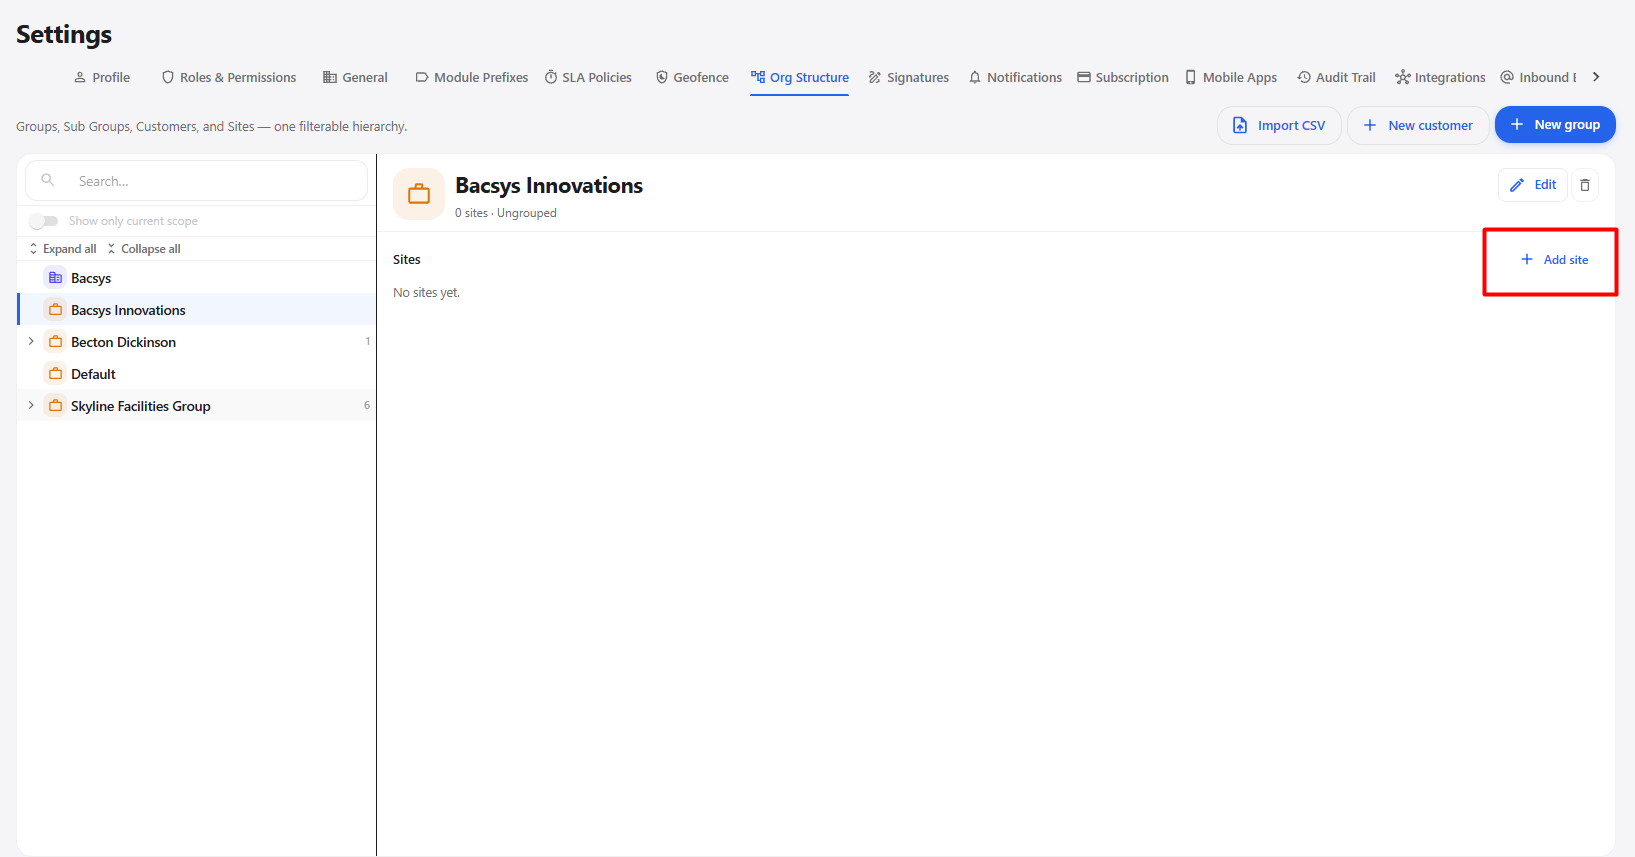
Steps
- Open the Locations module.
- Click Manage sites.
- Open the Org Structure section.
- Select the required customer.
- Click + New location.
- The Create a new site pop-up is displayed.
- Enter the required Site name*.
- Select the required Customer*.
- Enter the Description if required.
- Enter the site Address.
- Enter the Entity and State if required.
- Enter the Branch area (sq ft) if required.
- Select the Category if required.
- Enter any required custom field information.
- Use the map to select or confirm the site location.
- Review the entered site information.
- Click Create site.
- The site is created and added under the selected customer.
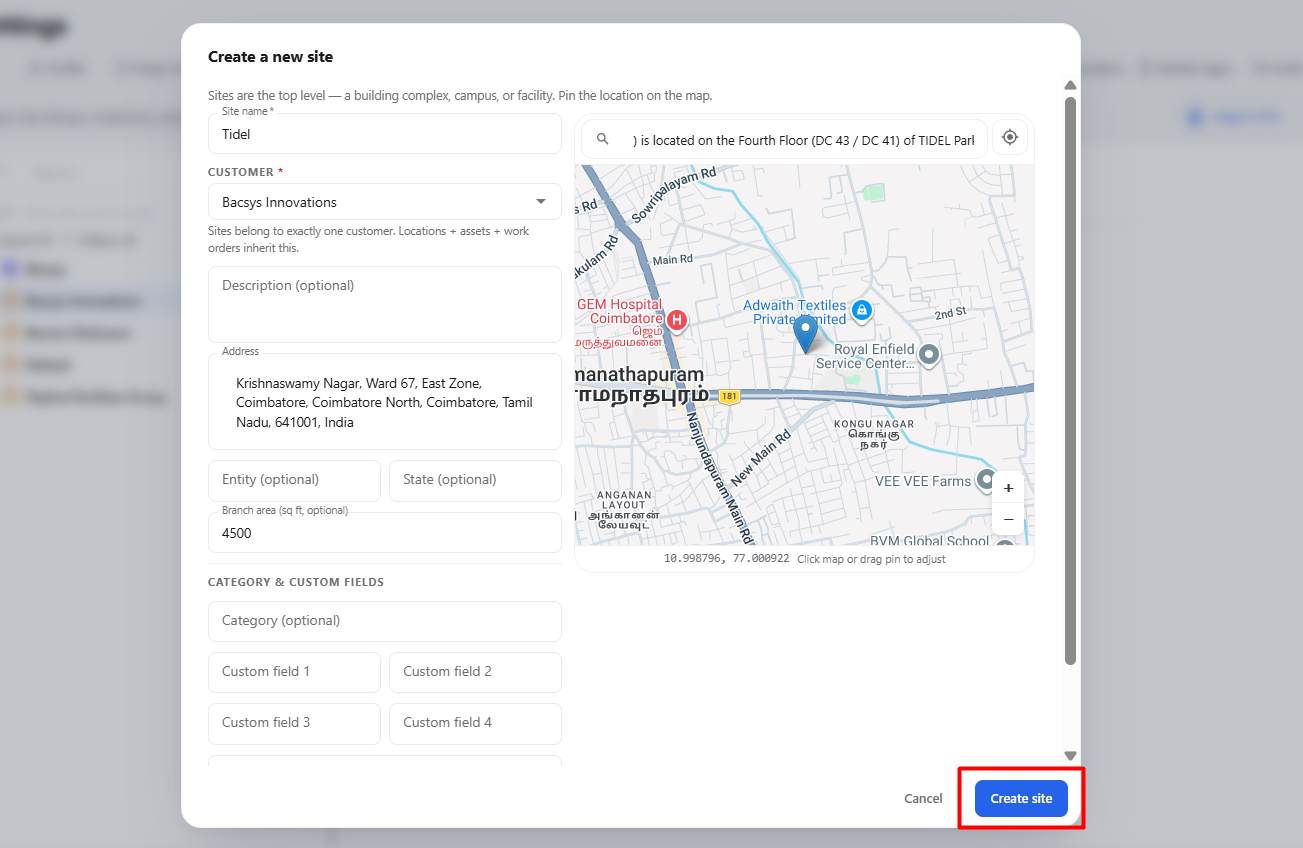
New Site Fields
| Field | Description |
|---|---|
| Site name* | Enter the name of the site. This field is mandatory. |
| Customer* | Select the customer to which the site belongs. This field is mandatory. |
| Description | Enter additional information about the site. |
| Address | Enter the address of the site. |
| Entity | Enter the entity associated with the site. |
| State | Enter or select the state associated with the site. |
| Branch area (sq ft) | Enter the branch or site area in square feet. |
| Category | Select the category associated with the site. |
| Custom field 1 | Enter additional custom information if required. |
| Custom field 2 | Enter additional custom information if required. |
| Custom field 3 | Enter additional custom information if required. |
| Custom field 4 | Enter additional custom information if required. |
| Custom field 5 | Enter additional custom information if required. |
| Map | Allows users to search for an address and select or confirm the site location on the map. |
| Cancel | Closes the pop-up without creating the site. |
| Create site | Creates the site using the entered information. |
6. Site Details
After creating a site, the Site Details page is displayed.
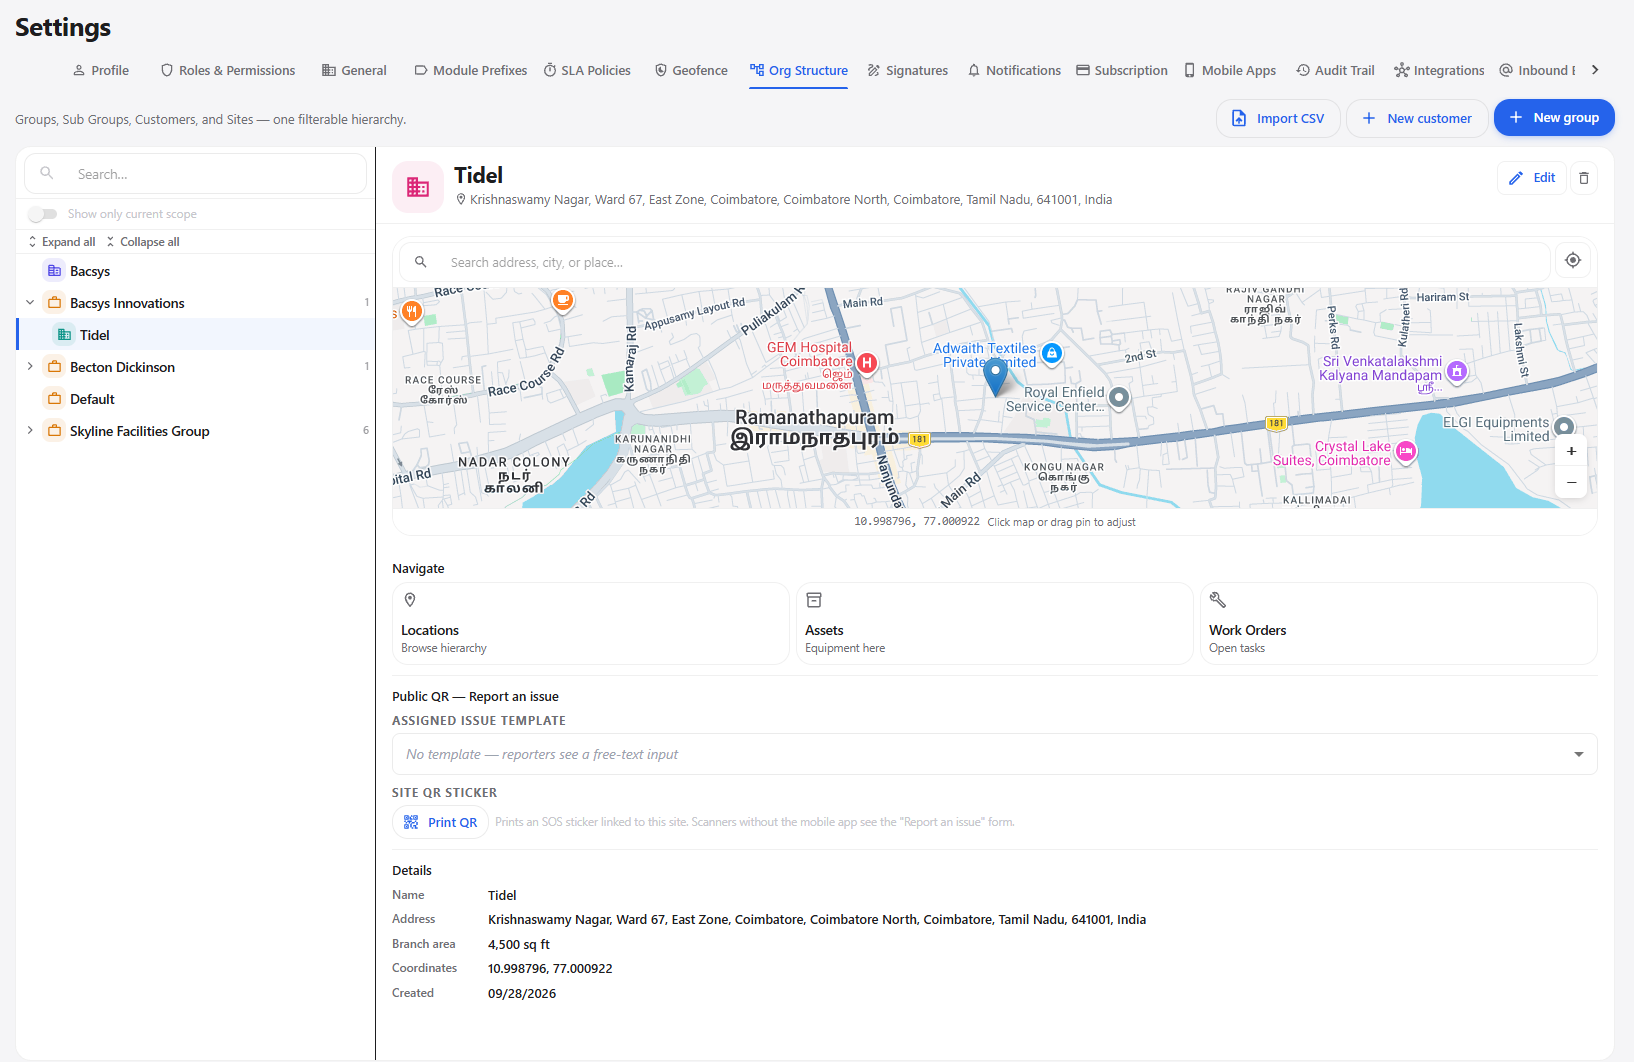
| Section / Option | Description |
|---|---|
| Site Name | Displays the name of the site. |
| Address | Displays the complete address of the site. |
| Map | Displays the geographical location of the site. |
| Coordinates | Displays the latitude and longitude of the site. |
| Branch Area | Displays the site area in square feet. |
| Created | Displays the date on which the site was created. |
| Locations | Opens the location hierarchy associated with the site. |
| Assets | Opens the assets associated with the site. |
| Work Orders | Opens the work orders associated with the site. |
| Assigned Issue Template | Allows an issue template to be assigned to the site's public QR reporting form. |
| Print QR | Allows users to print the site's QR sticker for reporting an issue. |
6.1 Edit Site
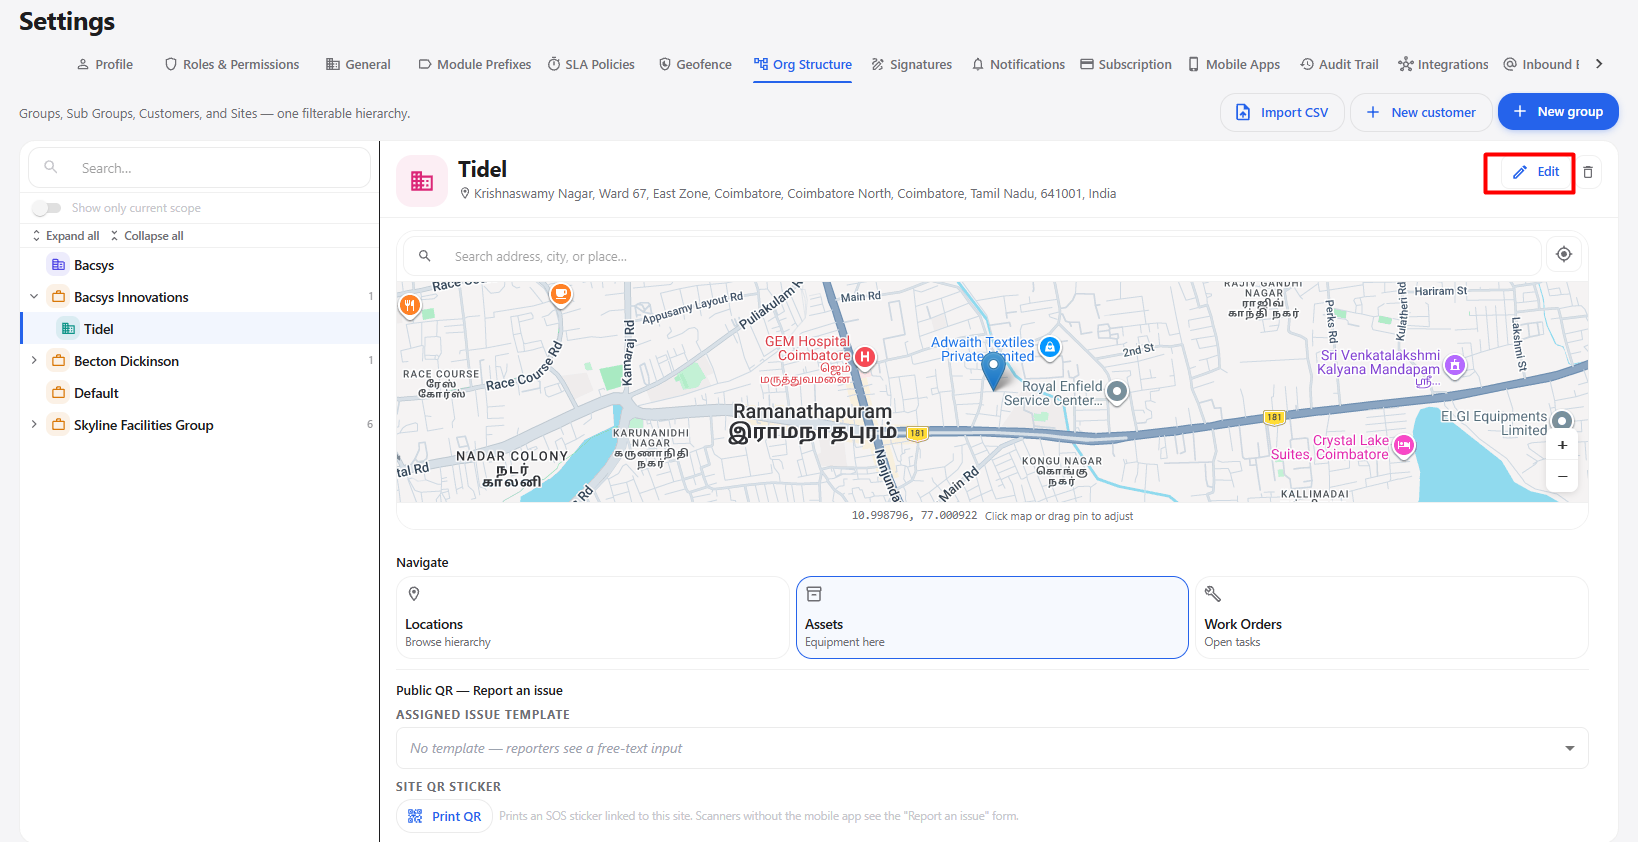
- Open the required site.
- Click Edit.
- Update the required site information.
- Review the changes.
- Save the updated information.
6.2 Delete Site
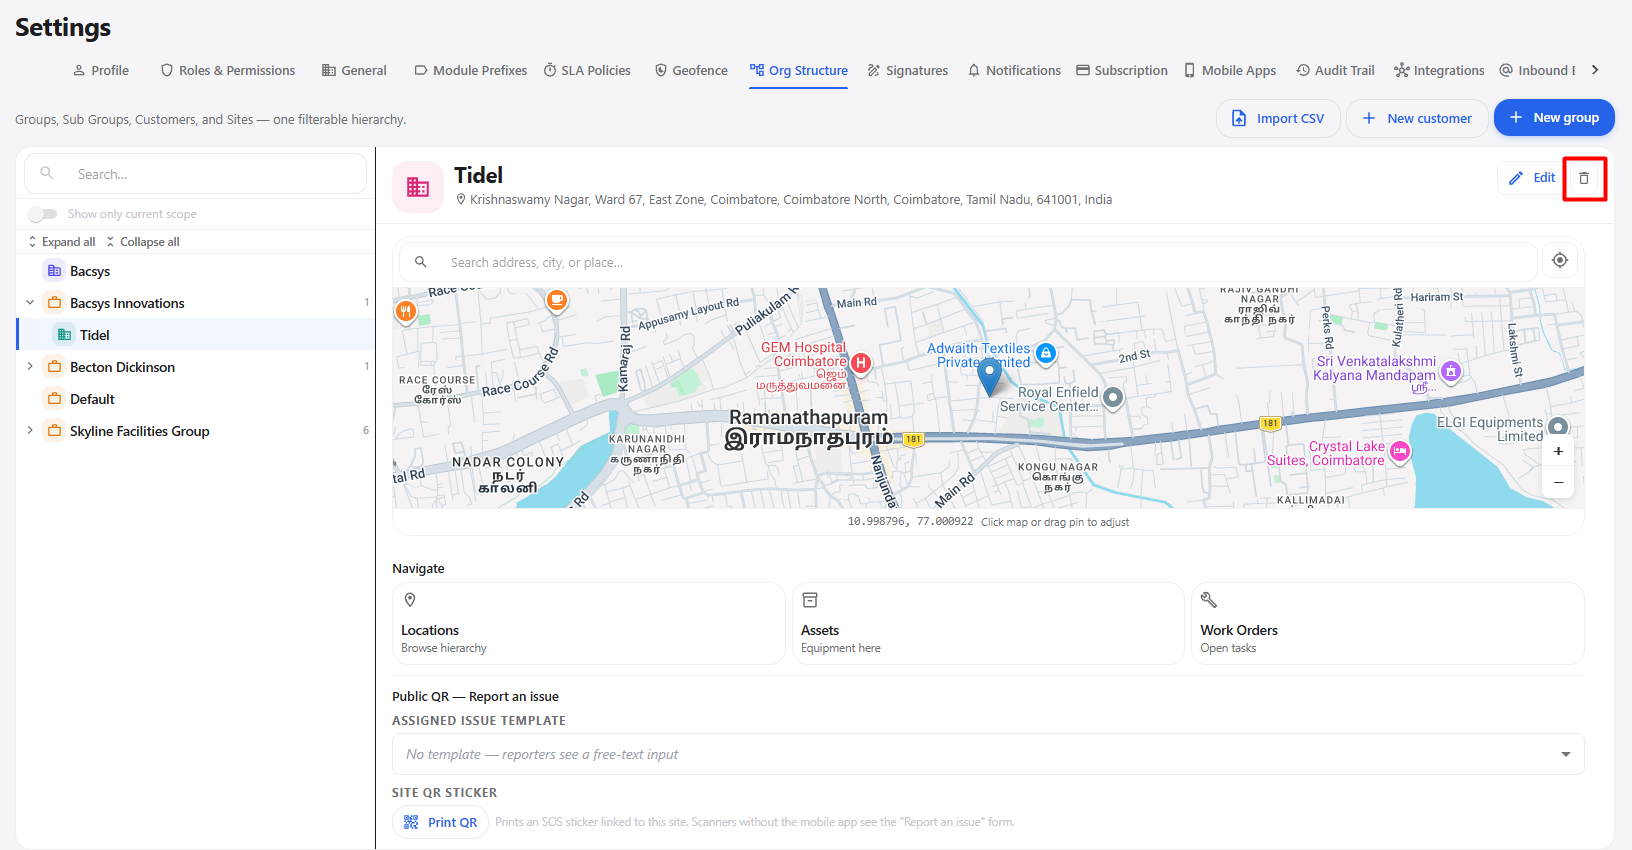
- Open the required site.
- Click Delete.
- Confirm the deletion if a confirmation message is displayed.
- The site is deleted from the system.
7. Import Groups, Customers, Sites & Locations
The Import CSV option allows users to create or update multiple groups, customers, sites, and locations using a CSV file.
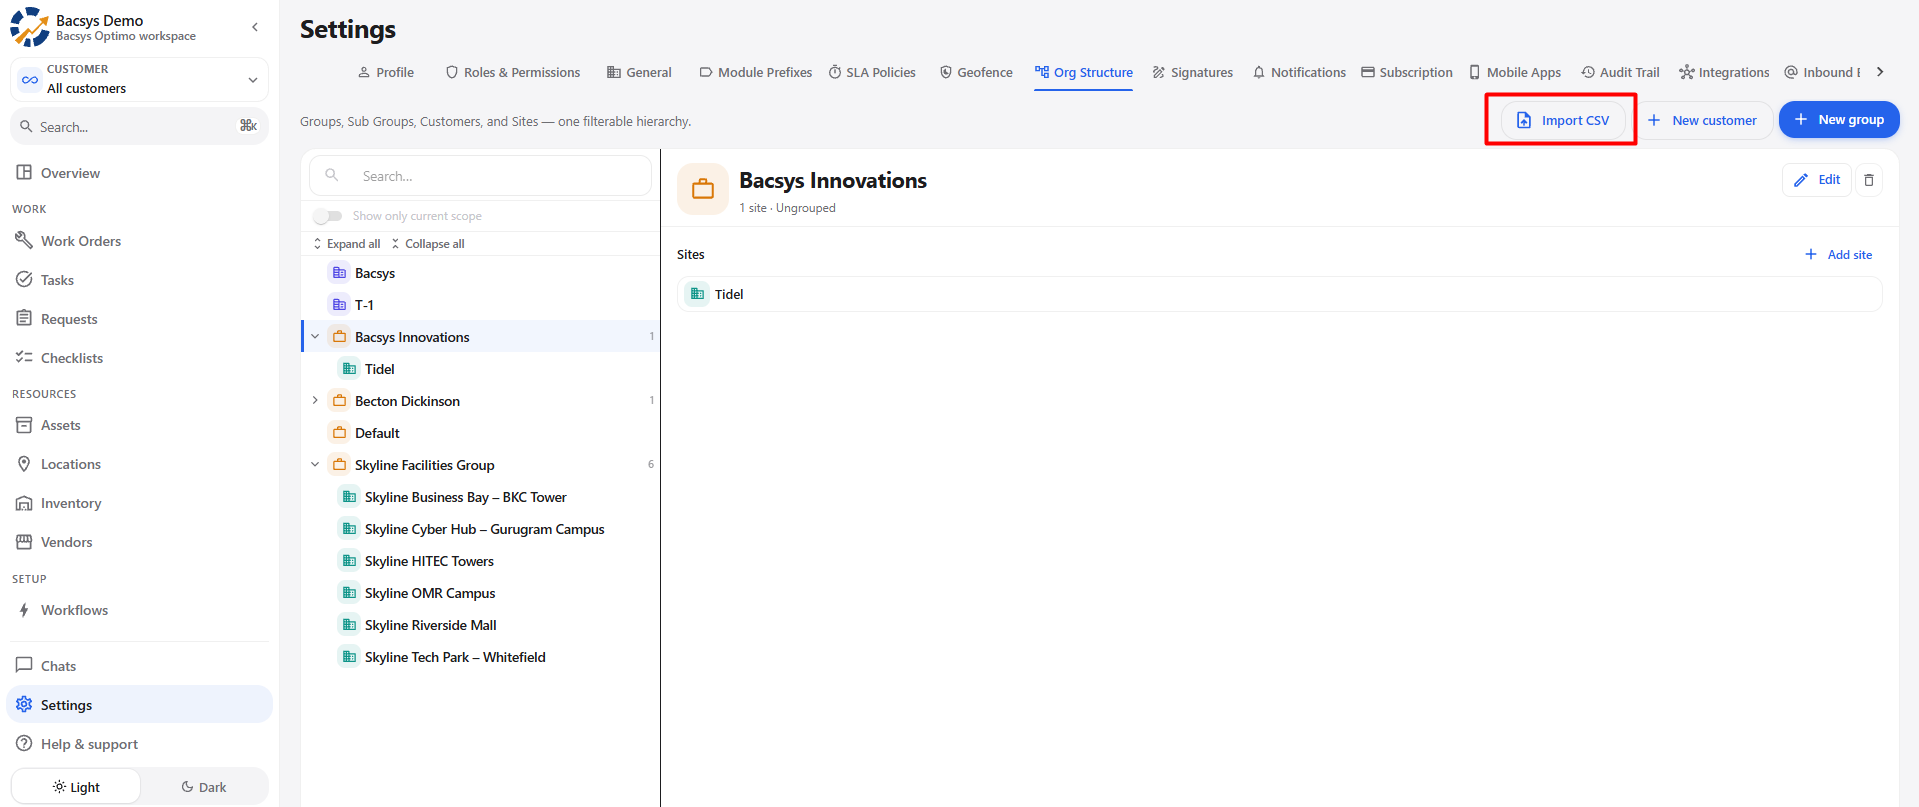
Steps
- Open the Locations module.
- Click Manage sites.
- The Org Structure page is displayed.
- Click Import CSV.
- The Import Groups, Customers, Sites & Locations pop-up is displayed.
- Click Download template to download the sample CSV file.
- Open the downloaded CSV file and add or modify the required information.
- Save the updated CSV file.
- Return to the import pop-up.
- Click Choose CSV file.
- Select the updated CSV file.
- If required, enable Update existing records with values from this file.
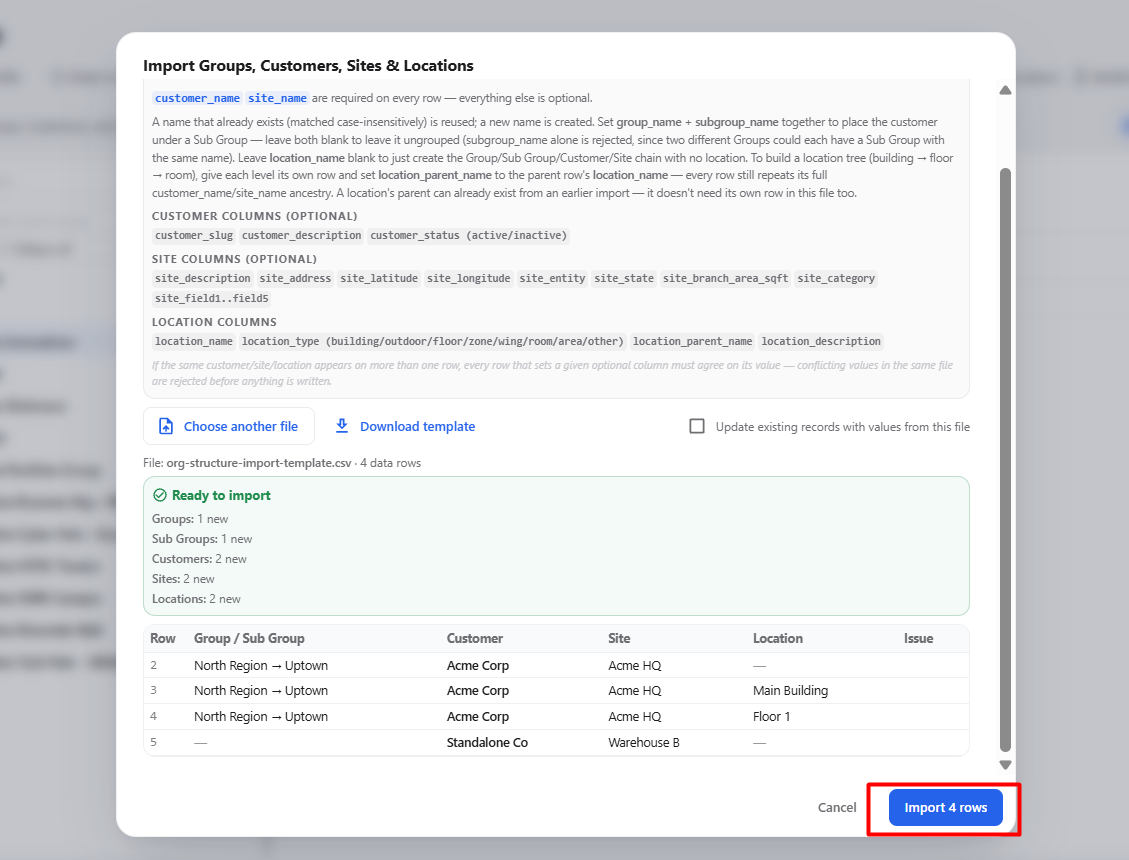
- Review the selected file.
- Continue with the import process.
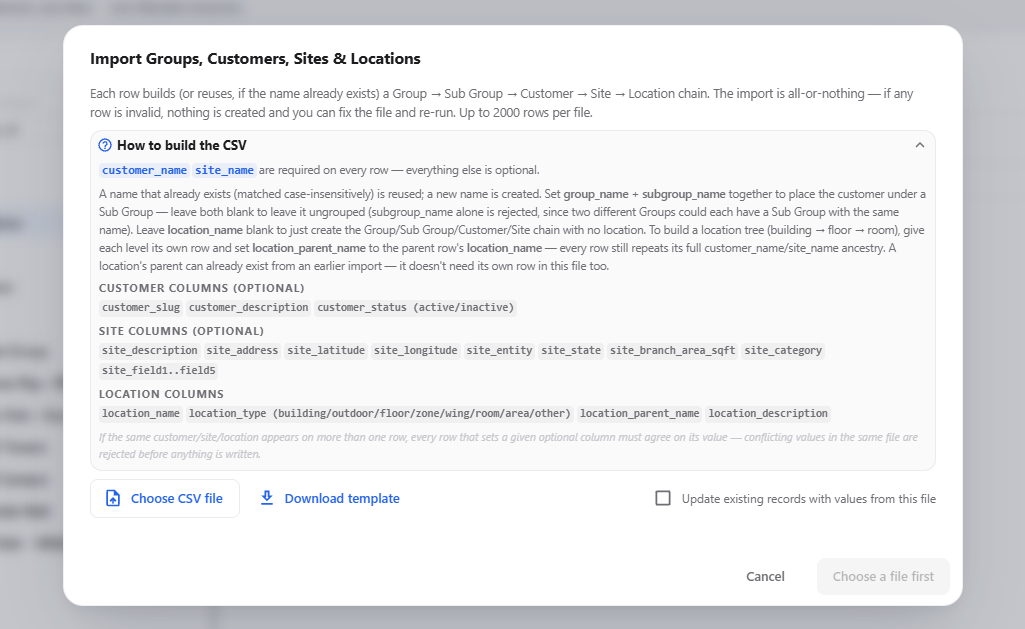
CSV Import Options
| Option | Description |
|---|---|
| Download template | Downloads the sample CSV template for preparing the import data. |
| Choose CSV file | Allows users to select the prepared CSV file. |
| Update existing records with values from this file | Updates existing records using the values provided in the uploaded CSV file. |
| Cancel | Closes the import pop-up without importing the CSV file. |
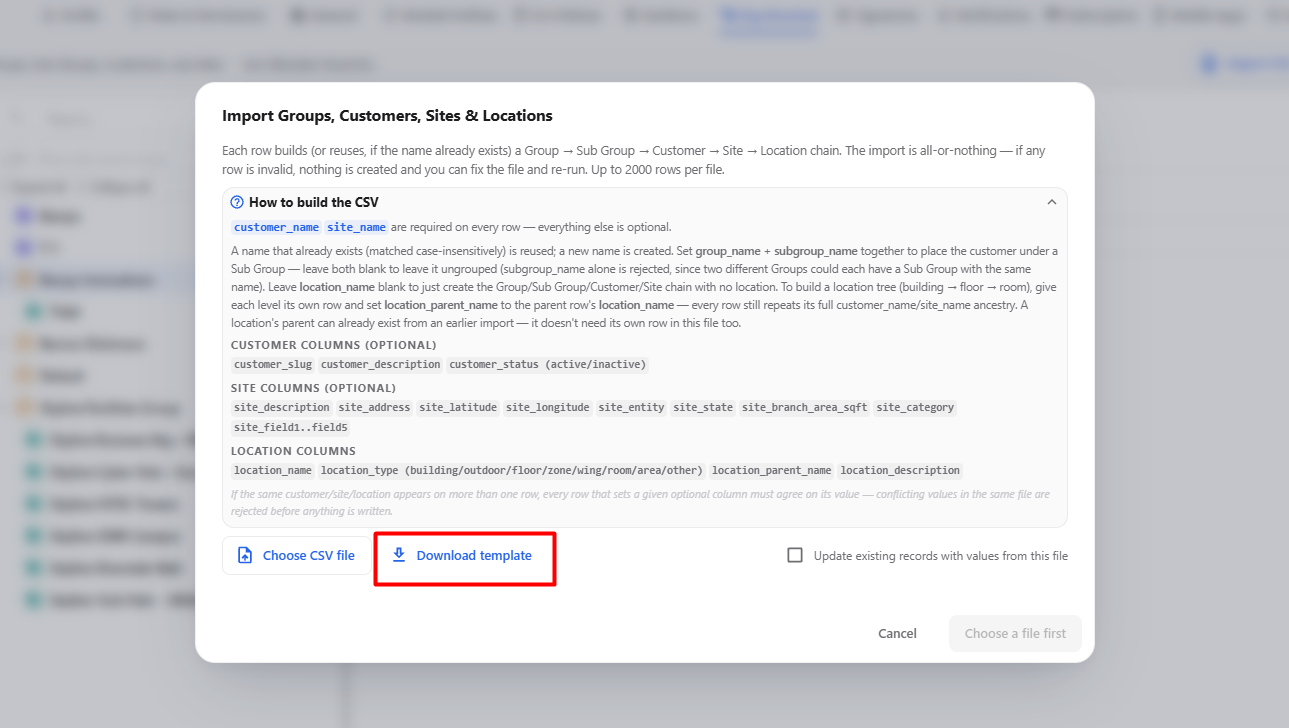
Required CSV Columns
| Column | Description |
|---|---|
| customer_name | Specifies the customer name. This field is required for every row. |
| site_name | Specifies the site name. This field is required for every row. |
| location_name | Specifies the location name when a location needs to be created. |
| location_type | Specifies the location type, such as building, outdoor, floor, zone, wing, room, area, or other. |
| location_parent_name | Specifies the parent location when creating a location hierarchy. |
8. Open a Created Group
After creating a group, the group is displayed in the Org Structure.
Steps
- Open the Locations module.
- Click Manage sites.
- Locate the created group in the Org Structure.
- Click the created group.
- The selected group opens and displays its details and associated organizational structure.
9. Create a New Location
The New location option allows users to create a location under the selected site.
Steps
- Open the Locations module.
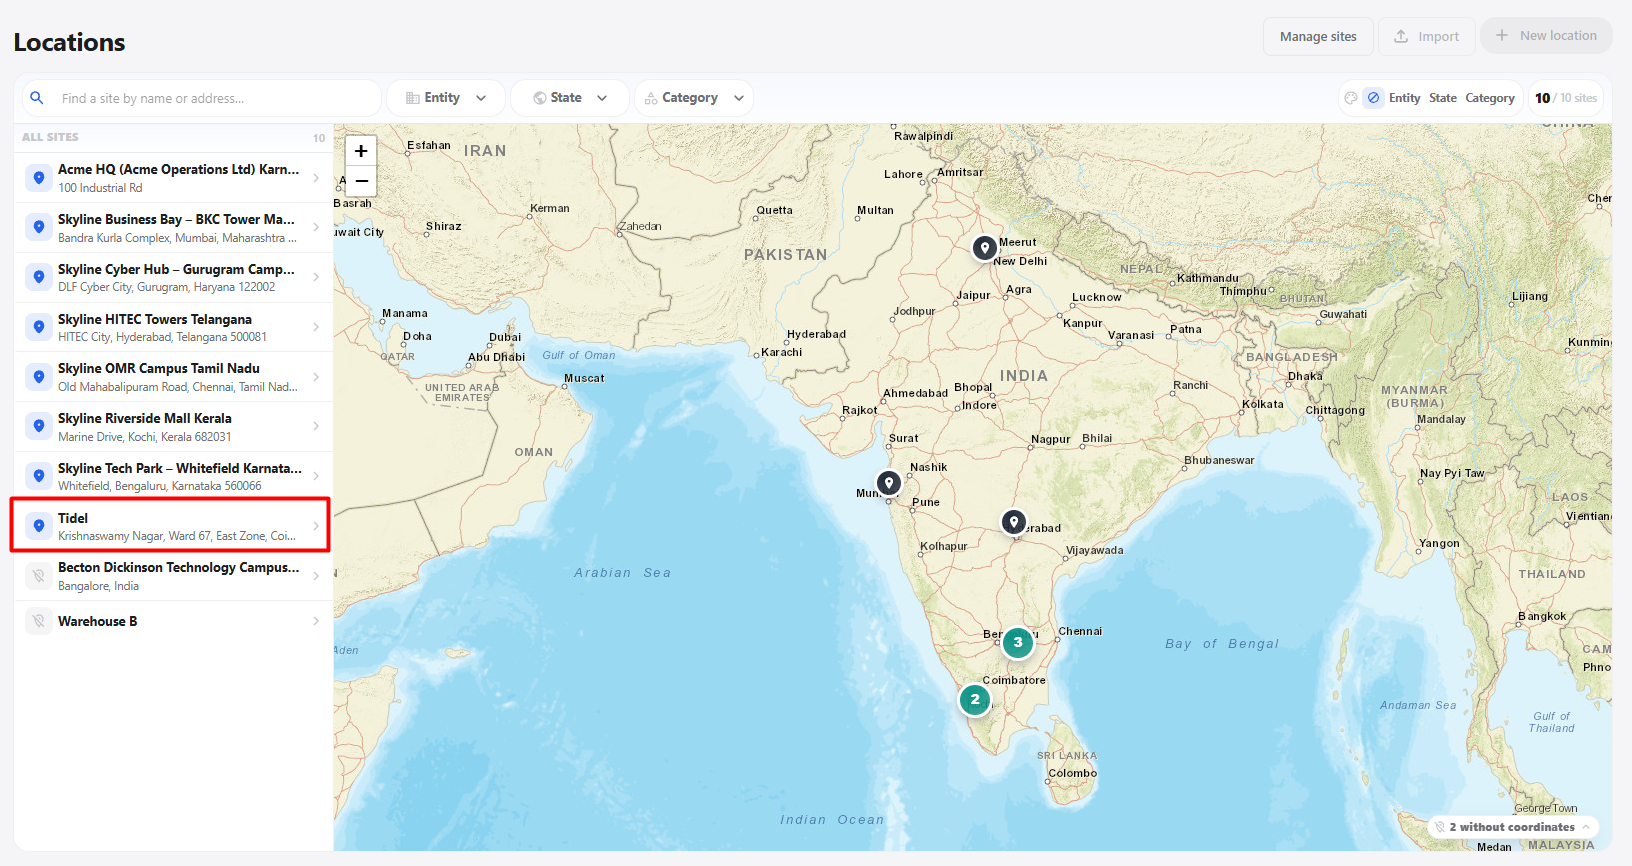
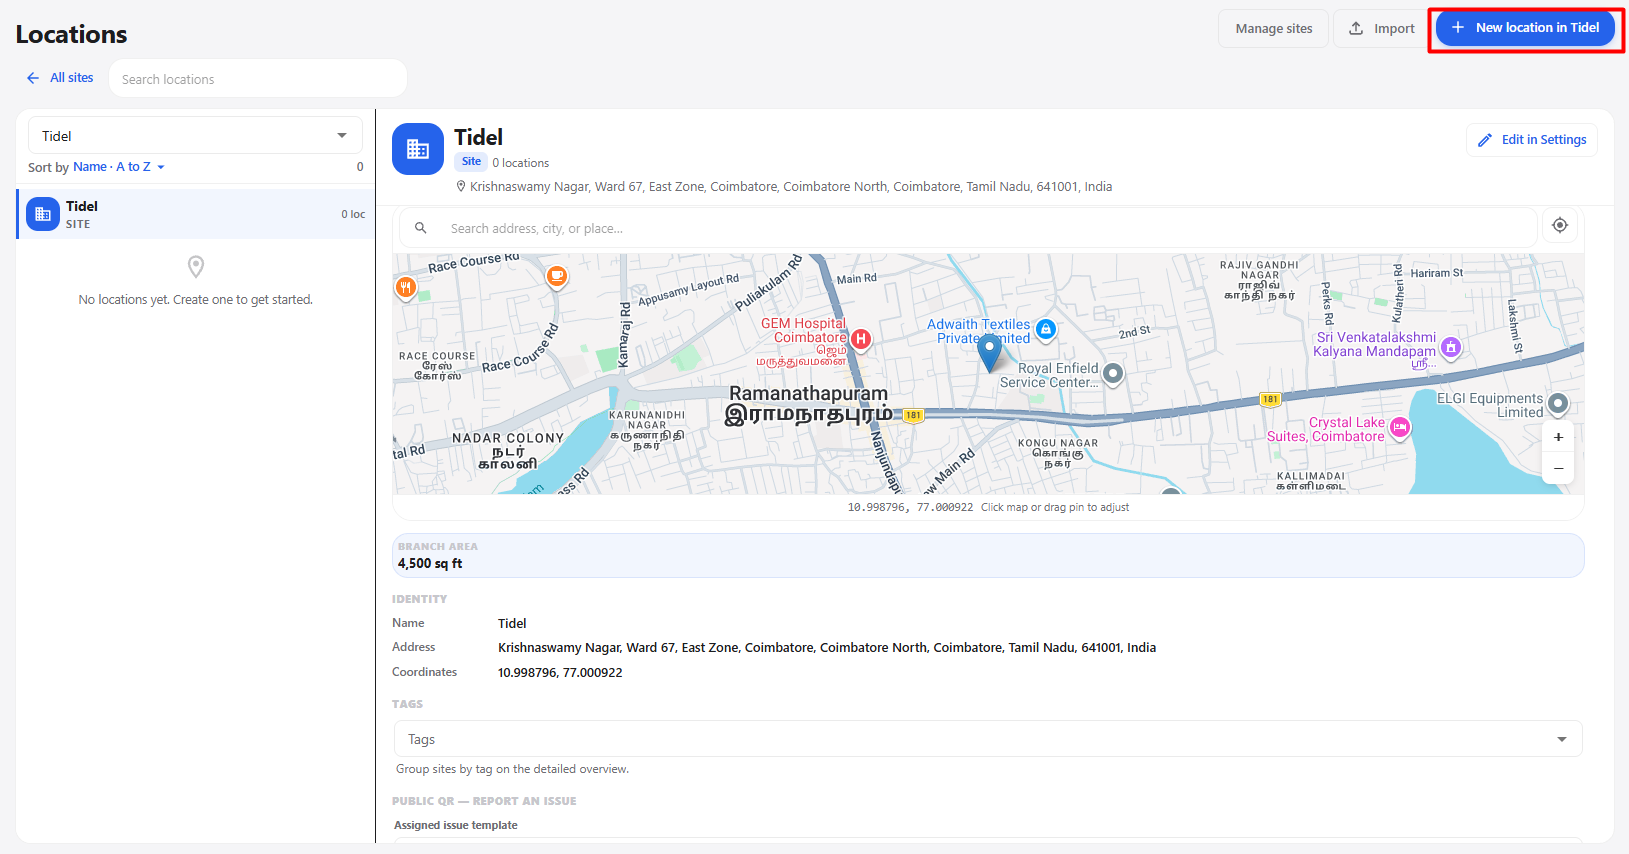
- Select the required site, such as Tidel.
- Click + New location in Tidel.
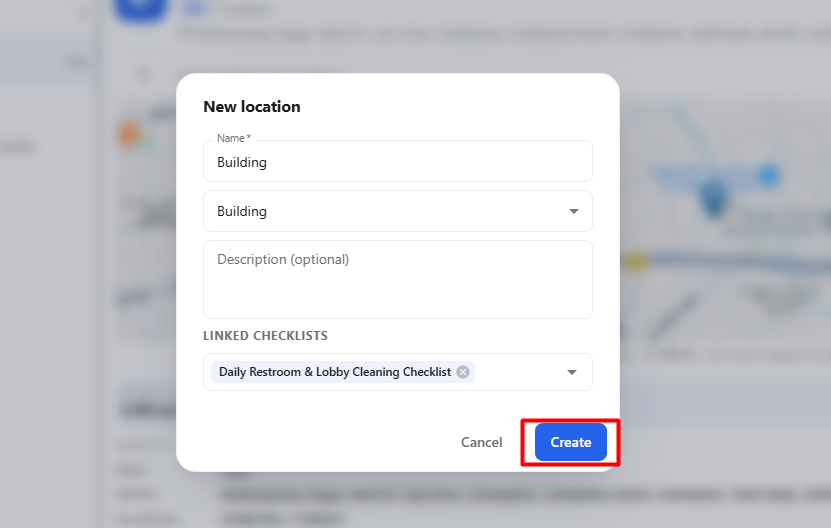
- The New location pop-up is displayed.
- Enter the required Name* for the location.
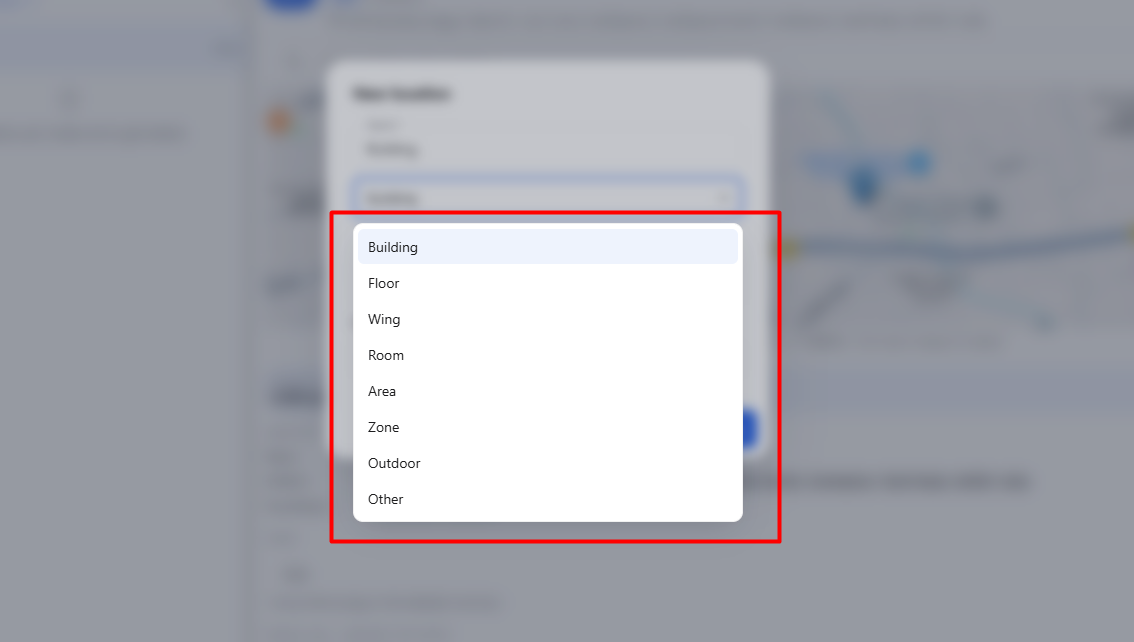
- Click the Location Type dropdown.
- Select the required location type.
9.1 Location Type Options
| Location Type | Description |
|---|---|
| Building | Creates a building-level location. |
| Floor | Creates a floor within a building. |
| Wing | Creates a wing within a site or building. |
| Room | Creates a room location. |
| Area | Creates an area within the site. |
| Zone | Creates a defined zone within the site. |
| Outdoor | Creates an outdoor location. |
| Other | Creates a location that does not fit the available location types. |
- Enter the Description if required.
- Select the required Linked Checklists if applicable.
- Review the entered information.
- Click Create.
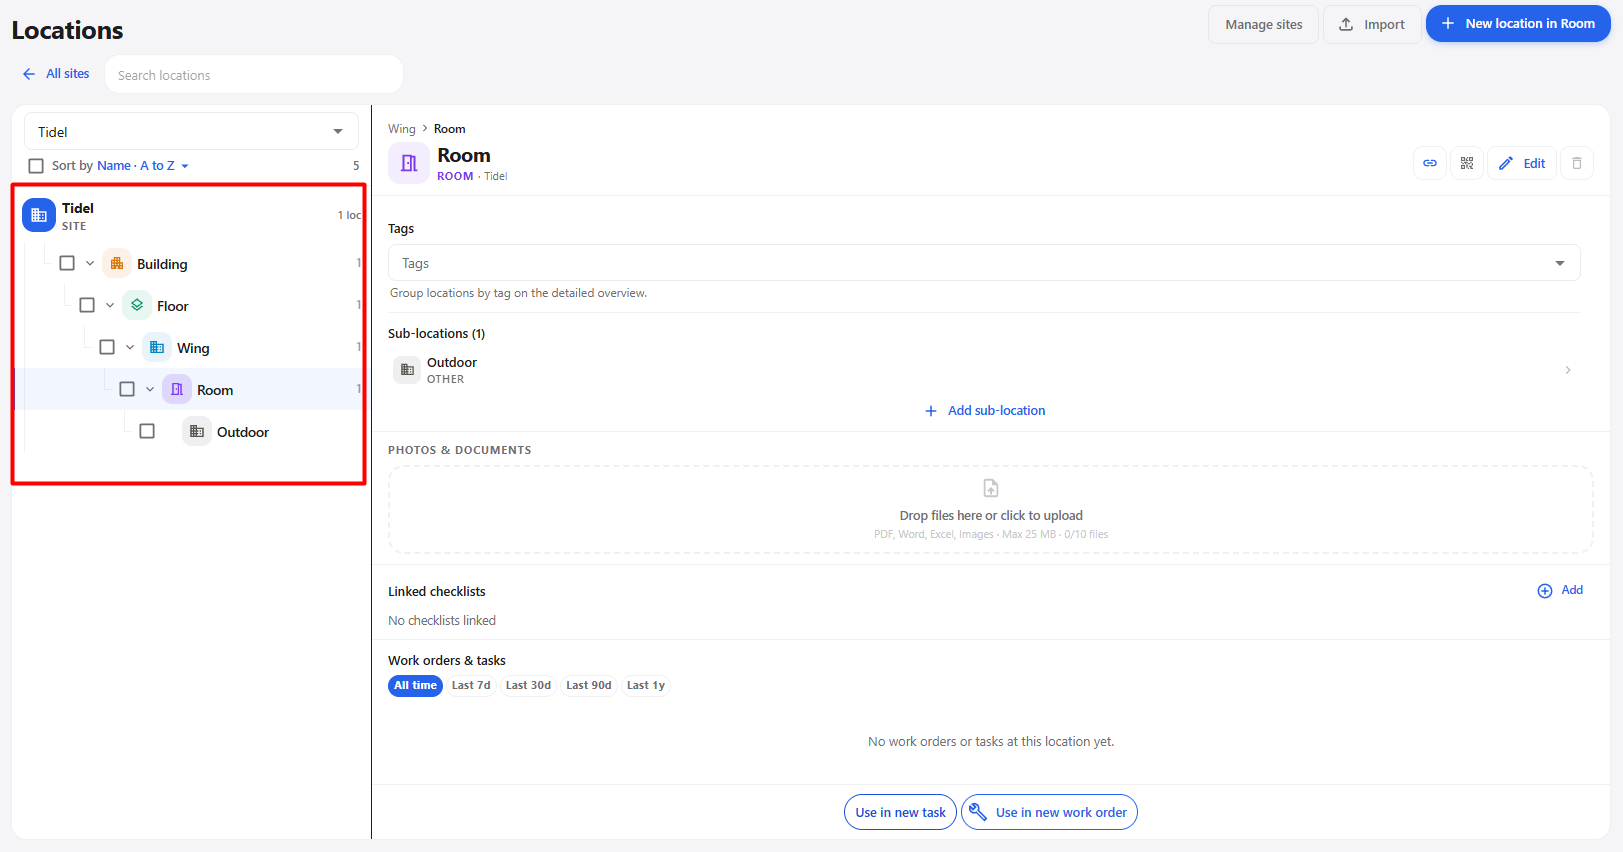
- The location is created and displayed under the selected site.
9.2 New Location Fields
| Field | Description |
|---|---|
| Name* | Enter the name of the location. This field is mandatory. |
| Location Type | Select the type of location from Building, Floor, Wing, Room, Area, Zone, Outdoor, or Other. |
| Description (optional) | Enter additional information about the location. |
| Linked Checklists | Select the checklists that should be linked to the location. |
| Cancel | Closes the pop-up without creating the location. |
| Create | Creates the location using the entered information. |
10. Location Details
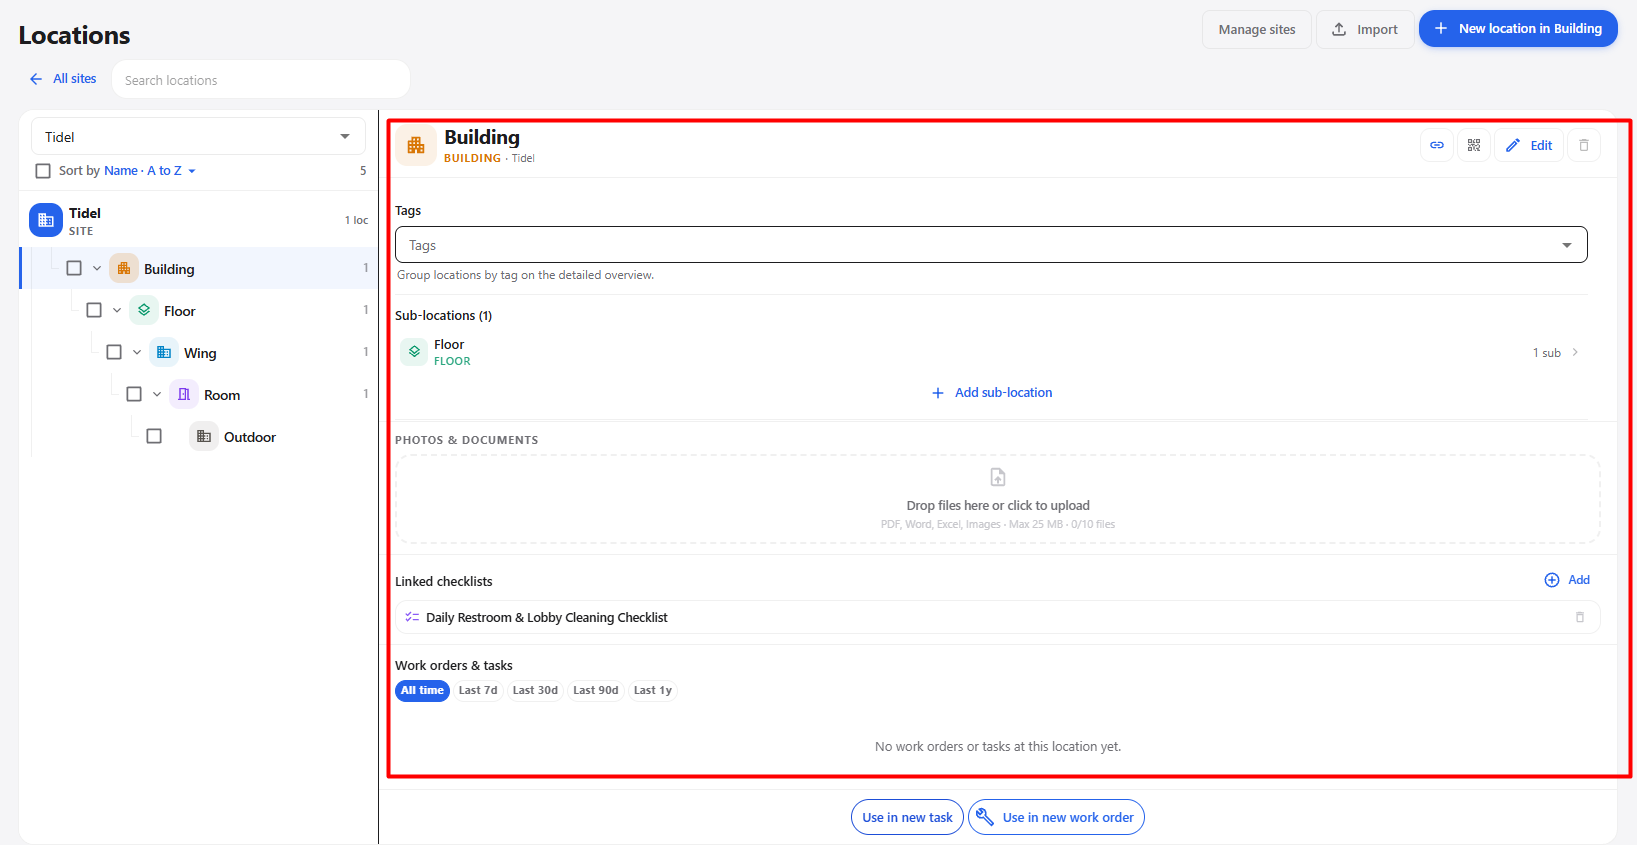
After creating a location, the Location Details page is displayed. It provides information about the selected location and allows users to manage tags, sub-locations, documents, checklists, and related work orders or tasks.
10.1 Location Information
| Section / Option | Description |
|---|---|
| Location Name | Displays the name of the selected location. |
| Location Type | Displays the type of location, such as Building. |
| Parent Site | Displays the site under which the location was created. |
| Link | Provides access to the location link or related location information. |
| QR Code | Provides access to the QR code associated with the location. |
| Edit | Allows users to edit the location information. |
| Delete | Allows users to delete the location. |
10.2 Tags
| Option | Description |
|---|---|
| Tags | Allows users to assign tags to the location. Tags can be used to group and organize locations on the detailed overview. |
10.3 Sub-locations
The Sub-locations section displays locations created under the current location.
| Option | Description |
|---|---|
| Sub-locations | Displays the locations created under the selected location. |
| Add sub-location | Allows users to create another location under the current location. |
| Sub-location Count | Displays the number of sub-locations available. |
10.4 Photos & Documents
The Photos & Documents section allows users to attach files related to the location.
| Option | Description |
|---|---|
| Upload Area | Allows users to drag and drop files or click to upload them. |
| Supported Files | Supports PDF, Word, Excel, and image files. |
| Maximum File Size | The displayed maximum file size is 25 MB. |
| File Limit | The displayed limit is 10 files. |
10.5 Linked Checklists
The Linked checklists section displays checklists associated with the selected location.
| Option | Description |
|---|---|
| Linked Checklists | Displays the checklists linked to the location. |
| Add | Allows users to add a checklist to the location. |
| Delete | Allows users to remove a linked checklist from the location. |
10.6 Work Orders & Tasks
The Work orders & tasks section displays work orders and tasks associated with the selected location.
| Option | Description |
|---|---|
| All time | Displays work orders and tasks for the entire available period. |
| Last 7d | Displays work orders and tasks from the last 7 days. |
| Last 30d | Displays work orders and tasks from the last 30 days. |
| Last 90d | Displays work orders and tasks from the last 90 days. |
| Last 1y | Displays work orders and tasks from the last year. |
| Work Orders & Tasks List | Displays the available work orders and tasks associated with the location. |
If there are no work orders or tasks associated with the location, the page displays that there are no work orders or tasks at the location yet.
11. Use Location in New Task
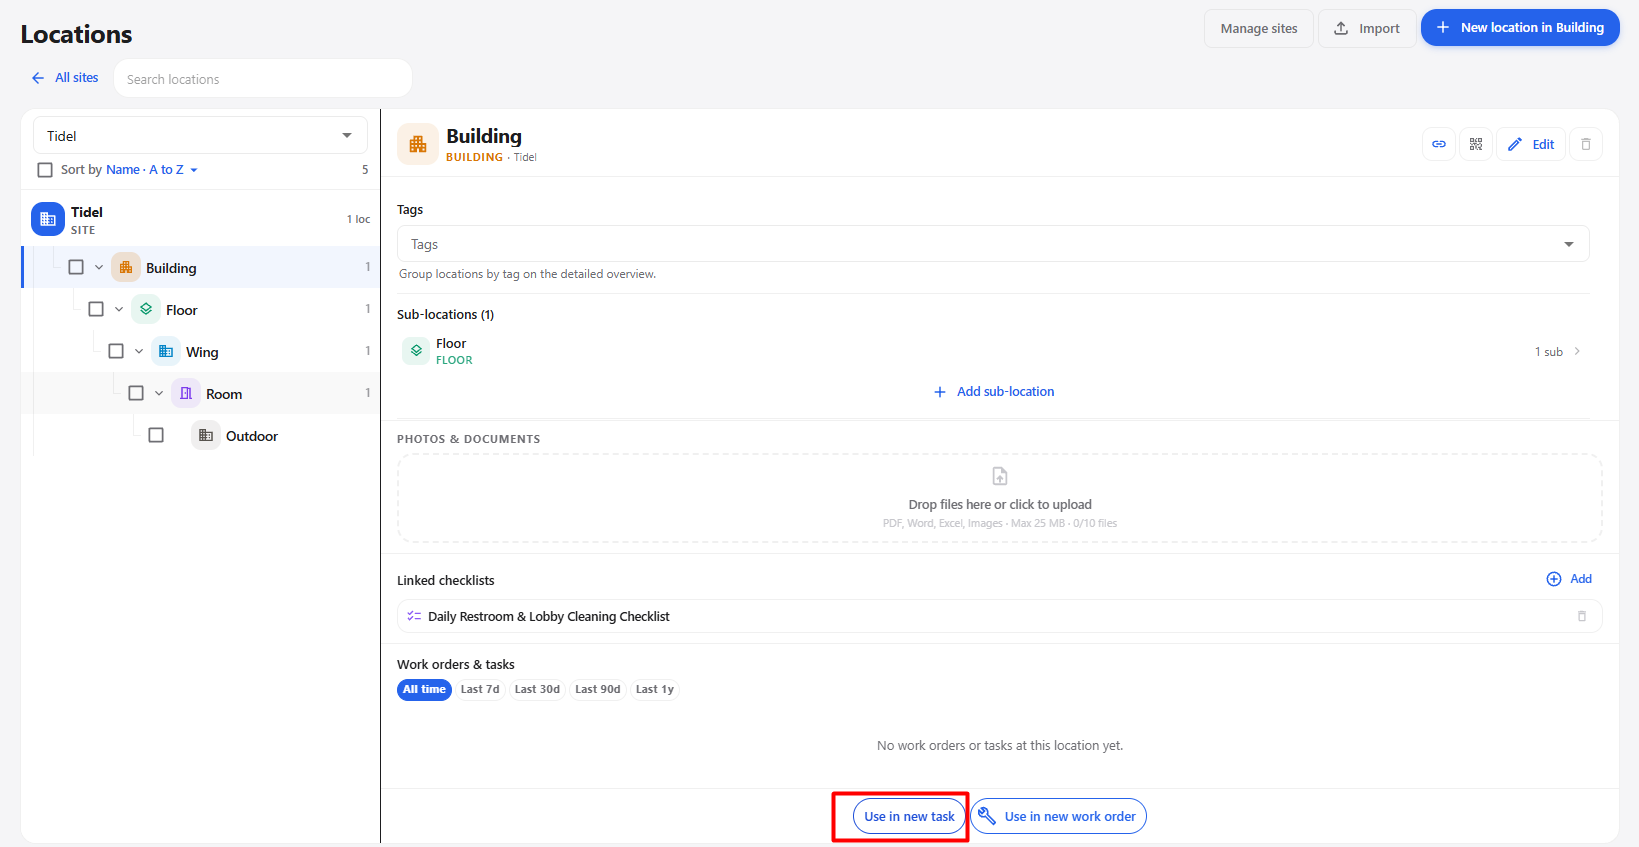
The Use in new task option allows users to create a new task directly from the selected location.
Steps
- Open the required location.
- Click Use in new task.
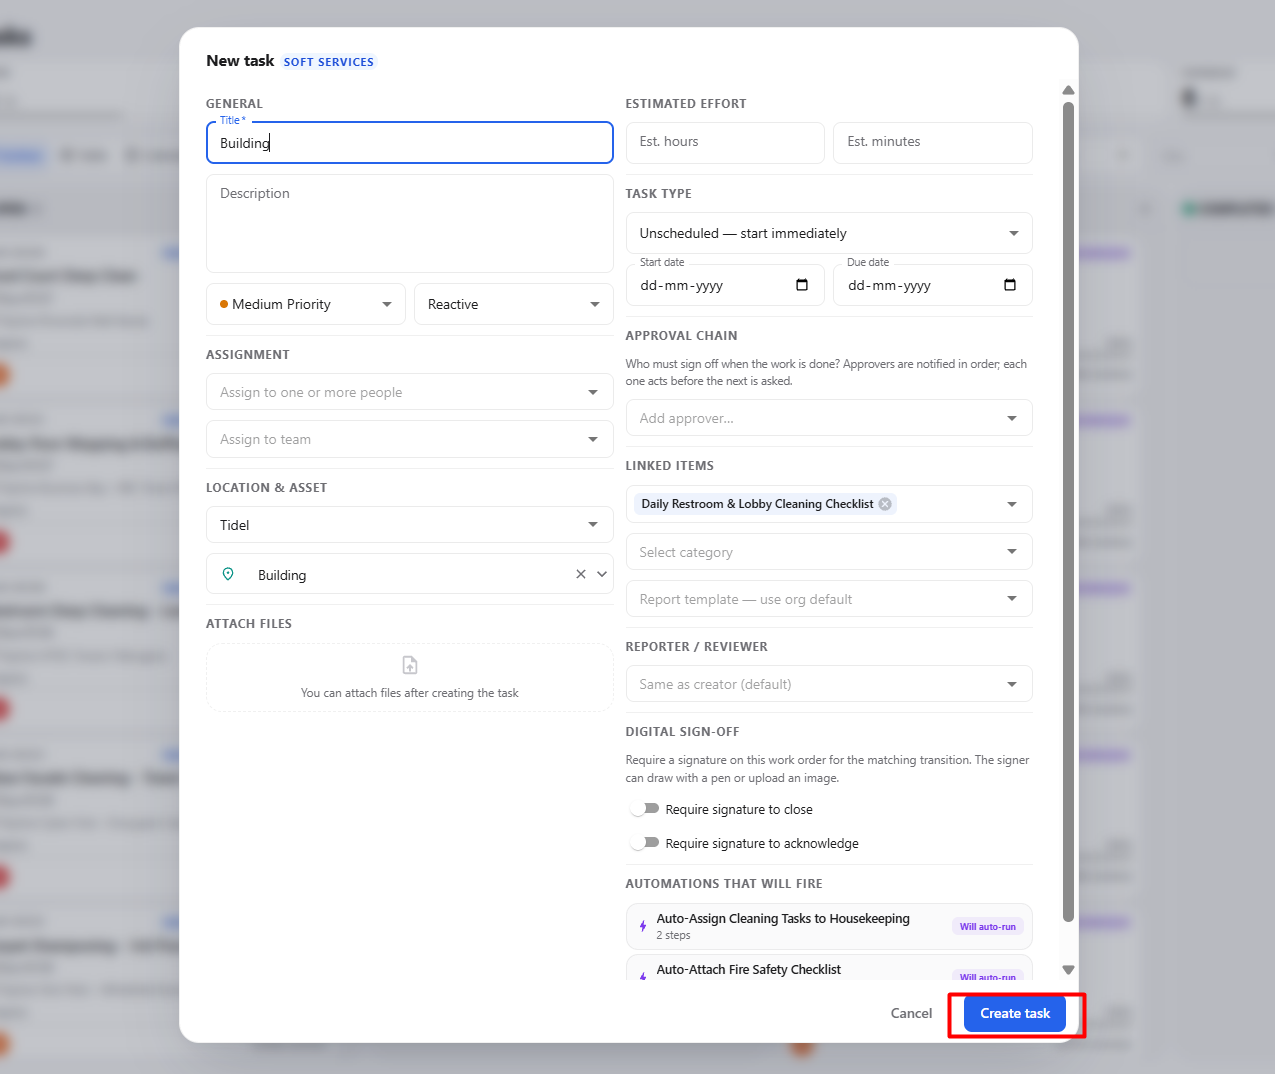
- The New task pop-up is displayed.
- Enter the required task information.
- Review the location and linked checklist information.
- Click Create task.
- The task is created and added to the Tasks module.
- Open the Tasks module to continue the task process.
- Start the task and complete the required work.
New Task Fields
| Section | Description |
|---|---|
| General | Enter the task title, description, priority, and task type. |
| Estimated Effort | Enter the estimated hours and minutes required to complete the task. |
| Task Type | Select how and when the task should be performed. |
| Assignment | Assign the task to one or more people or a team. |
| Approval Chain | Select users who need to review or approve the completed work. |
| Location & Asset | Displays the selected site and location from which the task was created. |
| Linked Items | Displays linked checklists and other related information. |
| Attach Files | Allows files to be attached after creating the task. |
| Reporter / Reviewer | Selects the reporter or reviewer for the task. |
| Digital Sign-Off | Allows signatures to be required when closing or acknowledging the task. |
| Automations That Will Fire | Displays automations that will run based on the created task. |
| Create task | Creates the task and adds it to the Tasks module. |
12. Use in New Work Order
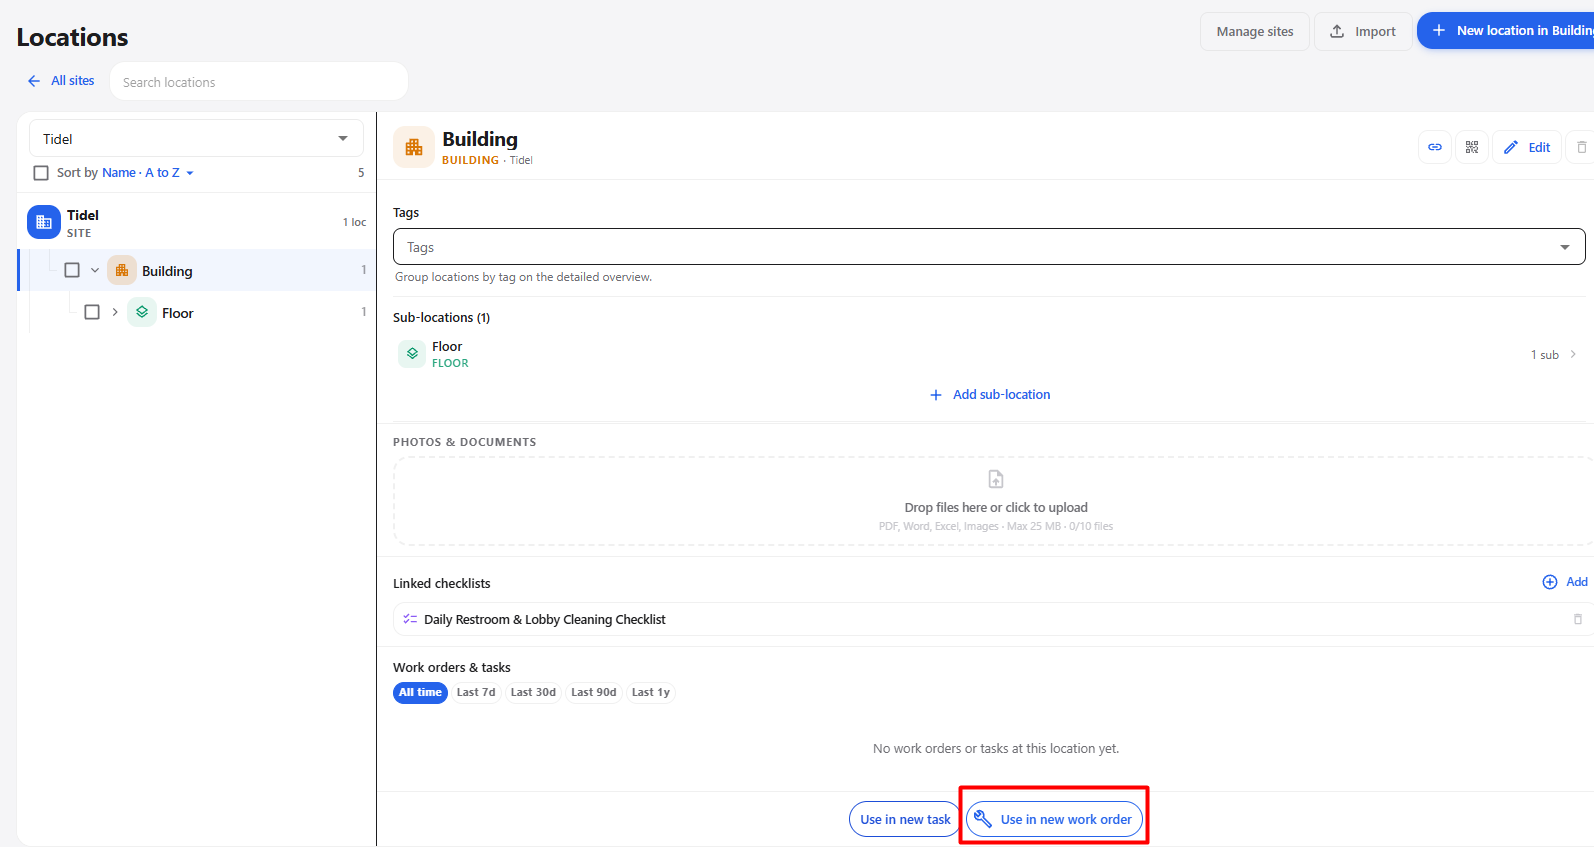
The Use in new work order option allows users to create a work order directly from the selected location.
Steps
- Open the required location.
- Click Use in new work order.
- The New work order pop-up is displayed.
- Enter the required work order details.
- Review the selected Location and other linked information.
- Click Create work order.
- The work order is created and saved in the Work Orders module.
- Open the Work Orders module.
- Start the work and complete the required activities.
- Resolve or close the work order after completing the work.
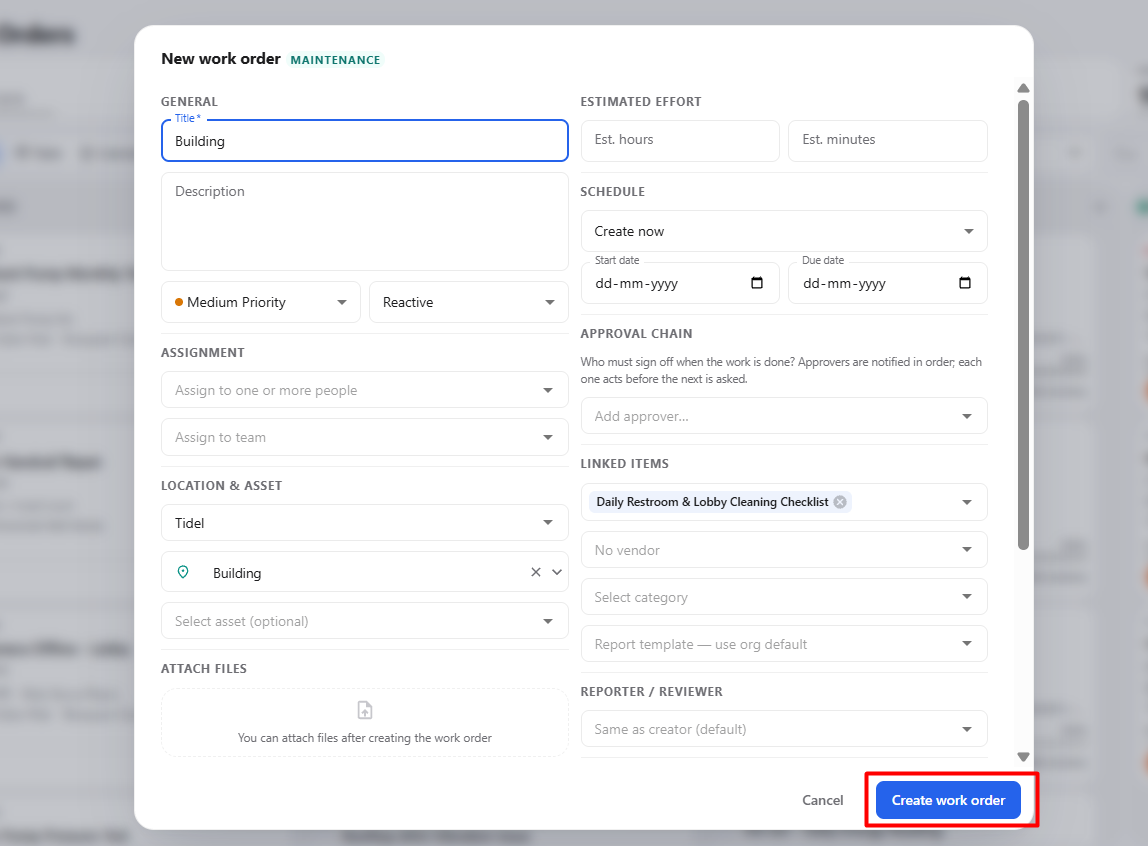
New Work Order Fields
| Section / Field | Description |
|---|---|
| Title* | Enter the name of the work order. |
| Description | Enter details about the required work. |
| Priority | Select the required priority. |
| Work Type | Select the required work type. |
| Estimated Effort | Enter the estimated hours and minutes required to complete the work. |
| Schedule | Select the schedule and enter the start and due dates. |
| Assignment | Assign the work order to one or more people or a team. |
| Approval Chain | Select the users who need to approve or review the completed work. |
| Location & Asset | Displays the selected site and location and allows an asset to be selected if required. |
| Linked Items | Allows checklists, vendors, categories, and report templates to be linked. |
| Attach Files | Allows files to be attached after creating the work order. |
| Reporter / Reviewer | Selects the reporter or reviewer for the work order. |
| Digital Sign-Off | Allows signatures to be required when closing or acknowledging the work order. |
| Automations That Will Fire | Displays automations that will run for the work order. |
| Create work order | Creates and saves the work order. |
13. Complete Locations Module Workflow
The following workflow provides the complete process for managing the Locations module, from creating the organizational structure to creating locations and using them for tasks and work orders.
Locations Module
      ↓
Manage Sites
      ↓
Org Structure
      ↓
Create Customer
      ↓
Enter Customer Details
      ↓
Create Customer
      ↓
Customer Created
      ↓
Create Group
      ↓
Enter Group Name
      ↓
Save Group
      ↓
Group Created
      ↓
Create Additional Groups if Required
      ↓
Select Customer
      ↓
Create Site
      ↓
Enter Site Details
      ↓
Select / Confirm Site Location on Map
      ↓
Create Site
      ↓
Site Created
      ↓
Open Site Details
      ↓
Edit / Delete Site if Required
      ↓
Select Site
      ↓
Create New Location
      ↓
Enter Location Name
      ↓
Select Location Type
      ↓
Building / Floor / Wing / Room
/ Area / Zone / Outdoor / Other
      ↓
Enter Description if Required
      ↓
Select Linked Checklists if Required
      ↓
Create Location
      ↓
Location Created
      ↓
Open Location Details
      ↓
Manage Tags
      ↓
Manage Sub-locations
      ↓
Upload Photos & Documents
      ↓
Manage Linked Checklists
      ↓
View Work Orders & Tasks
      ↓
       ┌──────────────┐
       │                       │
       ↓                       ↓
Use in New Task        Use in New Work Order
       ↓                       ↓
New Task                 New Work Order
       ↓                       ↓
Enter Task Details       Enter Work Order Details
       ↓                       ↓
Review Location /       Review Location /
Linked Items            Asset / Linked Items
       ↓                       ↓
Create Task             Create Work Order
       ↓                       ↓
Tasks Module            Work Orders Module
       ↓                       ↓
Start Work              Start Work
       ↓                       ↓
Complete Work            Complete Work
       ↓                       ↓
Resolve / Close         Resolve / Close
       Task               Work Order