

Work Orders
1. Work Orders
The Work Orders module allows users to create, assign, schedule, track, and manage maintenance work orders.
Users can view work orders based on their current status, apply filters, and create new work orders using the New Work Order option.
1.1 Work Orders Overview
The Work Orders page provides an overall view of all work orders and their current status.
Work Order Status Summary
The top section displays the count of work orders based on their current status:
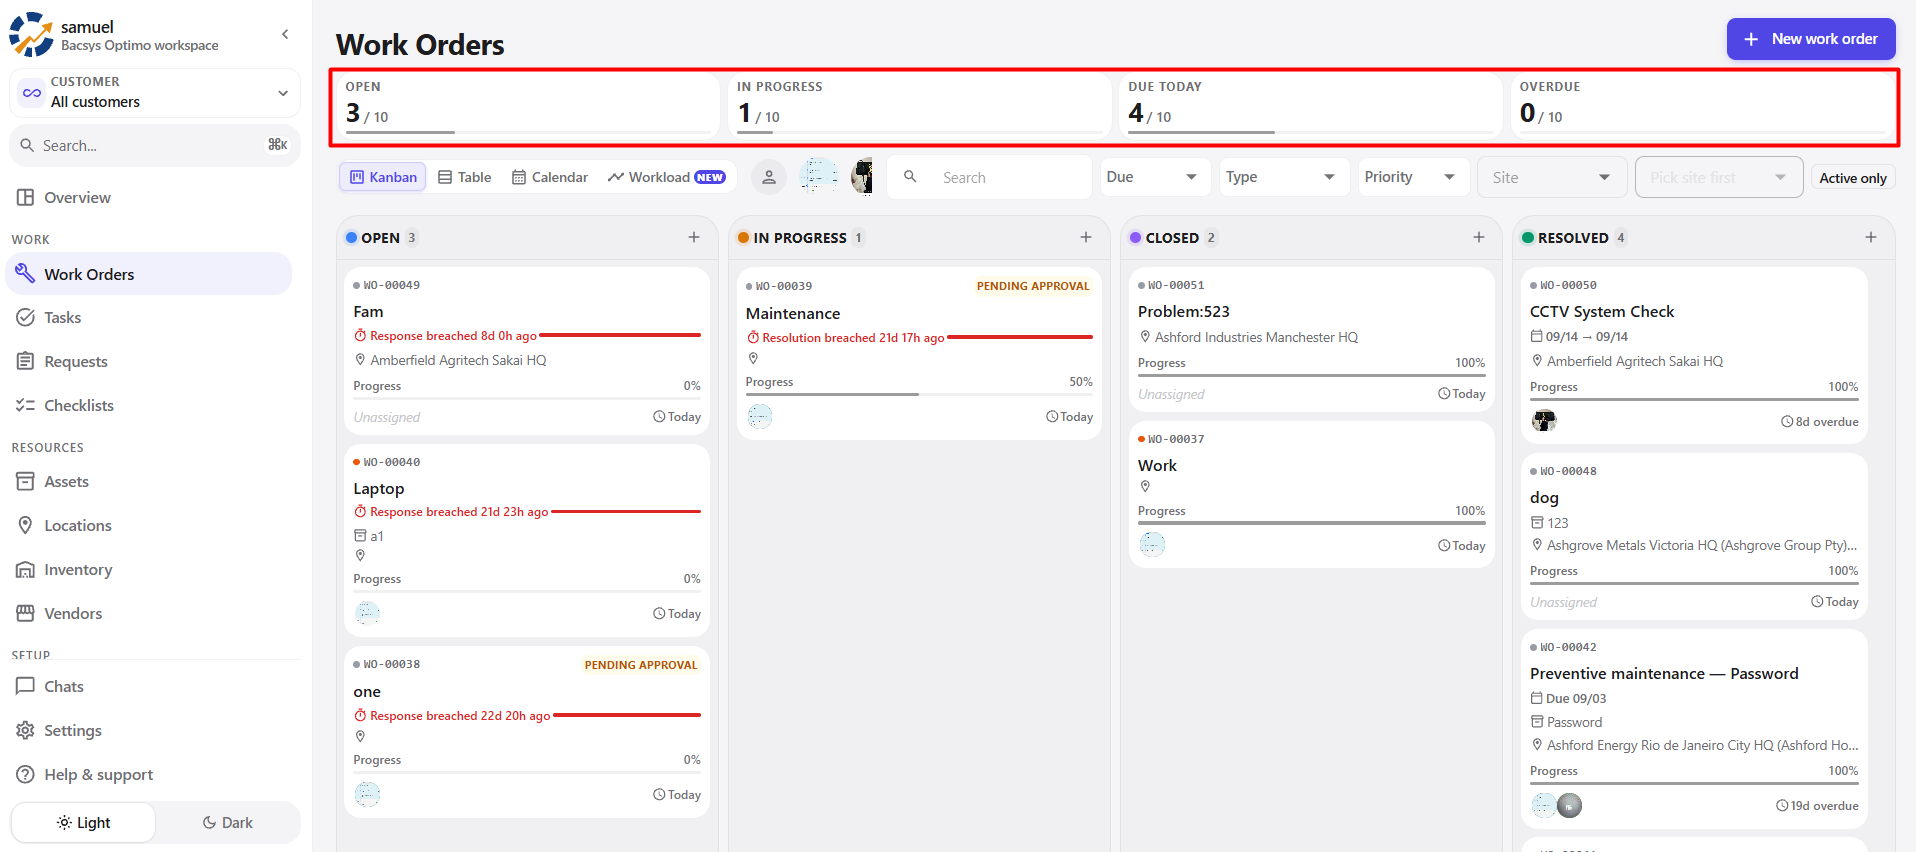
| Status | Description |
|---|---|
| Open | Work order has been created but work has not yet started. |
| In Progress | Work order is currently being worked on. |
| Due Today | Work order is scheduled to be completed today. |
| Overdue | Work order has passed its due date and is not yet completed. |
1.2 Work Order Views
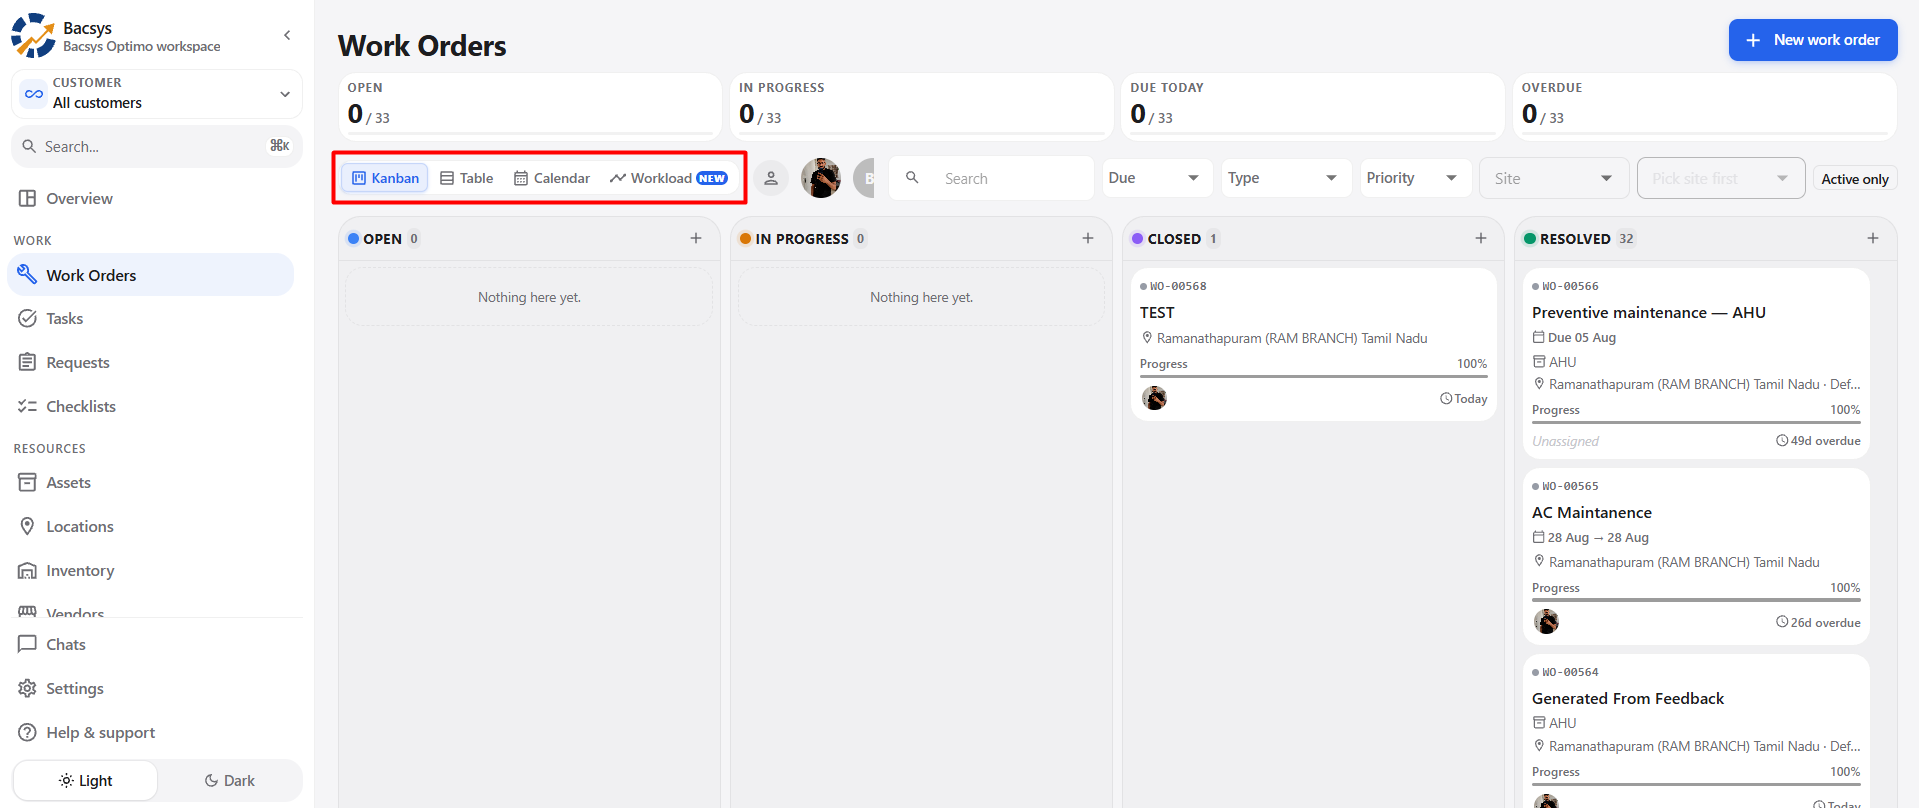
Users can change how work orders are displayed.
Available Views
- Kanban – Displays work orders in status-based columns.
- Table – Displays work orders in a tabular format.
- Calendar – Displays work orders according to their scheduled dates.
- Workload – Provides a workload-based view of assigned work.
Steps to Change the View
- Open the Work Orders module.
- Select the required view.
- Review the work orders using the selected layout.
1.3 Search and Filters
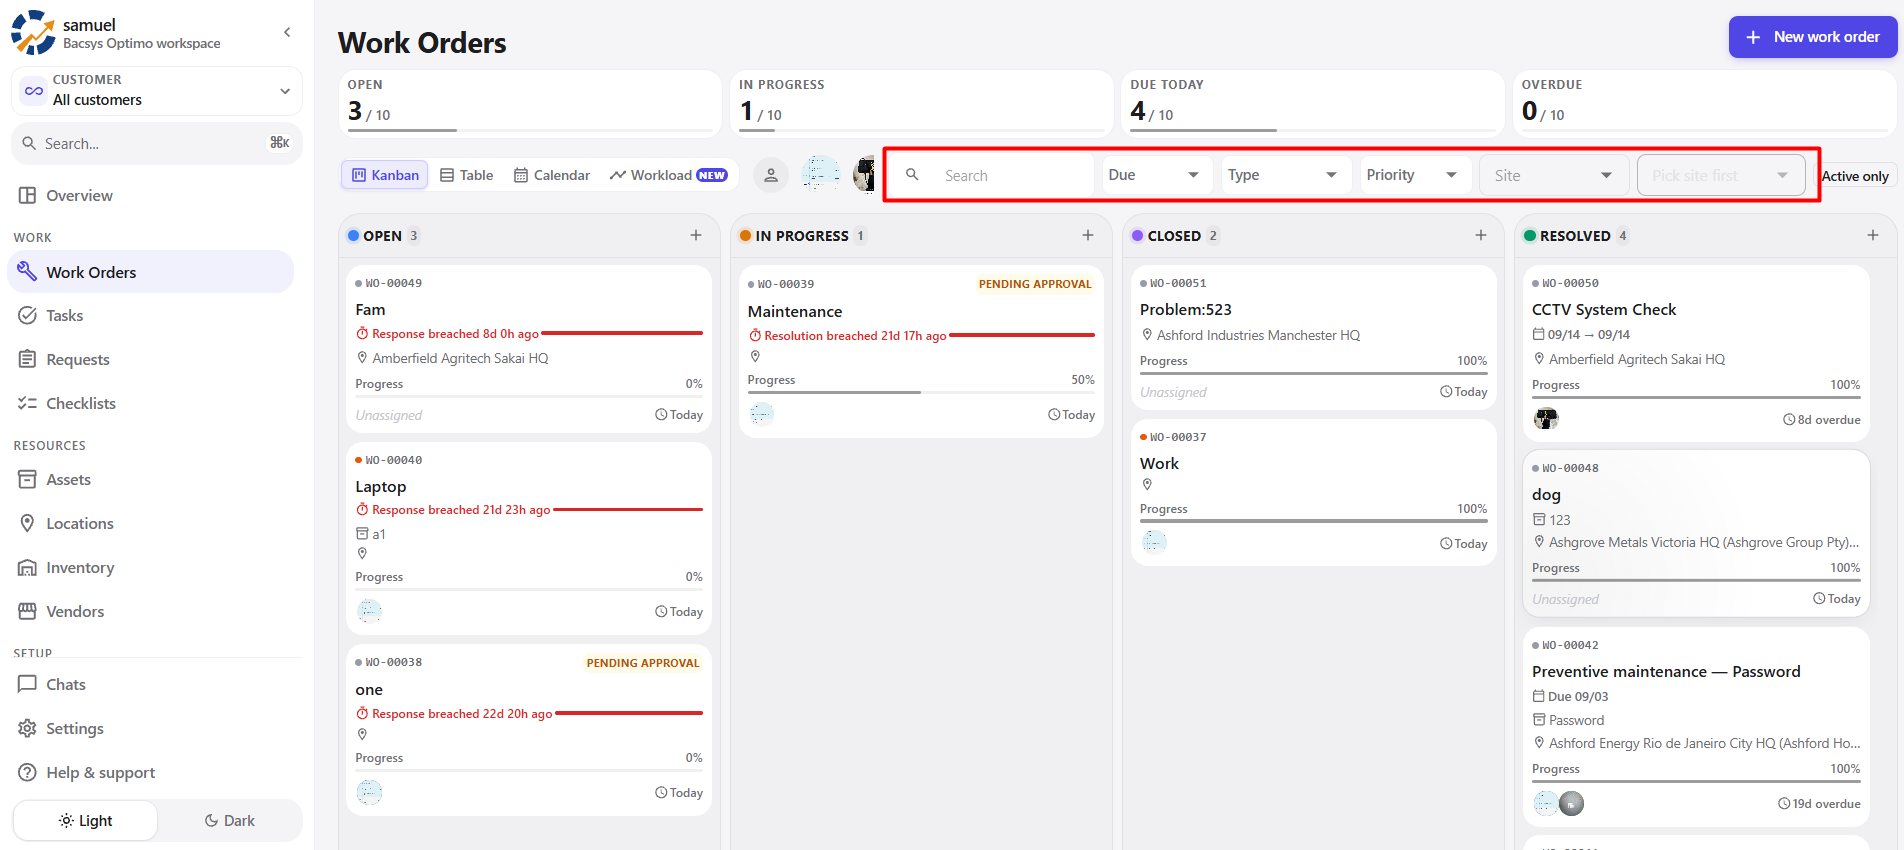
The Work Orders page provides search and filtering options to quickly find specific work orders.
Available Filters
- Search
- Due
- Type
- Priority
- Site
- Location
- Active Only
Steps to Search or Filter
- Enter a keyword in the Search field, if required.
- Select the required Due filter.
- Select the required Type.
- Select the required Priority.
- Select a Site.
- Select a location after choosing a site, if applicable.
- Enable Active Only to display only active work orders.
- Review the filtered results.
2. Creating a New Work Order
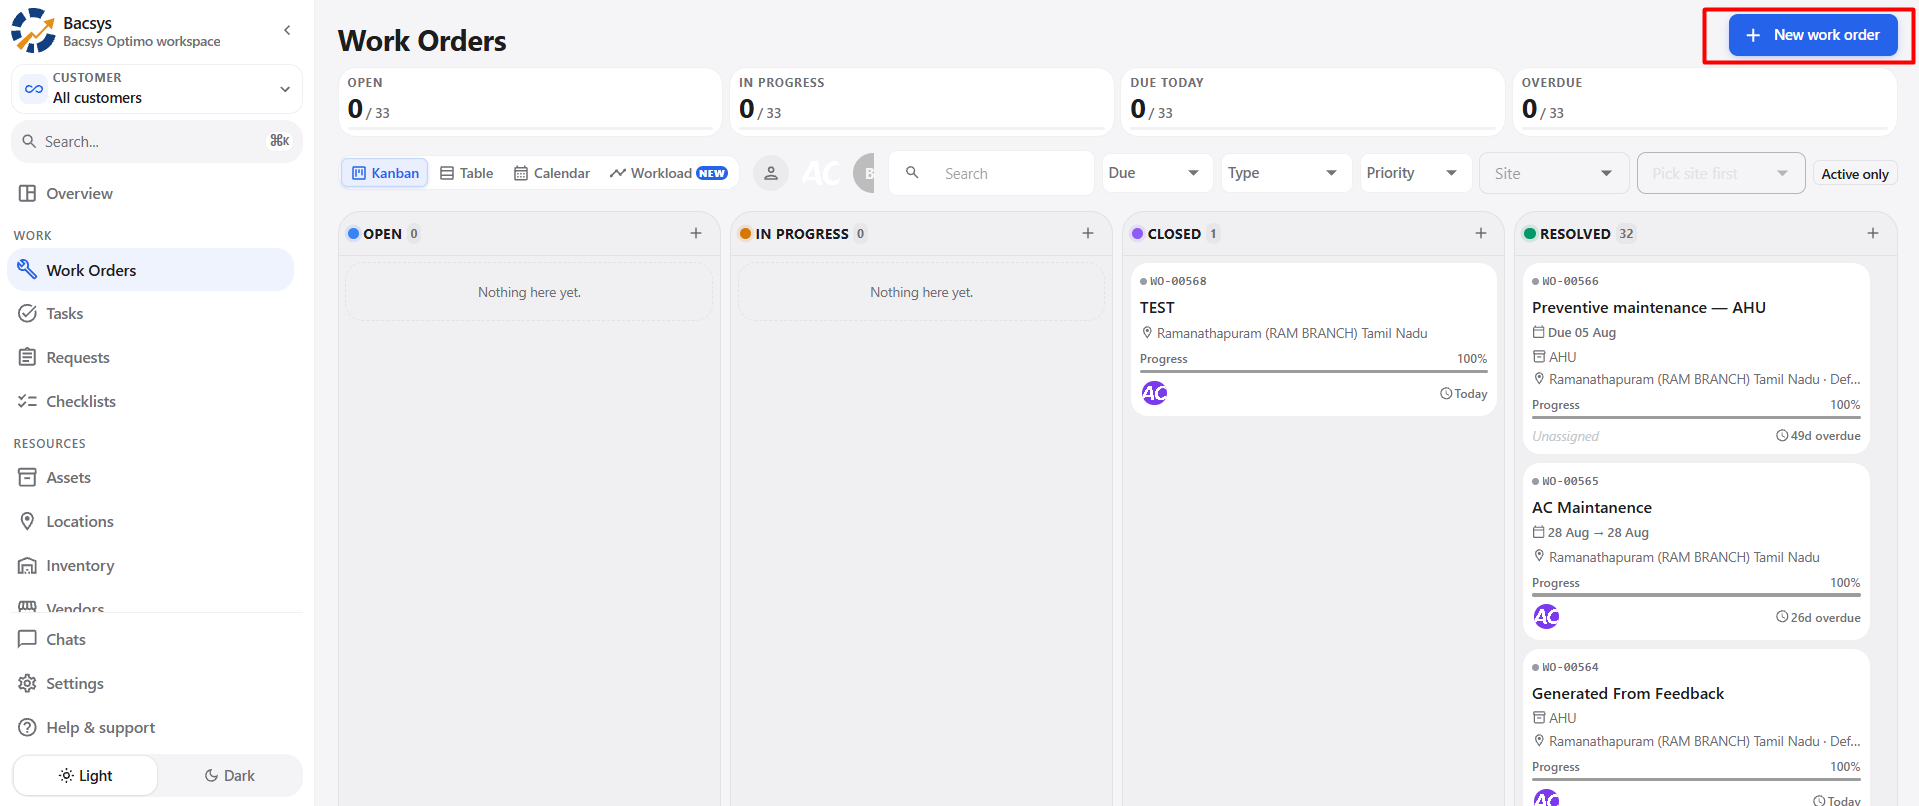
Users can create a new work order using the New Work Order button.
Steps to Create a Work Order
- Navigate to the Work Orders module.
- Click New Work Order.
- The New Work Order form opens.
- Enter the required work order information.
- Configure the schedule, assignment, location, and other details.
- Review the entered information.
- Click Create Work Order.
When the user clicks + New Work Order, the New Work Order form opens. The following table describes all available sections and fields.
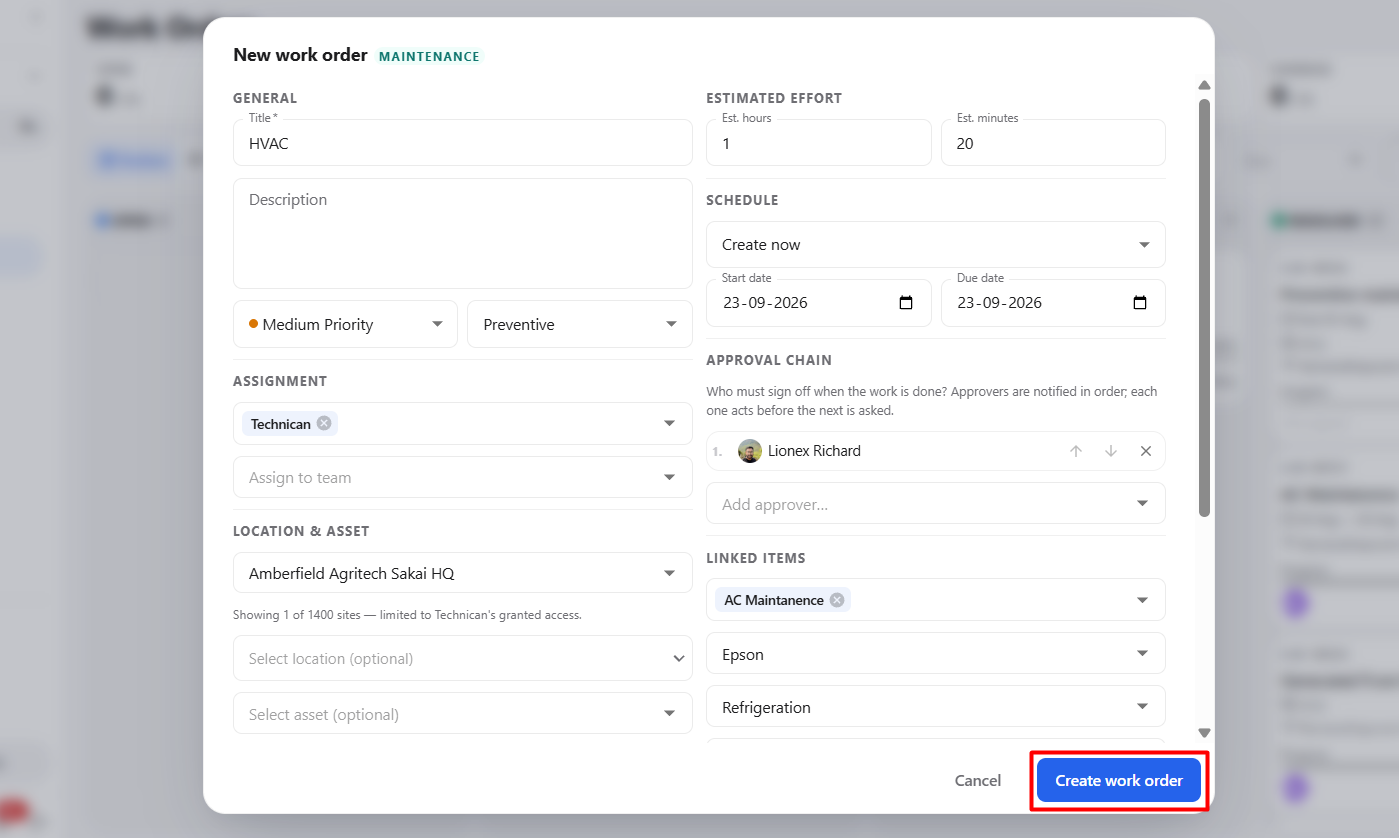
| Section | Field | Description |
|---|---|---|
| General | Title * | Enter the name or subject of the work order. |
| General | Description | Enter detailed information about the work to be performed. |
| General | Priority | Select the priority level of the work order. |
| General | Work Type | Select the applicable type of work. |
| Estimated Effort | Estimated Hours | Enter the estimated number of hours required to complete the work. |
| Estimated Effort | Estimated Minutes | Enter the estimated number of minutes required to complete the work. |
| Schedule | Schedule Type | Select Schedule for a specific date/time or Recurring (calendar-based). |
| Schedule | Activate Date & Time | For a specific schedule, select when the work order should become active. |
| Schedule | Due Date | Select the date by which the work order should be completed. |
| Schedule | Repeat Frequency | For recurring schedules, select how often the work order should repeat. |
| Schedule | Time of Day | Set the time when the recurring work order should be scheduled. |
| Schedule | Add Time | Add additional times for the recurring work order, if required. |
| Schedule | Stops On | Set an optional end date for the recurring schedule. |
| Schedule | Show Upcoming Work Orders Ahead of Time | Enable this option to display or generate upcoming recurring work orders in advance. |
| Assignment | Assign to People | Assign the work order to one or more users. |
| Assignment | Assign to Team | Assign the work order to a responsible team. |
| Approval Chain | Add Approver | Select users who need to approve or sign off on the work. |
| Location & Asset | Site * | Select the site where the work needs to be performed. |
| Location & Asset | Location | Select the location associated with the selected site. |
| Location & Asset | Asset | Select the asset related to the work order, if applicable. |
| Linked Items | Checklists | Link an applicable checklist to the work order. |
| Linked Items | Vendor | Select the vendor associated with the work, if applicable. |
| Linked Items | Category | Select the appropriate work order category. |
| Linked Items | Report Template | Select a report template or use the organization default. |
| Attach Files | Attach Files | Add supporting files after the work order has been created. |
| Reporter / Reviewer | Reporter / Reviewer | Select the user responsible for reporting or reviewing the work order. |
| Digital Sign-Off | Require Signature to Close | Require a digital signature before the work order can be closed. |
| Digital Sign-Off | Require Signature to Acknowledge | Require a digital signature when the work order is acknowledged. |
2.2 Creating the Work Order
After entering all required work order information:
- Review the entered details.
- Click Create Work Order.
- The system creates the work order successfully.
- The newly created work order is added to the Open status.
- The work order becomes available in the Open column of the Work Orders page.
- Users can open the work order to view, update, assign, or process it.
2.3 Viewing the Created Work Order
After creating the work order, the newly created work order is available in the Open section of the Work Orders page.
Steps to Open the Work Order
- Navigate to the Work Orders page.
- Open the Open section.
- Locate the newly created work order.
- Click the work order to open its details.
Work Order Details
The work order details page provides information such as:
| Section | Information |
|---|---|
| Work Order | Work order title and current status |
| Priority | Priority assigned to the work order |
| Assigned Person | User assigned to the work order |
| Assigned Team | Team assigned to the work order |
| Due Date | Scheduled completion date |
| Work Type | Type of work order |
| Estimated Effort | Estimated time required |
| Location | Site or location associated with the work |
| Category | Work order category |
| Reporter / Reviewer | User responsible for reporting or reviewing |
| Checklist | Linked checklist, if applicable |
| Approval Chain | Configured approval steps |
| Timeline | Record of important work order activities |
| Activity | Comments and other work order activities |
2.4 Starting the Work Order
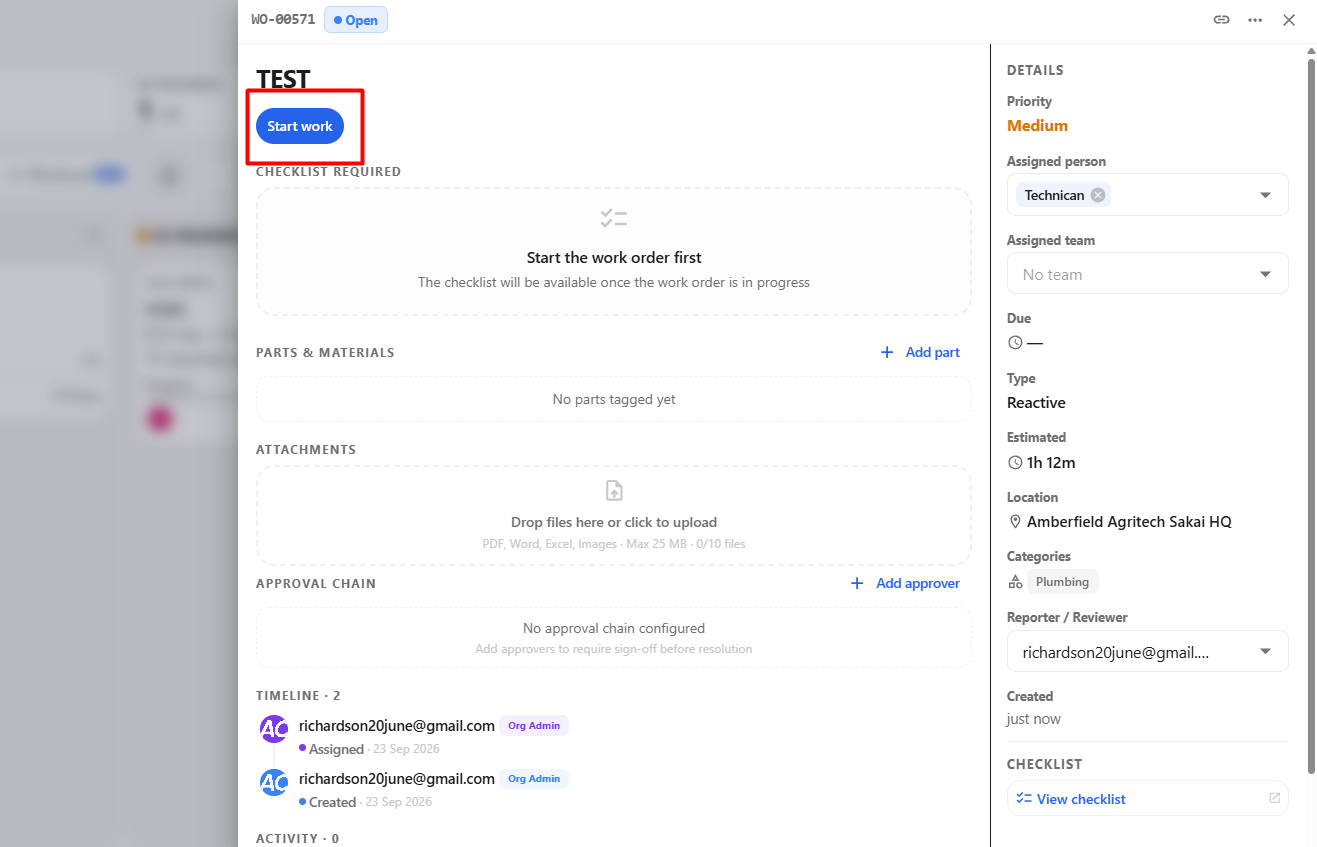
The Start Work option allows the assigned user to begin working on the work order.
Steps to Start Work
- Open the required work order from the Open section.
- Review the work order details.
- Click Start Work.
- The work order status changes to In Progress.
- The work order becomes available in the In Progress section.
Status Change
| Before | Action | After |
|---|---|---|
| Open | Click Start Work | In Progress |
2.5 Checklist Execution
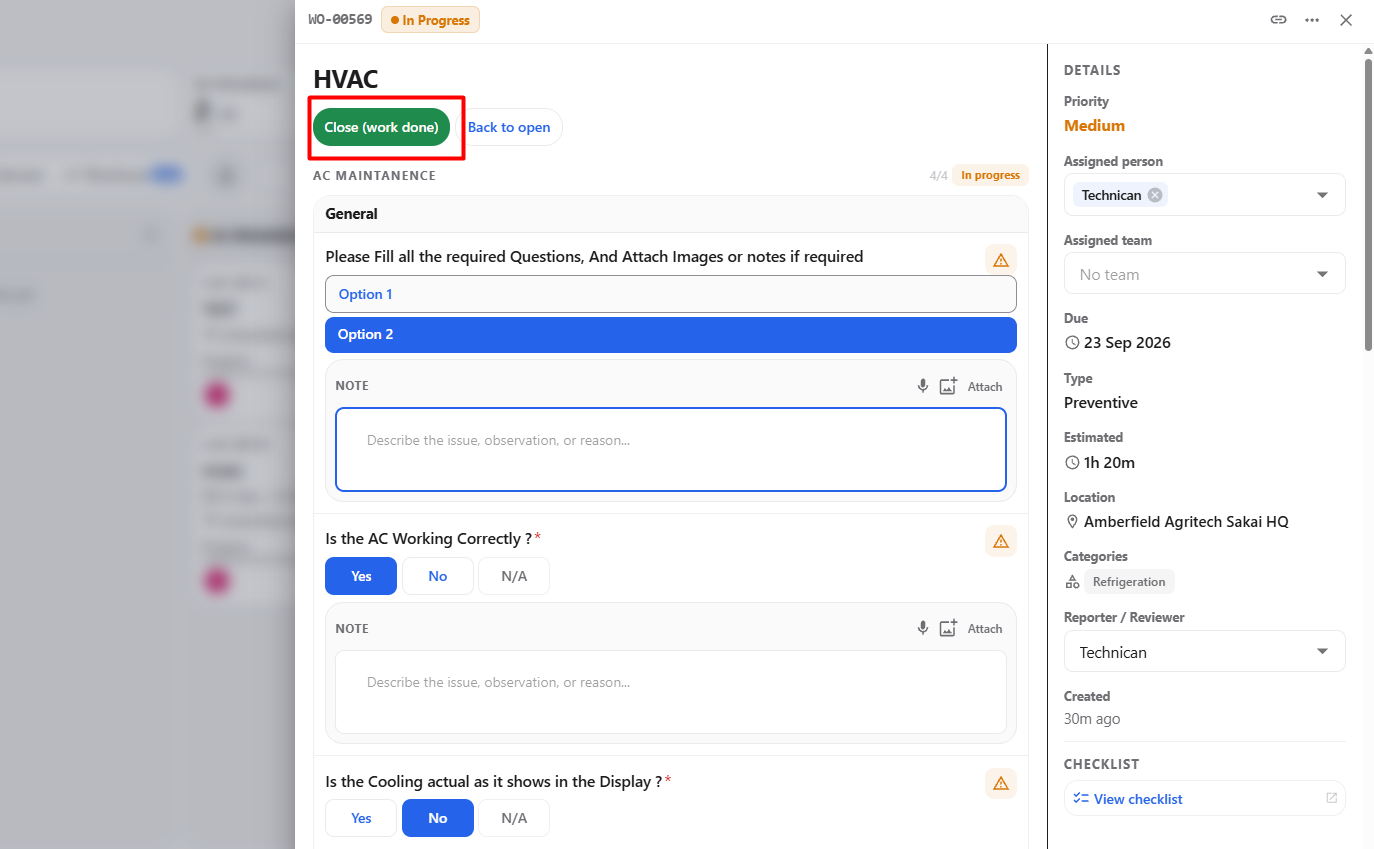
When a checklist is linked to the work order, it becomes available after the work order is moved to In Progress.
If the checklist is required, it must be completed before the work order can be closed.
Steps to Start the Checklist
- Open the work order from the In Progress section.
- Review the work order details.
- In the Checklist Required section, click Start Checklist.
- The checklist opens for completion.
- Review and complete all required checklist items.
- Provide the required Digital Signature, if applicable.
- Submit the completed checklist.
- The completed checklist is recorded against the work order.
- The work order remains In Progress until the required work and checklist conditions are completed.
Checklist Status
| Stage | Description |
|---|---|
| Checklist Required | Indicates that a checklist must be completed before the work order can be closed. |
| Start Checklist | Opens the linked checklist for completion. |
| Checklist In Progress | Allows the user to complete the required checklist items. |
| Digital Signature | Allows the user to provide the required signature, when applicable. |
| Submit Checklist | Saves and submits the completed checklist. |
| Work Order – In Progress | The work order remains in the In Progress status after checklist submission until the work is completed. |
2.6 Digital Signature
If digital sign-off is configured for the checklist, the user must provide the required signature before submitting the checklist.
Steps
- Complete all required checklist items.
- Provide the required Digital Signature.
- Submit the checklist.
- The submitted checklist is associated with the work order.
Note: A required checklist must be completed before the work order can proceed to the configured closing or completion stage.
2.7 Checklist Availability
The availability of the checklist depends on the current work order status.
| Work Order Status | Checklist Availability |
|---|---|
| Open | Checklist is not available for completion. |
| In Progress | Linked checklist becomes available for completion. |
Note: The checklist can be accessed and completed after the work order has been started and moved to In Progress.
2.8 Closing the Work Order
After the required checklist has been completed and submitted, the work order can be closed using the Close (work done) option.
If digital sign-off is required, the user must provide a digital signature before the work order can be closed.
Steps to Close the Work Order
- Open the work order from the In Progress section.
- Verify that the required checklist has been completed and submitted.
- Click Close (work done).
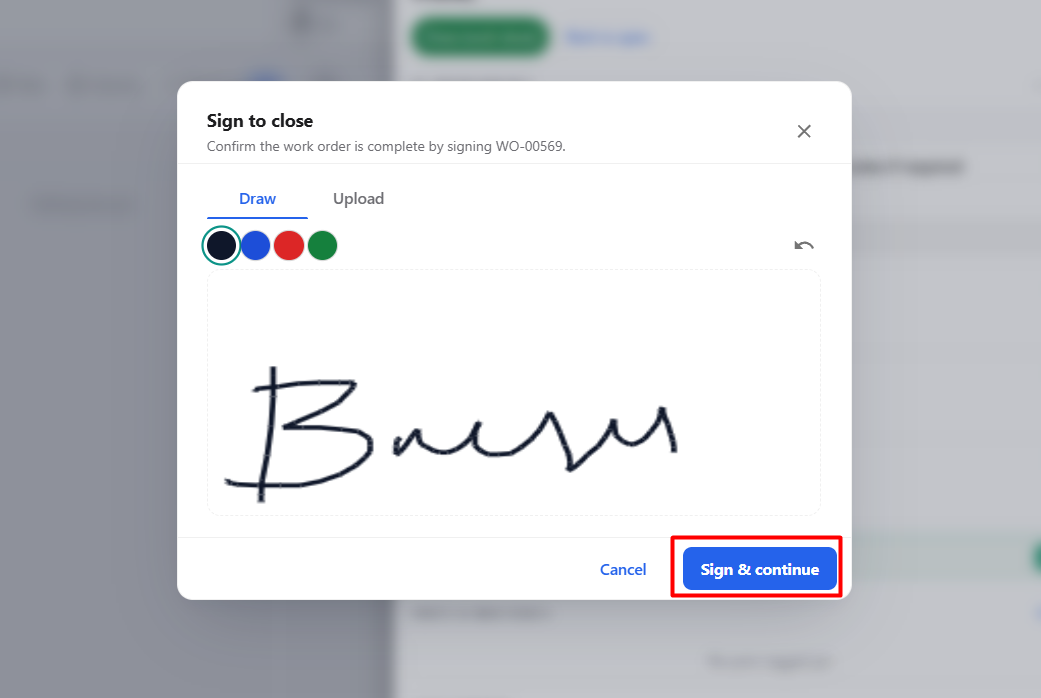
- The Digital Signature screen is displayed.
- Provide the required digital signature.
- Click Sign & Continue.
- The system verifies the signature.
- The work order is successfully closed.
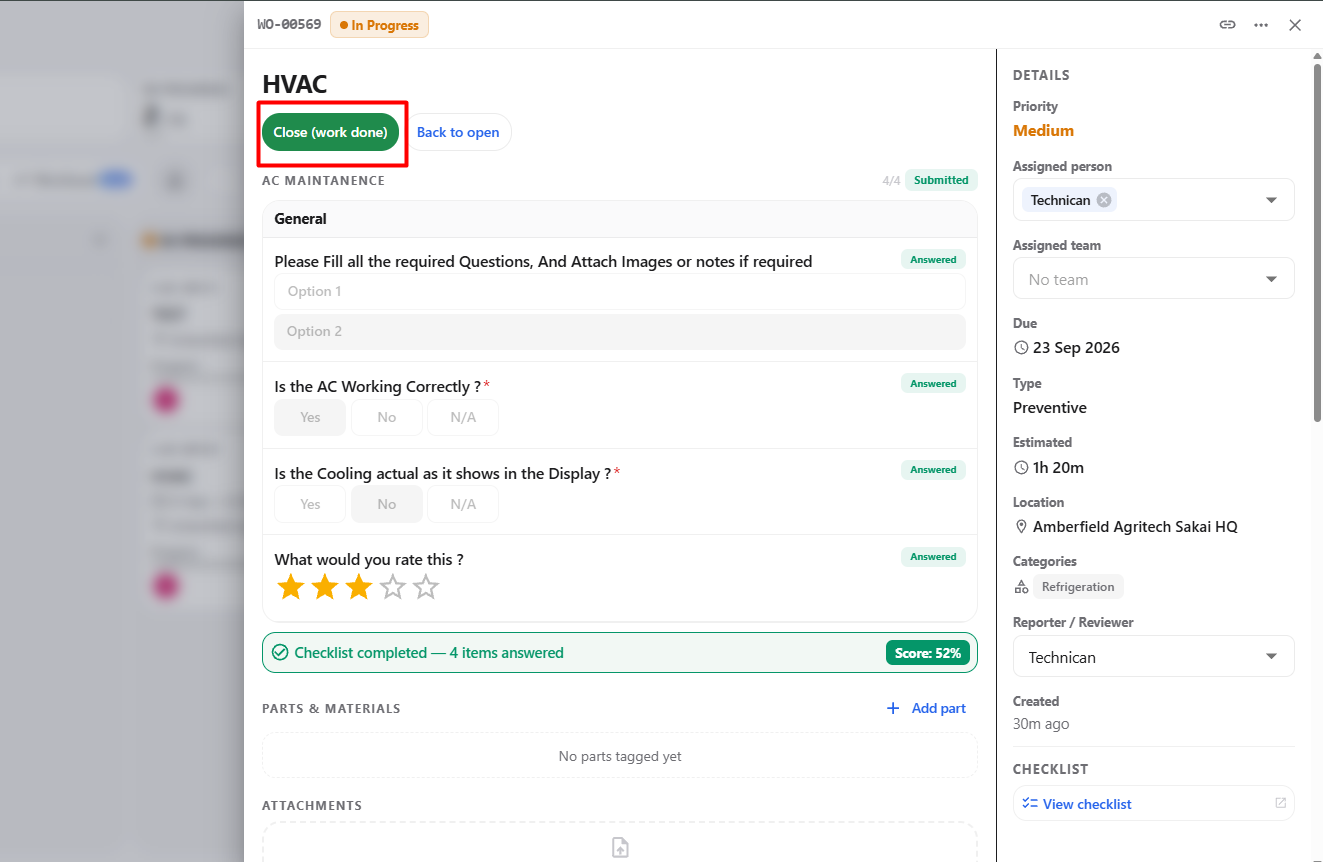
Closing Status
| Step | Status / Action | Description |
|---|---|---|
| 1 | In Progress | Work order is currently being worked on. |
| 2 | Close (work done) | User initiates the work order closure. |
| 3 | Digital Signature | User provides the required signature. |
| 4 | Sign & Continue | Signature is submitted for confirmation. |
| 5 | Closed | Work order is successfully closed. |
Note: When digital sign-off is configured, the work order cannot be closed until the required signature is provided and submitted.
2.9 Closed Work Order
After the required checklist is completed and submitted, the work order can be moved to the Closed status.
Once closed, the work order displays the completed checklist details and other relevant work order information.
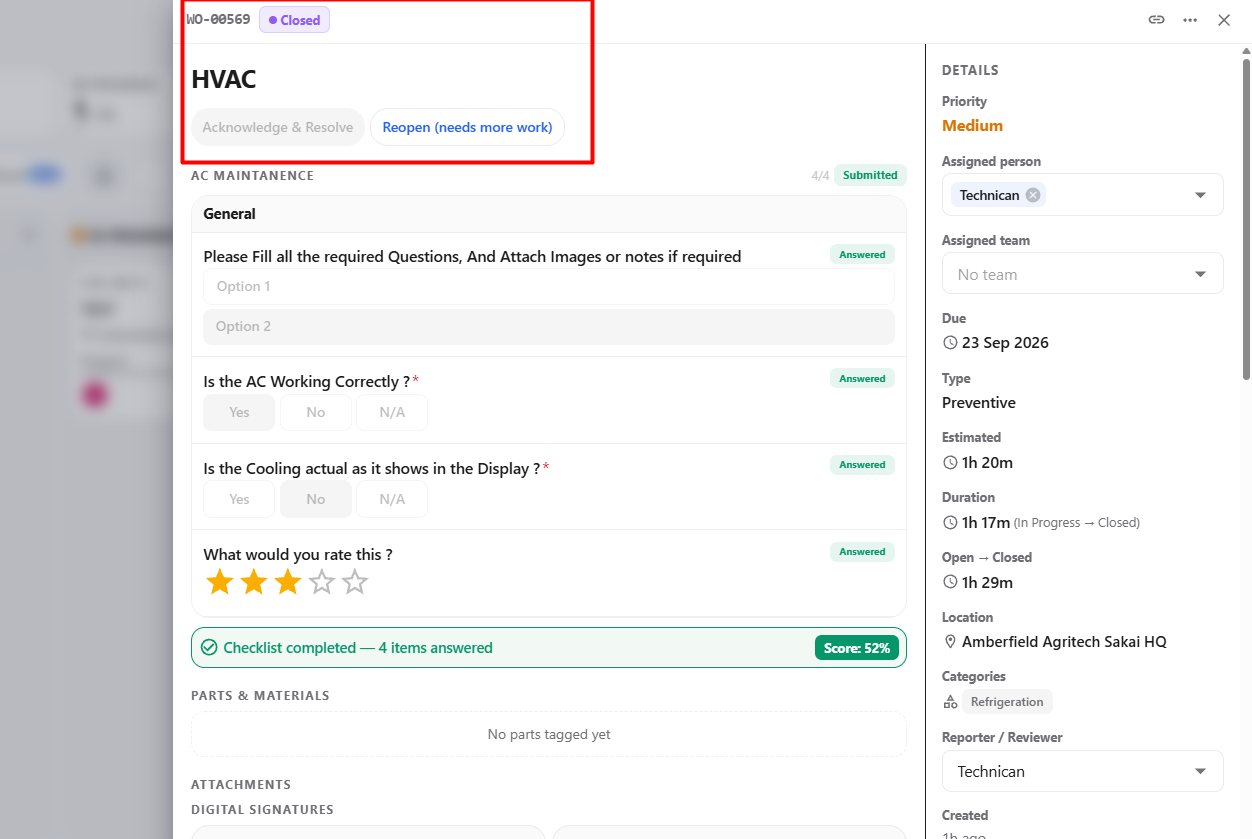
Closed Work Order Details
The closed work order may display:
- Work order title and Closed status
- Resolution notes, if provided
- Completed checklist
- Checklist score
- Parts & Materials
- Attachments
- Digital signatures
- Assigned person and team
- Work order duration
- Location and category
- Reporter / Reviewer
- Work order timeline
Acknowledge & Resolve
After the work order is closed, the Acknowledge & Resolve option becomes available.
The user can review the completed work and acknowledge the resolution.
Steps
- Open the work order from the Closed section.
- Review the completed checklist and work order details.
- Review the resolution notes, if available.
- Click Acknowledge & Resolve.
- Complete any required confirmation or resolution step.
- Confirm the action to acknowledge and resolve the work order.
Additional Option
The Reopen (needs more work) option is also available for a closed work order when additional work is required.
| Option | Description |
|---|---|
| Acknowledge & Resolve | Acknowledges the completed work and proceeds with the resolution. |
| Reopen (needs more work) | Reopens the work order when additional work is required. |
Note: The availability of Acknowledge & Resolve, Reopen, and any required confirmation depends on the configured work order workflow.
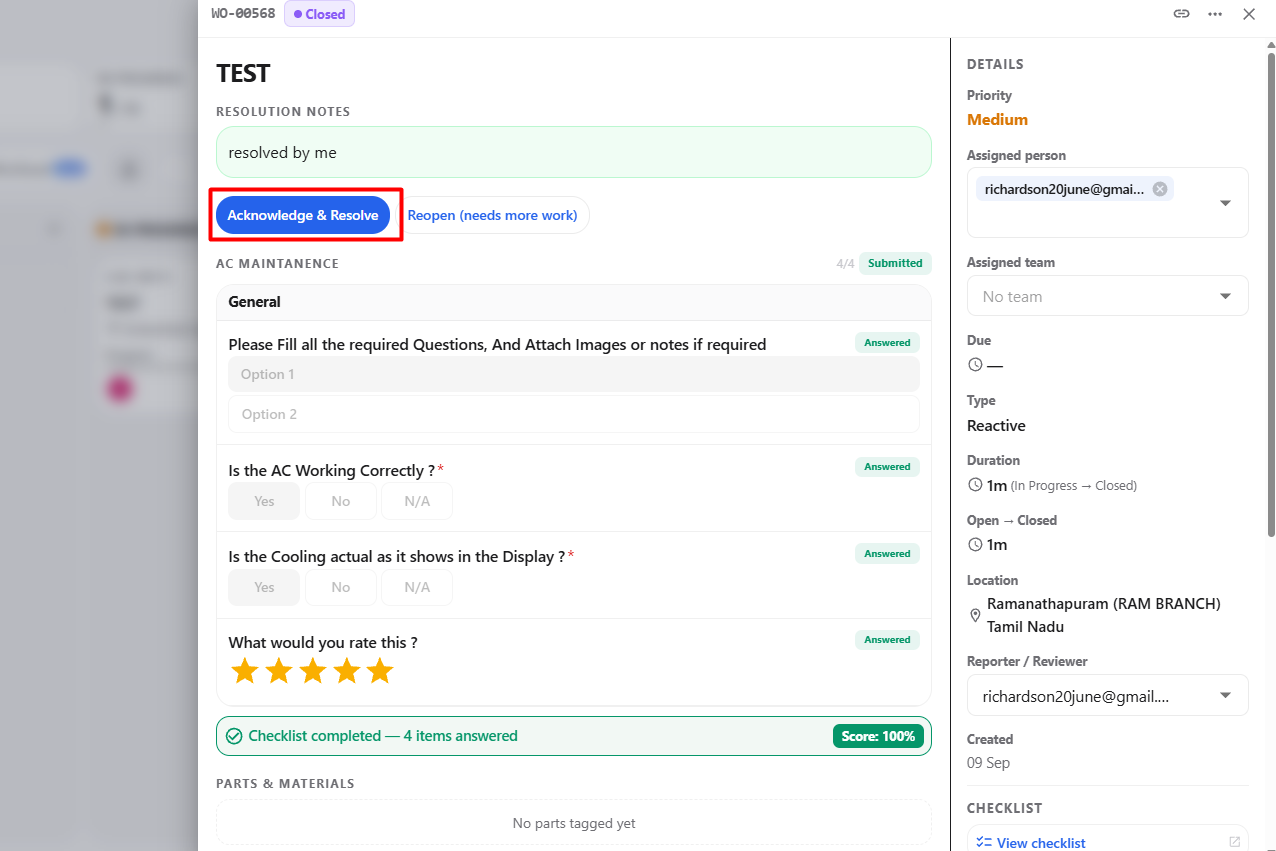
2.10 Reopening a Work Order
The Reopen (needs more work) option allows users to reopen a closed work order when additional work or corrections are required.
Steps to Reopen
- Open the required work order from the Closed section.
- Review the completed work order and checklist details.
- Click Reopen (needs more work).
- The work order is reopened and its status changes back to In Progress.
- Review and update the required work order or checklist information.
- Complete the additional work or make the necessary corrections.
- Complete the checklist again, if required.
- Once the required work is completed, click Close (Work done) again.
- Complete the required digital signature, if configured.
- The work order can then be moved back to Closed.
Status Change
| Before | Action | After |
|---|---|---|
| Closed | Click Reopen (needs more work) | In Progress |
Reopened Work Order
After reopening, the work order displays the In Progress status and provides the required options to continue working on it.
Users can:
- Update or complete the required checklist items.
- Add notes or required information.
- Add or update attachments.
- Review the assigned person and other work order details.
- Complete the additional work.
- Close the work order again after the work is completed.
Note: Reopening a work order allows additional work to be performed before it is closed again.
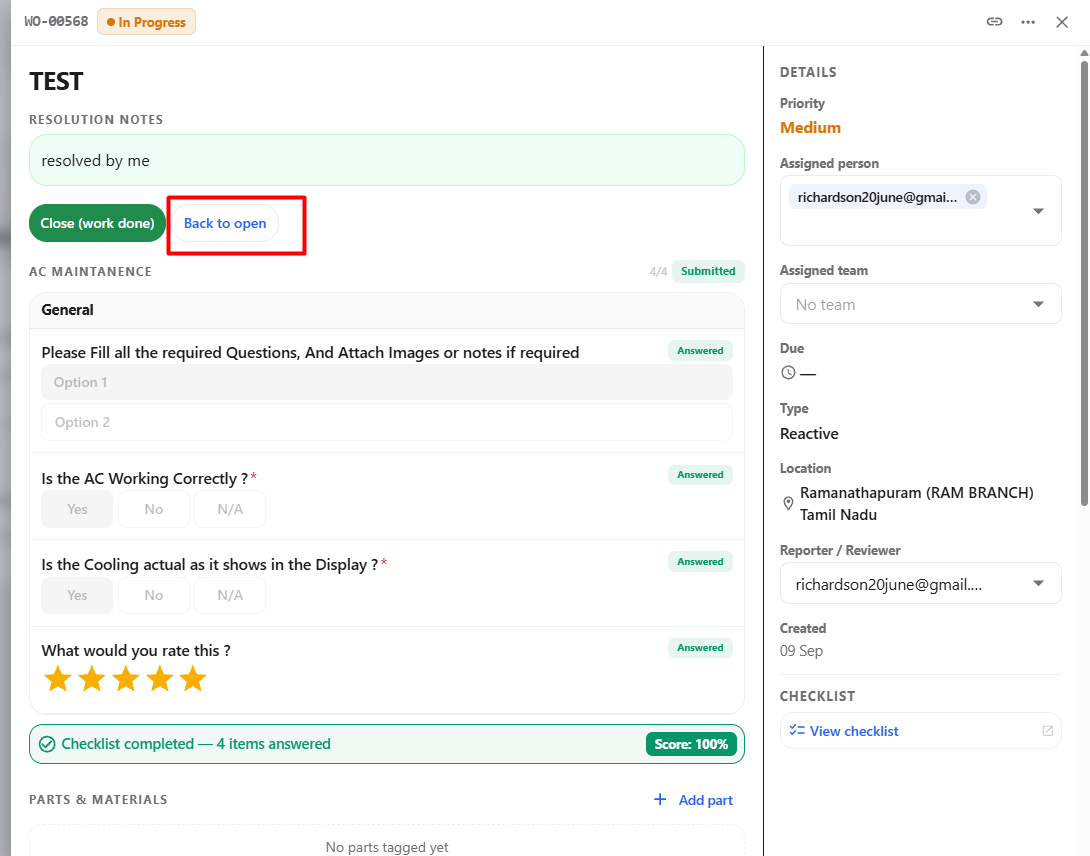
2.11 Resolving the Work Order
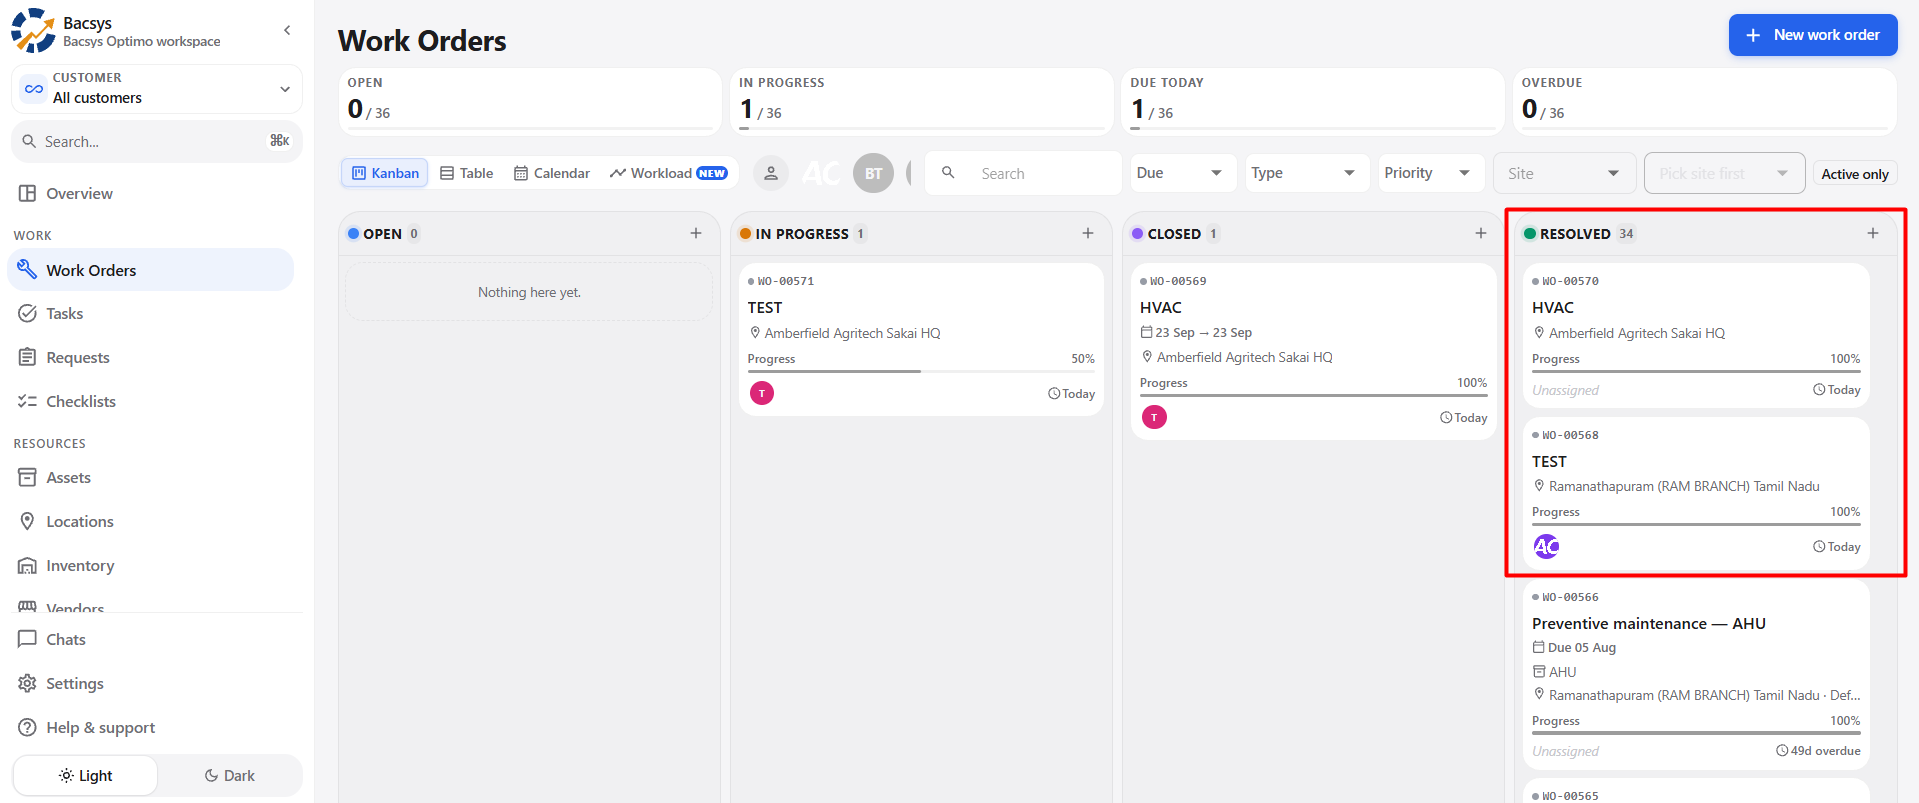
After the work order is Closed, it can be moved to the Resolved status using the Acknowledge & Resolve option.
Steps to Resolve
- Open the required work order from the Closed section.
- Review the completed work order and checklist details.
- Verify that all required checklist items have been submitted.
- Review the resolution information.
- Click Acknowledge & Resolve.
- The work order status changes from Closed to Resolved.
- The resolved work order is moved to the Resolved section.
Status Change
| Before | Action | After |
|---|---|---|
| Closed | Click Acknowledge & Resolve | Resolved |
2.12 Download Work Order Report
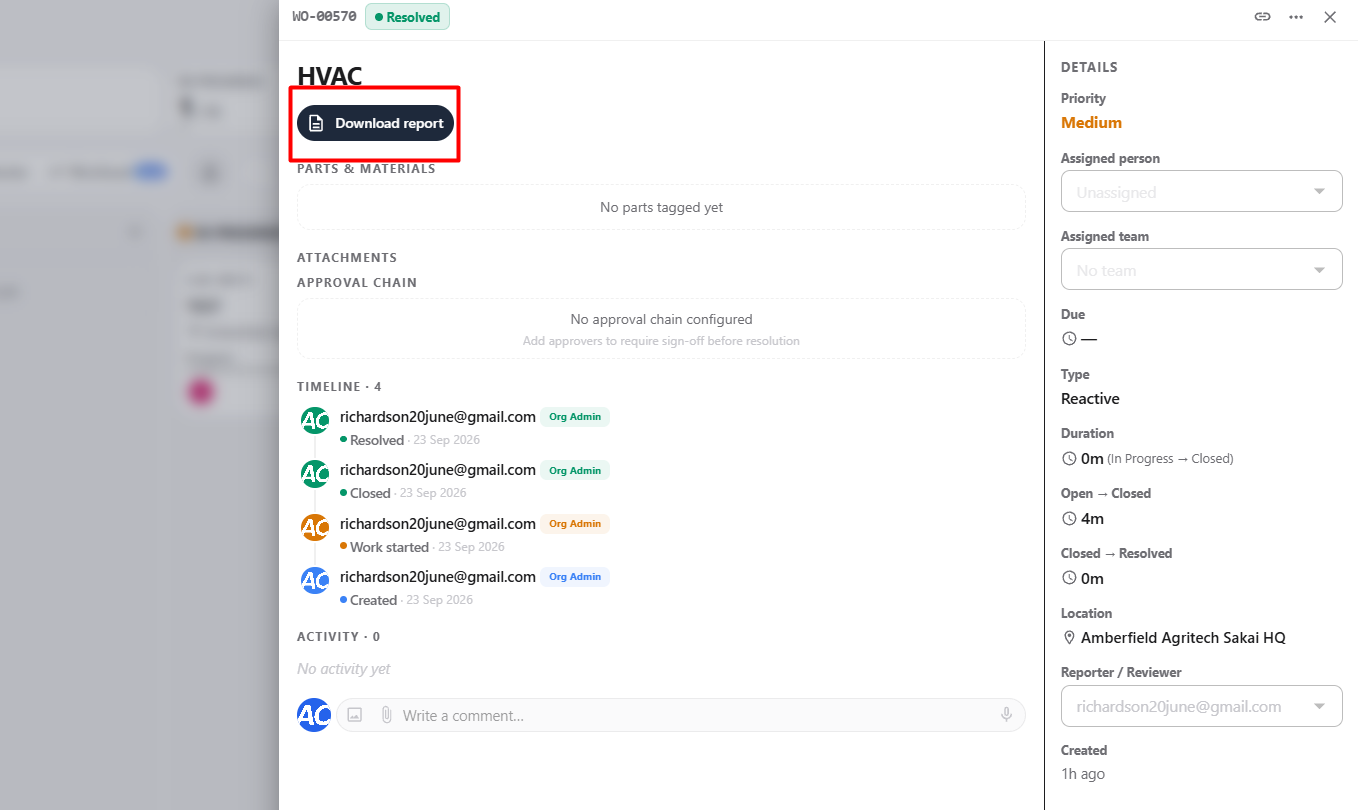
Once the work order reaches the Resolved status, users can download the completed work order report.
The Download Report option provides the report containing the completed work order and checklist information.
Steps to Download the Report
- Open the work order from the Resolved section.
- Verify that the work order status is Resolved.
- Click Download Report.
- The system generates the work order report.
- Download the generated report for documentation or record-keeping.
Resolved Work Order Information
The resolved work order displays information such as:
| Section | Information |
|---|---|
| Work Order | Work order title and resolved status |
| Checklist | Completed checklist and submitted responses |
| Checklist Score | Final checklist score |
| Assigned Person | User assigned to the work order |
| Work Type | Type of work performed |
| Duration | Time taken to complete the work |
| Location | Site or location where the work was performed |
| Attachments | Files associated with the work order |
| Resolution | Resolution information recorded for the work order |
| Report | Downloadable work order report |
Note: After the work order is resolved, it remains available in the Resolved section and the completed report can be downloaded for future reference.
2.13 Work Order Workflow
The Work Order follows a defined lifecycle from creation to resolution.
Standard Workflow
Create Work Order
        ↓
      Open
        ↓
   Start Work
        ↓
   In Progress
        ↓
 Complete Checklist
        ↓
 Close (Work Done)
        ↓
 Digital Signature
        ↓
      Closed
        ↓
 Acknowledge & Resolve
        ↓
     Resolved
        ↓
 Download Report
2.14 Reopen Work Order Workflow
      Closed
        ↓
Reopen (Needs More Work)
        ↓
   In Progress
        ↓
Complete Additional Work
        ↓
 Close (Work Done)
        ↓
 Digital Signature
        ↓
      Closed
        ↓
 Acknowledge & Resolve
        ↓
     Resolved
        ↓
 Download Report