

Email Configuration
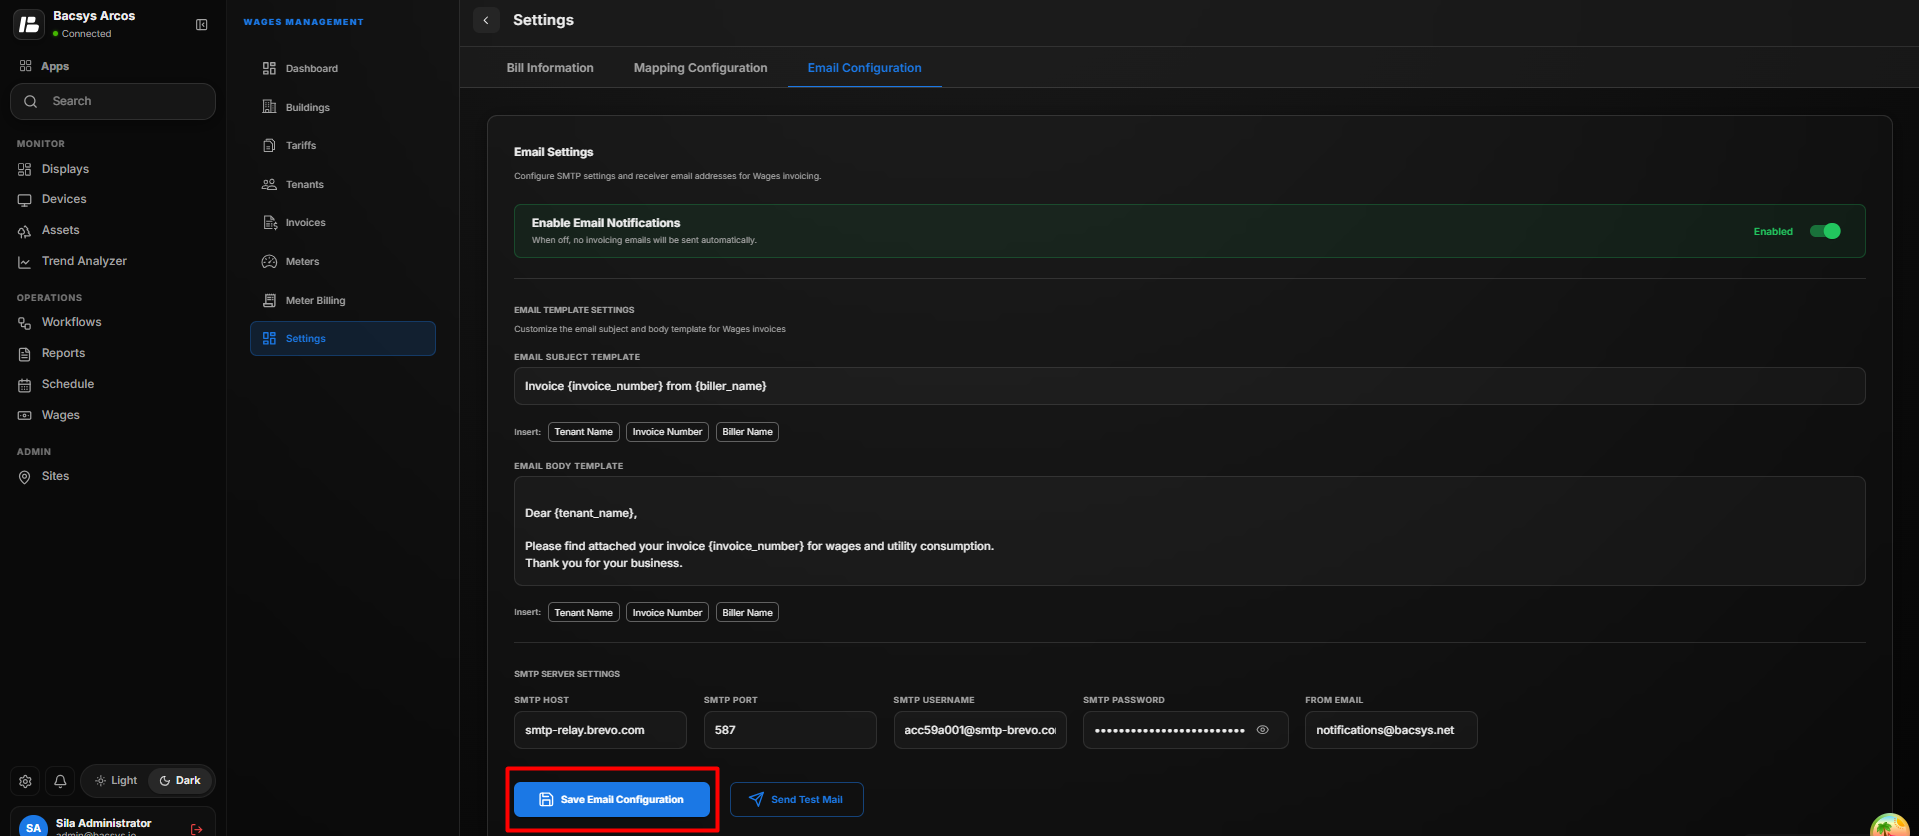
The Email Configuration section allows users to configure email notifications for Wages invoicing. Users can enable or disable automatic invoice email...
The Email Configuration section allows users to configure email notifications for Wages invoicing. Users can enable or disable automatic invoice emails, customize the email subject and body, configure SMTP server settings, and send a test email to verify the configuration.
Configure Email Settings
- Navigate to the Settings module.
- Select the Email Configuration tab.
- Configure the required email settings.
- Configure the Email Subject Template and Email Body Template.
- Enter the required SMTP Server Settings.
- Review the configured information.
- Click Save Email Configuration.
- Click Send Test Mail to verify the email configuration.
Email Settings
| Field | Description |
|---|---|
| Enable Email Notifications | Enables or disables automatic email notifications for Wages invoices. |
| Email Subject Template | Defines the subject line used for invoice emails. |
| Email Body Template | Defines the message content included in invoice emails. |
| Insert: Tenant Name | Inserts the tenant name into the email subject or body. |
| Insert: Invoice Number | Inserts the invoice number into the email subject or body. |
| Insert: Biller Name | Inserts the biller name into the email subject or body. |
Enable Email Notifications
The Enable Email Notifications option controls whether invoice emails are sent automatically.
- Enable the toggle to allow automatic invoice email notifications.
- Disable the toggle to prevent automatic invoice email notifications.
When enabled, the configured email template and SMTP settings are used when sending invoice emails.
Email Subject Template
The Email Subject Template defines the subject line displayed when an invoice email is sent.
For example:
Invoice {invoice_number} from {biller_name}
Email Body Template
The Email Body Template defines the message content included in the invoice email.
For example:
Dear {tenant_name},

Please find attached your invoice {invoice_number} for wages and utility consumption.

Thank you for your business.
Insert Options
The Insert Options allow users to add dynamic information to the email subject or body.
| Insert Option | Description | Placeholder |
|---|---|---|
| Tenant Name | Inserts the name of the tenant associated with the invoice. | {tenant_name} |
| Invoice Number | Inserts the generated invoice number. | {invoice_number} |
| Biller Name | Inserts the name of the biller configured in the system. | {biller_name} |
SMTP Server Settings
The SMTP Server Settings section is used to configure the email server through which invoice emails are sent.
| Field | Description | Placeholder |
|---|---|---|
| SMTP Host | Enter the hostname or address of the SMTP server used to send emails. | {smtp_host} |
| SMTP Port | Enter the port number used by the SMTP server. | {smtp_port} |
| SMTP Username | Enter the username required to authenticate with the SMTP server. | {smtp_username} |
| SMTP Password | Enter the password used to authenticate with the SMTP server. | {smtp_password} |
| From Email | Enter the email address that will be used as the sender of invoice emails. | {smtp_from} |
Configure SMTP Settings
- Enter the SMTP Host.
- Enter the SMTP Port.
- Enter the SMTP Username.
- Enter the SMTP Password.
- Enter the From Email address.
- Review the SMTP configuration.
Save Email Configuration
After configuring the email notification, templates, and SMTP settings:
- Review the Enable Email Notifications setting.
- Review the Email Subject Template.
- Review the Email Body Template.
- Verify the SMTP Server Settings.
- Click Save Email Configuration.
The configured email settings are saved.
Send Test Mail
- Click Send Test Mail.
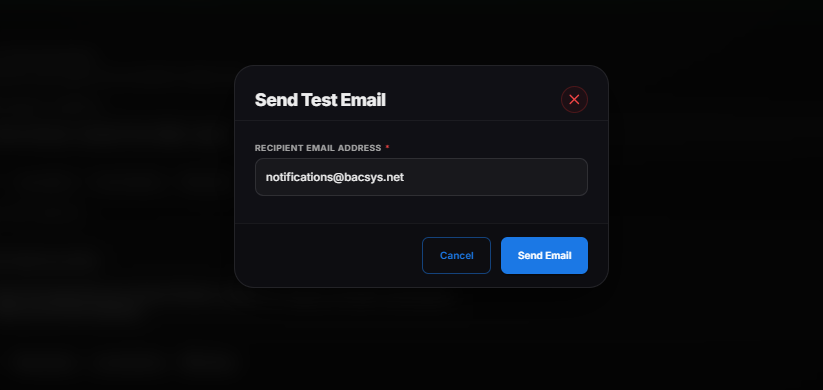
- The Send Test Mail pop-up window appears.
- Enter the required information.
| Field | Description | Placeholder |
|---|---|---|
| Tenant Name | Enter the name of the tenant. | {tenant_name} |
| Invoice Number | Enter the invoice number. | {invoice_number} |
| Biller Name | Enter the name of the biller. | {biller_name} |
- Click Send Test Mail.
The test email is sent automatically after the generation process is completed.
Send Test Mail
The Send Test Mail option allows users to verify whether the configured email settings and SMTP server are working correctly before sending invoice emails automatically.
Send a Test Email
- Configure the required SMTP Server Settings.
- Click Save Email Configuration to save the email settings.
- Click Send Test Mail.
- A Send Test Email dialog box is displayed.
- Enter the required Recipient Email Address.
- Click Send Email.
- The system sends a test email to the specified recipient.
- Check the recipient's email inbox to verify that the test email was received.
Send Test Email Fields
| Field | Description |
|---|---|
| Recipient Email Address | Enter the email address to which the test email should be sent. |
| Cancel | Closes the Send Test Email dialog without sending the email. |
| Send Email | Sends the test email to the specified recipient. |
Note
- The Recipient Email Address is required to send the test email.
- Make sure the SMTP Server Settings are configured correctly before sending the test email.
- A successful test email confirms that the configured email settings can be used to send emails.