

Configuring ModbusRTU
Configuring Modbus RTU
The Modbus RTU network allows the platform to communicate with Modbus RTU devices over an RS-485 serial communication network.
Creating a Modbus RTU Network
-
Navigate to the Devices module from the sidebar.
-
Click the + (Add) icon.
-
Drag and drop Modbus RTU into the Create Network window.
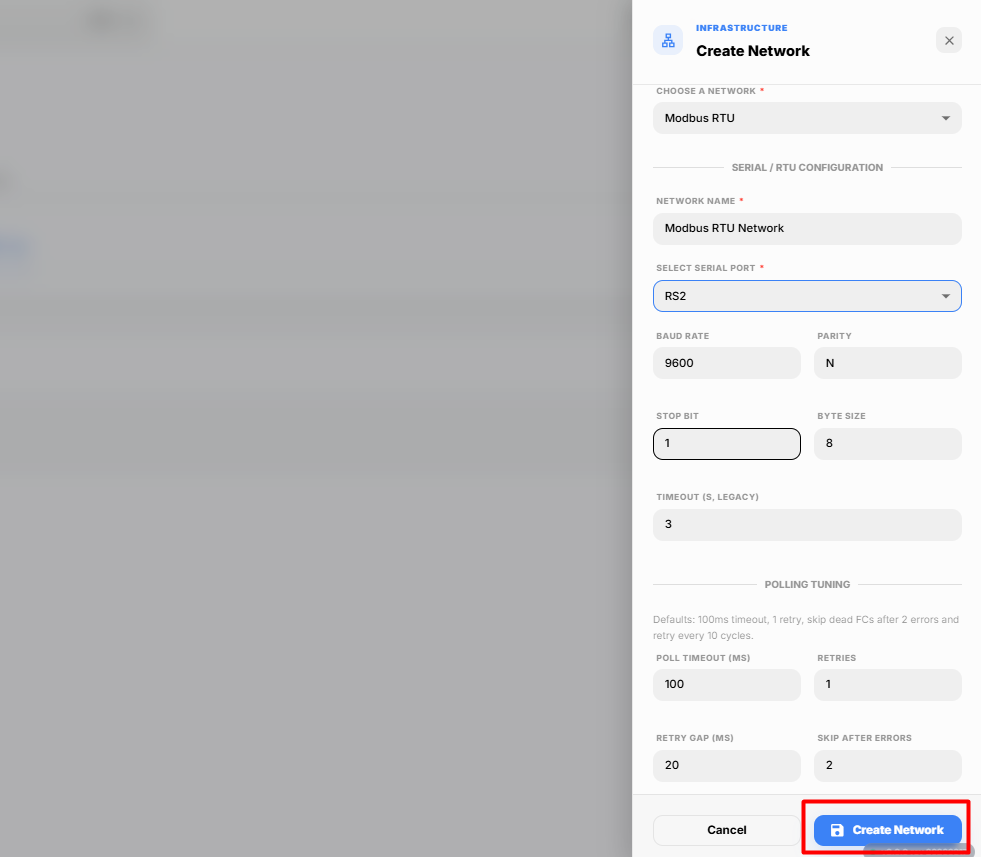
The Create Network dialog box appears.
-
Enter the required network details.
Field Description Network Name Enter a unique name to identify the Modbus RTU network. Choose a Port Select the serial communication port connected to the Modbus RTU device. Available ports include RS1, RS2, and RS3. -
After selecting the communication port, configure the serial communication parameters.
Field Description Baud Rate Select the communication speed used by the Modbus RTU device. The configured baud rate must match the connected device. Parity Select the parity mode used for serial communication (None, Even, or Odd). Stop Bit Select the number of stop bits used for communication. Byte Size Select the data byte size used by the device. Timeout Specifies the maximum time the platform waits for a response from the device. Poll Timeout Specifies the maximum time allowed for a polling request to complete. Retries Specifies the number of retry attempts if communication fails. Retry Gap Specifies the delay between consecutive retry attempts. Skip After Retries Enables the platform to skip the current request after all retry attempts have failed. Retry Every Cycle Enables the platform to retry communication during every polling cycle after a failed request. -
Review the network configuration.
-
Click Create Network.
The Modbus RTU network is successfully created and is displayed in the Devices module.
Adding Modbus RTU Devices
After creating the Modbus RTU network, you can add devices either manually or by using a predefined template.
-
Select the newly created Modbus RTU network from the Devices module.
-
Click Add Device.
The Add Device dialog box appears with the following options:
- Add Manually
- Add from Template
Add Manually
Use this option to configure a Modbus RTU device manually.
-
Select Add Manually.
-
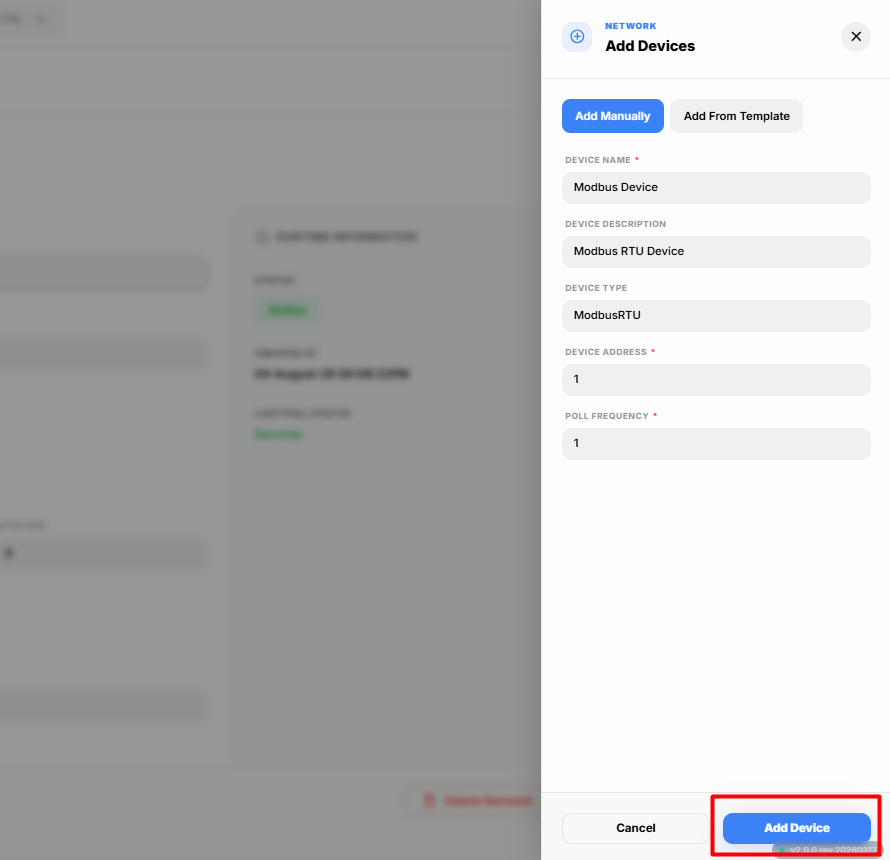
Enter the required device details.
Field Description Device Name Enter a unique name for the device. Device Description Enter a brief description of the device. Device Type Select the appropriate Modbus RTU device type. Device Address Enter the Modbus slave address of the device. Poll Frequency Specify how frequently the platform polls the device. -
Click Add Device.
The device is successfully added to the selected Modbus RTU Network.
Add from Template
Use this option to create a device using one of the predefined templates.
-
Select Add from Template.
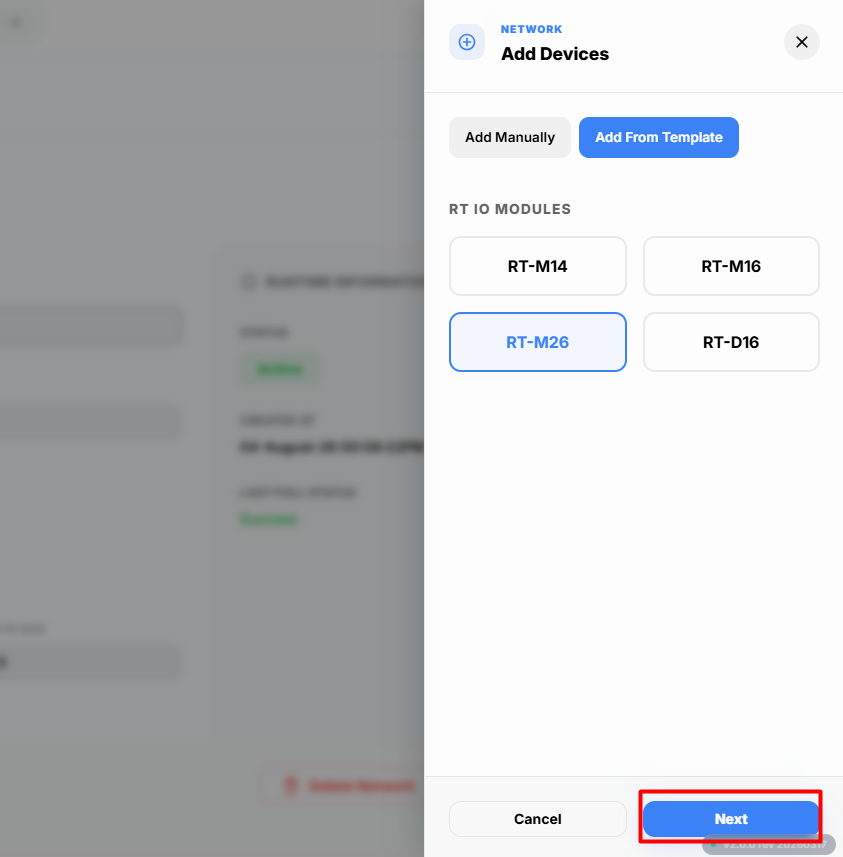
The following templates are available:
- RT-M14
- RTM16
- RTM26
- RTD16
-
Select the required template.
-
Click Next.
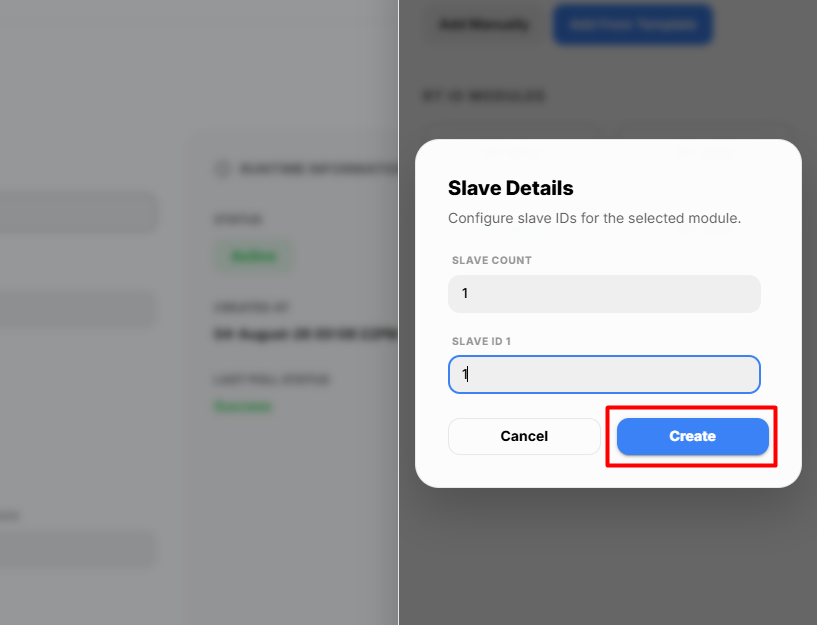
A configuration dialog box appears.
-
Enter the required details.
Field Description Slave Count Specify the number of slave devices to create. Slave ID Enter the starting Modbus slave ID. -
Click Create.
The platform automatically creates the device(s) based on the selected template and displays them under the Modbus RTU Network.
Adding Points
After adding the Modbus RTU device, you can add monitoring points using one of the following methods:
- Add Manually
- Import CSV
-
Select the newly added Modbus RTU Device.
-
Click Add Points.
The Add Points dialog box appears.
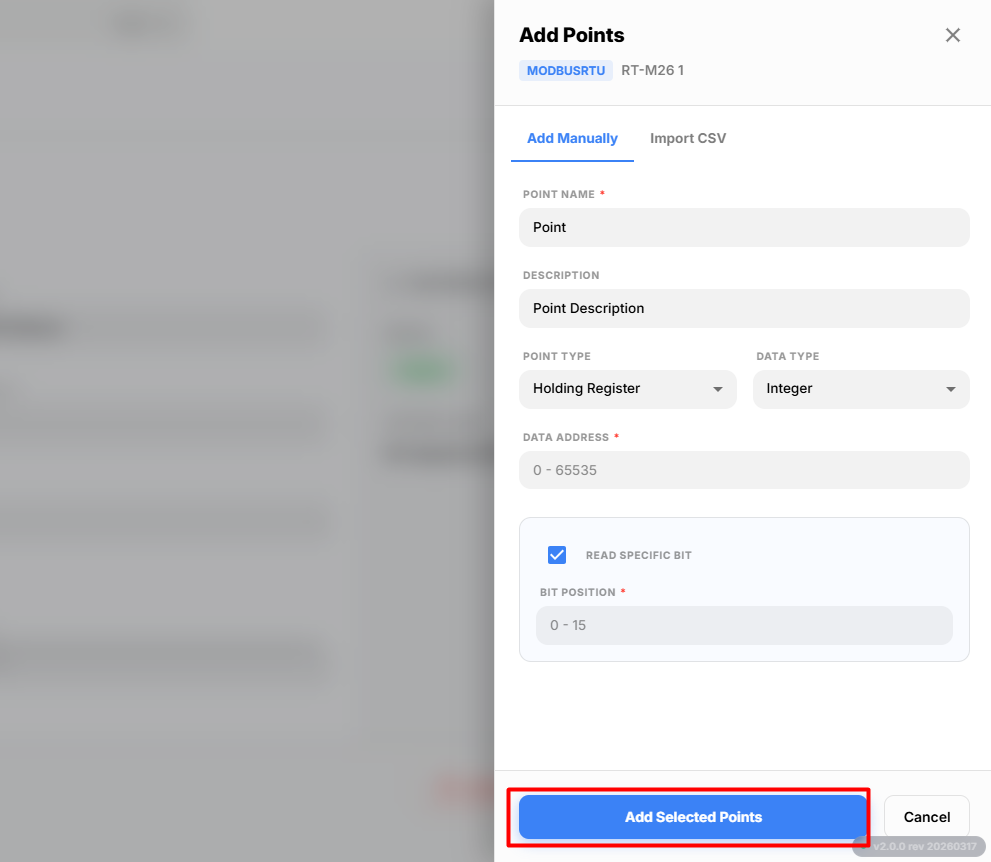
Add Manually
Use this option to create monitoring points manually.
-
Select Add Manually.
-
Enter the required point details.
Field Description Point Name Enter a unique name for the point. Point Description Enter a brief description of the point. Point Type Select the Modbus register type. Available options are Holding Register, Input Register, Coil Status, and Input Status. Data Type Select the data type used by the register. Available options include Integer, Long Integer, Float32, Hex, and Bit.
Reading a Specific Bit
If the selected Data Type is Bit, enable the Read Bit checkbox and specify the required Bit Number.
The platform reads only the selected bit from the configured register.
-
After entering all the required details, click Add Selected Points.
The configured points are added successfully to the selected Modbus RTU device.
Import CSV
Use this option to import multiple points using a CSV template.
-
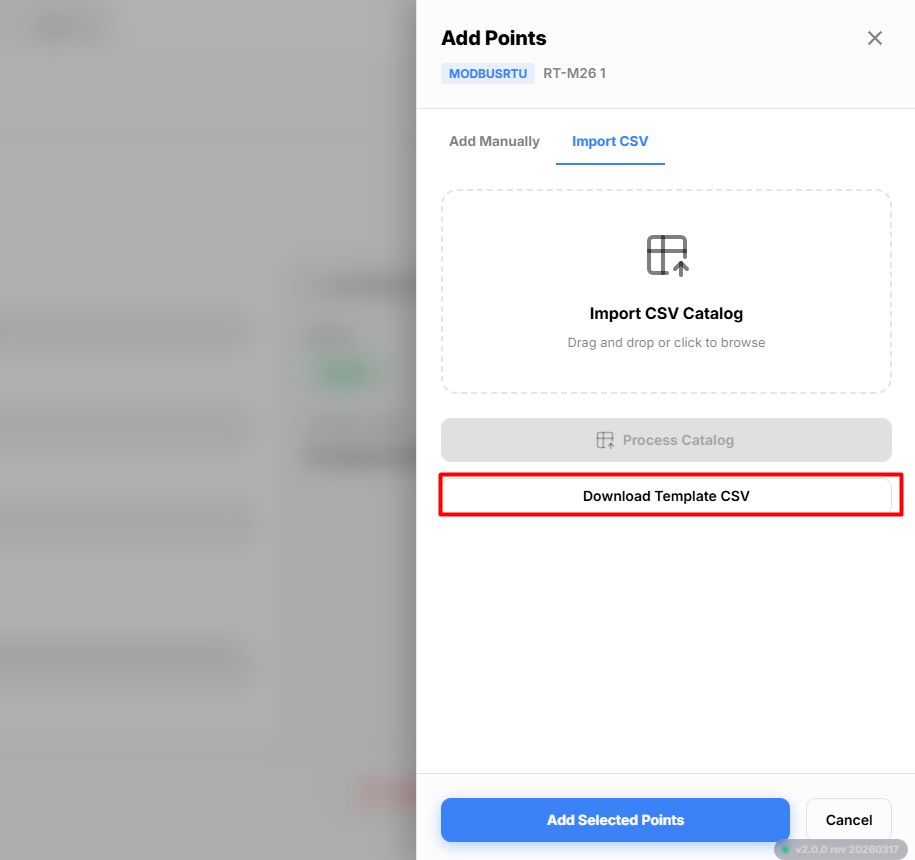
Select Import CSV.
-
Click Download CSV to download the point template.
-
Open the downloaded CSV file and enter the required point details.
Save the updated CSV file.
-
Click Import CSV Catalog and select the updated CSV file.
The imported points are displayed in the preview.
-
Click Process Catalog.
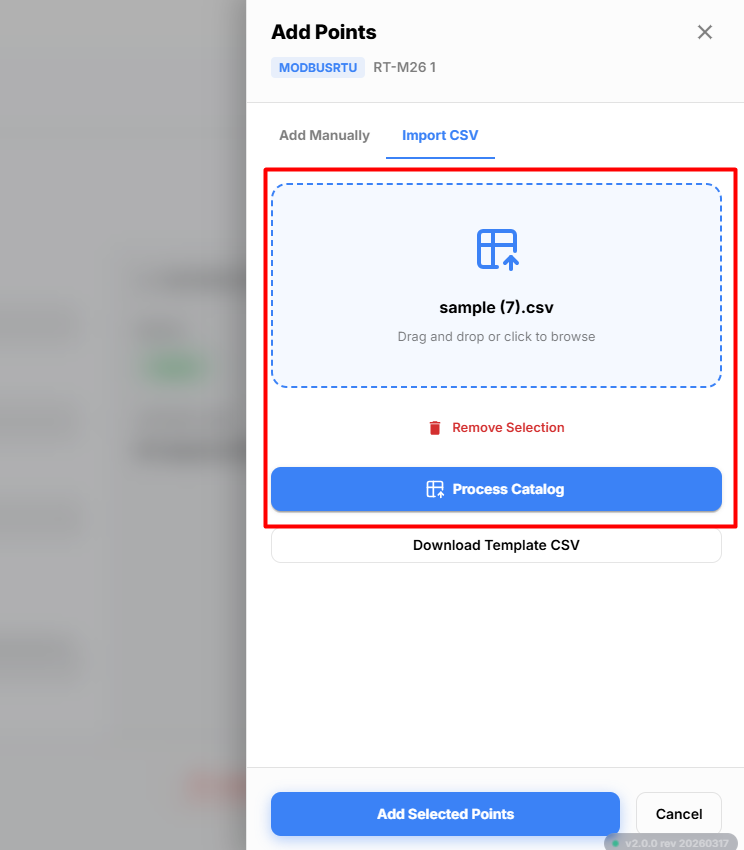
The platform validates and processes the imported point configuration.
-
Review the imported points.
-
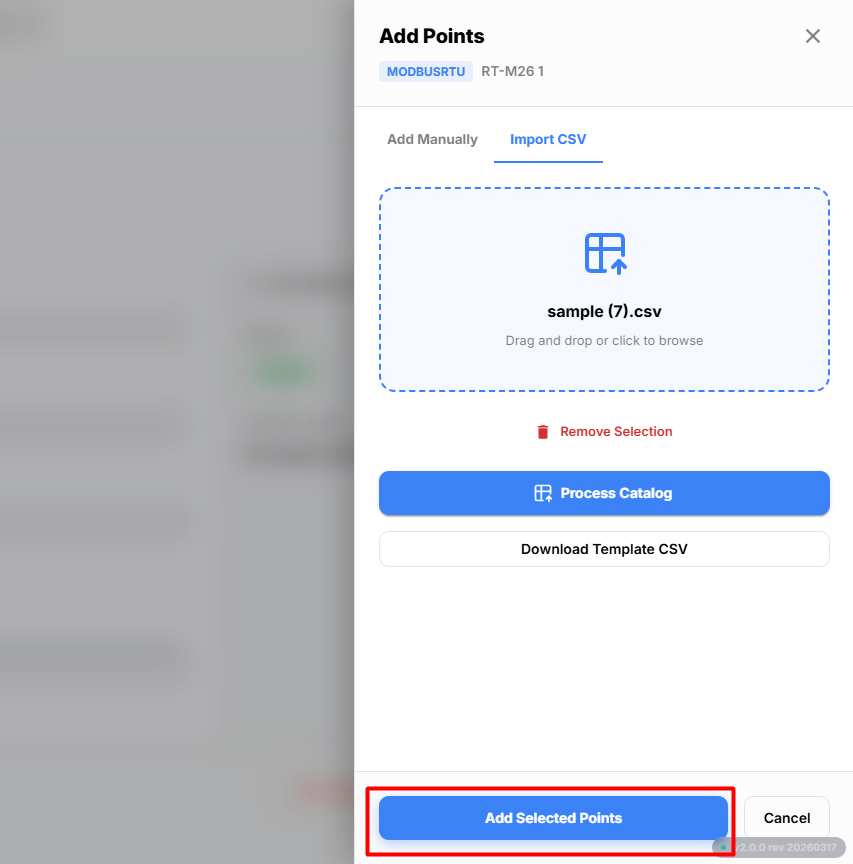
Click Add Selected Points.
The selected points are imported successfully and added to the Modbus RTU Device.
Writing Point Values
Modbus RTU supports both Read Points and Write Points.
- Read Points are used to continuously read data from the Modbus RTU device based on the configured polling interval.
- Write Points are used to write values to the Modbus RTU device.
To write a value to a Modbus RTU device:
-
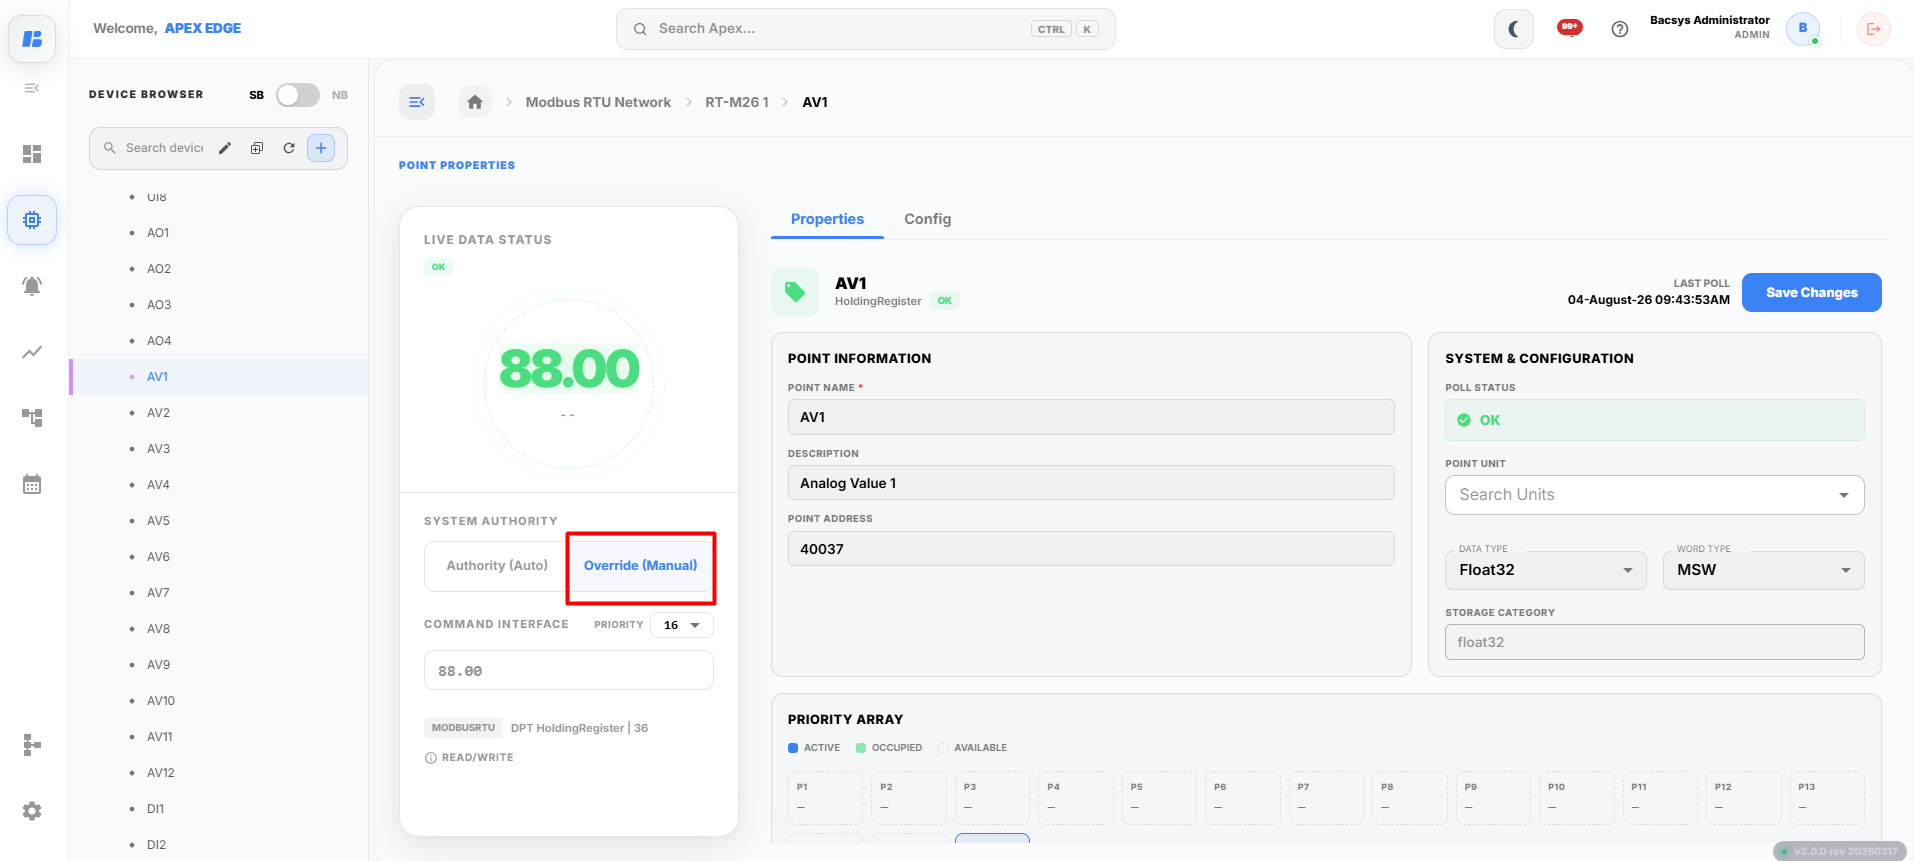
Select the required Write Point from the Device Browser.
-
Click Override.
The Override dialog box appears.
-
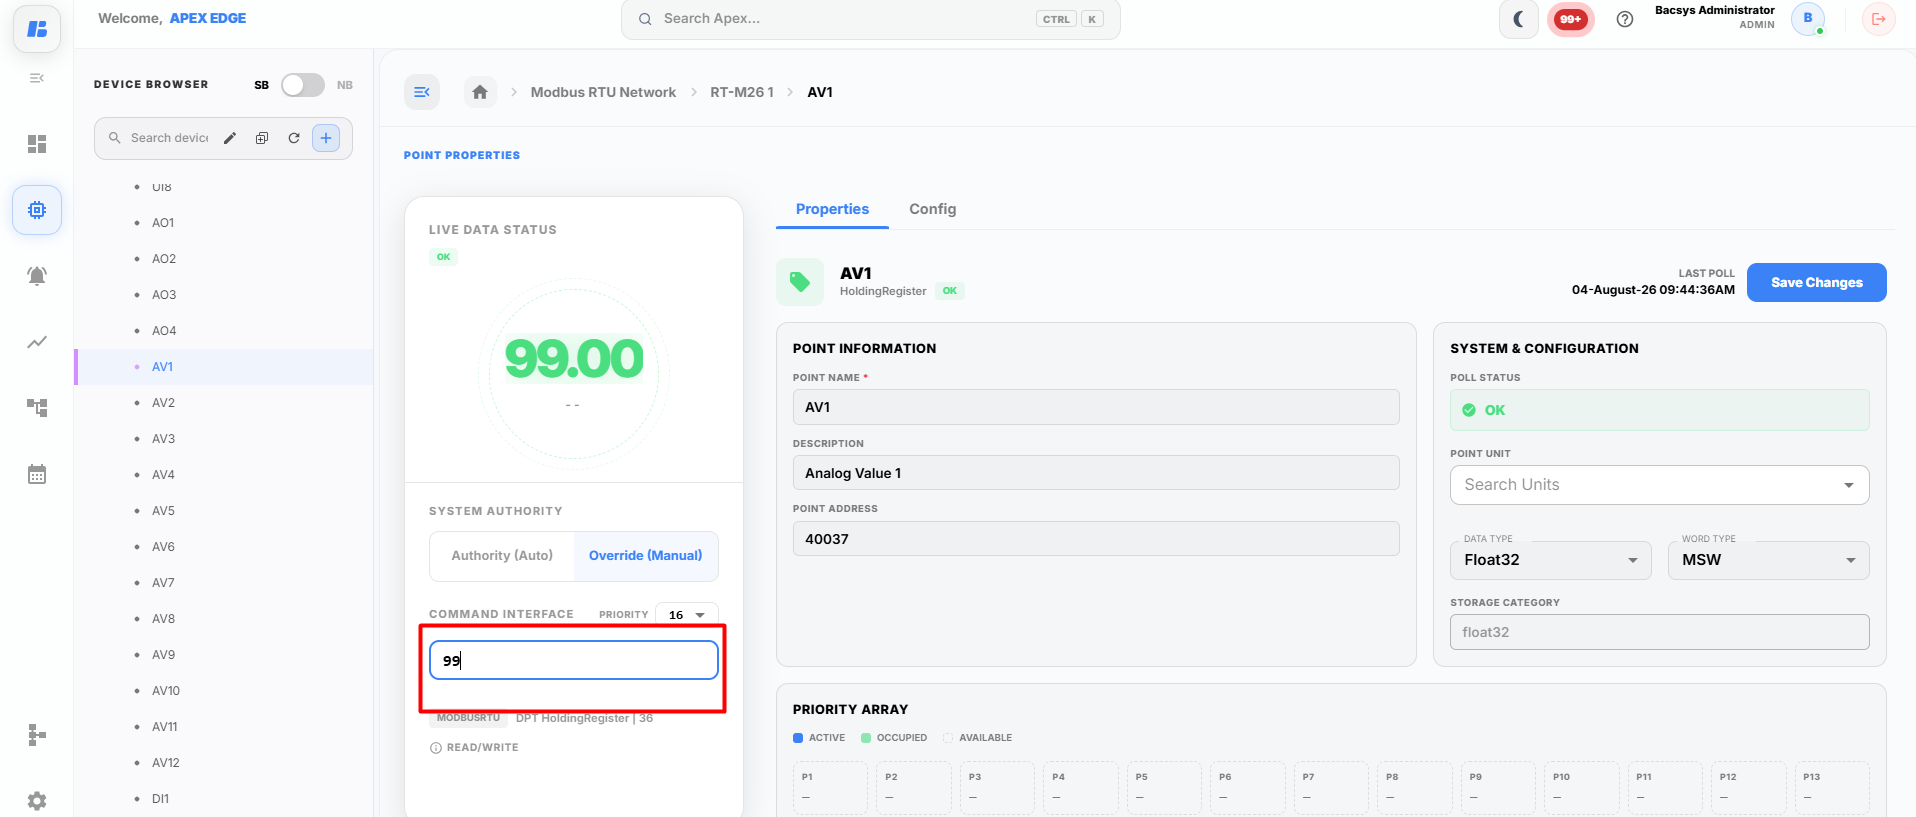
Enter the required value manually.
-
Click Write.
The entered value is written to the configured Modbus RTU register, and the device is updated accordingly.
Point Properties
After adding the required points, select a point from the Modbus RTU Device in the Device Browser.
The Point Properties page opens, allowing you to view the live value of the point, configure its properties, and perform write operations for read/write points.
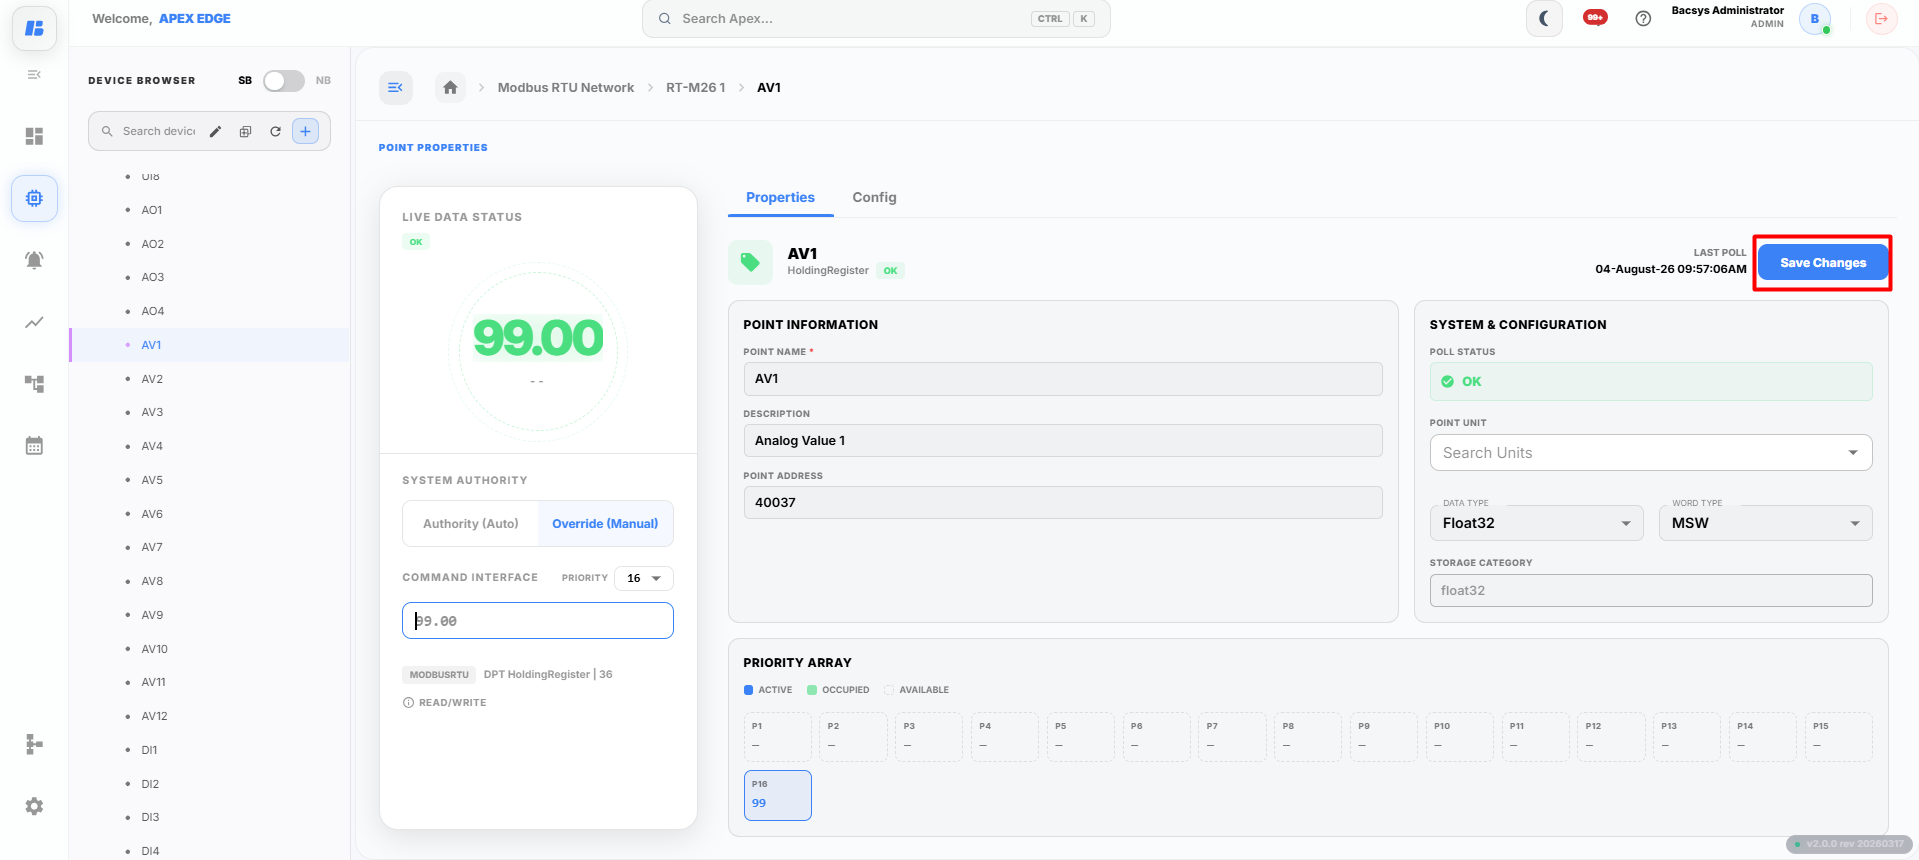
The point page contains two tabs:
- Properties
- Config
Properties
The Properties tab displays the current status and configuration of the selected point.
Live Data Status
The Live Data Status section displays the current value received from the Modbus RTU device along with its communication status.
It also provides:
- Current live value
- Communication status
- System authority
- Command interface
System Authority
The System Authority section determines how the point value is controlled.
The following options are available:
- Authority (Auto) – The point value is automatically updated based on the value received from the Modbus RTU device.
- Override (Manual) – Allows you to manually write a value to the selected point.
Command Interface
The Command Interface is used to write values to Read/Write points.
To manually update a point value:
- Click Override (Manual).
- Enter the required value in the Command Interface field.
- Select the required Priority.
- Click Save Changes.
The entered value is written to the configured Modbus RTU register.
Point Information
The Point Information section displays the basic information of the selected point.
| Field | Description |
|---|---|
| Point Name | Displays the name of the point. You can modify the point name if required. |
| Description | Enter or update a description for the point. |
| Point Address | Displays the Modbus register address associated with the point. |
System & Configuration
The System & Configuration section displays the configuration details of the selected point.
| Field | Description |
|---|---|
| Poll Status | Displays the communication status of the point. |
| Point Unit | Select the engineering unit for the point value. |
| Data Type | Displays or selects the data type of the point. |
| Word Type | Displays the word order used for the selected data type. |
| Storage Category | Displays the storage type used for the point value. |
Priority Array
The Priority Array displays the current command priorities assigned to the selected point.
The priority array consists of sixteen priority levels (P1–P16). The active priority is highlighted, indicating which priority level is currently controlling the point.
After making the required changes, click Save Changes to update the point configuration.
Point Configuration
After opening a point, click the Config tab to configure the operational settings of the selected point.
The Config tab contains the following sections:
- General
- Alarms
- Trends
- Tags
General
The General section allows you to configure how the point value is processed before it is displayed.
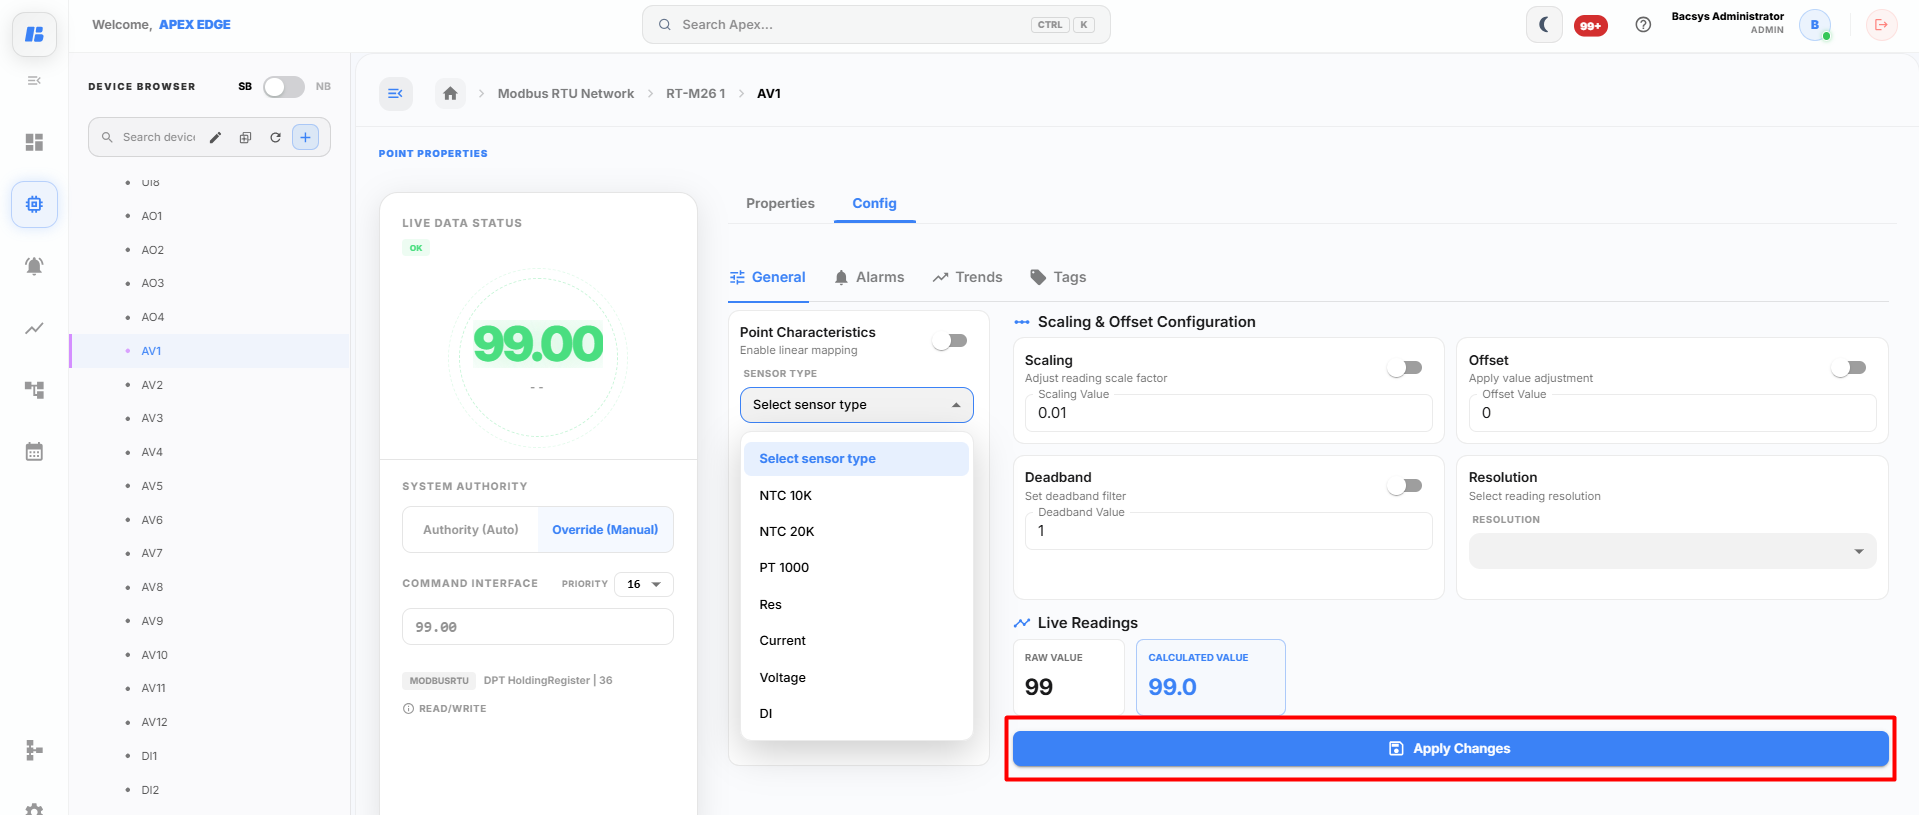
Point Characteristics
Enable Linear Mapping to convert the raw input value into the required engineering range.
Configure the following settings:
| Field | Description |
|---|---|
| Sensor Type | Select the appropriate sensor type for the point. Available options include NTC 10K, NTC 20K, PT1000, Resistance, Current, Voltage, and DI. |
Scaling
Enable Scaling to multiply the incoming point value by a scaling factor.
| Field | Description |
|---|---|
| Scaling Value | Specifies the multiplier applied to the point value. |
Offset
Enable Offset to adjust the calculated value by adding or subtracting a fixed value.
| Field | Description |
|---|---|
| Offset Value | Specifies the value added to or subtracted from the calculated value. |
Deadband
Enable Deadband to ignore small changes in the point value.
| Field | Description |
|---|---|
| Deadband Value | Specifies the minimum value change required before the point value is updated. |
Resolution
The Resolution setting determines the number of decimal places used when displaying the point value.
Select the required resolution from the available options.
Live Readings
The Live Readings section displays the current value of the selected point.
| Reading | Description |
|---|---|
| Raw Value | Displays the value received directly from the Modbus RTU device. |
| Calculated Value | Displays the processed value after applying scaling and offset. |
After configuring the required settings, click Apply Changes to save the configuration.
Alarms
The Alarms section allows you to configure alarm thresholds for the selected point.
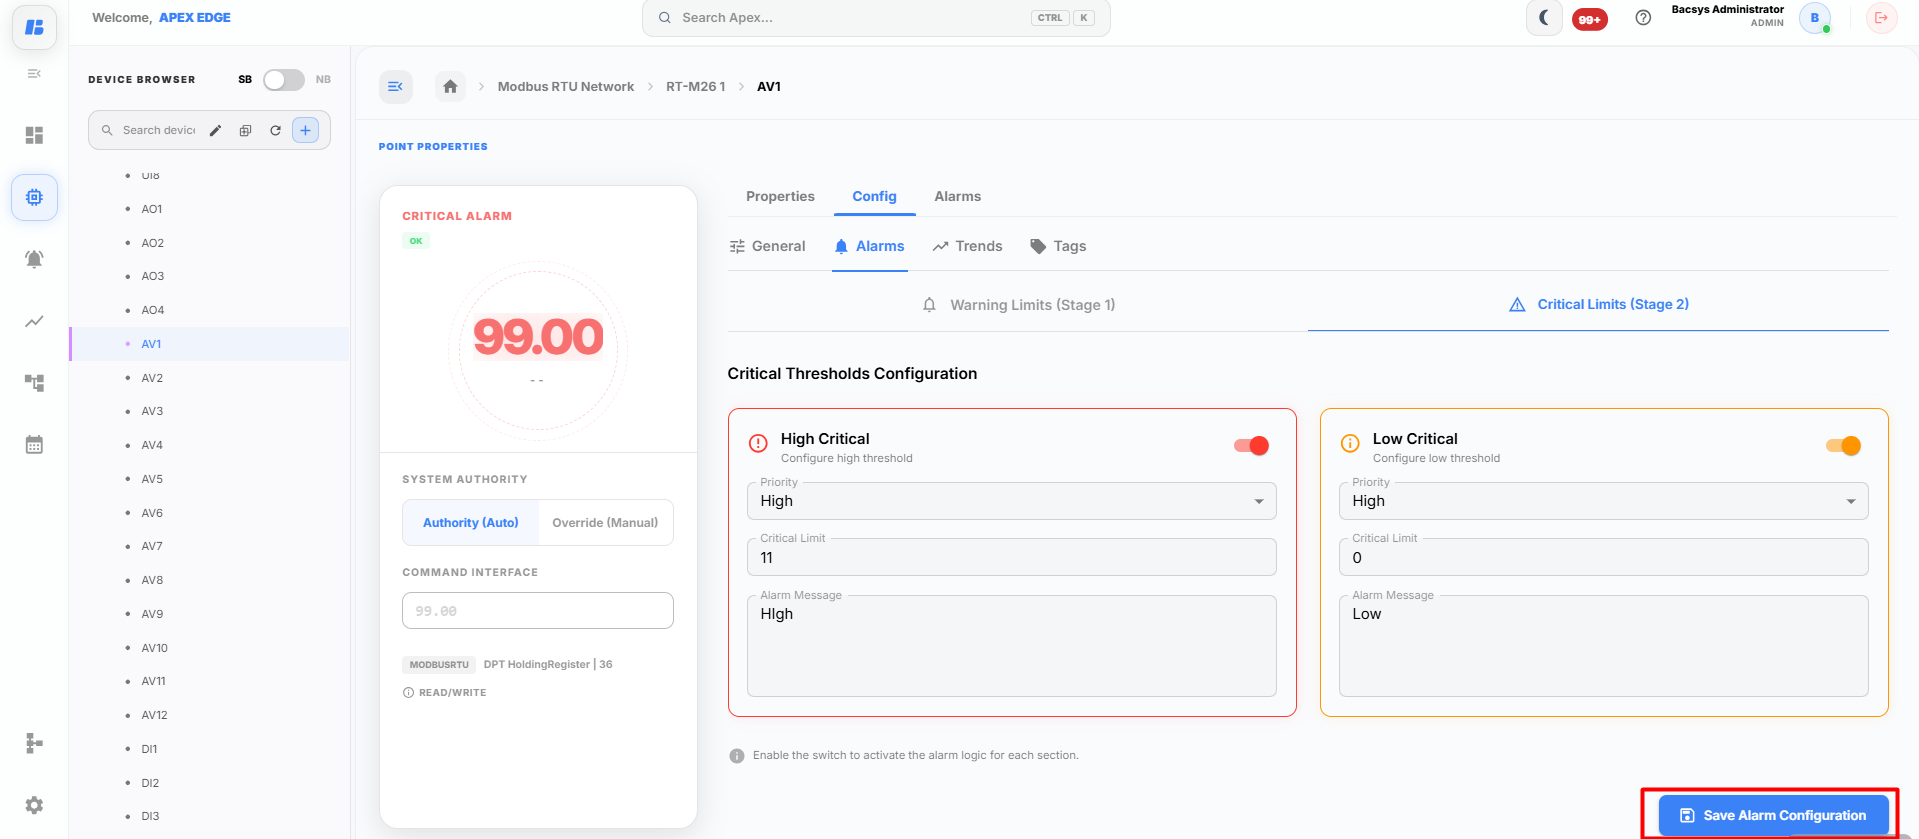
The following alarm types are available:
- High Critical
- Low Critical
For each alarm, configure the following settings:
| Field | Description |
|---|---|
| Enable | Enables or disables the alarm. |
| Priority | Select the alarm priority. |
| Critical Limit | Specifies the threshold value that triggers the alarm. |
| Alarm Message | Enter the message displayed when the alarm is triggered. |
After configuring the required settings, click Save Alarm Configuration.
Trends
The Trends section allows you to configure historical data logging for the selected point.
Data Logging
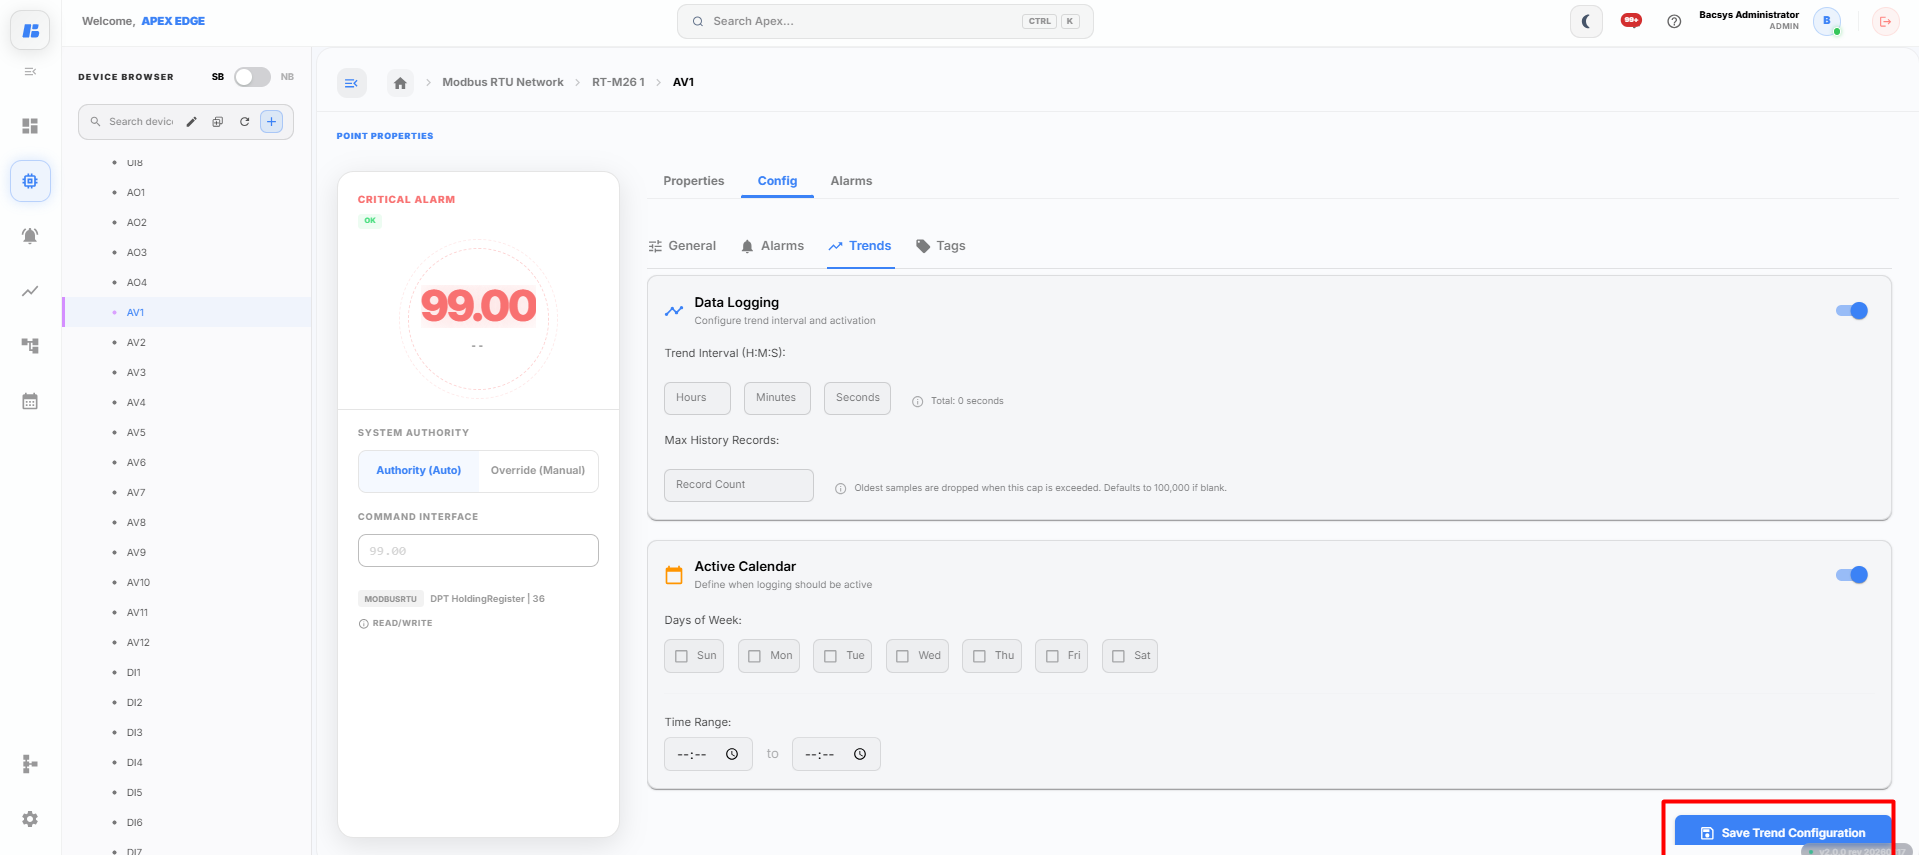
Enable Data Logging and configure the following settings:
| Field | Description |
|---|---|
| Trend Interval | Specifies how frequently the point value is recorded. |
| Max History Records | Specifies the maximum number of records to retain. |
Active Calendar
The Active Calendar allows you to configure when trend logging is active.
Configure:
- Days of the week
- Start Time
- End Time
After completing the configuration, click Save Trend Configuration.
Tags
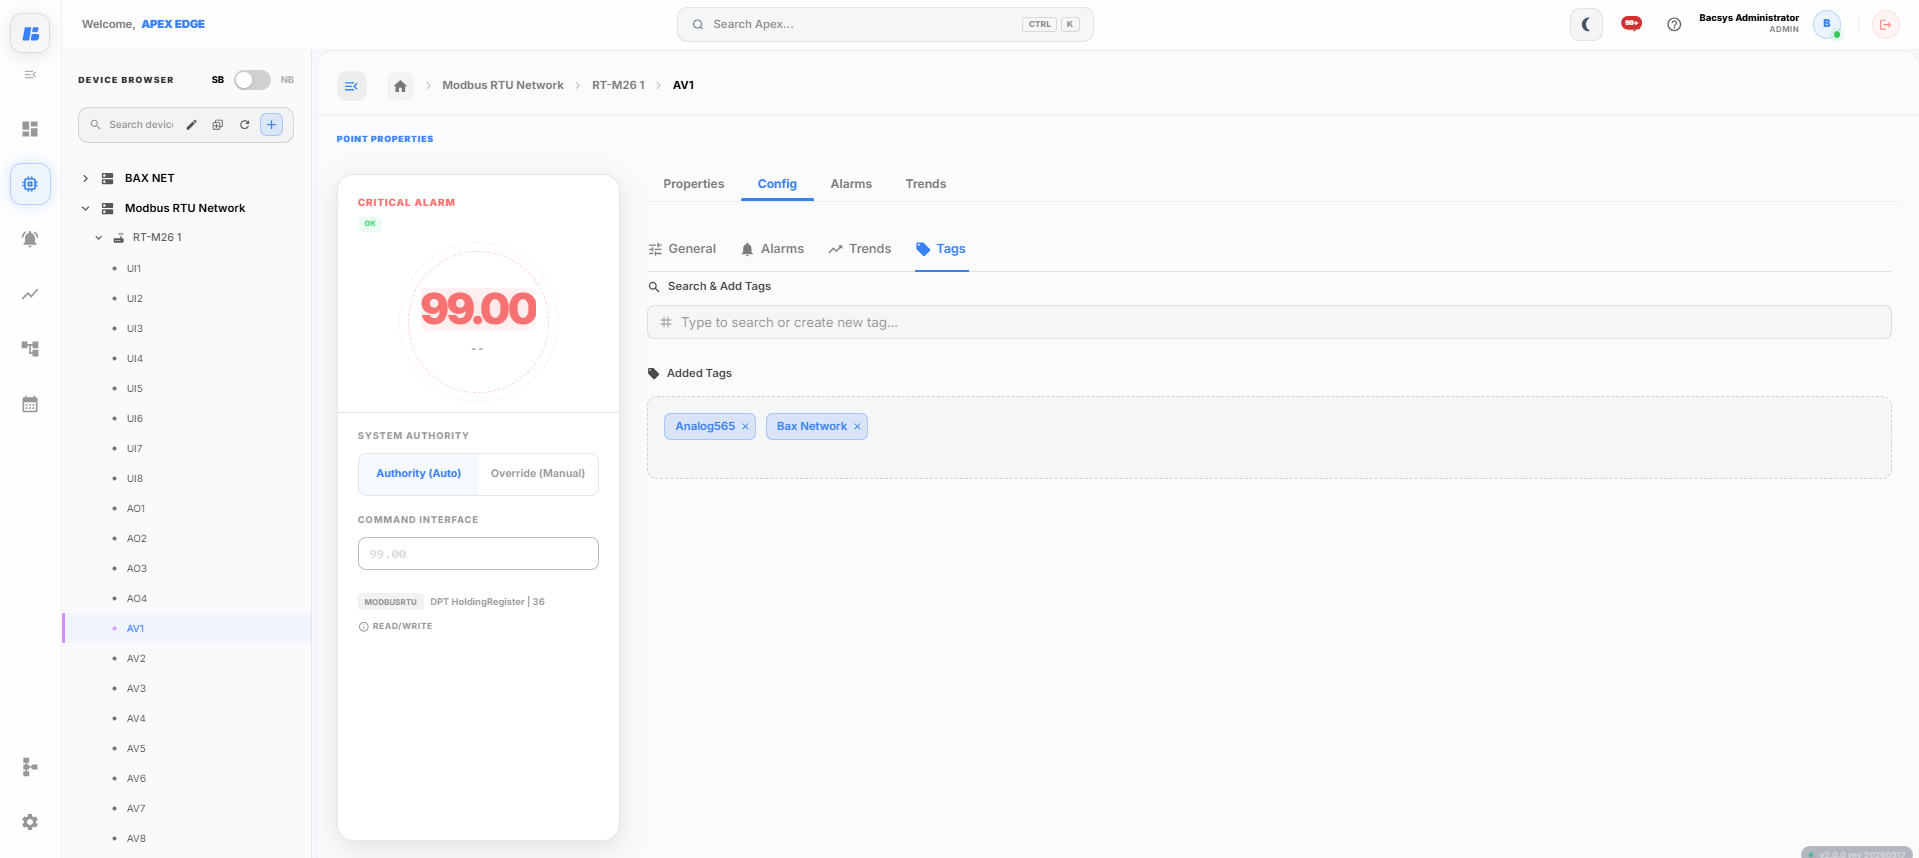
The Tags section allows you to organize and categorize points using custom tags.
To add a tag:
- Enter the tag name in the Search & Add Tags field.
- Select an existing tag or create a new tag.
- The selected tag is displayed under Added Tags.
Tags make it easier to organize, search, and filter points throughout the platform.
Alarm Status
After configuring the required alarm thresholds, click Save Alarm Configuration.
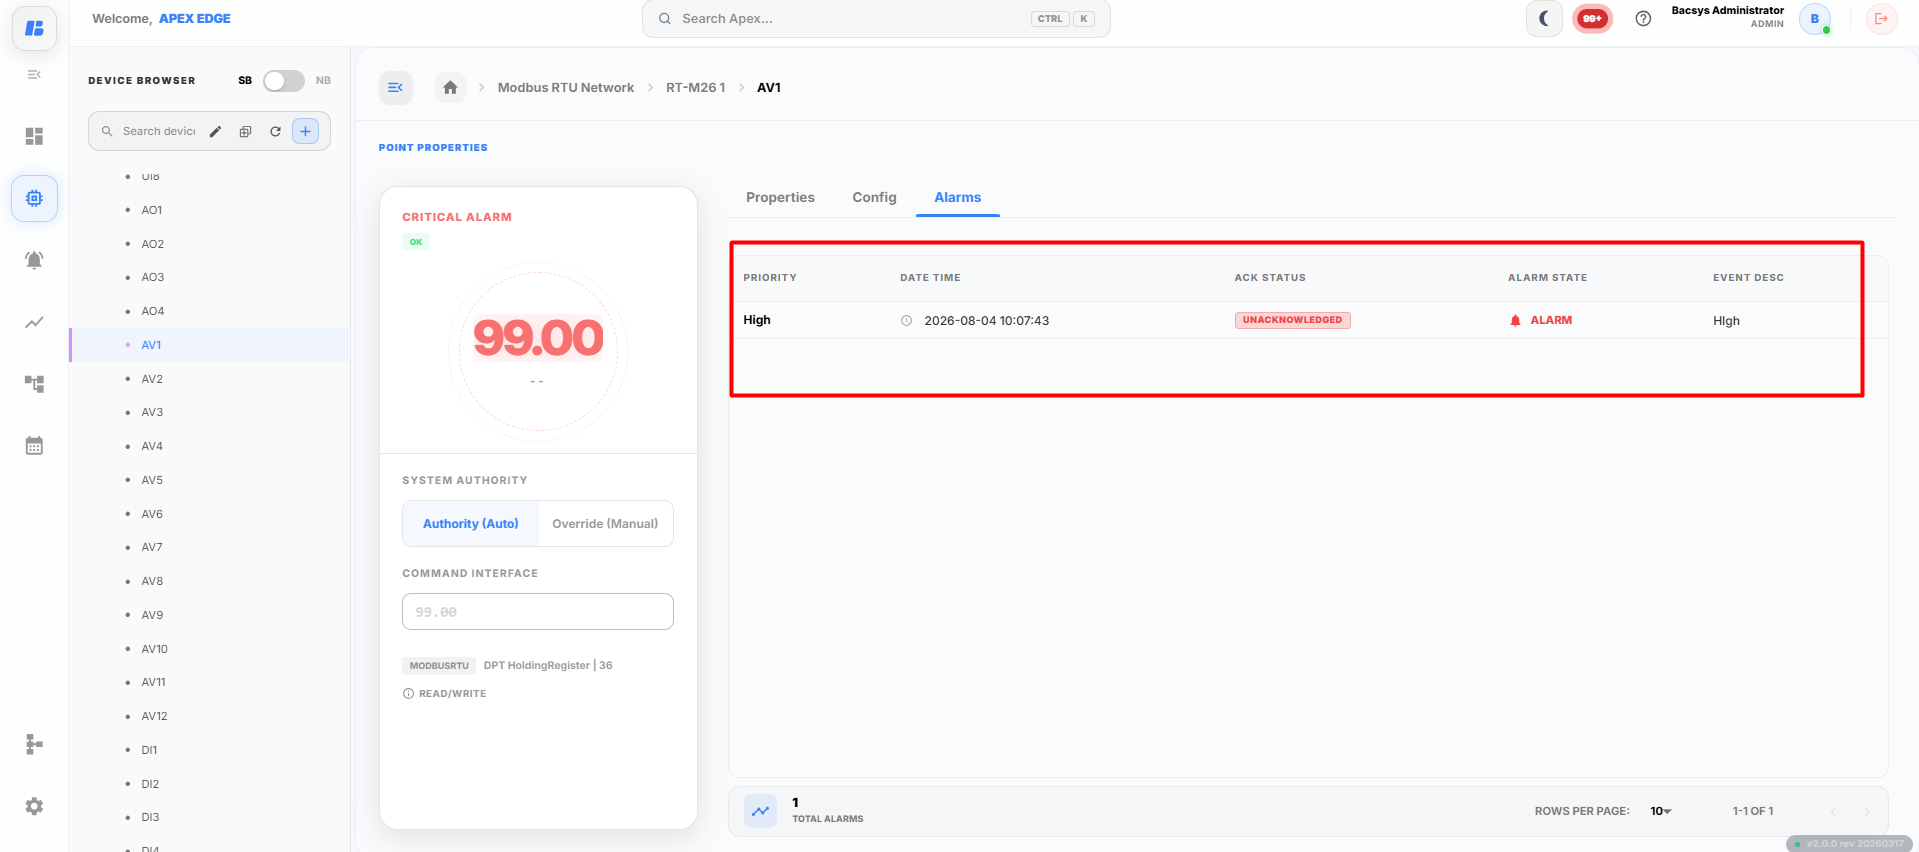
The platform continuously monitors the point value against the configured alarm limits. When the point value reaches or exceeds the configured threshold, the corresponding alarm is generated.
To view the generated alarm:
- Navigate to the Alarms module from the sidebar.
- Select the required alarm from the alarm list.
- Open the associated point to view the alarm details and current alarm status.
This allows you to verify whether the configured alarm has been triggered for the selected point.
Viewing Trends
After enabling trend logging, you can view the historical data recorded for the selected point.
Navigate to the Trends module and select the required point. The historical data is available in both Table View and Chart View.
Table View
The Table View displays the recorded values of the selected point in a tabular format.
The following options are available:
| Option | Description |
|---|---|
| Start Date | Select the start date for retrieving trend data. |
| End Date | Select the end date for retrieving trend data. |
| Export | Exports the displayed trend data as a CSV file. |
| Refresh | Reloads the trend data for the selected date range. |
| Clear | Clears the selected date range and displayed data. |
| Delta | Enables or disables delta value display. |
| Edit | Enables or disables edit mode using the toggle button. |
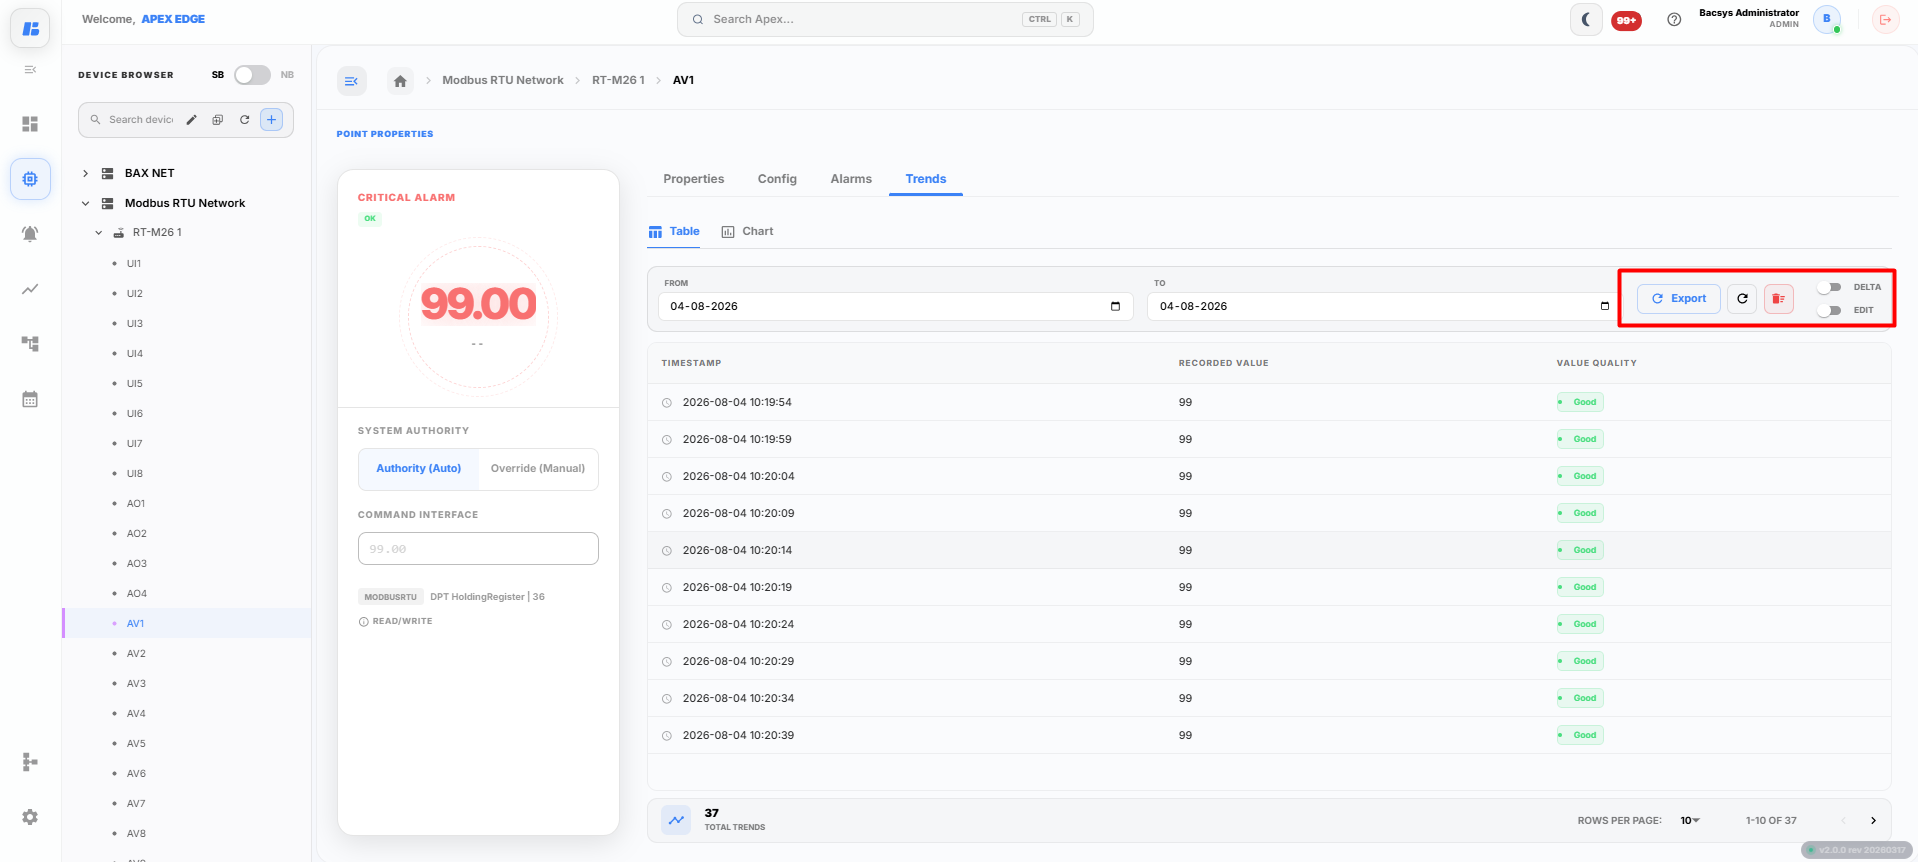
Chart View
The Chart View displays the historical values of the selected point in graphical format, making it easier to analyze value changes over time.
The following options are available:
| Option | Description |
|---|---|
| Start Date | Select the start date for displaying trend data. |
| End Date | Select the end date for displaying trend data. |
| Export | Exports the displayed chart data. |
| Refresh | Reloads the chart using the selected date range. |
| Clear | Clears the selected filters and chart data. |
| Delta | Enables or disables delta value display on the chart. |
| Edit | Enables or disables edit mode using the toggle button. |
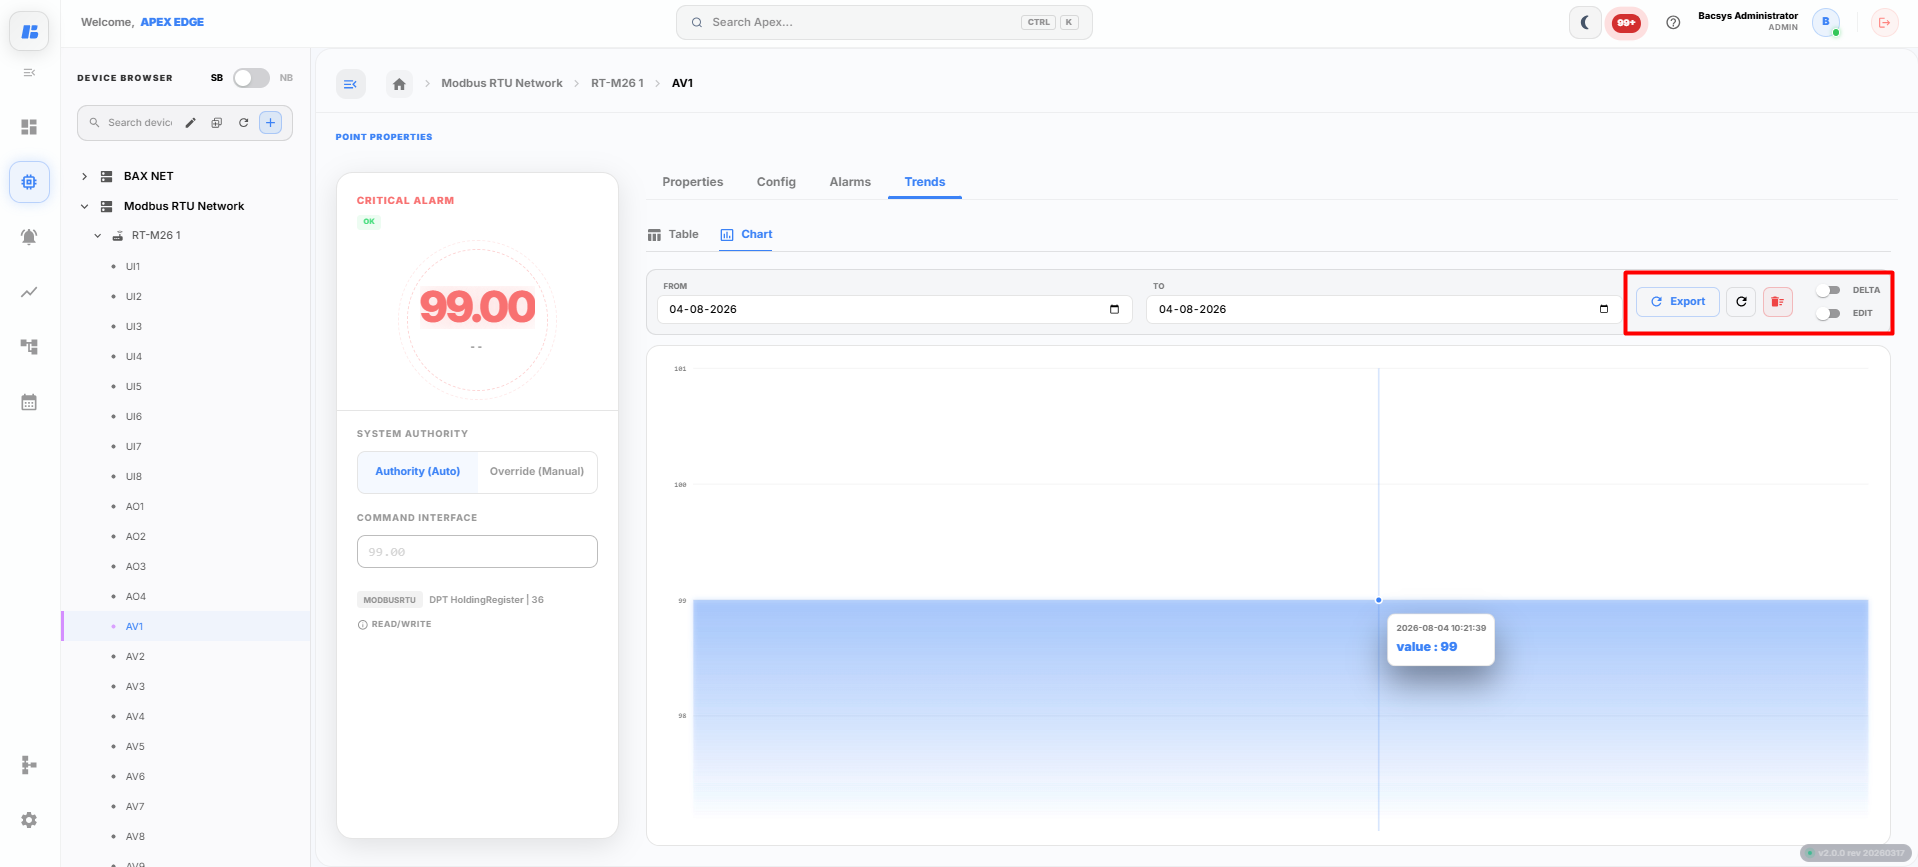
The Table View allows you to review and export historical point data in CSV format, while the Chart View provides a graphical representation of historical values, making it easier to analyze trends and monitor changes over time.
Complete Workflow
Configure a Modbus RTU network by following the workflow below:
- Open the Devices module.
- Click the + (Add) icon.
- Drag and drop Modbus RTU into the Create Network window.
- Enter the Network Name.
- Select the communication Port (RS1, RS2, or RS3).
- Configure the communication parameters:
- Baud Rate
- Parity
- Stop Bit
- Byte Size
- Timeout
- Poll Timeout
- Retries
- Retry Gap
- Skip After Retries
- Retry Every Cycle
- Click Create Network.
- Select the newly created Modbus RTU Network.
- Click Add Device.
- Add the device either Manually or From Template.
- Enter the required device details and create the device.
- Select the newly created device.
- Click Add Points.
- Add points either Manually or by Importing a CSV.
- Configure the required Read Points and Write Points.
- Click Add Selected Points.
- Select a point from the Device Browser.
- View and update the Point Properties if required.
- Configure the General, Alarms, Trends, and Tags settings from the Config tab.
- Click Apply Changes to save the General configuration.
- Click Save Alarm Configuration to save the alarm settings.
- Click Save Trend Configuration to save the trend settings.
- To write a value to a Read/Write Point, select Override (Manual), enter the required value, choose the priority, and click Save Changes.
- Verify generated alarms from the Alarms module.
- View historical point data from the Trends module using the Table View or Chart View.