Configuring OPC UA
The OPC UA section allows users to configure networks, add devices, discover points, and monitor real-time data using the OPC UA protocol.
Creating an OPC UA Network
-
Navigate to the Devices module from the sidebar.
-
Click the Create Network button.
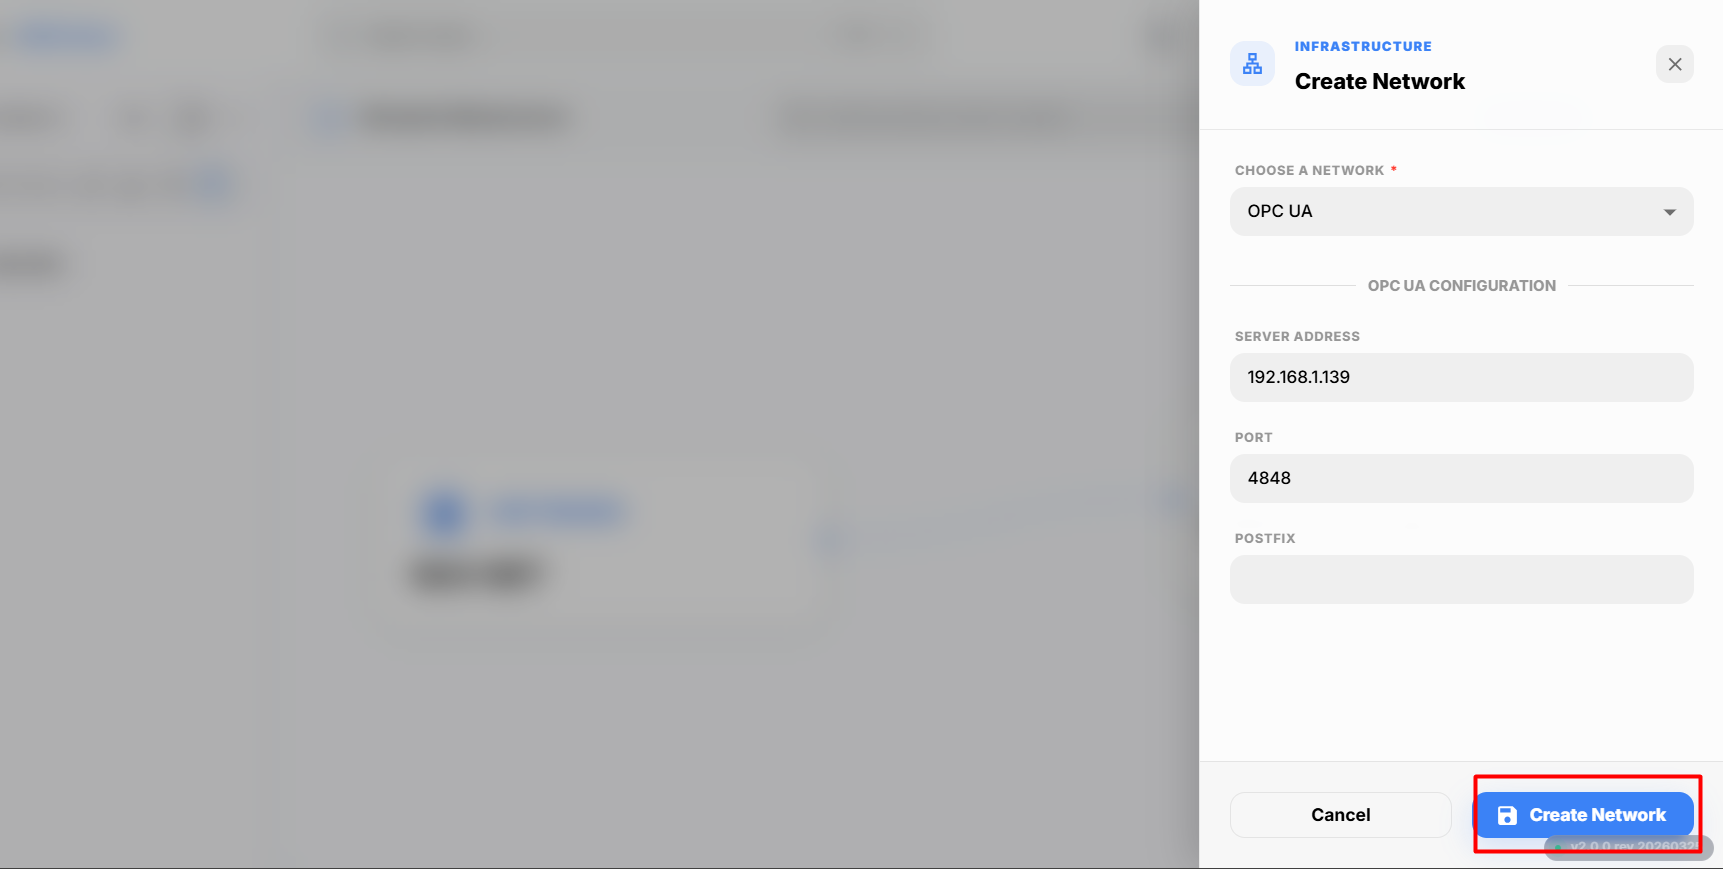
A Create Network popup appears.
-
From the Choose a Network dropdown, select OPC UA.
Enter the following network details:
Field Description Server Address Enter the IP address or hostname of the OPC UA server. Port Enter the communication port used by the OPC UA server. -
After entering the required details, click Create Network.
-
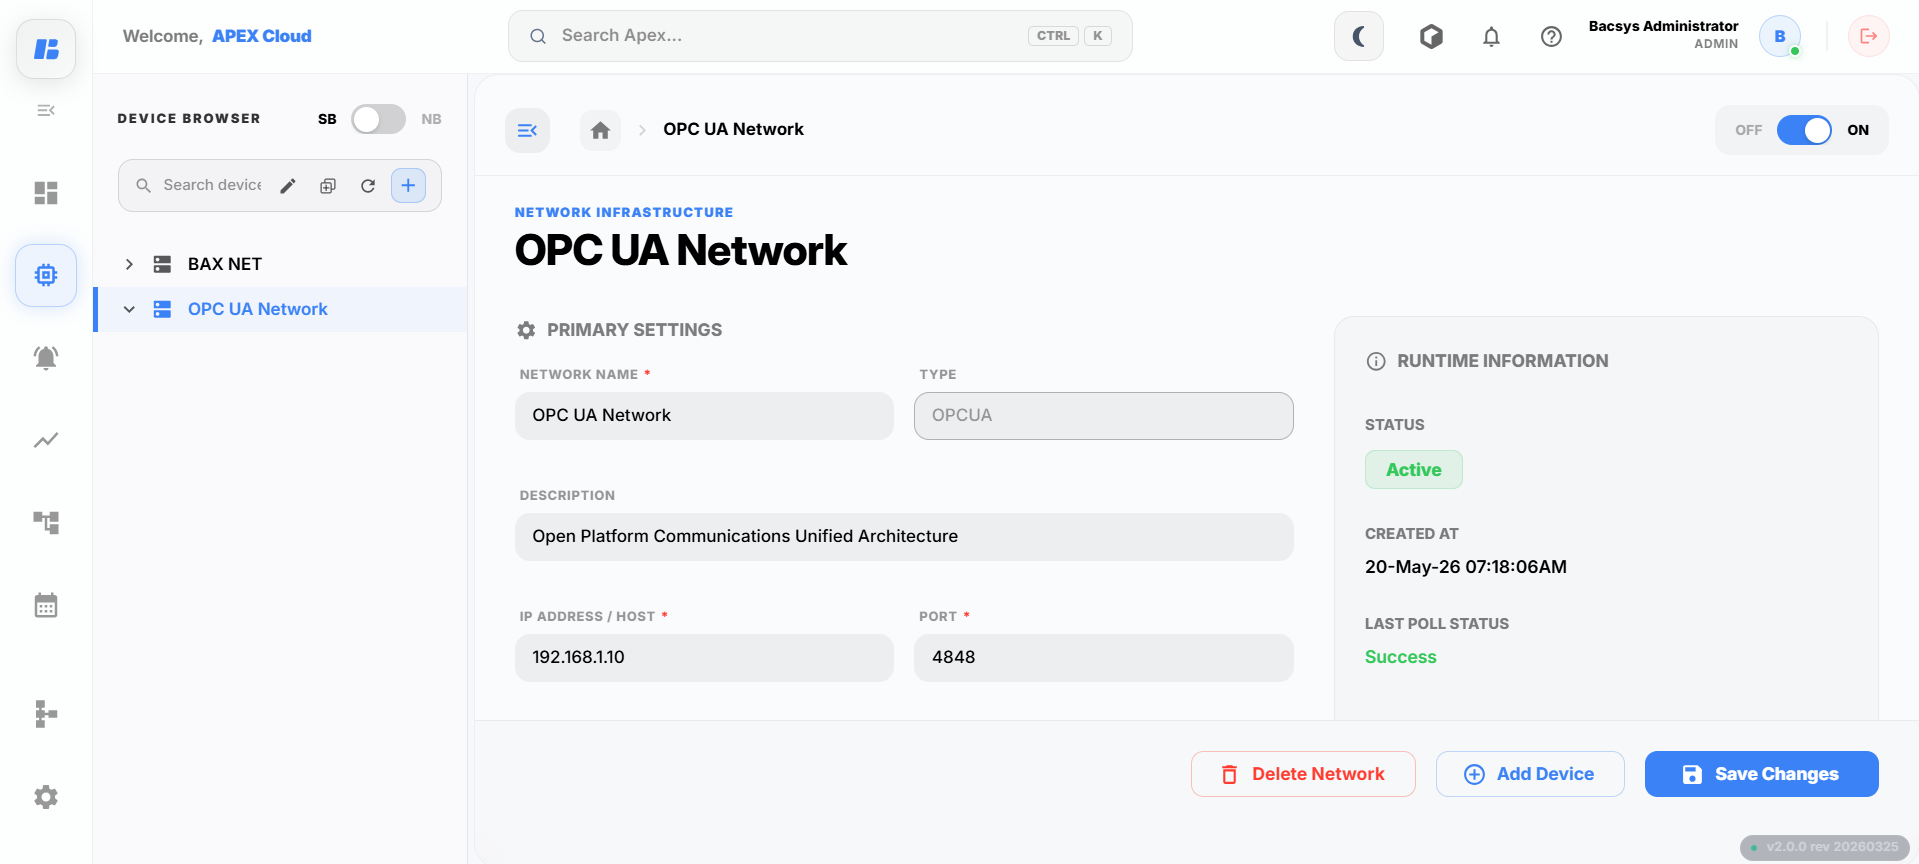
Once the network is created successfully, it is displayed in the network list.
Discovering and Adding Devices
After creating the OPC UA network, you can add devices connected to the OPC UA server.
-
Open the OPC UA network.
-
Click Add Device.
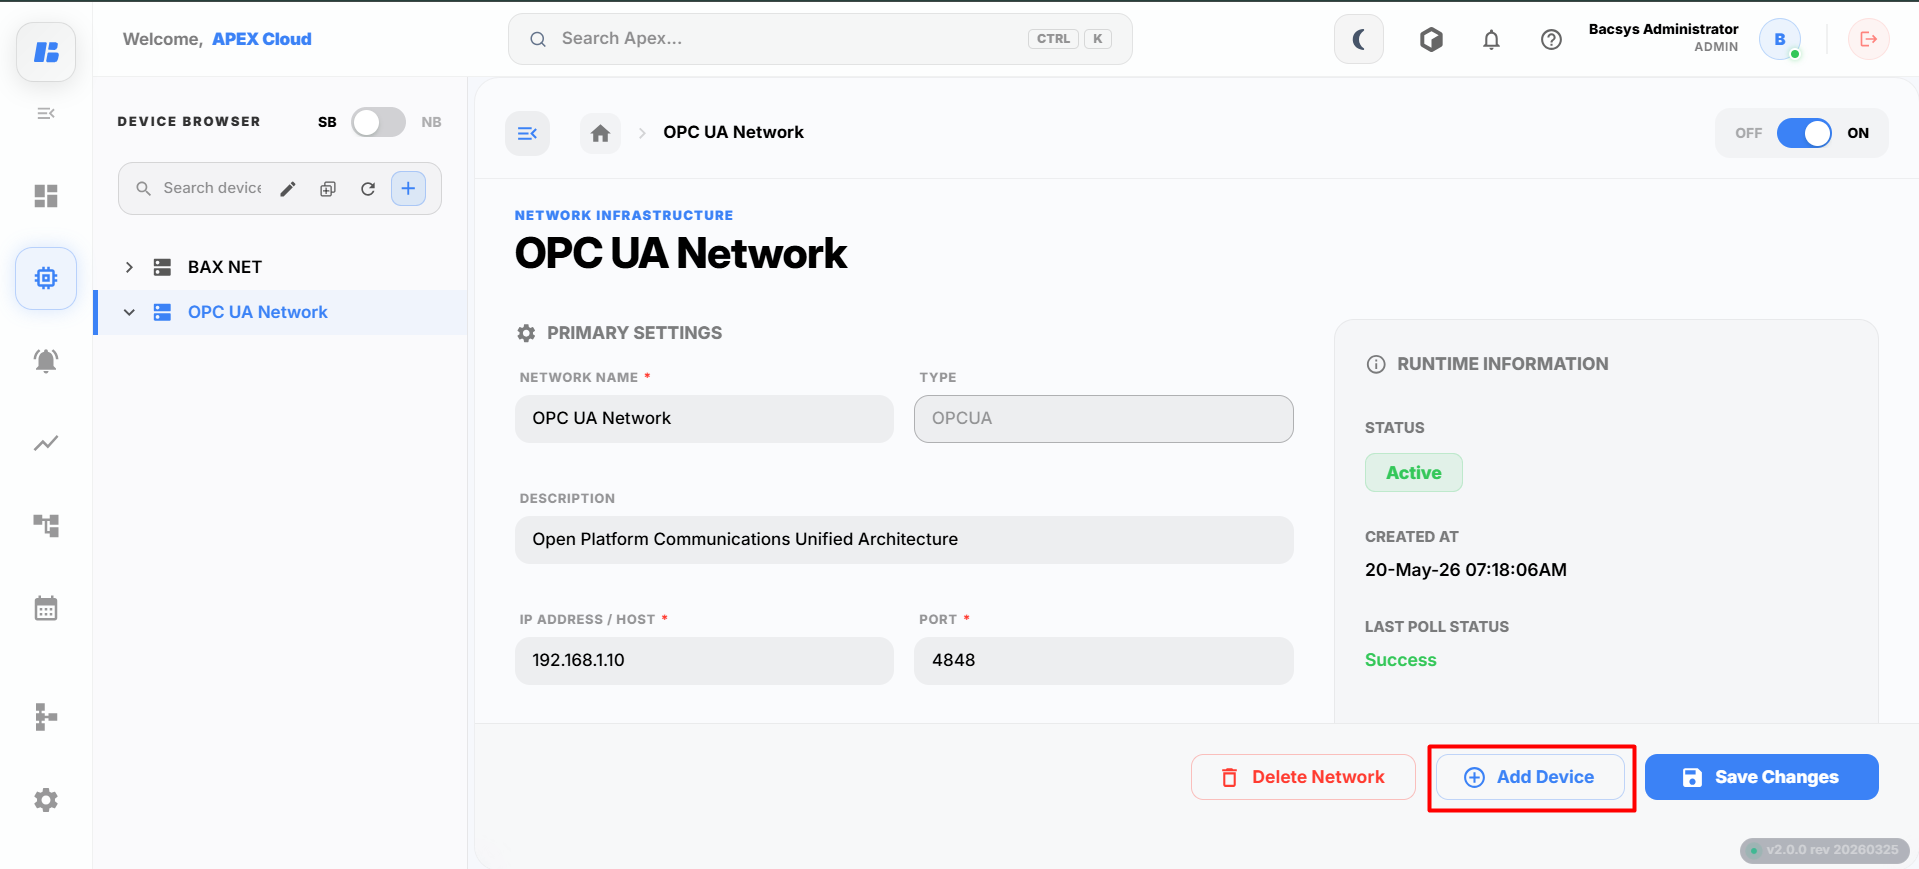
The Add Device popup appears.
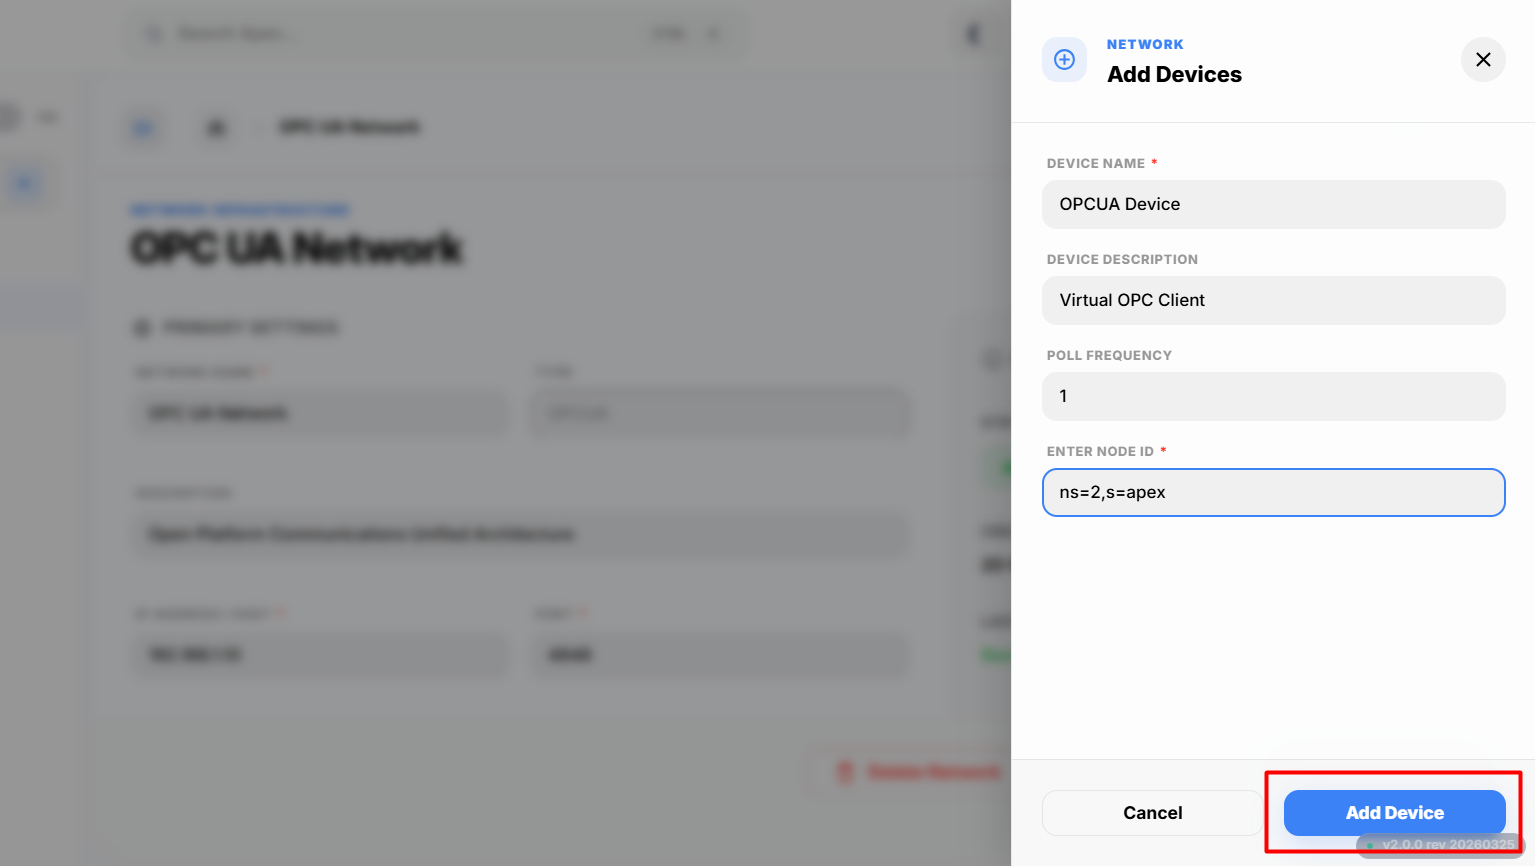
Enter the following device details:
Field Description Device Name Enter a unique name to identify the device. Device Description Enter a brief description of the device. Poll Frequency Specify how frequently APEX should poll the OPC UA server for updated values. Node ID Enter the OPC UA Node ID associated with the device. -
Click Add Device.
The device is added successfully and is displayed under the selected OPC UA network.
Discovering and Adding Points
After adding the device, you can discover and add the required points.
-
Open the OPC UA device.
-
Click Add Points.
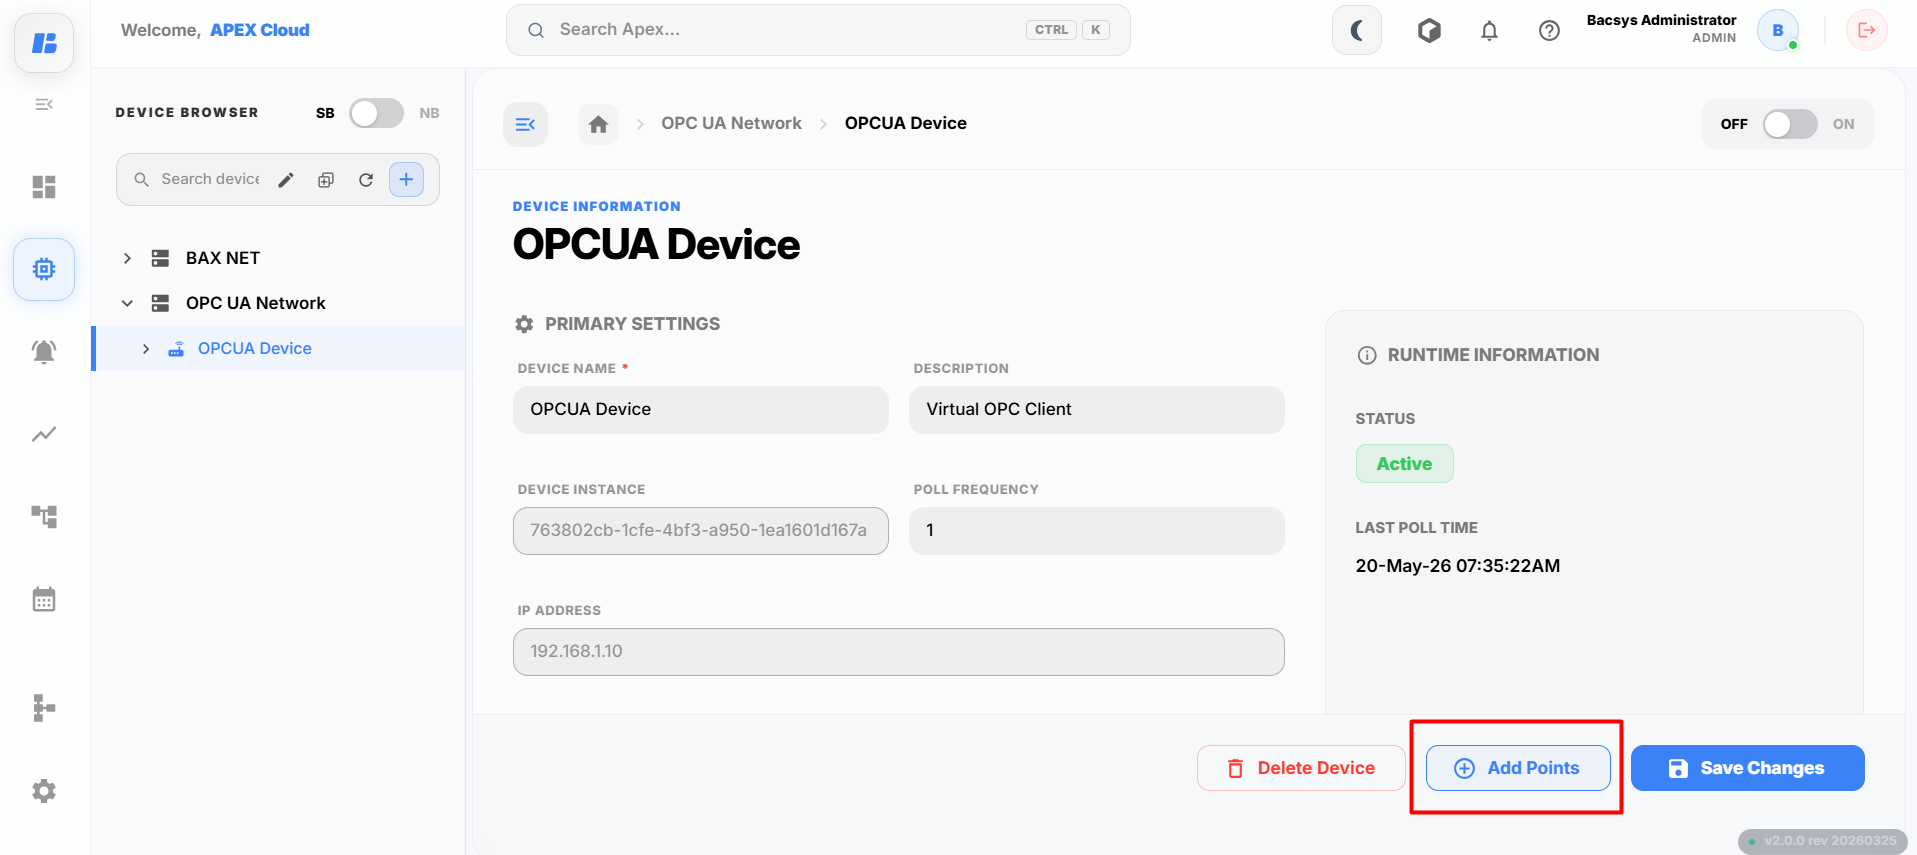
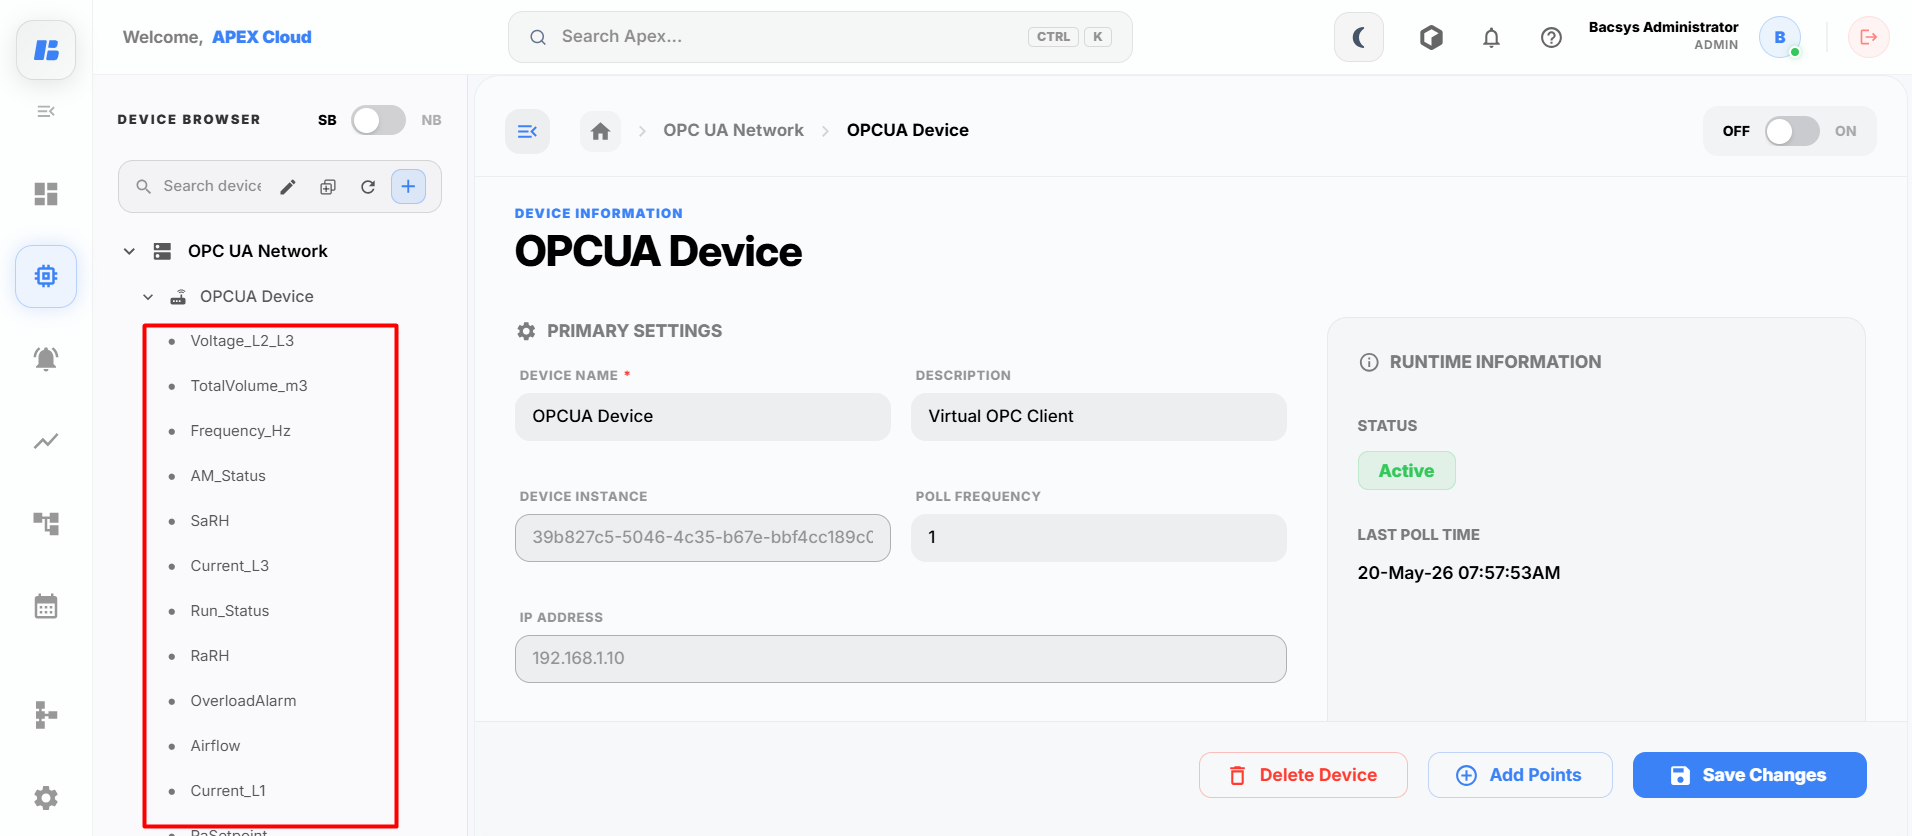
The Points Discovery window displays all the available points.
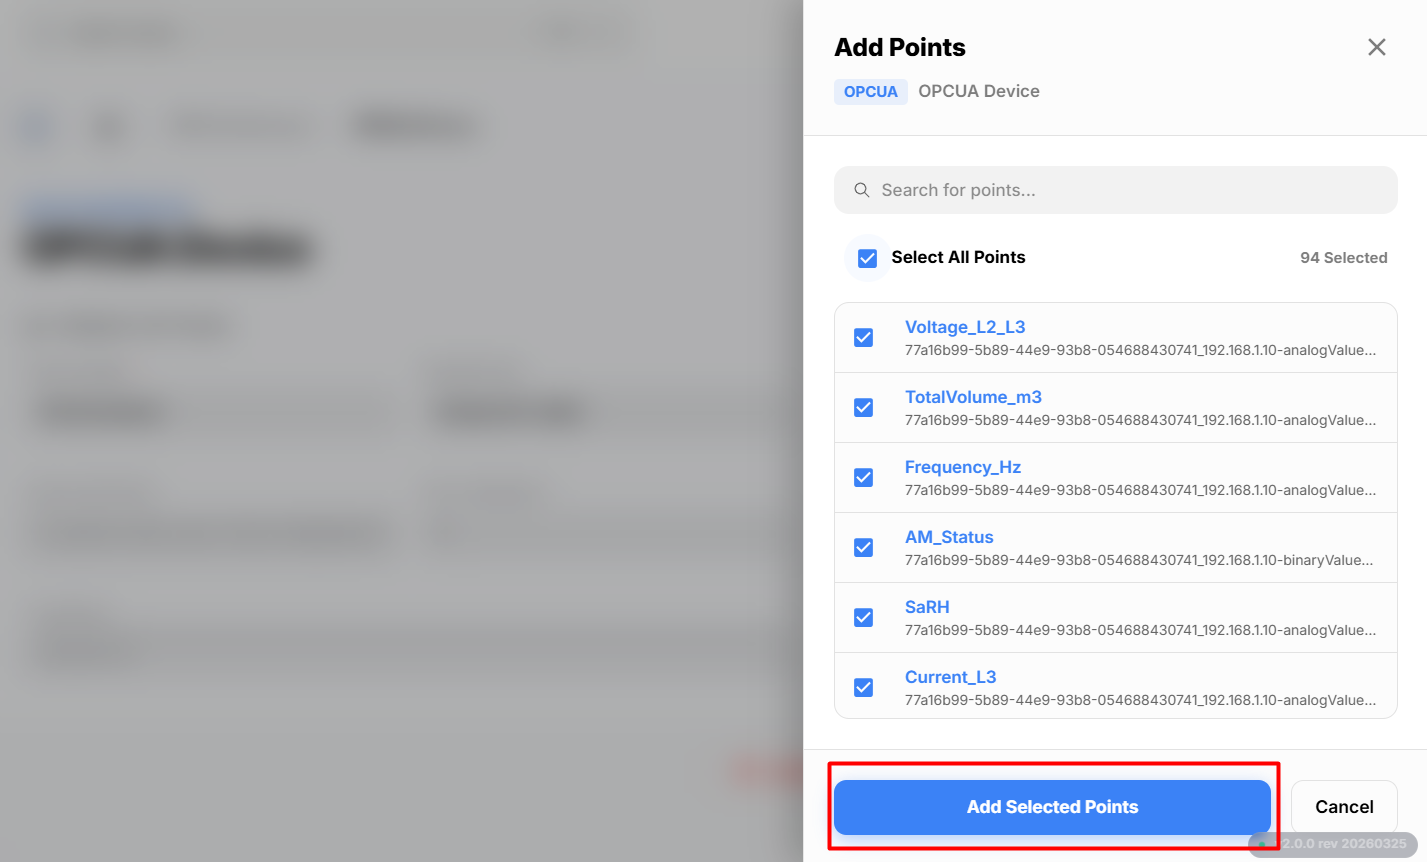
Select the required points or click Select All Points to add every available point.
Click Add Selected Points.
-
The selected points are added to the device.
-
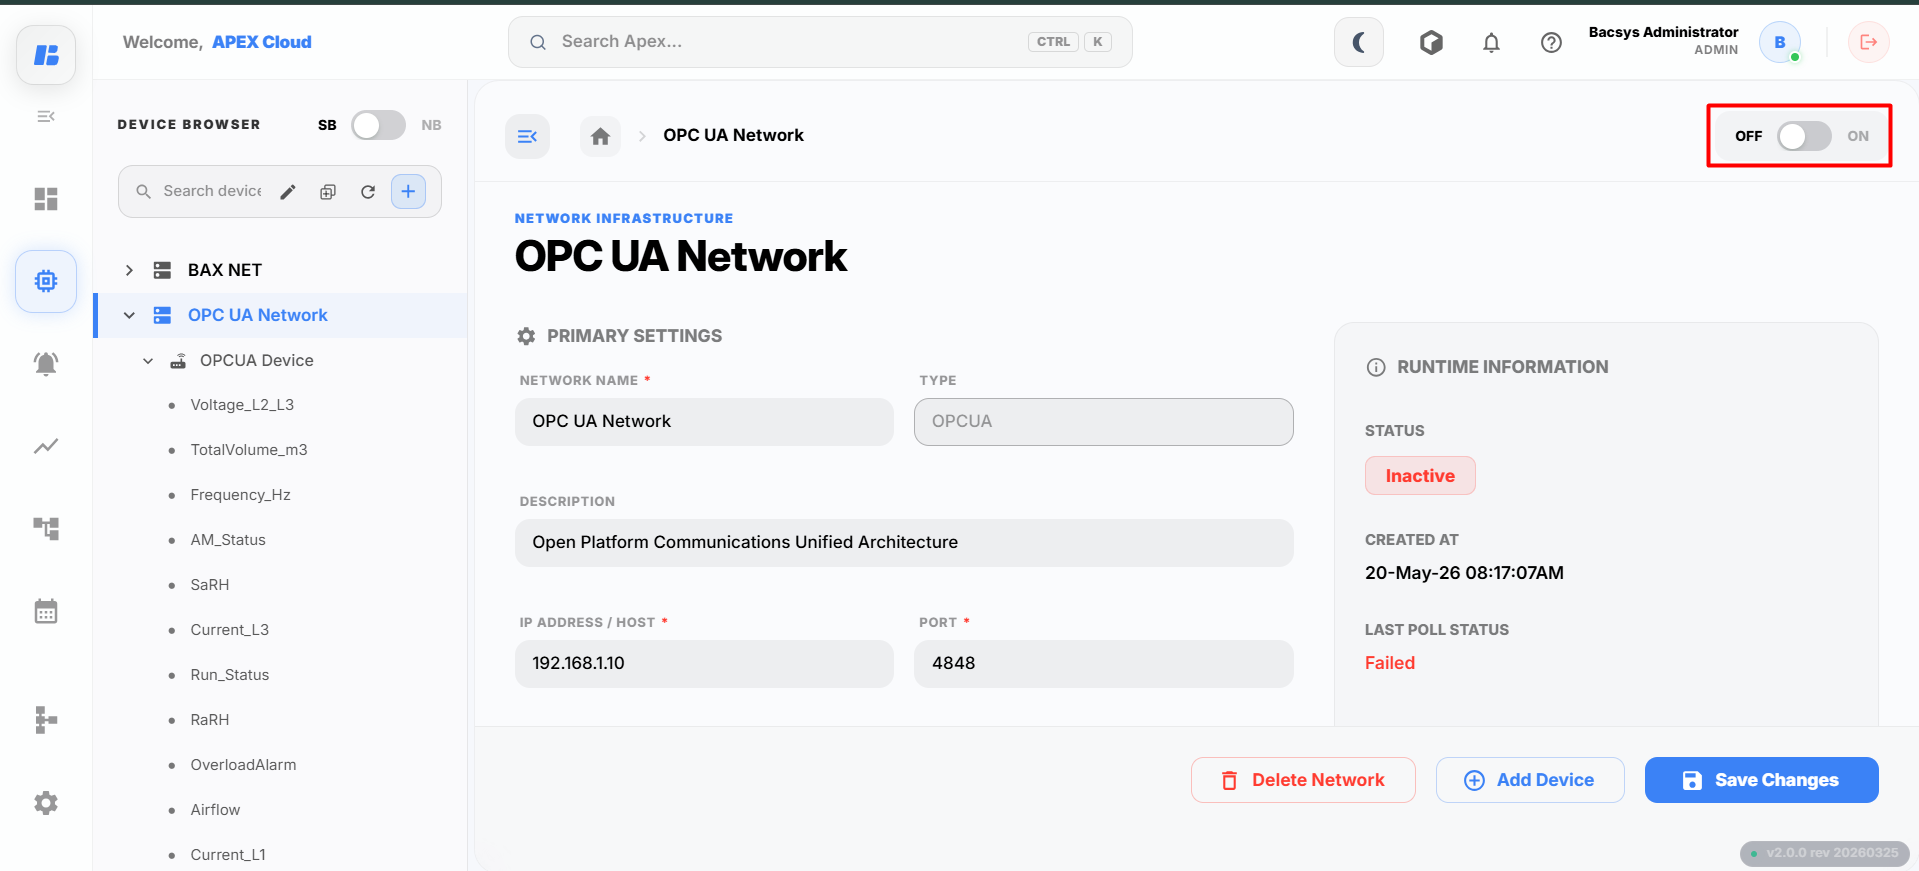
Enable the network by switching the ON/OFF toggle to ON.
Once enabled:
- The OPC UA network becomes active.
- Communication with the OPC UA server starts.
- Live point values begin updating automatically.
Navigating Through Points
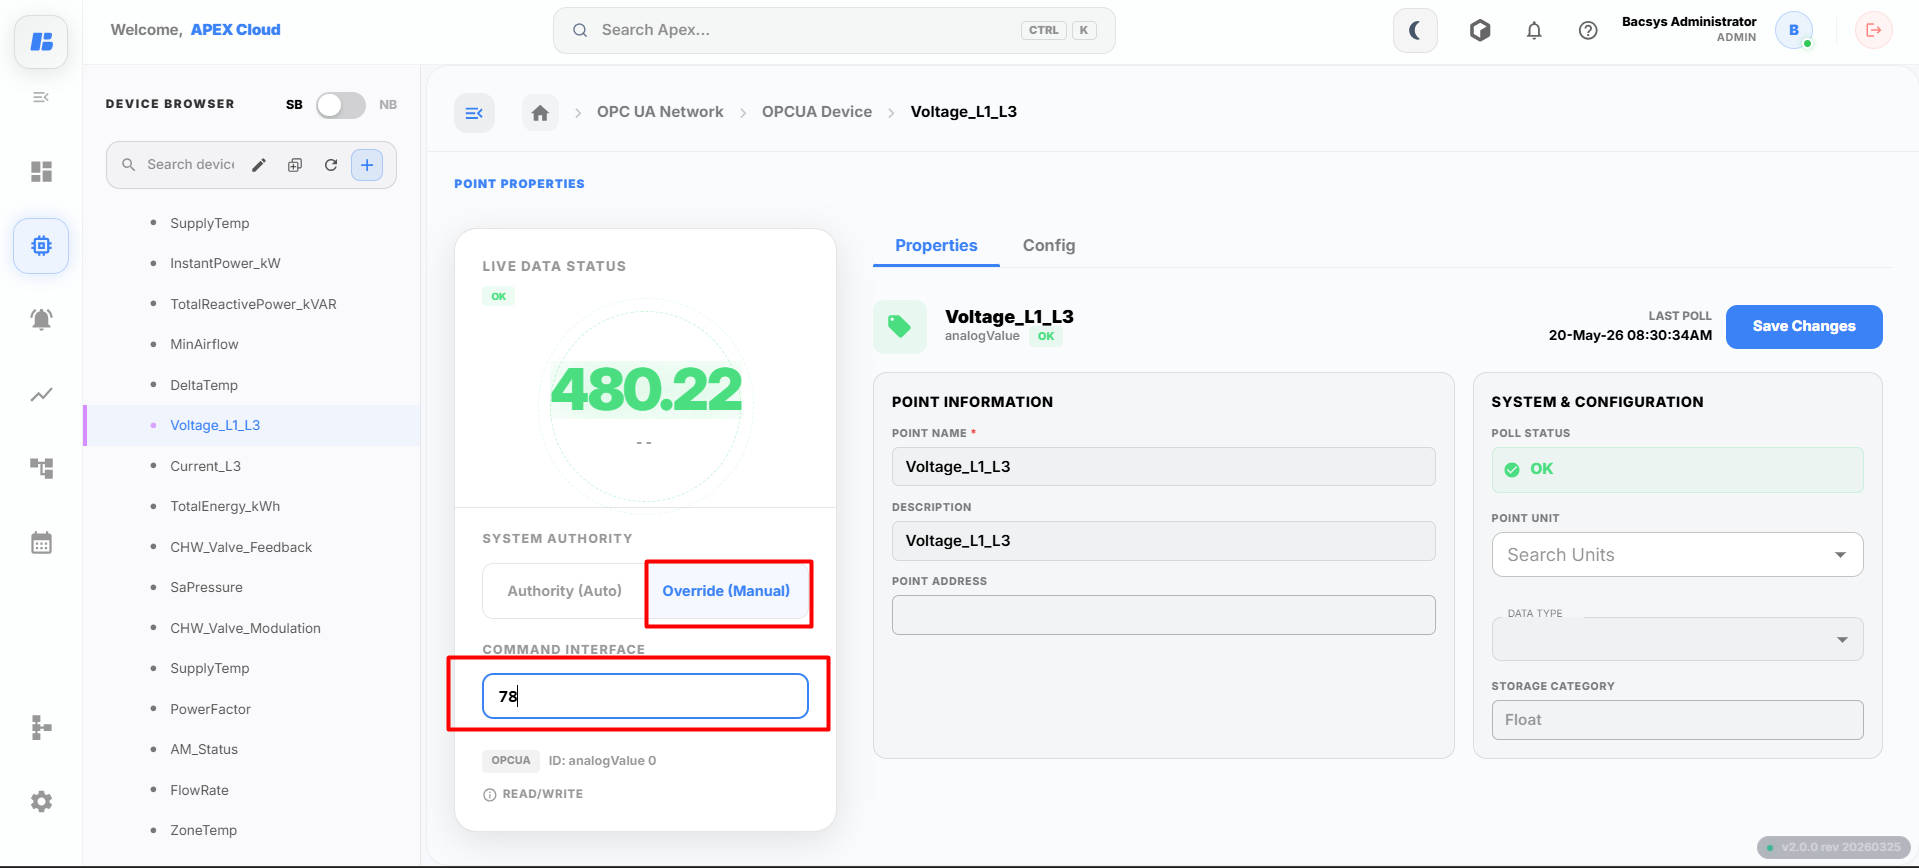
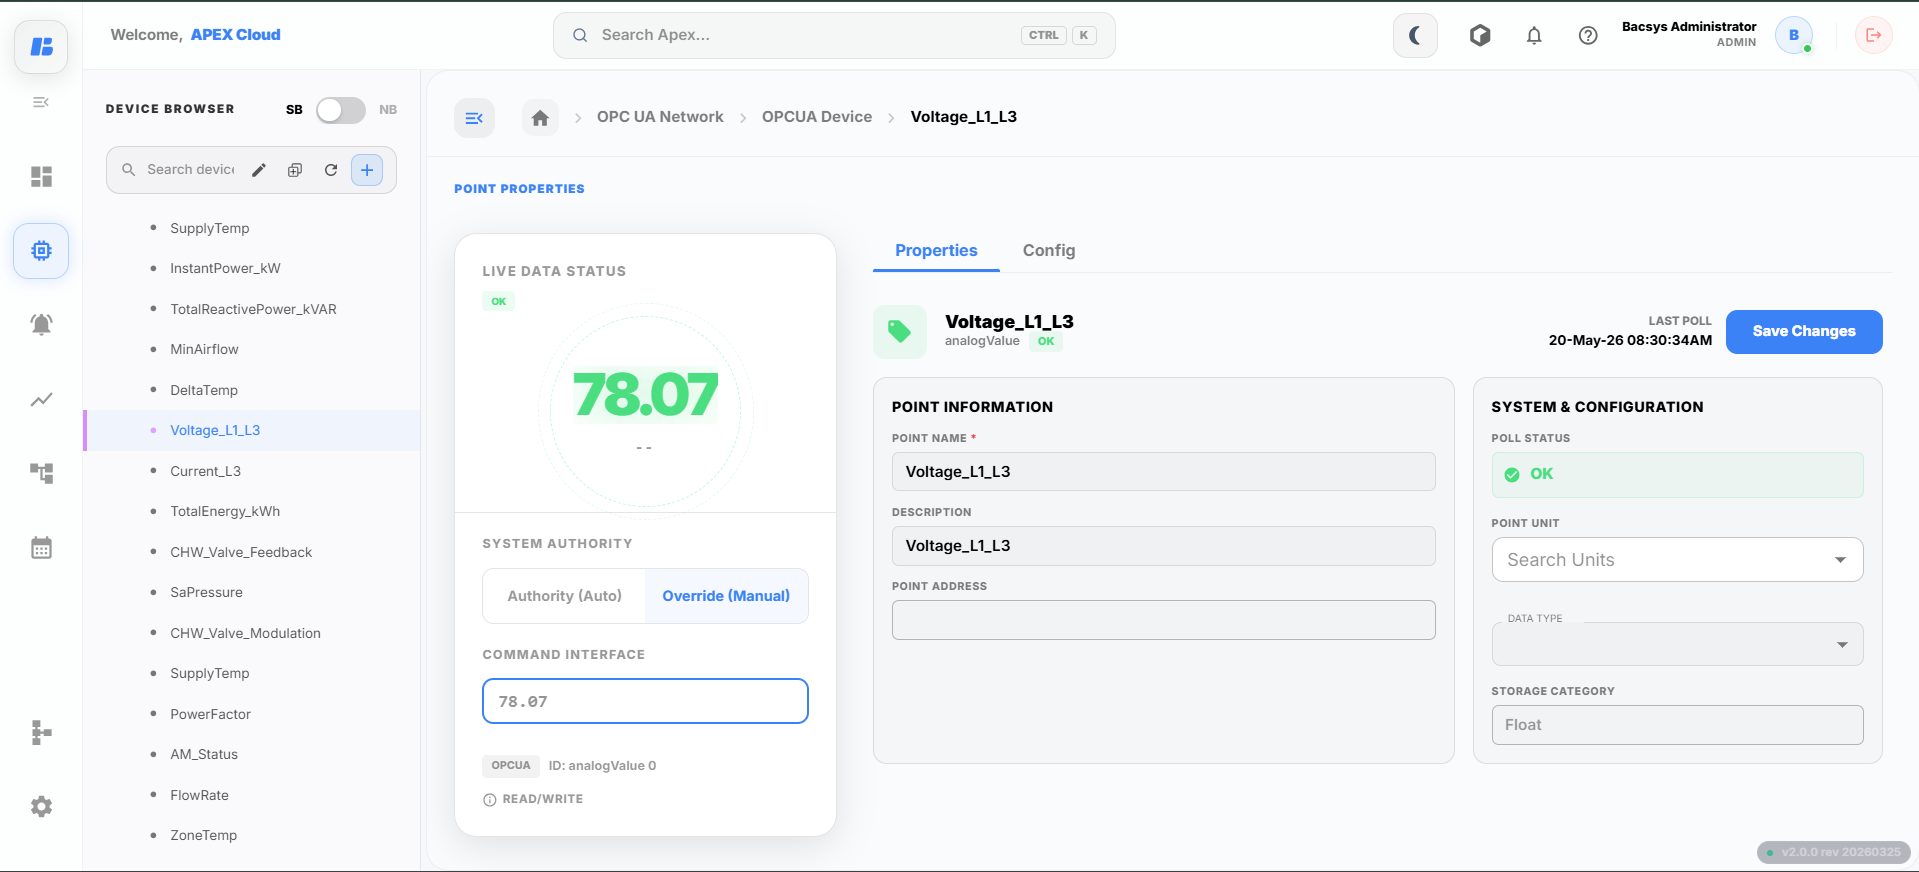
Click any point from the device to view its properties and live values.
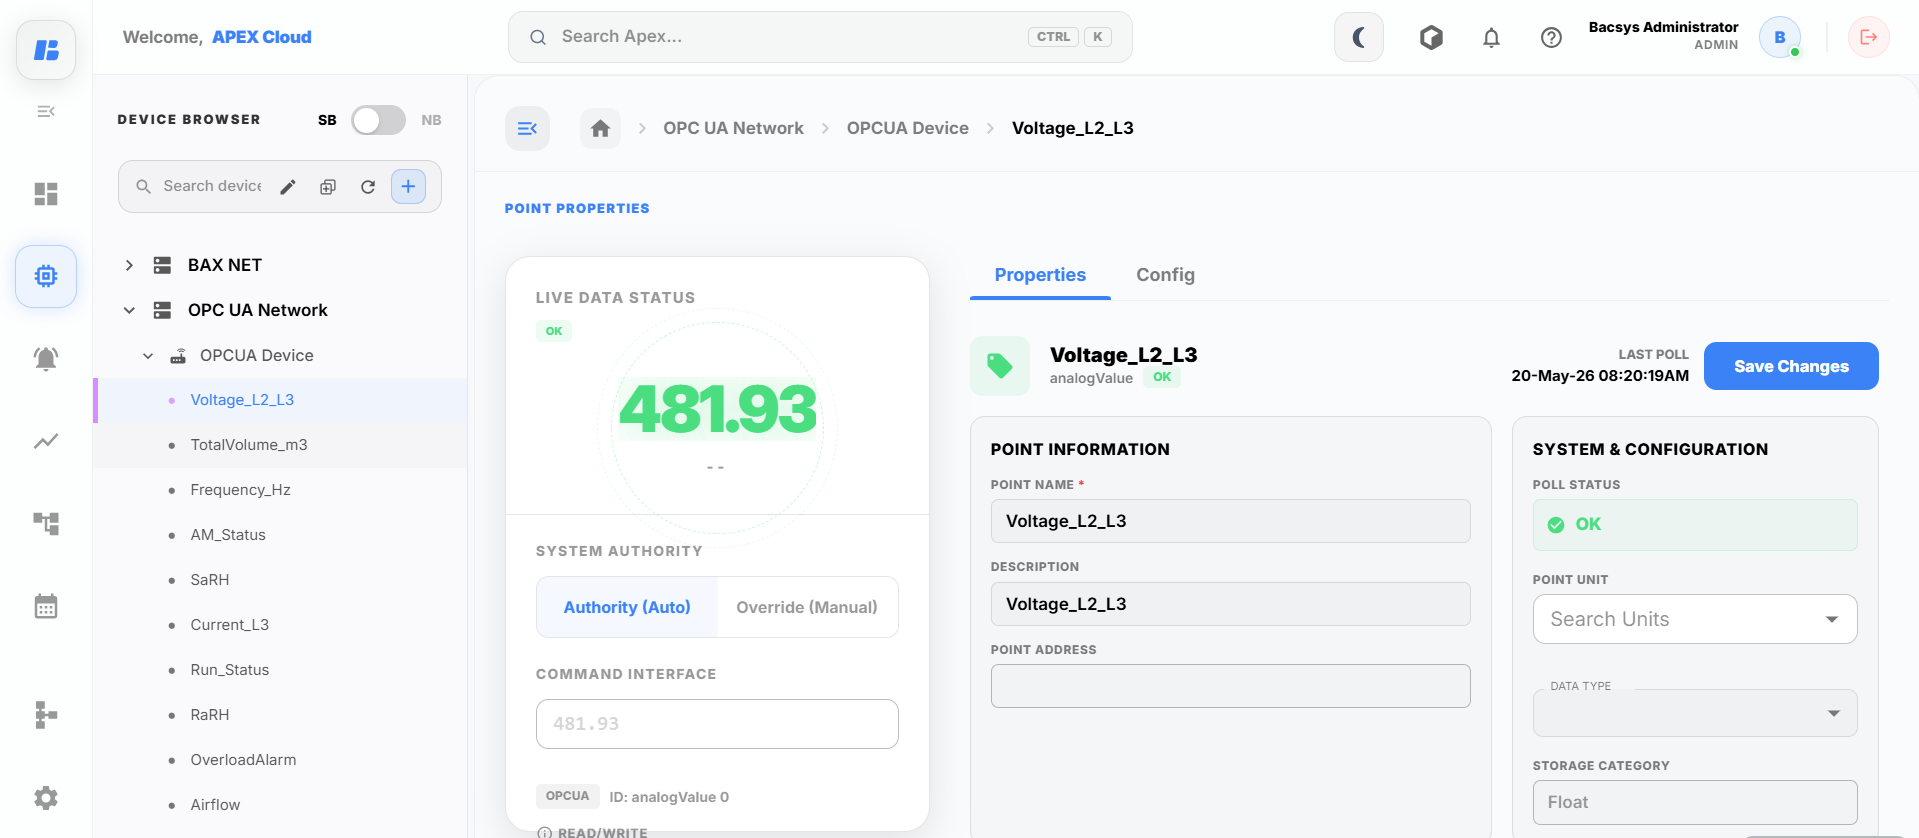
The point details page displays:
- Live Value
- Point Properties
- Communication Status
- Timestamp
- Real-Time Monitoring Data
Point Information
The Point Information section displays the basic configuration details of the selected OPC UA point.
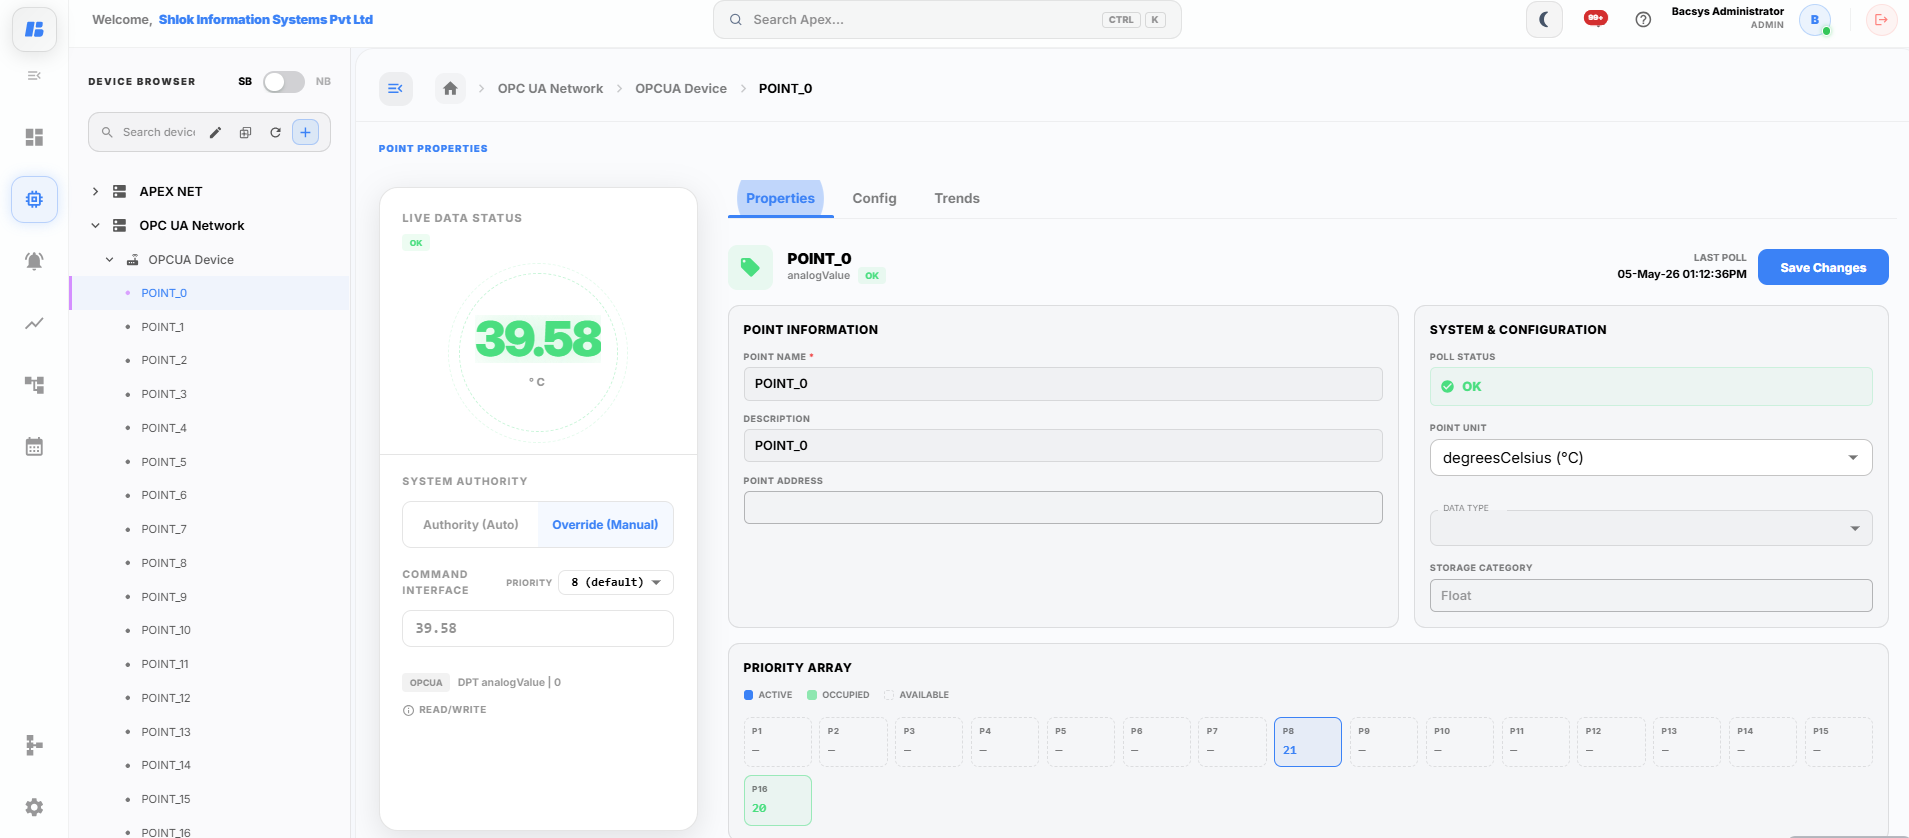
The following fields are available:
| Field | Description |
|---|---|
| Point Name | Displays the name of the selected point. You can modify the name if required. |
| Description | Displays or allows you to update the description of the point. |
| Point Address | Displays the address or identifier associated with the selected OPC UA point. |
System & Configuration
The System & Configuration section displays the communication status and configuration details of the selected point.
| Field | Description |
|---|---|
| Poll Status | Displays the current communication status of the point (for example, OK or Failed). |
| Point Unit | Displays or allows you to select the engineering unit associated with the point. |
| Data Type | Displays the data type of the selected point. |
| Storage Category | Displays the storage category used for storing the point value. |
Live Data Status
The Live Data Status section displays the current real-time value of the selected point.
The following information is available:
- Displays the current live value received from the OPC UA server.
- Indicates the communication status of the point.
- Updates automatically whenever the point value changes.
System Authority
The System Authority section allows you to control how the point value is managed.
The following options are available:
| Option | Description |
|---|---|
| Authority (Auto) | The point value is automatically controlled by the OPC UA server. |
| Override (Manual) | Allows the user to manually override the current point value. |
| Command Interface | Displays or allows you to enter the value to be written to the point when manual override is enabled. |
| Priority | Specifies the BACnet priority level used when writing the point value. |
Priority Array
The Priority Array displays the priority levels currently assigned to the selected point.
- Shows the status of priorities P1 through P16.
- Indicates whether a priority slot is Active, Occupied, or Available.
- Helps identify which priority level is currently controlling the point value.
After making any changes to the point properties, click Save Changes to apply the updated configuration.
Point Configuration
After selecting a point, click the Config tab to configure its settings.
The Config tab contains the following sections:
- General
- Alarms
- Trends
- Tags
General
The General tab allows you to configure linear mapping, scaling, and offset values for the selected point.
Point Characteristics
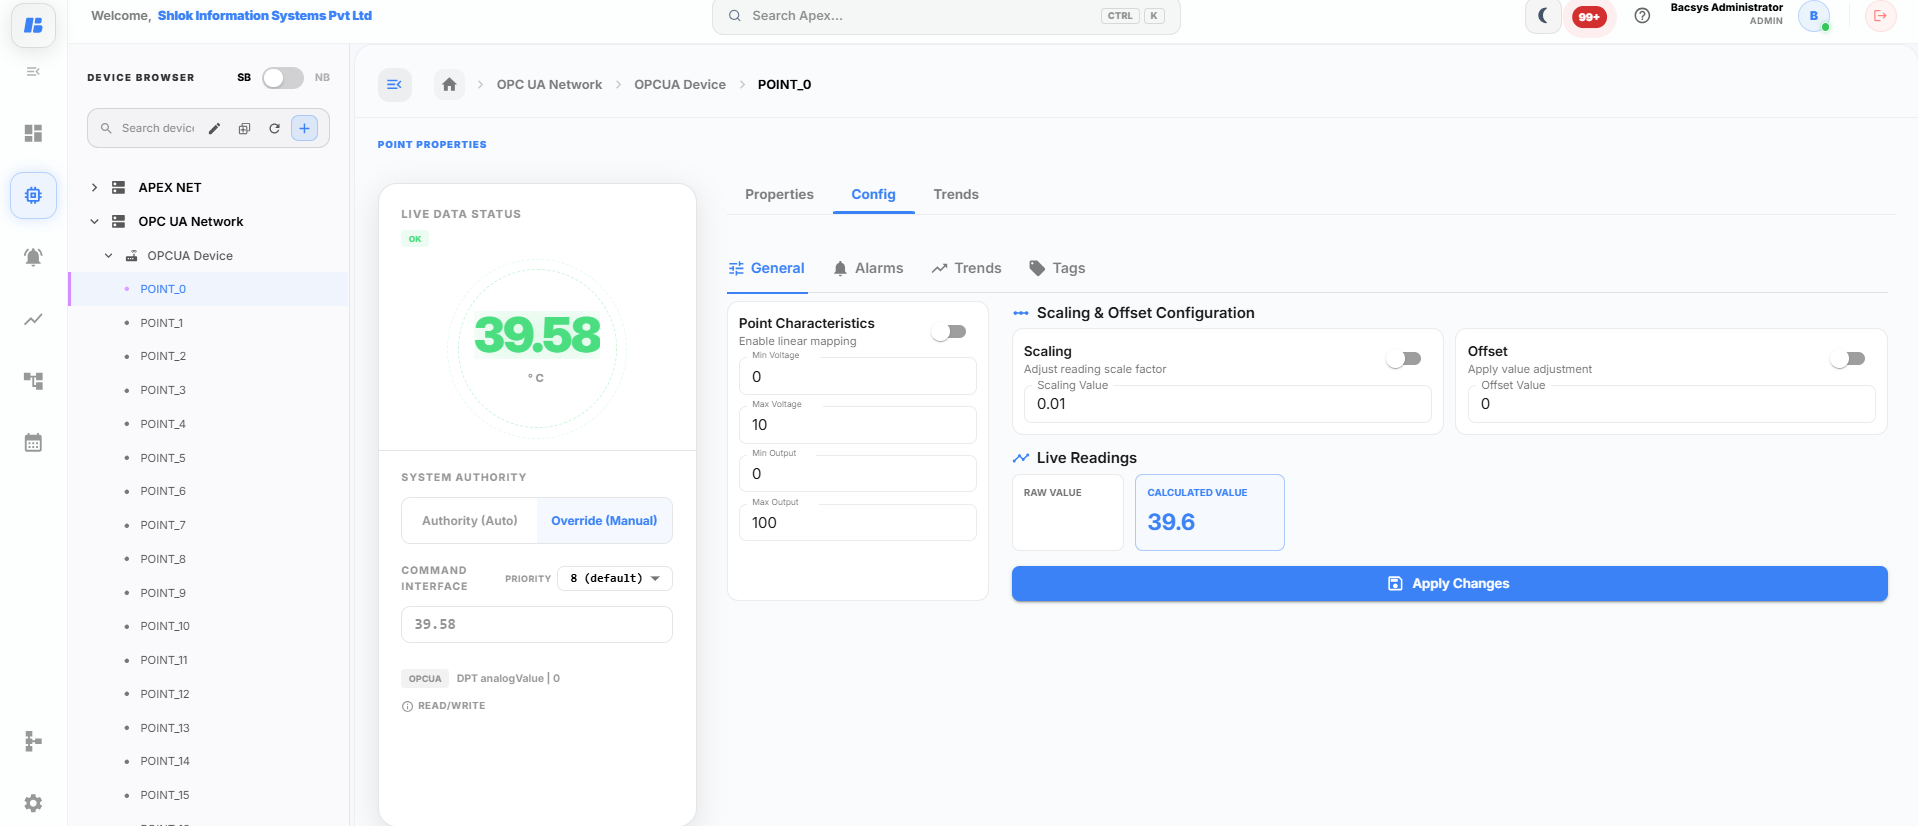
The Point Characteristics section is used to configure linear mapping.
| Field | Description |
|---|---|
| Enable Linear Mapping | Enables or disables linear mapping for the selected point. |
| Min Voltage | Specifies the minimum input value. |
| Max Voltage | Specifies the maximum input value. |
| Min Output | Specifies the output value corresponding to the minimum input value. |
| Max Output | Specifies the output value corresponding to the maximum input value. |
Scaling & Offset Configuration
The Scaling & Offset Configuration section is used to adjust the incoming point value.
| Field | Description |
|---|---|
| Scaling | Enables scaling for the selected point. |
| Scaling Value | Specifies the multiplication factor applied to the incoming value. |
| Offset | Enables offset adjustment. |
| Offset Value | Specifies the value added to or subtracted from the scaled value. |
Live Readings
The Live Readings section displays the current values of the point.
| Field | Description |
|---|---|
| Raw Value | Displays the value received directly from the OPC UA server. |
| Calculated Value | Displays the value after applying scaling and offset. |
After configuring the required settings, click Apply Changes.
Alarms
The Alarms tab is used to configure alarm limits for the selected point.
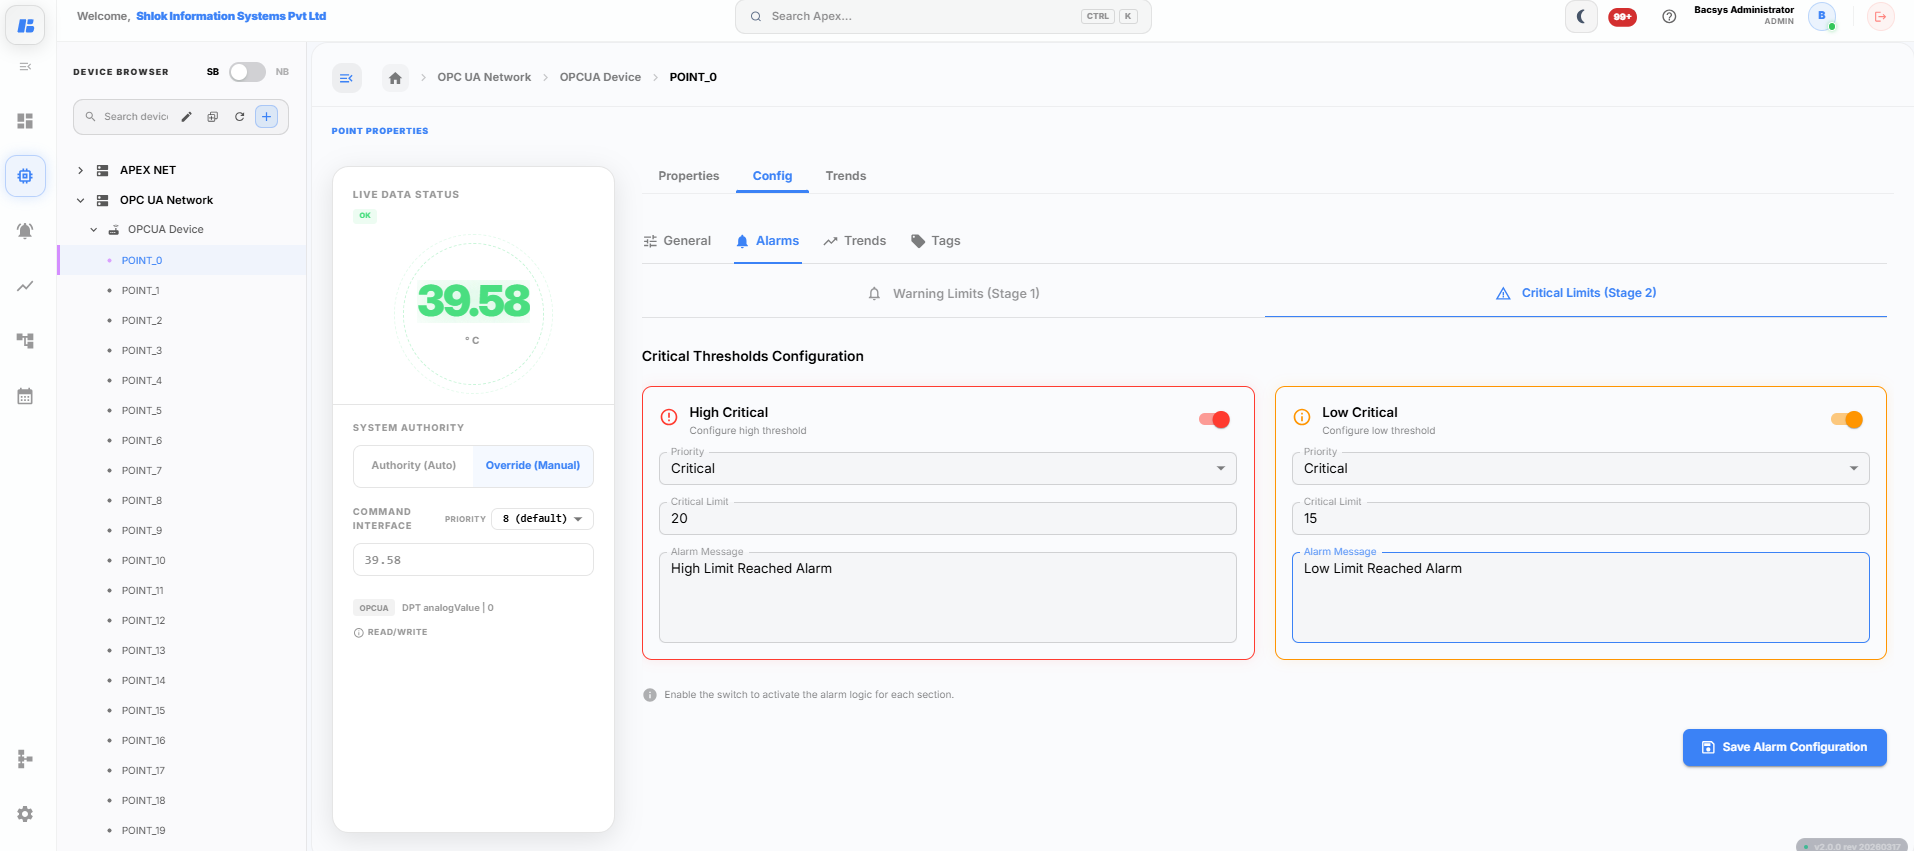
The following options are available:
| Field | Description |
|---|---|
| High Alarm Enable | Enables or disables the high alarm limit. |
| Low Alarm Enable | Enables or disables the low alarm limit. |
| High Alarm Limit | Specifies the upper alarm threshold. |
| Low Alarm Limit | Specifies the lower alarm threshold. |
| High Alarm Message | Specifies the message displayed when the high alarm is triggered. |
| Low Alarm Message | Specifies the message displayed when the low alarm is triggered. |
| High Priority | Specifies the priority level for the high alarm. |
| Low Priority | Specifies the priority level for the low alarm. |
After configuring the alarm settings, click Apply Changes.
Trends
The Trends tab is used to configure historical data logging for the selected point.
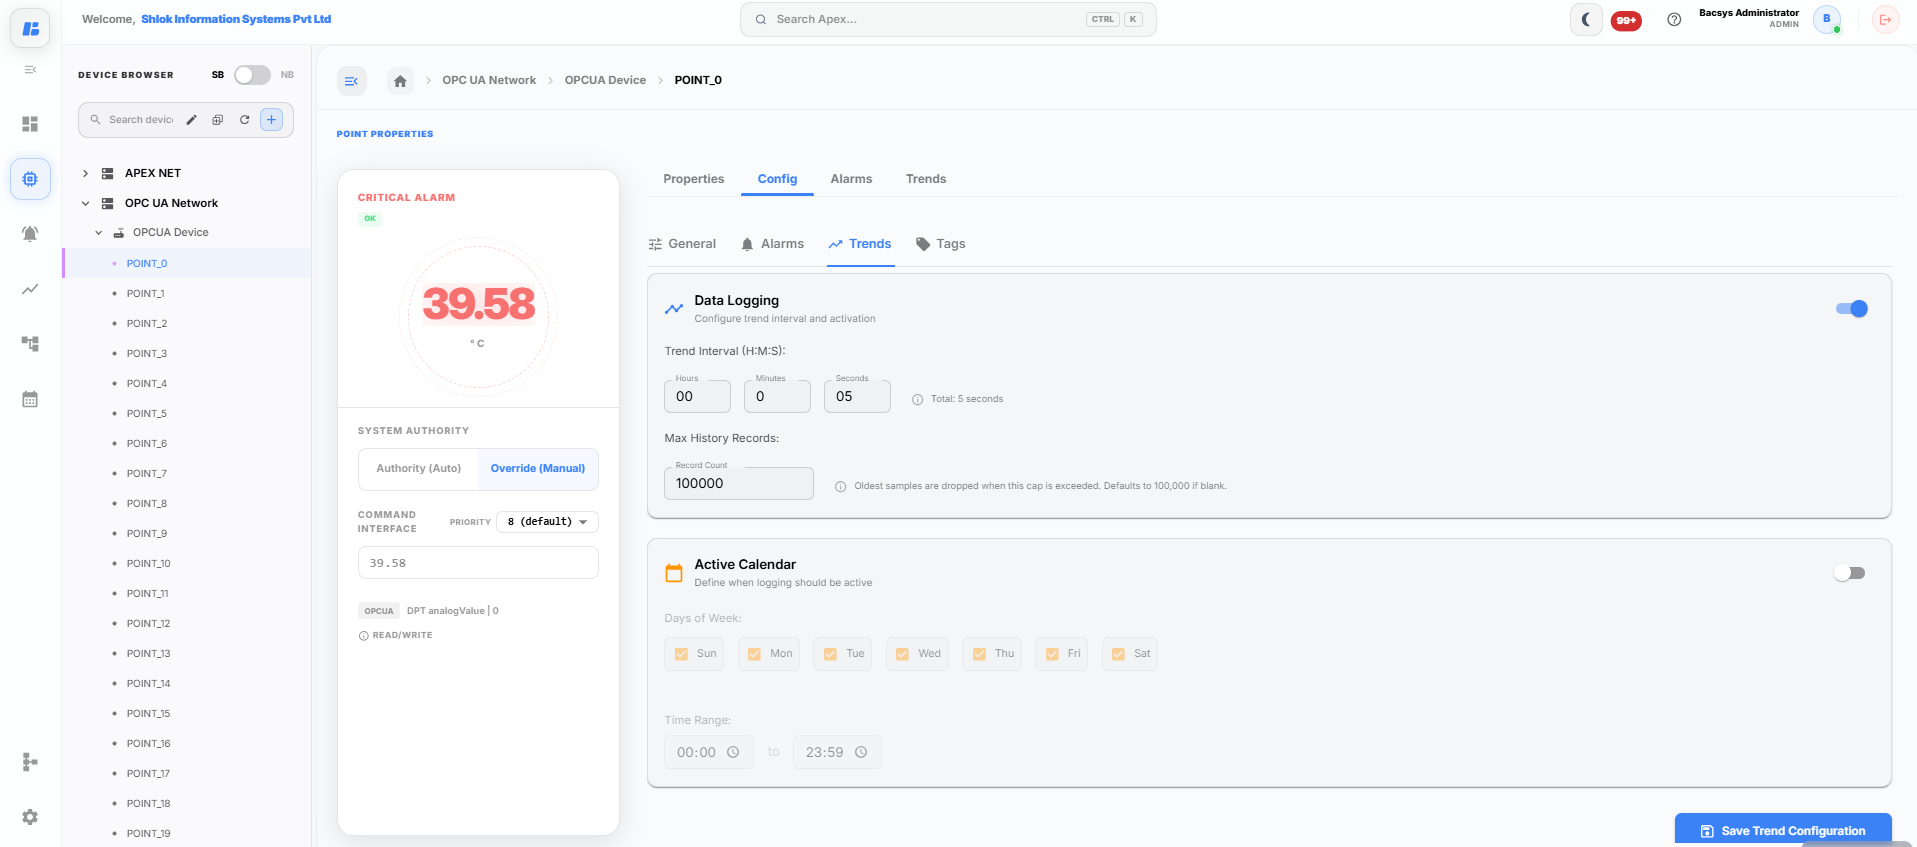
Configure the following settings:
| Field | Description |
|---|---|
| Enable Trend | Enables or disables trend logging for the point. |
| Use As Consumption | Records the point as a consumption value. |
| Enable Calendar | Enables calendar-based trend logging. |
| Trend Interval | Specifies how often the point value is recorded. |
| Record Limit | Specifies the maximum number of trend records to retain. |
After configuring the required settings, click Apply Changes.
Tags
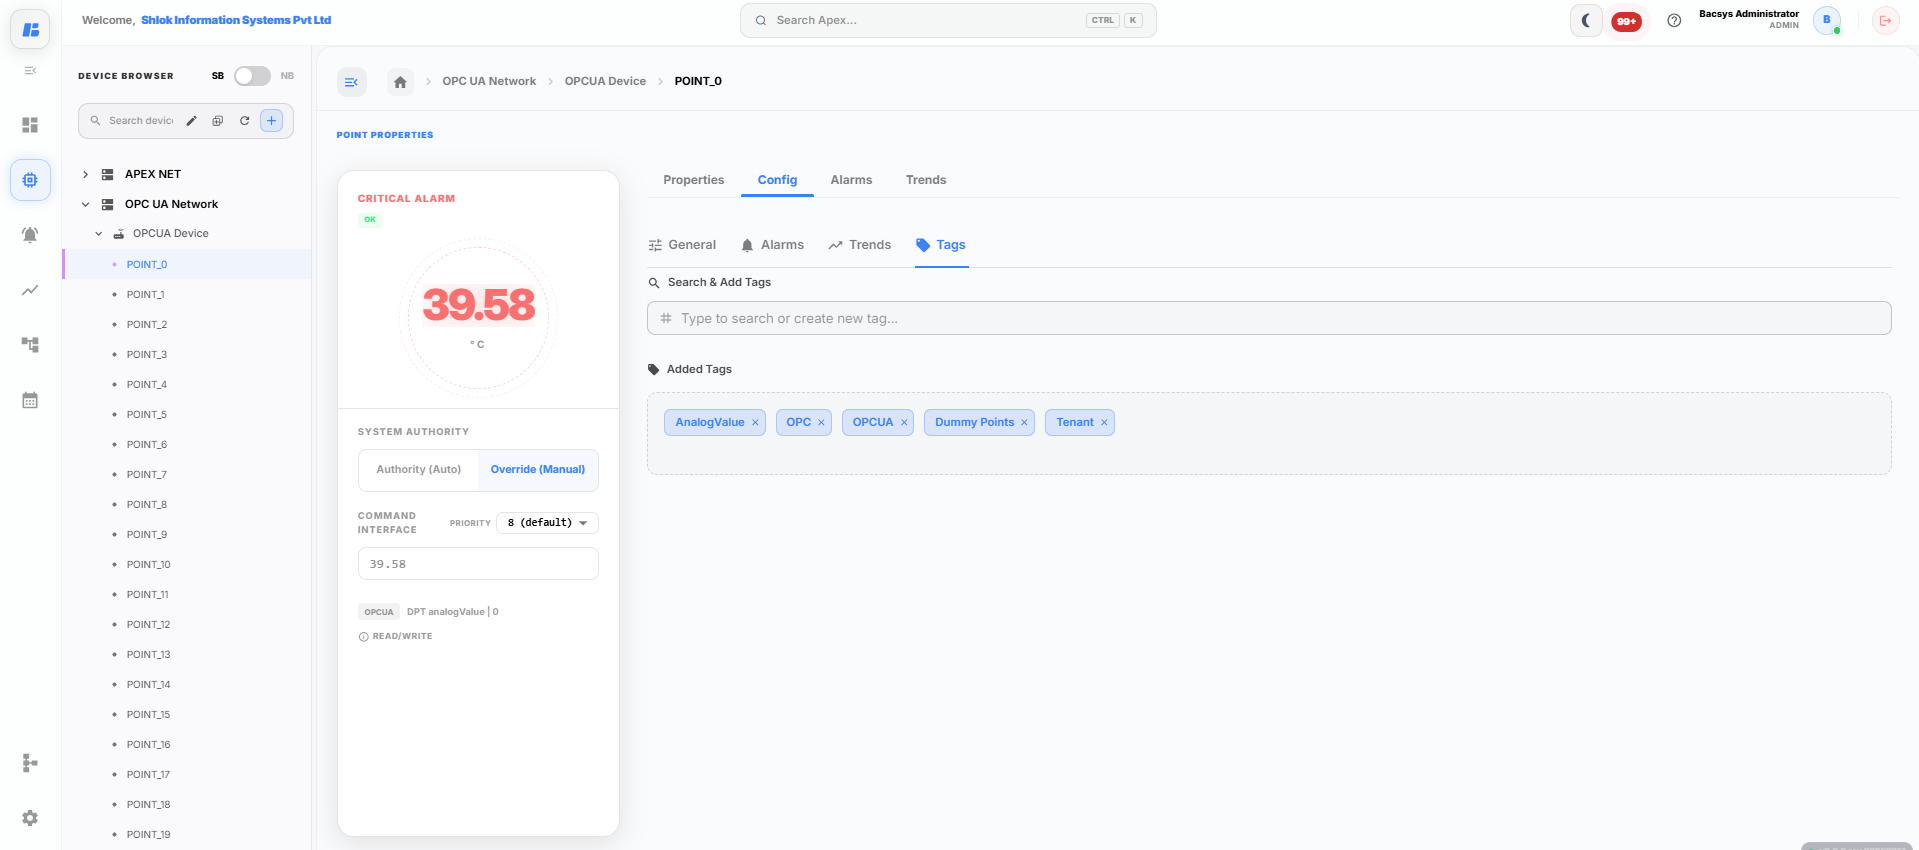
The Tags tab allows you to assign tags to the selected point for easier organization and filtering.
Configure the following settings:
| Field | Description |
|---|---|
| Select or Create Tags | Search for an existing tag or create a new tag by entering a tag name. |
| Current Selection Tags | Displays the tags currently assigned to the selected point. |
To assign a tag:
- Enter a tag name in the Select or Create Tags field.
- Select an existing tag or create a new one.
- The selected tag is added to the point.
After configuring the required tags, click Apply Changes.
Viewing Point Alarms
After configuring alarm settings for a point and when the configured alarm condition is triggered, you can verify the generated alarm from the selected point.
To view the alarm details:
- Open the required network and device.
- Select the point for which the alarm was configured.
- Click the Alarms tab.
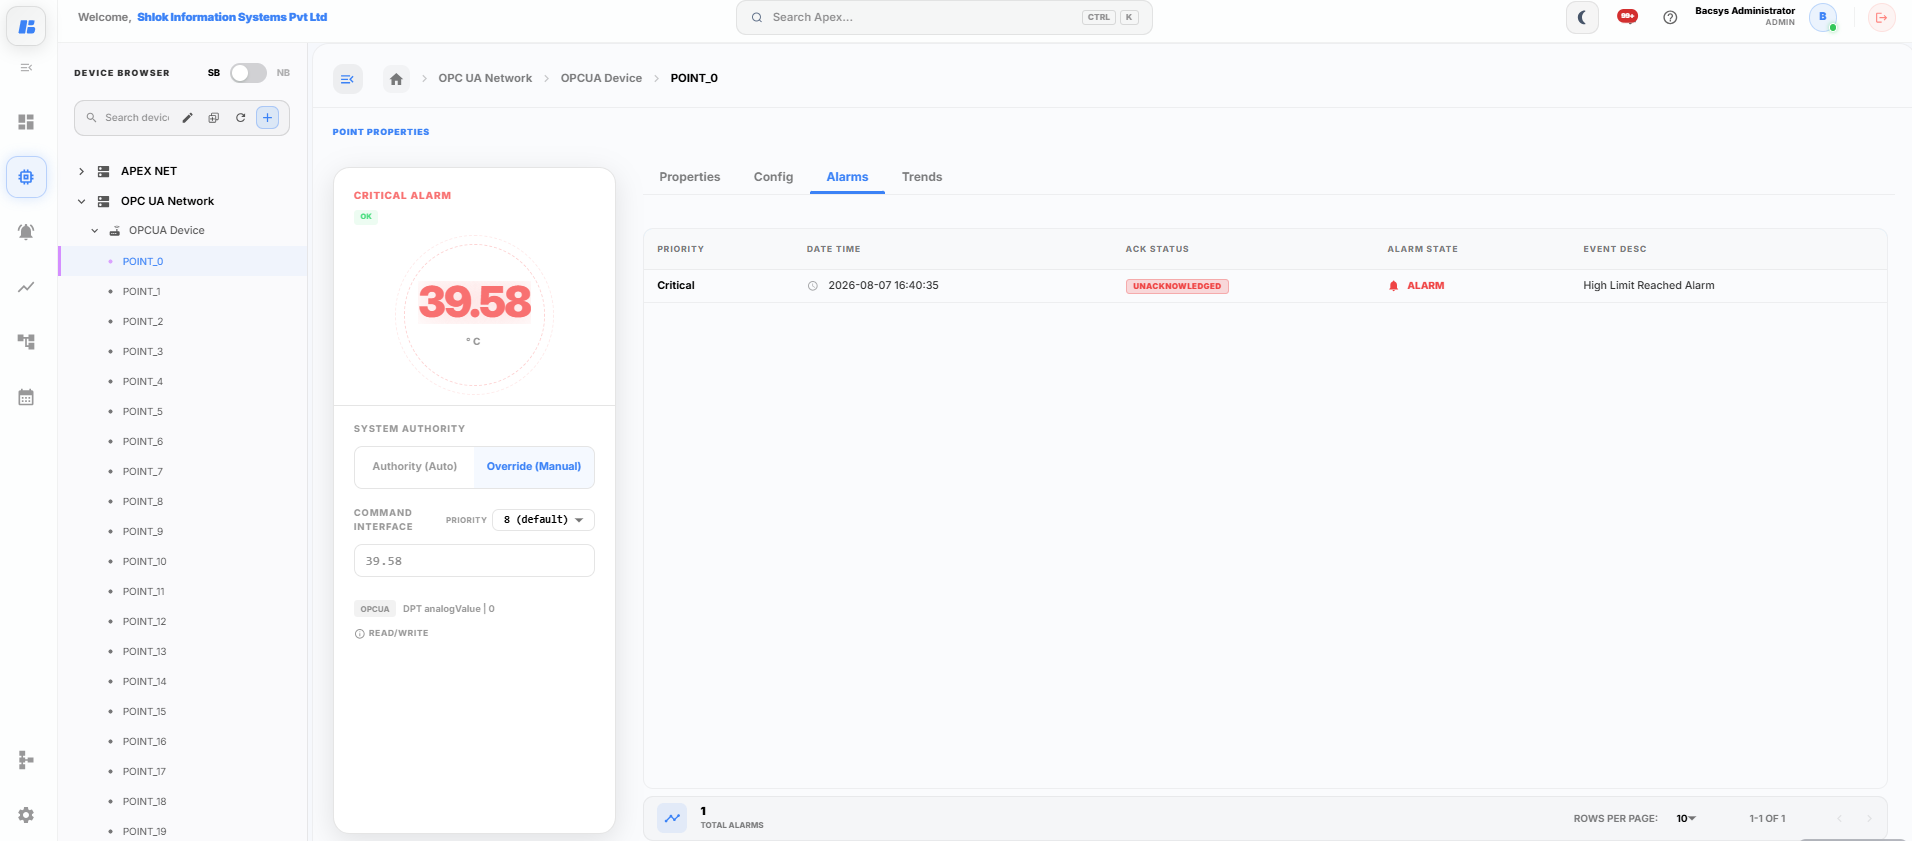
The Alarms tab displays all alarms generated for the selected point.
The following information is available:
| Field | Description |
|---|---|
| Priority | Displays the priority level assigned to the alarm (for example, Critical). |
| Date & Time | Displays the date and time when the alarm was generated. |
| ACK Status | Shows whether the alarm has been acknowledged or remains unacknowledged. |
| Alarm State | Displays the current state of the alarm, such as Alarm or Normal. |
| Event Description | Provides a brief description of the event that triggered the alarm. |
The alarm list is automatically updated whenever a new alarm is generated for the selected point, allowing you to verify whether the configured alarm conditions have been triggered successfully.
Trends
The Trends tab allows you to view the historical values of the selected point in both Table View and Chart View. You can filter trend data by date, export the results, refresh the data, enable delta values, and edit trend records.
Table View
The Table view displays historical trend data in a tabular format.
To view trend data:
- Click the Trends tab.
- Select the Table view.
- Choose the From and To dates.
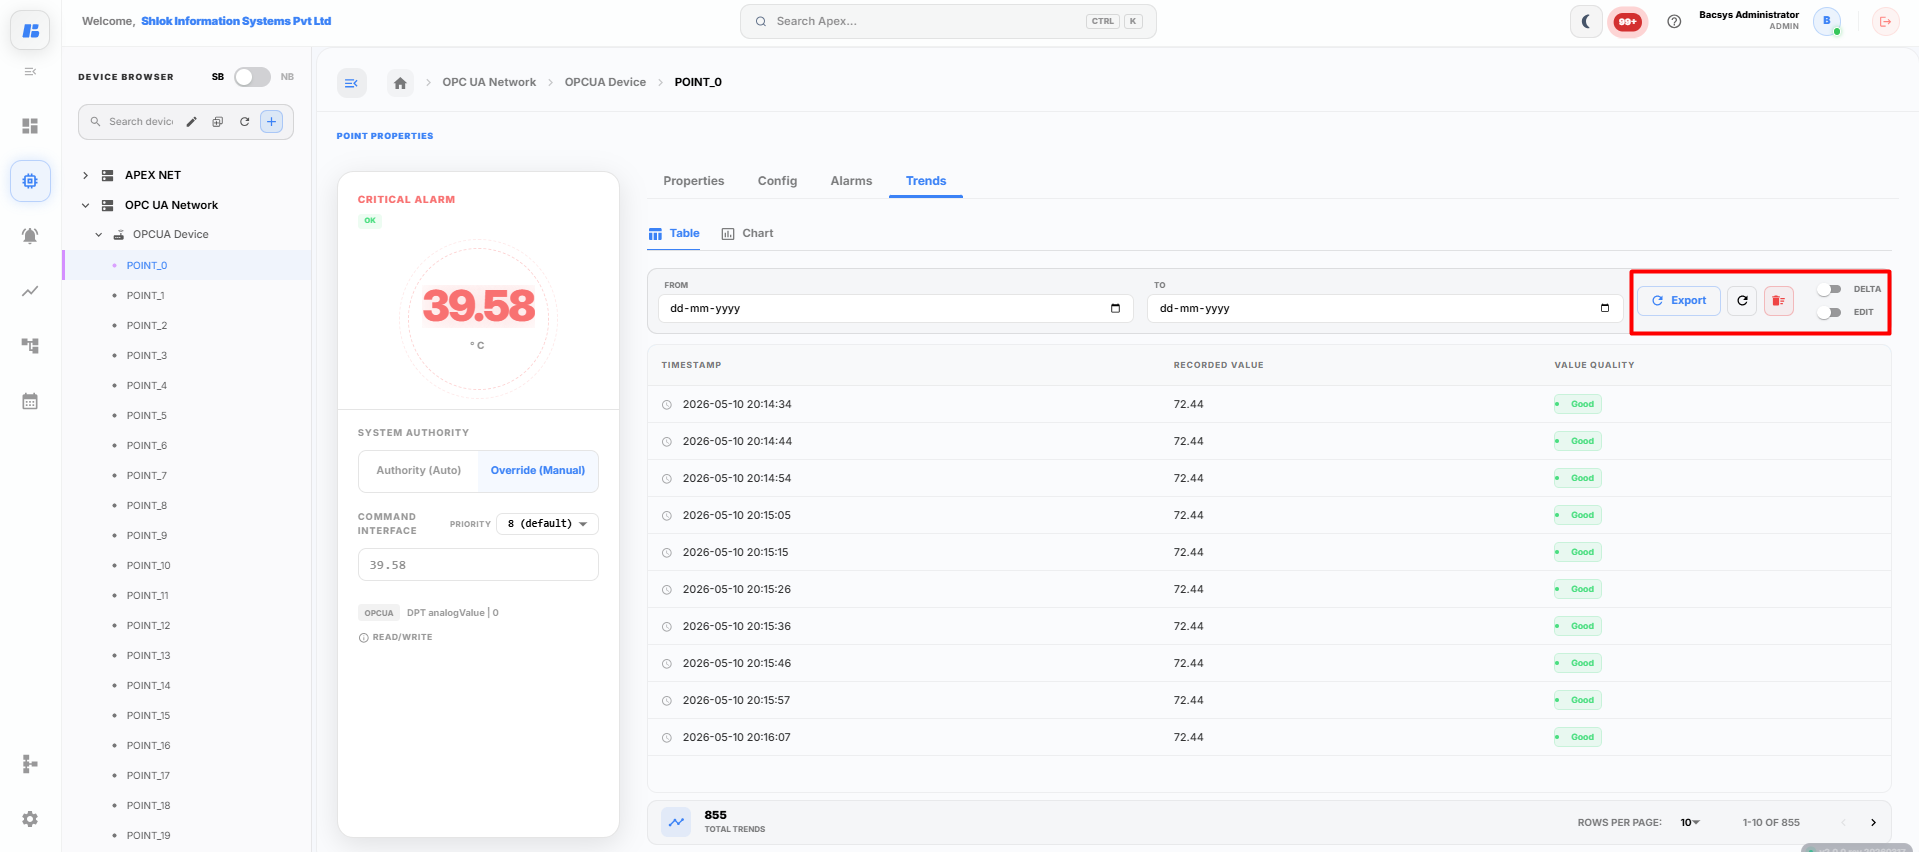
- The system displays all recorded values within the selected date range.
The table contains the following information:
| Field | Description |
|---|---|
| Timestamp | Displays the date and time when the value was recorded. |
| Recorded Value | Displays the value recorded for the selected point. |
| Value Quality | Displays the quality of the recorded value, such as Good or Bad. |
Chart View
The Chart view displays the historical trend data in graphical format.
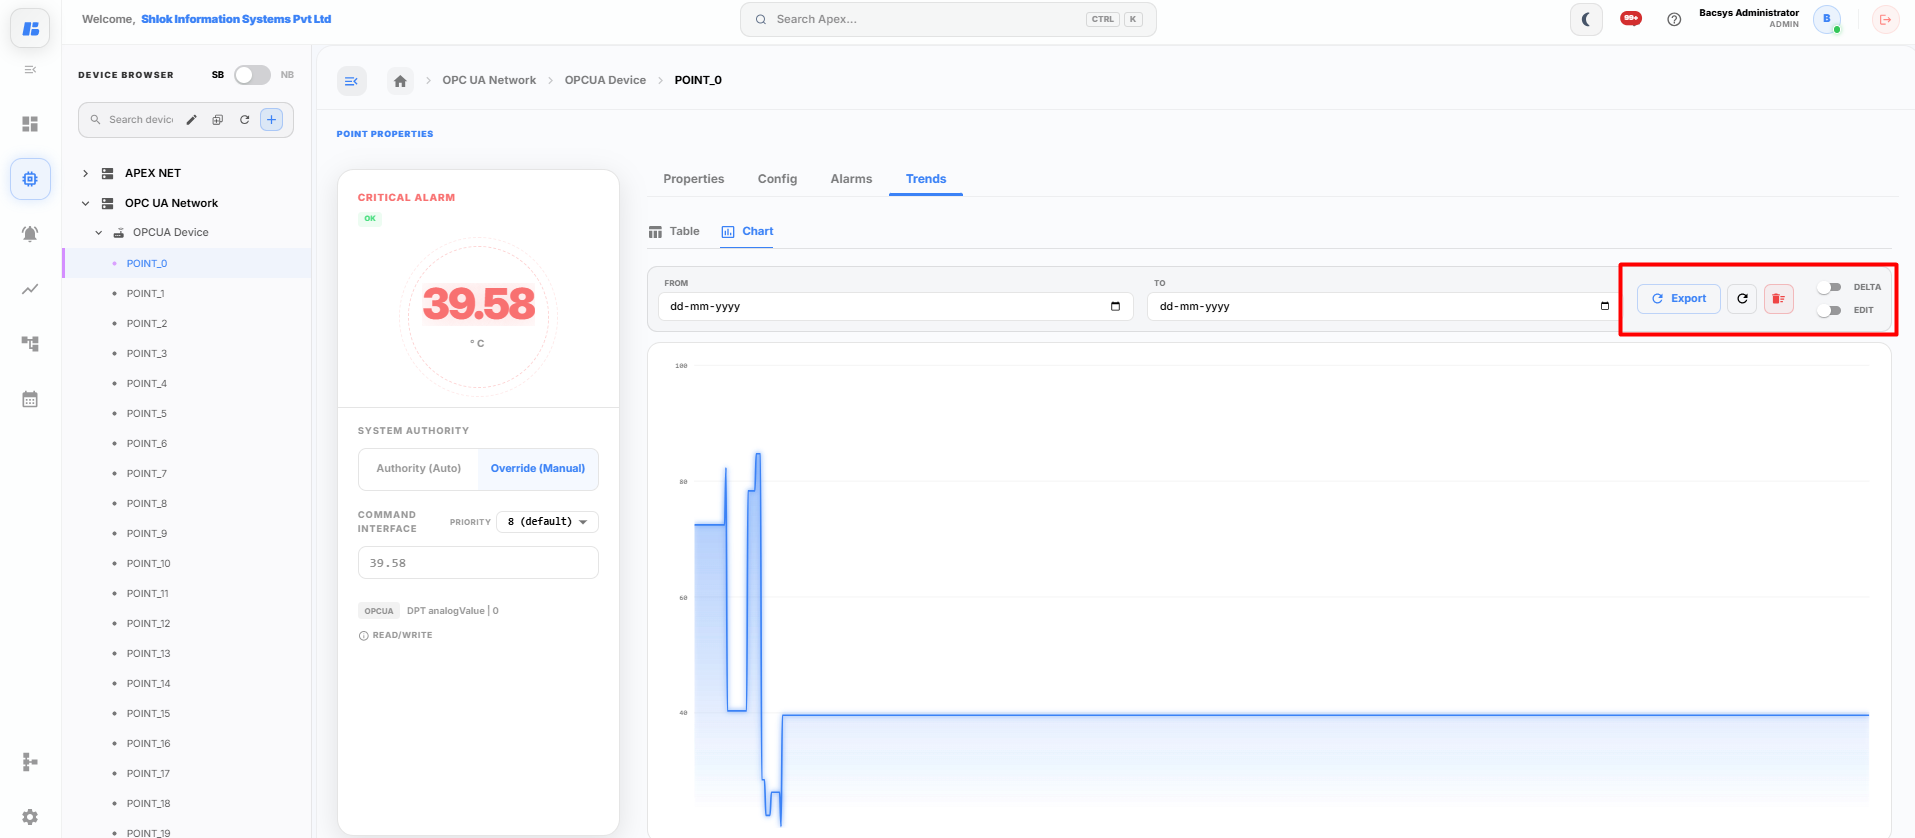
To view the trend chart:
- Click the Chart tab.
- Select the required From and To dates.
- The system plots the recorded values on a trend chart for the selected period.
The chart provides an easy way to visualize changes in point values over time.
Trend Actions
The following actions are available in both Table and Chart views.
Export
The Export button downloads the displayed trend data for the selected date range.
To export trend data:
- Select the required From and To dates.
- Click Export.
- The displayed trend data is downloaded to your local system.
Refresh
The Refresh button reloads the latest trend records.
To refresh the data:
- Click Refresh.
- The system retrieves and displays the latest available trend data.
Delta
The Delta toggle displays the difference between consecutive recorded values instead of the original values.
To enable Delta mode:
- Turn on the Delta toggle.
- The displayed trend values are updated to show the change between successive records.
Turn off the toggle to return to the original recorded values.
Edit
The Edit toggle allows authorized users to modify recorded trend entries.
To edit trend data:
- Enable the Edit toggle.
- Modify the required trend values.
- Save the changes.
The updated values are stored in the trend history.
Note: Editing trend records is available only to users with the required permissions.
Date Filter
The From and To date fields allow you to filter historical trend data.
To filter trend data:
- Select the From date.
- Select the To date.
- The system displays only the records within the selected date range.
This filter is available in both Table and Chart views.
Overwrite Points
If the OPC UA server configuration changes or new points become available, you can overwrite the existing points.
-
Click Overwrite.
This action:
- Replaces the existing points with the newly selected points.
- Updates the point configuration.
- Synchronizes the latest point information from the OPC UA server.